Herunterladen Inhalt Inhalt Diese Seite drucken

Werbung

Verfügbare Sprachen
  • DE

Verfügbare Sprachen

  • DEUTSCH, seite 24
Aquavolo Cromotherapy I02555
Rain Spray
I
Istruzioni di montaggio e manutenzione
GB
Installation and care instructions
D
Montage- und Wartungsanleitung
F
Instructions pour l'installation et conseils d'entretien
E
Instrucciones de montaje y de mantenimiento
P
Instruções de montagem e de manutenção
RUS
Руководство по монтажу и эксплуатации
NL
Instructies voor Montage en Onderhoud
DK
Monterings- og vedligeholdelsesvejledning
PL
Montaż i konserwacja
TR
Montaj ve bakım talimatları
AQUAVOLO RGB
Cascade Spray

Werbung

Inhaltsverzeichnis
loading

Inhaltszusammenfassung für Bossini AQUAVOLO RGB

  • Seite 1 AQUAVOLO RGB Aquavolo Cromotherapy I02555 Rain Spray Cascade Spray Istruzioni di montaggio e manutenzione Installation and care instructions Montage- und Wartungsanleitung Instructions pour l’installation et conseils d’entretien Instrucciones de montaje y de mantenimiento Instruções de montagem e de manutenção Руководство по монтажу и эксплуатации...
  • Seite 2 AQUAVOLO RGB (Cod. I02555)
  • Seite 3 AQUAVOLO RGB (Cod. I02555) Componenti Composants: 1) Plaque de support mural 1) Piastra di supporto a muro 2) Raccord prise d’eau 1/2” M 2) Raccordo presa acqua ½” M 3) Vis et chevilles 3) Viti e tasselli 4) Bloc douche de tête 4) Corpo soffione 5) Grains de fixation 5) Grani di fissaggio 6) Vis de fixation des ressorts...
  • Seite 4 AQUAVOLO RGB (Cod. I02555) Комплектация: Onderdelen: 1) Wandmontagesteun 2) Wateraansluiting toevoer ½” M 1) Крепление настенного кронштейна 3) Schroeven en pluggen 2) Водорозетка ½” M 3) Винты и дюбеля 4) Douchekop 4) Корпус душевой лейки 5) Borgschroeven 5) Винты фиксирующие 6) Bouten 6) Винты крепления амортизаторов 7) Steun voor afdekkap 7) Наружная панель 8) Schroeven voor afdekkap 9) Gasveren 8) Винты фиксации панели...
  • Seite 5 AQUAVOLO RGB (Cod. I02555) Parçalar: 1) Duvar destek plakası 2) ½” M su giriş rakoru 3) Vidalar ve dübeller 4) Duş başlığı 5) Sabitleme cıvataları 6) Yay sabitleme vidaları 7) Destek kapağı 8) Kapak sabitleme vidaları 9) Gaz pistonları 10) Koruma filmi 11) Elektronik parçalar grubu 12) Üç modüllü kutu 13) Kumanda tuş takımı 14) Trafolu kutu 15) LED ışıklar (4 ad.) LEGGERE ATTENTAMENTE IL PRESENTE LIBRETTO DI INSTALLAZIONE E MANUTENZIONE.
  • Seite 6 AQUAVOLO RGB (Cod. I02555) 1/2GAS...
  • Seite 7 AQUAVOLO RGB (Cod. I02555)
  • Seite 8 AQUAVOLO RGB (Cod. I02555) dis A...
  • Seite 9 AQUAVOLO RGB (Cod. I02555) dis B...
  • Seite 10 AQUAVOLO RGB (Cod. I02555) 1/2 F dis C dis D...
  • Seite 11 AQUAVOLO RGB (Cod. I02555) dis E dis F...
  • Seite 12 AQUAVOLO RGB (Cod. I02555) dis G...
  • Seite 13 AQUAVOLO RGB (Cod. I02555) dis H centralina...
  • Seite 14 AQUAVOLO RGB (Cod. I02555) dis I...
  • Seite 15 AQUAVOLO RGB (Cod. I02555)
  • Seite 16 AQUAVOLO RGB (Cod. I02555) dis L dis M...
  • Seite 17 AQUAVOLO RGB (Cod. I02555) getto Cascata getto Pioggia...
  • Seite 18: Istruzioni Di Montaggio

    è di 14 litri / minuto. Il punto di alimentazione elettrico deve essere posizionato sopra l’attacco dell’acqua. DESCRIZIONE FUNZIONI Aquavolo Cromotherapy, la doccia high-tech di Bossini con funzione cromoterapia, getto WideRain e getto Cascata. - 3 funzioni: •...
  • Seite 19: Collegamenti Elettrici

    AQUAVOLO RGB (Cod. I02555) - Inserire il corpo del soffione (4) ed avvitare gli appositi grani di fissaggio (5) già inseriti nel supporto. Quindi fissare l’estremità libera delle molle a gas (9) nella parte inferiore del supporto con le apposite viti (6) (Dis. G).
  • Seite 20 La garanzia non copre danni causati da deposito di calcare o impurità. CONDIZIONI DI GARANZIA BOSSINI Gentile Cliente, Ci complimentiamo con lei per aver scelto un prodotto Bossini e la ringraziamo per la fiducia accordataci. Il prodotto è garantito 2 anni contro vizi o difetti di fabbricazione.
  • Seite 21: Functions Description

    AQUAVOLO RGB (Cod. I02555) ASSEMBLY INSTRUCTIONS Introduction For ideal installation, showerhead must be placed at a height of about 2,000 mm from the floor, (meaning the distance between the lower part of the showerhead and the shower tray). The recommended flow rate for good functioning of the showerhead is 14 L per minute. The electrical supply must be positioned above the water connection.
  • Seite 22: Electrical Connections

    AQUAVOLO RGB (Cod. I02555) ELECTRICAL CONNECTIONS - Connect the keyboard electrical cable A (13) to the control unit input of the electronic components group (11), see (Fig. G and H). - Connect the cable C from the transformer (14) to the cable gland (Fig. H). NB: the electrician must use a bipolar electrical supply cable of 1mm² cross section, minimum outer diameter ø 5 mm – max outer diameter ø 13 mm. -Fit the group (11) onto the wall support plate (1) (Fig. I). -Apply the support cover (7) carefully, to avoid damage to the WideRain spray nozzles, until full adherence to the wall (Fig. L) . - Tightly fix the cover (7) onto the wall support with the special screws (8) (Fig. M). - Remove the protection film (10) from the showerhead upper and lower surfaces (4) (Fig. M). ELECTRICAL SYSTEM : TECHNICAL SPECIFICATIONS 1. Electrical supply ..........220/230V ~ – 50/60 Hz – 20va max Electricity consumption 0,1° protection class II 2. Supply cable..........bipolar 1mm² cross section It must have minimum outer diameter ø 5 mm and a max outer diameter ø 13 mm. (not included in the package) 3. Box with transformer and filter ...... (IP56) 7V ~/ 230V~ – 50/60 Hz for installation outside the safety area (in compliance with DIN VDE 0100 standard, part 10 – according to CEI 64/8 Italian regulation) 4. Protection grade ............ IP x 5 5. Electronic board............ IP66/IP67 6. Control keyboard............ IP65 7. Safety mark............
  • Seite 23: Warranty Terms

    WARRANTY TERMS Dear Customer, We congratulate you and thank you for choosing a Bossini quality product The product is covered by 2 Years warranty against any defects due to manufacturing faults. The warranty does not cover damages caused by improper installation or use, neglect, incorrect plumbing, normal fair wear and tear, damages caused by limescale deposits or impurities, the use of detergents and maintenance products other than those specifically recommended in our instructions manual. Furthermore Bossini is not responsible for labour costs and/or damages, whether accidental or consequent to the installation, repairing or replacement of the product. The request for replacement under the terms of this warranty must be made in a letter setting out the date and place of purchase and giving a brief explanation of the problem. The letter must be received by us within the warranty period and must be accompanied by proof of the purchase date (e.g. a receipt). The warranty only covers production faults / defects and is strictly limited to the repair or free replacement of the parts which are recognised to be defective. The defective parts have to be returned to Bossini carriage free with a report describing the defect. Bossini reserves the right to inspect the part alleged to be faulty or defective and to evaluate the applicability of the warranty terms. The warranty period commences on the date the product is purchased, evidenced by the relevant purchase document (e.g. receipt, invoice, cash voucher) and it is NOT renewable.
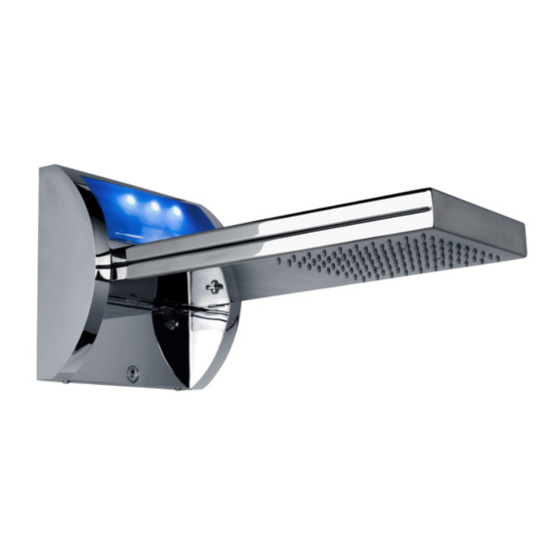
  • Seite 24: Funktionsbeschreibung

    Duschkörpers zur Duschtasse). Der für ein ordnungsgemäßes Funktionieren empfohlene Wasserdurchlauf liegt bei 14 Liter pro Minute. Der elektrische Anschluss muss über dem Wasseranschluss positioniert werden. FUNKTIONSBESCHREIBUNG: Aquavolo Cromotherapy, die High-Tech-Dusche von Bossini mit Farbtherapie, WideRain- und Wasserfallstrahl. - 3 Funktionen: • Wide Rain-Strahl: Der horizontale Duschkörper liefert einen breiten Regen-Strahl.
  • Seite 25: Elektrischer Anschluss

    AQUAVOLO RGB (Cod. I02555) - Die Halterung (1) definitiv montieren, indem man den Wasser-Anschlussbogen (2) und die sechs Befestigungsschrauben (3) anbringt (Zeichnung F). - Den Duschkörper (4) anbringen und mit den schon an der Halterung vormontierten Befestigungsstiften (5) verschrauben. Das freie Ende der Gasfedern (9) im unteren Bereich der Halterung mit den entsprechenden Schrauben (6) befestigen (Zeichnung G). ELEKTRISCHER ANSCHLUSS - Das Elektrokabel A der Bedientastatur (13) mit dem entsprechenden Eingang des Steuergeräts der Elektronikkomponenten-Einheit (11) verbinden, siehe Zeichnung G – Zeichnung H. - Das Transformatorkabel C (14) mit der Kabelverschraubung verbinden (Zeichnung H). HINWEIS: Der Elektriker muss ein zweipoliges Versorgungskabel mit einem Querschnitt von 1mm² und einem inneren Durchmesser von mindestens ø 5 mm/höchstens ø 13 mm verwenden. - Die Komponenteneinheit (11) in die Wandhalterung stecken (1) (Zeichnung I). - Die Abdeckung (7) vorsichtig bis zum Wandanschlag montieren, um die Düsen des WideRain-Strahls nicht zu beschädigen (Zeichnung L). - Die Abdeckung (7) mit Hilfe der vorgesehenen Schrauben (8) an der Wandhalterung befestigen (Zeichnung M).
  • Seite 26: Die Reinigung

    AQUAVOLO RGB (Cod. I02555) DIE REINIGUNG Lieber Kunde, liebe Kundin, Wir gratulieren Ihnen zum Kauf dieses Produktes der Firma Bossini und danken Ihnen für das Vertrauen, das Sie uns entgegengebracht haben. Um die Materialien so gut wie möglich zu schützen, müssen einige grundlegende Regeln befolgt werden. Reinigung der Metallteile: Unser Wasser enthält Kalk, das sich auf der Oberfläche des Produktes absetzt und unschöne Flecken bildet. Um die Brause einer normalen Reinigung zu unterziehen, reicht es aus, diese mit einem feuchten Tuch und etwas Seife zu säubern, mit Wasser abzuspülen und abzutrocknen. Um die Bildung von Kalkflecken zu vermeiden, genügt es also, die Brause nach jedem Gebrauch gut abzutrocknen.
  • Seite 27: Instructions Pour L'installation

    AQUAVOLO RGB (Cod. I02555) INSTRUCTIONS POUR L'INSTALLATION Avant l'installation: Pour une installation idéale, la douche de tête doit être placée à environ 2 mètres du sol (distance comprise entre le côté inférieur de la douche de tête et le receveur de douche). Le volume conseillé...
  • Seite 28: Branchements Électriques

    AQUAVOLO RGB (Cod. I02555) le support. Fixer les extrémités libres des ressorts à gaz (9) dans la partie inférieure du support avec les vis correspondantes (6) (Fig. G). BRANCHEMENTS ÉLECTRIQUES - Brancher le câble électrique A du clavier (13) à l'entrée correspondante du boîtier du groupe de composants électroniques (11), voir (Fig. G – H). - Brancher le câble C provenant du transformateur (14) au presse-étoupe (Fig. H). NB: l'électricien doit utiliser un cordon d'alimentation bipolaire de section 1mm² avec un diamètre extérieur compris entre minimum Ø 5 mm – maximum Ø 13 mm. - Emboîter le groupe (11) à la plaque de support mural (1) (Fig. I). - Monter la couverture (7) avec précaution, en prenant garde ne pas abimer les buses du jet WideRain, jusqu’à ce qu’elle adhère complètement au mur. (Fig. L). - Fixer définitivement la couverture (7) au support mural avec les vis correspondantes (8) (Fig. M). - Enlever la pellicule de protection (10) de la surface supérieure et inférieure du bloc douche de tête (4) (Fig. M). INSTALLATION ÉLECTRIQUE - CARACTÉRISTIQUES TECHNIQUES 1. Branchement électrique............... 220/230V ~ – 50/60 Hz – max 20va Courant absorbé 0,1A classe de protection II 2. Cordon d'alimentation..............bipolaire de section 1mm² Ø extérieur minimum de 5°mm et maximum Ø 13mm. (non inclus dans l'emballage) 3. Boîte avec transformateur et filtre.......... (IP56) 7V ~/ 230V~ – 50/60 Hz doit être situé hors de la zone sécurisée (conformément à la norme DIN VDE 0100, partie 10 – selon la prescription CEI 64/8) 4. Indice de protection............... IP x 5 5. Carte électronique................IP66/IP67 6. Clavier de commande..............IP65 7. Marquage de sécurité..............CE 8. Aquavolo .................. 4 led RGB max 3 watt Les installations électriques doivent, conformément aux normes nationales et internationales en...
  • Seite 29: Conditions De Garantie

    AQUAVOLO RGB (Cod. I02555) NETTOYAGE Cher Client, Félicitations ! Vous venez d’acheter un produit Bossini et vous remercions de la confiance que vous nous témoignez. Pour que le matériel conserve le plus longtemps possible son aspect d’origine, nous vous invitons à respecter quelques règles simples. Nettoyage des parties métalliques: l’eau contient du calcaire qui se dépose à la surface du produit et forme des taches inesthétiques. Pour le nettoyage normal du produit, utiliser un chiffon humide avec un peu de savon, rincer et sécher. Il est possible d’éviter la formation de taches de calcaire en l’essuyant après chaque utilisation. Remarque importante: il est recommandé d’utiliser uniquement des détergents à base de savon. Ne jamais faire usage de détergents ou de désinfectants abrasifs ou contenant de l’alcool, de l’acide chlorhydrique ou de l’acide phosphorique, Eau de Javel, Chlore, etc. Nettoyage des buses en caoutchouc: votre plafond de douche est munie du système “Easy-Clean” avec des buses (modules) en silicone . Le calcaire est le pire ennemi des douches et c’est pour cela que Bossini propose le système “Easy-Clean”. Ces modules en silicone sont extrêmement résistants à la chaleur et se dilatent sous l’action de l’eau chaude, permettant ainsi à la première couche de calcaire de se décrocher. En outre, il suffit d’appuyer régulièrement avec la main sur les modules en silicone pour libérer le calcaire présent dans les orifices. Un simple geste suffit pour que votre douche soit toujours en parfait état. Cher client, nous vous rappelons que la garantie sur la surface de nos produits ne s’applique pas si le matériel a subi un traitement autre que celui que nous recommandons. La garantie ne couvre pas les dommages causés par les dépôts de calcaire ou de saletés. CONDITIONS DE GARANTIE Cher Client, Nous vous félicitons et remercions d’avoir choisi un produit de qualité Bossini. Le produit est garanti 2 années contre tout défaut de production.
  • Seite 30: Instrucciones De Montaje

    AQUAVOLO RGB (Cod. I02555) INSTRUCCIONES DE MONTAJE Introducción Para una correcta instalación, el rociador debe estar colocada a una altura aproximada de 2.000 mm desde el suelo, considerando la distancia comprendida entre el lado inferior del rociador y el plato de ducha. El caudal aconsejado para un buen funcionamiento del rociador es de 14 litros por minuto. El punto de alimentación eléctrico debe colocarse sobre el empalme de la toma de agua. DESCRIPCIÓN DE LAS FUNCIONES : Aquavolo Cromotherapy, la ducha high-tech de Bossini con fucnión cromoterapia, chorro WideRain y Cascada, tiene tres funciones: • Chorro Wide Rain: ducha con el cuerpo en posición horizontal que emite un gran chorro de agua en forma de lluvia. • Chorro Cascata: empujando el cuerpo hacia abajo, emite un agradable chorro en cascada. • Cromoterapia: el rociador incluye 4 luces Led con una gama de 7 colores para aportar un agradable efecto cromoterapéutico. PANEL DE MANDOS La tabla de mandos es impermeable y, por tanto, se puede colocar tanto en el interior como en el exterior de la ducha. Dicho teclado controla las siguientes funciones: - La primera vez que se toca se activan las luces LED con cambio cíclico del color. - La segunda vez que se toca se para el ciclo en el color visualizado. - La tercera vez que se toca, el sistema se apaga. En caso de que no se transmita ningún comando al sistema, la función de Time-Out apaga automáticamente el dispositivo después de,...
  • Seite 31: Conexiones Eléctricas

    AQUAVOLO RGB (Cod. I02555) - Fije definitivamente el soporte de pared (1), atornillando la toma de agua (2) y los 6 tornillos de pared (3) (Figura F). - Introduzca el cuerpo de la alcachofa (4) y atornille los correspondientes prisioneros de fijación (5) ya insertados en el soporte. Fije el extremo libre de los muelles de gas (9) en la parte inferior del soporte con los tornillos correspondientes (6) (Figura G). CONEXIONES ELÉCTRICAS - Conecte los cables eléctricos A y B del teclado (13) y del lector musical (15) respectivamente a las correspondientes entradas de la central del grupo de componentes electrónicos (11) (véase figura G-H). - Conecte el cable C procedente del transformador (14) al prensacable (Figura H). Nota: el electricista debe utilizar un cable de alimentación de tipo bipolar, sección 1mm², con diámetro externo mínimo de ø 5 mm y máximo de ø 13 mm. - Encaje el grupo (11) en el soporte de pared (1) (Figura I) - Introduzca la cubierta (7) con precaución, prestando atención de no dañar las boquilla del chorro WideRain, hasta que se adhiera completamente a la pared (Figura L).
  • Seite 32: Condiciones De Garantía

    Los pedidos de sustitución en garantía podrán ser enviados solo si se presenta un documento que demuestre la adquisición del producto. La garantía se refiere unicamente a los defectos de fabricación y da derecho exclusivamente a la reparación o a la entrega gratuita de la pieza reconocido defectuoso. La pieza defectuosa deberá entregarse a Bossini a portes pagados, acompañado de un rapor de descripción del defecto. Bossini se reeserva el derecho de inspeccionar la pieza en cuestión para evaluar la aplicabilidad de la garantía. La garantía cuenta a partir de la adquisición del producto, verificada la documentación de adquisición (factura, albarán o dato fiscal) ) y no es renovable.
  • Seite 33: Instruções De Montagem

    é de 14 litros por minuto. O ponto de alimentação elétrico deve ser posicionado acima da saída da água. DESCRIÇÃO DAS FUNÇÕES: Aquavolo Cromotherapy, a ducha de alta tecnologia da Bossini com função de cromoterapia, jacto WideRain e jacto Cascata. - 3 funções: •...
  • Seite 34: Ligações Elétricas

    AQUAVOLO RGB (Cod. I02555) seis parafusos na parede (3) (Des. F). - Inserir o corpo da ducha (4) e aparafusar os relativos parafusos de fixação (5) já inseridos na placa. Depois, fixar a extremidade livre das molas a gás (9) na parte inferior da placa com os relativos parafusos (6) (Des. G). LIGAÇÕES ELÉTRICAS - Ligar os cabos elétricos A do teclado (13) à entrada correspondente da central do grupo de componentes eletrônicos (11) ver (Des. G - Des.H). - Ligar o cabo C proveniente do transformador (14) ao prensacabo (Des. G). NB: o eletricista deve utilizar um cabo de alimentação tipo bipolar, seção 1 mm², com diâmetro externo mínimo ø 5 mm - máximo ø 13 mm. - Encaixar o grupo (11) na placa de fixação à parede (1) (Des. I). - Inserir a cobertura (7) com cautela, prestando atenção para não danificar os bicos de jacto WideRain, até a completa aderência à parede (Des. L). - Fixar definitivamente a cobertura (7) à placa de fixação à parede com os relativos parafusos (8) (Des. M). - Remover a película de proteção (10) das superfícies superior e inferior do corpo (4) (Des. M). INSTALAÇÃO ELÉTRICA – DADOS TÉCNICOS 1. Ligação elétrica............ 220/230V ~ – 50/60 Hz – máx 20va Corrente absorvida 0,1 A classe de proteção II 2. Cabo de alimentação.......... bipolar seção 1 mm² Deve ser ø externo mínimo ø 5 mm e máximo ø 13 mm. (não incluído na embalagem) 3. Caixa com Transformador e filtro......(IP56) 7V ~/ 230V~ – 50/60 Hz a instalar fora da área de segurança (em conformidade com a norma DIN VDE 0100, parte 10 – de acordo com prescrição CEI 64/8) 4. Grau de proteção............ IP x 5 5. Placa eletrônica............ IP66/IP67 6. Teclado de comando.......... IP65...
  • Seite 35 Os pedidos de substituição em garantia poderão ser levados adiante somente mediante a apresentação de um documento datado comprovando a compra do produto. A garantia se refere unicamente aos defeitos de fabricação e dá direito exclusivamente à reparação ou ao fornecimento gratuito da peça identificada como defeituosa. A peça defeituosa deverá ser restituída à Bossini com porte pago, acompanhada de uma descrição detalhada to defeito. A Bossini se reserva o direito de inspecionar a peça contestada para avaliar a aplicabilidade da garantia. A garantia se inicia a partir da data de aquisição do produto, confirmada pela documentação comprovante (fatura, nota fiscal) e não é renovável. Para maiores informações contatar a Bossini ou o revendedor da região.
  • Seite 36 AQUAVOLO RGB (Cod. I02555) Инструкция по монтажу Важная рекомендация Для идеальной установки, лейка должна быть расположена на высоте примерно 2000 мм от пола (имеется в виду расстояние от низшей точки лейки и душевого поддона). Рекомендуемая подача воды, для оптимального функционирования, - 14 литров в...
  • Seite 37 AQUAVOLO RGB (Cod. I02555) - Окончательно закрепить настенный держатель (1) прикрутить соединение водорозетки (2) и 6 винтов (3) (Рис. F). - Установить корпус душевой лейки (4) закрепить соответствующими винтами (5) уже вставленными в крепление. Далее прикрутить свободные концы амортизаторов (9) к нижней части настенного крепления при помощи винтов (6) (Рис. G). Электроподключения - Соединить электрокабель A блока управления (13) с соответствующим входом группы электрокомплектующих (11) (Рис. G - Рис.H). - Соединить кабель C, исходящий из трансформатора (14) с местоположением (Рис. H). NB: электрик должен использовать биполярный кабель, с сечением 1мм², наружный диаметр которого минимум ø 5 мм- максимум ø 13 мм. - Установить группу (11) на настенное крепление (1) (Рис. I). - Вставить накладку (7) с осторожностью, внимательно проследить, чтобы исключить повреждение вкладок распыляющей поверхности Тропический Дождь, до ее полного прилегания к стене (Рис. L). - Окончательно закрепить накладку (7) к настенному креплению при помощи винтов (8) (Рис. M). - Снять защитную пленку (10) с верхней и нижней поверхностей корпуса (4) (Рис. M). Электрооборудование - Технические данные 1. Электроснабжение..........220/230V ~ – 50/60 Hz – макс.20va Электропотребление 0,1A класс защиты II 2. Электрокабель............ биполярный сечение 1мм² Должен иметь наружный минимальный ø 5 мм и максимальный ø 13 мм. (не входит в комплектацию) 3. Блок трансформатора и фильтр....(IP56) 7V ~/ 230V~ – 50/60 Hz для установки в безопасной зоне (согласно нормативам DIN VDE 0100, часть 10 – второе распоряжение CEI 64/8) 4. Уровень защиты..........IP x 5 5. Электросхема............IP66/IP67 6. Блок управления..........IP65 7. Марка безопасности......... CE 8. Aquavolo ..............4led RGB max 3 watt CE Подключение электрооборудования, согласно международным и национальным нормам, должно выполняться квалифицированными специалистами, которые должны устанавливать...
  • Seite 38: Гарантийные Условия

    повреждений возникших в последствии образования известкового налета или загрязнений и засоров. ГАРАНТИЙНЫЕ УСЛОВИЯ Дорогой покупатель, Выражаем Вам свою признательность за выбранный Вами продукт компании Bossini и благодарим за оказанное нам доверие. На нашу продукцию распространяется гарантия сроком 2 года на дефекты и изъяны, допущенные при производстве. Гарантия не распространяется на дефекты, возникшие по причине: неправильной...
  • Seite 39: Instructies Voor Montage

    AQUAVOLO RGB (Cod. I02555) INSTRUCTIES VOOR MONTAGE Inleiding Voor de ideale installatie moet de douchekop op een hoogte van ongeveer 2000 mm vanaf de vloer geïnstalleerd worden (hiermee wordt de afstand tussen de onderzijde van de douchekop en de douchebak bedoeld). De aangeraden capaciteit voor een goede werking van de douche is 14 liter per minuut.
  • Seite 40 AQUAVOLO RGB (Cod. I02555) Elektrische aansluitingen - Sluit de elektrische kabel A van het paneel (13) aan op de bijbehorende ingang van de besturingseenheid van de groep elektronische componenten (11) zie (Afb. G – Afb. H). - Sluit de kabel C, afkomstig van de transformator (14), aan op de kabelwartel (Afb. H). NB: de elektricien dient een bipolaire voedingskabel met doorsnede van 1mm² te gebruiken, met een externe diameter van minimaal ø 5 mm - maximaal ø 13 mm. - zet de electronica box (11) in de wandsteunplaat vast (1) (Afb. I). - Plaats voorzichtig de afdekkap, totdat deze volledig op de muur aansluit. Let er op de sproeiers van de WideRain stralen niet te beschadigen (Afb. L). - Bevestig definitief de afdekkap (7) op de plaat met de bijbehorende schroeven (8) (Afb. M). - Verwijder de beschermingsfilm (10) van de bovenste en onderste oppervlakten van de douchekop (4) (Afb. M). Elektrische installatie – Technische gegevens 1. Elektrische aansluiting.......... 220/230V ~ – 50/60 Hz – max 20va Stroomopname 0,1A beschermingsklasse II 2. Voedingskabel..........
  • Seite 41: Voor De Reiniging

    AQUAVOLO RGB (Cod. I02555) VOOR DE REINIGING Geachte klant, Wij willen u hartelijk feliciteren met de aanschaf van dit kwaliteitsproduct van Bossini, en danken u voor het in ons gestelde vertrouwen. Om u zo lang mogelijk te laten genieten van uw product moeten enkele richtlijnen gevolgd worden. Voor de reiniging van metalen delen: het water bevat kalk dat zich neerzet op de oppervlakken van de producten, en vormt onaangename vlekken. Voor de reguliere reiniging van het product is het voldoende om een vochtige doek met een beetje zeep te gebruiken, om daarna te spoelen en te drogen. Kalkvlekken kunnen voorkomen worden wanneer u het product na elk gebruik droogt. Belangrijk: er wordt aangeraden om uitsluitend reinigingsmiddelen op basis van zeep te gebruiken. Gebruik nooit reinigings- of ontsmettingsmiddelen die alcohol, zoutzuur of zwavelzuur bevatten. Ook wordt het gebruik van agressieve reinigingsmiddelen als schuurmiddel, schuursponsjes en microvezeldoekjes ten zeerste afgeraden, Bleekmiddel, Chloor etc! De reiniging van de rubberen sproeimondjes: de douchekop is voorzien van het “Easy-Clean” systeem met rubberen Sproeimondjes (nozzles). Kalk is de grootste vijand van douches, en daarom introduceert...
  • Seite 42 AQUAVOLO RGB (Cod. I02555) MONTERINGSVEJLEDNING Introduktion For at opnå en ideel installation skal bruseren placeres i en højde på cirka 2000 mm fra gulvet (hermed menes afstanden mellem brusehovedets underside og brusekabinens gulv). Det anbefalede vandtryk til en god brusefunktion er på 14 liter i minuttet. Strømforsyningen skal være placeret over vandudtaget.
  • Seite 43: Elektriske Tilslutninger

    AQUAVOLO RGB (Cod. I02555) ELEKTRISKE TILSLUTNINGER - Tilslut de elektriske kabel A fra tastaturet (13) til den tilsvarende indgang i styreenheden for de elektroniske komponenter (11) se (tegn. G - tegn.H). - Tilslut kablet C fra transformeren (14) til forskruningen (tegn. H). BEMÆRK: elektrikeren skal anvende et bipolar strømforsyningskabel med et tværsnit på 1mm², med en udvendig diameter på mindst ø 5 mm og maks. ø 13 mm. - Sæt enheden (11) på vægbeslaget (1) (Dis. I). - Sæt dækslet omhyggeligt på (7), og vær opmærksom på ikke at beskadige WideRain-dyserne, indtil det sidder helt ind til væggen (tegn. L). - Fastgør dækslet (7) til vægbeslaget med de medfølgende skruer (8) (tegn. M). - Fjern beskyttelsesfilmen (10) fra bruseenhedens over- og underside (4) (tegn. M). EL-INSTALLATION - TEKNISKE DATA 1. Elektrisk tilslutning............ 2 20/230V ~ – 50/60 Hz – maks. 20va Strømforbrug 0,1A beskyttelsesklasse II 2. Strømforsyningskabel.......... bipolar med 1mm² tværsnit Skal have en udvendig...
  • Seite 44 Rengøring af gummidyserne: Brusehovedet er udstyret med et “Easy-Clean” system med gummidyser (moduler). Kalk er badeværelsets værste fjende, og derfor har Bossini udviklet ”Easy-Clean” systemet: Når gummidyserne udsættes for varmt vand, udvider de sig, hvorved eventuelt aflejret kalk løsner sig. Hvis man af og til ”nulrer” eller gnubber gummidyserne med håndfladen eller fingrene, løsner man også...
  • Seite 45 AQUAVOLO RGB (Cod. I02555) INSTRUKCJE MONTAŻU Wstęp Poprawnie zamontowana wylewka powinna znajdować się na wysokości około H 2000 mm od ziemi (chodzi tu o odległość pomiędzy dolną częścią wylewki a brodzikiem). Aby uzyskać prawidłowe działanie wylewki, przepływ powinien wynosić 14 litrów na minutę.
  • Seite 46: Podłączenie Elektryczne

    AQUAVOLO RGB (Cod. I02555) - Mocno przymocować wspornik do muru (1) dokręcając złącze wody (2) i sześć śrub na ścianie (3) (Rys. F). - Włożyć wylewkę (4) i dokręcić specjalne kołki mocujące (5) już umieszczone we wsporniku. Następnie przymocować wolny koniec sprężyn gazowych (9) w dolnej części wspornika odpowiednimi śrubami (6) (Rys. PODŁĄCZENIE ELEKTRYCZNE - Połączyć kabel elektryczny A z klawiatury (13) do odpowiedniego wejścia w centralce zespołu komponentów elektronicznych (11) patrz (Rys. G - Rys.H). - Połączyć kabel C idący z transformatora (14) z zaciskiem kablowym (Rys. H). UWAGA!: elektryk powinien używać kabla zasilania typu dwubiegunowego, o przekroju 1mm², o zewnętrznej średnicy minimum ø 5 mm - maksimum ø 13 mm. - Zamocować zespół (11) do wspornika mocującego do ściany (1) (Rys. I). - Ostrożnie umieścić pokrywę (7) tak, aby całkowicie przystawała do ściany, uważając, by nie uszkodzić dysz natrysku WideRain, (Rys. L). - Przymocować na stałe pokrywę (7) do wspornika mocującego do ściany, używając odpowiednich śrub (8) (Rys. M). - Usunąć taśmę zabezpieczającą (10) z górnej i dolnej powierzchni korpusu (4) (Rys. M). INSTALACJA ELEKTRYCZNA – DANE TECHNICZNE 1. Podłączenie do prądu........... 220/230V ~ – 50/60 Hz – max 20va Prąd pobierany 0,1A...
  • Seite 47: Warunki Gwarancji

    AQUAVOLO RGB (Cod. I02555) CZYSZCZENIE Szanowny Kliencie, Gratulujemy udanego zakupu wyrobu firmy Bossini i dziękujemy za okazane zaufanie. W celu jak najdłuższego zachowania prawidłowego stanu wyrobu należy przestrzegać kilku zasad. Czyszczenie metalowych elementów woda zawiera wapień, który osadza się na powierzchni wyrobów i tworzy mało estetyczne plamy. Do codziennego czyszczenia wyrobu wystarczy użyć wilgotnej szmatki namoczonej w wodzie z mydłem, spłukać i wysuszyć. Można, zatem, zapobiec formowaniu się plam wycierając wyrób po każdym użyciu. Uwaga ważne: zaleca się używanie tylko detergentów na bazie mydła. Nie należy nigdy używać detergentów lub środków dezynfekujących zawierających substancje ścierne lub spirytus, kwas solny lub kwas fosforowy,...
  • Seite 48 2000 mm olmalıdır). Duş başlığının istenilen şekilde çalışması için tavsiye edilen debi dakikada 14 litredir. Elektrik besleme noktası suyun geldiği yerin üzerine yerleştirilmelidir. ÇALIŞTIRMAYLA ILGILI AÇIKLAMA: Aquavolo Kromoterapi; Bossini'nin kromoterapi özelliğine sahip, Geniş Yağmurlama (WideRain) ve Şelale (Cascata) tipi püskürtmeli ileri teknoloji 3 fonksiyonlu duş başlığıdır. FONKSİYONLARI; • Geniş Yağmurlama (WideRain) tipi püskürtme: Duş yatay konumda iken yağmur etkisi yaratmaktadır.
  • Seite 49: Elektrik Bağlantilari

    AQUAVOLO RGB (Cod. I02555) - Duş başlığının (4) gövdesini yerleştirin ve daha önce desteğe yerleştirilmiş özel sabitleme cıvatalarıyla vidalayın. Ardından gaz pistonlarının (9) serbest uçlarını özel vidalarla (6) desteğin alt kısmına sabitleyin (6) (Şekil G). ELEKTRIK BAĞLANTILARI - Tuş takımının (13) elektrik kablosunu elektronik parçalar grubu (11) merkezinin ilgili girişine bağlayın (Şekil G - Şekil H). - Transformatörden (14) gelen C kablosunu kablo deliğinden geçirin (Şekil H). Not: elektrikçinin iki kutuplu, 1mm² kesitli, dış çapı en az ø 5 mm - en çok ø 13 mm olan bir güç kablosu kullanması gerekir. - Grubu (11) duvar destek plakasının (1) içine oturtun (Şekil I). - WideRain püskürtme deliklerine hasar vermemeye özen göstererek kapağı (7) dikkatle, duvara tam olarak temas edene kadar yerleştirin (Şekil L). - Kapağı (7) özel vidaları (8) kullanarak duvar plakasına kalıcı olarak sabitleyin (Şekil M). - Gövdenin (4) alt ve üst yüzeylerindeki koruma filmini (10) çıkarın (Şekil M). ELEKTRIK TESISATI - TEKNIK BILGILER 1. Elektrik bağlantısı ..........220/230V ~ – 50/60 Hz – azami 20va Çekilen akım 0,1A Koruma sınıfı II 2. Güç kablosu ..........
  • Seite 50: Garanti Koşullari

    Metal kısımların temizliği: Suda ki kireç, yüzeylerde birikip nahoş lekeler oluşturur. Rutin temizlik için, biraz sabunlanmış nemli bir bez kullanın, durulayın ve kurulayın. Kullandıktan sonra kurutulursa kireç lekelerinin önüne geçilebilir. Önemli not: Sadece sabun bazlı bir deterjan kullanılması tavsiye edilir. Asla aşındırıcı nitelikte ya da alkol, hidroklorik asit veya fosforik asit içeren deterjanlar veya dezenfektanlar kullanmayın Çamaşır suyu, klor, vs. Lastik memelerin temizliği: duş başlığına lastik memeler (modüller) içeren “Easy-Clean” (kolay temizlenir) sistem takılmıştır. Kireç, bir duşun en büyük düşmanıdır. Bu nedenle Bossini “Easy-Clean” sistemini önermektedir. Bu lastik modüller ısıya azami derecede dayanıklıdır ve sıcak suda genişlediğinden, ilk kireç katmanını atar. Ayrıca, belirli aralıklarla silikon modüllerin elle bükülmesi, kireçten kolayca kurtulmanızı sağlar. Tek bir hareketle, duşunuz daima mükemmel durumda kalır. Sevgili Müşterimiz, ürünlerimizin yüzeyinin garantisinin, malzemeye önerdiğimizden farklı şekilde muamele edildiği taktirde geçersiz olacağını hatırlatırız.
  • Seite 51 AQUAVOLO RGB Distribuito da / Distributed by Bossini S.p.a. 25014 Castenedolo (Brescia) Italy Via G. Matteotti, 170/A Tel. ++39 030 2134 211 Fax ++39 030 2134 290 www.bossini.it info@bossini.it Made in Italy...

Diese Anleitung auch für:

I02555

Inhaltsverzeichnis