Gentili G2000 Maxi Benutzung Und Wartung
Leiterträger
Inhaltsverzeichnis
Quicklinks
LADDER RACK
Use and maintenance
PORTASCALA
Uso e manutenzione
L'utilisation et l'entretien
PORTE-ECHELLE
Uso y mantenimiento
PORTAESCALERA
Benutzung – und Wartung
LEITERTRÄGER
Gebruik en onderhoud
TRAPHOUDER
Uso e manutenção
PORTA-ESCADAS
Использование и техническое
УСТРОЙСТВО ДЛЯ
ЛЕСТНИЦЫ
обслуживание
Issued on 01/06/2016
Inhaltsverzeichnis

Verwandte Anleitungen für Gentili G2000 Maxi

Inhaltszusammenfassung für Gentili G2000 Maxi
- Seite 1 LADDER RACK Use and maintenance PORTASCALA Uso e manutenzione L’utilisation et l’entretien PORTE-ECHELLE Uso y mantenimiento PORTAESCALERA Benutzung – und Wartung LEITERTRÄGER Gebruik en onderhoud TRAPHOUDER Uso e manutenção PORTA-ESCADAS Использование и техническое УСТРОЙСТВО ДЛЯ ЛЕСТНИЦЫ обслуживание Issued on 01/06/2016...
- Seite 3 Rear support bar with central hoop retainer Support de barre arrière stop-échelle Barra transversal trasera para detener la escalera G2000 HARRIER MAXI USER MANUAL Traverso posteriore fermascala Hintere Traverse mit Leiter Rückhaltebügel Achterste steunbalk met ladder scheidingsbeugel (x1) Traverso posteriore fermascala Barra transversal traseira para escada Задний...
- Seite 4 Rear Front support bar mounting instruction Istruzioni di montaggio traverso posteriore fermascala Instructions de montage du support de barre avant M8 16 Nm stop-échelle Instrucciones de instalación barra transversal delantera para detener la escalera Montageanleitung Vordere Traverse mit Leiter Rückhaltebügel Montage instructie m.b.t.
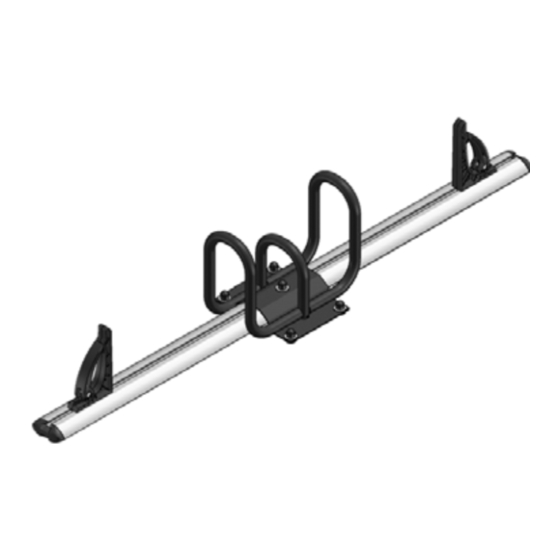
- Seite 5 Slitta G2000 MAXI assemblata Slitta G2000 HARRIER MAXI montata Parte deslizante montada G2000 MAXI Каретка G2000 MAXI в собранном виде Roof bars set (see specific mounting instruction) Kit de barres de toit pour le porte-échelle (voir les instructions de montage spécifiques).
- Seite 6 Install roof bars onto vehicle roof, referring to specific mounting instructions and vehicle manufacturers Install roof bars onto vehicle roof, referring to specific handbook. mounting instructions and vehicle manufacturers Installer les barres sur le toit du véhicule en suivant les handbook.
- Seite 7 Insert 6 bolts (M8x16) to underside of each individual Insert 6 bolts (M8x16) to underside of each individual Insert 6 bolts (M8x16) to underside of each individual side rail. side rail. side rail. Insert 6 bolts (M8x16) to underside of each Insérer 6 vis (M8x16) dans la partie inférieure de Insérer 6 vis (M8x16) dans la partie inférieure de chaque side rail.
- Seite 8 DO NOT FULLY TIGHTEN (see 10 & 11). Fixer le porte-échelle aux barres de toit à l’aide des étriers fournis. NE PAS SERRER A FOND (voir 10 et 11). Fijen el portaescalera a las barras utilizando los soportes Attach ladders rack to roof bars using brackets suministrados.
- Seite 9 Arcos trava-escada montadas (vide instruções de montagem específicas) Aрки еще лестница собрана (см. инструкции по монтажу) Tighten securing brackets once 13 is complete. Tighten securing brackets once 10 is complete. Ladder retainers mounting instruction Une fois la descente correcte du système vérifiée (voir Une fois la descente correcte du système vérifiée (voir l’image 10), serrer les étriers de fixation.
- Seite 10 Before deploying, make sure the securing catches have both disengaged from retaining point (section Before deploying, make sure the securing catches have view). both disengaged from retaining point (section view). Avant de sortir le porte-échelle, s’assurer que les Avant de sortir le porte-échelle, s’assurer que les leviers leviers de blocage ont été...
- Seite 12 Put the ladders onto system Put the ladders onto system Placer l’échelle sur le porte-échelle Placer l’échelle sur le porte-échelle Coloquen la escalera en el portaescalera Coloquen la escalera en el portaescalera Die Leiter auf die Leiterhalterung anbringen Die Leiter auf die Leiterhalterung anbringen Plaats de trap op de trapdrager Posizionare la scala sul portascala Plaats de trap op de trapdrager...
- Seite 13 How to correctly secure the ladders on retainer (A) How to correctly secure the ladders on retainer (A) Echelle fixée correctement sur l’arceau avant (A) Echelle fixée correctement sur l’arceau avant (A) Fiijación correcta de la escalera en el arco delantero (A) Korrekte Befestigung der Leiter auf dem vorderen Bügel Fiijación correcta de la escalera en el arco delantero (A) Korrekte Befestigung der Leiter auf dem vorderen...
- Seite 14 The ladders should never be higher than retainer The ladders should never be higher than retainer height height L’échelle ne doit jamais dépasser la hauteur de L’échelle ne doit jamais dépasser la hauteur de l’arceau de blocage l’arceau de blocage La escala no debe superar nunca la altura del arco que La escala no debe superar nunca la altura del arco bloquea escalera...
- Seite 15 Do not climb onto the ladders rack Do not climb onto the ladders rack Ne pas monter sur l’échelle Ne pas monter sur l’échelle No suban por la escalera Do not climb onto the ladders rack Nicht auf die Leiter steigen No suban por la escalera Ne pas monter sur l’échelle Klim niet op de trap...
- Seite 16 LOCK THE SYSTEM; make sure the lever catches are both locked against the retaining point, before travel. LOCK THE SYSTEM; make sure the lever catches are both locked against the retaining point, before travel. BLOQUER LE PORTE-ECHELLE; avant de partir, s’assurer que les leviers de blocage sont accrochés sur BLOQUER LE PORTE-ECHELLE;...
- Seite 17 - Thoroughly clean vehicle roof mounting fixings and follow the assembly instructions contained in the manual. - When the G2000 MAXI is assembled on the vehicle, the overall weight and height of the vehicle are increased. Take it into consideration when going under a low underpass or entering a garage, etc.
-
Seite 18: Technical Specifications
Technical specifications: G2000 MAXI TYPE 1 LENGTH 2500 MM WEIGHT KG 42 G2000 MAXI TYPE 2 LENGTH 2850 MM WEIGHT KG 46 G2000 MAXI TYPE 3 LENGTH 3300 MM WEIGHT KG 50 Max load capacity 60 Kg TUV GS Certificate... - Seite 19 LE MODE D’EMPLOI ET LE GARDER A L’INTERIEUR DU VEHICULE 1) Garantie Le porte-échelle G2000 MAXI est livré avec une garantie de 3 ans à compter de la date de livraison. Pendant la durée de la garantie, Gentili Technology Equipment s’engage à remplacer gratuitement, auprès de son siège ou d’un centre agréé, les parties ayant des défauts de fabrication.
-
Seite 20: Spécifications Techniques
Examiner régulièrement tous les composants pour repérer tout signe de détérioration ou tout dommage. Remplacer et réparer immédiatement en contactant le Fournisseur/ Fabricant. - Ne pas utiliser les produits Gentili pour toute utilisation autre que celle indiquée dans le mode d’emploi. Spécifications techniques: G2000 MAXI TYPE 1... -
Seite 21: Instalación
- Tenga en cuenta que, después de la instalación de un portaescalera G2000 MAXI, el peso total y la altura del vehículo aumentan. Este factor debe tenerse en cuenta en relación al pasaje por debajo de puentes bajos, garajes, etc. -
Seite 22: Especificaciones Técnicas
Sustituya o repare inmediatamente poniéndose en contacto con el Proveedor/ Fabricante. - Los productos Gentili no deben ser utilizados para fines diferentes a los mencionados. Especificaciones técnicas: G2000 MAXI TYPE 1 LONGITUD 2500 MM PESO KG 42... - Seite 23 FAHRZEUGS AUF 1) Garantie Für den Leiterträger G2000 MAXI wird eine 3 jährige Garantie ab Lieferdatum gewährleistet. Innerhalb der Garantiedauer verpflichtet sich die Firma Gentili Technology Equipment im eignen Firmensitz oder in einer autorisierten Werkstatt, kostenlos jene Teile zu ersetzen die Herstellungsfehler aufweisen. Die Mängelbewertung erfolgt durch die Firma Gentili Technology Equipment oder durch autorisiertes,...
-
Seite 24: Technische Eigenschaften
Montageanleitungen des Handbuchs befolgen. - Bitte beachten Sie dass nach der Montage eines Leiterträgers G2000 MAXI, das Gesamtgewicht und die Höhe des Fahrzeugs zunehmen. Bitte denken Sie daran, vor allem was die Höhe angeht, wenn niedrige Brücken befahren werden oder wenn Sie in eine Garage usw. fahren. - Seite 25 VOERTUIG 1) Garantie Voor de traphouder G2000 MAXI wordt een garantie van 3 jaar verleend die ingaat op de datum van levering. Binnen de garantieperiode zal Gentili Technology Equipment onderdelen met fabrieksfouten bij haar hoofdkantoor of een ander erkend centrum gratis vervangen. De beoordeling van het gebrek wordt uitgevoerd door Gentili Technology Equipment of door haar geautoriseerd personeel.
-
Seite 26: Technische Eigenschappen
- De producten van Gentili mogen niet worden gebruikt voor andere dan de aangegeven doelen. Technische eigenschappen: G2000 MAXI TYPE 1 LENGTE 2500 MM GEWICHT KG 42 G2000 MAXI TYPE 2 LENGTE 2850 MM GEWICHT KG 46 G2000 MAXI TYPE 3... -
Seite 27: Installazione
VEICOLO 1) Garanzia Sul portascala G2000 MAXI viene rilasciata garanzia di 3 anni a partire dalla data di consegna. Entro il periodo di garanzia la Gentili Technology Equipment si impegna a sostituire gratuitamente, presso la propria sede o altro centro autorizzato, parti di ricambio che evidenziano difetti di fabbricazione. -
Seite 28: Specifiche Tecniche
Ispezionare con regolarità tutti i componenti e individuare eventuali segni di logoramento o danni subiti. Provvedere immediatamente alla sostituzione e riparazione contattando il Fornitore / Produttore. - I prodotti Gentili non devono essere utilizzati per usi diversi da quelli indicati. Specifiche tecniche:... - Seite 29 GUARDE ESTE MANUAL NO INTERIOR DO SEU VEÍCULO 1) Garantia Para o porta-escada G2000 MAXI é passada uma garantia de 3 anos, a contar a partir da data da entrega. Até ao final do período de validade da garantia, a Gentili Technology Equipment encarrega- se de substituir gratuitamente, junto da própria sede ou em outro centro autorizado, as peças...
-
Seite 30: Caraterísticas Técnicas
Efetue imediatamente a substituição e a reparação contatando o Fornecedor / Fabricante. - Os produtos da marca Gentili não devem ser utilizados para usos diferentes daqueles indicados. Caraterísticas técnicas: G2000 MAXI TYPE 1... - Seite 31 ТРАНСПОРТНОГО СРЕДСТВА 1) Гарантия На устройство по перевозу лестницы G2000 MAXI предоставляется гарантия на 3 года с момента поставки. В течение гарантийного периода Gentili Technology Equipment осуществляет, как у себя на предприятии, так и в любом авторизованном центре, бесплатный замен частей, в...
-
Seite 32: Технические Характеристики
- Тщательно очистить на крыше монтажные точки, которые будут задействованы, и соблюдать инструкции по монтажу, изложенные в руководстве. - Учитывать, что после установки устройства по перевозу лестницы G2000 MAXI общий вес и высота транспортного средства увеличатся. Этот факт необходимо принимать во внимание при... - Seite 33 Directive 2006/42/EC. The person authorised to compile the technical file is the Technical Manager of the company Gentili Tecnology Equipment di Gentili Aldo e Ernesto S.a.s. Bagnarola di Cesenatico (FC) ITALY - Via Balitrona 12 Bagnarola di Cesenatico, 01/06/2016...
- Seite 34 NOTE...
- Seite 35 NOTE...
- Seite 36 Gentili Technology Equipment Via Balitrona, 12 47042 Cesenatico (FC) ITALY T. +39 0547 311206 F. +39 0547 311636 gentili@flligentili.com www.flligentili.com www.flligentili.com...