Inhaltsverzeichnis
Werbung
Verfügbare Sprachen
Verfügbare Sprachen
Werbung
Inhaltsverzeichnis

Verwandte Anleitungen für CAME BPT TH/124


Inhaltszusammenfassung für CAME BPT TH/124
- Seite 1 Cronotermostato programmabile FB00802M04 IT Italiano TH/124 EN English FR Français MANUALE DI INSTALLAZIONE ED USO DE Deutsch...
-
Seite 2: Avvertenze Generali
Avvertenze generali • Importanti istruzioni per la sicurezza delle persone: LEGGERE ATTENTAMENTE! • Assicurarsi che la rete di alimentazione, conformemente alle regole di installazione, sia provvista di dispositivo di disconnessione onnipolare, che consenta la protezione per categoria di sovratensione III. •... -
Seite 3: Descrizione Dispositivo
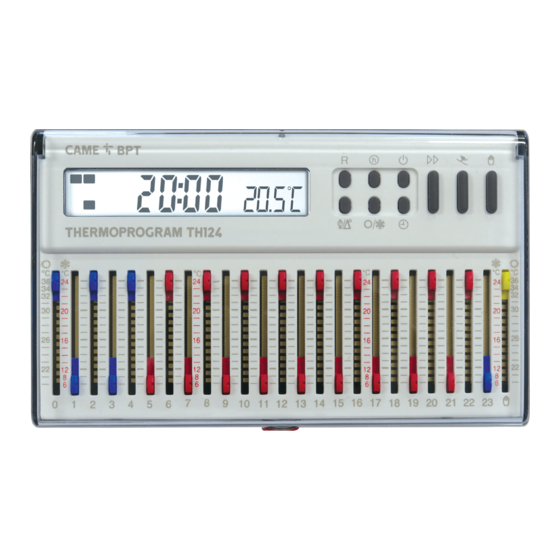
Descrizione dispositivo ⑤ ⑥ ⑦ ⑧ ⑨ ④ ③ ② ① Descrizione delle icone sul display Zona termica esclusa dal ⑤ Modalità raffrescamento attiva ① OFF controllo ⑥ Orologio digitale Controllo MANUALE ② MAN della zona termica attivo Riscaldatore o raffrescatore in ⑦... - Seite 4 ⑩ ⑪ ⑫ ⑯ ⑰ ⑱ ⑲ ⑳ ⑬ ⑭ ⑮ ㉒ ㉑ Funzione di pulsanti e cursori ⑩ Scala delle temperature valida con Pulsante di reset ⑲ modalità riscaldamento attiva Visualizza il tempo di attivazione ⑪ Scala delle temperature valida con impianto ⑳...
-
Seite 5: Installazione
Installazione Installare l’apparecchio in posizio- ne idonea a rilevare correttamente la temperatura dell’ambiente, pos- sibilmente in una parete interna, evitando l’installazione in nicchie, dietro a porte, a tende o vicino a sorgenti di calore. Premere il pulsante ❶ e separare la base dal corpo del dispositivo B. -
Seite 6: Collegamenti Elettrici
Fissare la base alla parete o alla scatola da incasso facendo passa- re i cavi di collegamento attraverso l'apposita apertura D. Nota. Non serrare con troppa forza le viti di fissaggio. Collegamenti elettrici I collegamenti vanno effettuati in funzione del tipo di apparecchiatura comandata dal cronotermostato. - Seite 7 Inserire n. 3 pile alcaline LR03 tipo mini stilo AAA da 1,5V, nell’apposita sede rispettando le polarità indica- te sul fondo dell’alloggiamento G. L’errato posizionamento delle pile può danneggiare l’apparec- chio. Qualora le indicazioni sul display non dovessero comparire entro 30 secondi, premere il pulsante di reset R.
-
Seite 8: Impostazione Dell'orologio
Programmazione e uso del dispositivo Impostazione dell’orologio Premere il pulsante Le cifre dei minuti lampeggiano. Usare il pulsante per impostare il valore esatto dei minuti B. Premere il pulsante Le cifre delle ore lampeggiano. Usare il pulsante per impostare l’ora esatta D. Premere il pulsante per termi- nare la procedura E. - Seite 9 Nota. Ad ogni pressione sul pulsante le cifre sul display avanzano di una unità. Man- tenendo premuto il pulsante, le cifre sul display si susseguono lentamente per i primi 5 secondi, poi più velocemente. Nota. Dopo 10 secondi di inattività, l’apparecchio esce autonomamente dalla procedura memorizzando gli ultimi dati impostati.
- Seite 10 Controllo della temperatura AUTOMATICO o MANUALE Controllo automatico A fino alla Premere il pulsante comparsa dell’indicazione AUT sul display. Agire sui cursori 0 ÷ 23 B, posi- zionandoli in corrispondenza della temperatura desiderata, per ogni ora della giornata. Il display mostra il numero del °C °C °C...
- Seite 11 Il display mostra la temperatura che si sta impostando. Fare riferimento alle scale a seconda della modalità di funzionamento dell'impianto. Utilizzo del programma VACANZE Nel caso si desideri mantenere una temperatura fissa per alcune ore o alcuni giorni (ad esempio per mantenere più a lungo una temperatura confortevole durante visite non previste o una temperatura antigelo di sicurezza durante assenze invernali) è...
- Seite 12 Attivazione giornaliera Attivare la modalità di funziona- mento MANUALE D. Agire sul cursore posizionandolo in corrispondenza della temperatu- ra desiderata. Premere per due volte il pulsante Sul display, al posto dell’indica- zione dell’ora corrente, compare la scritta d01. Usare il pulsante per impostare il numero di giorni di attivazione desiderati (da 1 a 99) F.
- Seite 13 Premere il pulsante Sul display, al posto dell’indica- zione dell’ora corrente, compare la scritta h01. Usare il pulsante per impostare il numero di ore nel corso delle quali il controllo termico della zona sarà escluso (da 1 a 99) C. L'esclusione a termine ha inizio immediatamente;...
- Seite 14 Variare il valore del differenziale termico Le impostazioni di fabbrica prevedono che il dispositivo operi con un differenziale termico di ± 0,2 °C. Questo intervallo termico di inter- vento è adatto per impianti con alta Set-point inerzia termica come, ad esempio, + differenziale impianti con radiatori in ghisa.
- Seite 15 Visualizzare le temperature programmate Premere il pulsante Sul display compare, per 5 s, il valore della temperatura impostata relativa all’ora indicata A. Per esempio se sono le ore 11.45 ed il cursore relativo (C11) è posizionato sui 20°C, sul display comparirà...
-
Seite 16: Sostituzione Delle Batterie
Sostituzione delle batterie L’icona lampeggiante sul display A indica che le batterie devono essere sostituite entro 1 mese circa. Quando sul display compaiono le indicazioni , l’appa- recchio non è più operativo e il controllo sulla zona termica è stato disabilitato. - Seite 17 Inserire n.3 pile stilo alcaline LR6, tipo AA da 1,5 V, nuove e dello stesso tipo, rispettando le polarità indicate sul fondo dell’alloggia- mento D. Qualora le indicazioni sul display non dovessero comparire entro 30 secondi, premere il pulsante di reset R. Attenzione.
-
Seite 18: Caratteristiche Tecniche
Risoluzione di eventuali anomalie di funzionamento Nel caso si verificassero anomalie di funzionamento, premere il pul- sante di reset R. Questa operazione riporta l'appa- recchio alle condizione di fabbrica. La comparsa sul display di una indicazione di errore ( ) seguita da un numero E, si riferisce alla posizione errata di uno dei cursori (da 00 a 25). - Seite 20 CAME S.p.A. Via Martiri Della Libertà, 15 31030 Dosson di Casier - Treviso - Italy tel. (+39) 0422 4940 - fax. (+39) 0422 4941...
- Seite 21 Programmable thermostat FB00802-EN TH/124 INSTALLATION AND USE MANUAL EN English...
-
Seite 22: General Precautions
General Precautions • Important people-safety instructions: READ CAREFULLY! • Make sure that the power supply network, in compliance with the installation rules, is fitted with a two-wait cut off switch, that provides category III protection levels; • Installing, programming, commissioning and maintenance must only be done by qualified, expert staff and in full compliance with the applicable law. -
Seite 23: Device Description
Device description ⑤ ⑥ ⑦ ⑧ ⑨ ④ ③ ② ① Description of the icons shown on the display Thermal zone excluded from ⑤ Cooling mode active ① OFF control ⑥ Digital clock MANUAL control ② MAN of the thermal zone ⑦... - Seite 24 ⑩ ⑪ ⑫ ⑯ ⑰ ⑱ ⑲ ⑳ ⑬ ⑭ ⑮ ㉒ ㉑ Function of buttons and cursors ⑩ Range of valid temperatures with Reset button ⑳ active cooling mode ⑪ Show system activation time Cursor for manually selecting ㉑ ⑫...
- Seite 25 Installing Install the device in a place suitable for detecting the room's tempera- ture, possibly onto an inside wall, and avoid any nooks, behind doors, near curtains or heat sources. Press button ❶ and separate the base from the body of the device B.
-
Seite 26: Electrical Connections
Fasten the base to the wall or to the recess-mounting box while thread- ing the connection cables through the corresponding opening D. Note. Do not excessively tighten the screws. Electrical connections The connections must be suitable for the devices controlled by the chronothermostat. LEGEND 230V~ Mains power-supply conductors... - Seite 27 Fit three LR03 alkaline AAA 1.5V batteries, into the battery housing while respecting the polarities shown on the bottom G. Wrongly fitted batteries can damage the device. If the indications on the display do not appear within 30 seconds, press the R reset button. Latch the device onto the base as shown in the figure H.
- Seite 28 Programming and using the device Setting the clock Press button The minute digits are flashing. Use the button to set the exact minute value Press button The hours digits are flashing. Use the button to set the exact time Press button to end the pro- cedure E.
- Seite 29 Note. Each time the button is pressed, the digits on the display advance by one unit. By keeping the button pressed, the digits on the display slowly increase for five seconds, then quickly increase. Note. After 10 seconds of inactivity, the device automatically exits the procedure while memorizing the latest set data.
-
Seite 30: Automatic Control
AUTOMATIC or MANUAL temperature control Automatic control A until the wording Press button AUT appears on the display. Move cursors 0 to 23 B, placing them on the wanted temperature, for each hour of the day. The display shows the cursor number on which you are working °C °C... - Seite 31 The display shows the temperature that you are setting. Use scales according to the system's operating mode. Using the VACATION program If you want to maintain a steady temperature for some hours or days - for example to keep the most comfortable temperature during when hosting guests or to prevent freezing during winter absences - you can activate the VACATION program.
- Seite 32 Daily activation Activating the MANUAL operating mode D. Set the cursor on the tempera- ture you want. E twice. Press button The display, in place of the cur- rent time indication, will show the wording d01. Use button to set the number of wanted days of activation (from 1 to 99) F.
- Seite 33 Press button The display shows the wording h01 instead of the current time. Use button to set the number of hours during which the thermal control of the zone will be excluded (from 1 to 99) C. The set exclusion starts immediately; the display shows the hours left for completing the execution of the program.
- Seite 34 Change the value of the temperature differential The factory settings have a ± 0.2°C temperature differential. This temperature differential is suitable for high thermal-inertia systems, such as, systems with cast iron radiators. If you need to change that value, proceed in the following way: Set-point + difference Set-point...
- Seite 35 View set temperatures Press button The display shows, for 5 seconds, the set temperature value cor- responding at a chosen time A. For example, if at 11:45 the C11 cursor is set to 20°C, the display will show C11 20°C. Press button to view the set temperature, for other times of day, by the various cursors.
-
Seite 36: Replacing The Batteries
Replacing the batteries When the icon is flashing on the display A it means the bat- teries need to be replaced within about one month. When the display shows , the device is no longer operational and the control over the thermal zone has been disabled. - Seite 37 Fit three new LR6 alkaline AA 1.5V batteries, into the battery housing while respecting the polarities shown on the bottom D. If the instructions on the dis- play don't appear within 30 seconds,press the R reset button. ATTENTION: badly fitted batteries may damage the heating system.
-
Seite 38: Problem Solving
Problem solving Press the R reset button if there are any malfunctions. This procedure restores the device to its factory settings. An error message on the display ( ) followed by a number E, means that one of the 00 to 25 cursors is in the wrong position. - Seite 40 CAME S.p.A. Via Martiri Della Libertà, 15 31030 Dosson di Casier - Treviso - Italy tel. (+39) 0422 4940 - fax. (+39) 0422 4941...
- Seite 41 Thermostat programmable FB00802-FR TH/124 MANUEL D'INSTALLATION ET D'UTILISATION FR Français...
-
Seite 42: Instructions Générales
Instructions générales • Instructions importantes pour la sécurité des personnes : À LIRE ATTENTIVEMENT ! • S’assurer que le réseau d’alimentation est bien doté, conformément aux règles d’instal- lation, d’un dispositif de déconnexion omnipolaire pour la protection en cas de surtension catégorie III. - Seite 43 Description dispositif ⑤ ⑥ ⑦ ⑧ ⑨ ④ ③ ② ① Description des icônes sur l’afficheur Zone thermique exclue du ⑤ Modalité climatisation activée ① OFF contrôle ⑥ Horloge numérique Contrôle MANUEL ② MAN de la zone thermique activé Réchauffeur ou climatiseur en ⑦...
- Seite 44 ⑩ ⑪ ⑫ ⑯ ⑰ ⑱ ⑲ ⑳ ⑬ ⑭ ⑮ ㉒ ㉑ Fonction de boutons et curseurs ⑩ Échelle des températures valide avec Bouton de remise à zéro ⑲ modalité chauffage activée Visualise le temps d’activation ⑪ Échelle des températures valide avec de l’installation ⑳...
-
Seite 45: Installation
Installation Installer l'appareil dans une posi- tion lui permettant de détecter correctement la température ambiante, si possible dans un mur interne, en évitant l'installation dans des ouvertures, derrière des portes, des rideaux ou près de sources de chaleur. Appuyer sur le bouton ❶ et sépa- rer la base du corps du dispositif ❶... -
Seite 46: Branchements Électriques
Fixer la base au mur ou au boîtier à encastrer en faisant passer les câbles de connexion à travers l’ouverture prévue à cet effet D. Remarque. Ne pas serrer trop fort les vis de fixation. Branchements électriques Les connexions doivent être effectuées en fonction du type d'équipement commandé... - Seite 47 Installer 3 piles alcalines LR03 1,5 V type AAA en respectant les polarités indiquées au fond du logement G. Le positionnement incorrect des piles peut endommager l'appareil. À défaut d’affichage des indica- tions dans les 30 secondes qui suivent, appuyer sur le bouton de remise à...
- Seite 48 Programmation et utilisation du dispositif Configuration de l'horloge Appuyer sur le bouton Les chiffres des minutes clignotent. Se servir du bouton pour configurer la valeur exacte des minutes B. Appuyer sur le bouton Les chiffres des heures clignotent. Se servir du bouton pour configurer l'heure exacte D.
- Seite 49 Remarque. À chaque enfoncement du bouton les chiffres à l’écran augmentent d’une unité. En maintenant ce bouton enfoncé, les chiffres à l'écran se succèdent lentement les 5 premières secondes puis plus rapidement. Remarque. Au bout de 10 secondes d'inactivité, l'appareil sort de façon autonome de la procédure en mémorisant les dernières données configurées.
- Seite 50 Contrôle de la température AUTOMATIQUE ou MANUEL Contrôle automatique A jusqu'à Appuyer sur le bouton ce que l'écran affiche l'indication AUT. Intervenir sur les curseurs de 0 à 23 B et les positionner au niveau de la température souhaitée pour chaque heure de la journée.
- Seite 51 L’écran affiche la température en phase de configuration. Se référer aux échelles en fonction de la modalité de fonctionnement de l’installation. Utilisation du programme VACANCES Afin de maintenir une température fixe pendant quelques heures ou quelques jours (ex. : pour maintenir plus longtemps une température confortable durant des visites imprévues ou une température antigel durant des absences en hiver), il est possible d'activer le pro- gramme VACANCES.
- Seite 52 Activation journalière Activer le mode de fonctionnement MANUEL D. Déplacer le curseur sur la tem- pérature souhaitée. Appuyer deux fois sur le bouton À la place de l’heure courante l’écran affiche le message d01. Se servir du bouton pour confi- gurer le nombre de jours d'activa- tion souhaité...
- Seite 53 Appuyer sur le bouton À la place de l’heure courante l’écran affiche le message h01. Se servir du bouton pour configurer le nombre d’heures au cours desquelles le contrôle ther- mique de la zone sera désactivé (de 1 à 99) C. La désactivation temporisée démarre immédiatement ;...
- Seite 54 Modifier la valeur du différentiel thermique Les configurations d’usine prévoient le fonctionnement du dispositif avec un différentiel thermique de ± 0,2°C. Cet intervalle thermique d’inter- vention est idéal pour des instal- Point de consigne lations à forte inertie thermique + différentiel comme, par exemple, les installa- Point de consigne...
- Seite 55 Visualiser les températures programmées Appuyer sur le bouton L’écran affiche pendant 5 s la valeur de la température configu- rée pour l’heure indiquée A. S’il est par exemple 11 h 45 et que le curseur correspondant (C11) est sur 20°C, l’écran visualisera le message C11 20°C.
-
Seite 56: Remplacement Des Piles
Remplacement des piles clignotant à l’écran A L’icône indique que les piles doivent être remplacées d'ici 1 mois environ. Quand l’écran affiche l’appareil ne fonctionne plus et le contrôle sur la zone thermique est désactivé. ATTENTION : si les piles ne sont pas remplacées à temps, le système de chauffage pourrait se détériorer. - Seite 57 Installer 3 nouvelles piles alcalines LR6 1,5 V type AA en respectant les polarités indiquées au fond du logement D. À défaut d’affichage des indica- tions dans les 30 secondes qui suivent, appuyer sur le bouton de remise à zéro R. Attention.
-
Seite 58: Caractéristiques Techniques
Résolution d’éventuelles anomalies de fonctionnement En présence d’anomalies de fonc- tionnement, appuyer sur le bouton de remise à zéro R. Cette opération permet la réinitia- lisation de l’appareil. L’affichage à l’écran du message d’erreur ( ) suivi d’un chiffre E signale la position incorrecte de l’un des curseurs (de 00 à... - Seite 60 CAME S.p.A. Via Martiri Della Libertà, 15 31030 Dosson di Casier - Treviso - Italy tel. (+39) 0422 4940 - fax. (+39) 0422 4941...
-
Seite 61: Programmierbare Thermostatsteuerung
Programmierbare Thermostatsteuerung FB00802-DE TH/124 MONTAGE- UND BETRIEBSANLEITUNG DE Deutsch... -
Seite 62: Allgemeine Hinweise
Allgemeine Hinweise • Wichtige Sicherheitshinweise: BITTE SORGFÄLTIG DURCHLESEN! • Sicherstellen, dass im Stromnetz gemäß den Installationsvorschriften eine omnipolare Schutzauslösungsreinheit, die das Gerät unter den Bedingungen der Überspannuskategorie III abtrennt, vorhanden ist; • Die Montage, Programmierung, Inbetriebnahme und Wartung muss von ausgebildeten Fachtechnikern und gemäß... - Seite 63 Beschreibung ⑤ ⑥ ⑦ ⑧ ⑨ ④ ③ ② ① Beschreibung der Symbole auf dem Display Von der Temperatursteuerung ④ Heizbetrieb eingeschaltet ① OFF ausgeschlossene ⑤ Kühlbetrieb eingeschaltet Temperaturzone MANUELLE Steuerung ⑥ Digital-Uhr ② MAN der Temperaturzone ist ⑦ ON Heiz-/Kühlgerät in Betrieb eingeschaltet AUTOMATISCHE Steuerung ⑧...
- Seite 64 ⑩ ⑪ ⑫ ⑯ ⑰ ⑱ ⑲ ⑳ ⑬ ⑭ ⑮ ㉒ ㉑ Funktion der Taster und Schiebetaster ⑩ MANUELLE/AUTOMATISCHE Rückstelltaste ⑱ Temperatursteuerung der Die Einschaltdauer der Anlage ⑪ Anlage wählen wird angezeigt Gültige Temperaturskala bei Die Temperaturkontrolle ⑲ eingeschaltetem Heizbetrieb ⑫...
-
Seite 65: Montage
Montage Das Gerät an einer für die Tempe- raturerfassung geeigneten Stelle montieren (möglichst an einer Innenwand, nicht in Nischen, hin- ter Türen oder Gardinen oder in der Nähe von Wärmequellen anbringen). Auf die Taste ❶ drücken und das Unterteil vom Gerät trennen B. ❶... -
Seite 66: Elektrische Anschlüsse
Das Unterteil an der Wand oder in der UP-Dose befestigen, dabei die Anschlussdrähte durch das entsprechende Loch ziehen D. Hinweis. Die Schrauben nicht zu stark anziehen. Elektrische Anschlüsse Der Anschluss hängt von den von der Ther- mostatsteuerung gesteuerten Geräten ab. ZEICHENERKLÄRUNG 230V~ Netzstromleiter... - Seite 67 Drei Mignonzellen LR03 AAA zu 1,5 V in das entsprechende Fach stecken, dabei die im Batteriefach angegebene Polung berücksich- tigen G. Falsches Einlegen der Batterien kann Schäden verursachen. Wenn die Display-Anzeige nicht innerhalb von 30 Sekunden sicht- bar ist, auf den Rücksetztaster R drücken.
-
Seite 68: Uhrzeit Einstellen
Programmierung und Gebrauch des Geräts Uhrzeit einstellen Drücken Sie auf die Taste Die Minuten blinken nun. Mit der Taste die genaue Minutenzahl eingeben B. Drücken Sie auf die Taste Die Stunden blinken nun. Mit der Taste die genaue Stun- denzahl eingeben eingeben D. Drücken Sie auf die Taste , um den Vorgang zu beenden E. -
Seite 69: Betriebsart Einstellen
Hinweis. Nach jedem Druck auf die Taste erhöht sich die Zahl auf dem Display um eine Einheit; durch ständigen Druck wechseln die Zahlen auf dem Display 5 Sekunden lang langsam und anschließend schneller. Hinweis. Wenn das Gerät 10 Sek. lang nicht betätigt wird, beendet das Gerät den Vorgang automatisch und speichert die zuletzt eingegebenen Daten. -
Seite 70: Manuelle Steuerung
AUTOMATISCHE oder MANUELLE Temperatursteuerung Automatische Steuerung A , bis Drücken Sie auf die Taste der Schriftzug AUT auf dem Display erscheint. Die Schiebetaster 0 ÷ 23 B so verschieben, dass für jede Stunde des Tages die Solltemperatur eingestellt wird. Auf dem Display wird die Nummer °C °C °C... - Seite 71 Auf dem Display wird die Temperatur, die gerade eingestellt wird, angezeigt. Die Temperatur- skalen entsprechend der Betriebsweise der Anlage berücksichtigen. Verwendung des URLAUB Programms Wenn für einige Stunden oder Tage eine bestimmte Temperatur bewahrt werden soll (z.B. Ver- längerung der Wohlfühltemperatur bei nicht erwartetem Besuch, oder Frostschutztemperatur bei Abwesenheit im Winter) kann das URLAUB Programm aktiviert werden.
-
Seite 72: Zeitgeschalteter Ausschluss Der Temperatursteuerung Einer Temperaturzone
Tagesschaltung Den MANUELLEN Betrieb akti- vieren D. Mit dem Schiebetaster Solltemperatur einstellen. Drücken Sie zwei Mal auf die Taste Auf dem Display wird an Stelle der laufenden Uhrzeit, der Schriftzug d01 angezeigt. Mit der Taste die gewünschte Einschaltdauer in Tagen (von 1 bis 99) einstellen F. - Seite 73 Mit der Taste Auf dem Display wird an Stelle der laufenden Uhrzeit, der Schriftzug h01 angezeigt. Mit der Taste die Anzahl der Stunden, in denen die Tempera- turkontrolle einer Temperaturzone ausgeschlossen werden soll (von 1 bis 99) eingeben C. Der zeitgeschaltete Ausschluss beginnt sofort; auf dem Display werden die Stunden bis zur Beendigung des Programms angezeigt.
-
Seite 74: Änderung Des Temperaturdifferentials
Änderung des Temperaturdifferentials In der Werkseinstellung ist ein Temperaturdifferential von ± 0,2 °C eingestellt. Dieses Temperaturdifferential eignet sich für Anlagen mit einer hohen thermischen Trägheit, wie z.B. Gussheizkörper. Sollte aufgrundder Beschaffenheit Set-point + Differential der Anlage eine Änderung des Set-point Differentials nötig sein, wie folgt vorgehen. -
Seite 75: Die Eingestellten Temperaturen Anzeigen
Die eingestellten Temperaturen anzeigen Drücken Sie auf die Taste Auf dem Display wird die für die angegebene Uhrzeit eingestellte Temperatur 5 Sek. lang ange- zeigt A. Z.B.: Wenn es 11:45 ist und der entsprechende Schiebetaster (C11) auf 20°C eingestellt ist, wird auf dem Display C11 20°C angezeigt. - Seite 76 Batteriewechsel Das Symbol auf dem Display blinkt A und zeigt somit an, dass die Batterien innerhalb von ca. 1 Monat gewechselt werden müssen. Wenn auf dem Display die An- gaben erscheinen, funktioniert das Gerät nicht mehr und die Temperatursteuerung der Temperaturzone ist ausgeschaltet.
- Seite 77 3 neue LR6 Mignonzellen - AA zu 1,5 V - desselben Typs einlegen, dabei die auf dem Boden des Batteriefachs angegebene Polung berücksichtigen eingeben D. Sollte die Display-Anzeige nicht innerhalb von 30 Sek. erschei- nen, auf den Rücksetz-Taster R drücken. Achtung.
-
Seite 78: Störungsbehebung
Störungsbehebung Im Fall von Störungen, den Rück- setztaster R drücken. Dadurch werden die Werkseinstel- lungen zurückgesetzt. Wenn auf dem Display eine Fehler- meldung ( ) auf die eine Nummer folgt, angezeigt wird E, bedeutet dies, dass einer der Schiebetaster (von 00 bis 25) falsch eingestellt wurde. - Seite 80 CAME S.p.A. Via Martiri Della Libertà, 15 31030 Dosson di Casier - Treviso - Italy tel. (+39) 0422 4940 - fax. (+39) 0422 4941...