Cisco Spark Room Kit Plus Installationshandbuch

Verwandte Anleitungen für Cisco Spark Room Kit Plus


Inhaltszusammenfassung für Cisco Spark Room Kit Plus
- Seite 1 Cisco Spark Room Kit Plus Installation Guide Guide d’installation Guía de instalación Manual de Instalação Guida per l’installazione Installationshandbuch...
-
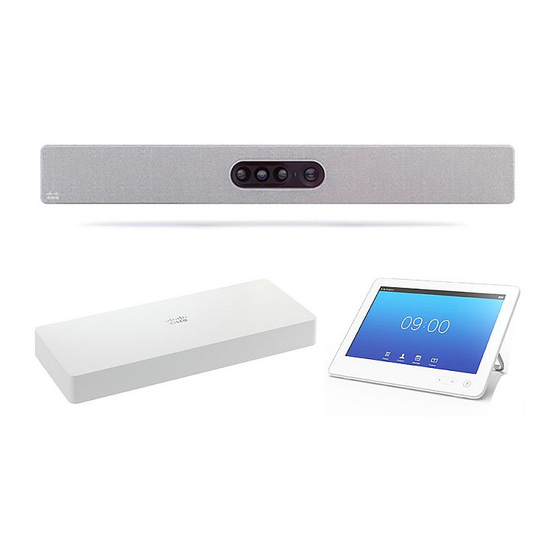
Seite 3: Box Contents
Box contents Contenu de la boîte Contenido de la caja Conteúdo da embalagem Contenuto della confezione Verpackungsinhalt Cisco Spark Quad Camera Ă 6 64,5 Cisco Touch 10 Cisco Spark Codec Plus Wall Bracket for the Quad Camera Support mural pour la Quad Camera... - Seite 4 Tools you may need Outils dont vous pourriez avoir besoin Herramientas que puede necesitar Ferramentas que poderão ser necessárias Utensili che possono essere necessari Werkzeuge, die Sie möglicherweise benötigen...
- Seite 5 Ethernet. Nous recommandons de commander ces câbles chez Cisco. Des câbles HDMI sont requis necessita’. Si consiglia di ordinare i cavi forniti da Cisco. Per schermi e presentazioni sono necessari pour les écrans et les contenus source. Nous recommandons de n’utiliser que des câbles certifiés : des cavi HDMI.
- Seite 6 Safety and mounting hardware The wall and mounting hardware must be able to safely support the product. The wall mounted system must be installed by qualified personnel, in accordance with state and local building regulations. Sécurité et matériel pour le montage Le mur et le matériel utilisé...
- Seite 7 Ventilation Do not block any ventilation openings on the codec. Minimum 10 cm / 3.9 " free space at each side of the unit. Ventilation Veillez à ne pas obstruer les orifices de ventilation du codec. Veillez à laisser un espace d’au moins 10 cm / 3.9 "...
- Seite 9 Step 1: Decide where to position the Quad Camera Étape 1: Choisissez l’emplacement de la Quad Camera Paso 1: Decida dónde colocar la Quad Camera Passo 1: Decidir o posicionamento da Quad Camera Passo 1: Decidere dove posizionare Quad Camera Schritt 1: Positionieren der Quad Camera 120 cm / 47 "...
- Seite 10 Step 2: Mount the camera wall bracket See next page for instructions in English. Étape 2: Installez le support mural de la caméra Vue latérale / Maximale 25 mm / 1 " REMARQUE : Lorsque vous installez la caméra au-dessus de l'écran, assurez-vous de respecter les mesures indiquées afin qu'il y ait suffisamment d'espace pour qu'elle puisse être entièrement inclinée vers l'avant.
- Seite 11 NOTE: When mounting the camera above the screen, be sure to comply with the measurements so that there is space enough for the camera to be tilted fully forward. Ø 6 mm 0.25 " 6.6 cm 2.6 " Maximum 25 mm / 1 " 10 mm 0.39 "...
- Seite 13 Step 3: Attach the camera to the bracket Étape 3: Fixez la caméra au support Paso 3: Fije la cámara en el soporte Passo 3: Fixar a câmara ao suporte Passo 3: Agganciare la videocamera alla staffa Schritt 3: Befestigen der Kamera an der Halterung...
- Seite 14 Step 4: Find the tilt angle for the camera according to its mounting height Étape 4: Inclinez la caméra en fonction de sa hauteur Paso 4: Descubra el ángulo de inclinación correcto de la cámara en función de la altura de montaje Passo 4: Encontre o ângulo de inclinação correto para a câmara com base na altura de montagem Passo 4: Trovare l'angolo di inclinazione corretto della videocamera in base all'altezza di montaggio Schritt 4: Den richtigen Neigungswinkel für die Kamera basierend auf der Montagehöhe finden...
- Seite 15 Height (H) Tilt angle ( Hauteur (H) / Altura (H) / Altura (H) / Altezza (H) / Höhe (H) Angle d’inclinaison ( ) / Ángulo de inclinación ( ) / Ângulo de inclinação ( Angolo di inclinazione ( ) / Neigungswinkel ( 105 —...
- Seite 16 Step 5: Adjust the tilt angle See next page for instructions in English. Étape 5: Ajustez l'angle d'inclinaison Passo 5: Regolare l’angolo di inclinazione Inclinez la caméra entièrement vers l’avant.Si vous ne parvenez pas à incliner la caméra Inclinare la videocamera completamente in avanti. Se non è possibile inclinare la complètement, retournez à...
- Seite 17 — 0° 15° — 0° 15° Tilt the camera fully forward. If you Move the two sliders to Tilt the Quad Camera You can check that the tilt angle cannot tilt the camera fully forward, adjust the tilt angle. The back to normal position.
- Seite 18 Step 6: Connect the cables Étape 6: Branchez les câbles Always use the supplied power adapter for the camera (FSP070) and the codec (FSP070). Paso 6: Conecte los cables Passo 6: Ligar os cabos Utilisez toujours l’adaptateur fourni pour la caméra (FSP070) et le codec (FSP070).
- Seite 19 LAN (RJ-45) HDMI Ethernet PoE (RJ-45) HDMI 15 16 FSP070 Power (100-240 V ac, 50/60 Hz) Alimentation / Alimentación / Alimentação / Alimentazione / Eingangsleistung Microphone(s) required Microphone(s) requis / Micrófono(s) es requerido / Microfone(s) necessário / Microfono(s) è necessario / Mikrofon(e) ist erforderlich...
- Seite 20 Cisco Spark Quad Camera Cisco Spark Codec Plus Power On/Off Sub-woofer output Marche/Arrêt / Encendido/apagado / Ligar/desligar / Tasto On/Off / Ein-/Aus-Schalter Sortie sub-woofer / Salida de sub-woofer / Saída de subwoofer / Uscita sub-woofer / Subwooferausgang Pin-hole reset, security lock slot Line input Orifice du bouton de réinitialisation, fente du système antivol / Orificio para restablecer, ranura...
- Seite 21 Step 7: Finish the installation For instructions in English see the text under the illustration. Étape 7: Finissez l’installation Inclinez la Quad Camera dans sa position normale. Assurez-vous de laisser suffisamment d'espace aux câbles pour qu'ils ne se desserrent pas lorsque vous inclinez complètement la caméra. Paso 7: Finalización Incline la Quad Camera hacia atrás para volver a la posición normal.
- Seite 22 Quando viene visualizzata la schermata di Benvenuto, seguire le istruzioni per completare la configurazione. Il est également recommandé de mettre à niveau le logiciel de votre Cisco Spark Room Kit Plus pour salle de réunion avant utilisation. Consultez le guide de l'administrateur pour le codec: Si consiglia di aggiornare il software di Cisco Spark Room Kit Plus prima di http://www.cisco.com/go/roomkit-docs...
- Seite 23 When you see the Welcome screen, follow the instructions to complete the setup. We recommend that you upgrade the software on your Cisco Spark Room Kit Plus before putting it to use. See the Administrator Guide for the codec:...
- Seite 24 How to release the Quad Camera from the wall bracket See next page for instructions in English. Comment détacher la Quad Camera du support mural Come sganciare la Quad Camera dalla staffa per il montaggio a parete Inclinez la caméra entièrement vers l’avant. Inclinare la videocamera completamente in avanti.
- Seite 25 The illustration shows the release levers in unlocked position. WARNING: Never leave the Quad Camera on the wall bracket with the release levers in unlocked position. Tilt the camera fully forward. Flip the two release levers to Tilt the camera back to normal Carefully pull the camera straight unlock the Quad Camera.
- Seite 27 Explore o Cisco Project Workplace para encontrar inspiração e diretrizes de preparação do seu escritório ou da sua sala de conferências para a realização de videoconferências. Esplorate il Cisco Project Workplace per trovare spunti e linee guida per la predisposizione di uffici e sale riunioni per alla videoconferenza.
- Seite 28 Cisco e qualquer outra empresa. (1110R) Cisco e il logo Cisco sono marchi o marchi registrati di Cisco e/o dei relativi affiliati negli Stati Uniti e in altri paesi. Per visualizzare l’elenco di marchi Cisco, visitare il sito Web all’indirizzo: www.cisco.com/go/trademarks.