Werbung
UNI-ORL7 and UNI-IRL7 Series
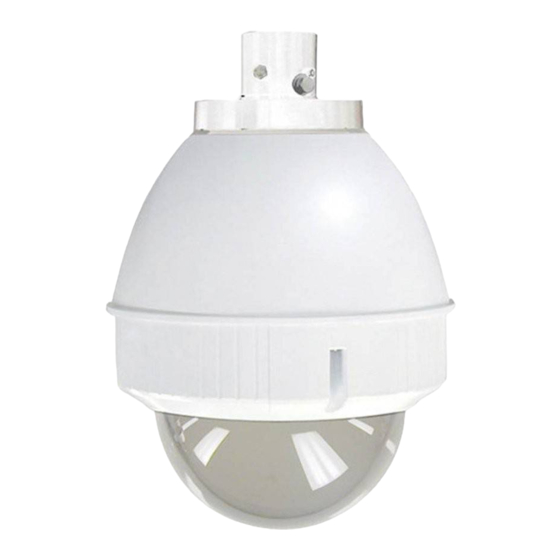
Outdoor and Indoor Dome Housings
Installation and Operation Instructions for the following model:
UNI-ORL7C2
UNI-ORL7T2
UNI-ORL7C2W
UNI-ORL7T2W
UNI-IRL7C2
UNI-IRL7T2
Note: AC 24V power supply for the camera and the heater/blower is an installer/reseller provided item.
Note: Please note that to achieve the increased depth with the aspheric design for optimal camera
lens to capsule orientation, the capsule is slightly angled around the highest section. This creates
a "line', visible to the naked eye, around the upper most section of the capsule. This "line" serves
as the geometric center line used to insure proper camera placement. It is not typically seen by
the camera. However, Sony RZ series PTZ cameras are able to tilt up above the horizon to 25°,
this wide range of tilt motion at a wide angle view may cause this line to be captured in the image.
Mounting instructions for:
SNC-RZ25
SNC-RX530
SNC-RX550
SNC-RX570
SNC-RH124
SNC-RS44
SNC-RS46
Quick Reference:
SNC-RZ25N............................Go to Steps 3-5
SNC-RX Series........................Go to Steps 6-8
Wireless RZ25/RX...................Go to Steps 9-10
SNC-RH/RS.............................Go to Steps 11-18
Outdoor Pendant Housing w/ heater & blower, clear lower dome
Outdoor Pendant Housing w/ heater & blower, tinted lower dome
Outdoor Pendant Housing w/ heater & blower, clear lower dome, and a
Wireless antenna cable
Outdoor Pendant Housing w/ heater & blower, tinted lower dome, and a
Wireless antenna cable
Indoor Pendant Housing without heater & blower, clear lower dome
Indoor Pendant Housing without heater & blower, tinted lower dome
Camera Installation Steps
81-IN6581
10-14-2009
Werbung
Inhaltsverzeichnis

Verwandte Anleitungen für Sony UNI-ORL7 Serie


Inhaltszusammenfassung für Sony UNI-ORL7 Serie
- Seite 1 It is not typically seen by the camera. However, Sony RZ series PTZ cameras are able to tilt up above the horizon to 25°, this wide range of tilt motion at a wide angle view may cause this line to be captured in the image.
-
Seite 2: Important Safeguards
These Installation and Operating Instructions. support structure and falling, with resultant damages or injury to anyone or anything struck by the falling unit. SERVICE If technical support or service is needed, contact Sony at the following number: TECHNICAL SUPPORT 8:15AM to 7:30PM (Eastern Time) - Seite 3 Contents of Box Details Content of Box (1) Spacer Packet 2” ½” 1” 200mm 25mm 50mm (4) M3 x 6mm Machine Screw (4) M3 lock washers (1) 1/4 x 20 Bolt (1) 1/4 flat washer (1) 1/4 lock washer (3) 8 x 32 x 3/8" bolt (3) Cable ties (1) 4 Pin Auxiliary Connector (1) 4 Pin Power Connector...
-
Seite 4: Electrical Specifications
Electrical Specifications UNI-IRL7C2 UNI-IRL7C2 & UNINL7C2 & UNI-IRL7T2 UNI-IRL7T2 UNI-ORL7C2 (Outdoor Only) UNINL7T2 Power 24VAC Class 2 Only Total Power: 77 Watts Heater: 50 Watts Blower: 2 Watts Camera Power: Approximately 25 Watts at 24 VAC* *Refer to applicable camera spcs for precise consumption. English Input Connectors (Outdoor Units): (1) BNC (Analog Video) - Seite 5 Camera Installation: SNC-RZ25 SNC-RZ25 SNC-RZ25 SNCRZ25 (2) 3mm screws (1) ¼”x 20 bolt lock washer SNCRZ25 MOUNTING HOLES Remove the quick release plate from the Mount the camera to the plate using the housing. appropriate pattern. • Monte la cámara fotográfica a la placa usando el •...
- Seite 6 Camera Installation: SNC-RX530 / RX550 / RX570 SNC-RX Series SNC-RX Series SNCRX550 SNCRX550 (4) 3mm screws SNC RX550 MOUNTING HOLES Mount the camera to the plate using the Remove the quick release plate from the appropriate pattern. housing. • Monte la cámara fotográfica a la placa usando el •...
- Seite 7 Camera Installation: SNC-RZ25 & SNC-RX SERIES in Wireless Ready Housing SNCRZ25 (2) 3mm screws (Wireless) (1) ¼”x 20 bolt lock washer MOUNTING PATTERN 1/2” Spacers Remove the quick release plate and mount it to the camera using the correct pattern, then add (4) 1/2” spacers, align tabs on the mounting plate and turn counterclockwise to secure.
- Seite 8 Camera Installation: SNC-RH124 / RS44 / RS46 SNC-RH124 SNC-RH124 SNC-RS44 SNC-RS44 SNC-RS46 SNC-RS46 Remove existing bracket to mount SNC-RH124 Leave four 1/2” spacers as shown. or the SNC-RS series cameras. • Retire el soporte existentes para organizar SNC-RH124 o la •...
- Seite 9 • Attacchi il piatto del soffitto di SNC RH124„ ai distanziatori 1 (di 25mm) • Colleghi il controllo ed alimenti i legare alla base della macchina in alloggiamento fotografica, (vedi le istruzioni della macchina fotografica di Sony) SNC-RH124 SNC-RH124 SNC-RS44...
-
Seite 10: Mounting Preparation
Mounting Preparation Connecting the Wireless Card and Antenna MMCX For wireless models, after installing the wireless card Securely attach pendant pipe or the UNI-WMB1. Pull connect the antenna cable to the card. Please refer to wiring through pipe and position grommet as shown. product manual for details. - Seite 11 Loop the lanyard over the set screw to temporarily hold housing. For indoor models, Screw the (2) bolts into the coupling. please go to step 28. • Loop el cordón sobre el tornillo de fijación para mantener temporal- • Atornille (2) los pernos en el acoplador. mente de la vivienda.
- Seite 12 Wiring Instructions RJ45 24VAC SNC-RZ25 / Other Camera* Camera 18 Watts 25 Watts Camera Orange Heater/Blower Yellow 26 Watts Heater/Blower Green Other Camera*: Please refer to product manuals regarding power consumption Alarm 1 Blue Alarm 2 Violet Alarm 3 Gray Common White RJ45...
- Seite 13 Wireless Systems Only The 2’ cable provided is to be connected at the top of the Slide the grommet down over the coupling to prevent housing. Push down onto the connector and thread until it is water from entering and complete the assembly. hand tight.
- Seite 14 Align the arrows on the outside of the dome Connect Lanyard to trim ring assembly. and lock. • Alinee las flechas en el exterior de la bóveda y • Conecte el acollador con el montaje del anillo del trábese.
- Seite 15 How - to Clean a Dome Bubble To effectively clean your video surveillance dome bubble (acrylic or polycarbonate) from debris, follow these simple step-by-step instructions. Materials Needed • Clean, dry, pressurized air • Water • High quality soft paper towel •...
- Seite 17 Available Mounting Accessories UNI-WMB1 UNI-PBU1 UNI-RMB1 UNI-CMA1 UNI-PMA1 Aluminum Gooseneck Aluminum Existing Aluminum Corner Power Block Unit Parapet Mount Wall Mount Pole Mount Adaptor Mount Adaptor UNI-WMB1 UNI-PMA1 Wall Mount Pole Mount Mounting Accessories Needed: Mounting Accessories Needed: • UNI-WMB1 - Gooseneck UNI-WMB1 - Gooseneck Wall Mount Wall Mount Outdoor Pendant Housing...
- Seite 18 Warranty For warranty information on this and other Sony Security Systems Products, please visit: http://pro.sony.com/bbsccms/services/files/servicesprograms/SecurityWarranty.pdf...