
Verwandte Anleitungen für sematic SDS


Inhaltszusammenfassung für sematic SDS
- Seite 1 ENG-DEU © Drive Drive - Instruction Manual Kabinentürantrieb - Handbuch 808-000-000 E 15 June 2009 DC-PWM AC-VVVF BRUSHLESS AC-VVVF BRUSHLESS PLUS...
- Seite 3 © Sematic Italia Spa. All rights reserved. Sematic regards all the information contained in this instruction manual to be correct at the time of printing. This information does not constitute any obligation to Sematic and can be modified without prior notification. Sematic cannot be held responsible for any possible damages or claims caused to items or persons due to errors or misunderstandings within the contents of this instruction manual.
- Seite 4 808-000-000 SDS © rel.3 • Edition 15 June 2009 sematic.com Sematic Group: Sematic Group: we take care of Wir kümmern uns um Ihre your integrated solutions! integrierte Lösung! COMPONENT SYSTEMS SYSTEM KOMPONENTEN • Automatic lift doors • Automatische Aufzugstüren • Frame and frameless glass doors •...
- Seite 5 Display in Automatic and Manual Mode Automatic Mode “AUTO” Manual Mode “MAN” Programming Mode “PROG” Verify the correct working of the controller SDS 6 FUNCTIONS AVAILABLE pag. Reversing 6.1.1 Reversing System Force Setting (Param. Code 09) 6.1.2 Reversing system offset Reversing System choice: INTERNAL or EXTERNAL (Param.
- Seite 6 808-000-000 SDS © rel.3 • Edition 15 June 2009 6.15.6 PM position control 6.16 Skate Type (Param. Code 26) 6.17 AUX Input (Param. Code 32) 6.17.1 Disables (default) 6.17.2 % Partial Reopening 6.18 IM (reversing motion) signal type (Param. Code 34) 6.18.1 IM pulse...
- Seite 7 Sematic will give an agreed reasonable time to all its customers to allow them to adapt to the new changes their complementary current constructions;...
- Seite 8 808-000-000 SDS © rel.3 • Edition 15 June 2009 Taking into account, during all project planning, the Risk Assessments relating to: A. RISKS OF MECHANICAL HAZARDS • Squeezing during operations • Squeezing after Trapping caused by friction (glass panels) •...
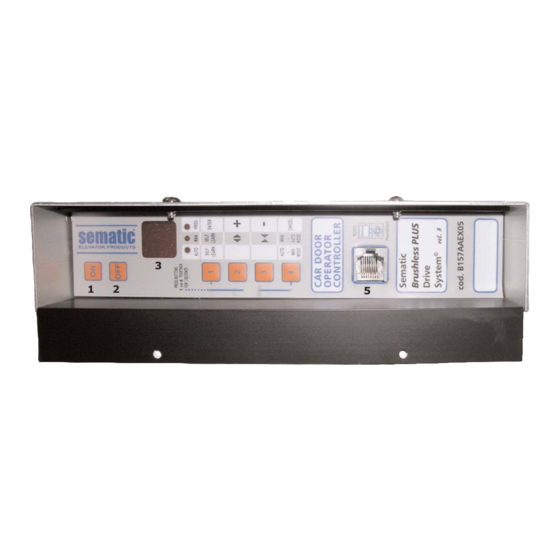
- Seite 9 (5) which can be modified by means of the door controller push but- tons or by means of the Sematic handset (an optional 8 digit keypad and display accessory which can be connected to the card by an RJ45 plug).
-
Seite 10: General Features
808-000-000 SDS © rel.3 • Edition 15 June 2009 3. GENERAL FEATURES 3.1 Technical information Sematic Drive System © (DC-PWM and AC-VVVF Brushless) MAIN SUPPLY VOLTAGE 90-290 Vac (115 V-20%, 230V+26%), 50-60 Hz TYPICAL POWER CONSUMPTION 200 VA PEAK POWER CONSUMPTION... -
Seite 11: Motor Overload Protection
808-000-000 SDS © rel.3 • Edition 15 June 2009 3.3 Technical information Sematic Drive System © Brushless Plus (AC-VVVF Brushless Plus) MAIN SUPPLY VOLTAGE 230-400 Vac ±10%, 50-60 Hz CONTROLLER POWER SUPPLY VOLTAGE 36 Vac ±10%, 50-60 Hz TYPICAL POWER CONSUMPTION... - Seite 12 808-000-000 SDS © rel.3 • Edition 15 June 2009 4 SIGNALS TO/FROM THE DOOR CONTROLLER 4.1 Sematic Drive System © (DC-PWM and AC-VVVF Brushless) connections DC-PWM © • FOR FURTHER INFORMATION REFER TO THE USER’S GUIDE • FÜR WEITERE INFORMATIONEN BENÜTZEN SIE BITTE DAS HANDBUCH •...
- Seite 13 Connector pins These connections require dry This connection is to signal the use of the 15 - 40 (voltage free) contacts. (contact Sematic E.O.D. Emergency Opening Device to open when inactive) the Door controller Handset (Optional) RJ45 connector Auxiliary Contact Kaux...
- Seite 14 • The door controller is supplied already mounted on the operator. All the connections between the door controller and the motor are pre-wired at Sematic. In order to prevent possible damage to the wiring cables by coming into contact with the drive belt, they are fixed to the header as shown in the following image (only for B105AAIX, B105AAJX, B105AAKX, B105AANX and B105AALX).
- Seite 15 Complete Connection means that the device draws its power supply from and sends the re-open signal directly and only © to the Sematic Drive System controller. It is possible to have the complete connection of detectors or photocells with a 24 Vdc max 100 mA supply and a PNP...
- Seite 16 808-000-000 SDS © rel.3 • Edition 15 June 2009 5 INSTRUCTIONS WITHOUT HANDSET Display in Automatic and Manual Mode 5.1 Automatic Mode “AUTO” • When the Door Controller is working in automatic mode the “AUTO” red led is on, whereas the other two red leds are off.
- Seite 17 808-000-000 SDS © rel.3 • Edition 15 June 2009 5.4 Verify the correct working of the controller SDS In order to verify if the controller is broken or not please follow the instruction below: INSTRUCTION CHECK 1. Remove all the connections to the controller including the power supply.
- Seite 18 808-000-000 SDS © rel.3 • Edition 15 June 2009 The following table contains the available parameters, the relevant codes, the description and the allowed modification range: Param. Default Parameter Range Note codes Reversing system choice 01 , 0 2 -> Internal ->...
-
Seite 19: Functions Available
808-000-000 SDS © rel.3 • Edition 15 June 2009 6 FUNCTIONS AVAILABLE 6.1 Reversing Parameter for managing the reversing function during the door closing cycle. This is divided into: 6.1.1 Reversing system force setting (Param. Code 09) The reverse motion torque parameter sets the sensitivity degree to detect an obstacle during the door closure, thus giving the reopening command. - Seite 20 01 -> On (function able) 6.7 AUX Output Relay (Param. Code 07) This option can be used to signal the achievement of a particular opening distance (pre-set) or as Gong while opening (device not supplied by Sematic). Note: default setting: 0 0 -> off...
- Seite 21 A magnetic switch, mounted on the Door Operator by Sematic, is connected to the 15-41 connectors and is operated by magnets mounted only on the landing doors with different door opening widths (TB)(the smaller) by means of a special support plate (see drawing).
-
Seite 22: Motor Type
6.14 Motor type Sematic Drive System rel. 3 door controller may be used with different motors as shown in § 4.1 (DC, Brushless or Brushless Plus). The door controller automatically recognizes as default the connected motor type, from the standard Sematic motor list. - Seite 23 Standard (STD) skate (Default): the speed profile setting are optimized for the Sematic standard ALU skate type. • Expansion (EXP and EXP-B) skate: the speed profile setting are optimized for the Sematic 2000 US Expansion skate type. 6.17 AUX Input (Param. Code 32) This parameter allow the choose of two possible options: 6.17.1 Disabled (default).
- Seite 24 © rel.3 • Edition 15 June 2009 6.19 Alarms The Sematic Drive System © controller has the ability to diagnose and record a number of defects; such diagnostics is very helpful to the maintenance personnel in order to locate possible operational problems.
- Seite 25 808-000-000 SDS © rel.3 • Edition 15 June 2009 7 TRIAL OPERATIONS BEFORE SETTING AT WORK To avoid damages, check that the power supply voltage be within the rated values before starting up the door con- troller Before the lift goes in operation, a self-learning cycle must be carried out and parameters must be set according to the General Options, as described in section 6 7.1 Self-learning cycle...
- Seite 26 To make this connection, ask Sematic for the appropriate adapter cod. B147AABX (see picture 3) (a 16 mm. diameter hole is required in any chosen position within the Car walls).
- Seite 27 808-000-000 SDS © rel.3 • Edition 15 June 2009 8.2 User Handset menus and submenus UPDATES PROFILE SETTINGS GENERAL OPTIONS MAINTENANCE SELF-LEARNING SOFTWARE Reversing system Fast Settings Monitor cod. 00 Opening high speed MLC Test Statistics cod. 10 cod. 01...
- Seite 28 808-000-000 SDS © rel.3 • Edition 15 June 2009 8.3 Self-learning cycle activation by means of the handset By using the handset to operate a self-learning cycle, interferences with possible signals coming from the main lift con- troller are avoided •...
- Seite 29 808-000-000 SDS © rel.3 • Edition 15 June 2009 8.6 Speed Profile and High Speed adjustments by means of the Handset • Connect the handset to RJ45 connector • If necessary, using keys choose the required language and confirm with the “OK” key •...
- Seite 30 808-000-000 SDS © rel.3 • Edition 15 June 2009 After confirming the choice by pressing the “OK” key, a 5-code password is required on the display. This selection is reserved for factory use only. Use keys to insert the codes; to select the required code and modify its value use keys 8.9 Option “Advanced Settings”...
- Seite 31 SWS SLAVE If necessary, using keys choose the required option and confirm with the “OK” key. Note: for inclined lifts that use Sematic Wireless System © please choose “SWS MASTER” or “SWS SLAVE” con- sulting the 809-000-000 Sematic SWS user manual.
- Seite 32 Is possible to save the downloaded data to a PC for using the set data in case of door controller replacements. To save the set data to a PC is necessary to have the Sematic SDS Updater kit, consisting of a E066AAYX cable and Sematic SDS ©...
-
Seite 33: General Options
808-000-000 SDS © rel.3 • Edition 15 June 2009 9 GENERAL OPTIONS • Connect the handset to RJ45 connector; • If necessary, using keys choose the required language and confirm with the “OK” key • Using keys run through the MAIN MENU and choose GENERAL OPTIONS •... - Seite 34 808-000-000 SDS © rel.3 • Edition 15 June 2009 9.4 Activation of the Main Lift Failure by means of the Handset • See § 6.3.3 for the meaning of this parameter • Using keys run through the GENERAL OPTIONS and choose the option NO MLC SIGNAL •...
- Seite 35 808-000-000 SDS © rel.3 • Edition 15 June 2009 • “BACK”: Press key F1 to restore the menu PROFILE SETTING • “MENU”: Press key F3 to restore the MAIN MENU 9.9 Fire Fighting Option setting by means of the Handset •...
- Seite 36 DC-PWM B105AAKX DC-PWM S40 V DC-PWM S30 V • For Sematic Drive System BRUSHLESS “cod. B157AAEX03” controller the default set motor is viewed on the display. • Using keys it is possible to manually chose the following motor types: Brushless B105AAJX...
-
Seite 37: Im Signal Type Setting By Means Of The Handset
808-000-000 SDS © rel.3 • Edition 15 June 2009 9.17 IM Signal type setting by means of the Handset • See § 6.18 for the meaning of this parameter • Using keys run through the GENERAL OPTIONS and choose the IM SIGNAL Option •... - Seite 38 808-000-000 SDS © rel.3 • Edition 15 June 2009 10 MAINTENANCE MENU - DIAGNOSTICS AND ALARM MANAGEMENT 10.1 Consulting the Maintenance Menu with the Handset • Connect the handset to the RJ45 connector • If necessary, using keys choose the required language and confirm with the “OK” key or confirm the sug- gested language with “OK”...
-
Seite 39: Spare Parts
The spare parts manual is extremely important to avoid misunderstandings and to ensure a rapid supply of the cor- rect spare parts. The spare parts catalogue, with photographs and details will make the Sematic doors spare parts purchase easy and quick.. - Seite 40 808-000-000 SDS © rel.3 • Edition 15 June 2009...
-
Seite 41: Inhaltsverzeichnis
808-000-000 SDS © rel.3 • Edition 15 June 2009 Inhalt 1 VORWORT Seite. 2 WAS BEDEUTET SEMATIC DRIVE SYSTEM © Seite Geschwindigkeitsprofile 3 GENERELLE EIGENSCHAFTEN Seite Technische Daten Sematic Drive System © (DC-PWM und AC-VVVF Brushless) Türsteuergerät Sematic Drive System ©... -
Seite 42: Vorbereitende Funktionsarbeiten
808-000-000 SDS © rel.3 • Edition 15 June 2009 6.15.6 PM position control 6.16 Auswahl des Typs des Mitnehmerschwerts 6.17 Eingang AUX (Param. Code 32) 6.17.1 Deaktiviert (Default) 6.17.2 % teilweise Öffnung 6.18 Anzeigentyp Richtungsumkehr (Param. Code 34) 6.18.1 Impulsweise 6.18.2 Dauer (Default) -
Seite 43: Vorwort
• Edition 15 June 2009 1 VORWORT Bei der Abfassung dieses Handbuches geht man davon aus, daß die Firma, die Sematic-Produkte einbaut oder verwen- det, folgende Vorschriften einhält: • Personen, die für den Einbau und die Instandhaltung zuständig sind, sollen über die allgemein geltenden Sicherheits- und Arbeitshygienevorschriften unterrichtet sein (89/391/EG - 89/654/EG - 89/656/EG);... -
Seite 44: Gefahren Mechanischen Ursprungs
808-000-000 SDS © rel.3 • Edition 15 June 2009 (*) nur mit Motoren: • B105AAIX - Brushless - BG62x30-SG80K • B105AAJX - Brushless - BG62x60-SG120 • B105AALX - Dc - GR63x55-SG120 • B105AANX - Dc - GR63x25-SG80K Während der Entwicklungsphase werden die Sicherheitsanforderungen wie folgt berücksichtigt (Risk Assessment): A. -
Seite 45: Was Bedeutet Sematic Drive System
808-000-000 SDS © rel.3 • Edition 15 June 2009 2 WAS BEDEUTET SEMATIC DRIVE SYSTEM © Das System besteht aus • einem Kabinentürantrieb (1) • einer Türsteuerung mit Mikroprozessoren (Türsteuergerät - 2) • einem Motor (DC mit Bürsten oder DC-Brushless ohne Bürsten 3) rück- geführt (4). -
Seite 46: Technische Daten Sematic Drive System © (Dc-Pwm Und Ac-Vvvf Brushless)
808-000-000 SDS © rel.3 • Edition 15 June 2009 3. GENERELLE EIGENSCHAFTEN 3.1 Technische Daten Sematic Drive System © (DC-PWM und AC-VVVF Brushless) SPANNUNG DER STROMVERSORGUNG 90-290 Vac (115 V-20%,230V+26%),50-60 Hz INSTALLATIONSLEISTUNG 200 VA HÖCHSTLEISTUNG 300 VA ÜBERLADUNGSSCHUTZ DES MOTORS @I n <15 Minuten... -
Seite 47: Technische Daten Sematic Drive System © Brushless Plus (Ac-Vvvf Brushless Plus)
808-000-000 SDS © rel.3 • Edition 15 June 2009 3.3 Technische Daten Sematic Drive System © Brushless Plus (AC-VVVF Brushless Plus) SPANNUNG DER STROMVERSORGUNG 230-400 Vac ±10%, 50-60 Hz SPANNUNG DER STROMV. TÜRSTEUERGERÄT 36 Vac ±10%, 50-60 Hz INSTALLATIONSLEISTUNG 500 VA oder 750 VA HÖCHSTLEISTUNG... -
Seite 48: Sematic Drive System © (Dc-Pwm Und Ac-Vvvf Brushless) Anschlüße
808-000-000 SDS © rel.3 • Edition 15 June 2009 4 INSTALLATION UND AUSZUFÜHRENDE VERBINDUNGEN 4.1 Sematic Drive System © (DC-PWM und AC-VVVF Brushless) Anschlüße DC-PWM © • FOR FURTHER INFORMATION REFER TO THE USER’S GUIDE • FÜR WEITERE INFORMATIONEN BENÜTZEN SIE BITTE DAS HANDBUCH •... -
Seite 49: Sematic Drive System © Set-Up Und Eingangs- / Ausgangssignale Des Türsteuergerätes
808-000-000 SDS © rel.3 • Edition 15 June 2009 4.3 Sematic Drive System © set-up und Eingangs- / Ausgangssignale des Türsteuergerätes cod. B105AAAX01 cod. B105AABX01 cod. B105AAAX02 cod. B105AABX02 cod. B105AANX cod. B105AALX IP23 - 1 Nm Dc IP54 - 1Nm Dc... -
Seite 50: Ausgangssignale Vom Türsteuergerät
808-000-000 SDS © rel.3 • Edition 15 June 2009 Hinweis: das Türsteuergerät Sematic Drive System © arbeitet auch mit Eingangssignalen der Aufzugssteuerung, die in einem Strombereich von 6 bis 24 Vcc stehen. Bitte dabei folgendes berücksichtigen: • die Brücke zwischen den Kontakten 37-38 entfernen •... -
Seite 51: Detektor/Lichtgitter/Fotozelle: Komplette Verbindung Zum Türsteuergerät
808-000-000 SDS © rel.3 • Edition 15 June 2009 Die Fotozelle (oder ähnliche Vorrichtungen) hat somit eine unabhängige Versorgung und gibt nur das Ausgangssignal Türsteuergerät Sematic Drive System © aus. Wiederöffnung wird über Eingaben WIEDERÖFFNUNGVORRICHTUNG, TEILWEISE WIEDERÖFFNUNG und LOGIK des Kn EINGANGS geregelt (siehe § 6.2;... -
Seite 52: Maßnahmen Zur Inbetriebnahme Ohne Gebrauch Des Handtasters
808-000-000 SDS © rel.3 • Edition 15 June 2009 5 MAßNAHMEN ZUR INBETRIEBNAHME OHNE GEBRAUCH DES HANDTASTERS Display-Anzeige der automatischen oder Handmodalität 5.1 Automatische Modalität “AUTO” • Wenn das Türsteuergerät automatisch funktioniert leuchtet das rote Led “AUTO” auf, während die anderen roten Leds ausgeschaltet sind. -
Seite 53: Funktionsprüfung Des Controllers Sds
808-000-000 SDS © rel.3 • Edition 15 June 2009 Funktionsprüfung des Controllers SDS Den einwandfreien Betrieb des Controllers nach folgender Anleitung prüfen: ANLEITUNG TEST 1. Alle Anschlüsse, einschließlich Netzkabel, vom Controller abziehen 2. Die Netzsicherung kontrollieren. Hinweis: Falls erforderlich, die Sicherung austauschen 3. - Seite 54 808-000-000 SDS © rel.3 • Edition 15 June 2009 Die anschließende Tabelle führt die einzelnen Parameter nach Code, Beschreibung und erlaubtem Ände- rungsbereich auf: Param. Default Parameter Bereich Hinweis Code Einstellung Wahl der Wiederöffnungs- 01 , 0 2 -> Intern vorrichtungs Modalität...
-
Seite 55: Anwendbare Funktionsbeschreibung
808-000-000 SDS © rel.3 • Edition 15 June 2009 6 ANWENDBARE FUNKTIONSBESCHREIBUNG Richtungsumkehr Parameter für die Verwaltung der Richtungsumkehr-Funktion während dem Schließen der Tür Unterteilt sich in: 6.1.1 Wiederöffnungsvorrichtungs Kraft (Param. Code 09) Dieser Parameter bestimmt die Sensibilität zur Erhebung eines Hindernisses während der Schließfase der Türen, um eine Öffnung zu veranlassen. -
Seite 56: Fehlende Aufzugssteuerung
01 -> On (Funktion aktiviert) 6.7 Ausgang AUX (Param. Code 07) Diese Option kann angewandt werden, um die Erreichung einer bestimmten Öffnungslaufquote (programmierbar) anzu- zeigen, oder kann als Öffnungsgong genutzt werden.(die sonore Vorrichtung wird nicht von Sematic geliefert). Hinweis: Default-Einstellung: 00 -> off... -
Seite 57: Prozentueller Öffnungsraum
Klemmen 15-22 geschlossen werden. Während der Schließfase wird der Klemmenausgang 15 (+24V) und 21 (Gnd) zur direkten Benutzung des Buzzers (Vorrichtung nicht über Sematic erhältlich) mit 24 Vdc max 100 mA oder über ein Relais aktiviert. 6.9 Fire Fighting (Param. Code 19) Die Fire Fighting Modalität ist nur bei dafür vorgesehenen Anlagen möglich, da davon auch wichtige Funktionen in der... -
Seite 58: Logik Des Kn Eingangs (Param. Code 21)
In einigen Notsituationen, wie z.B. bei fehlender Netz-Stromzufuhr, könnte es von Nutzen sein, wenn sich die Türen nach Erreichung des Ankopplungsbereichs öffnen, für einen bestimmten Zeitraum geöffnet bleiben und sich über das Öffnungs-/ Schließprofil bei fast normaler Geschwindigkeit schließen. Für diese Situation bietet Sematic als Option eine Sematic E.O.D. (Emergency Opening Device) Vorrichtung an. -
Seite 59: Pm Position Error
Verwendung mit einem Steuergerät für Aluminium-Mitnehmerschwert Sematic Standard. • Spreiz-Mitnehmerschwert (EXP und EXP-B): die Anforderungen des Geschwindigkeitsprofils sind optimiert für die Verwendung mit einem Steuergerät für Spreiz-Mitnehmerschwert Sematic 2000 US. 6.17 Eingang AUX (Param. Code 32) Der Parameter “Eingang Aux” ermöglicht die Auswahl zwischen zwei Optionen: 6.17.1. -
Seite 60: Alarm Tabelle
808-000-000 SDS © rel.3 • Edition 15 June 2009 6.19 Alarm Das Türsteuergerät Sematic Drive System © bietet die Möglichkeit eine gewisse Anzahl von anomalen Situationen auf- zunehmen und zu registrieren. Dies hilft dem Wartungsdienst, eventuelle Funktionsprobleme herauszufinden. Bei Auftreten eines monitorierten Fehlers erscheint auf dem Türsteuergerät - Display auch die Fehler-Codenummer. -
Seite 61: Aktivierung Des Selbstlernzyklus Über Türsteuergerät (Ohne Handtaster)
808-000-000 SDS © rel.3 • Edition 15 June 2009 7 VORBEREITENDE FUNKTIONSARBEITEN Zur Vermeidung von Beschädigungen des Türsteuergerätes bitte vorher prüfen, ob die Stromspannung den vorge- sehenen Werten entspricht. Vor Inbetriebnahme der Anlage bitte einen Selbstlernzyklus durchführen und die Parameter nach den gewünschten generellen Optionen einstellen, wie in §... - Seite 62 808-000-000 SDS © rel.3 • Edition 15 June 2009 8. AKTIVIERUNG DER FUNKTION ÜBER HANDTASTER 8.1 Handtaster (Option) Vorschlag! Auch wenn der Handtaster direkt an das Türsteuergerät auf dem Kabinendach ange- schlossen werden kann (siehe Foto 1), ist es aus Sicherheitsgründen ratsam, einen Direktanschluss im Kabineninnern vorzusehen (siehe Foto 2).
-
Seite 63: Menu Und Untermenu Des Handtasters
808-000-000 SDS © rel.3 • Edition 15 June 2009 8.2 Menu und Untermenu des Handtasters PROFIL- GENERELLE SOFTWARE WARTUNG SELBSTLERNZYKLUS EINSTELLUNG OPTIONEN UPGRADE Umkehrvorrichtungswahl Schnelle Einstellung Monitor Code 00 Schnelle Öffnungsge- Aufzugssteuerungstest Statistik schwindigkeit Code 10 Code 01 Langsame Öffnungsge-... -
Seite 64: Einstellung Der Wiederöffnungsvorrichtungs-Kraft Über Handtaster
808-000-000 SDS © rel.3 • Edition 15 June 2009 8.3 Aktivierung des Selbstlernzyklus über Handtaster Bei Aktivierung des Selbstlernzyklus über Handtaster lassen sich Störungen vermeiden, die von Signalen der Aufzugssteuerung ausgehen könnten. • das System unter Strom stellen • Türsteuergerät “ON” einschalten; bei vorhandenen Schließ- oder Öffnungssignalen, die von der Aufzugssteuerung ausgehen, führt der Kabinentürantrieb einen Reset-Zyklus in langsamer Geschwindigkeit bis zum Anschlag aus. -
Seite 65: Geschwindigkeitsprofile Und Regulierung Der Hohen Geschwindigkeit Mit Handtaster
808-000-000 SDS © rel.3 • Edition 15 June 2009 8.6 Geschwindigkeitsprofile und Regulierung der hohen Geschwindigkeit mit Handtaster • den Handtaster an Verbindung RJ45 anschließen • über Taster die gewünschte Sprache einstellen und mit Taster OK bestätigen. • über Taster im HAUPTMENU auf PROFILEINSTELLUNG gehen •... - Seite 66 808-000-000 SDS © rel.3 • Edition 15 June 2009 Eingabe. Diese Option ist nur für den Hersteller. Zur Eingabe der Password-Ziffern bitte Taster oder benutzen, zur Zahleneingabe oder Änderung ist Taster oder zu benutzen. 8.9 Option “Avansierte Einstellung” • den Handtaster an Verbindung RJ45 anschließen •...
- Seite 67 Über Taster ist die gewünschte Option anzuwählen und mit Taster OK zu bestätigen. Hinweis: bei schrägen Anlagen, bei denen das Sematic Wireless System vorgesehen ist, sind die Optionen "SWS MASTER" und "SWS SLAVE" unter Anweisung des Handbuchs 809-000-000 Sematic SWS einzustellen.
- Seite 68 Warten, bis die Meldung "Download OK" auf dem Handtaster erscheint. 8.8.9 Option "Daten Upload" Mit dieser Option können vorher auf einem Handtasters SDS rel. 3 gespeicherte Daten auf ein neues Türsteuergerät SDS rel. 3 abgeladen werden. Beim Aktivieren dieser Option kann gewählt werden, ob nur das Geschwindigkeitsprofil ("Profileinstellung") oder die generellen Einstelloptionen übertragen werden sollen.
-
Seite 69: Aktivierungseinstellung Der Umkehrvorrichtung Über Handtaster
808-000-000 SDS © rel.3 • Edition 15 June 2009 GENERELLE OPTIONEN • den Handtaster an die Verbindung RJ45 anschließen • Über Taster die gewünschte Sprache einstellen und mit Taster OK bestätigen. • Mit Taster im HAUPTMENU auf GENERELLE OPTIONEN gehen •... -
Seite 70: Aktivierungseinstellung Der Fehlenden Aufzugssteuerung Mit Handtaster
808-000-000 SDS © rel.3 • Edition 15 June 2009 9.4 Aktivierungseinstellung der fehlenden Aufzugssteuerung mit Handtaster • Die Aussage dieses Parameters ist in § 6.4.3 wiedergegeben • Über Taster im Menu GENERELLE OPTIONEN zur Option FEHLENDE AUFZUGSSTEUERUNG gehen. • Taster “OK” zur Bestätigung drücken •... -
Seite 71: Aktivierungseinstellung Der Option Fire Fighting Mit Handtaster
808-000-000 SDS © rel.3 • Edition 15 June 2009 Taster die Eingabe ändern, wie auf der rechten Seite im Display angegeben. Mit Taster "OK" bestätigen. Das Display zeigt die bestätigte Option an und geht ins HAUPTMENU zurück. • folgende Optionen sind einstellbar: •... -
Seite 72: Aktivierungseinstellung Der Motorwahl Mit Handtaster
Brushless B105AAJX Brushless B105AAIX Brushless B105AAHX • Für die Version BRUSHLESS PLUS des Türsteuergeräts Sematic Drive System "cod. B157AAEX05" ist nur der Motor B105AAGX vorgesehen. 9.14 Aktivierungseinstellung der Stationierungsart in Schließung über Handtaster • Die Aussage dieses Parameters ist § 6.15 wiedergegeben •... -
Seite 73: Einstellung Des Anzeigetyps Richtungsumkehr Mit Handtaster
808-000-000 SDS © rel.3 • Edition 15 June 2009 9.17 Einstellung des Anzeigetyps Richtungsumkehr mit Handtaster • Für die Bedeutung dieser Parameter siehe § 6.18 • Mit den Tasten im Menü Generelle Optionen die Option ANZEIGETYP IM einstellen • Bestätigen mit Drücken der Taste "OK"... -
Seite 74: Einsicht In Das Menu Wartung Mit Handtaster
808-000-000 SDS © rel.3 • Edition 15 June 2009 10 WARTUNGSMENU - DIAGNOSE UND ALARMDATEN 10.1 Einsicht in das Menu Wartung mit Handtaster • den Handtaster an die Verbindung RJ45 anschließen • Über Taster ã und ä die gewünschte Sprache einstellen und mit Taster OK bestätigen. -
Seite 75: Türsteuergerät Software Up-Grade
• Überprüfung und Säuberung der Kabelanschlüsse des Motors und des Encoders des Motors. 13 ERSATZTEILE Über unseren ERSATZTEILKATALOG können die zum Sematic Drive System © gehörenden Ersatzteile angefordert wer- den. Bitte nennen Sie dazu die cod-Nummer und die gewünschte Stückzahl. -
Seite 76: Description Of The Proposed Revision Beschreibung Des Änderungs-Vorschlages
VORGESCHLAGENE LÖSUNG Note: for changes or additions to the product, please see the foreword of this handbook. Sematic will not accept any debit note and will not be responsable for changes which have been made without our written approval. Hinweis: für Produkt-Änderungen oder Zusätze gilt das im Vorwort dieses Handbuch beschriebene. - Seite 77 808-000-000 SDS © rel.3 • Edition 15 June 2009 Date Notes Datum Anmerkungen...
- Seite 78 808-000-000 SDS © rel.3 • Edition 15 June 2009 Date Notes Datum Anmerkungen...
- Seite 80 UNI EN ISO 9001 APPROVED BY IMQ 0051 LIFT DIRECTIVE 95/16/EC ANNEX IX (Module H) ISO 14001 A MEMBER OF...