Linksys Wireless-G Kurzanleitung
Installation guide wrk54g (eu/la/uk) b
Vorschau ausblenden
Andere Handbücher für Wireless-G:
- Kurzanleitung (48 Seiten) ,
- Benutzerhandbuch (86 Seiten) ,
- Kurzanleitung (48 Seiten)
Inhaltsverzeichnis
Verfügbare Sprachen
Verfügbare Sprachen
Quicklinks
A Division of Cisco Systems, Inc.
4 ,
2
GHz
802.11g
Wireless
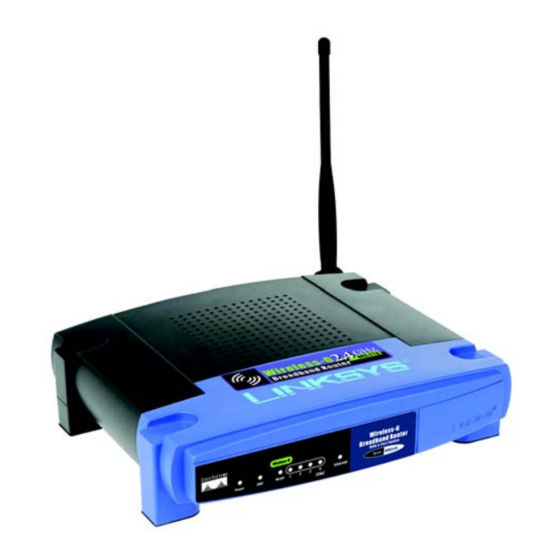
WRK54G (EU/LA/UK)
Model No.
®
Package Contents*
• Wireless-G Broadband Router
• Setup CD-ROM (with Symantec
Internet Security)
• User Guide on CD-ROM (English
Only)
• Power Adapter
• Ethernet Network Cable
• Quick Installation Guide
*other items may be included
Wireless-G
Broadband Router
Quick Installation Guide
1
Inhaltsverzeichnis

Verwandte Anleitungen für Linksys Wireless-G


Inhaltszusammenfassung für Linksys Wireless-G
- Seite 28 ® A Division of Cisco Systems, Inc. Lieferumfang* • Wireless-G Broadband-Router • Eine Installations-CD-ROM mit Symantec Internet Security. • Benutzerhandbüch auf CD-ROM (nur auf Englisch verfügbar) • Netzteil • Ethernet-Netzwerkkabel • Kurzanleitung * Der Lieferumhang kann u. U. variieren. Wireless-G 802.11g...
- Seite 29 Verbinden des Broadband Routers Stellen Sie zunächst sicher, dass Sie die Setup-Informationen für Ihre Internetverbindung zur Hand haben. Diese Informationen sollten Sie von Ihrem Internet-Dienstanbieter (ISP) bei der Installation Ihrer Breitband- Verbindung erhalten haben. Wenn diese Einstellungsdaten nicht zur Verfügung stehen, fordern Sie sie von Ihrem ISP an.
- Seite 30 Verbinden Sie Ihr Kabel- oder DSL- Modem mit einem anderen Ethernet-Netzwerkkabel über einen anderen Internet-Port auf der Rückseite des Routers. Dies ist der einzige Port, der für eine Modemverbindung verwendet werden kann. Schalten Sie das Kabel- oder DSL-Modem ein. Schließen Sie den Netzteil an den Stromanschluss des Routers an, und stecken Sie das andere Ende in eine Netzsteckdose.
-
Seite 31: Konfigurieren Des Broadband-Router
Konfigurieren des Broadband-Router In diesen Anweisungen wird erklärt, wie Sie den Router konfigurieren. Sie müssen den Router nur einmal konfigurieren. HINWEIS: Stellen Sie sicher, dass der Ethernet-Adapter Ihres PCs so eingestellt ist, dass er automatisch eine IP-Adresse bezieht. Weitere Informationen hierzu finden Sie in der Windows-Hilfe. -
Seite 32: Statische Ip-Adresse
Internet-Konfigurationstyp DHCP: Wenn Sie eine Verbindung über DHCP DHCP bzw. über eine dynamische IP- Adresse Ihres ISPs herstellen, behalten Sie die Standardeinstellung Obtain an IP automatically (IP-Adresse automatisch beziehen) bei. Statische IP-Adresse: Wenn Ihnen Ihr ISP eine statische IP-Adresse zuweist, wählen Sie aus dem Dropdown-Menü... - Seite 33 zu Ihrem ISP Keep Alive (Verbindung aufrecht halten), oder wählen Sie Connect on Demand (Bei Bedarf verbinden), falls die Verbindungszeit mit Ihrem ISP gebührenpflichtig ist. Telstra (HBS): Telstra (Heart Beat Signal) ist ein Dienst, der nur in Australien verwendet wird. Wenn Sie eine HBS- Verbindung verwenden, klären Sie die Telstra erforderlichen Setup-Informationen mit...
- Seite 34 Starten Sie Ihren Computer neu. Überprüfen Sie die Installation, HINWEIS: Informationen zu erweiterten indem Sie den Web-Browser öffnen Einstellungen und Sicherheitsoptionen und Folgendes eingeben: finden Sie im Benutzerhandbuch auf der http://www.linksys.com/registration. CD-ROM des Routers. Die Installation des Wireless-G Broadband-Routers ist abgeschlossen.
-
Seite 35: Konfigurieren Von Wireless-Sicherheit
Konfigurieren von Wireless-Sicherheit Auf dem Router können vier Wireless- Sicherheitstypen eingerichtet werden: WEP , WPA Pre-Shared (WPA Vorläufiger gemein- samer Schlüssel), WPA Enterprise und Radius. Diese Sicherheitseinstellungen sind jedoch nicht sofort nach Kauf des Geräts aktiviert. Wenn Sie die Wireless-Sicherheit auf dem Router konfigurieren möchten, führen Sie folgende Schritte aus: Öffnen Sie das webbasierte... -
Seite 36: Schlüssel) Sicherheitseinstellungen
E-Mail weitere Unterstützung anfordern. Website http://www.linksys.com/international Produktregistrierung http://www.linksys.com/registration Linksys ist eine eingetragene Marke bzw. eine Marke von Cisco Systems, Inc. und/oder deren Zweigunternehmen in den USA und anderen Ländern. Copyright © 2005 Cisco Systems, Inc. Alle Rechte vorbehalten. WRK54G-DE_V2-QIG-51114 TE...