Werbung
Quicklinks
Bright Starts
™
9219 WS
#
5-in-1 Swingin' Safari
™
Baby's Play Place
™
IMPORTANT! KEEP FOR FUTURE REFERENCE.
¡IMPORTANTE! CONSÉRVELO PARA REFERENCIA FUTURA.
IMPORTANT ! À CONSERVER POUR CONSULTATION ULTÉRIEURE.
WICHTIG! ZUM SPÄTEREN NACHSCHLAGEN AUFBEWAHREN.
IMPORTANTE! GUARDE PARA REFERÊNCIA FUTURA.
ВАЖНО! СОХРАНИТЕ ДЛЯ СПРАВКИ.
®
MANUFACTURED FOR • FABRIQUÉ POUR
• ©2014 KIDS II, INC. • www.kidsii.com/customerservice
KIDS II, INC., ATLANTA, GA USA 30305 • 1-800-230-8190
KIDS II CANADA CO. TORONTO, ONTARIO CANADA M2J 5C2 • 1-800-230-8190
KIDS II AUSTRALIA PTY LIMITED CASTLE HILL, NSW AUSTRALIA 2154 • (02) 9894-1855
KIDS II JAPAN K.K. SHINJUKU-KU, TOKYO, JAPAN, 163-0529 • (03) 5322-6081
KIDS II US MÉXICO S.A. DE C.V. AVE. VASCO DE QUIROGA NO. 3900 – 905A COL. LOMAS DE SANTA FE • CUAJIMALPA DE MORELOS,
MÉXICO D.F. • C.P. 05300 • (55) 5292-8488
KIDS II UK LTD. 725 CAPABILITY GREEN, LUTON, BEDFORDSHIRE, UK, LU1 3LU • +44 01582 816 080
EN • ES • FR • DE • PT • RU • 9219_6WS_IS_091313 • Printed in China • Imprimé en Chine
Werbung

Verwandte Anleitungen für Bright Starts 5-in-1 Swingin’ Safari Baby’s Play Place


Inhaltszusammenfassung für Bright Starts 5-in-1 Swingin’ Safari Baby’s Play Place
- Seite 1 Bright Starts ™ 9219 WS 5-in-1 Swingin’ Safari ™ Baby’s Play Place ™ IMPORTANT! KEEP FOR FUTURE REFERENCE. ¡IMPORTANTE! CONSÉRVELO PARA REFERENCIA FUTURA. IMPORTANT ! À CONSERVER POUR CONSULTATION ULTÉRIEURE. WICHTIG! ZUM SPÄTEREN NACHSCHLAGEN AUFBEWAHREN. IMPORTANTE! GUARDE PARA REFERÊNCIA FUTURA. ВАЖНО! СОХРАНИТЕ ДЛЯ СПРАВКИ.
- Seite 2 WARNING • ADVERTENCIA • AVERTISSEMENT To Prevent Serious Injury or Death: • Adult supervision required. • Do NOT leave child unattended while in use. • Do NOT allow babies to sleep on this product. • Do NOT use in crib, play yard, etc.
- Seite 3 CAUTION • PRECAUCIÓN • MISE EN GARDE • The toy bars are under tension. To avoid injury, grasp firmly and release the tension slowly. • Las barras de juguetes están bajo tensión. Para evitar lesiones, tómelas con firmeza y libere la tensión lentamente.
- Seite 4 Para evitar ferimentos graves ou morte: • É necessária a supervisão de um adulto. • NÃO deixe a criança sozinha enquanto estiver usando o produto. • NÃO permita que bebês durmam sobre este produto. • NÃO utilize no berço, cercado, etc. •...
- Seite 5 WICHTIG • IMPORTANTE • ВАЖНО! • Zusammenbau muss von einem Erwachsenen vorgenommen werden. • Il montaggio deve essere effettuato da un adulto. • Сборка должна осуществляться взрослым. Parts List and Drawing • Lista de partes 9219 y dibujo • Liste de pièces et dessin • Teileliste und Zeichnung •...
-
Seite 6: Beschreibung
Anz. N° Qtd. Beschreibung Descrição Описание № Кол- во Spielmatte mit Tapete de brincar Игровой мат с Stoffwänden com paredes de тканевыми стенками tecido Innenwand mit Seção da parede Секция внутренней Laschen interna com lingue- стенки со шпонками Innenwand mit Seção da parede Секция... - Seite 7 – 7 –...
-
Seite 8: Инструкции По Сборке
Assembly Instructions • Instrucciones para armarlo • Instructions d’assemblage • Montageanleitung • Instruções de Montagem • Инструкции по сборке Arrange the inner wall sections with tabs and slots into two pairs as shown. Acomode las secciones de las paredes internas con Slots Tabs pestañas y ranuras... - Seite 9 Unfold the play mat and place it on a flat surface with the printed (colorful) side facing down. Extienda la colchoneta de actividades y colóquela sobre una superficie plana con el lado impreso (colorido) hacia abajo. Déplier le tapis de jeu et le placer sur une surface plane avec le côté imprimé (coloré) tourné...
- Seite 10 Correct (smooth side down) Correcto (lado liso hacia abajo) Correct (côté soyeux vers le bas) Korrekt (glatte Seite nach unten) Correto (lado macio voltado para baixo) Правильно (гладкой стороной вниз) “This side away from child” “Este lado debe estar alejado del niño”...
- Seite 11 Repeat Steps 4 and 5 for the short inner walls. Repita los pasos 4 y 5 para las paredes internas cortas. Répéter les étapes 4 et 5 pour les parois internes courtes. Schritte 4 und 5 für die inneren Querwände wiederholen. Repita as Etapas 4 e 5 para as paredes internas curtas.
- Seite 12 Tilt a short wall and long wall into the vertical position. At the corner where the walls meet, press the triangular fabric flap onto the short wall to connect the walls. Repeat at the other three corners. Incline una pared corta y una pared larga de modo que queden en posición vertical.
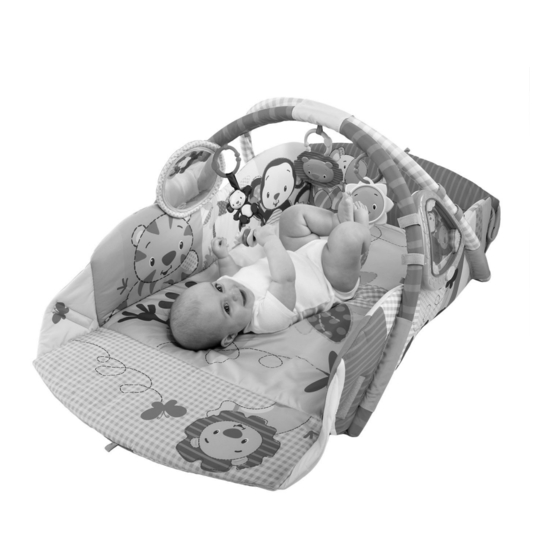
- Seite 13 Adapting the Play Environment • Cómo adaptar el ambiente de juego • Adapter l’environnement de jeu • Anpassen der Spielumgebung • Adaptando o Ambiente de diversão Адаптация игровой среды • Choose the configuration(s) that best matches the developmental stage of your child and the desired play activity.
- Seite 14 Newborn, crawling Baby, sitting Recién nacido, gateando Bebé, sentado Nouveau né, rampant Bébé, assis Neugeborenes in Krabbellage Kleinkind, sitzend Recém-nascido, engatinhando Bebê, sentado Для новорожденного, для Для младенца, для сидения ползания Toy Bar Installation • Instalación de la barra de juguetes Installation de la barre de jouets •...
- Seite 15 Toy loop Lazo para juguetes Boucle jouet Spielzeugschlaufe Alça do brinquedo Петля для игрушек Hold the toy bars above the walls. Insert the ends of the toy bar into the fabric sleeves outside the walls. Coloque las barras de juguetes sobre los laterales. Inserte los extremos de la barra de juguetes dentro de las mangas de tela en la parte exterior de las paredes.
- Seite 16 Fasten the A-hooks on the toy bar ends to the fabric loops on the mat. Ajuste los ganchos en forma de A en los extremos de la barra de juguetes a los lazos de tela de la colchoneta. Attacher les crochets A sur les extrémités des barres de jouets aux boucles en tissu sur le...
- Seite 17 Place the toy bars near the mat as shown. The fabric toy loops must point downward, toward the floor. Coloque las barras de juguetes en la colchoneta como se muestra. Los lazos de tela para juguetes deben apuntar hacia abajo, en dirección a la colchoneta. Placer les barres de jouets sur le tapis comme illustré.
- Seite 18 Fasten the A-hooks on the toy bar ends to the fabric loops on the mat. Ajuste los ganchos en forma de A en los extremos de la barra de juguetes a los lazos de tela de la colchoneta. Attacher les crochets A sur les extrémités des barres de jouets aux boucles en tissu sur le tapis.
- Seite 19 Battery Installation • Instalación de las Baterias • Installation des • Piles Installation der Batterien • Colocação das pilhas • Установка батарей The musical toy requires (2) size AA/LR6 (1.5v) alkaline batteries (not included). CAUTION: Follow the battery guidelines in this section. Otherwise, battery life may be shortened or the batteries may leak or rupture.
- Seite 20 • Saque las baterías gastadas del compartimiento para baterías. • Nunca intente recargar una batería, a menos que indique específicamente que es “recargable”. • Las baterías recargables deben retirarse del juguete antes de recargarse. • Las baterías recargables sólo deberán recargarse con la supervisión de un adulto. •...
- Seite 21 • Verbrauchte Batterien aus dem Batteriefach entfernen. • Neue Batterien nicht zusammen mit alten verwenden. • Keine unterschiedlichen Größen kombinieren (AAA, AA, C, D usw.). • Es sollte niemals versucht werden, eine nicht eindeutig als „wiederaufladbar“ gekennzeichnete Batterie aufzuladen. • Wiederaufladbare Batterien müssen zum Aufladen aus dem Spielzeug genommen werden. •...
- Seite 22 • Следует использовать только батареи одного и того же или эквивалентного типа. • Вставьте батареи так, чтобы полярность каждой из них соответствовала отметкам в отделении для батарей. • Не замыкайте накоротко контакты батарей. • Не храните батареи в местах с экстремальными температурами (например, на чердаках, в...
- Seite 23 Use a Phillips screwdriver to loosen the screw that secures the battery cover. Use un destornillador Phillips para aflojar el tornillo que sujeta la tapa del compartimiento de baterías. Desserrer la vis qui retient le cache du compartiment des piles à l’aide d’un tournevis cruciforme. Die Schraube in der Batteriefachabdeckung mit einem Kreuzschlitz-Schraubendreher lösen.
- Seite 24 Replace the battery cover on the musical toy and tighten the screw. Do not overtighten. Vuelva a colocar la tapa de las baterías en el el juguete musical y ajuste el tornillo. No apriete demasiado. Remettre le cache du compartiment à piles en place sur le jouet musical et serrez la vis.
- Seite 25 Operating Instructions • Instrucciones de funcionamiento • Mode d’emploi • Bedienungsanleitung • Instruções de operação • Инструкции по эксплуатации Play Button Botón de Reproducción Touche de lecture Speiltaste Botão Play Кнопка воспроизведения Power/Volume Switch Interruptor de Encendido/Volumen Interrupteur de mise en marche/Commande vol- Betriebsschalter/Lautstärke Interruptor de força/volume Переключатель...
- Seite 26 Motion Mode – In Motion Mode, movement of the musical toy plays a short, randomly selected melody. Motion that occurs during playback will skip to the next song in the list. Melody Mode – The musical toy plays a randomly selected melody, followed by the remaining melodies.
- Seite 27 Bewegungsmodus – Im Bewegungsmodus wird durch die Bewegung der die musikspielzeug eine zufällig ausgewählte Melodie abgespielt. Bewegungen während des Abspielens bewirken, dass zum nächsten Lied in der Liste gewechselt wird. – Melodiemodus Die musikspielzeug spielt eine zufällig ausgewählte Melodie, gefolgt von den restlichen Melodien. Nach 21 Minuten Musik schaltet sich das Gerät automatisch ab.
- Seite 28 Attaching the Toys • Cómo sujetar los juguetes • Fixation des jouets • Anbringen der Spielzeuge • Como prender os brinquedos • Установка игрушек • Toy bars – Attach the musical toy to the toy bars at either side of the mat. Route the upper two straps through the fabric loops and around the toy bars.
- Seite 29 Attaching Toys to the Play Place ™ Cómo sujetar juguetes al Play Place • Fixation des jouets ™ au Play Place • Anbringen von Spielzeugen am Play Place ™ ™ Fixando os brinquedos ao Play Place™ • Закрепление игрушек на Play Place™ Toy loop Lazo para juguetes Fun Link...
- Seite 30 Tapis : Retirer la barre de jouets, les jouets et de le jouet musical avant le lavage. Retirer également les parois internes des pochettes en tissu. Serrer toutes les san- gles auto-agrippantes. Lavage en machine à l’eau froide et détergent doux ; eau de Javel interdite.
- Seite 31 FCC Statement / CAN ICES-3 (B) / NMB-3(B) This device complies with Part 15 of the FCC rules. Operation is subject to the following two conditions: 1 this device may not cause harmful interference, and 2 this device must accept any interference received, including interference that may cause undesired operation.