Herunterladen Inhalt Inhalt Diese Seite drucken
reer BeeConnect Plus Gebrauchsanleitung

reer BeeConnect Plus Gebrauchsanleitung

Digitales babyphone
Inhaltsverzeichnis

Werbung

Verfügbare Sprachen
  • DE

Verfügbare Sprachen

  • DEUTSCH, seite 4
BeeConnect Plus digitales Babyphone
Gebrauchsanleitung // Art.Nr.: 50120
BeeConnet Plus babyphone numérique
FR
Mode d'emploi // Réf. : 50120
BeeConnet Plus babyphone digital
Instrucciones de uso // N° d'art.: 50120
BeeConnet Plus digitální dětská chůva
Návod k použití // Obj. č.: 50120
BeeConnet Plus digital baby monitor
Instruction manual // Art. no.: 50120
BeeConnet Plus babyphone digitale
Istruzioni per l'uso // N. art.: 50120
BeeConnet Plus digitale babyfoon
Gebruiksaanwijzing // Art.nr.: 50120
BeeConnet Plus digitalni monitor za bebe
Uputstvo za upotrebu// Art.br.: 50120

Werbung

Inhaltsverzeichnis
loading

Inhaltszusammenfassung für reer BeeConnect Plus

  • Seite 1 BeeConnect Plus digitales Babyphone BeeConnet Plus digital baby monitor Gebrauchsanleitung // Art.Nr.: 50120 Instruction manual // Art. no.: 50120 BeeConnet Plus babyphone digitale BeeConnet Plus babyphone numérique Mode d‘emploi // Réf. : 50120 Istruzioni per l‘uso // N. art.: 50120...
  • Seite 2: Inhaltsverzeichnis

    Inhaltsverzeichnis Technische Daten und Funktion ....04 Reichweitenkontrolle / ECO Modus ....10 Allgemeine Sicherheitshinweise .
  • Seite 3 Índice Especificaciones técnicas y funcionamiento..52 Control del alcance / Modo ECO ....58 Indicaciones generales de seguridad ... . . 53 Sensibilidad del micrófono / Interfono .
  • Seite 4: Technische Daten Und Funktion

    BeeConnect Plus digitales Babyphone Herzlichen Glückwunsch zum Erwerb Ihres neuen reer Babyphones. Das digitale Audio Babyphone überträgt die Geräusche Ihres Babys dank des hochempfindlichen Mikrofons kristallklar und zuverlässig. Die moderne 2,4 GHz- Technologie garantiert eine störungsfreie Übertragung und gewährleistet eine sichere und private Verbindung.
  • Seite 5: Allgemeine Sicherheitshinweise

    Allgemeine Sicherheitshinweise ! Überprüfen Sie vor jeder Benutzung das Gerät auf offensichtliche Beschädigungen. Sollten Sie Schäden feststellen, darf dieses Gerät nicht verwendet werden. ! Stellen Sie sicher, dass die Betriebsspannung der Steckdose, der des Netzteils entspricht. Prüfen Sie, insbesondere auf einer Auslandsreise, ob die lokale Netzspannung mit der angegebenen Spannung auf den Geräten bzw. den Netzteilen übereinstimmt.
  • Seite 6: Lieferumfang

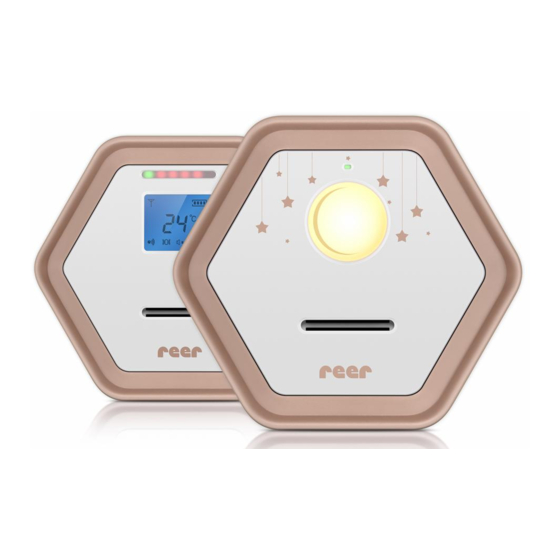
    Lieferumfang 2 x Akkus für Elterneinheit 1 x Babyeinheit (Sender) 1 x Elterneinheit (Empfänger) Bedienungsanleitung 1x USB-Adapter 2 x USB-Kabel Gerätebeschreibung Elterneinheit Lautstärkeregelung (+/-) Ein-/Ausschalter Elterneinheit TALK Ein-/Ausschalter Mikrofon Display Schlaflieder Buchse für Netzteil Lautsprecher Ein-/Ausschalter Gürtelclip und Batteriefach Nachtlicht Status-LED / Talk-Taste für Geräuschanzeige-LEDs...
  • Seite 7: Display Elterneinheit

    Display Elterneinheit Batteriestatus-Anzeige Verbindungs-Anzeige Temperatur-Anzeige Anzeige bei aktivierter Einschlafmusik Anzeige bei aktiviertem Nachtlicht Lautstärke-Anzeige Anzeige bei gedrückter Talk-Taste Anzeige bei aktiviertem Vibrationsalarm Gerätebeschreibung Babyeinheit Lautstärkeregelung (+/-) Ein-/Ausschalter Mikrofonempfindlich- Babyeinheit keits-Schalter (HI / LOW) Pager-Taste PAGER Status-LED Integriertes Buchse Batteriefach Ein-/Ausschalter Nachtlicht für Netzteil Schlaflieder...
  • Seite 8: Inbetriebnahme

    Inbetriebnahme Verwenden Sie nur Netzteile, die mit 5V und mindestens 200 mA arbeiten. Um sicherzustellen, dass das Gerät bei einem Stromausfall betriebsbereit bleibt, empfehlen wir zusätzlich NiMH-Akkus einzulegen. Diese werden in der Elterneinheit bei Anschluss an die Stromversorgung automatisch aufgeladen. Achtung: Beachten Sie die Hinweise im Kapitel „Betrieb mit Akkus“...
  • Seite 9: Betrieb Mit Akkus

    Inbetriebnahme TIPP Sie können die Elterneinheit mithilfe des Gürtelclips an Ihrem Gürtel befestigen. Die Status-LEDs geben den Zustand der Elterneinheit an. LED-Status LED-Anzeige Einstellung LED 1 grün Elterneinheit ist eingeschaltet / Verbindung ist vorhanden grün blinkend Elterneinheit ist eingeschaltet, Verbindung ist vorhanden / Batterien werden geladen orange Elterneinheit ist ausgeschaltet /...
  • Seite 10: Vox- Und Eco-Modus

    Betrieb mit Akkus Um sicherzustellen, dass das Gerät bei einem Stromausfall betriebsbereit bleibt, empfehlen wir zusätzlich Akkus einzulegen. In der Elterneinheit werden diese bei Anschluss an die Stromversorgung automatisch aufgeladen. Der Ladevorgang dauert ca. 10 Stunden bei ausgeschaltetem Gerät. Hinweis: Verwenden Sie nur wiederaufladbare NiMH Akkus in der Elterneinheit.
  • Seite 11: Mikrofonempfindlichkeit / Gegensprechfunktion

    Mikrofonempfindlichkeit Das Babyphone verfügt über zwei auswählbare Mikrofonempfindlichkeits- stufen. Schalten Sie die Mikrofonempfindlichkeit an der Babyeinheit auf „HI“, falls Sie schon beim leisesten Geräusch alarmiert werden wollen oder sich die Babyeinheit zu weit entfernt vom Babybett befindet. Steht die Mikrofonemp- findlichkeit auf dem Status „LOW“...
  • Seite 12: Lautstärkeregelung An Der Elterneinheit

    Lautstärkereglung / Vibrationsalarm Über die Babyeinheit wird die Lautstärke der Gegensprechfunktion reguliert. Die Lautstärke der Einschlaflieder kann sowohl über die Elterneinheit als auch die Babyeinheit gesteuert werden. Lautstärkeregelung an der Elterneinheit Empfängerlautstärke an der -Taste kurz drücken Elterneinheit wird erhöht. Empfängerlautstärke an der -Taste kurz drücken Elterneinheit wird verringert.
  • Seite 13: Tipps Zur Erweiterung Des Empfangsbereiches

    Pager-Funktion PAGER Drücken Sie den Suchschalter an der Babyeinheit. Die Elterneinheit meldet sich nach Betätigen der Taste mit einen akustischem Rufsignal und blinkenden Kontrollleuchten. Zum Beenden der Suchfunktion drücken Sie eine beliebige Taste an der Elterneinheit, die Kontrollleuchten erlischen, der Alarm wird beendet. HINWEIS: Die Suchfunktion ist nur möglich, wenn beide Einheiten eingeschaltet sind und sich innerhalb des Emp- fangsbereiches befinden.
  • Seite 14: Mögliche Ursache

    Problembehebung Problem Mögliche Ursache Maßnahme • Akkus sind erschöpft. • Wechseln/Laden Sie die Akkus und/oder schliessen Status LED blinkt rot Sie das Gerät an die Stromversorgung an. im eingeschalteten Zustand mit Signalton • Akkus werden geladen. • Keine Maßnahme notwendig. Status LED blinkt rot- grün im ausgeschalte- ten Zustand...
  • Seite 15: Garantie / Entsorgungshinweise

    Alle technischen Daten, Informationen sowie Eigenschaften des in diesem Werk beschriebenen Produktes wurden nach bestem Wissen zusammengestellt und entsprechen dem Stand bei Veröffentlichung. Die von reer bereitgestellten Informationen sollten korrekt und zuverlässig sein. Die Firma reer übernimmt dennoch keinerlei Haftung für mögliche Fehler in diesem Dokument und behält sich das Recht vor, ohne vorherige Ankündigung, Änderungen...
  • Seite 16: Technical Information And Function

    We are sure you will enjoy the quality of our product for many years to come. Please take a few minutes to read through the safety instructions carefully. You will only be able to use the reer baby monitor with confidence if all of the points mentioned here have been checked.
  • Seite 17: General Safety Instructions

    General safety instructions ! Check the unit for visible damage before each use. If you detect any damage, do not use the unit. ! Make sure that the operating voltage of the power outlet matches that of the mains adapter. Check - especially when travelling abroad - that the local mains voltage matches the voltage specified on the units and/or mains adapters.
  • Seite 18: Scope Of Delivery / Device Description Parent Unit

    Scope of delivery 2 x rechargeable batteries 1 x baby unit (transmitter) 1 x parent unit (receiver) for parent unit instruction manual 1x USB adaptor 2 x USB cable Device description parent unit volume control (+/-) on/off switch parent unit TALK on/off switch microphone...
  • Seite 19: Parent Unit Display

    Parent unit display battery status display connection display temperature display display with activated snooze music display with activated night light volume display display with pressed talk key display with activated vibration alert Device description baby unit volume control (+/-) on/off switch microphone sensitivity baby unit control (HI / LOW)
  • Seite 20: Before First Use

    Before first use Only the supplied adapter which operate with 5V and at least 200 mA may be used. We recommend also inserting NiMH batteries to ensure that the units remain operational in case of a power failure. These will be automatically charged when the parent unit is connected to a power supply.
  • Seite 21: Battery Operation

    Before first use You can attach the parent unit to your belt with the belt clip. The status LEDs reflect the condition of the parent unit. LED status LED display Setting LED 1 green parent unit is switched on/connection is available green flashing parent unit is switched on/connection is available/bat- teries are being charged...
  • Seite 22: Range Control / Eco Mode

    Battery operation We recommend also inserting rechargeable batteries to ensure that the units remain operational in case of a power failure. These will be automatically charged when the parent unit is connected to a power supply. The batteries take approximately 10 hours to charge (with the device switched off ). Attention: Only use rechargeable NiMH batteries in the parent unit.
  • Seite 23: Microphone Sensitivity / Intercom Function

    Microphone sensitivity The baby monitor has two selectable levels of sensitivity for the microphone. Switch the microphone sensitivity on the baby unit to “HI” if you would like to be notified even at the slightest sound, or the baby unit is too far away from the cot.
  • Seite 24: Volume Control / Vibrating Alert

    Volume adjustment / Vibration alert The volume of the intercom function is adjusted via the baby unit. The volume for the lullabies can be adjusted either on the parent unit or on the baby unit. Volume on the parent unit Receiver volume on the parent tap the unit is increased.
  • Seite 25: Pager Function / Tips / Cleaning And Maintenance . 25 Troubleshooting

    Pager function PAGER Press the search button on the baby unit. After activating the key, the parent unit reports with an acoustic call signal and flashing control lights. To terminate the search function, press any key on the parent unit. The control lights are turned off and the alarm is terminated.
  • Seite 26: Possible Cause

    Troubleshooting Problem Possible cause Action • Batteries are flat. • Replace/charge the batteries or connect the Status LED flashes red when unit to the power supply. device is switched on and signal tone sounds. • Batteries are charging. • No action required. Status LED flashes red green when device is switched off •...
  • Seite 27: Environmental Protection

    The technical specification, information and characteristics of the product described herein have been compiled to the best of our knowledge and belief and are correct at the time of printing. Any information provided by reer should be correct and authoritative. Nevertheless, reer does not accept liability for potential errors in this document and reserves the right to make changes to the product design and/or specifications without prior notice.
  • Seite 28: Caractéristiques Et Fonctions

    Veillez prendre quelques minutes pour lire attentivement la notice de sécurité. Le babyphone reer ne peut être utilisé sans souci que lorsque les points décrits ci-après sont respectés. Conservez bien ce mode d‘emploi, afin de pouvoir le relire ultérieurement.
  • Seite 29: Consignes Générales De Sécurité

    Consignes générales de sécurité ! Avant chaque utilisation, contrôlez que l‘appareil n‘a pas de défaut apparent. Si vous constatez un défaut, cet appareil ne doit pas être utilisé. ! Assurez-vous que la tension de la prise de courant correspond à celle de l‘adaptateur. Contrôlez, surtout en voyage à...
  • Seite 30: Contenu De La Livraison

    Contenu de la livraison 2 x batteries pour unité parents 1 x unité bébé (émetteur) 1 x unité parents (récepteur) mode d‘emploi 1x adaptateur USB 2 x câble USB Description de l‘appareil unité parents réglage du volume (+/-) interrupteur marche / arrêt unité...
  • Seite 31: Écran Unité Parents

    Écran d’affichage unité parents affichage statut piles affichage liaison affichage température affichage pour berceuse activée affichage pour veilleuse activée affichage volume sonore affichage avec bouton dialogue appuyé affichage avec alerte vibration activé Description de l‘appareil unité bébé réglage du volume (+/-) interrupteur marche/ régulateur de sensibilité...
  • Seite 32: Mise En Service

    Mise en service Utilisez uniquement des adaptateurs secteur fonctionnant avec 5V et au moins 200 mA. Afin d‘assurer que l‘appareil fonctionne même en cas de coupure de courant, nous recommandons de l‘équiper en plus de piles NiMH. Ceux-ci sont chargés automatiquement dans l’unité parents dès le branchement de l‘appareil à l’électricité. Attention : Veuillez observer les indications dans le chapitre « Fonctionnement avec batteries »...
  • Seite 33: Fonctionnement Avec Piles

    Mise en service CONSEIL Vous pouvez fixer l’unité parents à votre ceinture à l’aide du clip de ceinture. Les LEDS de statut indiquent le statut de l‘unité parents. Statut LED Affichage LED Réglages LED 1 vert l’unité parents est activée / la liaison est établie clignotant en vert l’unité...
  • Seite 34: Contrôle De La Portée / Mode Eco

    Fonctionnement avec piles Pour s’assurer que l‘appareil reste opérationnel pendant une panne de courant, nous vous recommandons d’insérer des piles en supplément. Dans l‘unité parents, celles-ci sont automatiquement rechargées une fois l’appareil bran- ché. La recharge dure 10 heures avec l’appareil mis hors tension. Remarque : N’utilisez que des piles rechargeables NiMH dans l’unité...
  • Seite 35: Sensibilité Du Microphone / Fonction Dialogue

    Sensibilité du microphone Le Babyphone dispose au choix de deux niveaux de sensibilité du microphone. Commutez la sensibilité du microphone de l‘unité bébé sur «  H I  » , si vous voulez être alerté déjà au moindre bruit ou si l’unité bébé est trop éloignée du lit de bébé.
  • Seite 36: Réglage Du Volume / Alarme Vibration

    Réglage du volume sonore / Alarme vibration Le volume sonore de la fonction Interphone est réglé via l’unité bébé. Le volume sonore des berceuses peut être commandé aussi bien sur l’unité parents que sur l’unité bébé. Le réglage du volume sonore sur l’unité parents Le volume sonore du récepteur appuyer brièvement la touche...
  • Seite 37: Fonction Bipeur Radio Messagerie

    Fonction bipeur radio messagerie PAGER Appuyez sur le bouton de recherche de l’unité bébé. Après avoir actionné le bouton, l’unité parents réagit avec un signal d’appel acoustique et un voyant de contrôle clignotant. Pour arrêter la fonction recherche, appuyez sur n’importe quel bouton au choix sur l’unité parents, les voyants de contrôle s’éteignent, l’alarme est arrêtée. REMARQUE : La fonction recherche n’est possible que si les deux unités sont activées et qu’elles se trouvent dans la zone de réception.
  • Seite 38 Résolution des problèmes Panne Origine possible Mesures à prendre • Les piles sont vides. • Remplacez/rechargez les piles et/ou branchez L’appareil allumé, le LED l‘appareil sur secteur. statut rouge clignote avec bips sonores • Les piles se rechargent. • Aucune mesure n‘est requise. L’appareil allumé, le LED statut rouge vert clignote •...
  • Seite 39: Garantie / Instructions D'élimination Des Déchets

    Les caractéristiques techniques, les informations et les spécificités du produit dans ces pages sont données de bonne foi, et répondent au stade actuel de la technique. Les informations fournies par reer devraient être correctes et fiables. La société reer ne peut cependant assumer aucune responsabilité pour les possibles erreurs dans ce document et elle se réserve le droit de procéder, sans préavis, à...
  • Seite 40: Dati Tecnici E Funzione

    Siete pregati di dedicare il tempo necessario a leggere attentamente le istruzioni di sicurezza. Solo se si rispettano tutti i punti qui indicati, il babyphone reer può essere utilizzato senza preoccupazioni. Conservare con cura le istru- zioni di funzionamento per futura consultazione.
  • Seite 41: Avvertenze Di Sicurezza Generali

    Avvertenze di sicurezza generali ! Prima di ogni utilizzo, verificare l‘eventuale presenza di danni visibili all‘apparecchio. Qualora si dovesse accertare la presenza di danni, l‘apparecchio non deve essere utilizzato. ! Assicurarsi che la tensione di esercizio della presa di corrente corrisponda a quella dell‘alimentatore. Verificare, so- prattutto quando ci si trova in viaggio all‘estero, che la tensione di rete del luogo corrisponda alla tensione indicata sugli apparecchi o sugli alimentatori.
  • Seite 42: Dotazione

    Dotazione 2 x batterie per l‘unità genitore 1 x unità bambino (trasmettitore) 1 x unità genitori (ricevitore) istruzioni per l‘uso 1x adattatore USB 2 x cavi USB Descrizione dell‘apparecchio unità genitori regolatore del volume (+/-) interruttore on/off unità genitore TALK interruttore on/off microfono display...
  • Seite 43: Display Unità Genitore

    Display unità genitore indicatore stato batterie indicatore collegamento indicatore temperatura indicatore musica per addormentamento attivata indicatore luce notturna attivata indicatore volume indicatore tasto conversazione premuto indicatore allarme con vibrazione attivato Descrizione dell‘apparecchio unità bambino regolatore del volume (+/-) interruttore on/off regolatore sensibilità...
  • Seite 44: Messa In Funzione

    Messa in funzione Utilizzare esclusivamente adattatori CA che funzionino a 5V e almeno 200 mA. Per garantire il funzionamento dell‘apparecchio anche in caso di blackout , si raccomanda di inserire anche le batterie NiMH al suo interno. Le batterie nell‘unità genitore vengono poste automaticamente in carica al momento del collegamento all‘alimenta- zione elettrica.
  • Seite 45: Funzionamento A Batterie

    Messa in funzione SUGGERIMENTO Grazie alla clip da cintura, potete assicurare l‘unità genitore alla vostra cintura. I LED di stato indicano lo stato dell‘unità genitore. LED di stato Indicatore LED Impostazione LED 1 verde l‘unità genitore è attivata / il collegamento è disponibile verde lampeggiante l‘unità...
  • Seite 46: Controllo Di Portata / Modalità Eco

    Funzionamento a batterie Per garantire che in caso di blackout di corrente l‘apparecchio rimanga pronto a entrare in funzione, si raccomanda di inserire anche le batterie. Nell‘unità genitore le batterie vengono messe automaticamente in carica al momento del collegamento all‘alimentazione elettrica. La procedura di carica dura 10 ore ad apparecchio spento. Avvertenza: Utilizzare esclusivamente batterie ricaricabili NiMH nell‘unità...
  • Seite 47: Sensibilità Del Microfono / Funzione Interfono

    Sensibilità del microfono Il babyphone dispone di due livelli di sensibilità del microfono selezionabili. Impostare la sensibilità del microfono su „HI“ se si desidera essere avvisati già al minimo rumore, o se l‘unità bambino è collocata troppo lontano dalla culla. Se la sensibilità...
  • Seite 48: Regolatore Del Volume / Allarme Con Vibrazione

    Regolazione volume / Allarme con vibrazione Dall‘unità bambino viene regolato il volume della funzione interfono. Il volume delle ninne nanne può essere gestito sia con l‘unità genitori che con quella del bambino. Regolazione volume sull‘unità genitori Aumenterà il volume del premere brevemente il tasto ricevitore.
  • Seite 49: Funzione Cercapersone

    Funzione cercapersone PAGER Premere l‘interruttore di ricerca sull‘unità bambino. L‘unità genitore, una volta azionato il tasto, risponde con un segnale acustico di chiamata e con il lampeggiamento delle spie luminose. Per interrompere la funzione di ricer- ca, premere un tasto qualsiasi sull‘unità genitore, le spie luminose si spengono, l‘allarme si interrompe. AVVERTENZA: La funzione di ricerca è...
  • Seite 50 Soluzione problemi Problema Possibile causa Soluzione • Le batterie sono esaurite. • Sostituire/caricare le batterie e/o collegare Il LED di stato lampeggia l‘apparecchio all‘alimentazione elettrica in rosso e viene emesso un segnale sonoro quando l‘apparecchio è acceso • Le batterie sono in carica. •...
  • Seite 51: Prescrizioni In Materia Di Tutela Ambientale

    Le informazioni messe a disposizione da reer dovrebbero essere corrette ed affidabili. reer non si assume comunque alcuna responsabilità per eventuali errori contenuti in questo documento e si riserva il diritto di modificare senza preavviso il design del prodotto e le sue specifiche.
  • Seite 52 BeeConnect Plus Babyphone digital Le felicitamos por la compra de su nuevo Babyphone (sistema de vigilancia para bebés) de reer. El Babyphone de audio digital transmite de forma confiable y nítida los sonidos de su bebé gracias a un micrófono altamente sen- sible.
  • Seite 53: Indicaciones Generales De Seguridad

    Indicaciones generales de seguridad ! Revise antes de cada uso que el aparato no presenta ningún daño visible. Si descubriese algún daño, no debe utilizar el aparato. ! Asegúrese de que la tensión de la toma de corriente se corresponda con la de la fuente de alimentación. Comprue- be que la tensión nominal coincida con la tensión indicada en los aparato o en la fuente de alimentación, sobre todo cuando viaje al extranjero.
  • Seite 54: Volumen De Suministro

    Volumen de suministro 2 x pilas recargables para 1 x unidad infantil (emisor) 1 x unidad parental (receptor) unidad parental instrucciones de uso 1x adaptador para USB 2 x cables USB Descripción del dispositivo unidad parental regulación de volumen (+/-) botón de encendido unidad parental TALK...
  • Seite 55 Pantalla de unidad parental indicador de estado de batería indicador de conexión indicador de temperatura indicador de música para dormir activada indicador de luz nocturna activada indicador de volumen indicador de tecla de transmisión presionada indicador de alarma vibratoria activada Descripción del dispositivo unidad infantil regulación de volumen (+/-) botón de...
  • Seite 56: Puesta En Funcionamiento

    Puesta en funcionamiento Utilice solamente fuentes de alimentación que operen con 5V y al menos 200 mA. Para asegurarse de que en caso de corte de corriente el aparato siga funcionando le recomendamos que coloque adicionalmente las pilas recargables NiMH. Esas pilas se cargan automáticamente en la unidad parental cuando el aparato está enchufado. Atención: Considere las referencias en el capítulo „Funcionamiento con baterías“...
  • Seite 57 Puesta en funcionamiento CONSEJO Podrá sujetar la unidad parental a su cin- turón con ayuda de la pinza para cinturón. Los ledes de estado indican la condición de la unidad parental. LED de estado Indicador LED Ajustes LED 1 verde unidad parental encendida / conexión establecida parpadeo verde unidad parental encendida, conexión establecida /...
  • Seite 58 Funcionamiento con pilas recargables Para asegurarse de que el aparato continúe funcionando en caso de corte de corriente, le recomendamos que coloque adicionalmente pilas recargables. Esas pilas se cargan automáticamente en la unidad parental cuando el aparato está enchufado. El proceso de carga dura 10 horas con el aparato apagado. Nota: Utilice solamente pilas AAA recargables de NiMH en la unidad parental.
  • Seite 59: Sensibilidad Del Micrófono

    Sensibilidad del micrófono El Babyphone dispone de dos niveles de sensibilidad del micrófono. Gire el regulador de sensibilidad del micrófono en la unidad infantil al modo „HI“ si desea ser alertado con ruidos suaves o si la unidad infantil está alejada de la cuna.
  • Seite 60: Luz Nocturna

    Control de volumen / Alarma vibratoria El volumen del interfono se puede regular mediante la unidad infantil. El volumen de las canciones de cuna se puede controlar tanto desde la unidad parental como desde la unidad infantil. Volumen en la unidad parental Sube el volumen del receptor pulsación breve de la tecla...
  • Seite 61: Limpieza Y Mantenimiento

    Localizador PAGER Presione el botón de búsqueda en la unidad infantil. Tras presionar la tecla, la unidad parental se activa con una señal de llamada acústica y luces de control intermitentes. Para finalizar la función de búsqueda, presione cual- quier tecla en la unidad parental. Las luces de control y la alarma se apagan. NOTA: La función de búsqueda opera solamente si ambas unidades están encendidas y se encuentran dentro del alcance.
  • Seite 62 Solución de problemas Problema Posible causa Medida • Las pilas están agotadas. • Sustituya/cargue las pilas o conecte el aparato a la El LED de estado emite red de corriente eléctrica. luz roja intermitente y una señal acústica cuando está encendido •...
  • Seite 63 La información puesta a disposición por reer es correcta y fiable. Sin embargo, la empresa reer no asume, ninguna responsabilidad de posibles errores de este documento y se reserva el derecho a realizar modificaciones sin previo aviso del diseño del producto o de las especificaciones.
  • Seite 64 GmbH Muehlstr. 41 • 71229 Leonberg • Germany www.reer.de Betrieb in folgenden Ländern gestattet: DE, CH, AT, IT, FR, BE, NL, ES, LU, GR, HU, CZ, SI, PL, GB, RS, FI, IS, LI, LT, NO, RO, SE, SK, TR...

Inhaltsverzeichnis