HELIX DSP.3 Bedienungsanleitung

Verwandte Anleitungen für HELIX DSP.3


Inhaltszusammenfassung für HELIX DSP.3
- Seite 1 DSP.3 Digitaler High-Res 8-Kanal Signalprozessor mit 96 kHz / 32 Bit Signalweg Digital High-Res 8-channel signal processor with 96 kHz / 32 Bit signal path...
-
Seite 2: Allgemeine Hinweise
Verarbeitung und eine tigen HELIX-Signalprozessors. überzeugende Anwendung ausgereifter Technolo- gien aus. Audiotec Fischer setzt mit dem HELIX DSP.3 neue Maßstäbe im Bereich der Signalprozessortechnik. Viel Freude an diesem Produkt wünscht Ihnen das Dabei profitieren Sie als Kunde direkt von unserer Team von nahezu 30-jährigen Erfahrung in der Forschung und... -
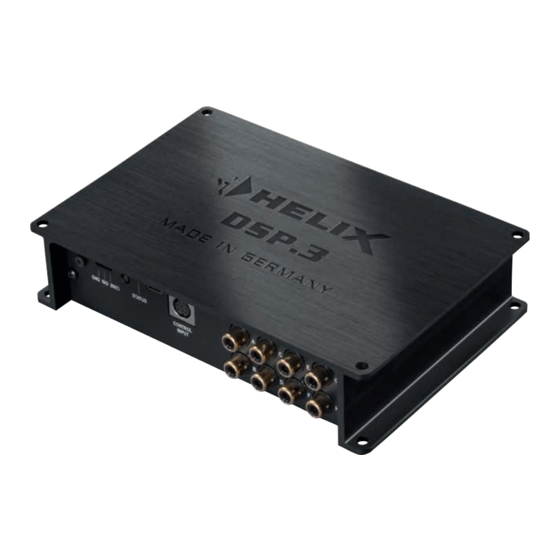
Seite 3: Anschluss- Und Bedienelemente
Control Taster Anschluss einer Fernbedienung Dient zum Umschalten der Sound Setups weiterem HELIX Zubehör. oder zum Resetten des Gerätes. Line Output Status LED Vorverstärkerausgänge zum Anschluss des / Die Status LED zeigt den Betriebszustand der Verstärker/s. Zur Einschaltung eines und den ausgewählten Speicherbereich an. -
Seite 4: Input Sensitivity
Diese Buchse dient zum Anschluss des Signalpro- Achtung: Es ist zwingend notwendig, die Eingangs- zessors an die Stromversorgung des Fahrzeuges empfindlichkeit des DSP.3 an die Signalquelle anzu- sowie für die Remote-Ein- und Ausgänge. passen, um Schäden am Signalprozessor zu ver- Sofern die Hochpegel-Lautsprechereingänge ver-... -
Seite 5: Status Led
USB Eingang Sound Setups. Mit Hilfe des Control Tasters lässt sich zwischen zwei Speicherplätzen umschalten. Mit Hilfe dieses Eingangs wird der HELIX DSP.3 über Diese können im DSP PC-Tool festgelegt werden. das beiliegende Kabel mit dem Computer verbunden Hinweis: Werkseitig sind die Speicherbereiche eins und kann anschließend über das DSP PC-Tool kon-... -
Seite 6: Einbau Und Installation
Kanal den Highlevel- bedeutet, dass an den Signalausgängen des und an einem anderen Kanal den Vorverstär- HELIX DSP.3 der volle Pegel anliegt und die kersignaleingang zu verwenden. angeschlossenen Verstärker voll ausgesteuert werden. Dies kann im Extremfall die Lautspre- 2. - Seite 7 Seitenblech der Geräteseite mit dem USB- teiler angeschlossen, der mit dem Pluspol der Batterie verbunden ist. Die Stromaufnahme Eingang indem Sie die fünf Schrauben (eine des HELIX DSP.3 ist mit ca. 450 mA zwar sehr Inbus- und vier Kreuzschlitzschrauben) lösen.
- Seite 8 Einbau und Installation Nun können Sie das Bodenblech aus dem 8. Konfiguration des DSPs Kühlkörper zur Seite hinausziehen und erhalten Es wird dringend empfohlen, vor der ersten so Zugriff auf den Schalter. Dieser befindet sich Inbetriebnahme die grundlegenden Einstel- lungen im DSP mit Hilfe der DSP PC-Tool in der Nähe der Highlevel-Lautsprechereingän- ge (siehe Markierung im nachfolgenden Bild).
-
Seite 9: Anschluss An Den Computer
USB-Kabel an den Computer an. DSP Kanäle separat eingestellt werden. Wenn Sie längere Distanzen zu überbrücken Bevor Sie den HELIX DSP.3 das erste Mal an ei- haben, verwenden Sie bitte eine aktive USB- Verlängerung mit integriertem Repeater und nen Computer anschließen, gehen Sie auf unsere Homepage und laden die aktuellste Software Ver- kein passives USB-Kabel. -
Seite 10: Konfigurationshinweise Für Die Dsp-Soundeffekte
Konfigurationshinweise für die DSP-Soundeffekte Der HELIX DSP.3 bietet einzigartige DSP-Sound- FX-Menüs die „Active Setup Link“-Funktion effekte wie das „Augmented Bass Processing“, den durch Setzen eines Hakens. „StageXpander“, den „RealCenter“ und noch mehr. Um in den Genuss der DSP-Soundeffekte zu kom- men, müssen bei der Hard- und Softwarekonfigu-... - Seite 11 Soundeffekt durch Setzen ACO Plattform-Features Remote Output Configuration Neben den einzigartigen DSP-Sound effekten bietet die ACO-Plattform des DSP.3 zusätzlich eine Viel- An dieser Stelle kann festgelegt werden, ob der zahl an System-Features. Remote-Ausgang, der die angeschlossenen End- Im DCM Menü...
-
Seite 12: Einbau Einer Helix Extension Card
Einbau einer HELIX Extension Card Der HELIX DSP.3 kann durch die Montage einer 6. Achten Sie auf den richtigen Sitz des HEC Mo- HELIX Extension Card (HEC) um weitere Funk- duls und darauf, dass alle Kontaktstifte vollstän- tionen erweitert werden – beispielsweise um eine dig im Sockel stecken. - Seite 13 Spezielle Features des HELIX DSP.3 96 kHz Abtastrate Start-Stopfähigkeit Der HELIX DSP.3 bietet eine Signalverarbeitung Das Netzteil im HELIX DSP.3 stellt die interne Spannungsversorgung auch bei kurzfristigen Ein- mit einer doppelten Abtastrate von 96 kHz. Dadurch brüchen bis hinab zu 6 Volt sicher.
-
Seite 14: Technische Daten
Technische Daten Eingänge ................. 6 x Cinch 6 x Hochpegel-Lautsprechereingang 1 x Optisch SPDIF-Format (12 - 96 kHz) 1 x Remote In Eingangsempfindlichkeit ..........Cinch 2 - 4 Volt Hochpegel 5 - 11 Volt Ausgänge ................ 8 x Cinch 1 x Remote Out Ausgangsspannung ............6 Volt Frequenzbereich..............10 Hz - 44.000 Hz DSP Auflösung ..............64 Bit... - Seite 28 Audiotec Fischer GmbH Hünegräben 26 · 57392 Schmallenberg · Germany Tel.: +49 2972 9788 0 · Fax: +49 2972 9788 88 E-mail: helix@audiotec-fischer.com · Internet: www.audiotec-fischer.com...