Herunterladen Inhalt Inhalt Diese Seite drucken
Phonocar VM496 Gebrauchsanweisungen

Phonocar VM496 Gebrauchsanweisungen

Full hd dash cam; full hd 1080p camera, 120 wide angle, emergency recording, g-sensor, 2'' lcd screen

Werbung

Verfügbare Sprachen
  • DE

Verfügbare Sprachen

Compatible
with:
RoadCam
FULL HD DASH CAM
06/2019
Videocamera per auto FULL HD 1080P, grandangolare 120°,
registrazione di emergenza, G-sensor, schermo LCD 2".
emergency recording, G-sensor, 2" LCD screen.
FULL HD 1080P camera, 120° wide angle,
Notice de montage et d'emploi
Gebrauchsanweisungen
Manual de instrucciones
VM496
Manuale istruzioni
Instructions manual
IT
EN
FR
DE
ES

Werbung

Inhaltsverzeichnis
loading

Inhaltszusammenfassung für Phonocar VM496

  • Seite 1 Compatible with: RoadCam VM496 FULL HD DASH CAM Videocamera per auto FULL HD 1080P, grandangolare 120°, registrazione di emergenza, G-sensor, schermo LCD 2”. FULL HD 1080P camera, 120° wide angle, emergency recording, G-sensor, 2” LCD screen. Manuale istruzioni Instructions manual Notice de montage et d’emploi...
  • Seite 2: Specifiche Tecniche

    Compatibile con l’applicazione Road-Cam. disponibili per eventuali rapporti su incidenti e richieste La DashCam VM496 è una videocamera ad alta di risarcimenti. Manual Lock: protegge i file registrati in modo che non definizione con registratore digitale multifunzione da auto facilmente installabile nell’abitacolo grazie al...
  • Seite 3 Funzioni 1 Led registrazione 2 Led accensione 3 Tasto menu / Mode 4 Sposta su Accensione/Spegnimento: premere 3 sec. Standby/Riattivazione: premere brevemente 6 Sposta giù 7 Tasto conferma. 8 Ingresso mini USB 9 Ingresso retrocamera (NON ATTIVO) 10 Slot micro SD Card 11 Reset 12 Altoparlante ATTENZIONE:...
  • Seite 4: Impostazioni Di Sistema

    Impostazioni di Sistema - Premere 2 volta per accedere. Per muoversi nei menu. - Premere 1 volta per tornare al menu precedente. Per confermare. Attiva e disattiva il WI-FI. Imposta data e ora. Imposta lo spegnimento automatico. Imposta suono tasti. Seleziona la lingua del dispositivo.
  • Seite 5: Impostazioni Video

    Impostazioni Video - Premere 1 volta per accedere. Per muoversi nei 3 menu. - Premere 1 volta per tornare al (VIDEO-FOTO-RIPRODUZIONE) menu precedente. Per confermare. Imposta la qualità dell’immagine. Imposta i cicli di registrazione. Opzione di compensazione della luce, ON/OFF. Imposta la compensazione di luminosità.
  • Seite 6: Impostazioni Foto

    Impostazioni foto - Premere 1 volta per accedere. Per muoversi nei 3 menu. - Premere 1 volta per tornare al (VIDEO-FOTO-RIPRODUZIONE) menu precedente. Per confermare. Imposta tempo di ritardo dello scatto 0/2/5/10. Seleziona la qualità Scatta 2/3 foto consecutive dell’immagine (formato). visualizzabili nella modalità...
  • Seite 7: Collegamento Al Computer

    Riproduzione Premere per entrare nei menu. Per muoversi nei video realizzati. Play o Stop riproduzione. Elimina il video corrente o tutti Blocco/Sblocco dei video correnti o tutti. Presentazione video e immagini. Nella schermata principale le frecce selezionano i file. Se è in riproduzione un video le frecce hanno le funzioni di accelerare o decelerare il video.
  • Seite 8: Technical Data

    Compatible with Road-Cam app. making them available for any accident reports and The DashCam VM496 is a high-definition camera with claims for damages Manual Lock: Recorded files are protected so that they...
  • Seite 9 Functions 1 Recording LED 2 Power on LED 3 Menu / Mode key 4 Move on Power On/Off: Press 3 sec. Standby/Reactivation: Press briefly 6 Move Down 7 Confirmation key. 8 Mini usb input 9 Rear-camera input (not activated) 10 Micro sd card slot 11 Reset 12 Loudspeaker WARNING:...
  • Seite 10: System Settings

    System settings - Press twice to enter. For moving through menus. - Press once to return to the previous menu. To confirm. Activate / deactivate WI-FI. Date and time setting. Automatic switch-off setting. Key sound setting. For selecting the language. Recording loops settings.
  • Seite 11: Video Settings

    Video settings - Press once to enter. To move through the 3 menus. - Press once to return to the (VIDEO-PHOTO-PLAYBACK) previous menu. To confirm. Image quality setting. Recording loops setting. Light balance option ON/OFF. Brightness balance setting. Motion detection recording ON/OFF.
  • Seite 12 Impostazioni foto - Press twice to enter. To move through the 3 menus. - Press once to return to the (VIDEO-PHOTO-PLAYBACK) previous menu. To confirm. Set delay time of the 0/2/5/10 shot. Shoot 2/3 consecutive pictures that For selecting image quality (format). can be displayed in playback mode with the up and down arrows.
  • Seite 13: Computer Connection

    Riproduzione Press to enter menus. To move through the videos made. Play or Stop the Playback. Delete current video or all. Lock/Unlock current or all videos. Slide show. In the main screen the arrows allow you to select the files. During the video playback the arrows can be used for accelerating or decelerating the video.
  • Seite 14: Caractéristiques Techniques

    LCD 2”. Compatible avec l’application Road-Cam. permet ainsi de les avoir à disposition en cas de besoin La DashCam VM496 est une caméra HD avec (comme par exemple: rapport su un accident, demande enregistreur numérique multi-fonctionnel. celle-ci de dédommagement..)
  • Seite 15 Fonctions 1 Led d’enregistrement 2 Led d’Allumage 3 Touche menu / Mode 4 Défile vers le haut Allumage/Extinction: appuyer 3 sec. Standby/Ré-activation: appuyer brièvement 6 Défile vers le bas 7 Touche Validation 8 Entrée mini USB 9 Entrée caméra de recul (N’EST PAS ACTIVE) 10 Port micro Carte SD 11 Reset 12 Haut-Parleur...
  • Seite 16: Réglages De Système

    Réglages de Système - Appuyer 2 fois pour allumer Pour parcourir les menus. - Appuyer 1 fois pour revenir au menu précédent. Pour valider. Active et désactive le WI-FI. Règle la date et l’heure. Règle l’extinction automatique. Règle le son des touches. Sélectionne la langue du dispositif.
  • Seite 17: Réglages Vidéo

    Réglages Vidéo - Appuyer 1 fois pour accéder Pour parcourir les 3 menus. - Appuyer 1 fois pour revenir au (VIDEO - PHOTO - REPRODUCTION) menu précédent Pour Valider. Règle la qualité de l’image. Règle les cycles d’enregistrement. Option de compensation de l’éclairage, ON / OFF.
  • Seite 18: Réglages Photo

    Réglages Photo - Appuyer 1 fois pour accéder. Appuyer pour parcourir les 3 menus. - Appuyer 1 fois pour revenir au (VIDEO-PHOTO-REPRODUCTION) menu précédent. Appuyer pour Valider. Règle le temps de déclenchement 0/2/5/10. Sélectionne la qualité de l’image Fait 2/3 photos consécutives visibles (Format).
  • Seite 19: Branchement À L'ordinateur

    Reproduction Appuyer pour parcourir Appuyer pour entrer dans les les vidéos réalisées. menus. Appuyer pour Play ou Stop reproduction. Efface la vidéo en cours ou toutes les vidéos. Blocage /Déblocage des vidéos en cours ou de toutes les vidéos. Slide show Dans l’écran principal, les flèches permettent de sélectionner les fichiers.
  • Seite 20: Technische Daten

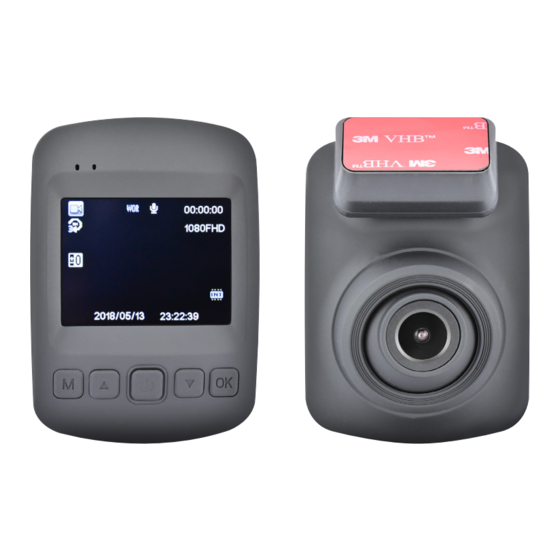
    Installation im Innenraum des Autos/ oder geschützt , sodass sie nicht Überschrieben werden. Cockpit durch eine selbstklebende Halterung Unser VM496 wird über einen micro USB-Anschluss an Stromversorgung über den Zigarettenanzünder Ihren PC angeschlossen. Dieses Produkt verfügt über Diese hat einen Betrachtungswinkel von 120° und wird die WI-FI-Funktion zur Bedienung über APP direkt auf...
  • Seite 21 Funktionen 1 Aufzeichnung-LED 2 Einschaltung-LED 3 Menü / Modus-Taste 4 Nach oben Ein-/Ausschalten: Drücken Sie 3 Sekunden lang. Standby/Reaktivierung: Kurz drücken 6 Nach unten 7 Bestätigung-Taste. 8 Mini-USB-Eingang 9 Rückfahrkamera-Eingang (NICHT AKTIV) 10 Micro SD Kartensteckplatz 11 Zurücksetzen 12 Lautsprecher WARNUNG: - Wenn das Gerät eingeschaltet ist, beginnt es automatisch mit der Aufzeichnung und die LED 1 blinkt blau.
  • Seite 22 SYSTEM-EINSTELLUNGEN - Zweimal drücken, um einzugeben. Zum Durchblättern der Menüs. - Einmal drücken, um zum vorheri- gen Menü zurückzukehren. Zur Bestätigung. WLAN Aktivierung -Deaktivierung. Stellt das Datum und die Uhrzeit ein. Stellt die automatische Abschaltung ein. Stellt den Tastenton ein. Wählt die Sprache des Gerätes aus.
  • Seite 23: Videoeinstellungen

    Video-Einstellungen - Einmal drücken, um einzugeben. Um sich durch die 3 Menüs zu bewe- - Einmal drücken, um zum vorheri- gen. (VIDEO-FOTO-WIEDERGABE) gen Menü zurückzukehren. Zur Bestätigung Stellt die Bildqualität ein. Stellt die Aufnahmezyklen ein. Ausgleichsmöglichkeit des Lichtes, EIN/AUS. Stellt den Helligkeitsausgleich ein. Aufnahme-Aktivierung bei Bewegung , EIN/AUS.
  • Seite 24 Bilder-Einstellungen - Zweimal drücken, um einzugeben. Um sich durch die 3 Menüs zu - Einmal drücken, um zum vorherigen bewegen. (VIDEO-FOTO-WIEDERGABE). Menü zurückzukehren. Zur Bestätigung. Stellt die Verzögerungszeit des Schusses 0/2/5/10 ein. Nimmt 2/3 aufeinanderfolgende Wählt die Bildqualität aus (Format). Fotos auf, die im Wiedergabe-Modus über die Pfeile nach oben und unten angezeigt werden können...
  • Seite 25 Wiedergabe Um in die Menüs zu gelangen. Um sich in den Videos zu bewegen. Wiedergabe oder Stopp . Aktuelles Video oder alle löschen. Sperren/Entsperren aktueller oder aller Videos Presentazione video e immagini. Im Hauptbildschirm werden die Pfeile zum Auswählen von Dateien verwendet. Bei der Video-Wiedergabe dienen die Pfeile zur Beschleunigung oder Verzögerung des Videos...
  • Seite 26: Características Técnicas

    Compatible con la aplicación Road-Cam. guarda los vídeos grabados en caso de emergencias La Dash Cam VM496 es una vídeo cámara de alta defini- dando la posibilidad de recuperar dichos vídeos en caso ción con grabador digital multifunción para coche, fácil- de accidentes y de reclamaciones.
  • Seite 27 Funzioni 1 LED Grabación 2 LED encendido 3 Tecla menú/modo 4 Tecla desplazamiento arriba Encendido/Apagado: Pulsar durante 3 s Standby/reactivacion : pulsar brevemente 6 Tecla desplazamiento abajo 7 Tecla Confirmación 8 Entrada mini Usb 9 Entrada retro cámara (NO ACTIVO) 10 Ranura Tarjeta micro SD 11 Reset 12 Altavoz...
  • Seite 28: Ajustes Del Sistema

    Ajustes del Sistema - Pulsar 2 veces para encender Para desplazarse en los menús. - Pulsar 1 vez para volver al menú anterior. Para confirmar. Activa e desactiva el WiFi. Ajustes fecha y hora. Configura el apagado automático. Ajusta sonido teclado. Selecciona el idioma del dispositivo.
  • Seite 29 Ajustes Video -Pulsar 1 vez para acceder Para desplazarse en los 3 menús - Pulsar 1 vez para volver al menú (VIDEO-FOTO-REPRODUCCION). anterior. Para confirmar. Ajuste calidad de imagen Ajustes ciclos de grabacion.. Opción de compensación de la luz. ON/OFF. Ajuste compensacion del brillo.
  • Seite 30 Ajustes foto - Pulsar 1 vez para acceder. Para desplazarse en los 3 menús - Pulsar 1 vez para volver al menú (VIDEO-FOTO-REPRODUCCION). anterior. Para confirmar. Ajuste tiempo de retraso 0/5/10. Selecciona la calidad Realiza 2/3 fotos consecutivas visuali- de la imagen (formato). zables en modo de reproducción con las flechas arriba y abajo.
  • Seite 31 Reproduccion Pulsar para entrar en los menús. Para desplazarte en los vídeos realizados. Play or Stop the Playback. Delete current video or all. Lock/Unlock current or all videos. Slide show. En la ventana principal las flechas seleccionan los archivos, Si esta en reproducción vídeo las flechas tienen la función de acele- rar o ralentizar los vídeos.
  • Seite 32 PHONOCAR S.p.a. Via F.lli Cervi, 167/C • 42124 Reggio Emilia (Italy) • Tel. +39 0522 941621 • www.phonocar.com • e-mail: info@phonocar.it...

Inhaltsverzeichnis