
Verwandte Anleitungen für Horizon Hobby Turbo Timber 1.5m


Inhaltszusammenfassung für Horizon Hobby Turbo Timber 1.5m
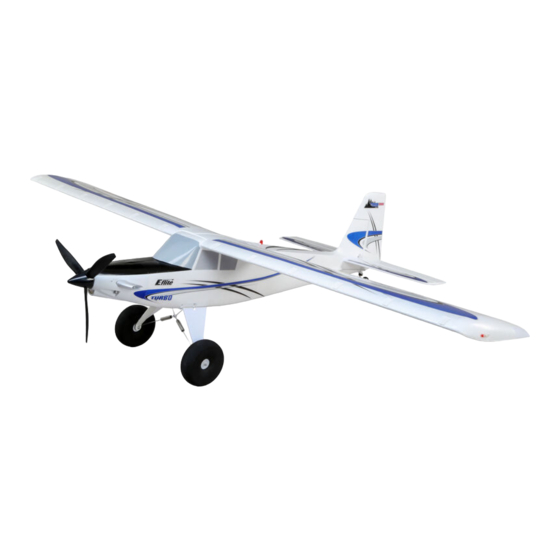
- Seite 1 Turbo Timber 1.5m ® Instruction Manual Bedienungsanleitung Manuel d’utilisation Manuale di Istruzioni SAFE ® Select Technology, Optional Flight Envelope Protection...
-
Seite 2: Safety Precautions And Warnings
NOTICE All instructions, warranties and other collateral documents are subject to change at the sole discretion of Horizon Hobby, LLC. For up-to-date product literature, visit www.horizonhobby.com or www.towerhobbies.com and click on the support or resources tab for this product. Meaning of Special Language:... -
Seite 3: Inhaltsverzeichnis
Box Contents Quick Start Information Transmitter Set up your transmitter using the Setup transmitter setup chart Hi Rate Low Rate 33mm 25mm 33mm 25mm Dual Rates 22mm 16mm 30mm 20mm Full Half Flaps =35mm =20mm Center of Gravity 60mm +/-5mm back from leading edge (CG) of wing (without slats) at the fuselage. -
Seite 4: Select Technology (Bnf Basic)
* Flap programming values may vary slightly. For your initial fl ights use the POS 2: -100% FLAP* 30% Elevator DX20 recommended fl ap travel settings provided in the Flaps section and adjust SPEED 2.0 the fl ap travel to your preference on subsequent fl ights. iX12 Turbo Timber 1.5m... -
Seite 5: Model Assembly
Model Assembly Landing Gear Installation 3 x 8mm button head Mount the Landing Gear to the Fuselage machine 1. Insert one landing gear assembly into the pocket on the side of the fuselage as shown. The landing gear legs mount to the aluminum block which can pivot in the pocket. - Seite 6 2. Slide the pushrod in the quick connector to change the length of the linkage between the servo arm and the control horn so the control surface is centered. 3. Apply thread lock compound to the screw threads and tighten the screw to secure the pushrod at the desired length. 90˚ Turbo Timber 1.5m...
-
Seite 7: Wing Assembly
Model Assembly Continued Wing Assembly Required Adhesives Medium CA Slat Installation (Optional) 1. Carefully remove all the foam slat pocket covers (A) from the wing. 2. When the pocket is exposed, carefully apply medium CA to each slat pocket. 3. Mount the slat onto the wing with the rounded edge facing forward. Ensure that the left and right slats are on the correct wing half. -
Seite 8: Binding / Switching On And Off Safe Select (Bnf Basic)
If the receiver loses transmitter communication, the failsafe will activate. When activated, failsafe moves the throttle channel to its preset failsafe position (low throttle) that was set during binding. All other channels move to actively level the aircraft in fl ight. Turbo Timber 1.5m... -
Seite 9: Battery Installation And Esc Arming
Battery Installation and ESC Arming Battery Selection The E-fl ite ® 2200mAh 14.4V 4S 30C Li-Po battery (EFLM22004s30) is recommended. The EFL22003S30 battery may also be used. Refer to the Optional Parts List for other recommended batteries. If using a battery other than those listed, the battery should be within the range of capacity, dimensions and weight of the E-fl... -
Seite 10: Control Horn And Servo Arm Settings
After fl ying, you may choose to adjust the linkage positions for the desired control response. See the table to the right. Tuning Horns Arms Rudder More control throw Aileron Less control throw Flaps Turbo Timber 1.5m... -
Seite 11: Center Of Gravity (Cg)
Center of Gravity (CG) The CG location is measured from the leading edge of the wing at the root. (without slats installed) • 60mm +/-5mm back from the leading edge NOTICE: Install the battery but do not arm the ESC while checking the CG. Personal injury may result. -
Seite 12: Flying Tips And Repairs
In AS3X mode holding full control will result in the aircraft pitching or rolling as fast as possible, and it will continue to rapidly change attitude as long as the control stick is fully defl ected. Turbo Timber 1.5m... -
Seite 13: Pnp Receiver Selection And Installation
PNP Receiver Selection and Installation The Spektrum AR636 receiver is recommended for ths airplane. If you choose AR636 Port to install another receiver, ensure that it is at least a 5-channel full range (sport) receiver. Refer to your receiver manual for correct installation and Assignments operation instructions. -
Seite 14: Troubleshooting Guide
Motor power pulses Weather conditions might be too cold Postpone flight until weather is warmer then motor loses Battery is old, worn out, or damaged Replace battery power Battery C rating might be too small Use recommended battery Turbo Timber 1.5m... -
Seite 15: Float Installation (Optional)
Float Installation (Optional) Float Assembly 1. Install the 2 cross members (A) to the left and right fl oats as shown. 2. Install the front and rear fl oat struts to the fl oats and secure the assembly together using the included 4 fl oat plates (B) and 3mm x 25mm machine screws (C). -
Seite 16: Ama National Model Aircraft Safety Code
(b) An inexperienced pilot is assisted by an experienced pilot. 4. When and where required by rule, helmets must be properly worn and fastened. They must be OSHA, DOT, ANSI, SNELL or NOCSAE approved or comply with comparable standards. Turbo Timber 1.5m... -
Seite 17: Limited Warranty
Product, (iv) attempted service by anyone as Horizon is not responsible for merchandise until it arrives and is accepted at other than a Horizon Hobby authorized service center, (v) Product not purchased our facility. An Online Service Request is available at http://www.horizonhobby. -
Seite 18: Fcc Information
FCC ID: BRWDASRX15 Supplier’s Declaration of Conformity Contains IC: 6157A-AMRX15 Turbo Timber 1.5m BNF Basic with AS3X and SAFE Select - EFL15250 FCC Information Turbo Timber 1.5m PNP - EFL15275 This device complies with part 15 of the FCC rules. Operation is subject to the This device complies with part 15 of the FCC Rules. -
Seite 19: Sicherheitsmaßnahmen Und Warnungen
Dieses Produkt ist nicht für den Gebrauch durch Kinder ohne direkte Aufsicht eines Erwachsenen vorgesehen. Versuchen Sie nicht, das Produkt ohne Zustimmung von Horizon Hobby, LLC zu zerlegen, mit nicht-kompatiblen Komponenten zu verwenden oder beliebig zu verbessern. Dieses Handbuch enthält Sicherheitshinweise sowie Anleitungen zu Betrieb und Wartung. -
Seite 20: Lieferumfang
Empfohlene Empfänger ..................66 Ersatzteile ......................67 Optionale Bauteile ..................... 68 INFORMATIONEN ZUM BINDEN DES EMPFÄNGERS 36.1 sq/dm Kanäle Frequenz 2405–2476 MHz Kompatibilität DSM2 und DSMX Registrieren Sie sich unter https://www.horizonhobby.com/content/e-fl ite-rc für Produktupdates, spezielle Angebote und mehr. Turbo Timber 1.5m... -
Seite 21: Safe Select-Technologie
SAFE ® Select Technology (BNF Basic) Die BNF Basic-Version dieses Flugzeugs verfügt über die SAFE Select-Technologie, die im Flug einen zusätzlichen Schutz bietet. Verwenden Sie die folgenden Anweisungen, um das SAFE Select-System zu aktivieren und einem Switch zuzuweisen. Wenn diese Option aktiviert ist, verhindert SAFE Select, dass das Flugzeug die vorgegebenen Grenzwerte überschreitet oder kippt. -
Seite 22: Zusammenbau Des Modells
Diese Baugruppen werden an der im Rumpf zwischen dem Fahrwerk 2. Die Baugruppe mit den beiden 2 x 6 mm Blechschrauben befestigen. vormontierten Halterung aus Kunststoff befestigt. 2. Die zwei 3 x 10 mm Blechschrauben montieren, um die Feder-Baugruppen in Position zu halten. 3 x 10 mm 2 x 6mm selbstschneidende selbstschneidende Halbrundschraube Halbrundschraube Turbo Timber 1.5m... -
Seite 23: Montage Des Modells; Fortsetzung
Montage des Modells; Fortsetzung Montage des Höhenleitwerks 1. Schieben Sie den Leitwerksverbinder (A) in die Öffnung im Rumpfheck. Das Ruderhorn muß dabei nach unten zeigen. 2. Schieben Sie beiden Teile (links und rechts) des Höhenruders auf. Bitte achten Sie darauf, dass die Ruderhörner nach unten zeigen. 3. -
Seite 24: Montage Der Tragfl Ächen
6. Richten Sie die Tragfl äche zum Rumpf aus und sichern Sie diese mit den beiden Schrauben (C) ACHTUNG: Quetschen Sie nicht die Kabel wenn Sie Tragfl äche montieren. Demontieren Sie in umgekehrter Reihenfolge. Klappen Beleuchtung Querruder Turbo Timber 1.5m Timber 1.2m... -
Seite 25: Bindungsverfahren/Ausschalten Von Safe Select
Binden von Sender und Empfänger/SAFE Select ein- und ausschalten Dieses Produkt erfordert einen zugelassenen Spektrum DSM2/DSMX kompatiblen Sender. Bind Plug Montage Eine vollständige Liste der zugelassenen Sender ist unter www.bindnfl y.com zu fi nden. Das Flugzeug verfügt über eine optionale SAFE Select-Funktion, die durch das Binden auf eine nachstehend beschriebene spezifi... -
Seite 26: Einsetzen Des Akkus Und Armieren Den Reglers
Geräuschen erzeugen. 3 fl ache Töne gefolgt von 2 aufsteigenden Tönen. • Eine LED leuchtet auf dem Empfänger. Sollte der Regler nach dem Anschluss des Akkus einen Doppelpiepton spielen muß der Akku ersetzt oder geladen werden. 7. Setzen Sie die Akkuklappe wieder auf. Turbo Timber 1.5m... -
Seite 27: Schalterbelegung Von Safe Select
Schalterbelegung von SAFE ® Select ® Die SAFE Select-Technologie kann jedem offenen Schalter (2 oder 3 Position) Zuweisen eines Schalters zugewiesen werden, der einen Sender (5–9) auf dem Sender steuert. Nach dem 1. Das Fluggerät für die Wahl des eingeschalteten SAFE Select binden. Dadurch kann Zuweisen zu einer Taste verfügt das eingeschaltete SAFE Select über die Flexibilität das System einem Schalter zugewiesen werden. -
Seite 28: Der Schwerpunkt (Cg)
Nach erfolgter Einstellung der Trimmung berühren Sie die Steuerknüppel 3 Sekunden lang nicht. Dadurch erhält der Empfänger die Informationen über die zur Optimierung der AS3X-Leistung geeigneten Einstellungen. Wenn Sie dies nicht tun, kann die Flugleistung beeinträchtigt werden. Turbo Timber 1.5m... -
Seite 29: Flugtipps Und Reparaturen
Flugtipps und Reparaturen Vor der Wahl des Flugstandorts die örtlichen Gesetze und Verordnungen konsultieren. HINWEIS: Steht ein Absturz unmittelbar bevor, die Gaszufuhr senken und Erste Schritte komplett trimmen. Wird dies unterlassen, können zusätzliche Schäden am Vor dem Fliegen einen Reichweitentest für das Funksystem Flugwerk sowie Schäden am Geschwindigkeitsregler und Motor auftreten. -
Seite 30: Pnp Version Empfängerauswahl Und Einbau
Flugzeug für 5 Sekunden vollkommen still stehen Falsche Reaktionen Falsche Einstellungen in den Empfänger, der Fliegen Sie NICHT. Korrigieren Sie die Einstellungen (bitte lesen Sie dazu in auf die AS3X kann einen Absturz verursachen der Empfängeranleitung nach) und fl iegen dann Ruderkontrolle Turbo Timber 1.5m... -
Seite 31: Leitfaden Zur Problemlösung
Leitfaden zur Problemlösung Problem Mögliche Ursache Lösung Das Gas befindet sich nicht im Leerlauf, und/oder die Steuerungen mit Gassteuerknüppel und Gastrimmung auf niedrigste Einstellung Gastrimmung ist zu hoch zurücksetzen Das Fluggerät re- agiert nicht auf Gas- Gas-Servoweg ist niedriger als 100% Sicherstellen, das der Gas-Servoweg 100% oder mehr beträgt eingaben, aber auf Gaskanal ist reversiert (umgedreht) -
Seite 32: Montage Des Modells; (Fortsetzung)
Flugzeug mit einer ausreichenden Geschwindigkeit, das Höhenruder leicht erforderlich ist. Beim Drehen oder Steuern mit Hundegang gegen den Wind zurückbringen, um es für den Start zu drehen. das Querruder gegen den Wind anlegen, um die Luvseite des Flügels unten zu Turbo Timber 1.5m... -
Seite 33: Haftungsbeschränkung
Ausmaßes führen. Dieses Produkt ist nicht für den Gebrauch durch Garantiezeitraum Kinder ohne die Aufsicht eines Erziehungsberechtigten vorgesehen. Die Anleitung Exklusive Garantie Horizon Hobby LLC (Horizon) garantiert, dass dasgekaufte enthält Sicherheitshinweise und Vorschriften sowie Hinweise für die Wartung und Produkt frei von Material- und Montagefehlern ist. Der Garantiezeitraum den Betrieb des Produktes. -
Seite 34: Garantie Und Service Kontaktinformationen
+49 (0) 4121 2655 100 Konformitätshinweise für die Europäische Union EU Konformitätserklärung EFL15275 Turbo Timber 1.5M PNP; Horizon LLC erklärt hiermit, dass dieses Anweisungen zur Entsorgung von Elektro-und Elektronik-Altgeräten für Produkt konform zu den essentiellen Anforderungen der EMC Direktive ist. -
Seite 35: Précautions Et Avertissements Liés À La Sécurité
REMARQUE La totalité des instructions, garanties et autres documents est sujette à modifi cation à la seule discrétion d’Horizon Hobby, LLC. Pour obtenir la documentation à jour de ce produit, veuillez consulter le site www.horizonhobby.com ou www.towerhobbies.com et cliquez sur l’onglet de support du produit. -
Seite 36: Contenu De La Boîte
Pièces optionnelles ..................68 INFORMATIONS D’AFFECTATION DE RÉCEPTEUR 36.1 sq/dm Canaux Fréquence 2 405 – 2 476 MHz Compatibilité DSM2 et DSMX Pour recevoir les mises à jour, les offres spéciales et plus encore, enregistrez votre produit sur https://www.horizonhobby.com/content/e-fl ite-rc Turbo Timber 1.5m... -
Seite 37: Technologie Safe Select
Technologie SAFE Select (BNF Basic) La version BNF Basic de cet avion intègre la technologie SAFE Select, qui peut offrir un niveau de protection supplémentaire en vol. Utilisez les instructions suivantes pour activer le système SAFE Select et l’affecter à un commutateur. Lorsque cette option est activée, SAFE Select empêche l’avion de bouger ou de tanguer au-delà de limites prédéterminées, et un auto-nivellement automatique garde l’avion en vol droit et horizontal lorsque les ailerons, les élévateurs et les gouvernes sont au point mort. -
Seite 38: Assemblage De La Maquette
2. Maintenez l’ensemble avec deux vis autotaraudeuses de 2 x 6 mm. préinstallé dans le fuselage entre les trains d’atterrissage. 2. Installez les deux vis autotaraudeuses de 3 x 10 mm pour maintenir les ensembles de ressorts en place. 2 x 6 mm 3 x 10 mm tête bombée tête bombée autotaraudeuse autotaraudeuse Turbo Timber 1.5m... -
Seite 39: Installation Du Stabilisateur
Assemblage du modèle Suite Installation du stabilisateur 1. Glissez la clé de stabilisateur (A) dans le trou situé à l’arrière du fuselage 2. Installez les deux parties du stabilisateur (gauche et droite) comme sur l’illustration. Assurez-vous que les guignols sont bien orientés vers le bas. 3. - Seite 40 (C). ATTENTION : N’écrasez ou n’endommagez PAS les câbles quand vous installez l’aile sur le fuselage. nstallez l aile sur le fuselage. Le démontage s’effectue en sens inverse. ontage s’effectue en sens inverse. Volets Eclairages Ailerons Turbo Timber 1.5m...
-
Seite 41: Affectation (Binding) / Activation Et Désactivation Safe Select
En cas de besoin, prenez contact avec le service technique Horizon Hobby. dépannage de l’émetteur pour d’autres instructions. En cas de besoin, prenez contact avec le service technique Horizon Hobby. -
Seite 42: Installation De La Batterie Et Armement Du Contrôleur
2 tonalités ascendantes. • Une DEL du récepteur va s’illuminer. Si le contrôleur émet un double-bip en continu après la connexion de la batterie, rechargez ou remplacez la batterie. 7. Réinstallez la trappe batterie. Turbo Timber 1.5m... -
Seite 43: Assignation D'un Interrupteur Pour La Technologie Safe Select
Désignation du commutateur SAFE ® Select La technologie SAFE ® Select peut être assignée à n’importe quel commutateur libre (2 ou Assignation d'un commutateur 3 positions) qui contrôle un canal (5 à 9) sur votre émetteur. Une fois attribué à un commutateur, le 1. -
Seite 44: Centre De Gravité (Cg)
Après avoir effectué le réglage des trims, ne touchez plus les manches durant 3 secondes. Le récepteur enregistre les nouveaux réglages pour optimiser l’effi cacité de l’AS3X. Les qualités de vol seront altérées si cette procédure n’est pas respectée. Turbo Timber 1.5m... -
Seite 45: Conseils De Vol Et Réparations
Conseils de vol et réparations Consultez les lois et ordonnances locales avant de choisir un espace de vol. REMARQUE : En cas de chute imminente, réduisez complètement les gaz et le trim (la compensation). Le non-respect de cette procédure risquerait d’endommager Avant de commencer Avant de piloter votre appareil, vérifi... -
Seite 46: Choix Et Installation Du Récepteur Pnp
Mauvaise réponse de l’appareil Paramétrage incorrect des NE volez PAS. Corrigez les paramètres des commandes (consulter le manuel du récepteur) aux essais de commande du directions des commandes du avant de voler système AS3X récepteur, pouvant causer un crash Turbo Timber 1.5m... -
Seite 47: Guide De Dépannage
Guide de dépannage Problème Cause possible Solution La manette des gaz n’est pas au ralenti (idle) et/ou Réinitialisez les commandes avec la manette des gaz et mettez le trim le trim des gaz est réglé à une valeur trop élevée des gaz à... -
Seite 48: Installation Des Fl Otteurs (Optionnelle)
Maintenez profondeur vers le bas lorsque l’avion est en roulage ou lors du décollage. la profondeur vers le haut lorsque l’appareil touche la piste et qu’il décélère sur l’eau. Turbo Timber 1.5m... -
Seite 49: Garantie Et Réparations
La garantie s’applique uniquement aux blessures et des dégâts. Horizon Hobby ne saurait être tenu responsable d’une produits achetés chez un revendeur Horizon agréé. Les ventes faites à des utilisation ne respectant pas les lois, les règles ou règlementations en vigueur. -
Seite 50: Informations De Contact Pour Garantie Et Réparation
Déclaration de conformité de l’Union européenne : Instructions relatives à l’élimination des D3E pour les utilisateurs rési- EFL15275 Turbo Timber 1.5m PNP; Horizon Hobby, LLC déclare par dant dans l’Union européenne la présente que ce produit est en conformité avec les exigences Ce produit ne doit pas être éliminé... - Seite 51 Non utilizzare componenti incompatibili o modifi care il prodotto in maniera diversa da quanto riportato nelle istruzioni fornite da Horizon Hobby, LLC. Il presente manuale contiene le istruzioni per la sicurezza, l’uso e la manutenzione del prodotto.
-
Seite 52: Contenuto Della Scatola
INFORMAZIONI PER LA CONNESSIONE (BINDING) DEL RICEVITORE Canali 36.1 sq/dm Frequenza 2405 – 2476 MHz Compatibilità DSM2 e DSMX Per ricevere gli aggiornamenti dei prodotti, offerte speciali e molto altro, registrare il prodotto sul sito https://www.horizonhobby.com/content/e-fl ite-rc Turbo Timber 1.5m... -
Seite 53: Tecnologia Safe Select
Tecnologia SAFE Select La versione base di BNF di questo aereo include la tecnologia SAFE Select che può offrire un livello extra di protezione in volo. Utilizzare le seguenti istruzioni per rendere attivo il sistema SAFE Select e assegnarlo a uno switch. Quando abilitato, SAFE Select impedisce all’aeroplano di effettuare operazioni bancarie o pitching oltre i limiti prestabiliti e l’autolivellamento automatico mantiene l’aereo in volo in posizione diritta e in piano quando gli alettoni, elevatore e stick del timone sono in posizione neutra. -
Seite 54: Montaggio Del Modello
2. Bloccare insieme l’unità con le due viti autofilettanti 2 x 6 mm. atterraggio. 2. Installare le due viti autobloccanti 3 x 10 mm per ancorare le unità di molla in sede. vite vite autofi lettante autofi lettante 2 x 6mm 3 x 10mm Turbo Timber 1.5m... - Seite 55 Montaggio del modello continuazione Installazione del piano di coda orizzontale 1. Inserire il tubo del piano di coda orizzontale (A) nel foro sul retro della fusoliera. 2. Assemblare i due pezzi (destro e sinistro) del piano di coda orizzontale come illustrato. Accertarsi che le squadrette siano rivolte in basso. 3.
-
Seite 56: Installazione Dell'ala
6. Allineare l’ala con la fusoliera e fi ssarla in posizione con le due viti nylon (C) incluse. ATTENZIONE: Quando si fi ssa l’ala alla fusoliera bisogna fare attenzione a NON pizzicare o danneggiare in qualche altro modo i cablaggi. Smontare in ordine inverso. ontare in ordine inverso. Flap Luci Alettone Turbo Timber 1.5m... -
Seite 57: Connessione / Commutazione On E Off Safe Select
Connessione fra trasmittente e ricevente / Commutare ON e OFF il SAFE Select Questo prodotto richiede una trasmittente compatibile Spektrum DSM2/DSMX. Per avere l’elenco completo delle trasmittenti approvate, si visiti il sito www.bindnfl y.com. Installazione del Bind Plug Questo aereo ha una funzione opzionale SAFE Select, che si può inserire (ON) o disinserire (OFF) facilmente facendo la connessione (binding) in un modo specifi... -
Seite 58: Installare La Batteria E Armare L'esc
Anche l’ESC produce una serie di tre toni ascendenti. Questi toni indicano che l’ESC è armato ammesso che lo stick del motore e il suo trim siano posizionati completamente in basso. • Un LED si accenderà sul ricevitore. 7. Reinstallare il coperchio. Turbo Timber 1.5m... -
Seite 59: Assegnazione Interruttore Per Safe Select
Assegnazione interruttore SAFE ® Select La tecnologia SAFE® Select può essere assegnata a un qualsiasi interruttore libero Assegnazione di un interruttore (posizione 2 o 3) che controlla un canale (5-9) sulla trasmittente. Una volta assegnata a 1. Collegare il velivolo per scegliere SAFE Select ON. Questo permetterà l’assegnazione un interruttore, SAFE Select ON assicura la fl... -
Seite 60: Baricentro (Cg)
Dopo aver regolato i trim, non toccare gli stick di comando per almeno 3 secondi. Questo permette alla ricevente di memorizzare le correzioni per ottimizzare le prestazioni dell’AS3X. Se non si fa questo, si potrebbe infl uire sulle prestazioni in volo. Turbo Timber 1.5m... -
Seite 61: Consigli Per Il Volo E Riparazioni
Consigli per il volo e le riparazioni Consultare le leggi e le normative locali prima di scegliere il luogo dove far volare l’aeromodello. AVVISO: nell’imminenza di un impatto, togliere completamente motore e trim. In caso contrario, si corre il rischio di danni più estesi alla cellula e anche all’ESC e Per iniziare Prima di andare in volo è... -
Seite 62: Scelta E Installazione Della Ricevente Per La Versione Pnp
Dalla verifi ca della direzione Impostazione della direzione sbagliata NON volare. Prima correggere l’impostazione della direzione (facendo riferimento al manuale dei controlli dell’AS3X sulla ricevente che potrebbe anche della ricevente) e poi volare risulta che sono sbagliati causare un incidente Turbo Timber 1.5m... -
Seite 63: Guida Alla Soluzione Dei Problemi
Guida alla soluzione dei problemi Problema Possibile causa Soluzione Lo stick motore e/o il suo trim non sono posizionati Resettare i comandi con stick e trim motore completamente in basso in basso L’aereo non risponde al comando motore, La corsa del servo è minore del 100% Regolare la corsa ad almeno il 100% ma gli altri comandi Il canale del motore è... -
Seite 64: Installazione Galleggianti (Opzionale)
SUGGERIMENTO: Usare una canna da pesca con una lenza robusta come tenere sollevato l’elevatore per gestire la velocità in acqua durante la fase di planata. attrezzo di recupero. Attaccare una palla da tennis alla lenza e lanciare la palla oltre l’aeromodello arenato per recuperarlo. Turbo Timber 1.5m... -
Seite 65: Garanzia
EMC. domestici. Al contrario, l’utente è responsabile dello smaltimento di EFL15250 Turbo Timber 1.5m BNF BASIC; Horizon Hobby, LLC con la presente tali rifi uti che devono essere portati in un centro di raccolta dichiara che il prodotto è conforme ai requisiti essenziali e ad altre disposizioni designato per il riciclaggio di rifi... -
Seite 66: Recommended Receivers
Aircraft Telemetry GPS Sensor Flugzeugtelemetrie-GPS-Sensor Capteur télémétrique GPS pour avion Telemetria per aerei - Sensore GPS *Not compatible with BNF, Telemetry receiver required *Nicht kompatibel mit BNF, Telemetrieempfänger erforderlich *Non compatible avec les modèles BNF, récepteur télémétrique requis *Non compatibile con BNF, necessita di ricevente con telemetria Turbo Timber 1.5m... -
Seite 67: Replacement Parts
Replacement Parts • Ersatzteile • Pièces de rechange • Pezzi di ricambio Part # | Nummer Description Beschreibung Description Descrizione Numéro | Codice EFL17554 Fuselage: Turbo Timber Turbo Timber: Rumpf Turbo Timber - Fuselage Fusoliera: Turbo Timber EFL17555 Wing: Turbo Timber Turbo Timber: Tragfl... -
Seite 68: Optional Parts
DX20 DSMX 20-Channel Transmitter Spektrum DX20 DSMX 20 Kanal Sender Emetteur DX20 DSMX 20 voies DX20 DSMX Trasmettitore 20 canali iX12 DSMX 12-Channel Transmitter Spektrum iX12 DSMX 12 Kanal Sender Emetteur iX12 DSMX 12 voies iX12 DSMX Trasmettitore 12 canali Turbo Timber 1.5m... - Seite 70 Turbo Timber 1.5m...
- Seite 72 E-Flite, Timber, AS3X, DSM, DSM2, DSMX, Airware, Bind-N-Fly, BNF, the Bind-N-Fly logo, Plug-N-Play, SAFE, the SAFE logo, ModelMatch, Dynamite, EC3, Kinexsis, Passport, Prophet and the Horizon Hobby logo are trademarks or registered trademarks of Horizon Hobby, LLC. The Spektrum trademark is used with permission of Bachmann Industries, Inc.