Herunterladen Inhalt Inhalt Diese Seite drucken
Inhaltsverzeichnis

Werbung

Verfügbare Sprachen

Verfügbare Sprachen

Schnurlostelefon
Téléphone sans fil
DE14
Telefono senza fili
Cordless telephone
Bedienungsanleitung
Mode d'emploi
Istruzioni per l'uso
Operating Instructions

Werbung

Inhaltsverzeichnis
loading

Inhaltszusammenfassung für switel DE14

  • Seite 1 Schnurlostelefon Téléphone sans fil DE14 Telefono senza fili Cordless telephone Bedienungsanleitung Mode d’emploi Istruzioni per l’uso Operating Instructions...
  • Seite 2 Bedienungsanleitung ..Mode d’emploi ... . . Istruzioni per l’uso ..Operating Instructions ..Declaration of Conformity .
  • Seite 3: Inhaltsverzeichnis

    − Inhaltsverzeichnis − Sicherheitshinweise ....... Bestimmungsgemäße Verwendung ......Aufstellungsort .
  • Seite 4 − Inhaltsverzeichnis − Das Telefonbuch ........Hinweise zum Telefonbuch .
  • Seite 5: Sicherheitshinweise

    − Sicherheitshinweise − Sicherheitshinweise Lesen Sie diese Bedienungsanleitung sorgfältig durch. Bestimmungsgemäße Verwendung Dieses Telefon ist geeignet für das Telefonieren innerhalb eines Telefonnetzes. Jede andere Verwendung gilt als nicht bestimmungsgemäß. Eigenmächtige Veränderungen oder Umbauten sind nicht zulässig. Öffnen Sie das Gerät in keinem Fall selbst und führen Sie keine eigenen Reparaturversuche durch.
  • Seite 6: Hinweis Für Medizinische Geräte

    − Sicherheitshinweise − Hinweis für medizinische Geräte Benutzen Sie das Telefon nicht in der Nähe von medizinischen Geräten. Eine Beeinflussung von Herzschrittmachern kann nicht völlig ausgeschlossen werden. DECT*−Telefone können in Hörgeräten einen unangenehmen Brummton verursachen. Reinigung und Pflege Reinigen Sie die Gehäuseoberflächen mit einem weichen und fusselfreien Tuch.
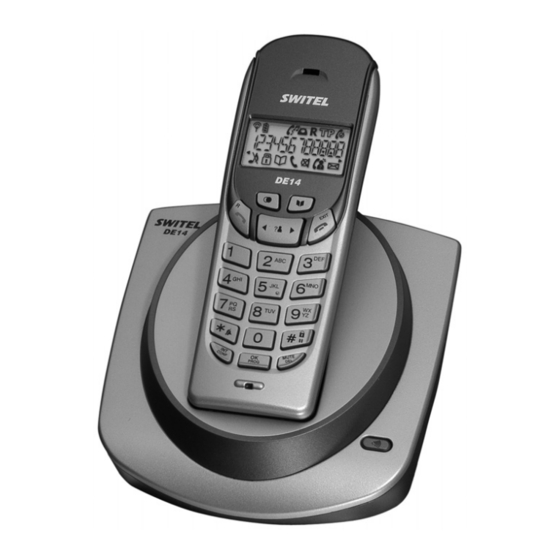
  • Seite 7: Bedienelemente

    − Bedienelemente − Bedienelemente Mobilteil 1. Telefonbuchtaste *G 2. Taste Gespräch beenden / Menü verlassen *„ 3. Anruferliste CLIP / Auswahltaste *- / ¢ / . 4. Tastensperre / Pause *” 5. Stummtaste / Löschen *D 6. Menütaste / OK−Taste *O 7.
  • Seite 8: Inbetriebnahme

    − Inbetriebnahme − Inbetriebnahme Sicherheitshinweise Achtung: Lesen Sie vor der Inbetriebnahme unbedingt die Sicherheitshinweise in Kapitel 1. Verpackungsinhalt prüfen Zum Lieferumfang gehören: eine Basisstation ein Telefonanschlusskabel ein Mobilteil zwei Standard−Akkus ein Netzanschlusskabel eine Bedienungsanleitung Basisstation anschließen Schließen Sie die Basisstation wie auf der Skizze abgebildet an. Verwenden Sie aus Sicherheitsgründen nur das mitgelieferte Netzanschluss−...
  • Seite 9: Standard−Akkus Einsetzen

    − Inbetriebnahme − Standard−Akkus einsetzen Drücken Sie auf den unteren Rand des Batteriefachdeckels (1) und entfernen Sie den Batteriefachdeckel nach oben (2). Legen Sie die Standard−Akkus ein (3). Achten Sie auf die richtige Polung! Schließen Sie das Batteriefach. Aufladen der Standard−Akkus Stellen Sie das Mobilteil bei der ersten Inbetriebnahme mit dem Display nach vorne für mindestens 14 Stunden auf die Basisstation.
  • Seite 10: Bedienung

    − Bedienung − Bedienung Das Display Display Beschreibung Dauerhaft: Die Verbindung zur Basisstation ist gut. Blinkend: Sie verlieren die Verbindung zur Basisstation. Zeigt den aktuellen Akkuladezustand an. Sie befinden sich im Menü Tonruf Mobilteil". Sie befinden sich im Menü Tonruf Basis". Sie befinden sich im Menü...
  • Seite 11: Darstellungssymbole Und Schreibweisen

    − Bedienung − Darstellungssymbole und Schreibweisen Folgende Darstellungssymbole und Schreibweisen werden in dieser Bedienungsanleitung verwendet: ˆ Mobilteil von der Basisstation nehmen ‰ Mobilteil auf die Basisstation stellen © Nummern oder Buchstaben eingeben 2 sec ” Abgebildete Taste 2 Sekunden drücken <...
  • Seite 12: Anrufe Führen

    − Bedienung − Anrufe führen © Rufnummer eingeben (max. 20 Stellen) Das Display zeigt maximal 12 Stellen an. Bei längeren Rufnummern werden nur die letzten 12 Stellen angezeigt. Bei Falscheingabe letzte Stelle löschen … Verbindung herstellen Sie können auch zuerst die Gesprächstaste … drücken und erhalten damit das Freizeichen.
  • Seite 13: Mikrofon Im Mobilteil Stummschalten

    − Bedienung − Mikrofon im Mobilteil stummschalten Sie können während eines Telefongespräches das Mikrofon des Mobilteils ausschalten. Mikrofon ausschalten Mikrofon einschalten 4.10 Tastensperre Sperren Sie das Tastenfeld, damit nicht ungewollt Tasten gedrückt werden. Trotz eingeschalteter Tastensperre können eingehende Gespräche normal entgegengenommen werden. 2 sec ”...
  • Seite 14: Externe Anrufbeantworter

    − Bedienung − 4.14 Externe Anrufbeantworter Einige Netzbetreiber stellen einen externen Anrufbeantworter für Sie bereit. Ihr Telefon informiert Sie mit dem Symbol über neue Nachrichten. Wenn Sie sich alle Nachrichten von Ihrem externen Anrufbeantworter angehört haben, erlischt das Symbol im Display. Sie können das Symbol auch folgendermaßen löschen: 2 sec „...
  • Seite 15: Das Telefonbuch

    − Das Telefonbuch − Das Telefonbuch Im Telefonbuch können Sie 10 Rufnummern mit Namen speichern. Hinweise zum Telefonbuch S Geben Sie bei allen Rufnummern immer die Vorwahl mit ein, damit das Telefon auch eingehende Ortsgespräche einem Telefonbucheintrag zuordnen kann. S Ist die Speicherkapazität von 10 Rufnummern erreicht, zeigt das Display beim nächsten Speichern die Meldung VOLL .
  • Seite 16: Rufnummern In Das Telefonbuch Eingeben

    − Das Telefonbuch − Rufnummern in das Telefonbuch eingeben ©, G Rufnummer eingeben (max. 20 Stellen) und Telefonbuchtaste drücken ©, O Namen eingeben (max. 8 Stellen) und bestätigen 123456789 Rufnummer erneut bestätigen Gespeicherte Rufnummern aus dem Telefonbuch wählen G, - oder ., … Telefonbucheintrag auswählen und Verbindung herstellen Gespeicherte Einträge im Telefonbuch ändern...
  • Seite 17: Rufnummernanzeige (Clip)

    − Rufnummernanzeige (CLIP) − Rufnummernanzeige (CLIP) Wenn diese Funktion an Ihrer Telefonleitung zur Verfügung steht, zeigt Ihnen das Display bereits die Rufnummer des Anrufers, wenn das Telefon klingelt. Haben Sie diese Rufnummer in Ihrem Telefonbuch gespeichert, wird anstatt der Rufnummer der Name angezeigt. Hat der Anrufer das Übertragen seiner Rufnummer unterdrückt, erscheint im Display die Meldung PRIVAT .
  • Seite 18: Einzelne Rufnummer Löschen

    − Rufnummernanzeige (CLIP) − Zwei unterschiedliche Displaysymbole informieren Sie, ob der Eintrag in der Anrufliste schon einmal angesehen wurde oder ob der Eintrag in der Anrufliste neu ist. Display Beschreibung Die Rufnummer wurde bereits angesehen. Der Eintrag in der Anrufliste ist neu. 6.1.2 Rufnummer zurückrufen ¢, - oder ., …...
  • Seite 19: Nebenstellenanlagen / Mehrwertdienste

    Ihrer Nebenstellenanlage einwandfrei funktioniert, erfahren Sie bei dem Händler, bei dem die Anlage gekauft wurde. R−Taste und die Mehrwertdienste Ihres Netzbetreibers Ihr SWITEL−Telefon unterstützt die wichtigsten Mehrwertdienste Ihres Netzbetreibers (z. B. Makeln, Anklopfen, Dreier−Konferenz). Bitte fragen Sie Ihren Netzbetreiber, welche Flash−Zeit Sie zur Nutzung von Mehrwertdiensten einstellen müssen (siehe Kapitel 8.4).
  • Seite 20: Einstellungen Und Menüstruktur

    − Einstellungen und Menüstruktur − Einstellungen und Menüstruktur Menüstruktur Alle Einstellungen für das Mobilteil und die Basisstation sind über ein benutzerfreundliches Menü zu erreichen. LAUTST 1 bis 5 MELODIE 1 bis 5 Tonruf Mobilteil MELODIE 1 bis 5 LAUTST 1 bis 5 Tonruf Basisstation 1 (120 ms) Flash−Zeit...
  • Seite 21: Tonruf Am Mobilteil Und Der Basisstation Einstellen

    − Einstellungen und Menüstruktur − Tonruf am Mobilteil und der Basisstation einstellen An Ihrem Mobilteil und der Basisstation können 5 verschiedene Tonrufmelodien und entsprechende Lautstärken eingestellt werden. Hauptmenü öffnen - oder . oder Untermenü auswählen und öffnen - oder . MELODIE 1 bis MELODIE 5 , O Melodie auswählen und bestätigen - oder .
  • Seite 22: Werkseinstellungen Wieder Herstellen

    − Einstellungen und Menüstruktur − Werkseinstellungen wieder herstellen Mit dieser Funktion werden das Mobilteil und die Basisstation wieder auf die Werkseinstellungen zurückgesetzt. 8.6.1 Werkseinstellungen Mobilteil Melodie Mobilteil: Lautstärke Mobilteil: 3 Melodie Basis: Lautstärke Basis: Hörerlautstärke: Mittel Flash−Zeit: 1 (120 ms) Wahlverfahren: 1 (MFV) Das Telefonbuch, die Anrufliste und die Wahlwiederholung...
  • Seite 23: Mehrere Mobilteile

    Basisstation anmelden wollen, melden Sie diese Mobilteile vorher von der alten Basisstation ab. Über den international genormten GAP Standard können Switel−Mobilteile und auch Mobilteile von Fremdherstellern in das Telefonsystem integriert werden. Genauso können Sie ein Switel−Mobilteil an Basisstationen anderer Hersteller anmelden, sofern diese Geräte nach dem GAP Standard...
  • Seite 24: Mehrere Mobilteile

    − Mehrere Mobilteile − An− und Abmelden von Mobilteilen 9.1.1 Anmelden von DE14 Mobilteilen 2 sec ˜ {ª} Paging−Taste an der Basisstation drücken Hauptmenü öffnen - oder . Untermenü auswählen und öffnen ©, O PIN−Code eingeben und bestätigen Dem Mobilteil wird eine interne Rufnummer gegeben. Das bereits angemeldete Mobilteil hat die interne Rufnummer 1.
  • Seite 25: Pin-Code Ändern

    − Mehrere Mobilteile − 1 9-1 oder 2 9-2 , O Abzumeldendes Mobilteil auswählen und bestätigen ©, O PIN−Code eingeben und bestätigen Im Display des abgemeldeten Mobilteils erscheint die Meldung N REG . Das Mobilteil ist nun abgemeldet und kann für externe und interne Gespräche nicht mehr benutzt werden.
  • Seite 26: Externe Gespräche Weiterleiten

    − Mehrere Mobilteile − Externe Gespräche weiterleiten Haben Sie ein externes Gespräch an einem Mobilteil entgegengenommen, können Sie das externe Gespräch auf ein anderes Mobilteil weiterleiten. I, 1 oder 2 Während des Gesprächs interne Rufnummer wählen … Gespräch annehmen „ Gespräch weiterleiten Sollte sich das gerufene Mobilteil nicht melden, können Sie sich das externe Gespräch mit der Taste I wieder...
  • Seite 27: Fehlerbeseitigung

    − Fehlerbeseitigung − Fehlerbeseitigung Haben Sie Probleme mit Ihrem Telefon, kontrollieren Sie bitte zuerst die folgenden Hinweise. Bei Garantieansprüchen wenden Sie sich bitte an Ihren Fachhändler. Fehler Lösungen − Keine Verbindung − Sie haben sich zu weit von der Basisstation zur Basisstation entfernt.
  • Seite 28: Wichtige Informationen

    − Wichtige Informationen − Wichtige Informationen 11.1 Technische Daten Merkmal Wert Standard DECT−GAP Stromversorgung Eingang: 230 V, 50 Hz Ausgang: 6 VDC 400 mA Reichweite (Außen/Innen) 300 m, 50 m Standby bis zu 110 h Max. Gesprächsdauer bis zu 8 h Aufladbare Standard−Akkus 2 x 1.2 V/ 650mAh, Größe: AAA Wahlverfahren...
  • Seite 29 − Table des matières − Consignes de sécurité ......Utilisation conforme aux prescriptions .
  • Seite 30 − Table des matières − Le répertoire ........Remarques concernant le répertoire .
  • Seite 31: Consignes De Sécurité

    − Consignes de sécurité − Consignes de sécurité Lisez très attentivement ce mode d’emploi. Utilisation conforme aux prescriptions Ce téléphone convient pour téléphoner à l’intérieur d’un réseau téléphonique. Toute autre utilisation est considérée comme non conforme à l’usage. Des modifications ou changements effectués d’un propre gré...
  • Seite 32: Remarque Relative Aux Appareils Médicaux

    − Consignes de sécurité − Remarque relative aux appareils médicaux N’utilisez pas le téléphone à proximité d’appareils médicaux. Une influence sur les stimulateurs cardiaques ne peut être totalement exclue. Les téléphones DECT* peuvent causer un bourdonnement désagréable dans les prothèses auditives. Nettoyage et entretien Nettoyez les surfaces du boîtier avec un chiffon doux et non pelucheux.
  • Seite 33: Eléments De Manipulation

    − Eléments de manipulation − Eléments de manipulation Combiné 1. Touche de répertoire *G 2. Terminer entretien / Quitter le menu *„ 3. Liste d’appels CLIP / Touche de sélection *- / ¢/ . 4. Verrouillage du clavier / Pause *” 5.
  • Seite 34: Mise En Service

    − Mise en service − Mise en service Remarques concernant la sécurité Attention: Avant la mise en service, lisez impérativement les consignes de sécurité mentionnées au chapitre 1. Contrôle du contenu du paquet Les éléments suivants font partie de la livraison: une base un câble de raccordement téléphonique...
  • Seite 35: Placez Des Piles Rechargeables Standard

    − Mise en service − Placez des piles rechargeables standard Appuyez sur le bord inférieur du cache du compartiment à piles (1) et retirez−le (2). Placez les piles rechargeables standard (3). Veillez à une polarisation correcte ! Fermez le compartiment à piles. Rechargement des piles rechargeables standard Lors de la première mise en marche, posez le combiné, avec l’écran vers l’avant, sur la base et laissez−le dessus pendant 14 heures.
  • Seite 36: Manipulation

    − Manipulation − Manipulation L’écran Ecran Description En continu: La liaison avec la base est bonne. Clignotant: Vous perdez la liaison avec la base. Indique le niveau actuel de chargement des piles. Vous vous trouvez dans le menu Sonnerie d’appel du com- biné".
  • Seite 37: Icônes De Visualisation Et Notations

    − Manipulation − Icônes de visualisation et notations Les icônes de visualisation et les notations suivantes sont utilisés dans ce mode d’emploi: ˆ Retirer le combiné de la base ‰ Poser le combiné sur la base © Entrer des chiffres ou des lettres 2 sec ”...
  • Seite 38: Comment Téléphoner

    − Manipulation − Comment téléphoner © Entrer le numéro (max. 20 chiffres) L’écran affiche 12 positions maximum. Dans le cas de numéros d’appel plus longs, seules les dernières 12 positions sont affichées. Si la saisie est erronée, effacer la dernière position …...
  • Seite 39: Désactivation Du Microphone Du Combiné (Silencieux)

    − Manipulation − Désactivation du microphone du combiné (silencieux) Vous pouvez débrancher le microphone du combiné pendant une communication. Débrancher le microphone Brancher le microphone 4.10 Verrouillage du clavier Verrouillez le clavier afin que des touches ne soient pas enfoncées par inadvertance.
  • Seite 40: Répondeur Externe

    − Manipulation − 4.14 Répondeur externe Quelques exploitants de réseau tiennent un répondeur externe à votre disposition. Votre téléphone vous informe par l’icône de nouveaux messages. Quand vous avez écouté tous les messages, l’icône disparaît de l’écran. Vous pouvez également effacer l’icône de la manière suivante: 2 sec „...
  • Seite 41: Le Répertoire

    − Le répertoire − Le répertoire Vous pouvez enregistrer 10 numéros avec nom dans votre répertoire. Remarques concernant le répertoire S Saisissez toujours les numéros d’appel avec le préfixe afin que le téléphone puisse aussi attribuer les communications locales à un enregistrement du répertoire. S 10 Si la capacité...
  • Seite 42: Saisie Des Numéros D'appel Dans Le Répertoire

    − Le répertoire − Saisie des numéros d’appel dans le répertoire ©, G Entrer le numéro (max. 20 chiffres) et appuyer sur la touche de répertoire ©, O Entrer le nom (max. 8 positions) et confirmer 123456789 Confirmer encore une fois le numéro Composition des numéros d’appel enregistrés dans le répertoire G, - ou ., …...
  • Seite 43: Affichage Du Numéro D'appel (Clip)

    − Affichage du numéro d’appel (CLIP) − Affichage du numéro d’appel (CLIP) − Si cette fonction est à votre disposition sur votre ligne téléphonique, l’écran vous indique le numéro du correspondant dès que le téléphone sonne. Si vous avez enregistré ce numéro d’appel dans votre répertoire, le nom sera affiché...
  • Seite 44: Effacer Tous Les Numéros

    − Affichage du numéro d’appel (CLIP) − Deux icônes distincts sur l’écran vous informent si l’enregistrement a déjà été regardé dans la liste d’appels ou si ce dernier est nouveau. Ecran Description Le numéro d’appel a déjà été regardé. L’enregistrement est nouveau. 6.1.2 Rappeler le numérpo ¢, - ou ., …...
  • Seite 45: Installations À Postes Supplémentaires / Services Spéciaux

    Touche R et les services confort de votre exploitant de réseau Votre téléphone SWITEL supporte les services confort les plus importants de votre exploitant de réseau (par ex. le va−et−vient, la signalisation d’appel en instance, la conférence à trois). Veuillez demander à...
  • Seite 46: Réglages Et Structure Du Menu

    − Réglages et structure du menu − Réglages et structure du menu Structure du menu Tous les réglages du combiné et de la base s’obtiennent par un menu facile d’utilisation. LAUTST 1 à 5 MELODIE 1 à 5 Sonnerie combiné MELODIE 1 à...
  • Seite 47: Réglage De La Sonnerie D'appel Du Combiné Et De La Base

    − Réglages et structure du menu − Réglage de la sonnerie d’appel du combiné et de la base Vous pouvez, sur votre combiné comme sur la base, régler 5 mélodies différentes ainsi que leur volume. Ouvrir le menu principal - ou . Sélectionner le sous−menu et l’ouvrir - ou .
  • Seite 48: Rétablir Les Réglages Usine

    − Réglages et structure du menu − Rétablir les réglages usine Cette fonction permet de remettre le combiné et la base en réglages usine. 8.6.1 Réglages en usine combiné Mélodie du combiné: 1 Volume du combiné: 3 Mélodie de la base: 1 Volume de la base: 3 Volume sonore Temps de flash:...
  • Seite 49: Plusieurs Combinés

    Par l’intermédiaire du GAP standard normé international, il est possible d’intégrer les combinés SWITEL ainsi que les combinés d’autres fabricants dans le système téléphonique. De même, vous pouvez déclarer un combiné SWITEL sur des bases d’autres fabricants dans la mesure où ces appareils travaillent d’après le GAP standard.
  • Seite 50: Déclaration Et Annulation De Combinés

    − Plusieurs combinés − Déclaration et annulation de combinés 9.1.1 Déclarer les combinés DE14 2 sec ˜ {ª} Appuyer sur la touche Paging sur la base pendant 3 sec Ouvrir le menu principal - ou . Sélectionner le sous−menu et l’ouvrir ©, O...
  • Seite 51: Modification Du Code Pin

    − Plusieurs combinés − Sur l’écran du combiné annulé apparaît le message N REG apparaît sur l’écran du combiné annulé. Le combiné est maintenant annulé et ne peut plus servir à passer des communications externes et internes. 9.1.5 Modification du code PIN L’inscription et l’annulation de combinés sont protégées par un code PIN contre les emplois abusifs.
  • Seite 52: Transférer Des Communications Externes

    − Plusieurs combinés − Transférer des communications externes Si vous avez pris une communication externe sur un combiné, vous pouvez transférer la communication externe sur un autre combiné. I, 1 ou 2 Composer un numéro interne pendant la communication … Réceptionner la communication „...
  • Seite 53: Elimination Des Perturbations

    − Elimination des perturbations − Elimination des perturbations Si vous avez des problèmes avec votre téléphone, contrôlez tout d’abord les indications suivantes sur votre appareil. En ce qui concerne le droit à la garantie, veuillez vous adresser à votre revendeur. Erreurs Solutions −...
  • Seite 54: Informations Importantes

    − Informations importantes − Informations importantes 11.1 Données techniques Caractéristique Valeur Standard DECT−GAP Alimentation en courant Entrée: 230 V, 50 Hz Sortie: 6 VDC 400 mA Portée (à l’extérieur / à l’intérieur) 300 m, 50 m Etat de veille jusqu’à 110 h Durée max.
  • Seite 55 − Indice − Indicazioni di sicurezza ......Impiego conforme agli usi previsti ......Luogo di installazione .
  • Seite 56: Indice

    − Indice − La rubrica telefonica ......Avvertenze riguardo la rubrica telefonica .
  • Seite 57: Indicazioni Di Sicurezza

    − Indicazioni di sicurezza − Indicazioni di sicurezza Leggere attentamente le presenti istruzioni per l’uso. Impiego conforme agli usi previsti Il presente apparecchio consente di compiere telefonate nell’ambito di una rete di telecomunicazione. Qualsiasi altro impiego è considerato come non conforme agli usi previsti. Non sono consentite modifiche o trasformazioni non autorizzate.
  • Seite 58: Avvertenza Per Apparecchiature Mediche

    − Indicazioni di sicurezza − Avvertenza per apparecchiature mediche Evitare di utilizzare il telefono nelle vicinanze di apparecchiature mediche. Non è possibile escludere completamente il rischio di un influsso su cardiostimolatori. Telefoni DECT* possono causare un fastidioso ronzio in apparecchi acustici. Pulizia e cura Pulire le superfici degli apparecchi con un panno morbido e antipilling.
  • Seite 59: Elementi Di Comando

    − Elementi di comando − Elementi di comando Unità portatile 1. Tasto rubrica telefonica *G 2. Tasto concludere telefonata / Uscire dal menu *„ 3. Elenco chiamate CLIP / Tasto di selezione *- / ¢/ . 4. Blocco tastiera / Pausa *” 5.
  • Seite 60: Messa In Funzione

    − Messa in funzione − Messa in funzione Indicazioni di sicurezza Attenzione: Prima della messa in funzione, leggere attenta- mente le indicazioni di sicurezza riportate al capitolo 1. Verificare il contenuto della confezione La confezione contiene: una stazione base un cavo di collegamento telefo- nico un’unità...
  • Seite 61: Inserire Le Batterie Standard Ricaricabili

    − Messa in funzione − Inserire le batterie standard ricaricabili Premere il bordo inferiore del coperchio del vano batterie (1) e rimuovere il coperchio spingendolo verso l’alto (2). Inserire le batterie standard ricaricabili (3). Osservare la giusta polarità! Chiudere quindi il vano batterie. Caricare le batterie standard ricaricabili Posizionare l’unità...
  • Seite 62: Esercizio

    − Esercizio − Esercizio Il display Display Descrizione Se la spia rimane accesa: Il collegamento con la stazione base è buono. Se la spia lampeggia: Il collegamento con la stazione base è interrotto. Indica lo stato di ricarica attuale delle batterie. E’...
  • Seite 63: Simboli Di Visualizzazione E Modalità Di Scrittura

    − Esercizio − Simboli di visualizzazione e modalità di scrittura Nel presente manuale di istruzioni per l’uso sono utilizzati i seguenti simboli di visualizzazione e modalità di scrittura: ˆ Estrarre l’unità portatile dalla stazione base ‰ Riporre l’unità portatile nella stazione base ©...
  • Seite 64: Condurre Telefonate

    − Esercizio − Attenzione: La visualizzazione del numero di chiamata e la funzione di avviso di chiamata sono dei servizi opzionali del rispettivo gestore di rete telefonica. Si consiglia di rivolgersi al proprio gestore di rete telefonica per ricevere ulteriori informa- zioni a riguardo.
  • Seite 65: Ripetizione Di Chiamata

    − Esercizio − Ripetizione di chiamata Il telefono memorizza l’ultimo numero di chiamata selezionato. F, … Selezione dell’ultimo numero di chiamata selezionato Nel caso in cui il numero di chiamata si trova memorizzato nella rubrica telefonica, sul display compare automaticamente il nome dell’interlocutore e non il numero di chiamata.
  • Seite 66: Selezione A Toni Temporanea

    − Esercizio − 4.13 Selezione a toni temporanea Qualora fosse possibile utilizzare il telefono soltanto con la procedura di selezione a IMPULSI (vedi capitolo 8.5), non sarà necessario rinunciare ai vantaggi della procedura di selezione a TONI (per es. interrogazione della segreteria telefonica).
  • Seite 67: La Rubrica Telefonica

    − La rubrica telefonica − La rubrica telefonica Nella rubrica telefonica è possibile memorizzare 10 numeri di chiamata con rispettivi nomi. Avvertenze riguardo la rubrica telefonica S I numeri di chiamata dovranno essere immessi sempre con il rispettivo prefisso, cosa che consente di assegnare anche ai numeri di chiamate urbane una delle voci dell’elenco telefonico.
  • Seite 68: Immettere Il Numero Di Chiamata Nella Rubrica Telefonica

    − La rubrica telefonica − Immettere il numero di chiamata nella rubrica telefonica ©, G Immettere il numero di chiamata (max. 20 segni) e premere il tasto rubrica telefonica ©, O Immettere e confermare il nome (max. 8 segni) 123456789 Confermare ancora una volta il numero di chiamata Selezionare numeri di chiamata memorizzati nella rubrica...
  • Seite 69: Visualizzazione Del Numero Di Chiamata (Clip)

    − Visualizzazione del numero di chiamata (CLIP) − Visualizzazione del numero di chiamata (CLIP) A condizione che la linea telefonica offra questa funzione, sul display LCD sarà visualizzato il numero del chiamante non appena il telefono squilla. Se il numero di chiamata è stato precedentemente memorizzato nella rubrica telefonica, al posto del numero di chiamata viene visualiz- zato il nome.
  • Seite 70 − Visualizzazione del numero di chiamata (CLIP) − S Nel caso in cui il chiamante è stato precedentemente memo- rizzato nella rubrica telefonica con nome, è visualizzato il nu- mero di chiamata. S Se la data e l’orario sono stati trasmessi, questi dati sono vi- sualizzati.
  • Seite 71 − Visualizzazione del numero di chiamata (CLIP) − LOESCH? „ Interrompere la cancellazione 6.1.5 Cancellare tutti i numeri di chiamata ¢, - o ., 2 sec D Aprire l’elenco chiamate e premere il ta- sto di cancellazione ALLE? Confermare il processo di cancellazione ALLE? „...
  • Seite 72: Impianti Telefonici Int. / Servizi Aggiunti

    Tasto R e i servizi a valore aggiunto del proprio gestore di rete telefonica Il telefono SWITEL supporta i più importanti servizi a valore aggiunto del proprio gestore di rete telefonica (per es. funzioni di chiamata in attesa, avviso di chiamata, conferenza a tre). Si prega di consultare il proprio gestore di rete telefonica per l’impostazione del tempo flash necessario...
  • Seite 73: Impostazioni E Struttura Menu

    − Impostazioni e struttura menu − Impostazioni e struttura menu Struttura di menu Tutte le impostazioni relative all’unità portatile e alla stazione base sono disponibili attraverso un menu di facile accesso e semplice funzionamento. MELODIE 1 fino LAUTST 1 fino Segnalazione di chia- mata unità...
  • Seite 74: Impostare La Segnalazione Acustica Di Chiamata Presso Unità

    − Impostazioni e struttura menu − 2 sec „ Modalità di stand−by Ogni singolo processo di programmazione si interrompe automaticamente se entro 30 secondi non segue alcuna immissione. Impostare la segnalazione acustica di chiamata presso unità portatile e stazione base Per unità...
  • Seite 75: Ripristinare Le Impostazione Di Default

    − Impostazioni e struttura menu − Ripristinare le impostazione di default Con questa funzione si ha modo di ripristinare le impostazioni di default per unità portatile e stazione base. 8.6.1 Impostazioni di default dell’unità portatile Melodia unità portatile: 1 Volume unità portatile: 3 Melodia base: Volume base: Volume del ricevitore:...
  • Seite 76: Maggior Numero Di Unità Portatili

    Lo standard internazionale GAP consente di integrare unità portatili SWITEL così come unità portatili di altri costruttori in un unico sistema telefonico. Allo stesso modo è possibile selezionare unità portatili SWITEL per stazioni base di altri costruttori, a condizione che gli apparecchi dispongano della funzione GAP standard.
  • Seite 77: Selezione E Deselezione Di Unità Portatili

    − Maggior numero di unità portatili − Selezione e deselezione di unità portatili 9.1.1 Selezione di unità portatili DE14 2 sec ˜ {ª} Premere il tasto di paging presso la stazione base Aprire il menu principale - o . Scegliere e aprire il sottomenu ©, O...
  • Seite 78: Modifica Del Codice Pin

    − Maggior numero di unità portatili − 1 9-1 o 2 9-2 , O Scegliere l’unità portatile che si desidera deselezionare ©, O Immettere e confermare il codice PIN Sul display dell’unità portatile deselezionata viene visualizzato il messaggio N REG .
  • Seite 79: Trasferimento Di Chiamate Esterne

    − Maggior numero di unità portatili − Trasferimento di chiamate esterne Avendo accettato una chiamata esterna con una delle unità portatili, è possibile trasferire la chiamata esterna sull’altra unità portatile. I, 1 o 2 Selezionare il numero di chiamata interno mentre si conduce la telefonata …...
  • Seite 80: Eliminazione Di Errori

    − Eliminazione di errori − Eliminazione di errori In presenza di problemi con il telefono, si prega di verificare innanzitutto quanto riportato nelle seguenti indicazioni. In caso di reclami entro il periodo di garanzia si prega di rivolgersi al rivenditore autorizzato. Errore Soluzione −...
  • Seite 81: Informazioni Importanti

    − Informazioni importanti − Informazioni importanti 11.1 Dati tecnici Caratteristica Valore Standard DECT−GAP Alimentazione elettrica Ingresso: 230 V, 50 Hz Uscita: 6 VDC 400 mA Distanza (esterni/interni) 300 m, 50 m Autonomia di stand−by fino a 110 ore Autonomia di chiamata fino a 8 ore Batterie standard ricaricabili 2 x 1.2 V/650 mAh, tipo: AAA...
  • Seite 82 − Contents − Safety Information ....... . Intended use ..........Installation location .
  • Seite 83 − Contents − Phone Book ........Information on the phone book .
  • Seite 84: Safety Information

    − Safety Information − Safety Information Please read this operating instruction manual thoroughly. Intended use The telephone is suitable for telephoning within a public telephone network system. Any other use is considered unintended use. Unauthorised modification or reconstruction is not permitted. Under no circumstances open the device or complete any repair work yourself.
  • Seite 85: Note On Medical Equipment

    − Safety Information − Notes on medical equipment Never use the telephone in the vicinity of medical equipment. It cannot be fully ruled out that they will not affect heart pacemakers. DECT* telephones can cause an unpleasant humming sound in hearing aids. Cleaning and upkeep Clean the housing surfaces with a soft, fluff−free cloth.
  • Seite 86: Operating Elements

    − Operating Elements − Operating Elements Handset 1. Phone book button *G 2. End call / Exit menu button *„ 3. Calls list (CLIP) / Scrolling button *- / ¢/ . 4. Key lock / Pause *” 5. Muting button / Delete *D 6.
  • Seite 87: Starting Up

    − Starting Up − Starting Up Safety notes Caution: It is essential to read the Safety Information in Chap- ter 1 before starting up. Checking the package contents The package contains: a base station a telephone connection cable a handset two standard batteries a power adapter plug an operating manual...
  • Seite 88: Inserting The Standard Batteries

    − Starting Up − Inserting the standard batteries Press on the lower edge of the battery compartment cover (1) and remove the battery compartment by lifting it up (2). Insert the standard batteries (3). Pay attention to correct polarity. Close the battery compartment cover. Charging the standard batteries When preparing to use the handset for the first time, place it in the base station with its display facing the front for at least 14 hours.
  • Seite 89: Operation

    − Operation − Operation Display Display Description Continuously on: The connection to the base station is good. Flashing: The connection to the base station is poor. Indicates the current battery charge status. You have activated the Handset ringer" menu. You have activated the Base ringer" menu. You have activated the Flash time"...
  • Seite 90: Icons Used And Display Texts

    − Operation − Icons Used and Display Texts The icons used and display texts appear as follows throughout this manual: ˆ Remove handset from the base station ‰ Place handset in the base station © Enter digits and letters 2 sec ” Press the button depicted for 2 seconds <...
  • Seite 91: Making A Call

    − Operation − Making a call © Enter the phone number (max. 20) A maximum of 12 digits can appear in the display. In the case of longer phone numbers, only the last 12 digits are displayed. Delete the last digit if incorrect …...
  • Seite 92: Muting The Microphone In The Handset

    − Operation − Muting the microphone in the handset The microphone in the handset can be deactivated during a telephone conversation. Deactivate the microphone Reactivate the microphone 4.10 Key lock Lock the keys to ensure numbers or functions are not activated inadvertently.
  • Seite 93: External Answering Machine

    − Operation − 4.14 External answering machine Some telephone network providers provide an external answering machine for you. If the icon appears in the display, it means new messages have been recorded for you. After playing back all the messages on the external answering machine, the icon disappears from the display.
  • Seite 94: Phone Book

    − Phone Book − Phone Book Up to 10 phone numbers can be stored, with associated names, in the phone book. Information on the phone book S Always enter the area access code with the phone numbers so that the telephone can also assign incoming local calls to a phone book entry.
  • Seite 95: Entering Phone Numbers In The Phone Book

    − Phone Book − Entering phone numbers in the phone book ©, Enter the phone number (max. 20 places) and press the phone book button ©, Enter the name (max. 8 places) and confirm 123456789 Confirm the phone number again Dialling phone numbers stored in the phone book G, - or ., …...
  • Seite 96: Caller Number Display (Clip Function)

    − Caller Number Display (CLIP Function) − Caller Number Display (CLIP Function) If this function is provided by your telephone service, the number of the caller appears in the display when the telephone rings. If the caller’s number is stored in the phone book, the name appears in the display instead of the phone number.
  • Seite 97 − Caller Number Display (CLIP Function) − Two different display icons indicate whether the entry in the calls list has already been viewed or whether the entry is new. Display Description The phone number has already been viewed. The entry in the calls list is new. 6.1.2 Calling back the phone number ¢, - or ., …...
  • Seite 98: Private Branch Exchanges / Supplementary Services

    R button and supplementary services offered by your telephone network provider Your SWITEL telephone supports the most important supplementary services offered by your telephone network provider (e.g. brokering, call waiting, three−way conferencing, etc.). Please contact your telephone network provider regarding which recall (Flash) time must be set to use the supplementary services (refer to Chapter 8.4).
  • Seite 99: Settings And Menu Structure

    − Settings and Menu Structure − Settings and Menu Structure Menu structure All the settings for the handset and base station can be set by accessing the relevant options in the user−friendly menu. LAUTST 1 to 5 MELODIE 1 to 5 Handset melody MELODIE 1 to 5 LAUTST 1 to 5...
  • Seite 100: Setting The Ringing Tones On The Handset And Base Station

    − Settings and Menu Structure − Setting the ringing tones on the handset and base station Five different ringing melodies and volume settings can be set on the handset and base station. Open the main menu - or . Select and open the submenu - or .
  • Seite 101: Restoring The Default Settings

    − Settings and Menu Structure − Restoring the default settings This function resets the handset and base station settings to their status on leaving the factory. 8.6.1 Default settings handset Handset melody: Handset volume: Base melody: Base volume: Receiver volume: Middle Recall time: 1 (120 ms)
  • Seite 102: Multiple Handsets

    The standardised GAP Standard enables SWITEL handsets and even those from other manufacturers to be integrated in the telephone system. In the same way, a SWITEL handset can be registered on base stations from other manufacturers as long as they comply with the GAP Standard.
  • Seite 103: Registering And Deregistering Handsets

    − Multiple Handsets − Registering and deregistering handsets 9.1.1 Registering DE14 handsets 2 sec ˜ {ª} Press the Paging button on the base station Open the main menu - or . Select and open the submenu ©, O Enter the PIN code and confirm The handset is assigned an internal call number.
  • Seite 104: Changing The Pin Code

    − Multiple Handsets − ©, O Enter the PIN code and confirm The message N REG appears in the display of the deregistered handset. The handset is thus deregistered and can no longer be used for external or internal calls. 9.1.5 Changing the PIN code The registration and deregistration of handsets are protected against...
  • Seite 105: Forwarding External Calls

    − Multiple Handsets − Forwarding external calls If you have taken an external call on a handset, the call can be transferred to another handset. I, 1 or 2 Dial the internal handset call number during a call … Take the call „...
  • Seite 106: Troubleshooting

    − Troubleshooting − Troubleshooting Should problems arise with the telephone, refer to the following information. In the case of claims under the terms of guarantee, contact your sales outlet. Faults Corrective measures − No connection to − The handset is too far from the base station. base station possible −...
  • Seite 107: Important Information

    − Important Information − Important Information 11.1 Technical data Feature Value Standard DECT−GAP Power supply Input: 230 V, 50 Hz Output: 6VDC 400mA Range (outdoors/indoors) 300 m, 50 m Standby Up to 110 h Max. talk time Up to 8 h Rechargeable standard batteries 2 x 1.2 V/650 mAh, size: AAA Dialling method...
  • Seite 108: Declaration Of Conformity

    TELGO AG Route d’Englisberg 17 CH−1763 Granges−Paccot Declare under our own responsibility that the product MODEL: DE14 DESCRIPTION: Cordless digital DECT telephone Is in conformity with directives: R&TTE Directive (1999/5/EC) COMPLIANCE IS ACHIEVED BY CONFORMITY TO THE FOLLOWING: EN 60950−1:2001, EN 41003:1998, EN 301489−1/−6:V1.4.1/V1.2.1, EN 301406:V1.5.1...

Inhaltsverzeichnis