Hamax Zenith Gebrauchsanleitung
Inhaltsverzeichnis

Verwandte Anleitungen für Hamax Zenith


Inhaltszusammenfassung für Hamax Zenith
- Seite 1 User Manual Zenith...
- Seite 2 Important! Important! BELANGRIJK! Wichtig! Ważne! Viktig! IMPORTANTE! Důležité! Importantă! Vigtigt! важно! ¡Importante! VIKTIGT! TÄRKEÄÄ! Dôležité! Važno Dôležité! FONTOS! Важно! IMPORTANTE! Önemli! Важливо! 중요 사항 BIKE FRAME TUBE NOT OK! Ø = 28 - 40mm NOT OK!
- Seite 3 User Manual Congratulations on purchasing the Hamax bicycle child seat. You now have a comfortable and safe child seat that can be adjusted to fit your child as she/he grows. Please read the instructions carefully before assembling or using the child seat.
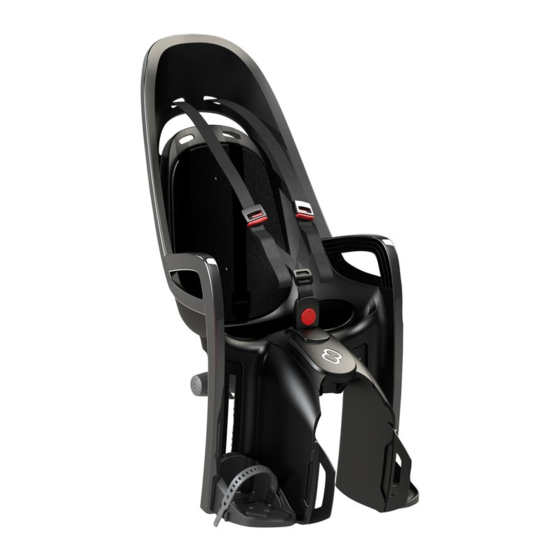
- Seite 4 Zenith 1. Main seat 2. Restraint system 3. Belt lock 4. Foot rests 5. Carrier bow 6. Fastening bracket complete a) Bracket b) Metal strips c) Fastening screws d) Safety indicator 7. Locking pin 8. Footguard...
- Seite 6 b) Tiras metálicas c) Tornillos de fjiación 1. Siège principal d) Indicador de seguridad 2. Système de harnais 7. Eje excéntrico 3. Fermeture de ceinture 8. Protección para los pies 4. Supports de pieds 5. Arc porteur 6. Étrier de fixation complet 1. Istuin a) Étrier 2. Turvakiinnitysjärjestelmä b) Sangles métalliques 3. Vyön lukkosolki c) Vis de fixation 4. Jalkatuet d) Indicateur de sécurité 5. Kantokaari 7. Tige excentrique 6. Kiinnityspidike kokonaisena 8. Protection de pied a) Pidike b) Metalliliuskat c) Kiinnitysruuvit Sitz d) Turvamerkinnät 2. Rückhaltesystem 7. Epäkeskoakseli 3. Gurtverschluss 8. Jalkasuoja...
- Seite 8 6. Komplett fäste a) Fäste Hoofdzitje b) Metallsektioner Harnassysteem c) Fästskruvar Riemsluiting d) Säkerhetsindikator Voetsteunen 7. Excenteraxel Draagboog 8. Fotskydd Beugelvergrendeling compleet a) Beugel b) Metalen strips 1. Hlavné sedadlo c) Bevestigingsschroeven 2. Obmedzovací systém d) Veiligheidsindicatie 3. Zámka pásu Excentrische stang 4.
- Seite 9 - Avertissement : N’attachez pas de baga- et qu’il ne puisse glisser hors du siège. ges ou d’équipements supplémentaires au Hamax recommande que le dossier soit siège pour enfants, puisque cela pourrait légèrement incliné vers l’arrière. faire augmenter le poids au-delà des 22 - Vérifiez que tous les composants de la bi-...
- Seite 10 à vous, de belles randonnées en - Si le siège pour enfants a souffert un ac- vélo avec votre siège Hamax pour cident ou des dommages, contactez votre enfants ! fournisseur pour qu’il vérifie si le siège peut encore être utilisé.
- Seite 11 - Warnung: Benutzen Sie den Monterings- og bruksanvisning Gratulerer med kjøpet av barnesetet fra Hamax anbefaler at ryggstøtten bør Hamax til sykkelen din. Du har nå helle litt bakover. et komfortabelt og sikkert barnesete • Kontroller at alle deler på sykkelen...
- Seite 12 Dette vil automatisk gjøre herlige sykkelturer sammen med garantien ugyldig og produsentens barnesetet fra Hamax! ansvar vil utløpe. • Advarsel: Vær oppmerksom på at det Vennlig hilsen oss på Hamax. ávod k použití Blahopřejeme ke koupi dětské (6). Viz obrázek F. Šrouby musejí být cyklosedačky Hamax. Pořídili jste si utaženy dostatečně silně aby držely pohodlnou a bezpečnou dětskou...
- Seite 13 Hamax! pozornění epřipojujte další zavazadla nebo zařízení do dětské Srdečně vás zdravíme my v Hamax. Brugervejledning Tillykke med købet af Hamax’ barnestol. - Barnestolen skal monteres ved hjælp Du har købt en sikker og behagelig stol, af beslaget (6) på cyklens rammerør. som dine børn kan vokse med.
-
Seite 14: Es Manual Del Usuario
Manual del usuario Enhorabuena. Ha adquirido un asiento Si tiene dudas sobre si el asiento va a infantil Hamax para bicicleta. Se trata encajar bien, le aconsejamos que se de un cómodo y seguro asiento infantil dirija a la casa conde compró la que se puede ajustar a medida que su bicicleta. - Seite 15 Hamax. - Recuerde que el asiento infantil puede calentarse mucho si le da el sol Saludos de Hamax. directamente. Compruebe que no esté caliente antes de colocar al niño en el asiento. Käyttöohjeet Onnittelut ostamastasi Hamax- lisävarusteita lastenistuimeen.
-
Seite 16: Hr Korisnički Priručnik
- Tarkista, ettei terävät esineet, kuten rikkoutuneet pyöränpinnat voi Toivotamme teille mukavia yhteisiä vahingoittaa lasta. pyöräretkiä. - Varmista, ettei turvakiinnitysjärjestelmä ole löysällä tai Ystävällisin terveisin Hamax Korisnički Priručnik estitamo na kupnji dječje sjedalice za bicikl Hamax. Nabavili ste ugodnu i Prije montaže ili uporabe dječje sjedalice sigurnu sjedalicu koju možete pozorno pročitajte upute. prilago avati kako vaše dijete raste. - Seite 17 áthelyezheti az ülést egy másik ljajte tu provjeru kako dijete raste. Postoji kerékpárra. opasnost da mu se stopalo zaglavi u kotaču ili u oprugama sjedalice i u Želimo vama i vašem djetetu mnogo kočnom mehanizmu. Dječja sjedalica ugodnih vožnji biciklom sa pruža dobru zaštitu bokova i stopala. Ipak sjedalicom tvrtke Hamax! preporučujemo da nabavite i montirate...
- Seite 18 Vigyázat e erősítsen a az ülés ne lejtsen előrefelé különben a gyermeküléshez más csomagot vagy gyermek kicsúszik az ülésből. felszerelést, mert emiatt a teljes A Hamax azt ajánlja, hogy a háttámla terhelés meghaladhatja a 22 kg-ot. Azt legyen kissé hátrafelé megdöntve. ajánljuk, hogy a külön csomagot a Ellenőrizze a kerékpár minden kerékpár elejéhez rögzítse.
- Seite 19 Hamax consiglia di fare in modo che lo vi il bambino. schienalesia leggermente reclinato. - Quando si trasporta la bici con la mac-...
- Seite 20 - Avvertenza: Non lasciare mai la bici olino Hamax! parcheggiata con unbambino seduto sul seggiolino. Cordiali saluti da Hamax. - Avvertenza: Non usare il seggiolino se è rottoin qualsiasi punto. - Coprire eventuali molle in sporgenza sul retro del sellino.
- Seite 21 Hamax raad aan dat de rugleuning lichtjes naar achter zou hellen. Bewaar deze instructies op een veili- - Controleer of alle onderdelen van de fiets...
- Seite 22 WAARSCHUWINGEN Wij wensen u en uw kindje vele leuke - Waarschuwing: Bevestig geen extra la- fietstochten toe met uw Hamax ding of uitrusting aan het kinderzitje aan- kinderzitje! gezien op die manier de totaal toegelaten last van 22 kg zou kunnen overschreden Vriendelijke groeten van uw Hamax-team.
-
Seite 23: Pt Instruções De Utilização
Pozdrowienia od firmy Hamax. Instruções de utilização Parabéns por ter adquirido a cadeira adicionais para a cadeira. infantil de bicicleta Hamax. Dispõe agora de uma cadeira confortável e INSTALAÇÃO segura que acompanha o crescimento - Pode ser montada em bicicletas com do seu filho. - Seite 24 AVISOS deslizar. - Aviso: Não junte bagagem ou A Hamax recomenda que a cadeira se equipamento extra à cadeira de criança, incline ligeiramente para trás. pois pode fazer com que o peso total - Verifique que todas as peças da...
- Seite 25 Manualul utilizatorului Felicitări pentru cumpărarea scaunului capacitatea maximă a scaunului. de copil Hamax pentru bicicletă. Acum u transporta i un copil care este prea ave i un scaun confortabil i sigur mic ca v rstă pentru a sta n siguran ă pentru copil, care poate fi reglat pentru n scaun. Transporta i numai un copil a se potrivi copilului dumneavoastră pe care este capabil să stea pe scaun fără măsură ce acesta cre te. ajutor pentru un interval de timp mai ndelungat cel pu in pe toată durata Vă rugăm să citi i cu aten ie deplasării cu bicicleta.
- Seite 26 н а в л . о ол н н о. но и и в л олж н о ани Hamax о н о л в ло и и . анавлива ло а о но олж н а и...
- Seite 27 Bruksanvisning Grattis till ditt köp av en cykelbarnsits - Barnsitsen monteras på cykelns från Hamax. Nu har du en bekväm och ramrör med fästet (6). Se bild F. säker barnsits som kan justeras så att Skruvarna måste dras åt tillräckligt hårt den passar ditt barn i takt med att han för att hålla barnsitsen säkert på...
- Seite 28 - Varning: Häng inte på något extra barnsitsen från Hamax! bagage eller utrustning på barnsitsen, eftersom det kan leda till att dess max. Vänliga hälsningar från oss på Hamax. Uzivatelska prirucka Blahoželáme vám k zakúpeniu detského dotiahnuté a pravidelne ich kontrolujte. sedadla na bicykel Hamax. Teraz máte - Detské...
- Seite 29 čo by Všetko najlepšie od Hamaxu. spôsobilo nehodu. ávod na použitie Blahoželáme vám k zakúpeniu detského – edá sa namontova na bicykle s sedadla na bicykel Hamax. Teraz mate nosičom batožiny s priemerom trubky bezpečné a pohodlné detské sedadlo viac ako 20 mm. ktoré sa dá prispôsobi rastu vášho – Sedadlo by sa malo namontova len na die a a. bicykel, ktorý je vhodný pre tento druh za aženia. Pre podrobné informácie sa...
- Seite 30 Želáme vám a vášmu dieťaťu die a. mnoho radostných výletov na – Pri preprave bicykla vozidlom (mimo vo- bicykli s vaším detským sedadlom zidla) odstráňte sedadlo. Vzduchová Hamax! ово во а о и л ла о а и ви а...
- Seite 31 а а в много щастливи пътувания с ал а а. вашата детска седалка Hamax! Вина и и ол ва о и и лна а и а а ни олан важ ни о Hamax. а ан и а о о и но в...
- Seite 32 и в и о и ина ож ов н и н о о. н а но о ви а о ан Hamax о н в ановл ва и ло а о ин а вала н в ли и на ило...
- Seite 33 ви о и ов ва и. В о о ж н Hamax. ал н о но а ни и. в н Kullan m K lavuzu Hamax bisiklet ocuk koltu unu sat n Bisiklet koltu u monte edilmi n z i in te ekkür ederiz. haldeyken bisikletin tüm par alar n n ocu unuz büyüdük e ayarlanabilme sorunsuz i lev yapt n kontrol edin.
- Seite 34 bisiklet i in yar ocu unuzun koltu a kullanabilirsiniz. uygulayaca yükün özellikle dönü ler ve frenlemeler s ras nda bisikletin Hamax çocuk koltuğu ile size ve stabilitesini ve al ma özelliklerini çocuğunuza keyifli yolculuklar de i tirebilece ini unutmay n. diliyoruz. yar Bisikletinizi asla ocu unuz ocuk koltu unda tek ba na Hamax’tan en iyi dileklerimizle.
- Seite 36 User Manual Zenith...
- Seite 37 Remove the transportation lock Zenith Press the front of the mounting bracket (6) to release the bracket from the transportation pins (13). Remove the transportation pins. The transportation pins (13) are recyclable. PRESS (13). Retire los pasadores de Appuyez sur la partie frontale de transporte.
- Seite 38 Verwijder de transportpinnen. De Zatlačte prednú čas montážnej transportpinnen (13) zijn recycleerbaar. konzoly (6) a konzola sa odpojí od prepravných zámkov (13). Odmontujte acisn przedni cz uchwytu prepravné zámky. Prepravné zámky mocuj cego 6) i zwolni uchwyt z 13) sú recyklovate né. blokady transportowej 13). sun blokad transportow . Blokad Stlačte prednú čas montážnej transportow 13) oddajemy do konzoly 6) pre uvo nenie konzoly z...
- Seite 39 Remove cable tie & protective foam blocks Zenith Remove the cable tie (11) by clipping them, then remove the protection foam blocks (12) from the front and back. Both the cable tie and protection foam blocks are recyclable. CLIP! Pic. 1 Retirez le serre-câbles (11) en le...
- Seite 40 Zdejmij opask zaciskow 11) Prestrihnite a odstráňte pásik 11) nast pnie usu piank zabezpieczaj c a potom odstráňte spredu a zozadu 12) znajduj c si z przodu i z ty u. ochranné penové bloky (12). Pásik aj Zarówno opaska zaciskowa jak i pianka ochranné penové bloky sú nadaj si do recyklingu. recyklovate né. Remova o cabo de fixação (11) Odstráňte káblové viazače 11) prendendo-o e, em seguida, remova os odrezaním potom odstráňte ochranné...
- Seite 41 Remove locking pin Zenith Turn the seat (1) upside down. Turn the locking pin (7) and push down the two snapfits before you pull the locking pin completely out. zoom Retournez le siège (1). Tournez la Okrenite sjedalicu 1) naopačke. barre excentrique (7) et enfoncez les Okrenite ekscentrično vratilo 7) i...
- Seite 42 ntoarce i scaunul 1) invers. н ал а а 1) о а но. Roti i axul excentric 7) i apăsa i n jos ав н и ни вал 7) и cele două dispozitive de blocare nainte и а на ол ва а и а о а de a trage complet afară axul excentric. и а и а и ло...
- Seite 43 Mount the carrier bar to the seat Zenith Insert the carrier bow (5) through the holes as shown below. Insérez l’arc porteur (5) dans les 캐리어 보우 trous comme illustré ci-dessous. Stecken Sie den Trägerbogen (5) Voer de draagboog (5) door de wie unten dargestellt durch die gaten zoals hieronder weergegeven.
- Seite 44 Ta y c yay 5) a a da gösterildi i gibi deliklerden tak n. о н а ажни а 5) о во и о а ано ниж...
- Seite 45 Insert locking pin Zenith Insert the locking pin (7) through the holes under the seat base, keeping it in unlocked position to allow final adjustment later on. 1) Bloqueado Insérez la goupille de verrouillage 2) Desbloqueado (7) dans les trous sous la base du siège, en la laissant en position non verrouillée...
- Seite 46 1) Locked 2) Unlocked zoom staan om later de eindafstelling toe te Vlozte blokovaci kolik (7) cez otvory laten. pod zakladnou sedadla, pricom ho 1) Vergrendeld udrziavajte v nezablokovanej polohe, aby 2) Onvergrendeld ste neskorsie umoznili zaverecne nastavenie. Wk adamy bolec blokuj cy 7) w 1) Zamknute otwory pod siedzeniem i pozostawiamy w 2) Odomknute...
- Seite 47 Fastening bracket Zenith Place the fastening bracket (6a) over the frame tube of the bike. Attach the bracket with the metal strips/ fastening screws (6b+c). Do not tighten fully, so that the height can be adjusted at a later stage.
- Seite 48 6b c). e zatežite ga potpuno kako tre cablu i eava cadrului. biste poslije mogli namjestiti visinu. Ako na području postavljanja metalnih а и жн о traka 6b) postoji žičano uže metalne 6a) на о а в ло и а. trake 6b) postavite izme u žičanog и и о алли и и užeta i cijevi okvira. о ла а и жн...
- Seite 49 Mount the bicycle child seat onto the bracket Zenith Guide the carrier bow ends (5) down into the bracket (6a) until you hear a click = locked position. 1. Adjust the bracket (6a) to the correct height until there is approx.
- Seite 50 Das empfohlene Anzugsmoment Introduzca los extremos de la beträgt 10 Nm. Es handelt sich barra portadora (5) por el soporte (6a) dabei jedoch lediglich um eine hasta que haga clic = posición de Empfehlung. Wenn sich die Halterung bloqueo. während der Verwendung bewegt, die Schrauben so fest anziehen, bis der Sitz 1.
- Seite 51 2. Ezután húzza meg a konzol hátoldalán lévő négy rögzítőcsavart Maak er een regel van de 6c) a következő mintázat szerint spanning van de beugel voor (meghúzás, majd meghúzás ismét): elke rit na te kijken en deze indien nodig aan te spannen. A javasolt meghúzási nyomaték 10 Nm. Ez azonban csak útmutatásnak Wsu ko ce pa ka mocuj cego tekinthető. Ha használat közben a...
- Seite 52 nou suportul, înainte de fiecare 1. Nastavte konzolu (6a) do správnej deplasare cu bicicleta. výšky, aby bola medzi detskou sedačkou bicykla a zadným kolesom В ав он и а ажни а blatníkom nosičom batožiny 5) вни в о 6a) о а н vzdialenos približne 1 12 cm. л...
- Seite 53 а н а о кріпильну скобу перед кожним н використанням велосипеда. Hamax Fastening bracket Zenith Hamax Fastening bracket: Make sure the carrier bow is correctly attached to the bracket by checking that the green safety indicators (6d) are visible. zoom...
- Seite 54 Étrier Hamax de fixation: controleren dat de groene Assurez-vous que l’arc porteur est veiligheidsindicaties (6d) zichtbaar zijn. correctement attaché à l’étrier en vérifiant que les indicateurs verts de chwyt mocuj cy Hamax sécurité (6d) sont visibles.
- Seite 55 Adjusting the seat Zenith Make sure the locking pin (7) is in the unlocked position before adjusting the seat to the correct lengthways position = max. 10 cm between the centre mark (14) on the seat and the rear hub. After adjustment, lock the seat by turning the locking pin (7) to locked position.
- Seite 56 Locked correcte positie in lengterichting gaat bakhjulets nav. Efter justeringen låser instellen = max. 10 cm tussen de du fast sitsen genom att vrida centrummarkering van het zitje en de låspinnen (7) till låst läge. achteras. Na deze instelling, dient u het zitje vergrendelen door de Skontrolujte, ci je blokovaci kolik vergrendelingspin (7) naar de...
-
Seite 57: Foot Rest Adjustment
Foot rest adjustment Zenith How to release the foot rest (4): Release the footrest handle on the back by flipping it upwards. Move the foot rest (4) to the preferred height and fasten the foot rest by pressing the foot rest handle down. - Seite 58 Jak odblokowa podpórk na nogi Ako uvo ni opierku nohy 4) 4) Odblokowa d wigni podpórki vo nite držadlo opierky na nohy na umieszczon z ty u przesuwaj c j w zadnej strane, aby ste ju prepli nahor. gór . Przesun podpórk 4) na Posuňte opierku na nohy 4) do želanej wybran wysoko i zamocowa w tej výšky a upevnite opierku na nohy pozycji naciskaj c d wigni podpórki ku stlačením držadla opierky na nohy do owi.
- Seite 59 Foot strap adjustment Zenith How to fasten/release the foot strap (a): To fasten the foot strap put the strap into the track and pull down to preferred length. The strap will automatically lock. It’s only possible to tighten the strap when it is in the track. To loosen the foot strap, just pull it out of the track.
- Seite 60 Jak odblokowa pasek Ako uvo ni pás na nohy a) Ak zabezpieczaj cy a) W celu zapi cia chcete upevni pás na nohy vložte pás paska należy wprowadzi go w prowadnik do dráhy a potiahnite ho nadol do i poci gn aby uzyska poż dan želanej d žky. Pás sa automaticky d ugo . Pasek zablokuje si zablokuje. Pás je možné utiahnu iba automatycznie. Zaci ni cie paska jest vtedy ke je vo svojej dráhe. Ak możliwe tylko wtedy gdy znajduje si w chcete uvo ni pás na nohy vytiahnite prowadniku.
- Seite 61 Extra footguard Zenith To mount the extra foot guard (8): Press the foot guard into the fitting grooves until it clicks. zoom Pour monter la protection de pieds Lisäpinnasuojan kiinnitys Paina supplémentaire (8) : Poussez la pinnasuojaa asennusuriin, kunnes protection de pied dans les rainures kuuluu naksahdus.
- Seite 62 CLICK! Opposite view Aby zamontowa specjaln os on Montáž extra ochrany nôh 8) przed szprychami 8) Wcisn os on Stlačte ochranu nôh do drážok kým do pasuj cych rowków do momentu nezapadne do svojej polohy. klikni cia. Montáž extra ochrany nôh 8) Para montar a proteção extra para Stlačte ochranu nôh do drážok kým pés (8): Encaixe a proteção para pés nezapadne do svojej polohy.
-
Seite 63: Restraint System
Restraint system Zenith The restraint system (2) can be attached and detached by pressing in or out the belt lock (3) shown in pic. 1. It is important to press at the middle of the belt lock button (pic. 2 & 3) when detaching the restraint system. - Seite 64 Pic. 1 Where to push: Pic. 2 Pic. 3 van de beugelknop duwt (fig. 2 en 3). självt ska kunna öppna spännet. Het openen van de beugelknop vereist de kracht van een volwassene, dit om Obmedzovací systém (2) sa dá te voorkomen dat het kindje deze zu pripoji a odpoji stlačením spony 3) kunnen openen.
- Seite 65 Chest buckle adjustment Zenith The restraint system length can be adjusted by adjusting buckle a and b. To adjust buckles (a+b) hold the buckle as shown in pic. 1. By pressing the red button, the belt loosens by pulling the buckle upwards.
- Seite 66 Pic. 1 Pic. 2 Pic. 3 Turvakiinnitysjärjestelmän pituutta Le cinture di sicurezza possono voi säätää säätämällä solkia a ja b. essere regolate agendo sulla fibbia a e Säädä solkia (a+b) pitämällä soljesta sulla fibbia b. Per regolare le fibbie (a+b) kuten kuvassa 1.
- Seite 67 Regulacja systemu D žka obmedzovacieho systému sa zabezpieczaj cego odbywa si za dá nastavi s pomocou spony a a b. Ak pomoc sprz czek a i b. W tym celu chcete nastavi spony a b) podržte należy je uchwyci w sposób pokazany sponu pod a znázornenia na obr. 1. na rys. 1. Po naci ni ciu czerwonego Stlačením červeného tlačidla sa pás przycisku poluzowa pasek ci gn c uvo ní potlačením spony do vrchu. sprz czk ku górze. Ak chcete utiahnu obmedzovací systém W celu zaci ni cia wystarczy poci gn potiahnite za koniec pásu (obr.
- Seite 69 How to remove the seat Zenith The seat (1) is easy to PRESS remove from the bicycle when not in use. Press the cover of the bracket and pull the seat bar free from the bracket (6). Le siège est facile à enlever Istuin (1) on helppo tarvittaessa lorsque la bicyclette n’est pas utilisée.
- Seite 70 Fotelik 1) można atwo zdj Sedadlo 1) sa ahko zloží z roweru gdy nie jest użytkowany. bicykla ke sa nepoužíva. Stlačte kryt aciskamy pokryw uchwytu konzoly a vytiahnite tyč sedadla z mocuj cego 6) i wyci gamy z niego konzoly (6). pa k fotelika. ал а а 1) л но A cadeira (1) pode ser facilmente он и а о в ло и а о а о н desmontada da bicicleta quando não и...
- Seite 71 Before embarking on a bicycle trip Zenith • Adjust the restraint system (2) • Adjust the foot rests (4) and fasten foot straps • Check the safety indicators (6d) of the bracket • Always wear helmets; both child and adult NB! Never leave your child alone in the bicycle child seat.
- Seite 72 • Juster sikkerhedsselen (2) • Säädä turvavyö (2) • Juster fodstøtterne og stram • Säädä jalkatuet ja kiinnitä jalkahihnat fodremmene (4) • Kontroller sikkerhedslåsene (6d) på • Tarkista pidikkeen turvamerkinnät beslaget. (6d). • Bær altid hjelm, både barn og voksen. •...
- Seite 73 • Állítsa be a (2) biztonsági övet • Ajuste o cinto de segurança (2) • Állítsa be a lábtartókat és húzza meg • Ajuste o apoio de pés e aperte as a (4) lábszíjakat correias (4) Ellenőrizze a konzol 6d) • Verifique os indicadores de segurança biztosításjelzőit.
- Seite 74 • Nastavte obmedzovací systém (2). • Prispôsobte opierky nôh (4) a upevnite pásy na nohy. Skontrolujte bezpečnostné indikátory (6d) na konzole. Vždy noste prilby die a aj dospelý. Dôležité! Nikdy nenechávajte vaše dieťa samo na sedadle bicykla. Nezabudnite prosím, že opierka nie je vhodná podpera, ktorá by bola schopná...
- Seite 75 Extra fastening bracket Zenith With an extra bracket (6) you can easily move one seat between two bicycles. Hamax fastening bracket (6) is available in two version; standard and lockable Art. nr.: 604001 STANDARD BRACKET Art. nr.: 604002 LOCKABLE BRACKET Nº...
- Seite 76 ни в ло и а . ил на о а Med ett extra fäste (6) flyttar du Hamax 6) во ва ан а enkelt sitsen mellan två olika cyklar. ан а на о а о а о...
-
Seite 77: Problem Solving
Problem solving Zenith Should your seat be too close to the carrier/wheel when mounted, there is an extra bar available which may solve your problem. Please contact your bicycle dealer. Problem: su problema. Por favor, póngase en Une fois monté, si votre siège est contacto con su distribuidor de situé... - Seite 78 Solution: Extra bar for small frames 604015 Zenith oplossing bieden. Contacteer uw Ak by bolo vaše sedadlo po montáži fietshandelaar. príliš blízko k nosiču kolesu je dostupná alšia tyč ktorá môže vyrieši Je li zamontowany fotelik znajduje váš problém. Kontaktujte, prosím, si zbyt blisko bagażnika ko a wówczas svojho predajcu bicyklov. dodatkowy pr t może pomóc w rozwi zaniu problemu. Prosimy o Ak by bolo vaše sedadlo po kontakt ze sprzedawc .
- Seite 79 This can be useful if your bicycle has a frame diameter outside the range of 28–40 mm, or if you have an electrical bicycle. Read more about the carrier adapters at www.hamax.com/child- bike-seat/caress-collection/zenith-with-carrier-adapter Full assembly instructions follows the product when purchased, and can also ble downloaded from www.hamax.com.
- Seite 80 A vásárlás után teljes összeszerelési utasítást kap, amelyet a www.hamax. Voit kiinnittää istuimen com oldalról le is tölthet. polkupyörän tavaratelineeseen myös istuinsovittimen avulla. Tästä voi olla Il seggiolino può essere montato etua, jos polkupyörän rungon halkaisija...
- Seite 81 28-40 mm, ou se tiver uma bicicleta nosiča namontova sedadlo na nosič elétrica. batožiny na bicykli. To môže by Leia mais sobre adaptadores para užitočné ak má váš bicykel priemer suportes de carga em www.hamax. rámu mimo rozsahu 28 – 40 mm alebo com/child-bike-seat/caress-collection/ ak máte elektrický bicykel. zenith-with-carrier-adapter O produto O adaptéroch nosičov si prečítajte viac vem acompanhado de instruções...
- Seite 82 28 4 mm aral nda kald nda veya elektrikli bir bisikletiniz oldu unda yararl olabilir. Ta y c adaptörleri hakk nda daha fazla bilgi i in bak n www.hamax.com child bike-seat/caress-collection/zenith-with- carrier adapter Tam montaj talimatlar sat n al nan ürünün yan nda verilir ve ayr ca www.hamax.com adresinden de indirilebilir. Ви а ож ож...