Inhaltsverzeichnis
Werbung
Verfügbare Sprachen
Verfügbare Sprachen
Quicklinks
CSR1 – PROFESSIONAL METAL DETECTOR
1. Introduction
Thank you for buying the CSR1! Please read the manual thoroughly before bringing this device into service.
If the device was damaged in transit, don't use it and contact your dealer.
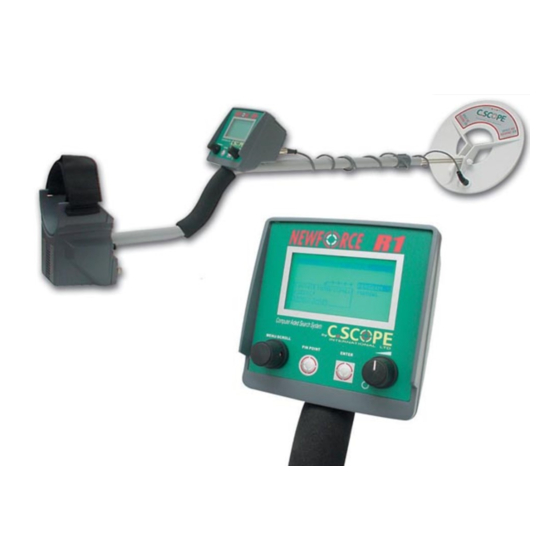
2. Assembly
Open the carton and remove the main housing assembly. Twist the plastic stem lock at the end of the upper stem to
allow the lower stem to be inserted. Adjust the length and rotate the lower stem to wrap the cable around the stems
and take up any slack. Push the cable into the cable slots to hold it firm while allowing enough cable for free
movement of the search head. Turn the stem lock to fix it at the desired position.
1. Battery compartment
2. Upper shank & handle grip
3. Control box + socket
4. Stem connecting nut
5. Cable
6. Lower stem
7. Search head fastener
3. Batteries & Battery Check
The CSR1 is powered by eight AA batteries (not supplied). It is advisable to use standard alkaline batteries to start
with. You can then evaluate the sort of use you give the detector and decide whether the investment in
rechargeables is justified.
The batteries should be fitted in the holder which is located in the battery compartment. To fit new batteries first
check the power switch on the unit is switched to OFF. Then loosen the two captive screws located in the battery
cover (do not fully remove these from the cover) and remove the cover. Inside is the battery holder. Lift out the holder
and detach the connector if it is already fitted. Load it with the eight batteries ensuring that each battery is inserted
the correct way round, (direction of batteries alternating). Roll each individual battery to ensure it is located correctly
and making proper contact. Replace the connector making sure that it is firm and well seated, and put the loaded
holder into the housing. Fit the cover and tighten the two captive screws finger tight.
CSR1
13. Headphone socket
14. Battery compartment
8. LCD display
9. Menu / Scroll button
10. Pinpoint push button
11. Enter button
12. Power on / off & volume control
1
VELLEMAN
Werbung
Inhaltsverzeichnis
Fehlerbehebung

Verwandte Anleitungen für Velleman CSR1


Inhaltszusammenfassung für Velleman CSR1
- Seite 1 3. Batteries & Battery Check The CSR1 is powered by eight AA batteries (not supplied). It is advisable to use standard alkaline batteries to start with. You can then evaluate the sort of use you give the detector and decide whether the investment in rechargeables is justified.
-
Seite 2: Display Layout
8. Ground radar simulator Ground radar simulator: this continuously scrolling radar is a view of the signal received by the CSR1. It can be used as an additional tool to analyse signals and it is also a useful pinpointing aid. It is visible in both full screen search mode and when the first level menus are displayed. - Seite 3 OPTIONS DEFAULT LAST RECALL COIN INLAND PROGRAM ALL METAL PROGRAM COIN BEACH PROGRAM USER PROGRAM 1 USER PROGRAM 2 STORE USER PROGRAM 1 USER PROGRAM 2 SETUP DISPLAY CONTRAST BRIGHTNESS GROUND ADJust FREQUENCY MIDDLE HIGH BATTERY RECHARGEABLE ALKALINE CSR1 VELLEMAN...
- Seite 4 DONE Learn Reject allows you to ‘teach’ the CSR1 to reject one or more targets that are swept over the search head. Once Learn Reject is selected the sample or samples are swept several times over the head. The CSR1 will then set the disc block at the sample ID point so that any objects with the same ID as the sample will be rejected.
- Seite 5 SET UP BACK This sets the sensitivity of the Pin Point, or non-motion, mode. When Pin-Pt Gain is selected the CSR1 automatically selects Pin Point mode. Once the desired level has been set by rotating the MENU/SCROLL control press then ENTER button to store the setting.
- Seite 6 Programs These functions allow the operator to store and recall the set up of the CSR1. Up to two programs can be stored. A program will store all of the current settings including Discrimination, Sensitivity, Frequencies etc. It will not store the Display Contrast and Brightness settings.
- Seite 7 CONTRAST: sets the contrast level or viewing angle of the display. Once set it shouldn’t require adjustment. However, if the CSR1 is used at dawn or dusk when the sun is low in the sky then some adjustment may be required to improve the visibility of the display.
-
Seite 8: General Hints
IMPORTANT NOTE: The backlight consumes a lot of power compared with the low consumption circuitry of the rest of the CSR1. For this reason to ensure long battery life the backlight should only be used where necessary and the brightness level kept to a minimum. When the backlight is on the symbol appears on the display to prevent inadvertent use. -
Seite 9: Detection Range
Detection Range Your CSR1 is a top performance deep seeker but adverse soil conditions can significantly reduce the depth of detection. Detection ranges will vary depending on the size of the object, the length of time an object has been buried, and the type of ground the object is buried in. -
Seite 10: Troubleshooting
Check that the search head is properly attached to the control box via the search head cable connector. c) Interchange batteries and ensures connections are correct and secure. Battery life can vary tremendously between makes, therefore your 'new' batteries may already be insufficiently powerful to run the detector. CSR1 VELLEMAN... -
Seite 11: Further Information
The CSR1 internal storage could be corrupted. To reset the detector ensure it is turned OFF, press and hold ENTER, turn the CSR1 ON and wait 5 seconds. You will be asked if you wish to reset the detector. Use the MENU/SCROLL control to highlight YES then press ENTER. -
Seite 12: Montage
3. Batterijen & batterijcontrole De CSR1 werkt op 8 AA batterijen (niet bijgeleverd). Wij raden aan eerst gewone alkalinebatterijen te gebruiken. Zo kunt u eerst zien hoe intensief u de detector gebruikt en of het de moeite loont oplaadbare batterijen aan te kopen. - Seite 13 5. Bedieningsknoppen en hun functie a. Aan/uit + volume (p.1 #12) Schakelt de CSR1 aan en uit door in of tegen wijzerzin te worden gedraaid en regelt het audiovolume. b. Menu / Scrollknop(p.1 #9) Deze draaiknop dient om de gewenste menuoptie te selecteren of de waarde van een instelling te regelen.
- Seite 14 OPTIONS DEFAULT LAST RECALL COIN INLAND PROGRAM ALL METAL PROGRAM COIN BEACH PROGRAM USER PROGRAM 1 USER PROGRAM 2 STORE USER PROGRAM 1 USER PROGRAM 2 SETUP DISPLAY CONTRAST BRIGHTNESS GROUND ADJust FREQUENCY MIDDLE HIGH BATTERY RECHARGEABLE ALKALINE CSR1 VELLEMAN...
- Seite 15 BACK DONE Learn Reject laat u toe de CSR1 te 'leren' een of meerdere voorwerp(en) die over de zoekspoel worden bewogen, te negeren. Wanneer Learn Reject geselecteerd is, moeten de stalen een aantal keren over de zoekspoel worden bewogen. De CSR1 zal die detectie opslaan zodat soortgelijke detecties zullen worden genegeerd.
- Seite 16 ENTER om deze instelling te bewaren. OPMERKING: Deze instelling heeft geen gevolg voor de radarweergave of het audiosignaal in Pinpoint mode. TIP! Regel dit niveau zo hoog mogelijk, maar zonder dat de CSR1 om de haverklap valse detecties doet. PIN - PT GAIN...
- Seite 17 DIGITAL: Dit audiosignaal gaat via de computer in de CSR1. In deze mode is er ofwel een toon ofwel geen toon (zonder schommeling in geluidssterkte): een voorwerp dat dieper zit zal hetzelfde volume opleveren als een voorwerp vlak onder de oppervlakte.
- Seite 18 LAST (laatste instelling): als de MANUAL mode geselecteerd is (zie hieronder) zal de CSR1 opstarten met dezelfde instellingen waarmee hij de laatste keer werd gebruikt. Zo kunt u de CSR1 afzetten terwijl u aan het zoeken bent naar voorwerpen diep in de grond en hem achteraf terug aanzetten om verder te doen zonder hem helemaal opnieuw te moeten afregelen.
- Seite 19 SET UP BACK Via dit menu kunt u instellen of u alkaline dan wel herlaadbare batterijen in de CSR1 hebt gestopt. Deze instelling zorgt ervoor dat de status van de batterijen correct wordt weergegeven op het scherm. Selecteer het correcte type met MENU/SCROLL en druk op ENTER om de selectie te bevestigen.
- Seite 20 Detectiebereik De CSR1 is heel goed voor zoeken op grote diepte, maar de bodemsoort kan het detectiebereik ernstig beperken. Het detectiebereik is afhankelijk van de grootte van het voorwerp, het tijdstip waarop het begraven werd, en het soort grond waarin het begraven is. Vaste grondsoorten leveren de beste resultaten op. Muntstukken kunnen ook op grote diepte teruggevonden worden als ze al een tijdje begraven zijn en gereageerd hebben met de zouten in de grond, waardoor ze voor de detector groter lijken.
-
Seite 21: Problemen En Oplossingen
Kijk na of de detectorkop goed vastzit aan het bedieningspaneel met de detectorkopkabel. c) Verwissel de batterijen onderling en zorg ervoor dat ze allemaal goed vast en in de juiste richting liggen. De levensduur van batterijen kan enorm verschillen. Soms zijn zelfs ‘nieuwe’ batterijen niet sterk genoeg. CSR1 VELLEMAN... -
Seite 22: Verdere Informatie
Dit kan aan zwakke batterijen liggen: controleer of ze nog voldoende vermogen hebben. b) Het intern geheugen van de CSR1 kan ontregeld zijn. Om de detector te resetten schakelt u hem uit en houdt u ENTER ingedrukt terwijl u de detector weer inschakelt. Na 5 seconden zal de CSR1 u vragen of u hem wil resetten. - Seite 23 3. Piles & test des piles Le CSR1 est alimenté par huit piles R03 (non fournies). Il est préférable de commencer avec des piles alcalines. Vous pouvez ainsi évaluer l’usage du détecteur et décider si l’investissement en piles rechargeables se justifie ou non.
- Seite 24 Valeur ID: le numéro ID (#4) correspond à la position du bloc ID (#1) sur l'échelle ID. Quand il n'y a pas de signal ou le signal est faible ou imprécis, le CSR1 affichera "??". Une valeur (et un bloc ID en haut de l'écran) apparaît quand un signal est fructueusement analysé.
- Seite 25 OPTIONS DEFAULT LAST RECALL COIN INLAND PROGRAM ALL METAL PROGRAM COIN BEACH PROGRAM USER PROGRAM 1 USER PROGRAM 2 STORE USER PROGRAM 1 USER PROGRAM 2 SETUP DISPLAY CONTRAST BRIGHTNESS GROUND ADJust FREQUENCY MIDDLE HIGH BATTERY RECHARGEABLE ALKALINE CSR1 VELLEMAN...
- Seite 26 BACK DONE Learn Reject vous permet de "apprendre" le CSR1 à ignorer des objets que vous bougez au-dessus du disque chercheur. Sélectionnez Learn Reject et bougez les échantillons au-dessus du disque chercheur. Le CSR1 sauvegardera cette détection pour ignorer de telles détections dans le futur.
- Seite 27 ENTER pour sauvegarder ce réglage. REMARQUE: Ce réglage n'affecte pas l'affichage du radar et le signal audio en mode de localisation (pinpoint). TUYAU! Mettez ce niveau aussi haut que possible, mais sans que le CSR1 donne de faux signaux. PIN - PT GAIN...
- Seite 28 à grande profondeur ne donnent que des signaux faibles. DIGITAL: ce signal audio passe par l'ordinateur dans le CSR1. Dans ce mode, ou bien il y a un ton, ou bien il n'y en a pas (sans variation en volume): un objet plus profond entraînera un ton aussi fort qu'un objet près de la surface.
- Seite 29 MANUAL ON SET UP BACK Pour déterminer le réglage de défaut du CSR1 quand il est allumé. Sélectionnez le réglage avec MENU/SCROLL et pressez ENTER. DEFAULT (réglage d'usine): votre CSR1 chargera toujours le réglage de défaut quand vous l'allumez. LAST (dernier réglage): quand le mode MANUAL est sélectionné (voir ci-dessous), le CSR1 démarrera avec le même réglage de la dernière utilisation.
-
Seite 30: Portée De Détection
SET UP BACK Ce menu sert à stipuler si vous avez mis des piles alcalines ou des accus rechargeables dans le CSR1, pour assurer que l'état des piles soit correctement affiché sur l'écran. Sélectionnez le type applicable avec MENU/SCROLL et pressez ENTER pour confirmer. - Seite 31 Portée de détection Votre CSR1 est très performant, mais un mauvais sol peut fortement limiter la profondeur de détection. La portée de la détection varie en fonction de la taille de l'objet, de la période pendant laquelle l’objet a été enterré et du type de terrain dans lequel l'objet est enterré.
- Seite 32 à terme. Après avoir utilisé votre détecteur dans un environnement hostile (eau salée, sable, etc.), nettoyez les parties extérieures à l'eau douce, en prêtant une attention particulière à la tête et aux tubes, puis séchez-les délicatement. CSR1 VELLEMAN...
-
Seite 33: Problèmes Et Solutions
Il se peut que les piles soient faibles. Vérifiez l'état des piles. b) Le mémoire interne du CSR1 est corrompu. Pour réinitialiser votre détecteur, éteignez-le, enfoncez le bouton ENTER pendant que vous l'allumez et attendez pendant 5 secondes. Le détecteur vous demandera si vous voulez le réinitialiser. - Seite 34 3. Pilas & prueba de pilas El CSR1 funciona con 8 pilas AA (no incluidas). Es preferible usar las pilas alcalinas estándar al principio. De esta manera puede evaluar si Ud. usa el detector frecuentemente y si es necesario comprar pilas recargables.
- Seite 35 Valor ID : el número de identificación (#4) corresponde con la posición del bloque ID (#1) en la escala ID. Si no hay una señal o si la señal es demasiado débil, se visualizará "??". Si el CSR1 analiza una señal con éxito, aparecerá un valor (y un bloque en la parte superior de la pantalla).
- Seite 36 OPTIONS DEFAULT LAST RECALL COIN INLAND PROGRAM ALL METAL PROGRAM COIN BEACH PROGRAM USER PROGRAM 1 USER PROGRAM 2 STORE USER PROGRAM 1 USER PROGRAM 2 SETUP DISPLAY CONTRAST BRIGHTNESS GROUND ADJust FREQUENCY MIDDLE HIGH BATTERY RECHARGEABLE ALKALINE CSR1 VELLEMAN...
- Seite 37 "Learn Accept" le permite "aprender" al CSR1 a aceptar objetos que Ud. mueve encima del cabezal. Seleccione "Learn Accept" y mueva las muestras encima del cabezal. El CSR1 "abrirá" el valor ID de la muestra para que se acepten todos los objetos con el mismo valor en le futuro. Cuidado de no aceptar "tierra" (ID 0)…...
- Seite 38 OBSERVACIÓN : Este ajuste no tiene consecuencias para la visualización del radar y la señal audio en modo de localización (pinpoint). ¡CONSEJO! Coloque este nivel lo más alto posible, pero sin que el CSR1 dé señales falsas. PIN - PT GAIN...
- Seite 39 DIGITAL : esta señal audio pasa por el ordenador en el CSR1. En este modo, o hay un sonido, o no hay un sonido (sin variación en el volumen) : un objeto que se encuentra más profundo causará un sonido tan fuerte como para un objeto lejos de la superficie.
- Seite 40 LAST (último ajuste) : si se ha seleccionado el modo "MANUAL" (véase abajo), el CSR1 empezará con el mismo ajuste que el último ajuste de antes de la desactivación. Esto le permite apagar el CSR1 durante una búsqueda para continuar más tarde sin que necesite reajustar todo.
- Seite 41 "MENU/SCROLL" y pulsando “ENTER”. OBSERVACIÓN IMPORTANTE : la retroiluminación utiliza mucha potencia en comparación con el resto de la electrónica del CSR1. Sólo utilícela si es necesario y seleccione el brillo mínimo para economizar las pilas. Si está iluminado la retroiluminación, el símbolo aparece en la pantalla.
- Seite 42 Rango de detección El CSR1 es un detector de profundidad, pero por malas condiciones del terreno puede disminuir sensiblemente la profundidad de detección. El rango de detección depende del tamaño del objeto, del período durante el que el objeto ha sido enterrado y del tipo de suelo en el que el objeto se encuentra.
- Seite 43 Después de haber usado el detector en agua salada, arena, etc., limpie las partes exteriores con agua dulce cuidando el cabezal y la barra. Séquelos bien. CSR1 VELLEMAN...
-
Seite 44: Solución De Problemas
Es posible que las pilas se hayan debilitadas. Verifique el estado de carga de las pilas. b) Le memoria interna del CSR1 puede ser corrompido. Para reinicializar el detector, desactívelo, pulse el botón “ENTER” mientras que está activándolo y espere durante 5 segundos. El detector le preguntará si quiere reinicializarlo. -
Seite 45: Batterien Und Batterien Prüfen
7. Befestigung der Suchsonde 3. Batterien und Batterien prüfen Der CSR1 wird über 8 AA-Batterien mit Strom versorgt (nicht mitgeliefert). Wir empfehlen, dass Sie zuerst normale Batterien verwenden. So können Sie prüfen, wie intensiv Sie den Detektor verwenden und ob es sich lohnt wiederaufladbare Batterien zu kaufen. -
Seite 46: Daten Auf Dem Schirm
Silberne Dollarmünze 5. Bedienelemente und ihre Funktion a. EIN/AUS + Lautstärke Schalten Sie den CSR1 ein und aus, indem Sie diesen Knopf im oder gegen den Uhrzeigersinn drehen. Er regelt auch die Lautstärke. b. Menü / Scroll-Knopf.( S. 1 #9) Mit diesem Knopf wählen Sie eine Menü-Option oder regeln Sie den Wert einer Einstellung. - Seite 47 Bestätigen. Wenn ein Wert eingegeben ist, drücken Sie auf ENTER um den Wert zu speichern. d. Pinpoint-Taste (S.1 #10) Halten Sie diese Taste eingedrückt für den 'Pinpoint'-Modus (ohne Bewegung). Der CSR1 kehrt zum normalen Modus zurück, sobald die Taste losgelassen wird. Wenn die Taste losgelassen wird, wird der Radar zurückgesetzt.
- Seite 48 BACK DONE 'Learn Reject' ermöglicht Ihnen, den CSR1 zu 'lehren', ein oder mehrere Objekt(e), die über der Suchsonde bewogen werden, zu ignorieren. Wann 'Learn Reject' selektiert ist, müssen die Muster einige Male über der Suchsonde bewogen werden. Der CSR1 wird diese Detektion speichern, sodass ähnliche Detektionen später ignoriert werden.
- Seite 49 So regeln Sie die Empfindlichkeit des Pinpoint-, oder des nicht- Bewegungsmodus. Wenn "Pin-Pt Gain" selektiert ist, schaltet der CSR1 automatisch auf den Pinpointmodus um. Drehen Sie an MENU/SCROLL um den Grad zu wählen und drücken Sie ENTER um die Einstellung zu speichern. Diese Einstellung ändert auch die Empfindlichkeit des Radars.
- Seite 50 (Bewegungs-)Modus. Selektieren Sie die gewünschte Option mit MENU/SCROLL und drücken Sie auf ENTER. ANALOG: Das Audiosignal kommt direkt vom Empfänger des CSR1. Es ermöglicht dem Benutzer den echten Signalpegel anzuhören und der fortgeschrittene Benutzer kann aus diesen Signale mehr Informationen ableiten. Der Nachteil ist aber, dass kleinere Objekte, die tief im Boden begraben sind, schwächere Signale erzeugen.
- Seite 51 DIGITAL: Dieses Audiosignal geht über den Computer im CSR1. In diesem Modus gibt es entweder einen oder keinen Ton (ohne Schwankungen der Lautstärke). Das bedeutet, dass ein tieferes Objekt dieselbe Lauststärke haben wird wie ein Objekt an der Oberfläche. Das erleichtert die Detektion, aber liefert wenig oder keine zusätzliche Information.
- Seite 52 BACK In diesem Menü können Sie die Displayeigenschaften regeln. Diese Einstellungen werden automatisch gespeichert wenn der CSR1 ausgeschaltet wird und sie werden erneut abgerufen wenn er eingeschaltet wird. Selektieren Sie den gewünschten Parameter mit MENU/SCROLL und drücken Sie ENTER. CONTRAST: regelt den Kontrast des Schirms. Wenn Sie den Kontrast eingestellt haben, brauchen Sie diese Einstellung nicht mehr zu ändern, es sei denn, dass Sie bei Sonnenaufgang oder –Untergang suchen wollen und das...
-
Seite 53: Bedienung
Stelle, an der sich das Objekt befindet. Graben Sie es vorsichtig aus um Beschädigung zu vermeiden. b. Detektionsbereich Der CSR1 eignet sich sehr für die Suche nach Objekten in großer Tiefe, aber der Bodentyp kann den Detektionsbereich ansehnlich verringern. Der Detektionsbereich ist von der Größe des Objekts, dem Zeitpunkt, an dem das Objekt begraben wurde, und der Bodenart abhängig. -
Seite 54: Die Wichtigkeit Der Korrekten Vorgehensweise
Es ist sehr wichtig, dass Sie die Suchsonde möglichst dicht und parallel zu dem Boden halten (siehe Abb. B). Halten Sie die Suchsonde nicht zu hoch oder in einem Winkel (Abb. A, B, C), denn so könnten Sie Objekte verfehlen. CSR1 VELLEMAN... -
Seite 55: Wartung Und Pflege (Lagern)
Könnte durch schlecht eingelegte Batterien verursacht werden Sorgen Sie dafür, dass die Batterien einen guten Kontakt machen und sie richtig eingelegt sind. b) Das Detektorkopfkabel ist locker. – Machen Sie es fest. c) Störung verursacht durch Radiosender (siehe oben) CSR1 VELLEMAN... -
Seite 56: Display Mit Wenigem Oder Keinem Kontrast
Batterien sind zu schwach: prüfen Sie die Batterieleistung. b) Fehler im internen Speicher des CSR1. Um den Detektor rückzustellen: schalten Sie den Detektor aus und halten Sie ENTER eingedrückt während Sie ihn einschalten. Nach 5 Sekunden werden Sie darum gebeten werden, den Detektor rückzustellen.