Fisher-Price C6408 Anleitung
Quicklinks
G Instructions
Model Number C6408
F Mode d'emploi
Modèle numéro : C6408
D Anleitung
Artikelnummer: C6408
N Gebruiksaanwijzing
Artikelnummer: C6408
I Istruzioni
Numero Modello: C6408
E Instrucciones
Número de referencia: C6408
G • IMPORTANT! KEEP FOR FUTURE REFERENCE.
• Please read these instructions before assembly and use of this product.
• Adult assembly is required.
• Tool required for assembly: Phillips screwdriver (not included).
• Requires one "D" (LR20) alkaline battery (not included) for soother operation;
three "D" (LR20) alkaline batteries (not included) for toy bar operation.
F • IMPORTANT ! CONSERVER CES INSTRUCTIONS POUR S'Y RÉFÉRER EN CAS DE BESOIN.
• Lire les instructions avant d'assembler et d'utiliser ce produit.
Il doit être assemblé par un adulte.
• Outil nécessaire pour l'assemblage : un tournevis cruciforme (non inclus).
• L'unité d'apaisement fonctionne avec une pile alcaline LR20 (non incluse).
• Le panneau d'activités fonctionne avec trois piles alcalines LR20 (non incluses).
D • WICHTIG! BITTE FÜR MÖGLICHE RÜCKFRAGEN AUFBEWAHREN.
• Die Anleitung vor Zusammenbau und Gebrauch des Produkts bitte sorgfältig durchlesen.
• Zusammenbau durch einen Erwachsenen erforderlich.
Für den Zusammenbau ist ein Kreuzschlitzschraubenzieher erforderlich (nicht enthalten).
• Eine Alkali-Monozelle D (LR20) für das Funktionselement erforderlich(nicht enthalten).
• Drei Alkali-Monozellen D (LR20) für die Spielzeugleiste erforderlich(nicht enthalten).
N • BELANGRIJK! BEWAAR DEZE GEBRUIKSAANWIJZING. KAN LATER NOG
VAN PAS KOMEN.
• Lees vóór montage en gebruik van dit product eerst deze gebruiksaanwijzing.
• Moet door volwassene in elkaar worden gezet.
• Benodigd gereedschap: kruiskopschroevendraaier (niet inbegrepen).
• De trilfunctie werkt op één "D" (LR20) alkalinebatterij (niet inbegrepen);
de s peelgoedstang werkt op drie "D" (LR20) alkalinebatterijen (niet inbegrepen).
I • IMPORTANTE! CONSERVARE PER EVENTUALE RIFERIMENTO.
• Leggere queste istruzioni prima del montaggio e dell'uso.
• Il giocattolo deve essere montato da un adulto.
• Attrezzo richiesto per il montaggio: cacciavite a stella (non incluso).
• Richiede una pila alcalina formato torcia (LR20) (non inclusa) per l'attivazione
dell'unità di rilassamento; tre pile alcaline formato torcia (LR20) (non incluse)
per l'attivazione della barra.
E • ¡IMPORTANTE! GUARDAR PARA FUTURA REFERENCIA.
• Leer estas instrucciones antes de ensamblar y usar el producto.
• Requiere ensamblaje por un adulto.
• Herramienta necesaria para el ensamble: destornillador de cruz (no incluido).
• Funciona con una pila alcalina tipo 1 x "D" (LR20) x 1,5V (no incluida) para la unidad
tranquilizante; y tres pilas alcalinas tipo 3 x "D" (LR20) x 1,5V (no incluidas) para
la barra de juguetes.
• LEA LAS INSTRUCCIONES ANTES DE USAR ESTE PRODUCTO.
K Brugsanvisning Käyttöohjeet
Model nummer: C6408
P Instruções
Referência do Produto: C6408
T Käyttöohjeet
Mallinumero: C6408
M Bruksanvisning
Modellnummer: C6408
s Anvisningar
Modellnummer: C6408
R √‰ËÁ›Â˜
∞ÚÈıÌfi˜ ¶ÚÔ˚fiÓÙÔ˜: C6408
K • VIGTIGT! GEM DENNE BRUGSANVISNING TIL SENERE BRUG.
• Læs venligst denne brugsanvisning, før legetøjet samles og tages i brug.
• Produktet skal samles af en voksen.
• Der skal bruges en stjerneskruetrækker (medfølger ikke), når legetøjet samles.
• Der skal bruges et alkalisk "D"-batteri (LR20 – medfølger ikke) til stolen og tre
alkaliske "D"-batterier (LR20 – medfølger ikke) til legetøjsstangen.
P • ATENÇÃO! GUARDE ESTE FOLHETO PARA REFERÊNCIA FUTURA.
• Por favor leia as instruções antes de montar e utilizar este produto.
• A montagem deve ser feita por um adulto.
• Ferramenta necessária para a montagem: chave de fendas (não incluída).
• A unidade relaxante funciona com uma pilha "D" (LR20) alcalina (não incluída);
a barra de actividades funciona com três pilhas "D" (LR20) alcalinas (não incluídas).
T TÄRKEÄÄ! SÄILYTÄ NÄMÄ OHJEET.
• Lue nämä ohjeet huolellisesti, ennen kuin alat koota ja käyttää tuotetta.
• Tuote on tarkoitettu aikuisen koottavaksi.
• Kokoamiseen tarvitaan ristipäämeisseli (ei mukana pakkauksessa).
• Tuuditusyksikköön tarvitaan yksi D-alkaliparisto (LR20), ei mukana pakkauksessa
ja lelutankoon kolme D-alkaliparistoa (LR20), ei mukana pakkauksessa.
M • VIKTIG! OPPBEVARES FOR SENERE BRUK.
• Les bruksanvisningen før montering og bruk av dette produktet.
• Montering må foretas av en voksen.
• Du trenger følgende verktøy til monteringen: Stjerneskrujern (medfølger ikke).
• Bruker ett alkalisk D-batteri (LR20, medfølger ikke) for vibreringsenheten og tre
alkaliske D-batterier (LR20, medfølger ikke) for lekebøylen.
s • VIKTIGT ! SPARA FÖR FRAMTIDA ANVÄNDNING.
• Läs dessa anvisningar innan du monterar eller använder produkten.
• Kräver vuxenhjälp vid montering.
• Verktyg som krävs för montering: Stjärnskruvmejsel (ingår ej).
• Kräver ett alkaliskt LR20-batteri (D) (medföljer ej) för vyssjaren, tre alkaliska
LR20-batterier (D) (medföljer ej) för leksaksbågen.
R • ¶ƒ√™√Ã∏! ∫ƒ∞∆∏™∆∂ ∆π™ √¢∏°π∂™ °π∞ ª∂§§√¡∆π∫∏ Ã∏™∏.
• ¢È·‚¿ÛÙ ÙȘ Ô‰ËÁ›Â˜ ÚÈÓ ÙËÓ Û˘Ó·ÚÌÔÏfiÁËÛË Î·È ÙËÓ ¯Ú‹ÛË ÙÔ˘ ·È¯ÓȉÈÔ‡.
• ∞·ÈÙÂ›Ù·È Û˘Ó·ÚÌÔÏfiÁËÛË ·fi ÂÓ‹ÏÈη.
• ∂ÚÁ·ÏÂ›Ô ÁÈ· ÙË Û˘Ó·ÚÌÔÏfiÁËÛË: ™Ù·˘ÚÔηÙÛ¿‚È‰Ô (‰ÂÓ ÂÚÈÏ·Ì‚¿ÓÂÙ·È).
• ∞·ÈÙÂ›Ù·È ÌÈ· ·ÏηÏÈ΋ Ì·Ù·Ú›· ÌÂÁ¤ıÔ˘˜ "D" (LR20) (‰ÂÓ ÂÚÈÏ·Ì‚¿ÓÂÙ·È)
ÁÈ· ÙÔ Ì˯·ÓÈÎfi ̤ÚÔ˜, ÙÚÂȘ ·ÏηÏÈΤ˜ ̷ٷڛ˜ ÌÂÁ¤ıÔ˘˜ "D" (LR20) (‰ÂÓ
ÂÚÈÏ·Ì‚¿ÓÔÓÙ·È) ÁÈ· ÙËÓ Ì¿Ú· ·È¯ÓȉÈÔ‡.

Verwandte Anleitungen für Fisher-Price C6408


Inhaltszusammenfassung für Fisher-Price C6408
- Seite 1 G Instructions K Brugsanvisning Käyttöohjeet Model Number C6408 Model nummer: C6408 F Mode d’emploi P Instruções Modèle numéro : C6408 Referência do Produto: C6408 D Anleitung T Käyttöohjeet Artikelnummer: C6408 Mallinumero: C6408 N Gebruiksaanwijzing M Bruksanvisning Artikelnummer: C6408 Modellnummer: C6408...
- Seite 2 GWARNING FATTENTION DWARNUNG NWAARSCHUWING IAVVERTENZA EPRECAUCIÓN KADVARSEL PADVERTÊNCIA TVAROITUS MADVARSEL sVARNING R¶ÚÔÂȉÔÔ›ËÛË G To prevent serious injury or death: K Undgå, at barnet kommer alvorligt til skade eller dør: • It is dangerous to use this reclined cradle on an elevated surface. •...
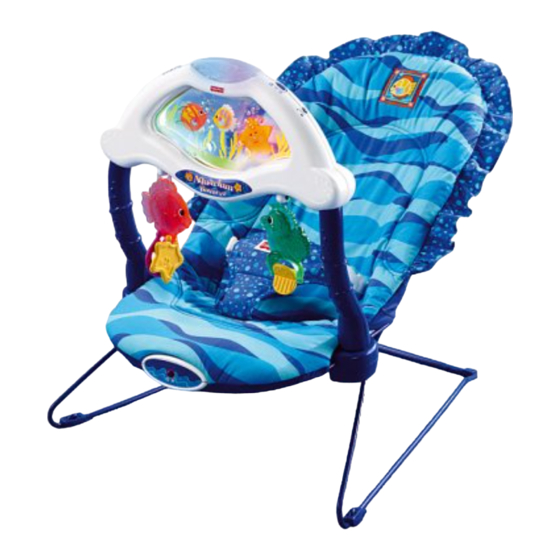
- Seite 3 G Parts F Éléments D Teile N Onderdelen I Componenti E Piezas K Dele P Peças T Osat M Deler s Delar R ª¤ÚË G Toy Bar K Legetøjsstang F Panneau d’activités P Barra de Actividades G Removable Teether Rings D Spielzeugleiste T Lelutanko F Anneaux de dentition détachables...
- Seite 4 G Battery Installation F Installation des piles D Einlegen und Auswechseln der Batterien N Het plaatsen van de batterijen I Come Inserire le Pile E Colocación de las pilas K Isætning af batterier P Instalação das Pilhas T Paristojen asennus M Innsetting av batterier s Batteriinstallation R ∆ÔÔı¤ÙËÛË...
- Seite 5 G Battery Installation F Installation des piles D Einlegen und Auswechseln der Batterien N Het plaatsen van de batterijen I Come Inserire le Pile E Colocación de las pilas K Isætning af batterier P Instalação das Pilhas T Paristojen asennus M Innsetting av batterier s Batteriinstallation R ∆ÔÔı¤ÙËÛË...
- Seite 6 G Battery Safety Information F Mises en garde au sujet des piles D Batteriesicherheitshinweise N Batterij-informatie I Norme di Sicurezza per le Pile E Información de seguridad acerca de las pilas K Information om sikker brug af batterier P Informação de Segurança sobre Pilhas T Tietoa paristojen turvallisesta käytöstä...
- Seite 7 G Battery Safety Information F Mises en garde au sujet des piles D Batteriesicherheitshinweise N Batterij-informatie I Norme di Sicurezza per le Pile E Información de seguridad acerca de las pilas K Information om sikker brug af batterier P Informação de Segurança sobre Pilhas T Tietoa paristojen turvallisesta käytöstä...
- Seite 8 E ¡IMPORTANTE! Previo al montaje, revisar que este producto no tenga hardware dañado, conexiones sueltas, piezas faltantes o bordes filosos. NO usar el producto si falta o está rota alguna pieza. Póngase en contacto con la oficina Fisher-Price más próxima a su localidad para obtener piezas de repuesto e instrucciones, en caso de ser necesarias. No usar piezas de terceros.
- Seite 9 G Assembly F Assemblage D Zusammenbau N Montage I Montaggio E Montaje K Sådan samles produktet P Montagem T Kokoaminen M Montering s Montering R ™˘Ó·ÚÌÔÏfiÁËÛË G Coloured Tabs G Coloured Tab K Farvet tap F Languettes de couleur F Languette de couleur P Lingueta Colorida D Farbige Laschen D Farbige Lasche...
- Seite 10 G Assembly F Assemblage D Zusammenbau N Montage I Montaggio E Montaje K Sådan samles produktet P Montagem T Kokoaminen M Montering s Montering R ™˘Ó·ÚÌÔÏfiÁËÛË G Flex Base Wires Inward E • Colocar el reposapiés de modo que las tapas del compartimento de pilas de F Supports de la base courbés vers l’intérieur la unidad electrónica queden en posición vertical.
- Seite 11 G Assembly F Assemblage D Zusammenbau N Montage I Montaggio E Montaje K Sådan samles produktet P Montagem T Kokoaminen M Montering s Montering R ™˘Ó·ÚÌÔÏfiÁËÛË G IMPORTANT! You MUST position the seat back tube correctly for proper assembly of this product! F IMPORTANT ! Le tube du dossier DOIT être positionné...
- Seite 12 G Assembly F Assemblage D Zusammenbau N Montage I Montaggio E Montaje K Sådan samles produktet P Montagem T Kokoaminen M Montering s Montering R ™˘Ó·ÚÌÔÏfiÁËÛË E • Ajustar un retenedor (lado redondo para adentro) en uno de los extremos G Retainers del tubo del respaldo.
- Seite 13 G Assembly F Assemblage D Zusammenbau N Montage I Montaggio E Montaje K Sådan samles produktet P Montagem T Kokoaminen M Montering s Montering R ™˘Ó·ÚÌÔÏfiÁËÛË E • Cerciorarse de que el tubo del respaldo se doble para atrás. • Jalar para arriba el tubo del respaldo para verificar que está seguro. G Seat back tube bends backward G Pull Up •...
- Seite 14 G Assembly F Assemblage D Zusammenbau N Montage I Montaggio E Montaje K Sådan samles produktet P Montagem T Kokoaminen M Montering s Montering R ™˘Ó·ÚÌÔÏfiÁËÛË E • Desabrochar los cinturones de sujeción de la almohadilla de sujeción. Pasar los G Pad K Pude cinturones de sujeción de regreso por las ranuras en la almohadilla...
- Seite 15 G Assembly F Assemblage D Zusammenbau N Montage I Montaggio E Montaje K Sådan samles produktet P Montagem T Kokoaminen M Montering s Montering R ™˘Ó·ÚÌÔÏfiÁËÛË G Restraint Belts F Attaches de sécurité G Buckle K Spænde D Schutzgurte F Passant P Fivela N Veiligheidsriempjes D Schnalle...
- Seite 16 G Assembly F Assemblage D Zusammenbau N Montage I Montaggio E Montaje K Sådan samles produktet P Montagem T Kokoaminen M Montering s Montering R ™˘Ó·ÚÌÔÏfiÁËÛË G Latch K Lås F Attache P Fecho D Verschluss T Salpa N Grendel M Sperre I Chiusura s Spärr...
- Seite 17 GWARNING FATTENTION DWARNUNG NWAARSCHUWING IAVVERTENZA EPRECAUCIÓN KADVARSEL PADVERTÊNCIA TVAROITUS MADVARSEL sVARNING R¶ÚÔÂȉÔÔ›ËÛË G To prevent serious injury or death: K Undgå, at barnet kommer alvorligt til skade eller dør: • It is dangerous to use this reclined cradle on an elevated surface. •...
- Seite 18 G Set-Up & Use F Installation et utilisation D Aufbau & Gebrauch N Opstelling en gebruik I Preparativi e Uso E Preparación y uso K Opstilling og brug P Montagem e Utilização T Valmistelut ja käyttö M Forberedelser og bruk s Installation och användning R ™Ù‹ÛÈÌÔ...
- Seite 19 G Set-Up & Use F Installation et utilisation D Aufbau & Gebrauch N Opstelling en gebruik I Preparativi e Uso E Preparación y uso K Opstilling og brug P Montagem e Utilização T Valmistelut ja käyttö M Forberedelser og bruk s Installation och användning R ™Ù‹ÛÈÌÔ...
- Seite 20 G Set-Up & Use F Installation et utilisation D Aufbau & Gebrauch N Opstelling en gebruik I Preparativi e Uso E Preparación y uso K Opstilling og brug P Montagem e Utilização T Valmistelut ja käyttö M Forberedelser og bruk s Installation och användning R ™Ù‹ÛÈÌÔ...
- Seite 21 G Set-Up & Use F Installation et utilisation D Aufbau & Gebrauch N Opstelling en gebruik I Preparativi e Uso E Preparación y uso K Opstilling og brug P Montagem e Utilização T Valmistelut ja käyttö M Forberedelser og bruk s Installation och användning R ™Ù‹ÛÈÌÔ...
- Seite 22 G Set-Up & Use F Installation et utilisation D Aufbau & Gebrauch N Opstelling en gebruik I Preparativi e Uso E Preparación y uso K Opstilling og brug P Montagem e Utilização T Valmistelut ja käyttö M Forberedelser og bruk s Installation och användning R ™Ù‹ÛÈÌÔ...
- Seite 23 G Set-Up & Use F Installation et utilisation D Aufbau & Gebrauch N Opstelling en gebruik I Preparativi e Uso E Preparación y uso K Opstilling og brug P Montagem e Utilização T Valmistelut ja käyttö M Forberedelser og bruk s Installation och användning R ™Ù‹ÛÈÌÔ...
- Seite 24 G Set-Up & Use F Installation et utilisation D Aufbau & Gebrauch N Opstelling en gebruik I Preparativi e Uso E Preparación y uso K Opstilling og brug P Montagem e Utilização T Valmistelut ja käyttö M Forberedelser og bruk s Installation och användning R ™Ù‹ÛÈÌÔ...
- Seite 25 G Set-Up & Use F Installation et utilisation D Aufbau & Gebrauch N Opstelling en gebruik I Preparativi e Uso E Preparación y uso K Opstilling og brug P Montagem e Utilização T Valmistelut ja käyttö M Forberedelser og bruk s Installation och användning R ™Ù‹ÛÈÌÔ...
- Seite 26 G Set-Up & Use F Installation et utilisation D Aufbau & Gebrauch N Opstelling en gebruik I Preparativi e Uso E Preparación y uso K Opstilling og brug P Montagem e Utilização T Valmistelut ja käyttö M Forberedelser og bruk s Installation och användning R ™Ù‹ÛÈÌÔ...
- Seite 27 G Care F Entretien D Pflege N Onderhoud I Manutenzione E Mantenimiento K Vedligeholdelse P Manutenção T Hoito-ohjeet M Vedlikehold s Skötsel R ºÚÔÓÙ›‰· G The pad is machine washable. Wash the pad separately in cold water on the gentle K Puden kan maskinvaskes.
- Seite 28 Fisher-Price, Inc., a subsidiary of Mattel, Inc., East Aurora, New York 14052, U.S.A. ©2003 Mattel, Inc. Tous droits réservés. ® et ™ désignent des marques déposées de Mattel, Inc. aux É.-U. Fisher-Price, Inc., une filiale de Mattel, Inc., East Aurora, New York 14052, É. -U. Printed in China/Imprimé en Chine...