Seite 1
Dell™ 5100MP Projector Owner’s Manual Model XXX w w w . d e l l . c o m | s u p p o r t . d e l l . c o m...
Seite 2
All statements or claims regarding the properties, capabilities, speeds, or qualifications of the part referenced in this document are made by the manufacturer and not by Dell. Dell specifi- cally disclaims any knowledge of the accuracy, completeness, or substantiation for any such statements.
Your Dell Projector Your projector comes with all the items shown below. Ensure that you have all the items, and contact Dell if anything is missing. Package Contents 1.8 m power cord (3.0 m in Americas) 1.8 m M1 to D-sub/USB cable 2.0 m S-video cable...
(continued) Package Contents Documentation Batteries (2) About Your Projector Control panel Elevator button Remote control transceiver Lens Lens Cap Focus ring Zoom tab Your Dell Projector...
Connecting to a Computer Connecting a Computer with an M1 to D-sub/USB Cable Power cord M1A to D-sub/USB cable NOTE: The USB cable can not be connected if the USB Dongle is used, for the USB dongle connection refer to page 37. Connecting Your Projector...
Connecting a Computer with a D-sub to D-sub Cable Power cord D-sub to D-sub cable NOTE: The USB cable can not be connected if the USB Dongle is used, for the USB dongle connection refer to page 37. Connecting Your Projector...
M1 to HDTV cable Connecting a DVD Player with a D-sub to YPbPr Cable Power cord D-sub to YPbPr cable NOTE: The D-sub to YPbPr cable is not provided by Dell. Consult a professional installer for the cable. Connecting Your Projector...
Connecting a DVD Player with a RCA to RCA Cable Power cord RCA to RCA component cable NOTE: The RCA to RCA cable is not provided by Dell. Consult a professional installer for the cable. Connecting a DVD Player with an S-video Cable Power cord...
Composite video cable Connecting a DVD Player with a BNC to VGA cable Power cord BNC to VGA cable NOTE: The BNC to VGA cable is not provided by Dell. Consult a professional installer for the cable. Connecting Your Projector...
Professional Installation Options: Installation for Driving Automatic Screen Power cord 12V DC Plug Automatic screen NOTE: Use the dimension of 12V DC plug in 1.7mm(ID) x 4.00mm(OD) x 9.5mm (shaft) to connect the automatic screen with the projector. 12V DC Plug Connecting Your Projector...
Installation for wired RS232 remote control: Connection with PC Power cord RS232 cable NOTE: The RS232 cable is not provided by Dell. Consult a professional installer for the cable. Connecting Your Projector...
Connection with Commercial RS232 Control Box: Power cord RS232 cable Commercial RS232 control box NOTE: The RS232 cable is not provided by Dell. Consult a professional installer for the cable. Connecting Your Projector...
Connect the power cord and appropriate signal cables. For information about connecting the projector, see page 9. Press the power button (see page 23 to locate the power button). The Dell logo displays for 30 seconds. Turn on your source (computer, DVD player, etc.). The projector automatically detects your source.
Adjusting the Projected Image Raising the Projector Height Press the elevator button. Raise the projector to the desired display angle, and then release the button to lock the elevator foot into position. Use the tilt adjustment wheel to fine-tune the display angle. Lowering the Projector Height Press the elevator button.
Adjusting the Projector Zoom and Focus CAUTION: To avoid damaging the projector, ensure that the zoom lens and elevator foot are fully retracted before moving the projector or placing the projector in its carrying case. Rotate the zoom tab to zoom in and out. Rotate the focus ring until the image is clear.
Max. 36.9" 83.7" 135.3" 189.5" 241.1" 295.3" Screen (93.8cm) (212.5cm) (343.8cm) (481.3cm) (612.5cm) (750.0cm) (Diagonal) Min. 30.8" 69.7" 112.8" 157.9" 201.0" 246.1" (78.1cm) (177.1cm) (286.5cm) (401.0cm) (510.4cm) (625.0cm) Max. 29.5" X 22.1" 66.9" X 50.2" 108.3" X 81.2" 151.6" X 113.7" 192.9"...
Seite 24
The display automatically shuts down. Turn the display on again after the projector cools down. If the problem persists, contact Dell. • If the TEMP light is blinking orange, a projector fan has failed and the projector automatically shuts down.
Using the Remote Control Power Turn the projector on and off. For more information, see page 19. Press to adjust the OSD setting. Laser Aim the remote control at the screen, press and hold the laser button to activate the laser light. Volume Press to increase the volume.
Seite 26
Video mode The Dell 5100MP Micro-projector has preset configurations that are optimized for displaying data (PC Graphics) or video (movies, games, etc.). Press Video Mode button to toggle between PC mode, Movie mode, Game Mode, sRGB, or User mode (for user to setup and save preferred settings).
Seite 27
25 PIP Swap Press the PIP Swap button to swap between the foreground and background. Laser Warning The remote control is equipped with a Class II laser that emits laser radiation. To reduce the risk of injury, do not look directly into the laser light, and do not point the laser light into anyone's eyes.
Wireless USB mouse The wireless USB device for controlling PC or dongle Notebook mouse through the remote control. Remote cover The back cover of the remote control. Battery chamber The chamber of the battery. Using the On-Screen Display The projector has a multi-language On-Screen Display (OSD) that can be displayed with or without an input source present.
Seite 29
—Use adjust the RIGHTNESS brightness of the image. —Use to control the ONTRAST degree of difference between the brightest and darkest parts of the picture. Adjusting the contrast changes the amount of black and white in the image. .—Adjust the color temperature. OLOR The higher the temperature, the screen appears more blue;...
– Component cable (720p, 576i/p, 480i/p) – S-Video cable – Composite cable • 16:9 — The input source scales to fit the width of the screen. • 4:3 — The input source scales to fit the screen. Use 16:9 or 4:3 if you are using one of the following: –...
Management Menu —Select the location of the OCATION OSD on the screen. —Select how the image ROJECTION appears: • Front Projection-Desktop (the default). • Rear Projection-Desktop-- The projector reverses the image so you can project from behind a translucent screen. •...
Seite 32
—Select On (the default) to autodetect the available input signals. OURCE When the projector is on and you press SOURCE, it automatically finds the next available input signal. Select Off to lock the current input signal. When Off is selected and you press SOURCE, you select which input signal you want to use. —Select Auto Source Off OURCE ELECT...
Language Menu Press to select the preferred language for the OSD. PIP Setting Menu NOTE 1: PIP Image is enabled only when both the following types of signals are connected to the projector. Type 1: S-Video, Composite Video, M1-D, Type 2: D-sub, BNC, Component, HDMI, M1 signals.
Select On to enter Options to PIP I — MAGE select following settings. Select Off to disable the picture-in-picture display function. PIP S —Use PIP Source to step through OURCE the display source one by one for the foreground display. The possible PIP source is available in the OSD selection depending on the current primary input source.
Factory Reset Menu —Select Yes to reset the ACTORY ESET projector to its factory default settings. Reset items include both computer image and video image settings. Computer Source Menu NOTE: This menu is only available connected to a computer. —Change the display data clock REQUENCY frequency to match the frequency of your computer graphics card.
Video Source Menu NOTE: This menu is only available with S-video, Video (composite) signal connected. —Adjust a video source from black ATURATION and white to fully saturated color. Press decrease the amount of color in the image and to increase the amount of color in the image.
Seite 37
• Press the Prgm button on the remote control for 5 seconds to reset the transmitter to the factory default channel. • The successful reset back to the default channel on both ends can be confirmed when the remote control transmitter controls the projector. Auto Learning to Change RF Channel Between Remote Controller and USB Wireless Dongle Step 1...
To Manage the Projector from Web Management Configuring the Network Setting If the projector is connected to a network, you can access the projector using a web browser by configuring the network setting (TCP/IP). When using the network function, the IP address should be unique. For configuring the network setting, refer to Network Setting Menu in page 34.
Seite 40
Managing Properties Home Displays Group name, Projector name, Location, Contact, Lamp hours, Firmware version, IP address, MAC address and Admin password information. Using Your Projector...
Seite 41
Network Setting See OSD section on page 34. • Set up the Group Name, Projector Name, Location and Contact information in this tab, press Submit to confirm the settings. • Choose DHCP to assign an IP address to the projector from a DHCP server automatically, or Manual to assign an IP address manually.
Seite 42
Projector Status and Control The function is same as On Screen Display. Manage the projector status, image control and audio control using Projector Status and Control. Using Your Projector...
Seite 43
E-mail Alert Set E-mail address, Owner, Subject and Alert Condition to send automatic e-mail alerts to the preset administrator. Using Your Projector...
Seite 44
Password Setting Use Password Setting to set up an administrator password to access the Web Management . When enabling password for the first time, set the password before enabling it. When the password function is enabled, the administrator password will be required for accessing the Web Management. Using Your Projector...
• Ensure that the lens cap is removed and the screen projector turned on. • Ensure the external graphics port is enabled. If you are using a Dell portable computer, press . For other computers, see your documentation. • Ensure that all the cables are securely connected.
Seite 46
Partial, scrolling, or • Press the Resync button on the remote incorrectly displayed image control or the control panel. If you are using a Dell portable computer, set • the resolution of the computer to XGA (1024 x 768): Right-lick the unused portion of your Windows desktop, click Properties and then select Settings tab.
Seite 47
TEMP light is solid orange The projector has overheated. The display automatically shuts down. Turn the display on again after the projector cools down. If the problem persists, contact Dell. TEMP light is blinking A projector fan has failed and the projector orange will automatically shut down.
While in Self-diagnostic mode, the screen will run a seven-color-cycle test as following: Red--> Green--> Blue--> White--> Watchet Blue--> Dark Green--> Yellow. Ensure that the colors of the test pattern are correct. Contact Dell if the colors are not displayed correctly. Changing the Lamp Replace the lamp when you see "Lamp is approaching the end of its useful life in...
Seite 49
LAMP(S) INSIDE THIS PRODUCT CONTAIN MERCURY AND MUST BE RECYCLED OR DISPOSED OF ACCORDING TO LOCAL, STATE OR FEDERAL LAWS. FOR MORE INFORMATION, GO TO WWW.DELL.COM/HG OR CONTACT THE ELECTRONIC INDUSTRIES ALLIANCE AT WWW.EIAE.ORG. FOR LAMP SPECIFIC DISPOSAL INFORMATION CHECK WWW.LAMPRECYCLE.ORG.
Specifications Light Valve Single-chip 0.95" SXGA+ DLP™ LVDS (low-voltage differential signaling) technology Brightness 3300 ANSI Lumens (Max.) Contrast Ratio 2500:1 Typical (Full On/Full Off) Uniformity 80% Typical (Japan Standard - JBMA) Lamp 300-watt user-replaceable 1700-hour lamp (up to 2200 hours in eco mode) Number of Pixels 1400 x 1050 (SXGA+) Displayable Color...
Seite 52
Power Consumption 400 watts typical, 335 watts in eco mode Audio 2 speakers, 2 watts RMS Noise Level 37dB(A) Full-on mode, 31dB(A) Eco- mode Weight 8.2 lbs (3.73 kgs) Dimensions (W x H x D) External 13 x 10.3 x 4.5 ± 0.04 inches (329.8 x 261.4 x 115.2 ±...
Seite 53
Video input: 3 RCA connectors for component video/ HDTV input, one mini-DIN 4-pin S-video input, one RCA jack for composite video input Audio input: one phone jack (diameter 3.5mm) DC jack 12 volt @ 200mA output, relay control for automatic projection screen control One RJ45 connector for networking One HDMI input...
Seite 54
Address Code "10" ==> pt_OEM Payload Size "05 00"==> From wMsgID to end CRC "C6 FF" ==> If CRC value is "C6 (Low Byte) FF (High Byte)" MsgID "11 11" MsgSize "01 00"==> From command to end. Command "01"==> "Power ON" command. •...
Seite 55
Control Commands List Header Address Size of the CRC16 MsG ID MsG size Command Command payload for the (WORD) (WORD) code Description (WORD) Code (WORD) entire (BYTE) (BYTE) packet (WORD) 0xefbe 0x10 0x0005 0xffc6 0x1111 0x0001 0x01 Power 0xbfc7 0x02 Menu 0x7e07 0x03...
Seite 56
PIP combination sources Source HDMI Component Computer Component Component Component S-Video Composite M1 Digital NOTE: If two sources combination overpass the bandwidth of the scaler, the projector will show the black image. Specifications...
Seite 57
Compatibility Modes Mode Resolution (ANALOG) (DIGITAL) V. Frequency H. Frequency V. Frequency H. Frequency (Hz) (KHz) (Hz) (KHz) 640X350 31.5 31.5 640X350 37.9 37.9 640X400 37.9 37.9 640X480 31.5 31.5 640X480 37.9 37.9 640X480 37.5 37.5 640X480 43.3 43.3 720X400 31.5 31.5 720X400...
Seite 58
MAC G4 640X480 68.03 MAC G4 640X480 97.09 IMAC DV 640X480 IMAC DV 800X600 IMAC DV 1024X768 IMAC DV 1152X870 68.49 IMAC DV 1280X960 IMAC DV 1280X1024 91.1 * Compressed computer image. NOTE: UXGA is not supported in the DVI (M1-to-DVI). Specifications...
If you do not see a telephone number listed that is specific for Inspiron XPS computers, you may contact Dell through the technical support number listed and your call will be routed appropriately.
Seite 60
Department Name or Service Area, Area Codes, International Website and E-Mail Address Local Numbers, and Access Code Toll-Free Numbers Country Code City Code Argentina Website: www.dell.com.ar (Buenos Aires) E-mail: International us_latin_services@dell.com Access Code: 00 E-mail for desktop and portable Country Code: 54 computers: la-techsupport@dell.com City Code: 11 ®...
Seite 61
1-800-633-559 City Code: 2 Preferred Accounts Division toll-free: 1-800-060-889 (PAD) Customer Care toll-free: 1-800-819-339 Technical Support (portables and toll-free: 1-300-655-533 desktops) Technical Support (servers and toll-free: 1-800-733-314 workstations) Corporate Sales toll-free: 1-800-808-385 Transaction Sales toll-free: 1-800-808-312 toll-free: 1-800-818-341 Contacting Dell...
Seite 62
Area Codes, International Website and E-Mail Address Local Numbers, and Access Code Toll-Free Numbers Country Code City Code Austria (Vienna) Website: support.euro.dell.com International E-mail: Access Code: 900 tech_support_central_europe@de ll.com Country Code: 43 Home/Small Business Sales 0820 240 530 00 City Code: 1...
Seite 63
Department Name or Service Area, Area Codes, International Website and E-Mail Address Local Numbers, and Access Code Toll-Free Numbers Country Code City Code Belgium Website: support.euro.dell.com (Brussels) E-mail for French-speaking International Customers: Access Code: 00 support.euro.dell.com/be/fr/email dell/ Country Code: 32 Technical Support for Inspiron...
Seite 64
Sales (med./large bus., toll-free: 1-800-387-5755 government) Spare Parts Sales & Extended 1 866 440 3355 Service Sales Cayman Islands General Support 1-800-805-7541 Chile (Santiago) Sales, Customer Support, and toll-free: 1230-020-4823 Technical Support Country Code: 56 City Code: 2 Contacting Dell...
Seite 65
592 818 1350 Technical Support (Dell™ toll-free: 800 858 2969 Dimension™ and Inspiron) Technical Support (OptiPlex™, toll-free: 800 858 0950 Latitude™, and Dell Precision™) Technical Support (servers and toll-free: 800 858 0960 storage) Technical Support (projectors, toll-free: 800 858 2920...
Seite 66
Large Corporate Accounts Spare toll-free: 800 858 2621 Parts Colombia General Support 980-9-15-3978 Costa Rica General Support 0800-012-0435 Czech Republic Website: support.euro.dell.com (Prague) E-mail: czech_dell@dell.com International Technical Support 22537 2727 Access Code: 00 Customer Care 22537 2707 Country Code: 22537 2714...
Seite 67
Department Name or Service Area, Area Codes, International Website and E-Mail Address Local Numbers, and Access Code Toll-Free Numbers Country Code City Code Denmark Website: support.euro.dell.com (Copenhagen) E-mail: International support.euro.dell.com/dk/da/emai Access Code: 00 ldell/ Country Code: 45 Technical Support for Inspiron 7010 0074...
Seite 68
Department Name or Service Area, Area Codes, International Website and E-Mail Address Local Numbers, and Access Code Toll-Free Numbers Country Code City Code Finland Website: support.euro.dell.com (Helsinki) E-mail: support.euro.dell.com/fi/fi/emaild International Access Code: 990 ell/ Country Code: Technical Support 09 253 313 60...
Seite 69
Area Codes, International Website and E-Mail Address Local Numbers, and Access Code Toll-Free Numbers Country Code City Code France (Paris) Website: support.euro.dell.com (Montpellier) E-mail: International support.euro.dell.com/fr/fr/emaild Access Code: 00 ell/ Country Code: 33 Home and Small Business City Codes: (1)
Seite 70
Department Name or Service Area, Area Codes, International Website and E-Mail Address Local Numbers, and Access Code Toll-Free Numbers Country Code City Code Germany Website: support.euro.dell.com (Langen) E-mail: International tech_support_central_europe@de Access Code: 00 ll.com Country Code: 49 Technical Support for Inspiron 06103 766-7222...
Seite 71
Access Code: 001 apsupport@dell.com Country Code: Technical Support (Dimension 2969 3188 and Inspiron) Technical Support (OptiPlex, 2969 3191 Latitude, and Dell Precision) Technical Support (PowerApp™, 2969 3196 PowerEdge™, PowerConnect™, and PowerVault™) Customer Care 3416 0910 Large Corporate Accounts 3416 0907...
Seite 72
Area Codes, International Website and E-Mail Address Local Numbers, and Access Code Toll-Free Numbers Country Code City Code Ireland Website: support.euro.dell.com (Cherrywood) E-mail: International dell_direct_support@dell.com Access Code: 16 Technical Support for Inspiron 1850 200 722 Country Code: XPS computers only...
Seite 73
City Code: 44 Technical Support (Dimension toll-free: 0120-198-226 and Inspiron) Technical Support outside of 81-44-520-1435 Japan (Dimension and Inspiron) Technical Support (Dell Precision, toll-free:0120-198-433 OptiPlex, and Latitude) Technical Support outside of 81-44-556-3894 Japan (Dell Precision, OptiPlex, and Latitude) Contacting Dell...
Seite 74
Switchboard 044-556-4300 Korea (Seoul) Technical Support toll-free: 080-200-3800 International Sales toll-free: 080-200-3600 Access Code: 001 Customer Service (Penang, 604 633 4949 Country Code: 82 Malaysia) City Code: 2 2194-6202 Switchboard 2194-6000 Technical Support (Electronics toll-free: 080-200-3801 and Accessories) Contacting Dell...
Seite 75
512 728-3883 Customer Service) (Austin, Texas, U.S.A.) Sales (Austin, Texas, U.S.A.) 512 728-4397 SalesFax (Austin, Texas, U.S.A.) 512 728-4600 or 512 728-3772 Luxembourg Website: support.euro.dell.com International E-mail: tech_be@dell.com Access Code: 00 Technical Support (Brussels, 3420808075 Country Code: Belgium) Home/Small Business Sales...
Seite 76
Local Numbers, and Access Code Toll-Free Numbers Country Code City Code Malaysia Website: support.ap.dell.com (Penang) Technical Support (Dell Precision, toll-free: 1 800 88 0193 International OptiPlex, and Latitude) Access Code: 00 Technical Support (Dimension, toll-free: 1 800 88 1306 Country Code: 60...
Seite 77
International Website and E-Mail Address Local Numbers, and Access Code Toll-Free Numbers Country Code City Code Netherlands Website: support.euro.dell.com (Amsterdam) Technical Support for Inspiron 020 674 45 94 International XPS computers only Access Code: 00 Technical Support for all other...
Seite 78
Department Name or Service Area, Area Codes, International Website and E-Mail Address Local Numbers, and Access Code Toll-Free Numbers Country Code City Code Norway (Lysaker) Website: support.euro.dell.com International E-mail: Access Code: 00 support.euro.dell.com/no/no/emai ldell/ Country Code: 47 Technical Support 671 16882 Relational Customer Care...
Seite 79
International Inspiron, and Electronics and Access Code: 005 Accessories) Country Code: 65 Technical Support (OptiPlex, toll-free: 1800 394 7488 Latitude, and Dell Precision) Technical Support (PowerApp, toll-free: 1800 394 7478 PowerEdge, PowerConnect, and PowerVault) Customer Service (Penang, 604 633 4949...
Seite 80
Area Codes, International Website and E-Mail Address Local Numbers, and Access Code Toll-Free Numbers Country Code City Code Slovakia (Prague) Website: support.euro.dell.com International E-mail: czech_dell@dell.com Access Code: 00 Technical Support 02 5441 5727 Country Code: Customer Care 420 22537 2707...
Seite 81
Area Codes, International Website and E-Mail Address Local Numbers, and Access Code Toll-Free Numbers Country Code City Code Spain (Madrid) Website: support.euro.dell.com International E-mail: Access Code: 00 support.euro.dell.com/es/es/email dell/ Country Code: 34 Home and Small Business City Code: 91 Technical Support...
Seite 82
Department Name or Service Area, Area Codes, International Website and E-Mail Address Local Numbers, and Access Code Toll-Free Numbers Country Code City Code Switzerland Website: support.euro.dell.com (Geneva) E-mail: International Tech_support_central_Europe@d Access Code: 00 ell.com Country Code: 41 E-mail for French-speaking HSB and Corporate Customers: City Code: 22 support.euro.dell.com/ch/fr/email...
Seite 83
City Code Thailand Website: support.ap.dell.com International Technical Support (OptiPlex, toll-free: 1800 0060 07 Access Code: 001 Latitude, and Dell Precision) Country Code: 66 Technical Support (PowerApp, toll-free: 1800 0600 09 PowerEdge, PowerConnect, and PowerVault) Customer Service (Penang, 604 633 4949...
Seite 84
Area Codes, International Website and E-Mail Address Local Numbers, and Access Code Toll-Free Numbers Country Code City Code U.K. (Bracknell) Website: support.euro.dell.com International Customer Care website: Access Code: 00 support.euro.dell.com/uk/en/ECare/Form/Home.asp Country Code: 44 City Code: 1344 E-mail: dell_direct_support@dell.com Technical Support...
Seite 85
1-877-Dellnet (1-877-335-5638) Employee Purchase Program toll-free: 1-800-695-8133 (EPP) Customers Financial Services website: www.dellfinancialservices.com Financial Services (lease/loans) toll-free: 1-877-577-3355 Financial Services (Dell Preferred toll-free: 1-800-283-2210 Accounts [DPA]) Business Customer Service and Technical toll-free: 1-800-822-8965 Support Employee Purchase Program toll-free: 1-800-695-8133...
Seite 86
Software and Peripherals Sales toll-free: 1-800-671-3355 Spare Parts Sales toll-free: 1-800-357-3355 Extended Service and Warranty toll-free: 1-800-247-4618 Sales toll-free: 1-800-727-8320 Dell Services for the Deaf, Hard- toll-free: 1-877- of-Hearing, or Speech-Impaired DELLTTY (1-877-335-5889) U.S. Virgin General Support 1-877-673-3355 Islands...
Appendix: Regulatory Notices FCC Notices (U.S. Only) Most Dell computer systems are classified by the Federal Communications Commission (FCC) as Class B digital devices. To determine which classification applies to your computer system, examine all FCC registration labels located on the bottom, side, or back panel of your computer, on card-mounting brackets, and on the cards themselves.
Exporter: Dell Inc. One Dell Way Round Rock, TX 78682 Importer: Dell Computer de México, S.A. de C.V. Paseo de la Reforma 2620 - 11° Piso Col. Lomas Altas 11950 México, D.F. Ship to: Dell Computer de México, S.A. de C.V.
Glossary ANSI Lumens— A standard for measuring light output, used for comparing projectors. Aspect Ratio—The most popular aspect ratio is 4:3 (4 by 3). Early television and computer video formats are in a 4:3 aspect ratio, which means that the width of the image is 4/3 times the height.
Seite 90
Contrast Ratio— Range of light and dark values in a picture, or the ratio between their maximum and minimum values. There are two methods used by the projection industry to measure the ratio: Full On/Off — measures the ratio of the light output of an all white image (full on) and the light output of an all black (full off) image.
Seite 91
Maximum Distance— The distance from a screen the projector can be to cast an image that is useable (bright enough) in a fully darkened room. Maximum Image Size— The largest image a projector can throw in a darkened room. This is usually limited by focal range of the optics. Metal Halide Lamp—...
Seite 92
Zoom Lens— Lens with a variable focal length that allows operator to move the view in or out making the image smaller or larger. Zoom Lens Ratio— Is the ratio between the smallest and largest image a lens can projector from a fixed distance. For example, a 1.4:1 zoom lens ratio means that a 10 foot image without zoom would be a 14 foot image with full zoom.
Index YPbPr Cable 12 Adjusting the Projected Image 20 Connecting a DVD Player with an M1 to HDTV Adjusting the Projector Height Cable 12 Connecting to a DVD Player lower the projector Elevator button 20 Connection with Commercial Elevator foot 20 RS232 Control Box Tilt adjustment wheel 20 Lowering the Projector Height...
Seite 94
VGA input connector 9 VGA output connector 9 Remote Control 25 Video input connector 9 Control Panel 23 Specifications Audio 52 Dell Brightness 51 contacting 59 Color Wheel Speed 51 Compatibility Modes 57 Contrast Ratio 51 Main Unit 8 Dimensions 52...
Seite 95
Uniformity 51 V. Frequency 51 Troubleshooting 45 Video Compatibility 51 contact Dell 45 Weight 52 Self-diagnostic 48 support contacting Dell 59 Index...
Seite 97
Dell™ Projektor 5100MP Benutzerhandbuch Model XXX w w w . d e l l . c o m | s u p p o r t . d e l l . c o m...
Seite 98
Vorsichtshinweise sowie Genehmigungen durch die Regulierungsbehörden und Zertifizierungen, basieren auf Angaben, die Dell vom Zulieferer zur Verfügung gestellt wurden und wurden durch Dell nicht unabhängig geprüft oder getestet. Dell lehnt jegliche Haftung für fehlerhafte Angaben in diesem Zusammenhang ab. Alle Erklärungen oder Behauptungen hinsichtlich der Eigenschaften, Fähigkeiten, Geschwindigkeit oder Voraussetzungen des in diesem Dokument genannten Geräts gehen auf...
Seite 99
Inhaltsverzeichnis 1 Der Dell-Projektor ....7 Informationen über den Projektor ... 2 Anschließen des Projektors ... 9 Anschließen an einen Computer...
Seite 100
Anschließen mit einer handelsüblichen RS232-Steuereinheit: ....3 Bedienen des Projektors ... . 19 Einschalten des Projektors ... . . Ausschalten des Projektors .
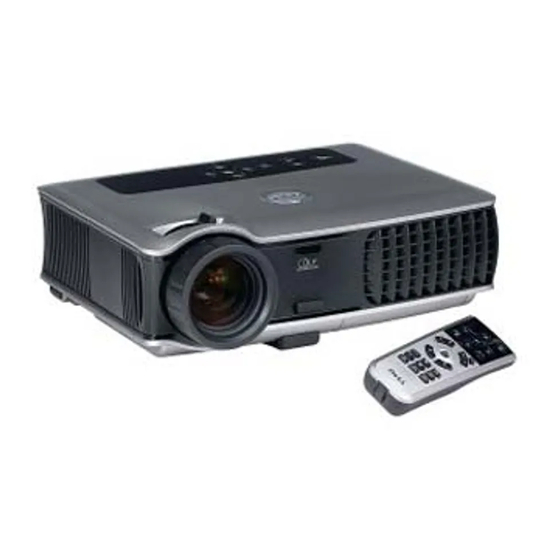
Der Dell-Projektor Im Lieferumfang des Projektors sind die unten abgebildeten Artikel enthalten. Prüfen Sie den Lieferumfang auf Vollständigkeit und wenden Sie sich an Dell, falls etwas fehlen sollte. Lieferumfang 1,8 m Netzkabel (in Amerika 3,0 m) 1,8 m M1-auf-D-Sub-/USB-Kabel 2,0 m S-Video-Kabel...
Anschließen an einen Computer Anschließen eines Computers über M1-auf-D-Sub-/USB-Kabel Netzkabel M1A-auf-D-Sub-/USB- Kabel HINWEIS: Das USB-Kabel kann nicht angeschlossen werden, wenn der USB- Dongle verwendet wird. Informationen über den USB-Dongle-Anschluss finden Sie auf seite 40. Anschließen des Projektors...
Anschließen eines Computers über ein D-Sub-auf-D-Sub-Kabel Netzkabel D-Sub-auf-D-Sub-Kabel HINWEIS: Das USB-Kabel kann nicht angeschlossen werden, wenn der USB- Dongle verwendet wird. Informationen über den USB-Dongle-Anschluss finden Sie auf seite 40. Anschließen des Projektors...
Anschließen an einen DVD-Player Anschließen eines DVD-Players über ein M1-auf-HDTV-Kabel Netzkabel M1-auf-HDTV-Kabel Anschließen eines Projektors über ein D-Sub-auf-YpbPr-Kabel Netzkabel D-Sub-auf-YPbPr-Kabel HINWEIS: Das D-Sub-auf-YPbPr-Kabel wird nicht von Dell mitgeliefert. Wenden Sie sich an einen Fachmann, der Ihnen das Kabel liefern kann. Anschließen des Projektors...
Anschließen eines DVD-Players über ein RCA-auf-RCA-Kabel Netzkabel RCA-auf-RCA-Komponentenkabel HINWEIS: Das RCA-auf-RCA-Kabel wird nicht von Dell mitgeliefert. Wenden Sie sich an einen Fachmann, der Ihnen das Kabel liefern kann. Anschließen eines DVD-Players über ein S-Video-Kabel Netzkabel S-Video-Kabel Anschließen des Projektors...
Anschließen eines DVD-Players über ein Mischsignalkabel Netzkabel Mischsignal-Videokabel Anschließen eines DVD-Players über ein BNC-auf-VGA-Kabel Netzkabel BNC-auf-VGA-Kabel HINWEIS: Das BNC-auf-VGA-Kabel wird nicht von Dell mitgeliefert. Wenden Sie sich an einen Fachmann, der Ihnen das Kabel liefern kann. Anschließen des Projektors...
Professionelle Installationsoptionen: Installation für Betrieb mit automatischem Bildschirm Netzkabel Stecker des 12-V-DC-Kabels Automatischer Bildschirm HINWEIS: Schließen Sie den automatischen Bildschirm mit dem 12-V-DC- Kabel(1,7 mm (ID) x 4,00mm (OD) x 9,5mm (Schaft)) an den Projektor an. Stecker des 12-V-DC-Kabels Anschließen des Projektors...
Installation für kabelgebundene RS232-Fernbedienung: Anschließen an einen PC Netzkabel RS232-Kabel HINWEIS: Das RS232-Kabel wird nicht von Dell mitgeliefert. Wenden Sie sich an einen Fachmann, der Ihnen das Kabel liefern kann. Anschließen des Projektors...
Anschließen mit einer handelsüblichen RS232-Steuereinheit: Netzkabel RS232-Kabel Handelsübliche RS232-Steuereinheit HINWEIS: Das RS232-Kabel wird nicht von Dell mitgeliefert. Wenden Sie sich an einen Fachmann, der Ihnen das Kabel liefern kann. Anschließen des Projektors...
Anschließen des Projektors finden Sie unter seite 9. Drücken Sie die Ein-/Aus-Taste (siehe seite 23 zur genauen Position der Ein-/Aus- Taste). 30 Sekunden lang wird das Dell-Logo angezeigt. Schalten Sie dann die Signalquelle (Computer, Notebook, DVD-Player usw.) ein. Das Gerät wird durch den Projektor automatisch erkannt.
Einstellen des Projektionsbildes Anheben des Projektors Drücken Sie auf die Höhenregulierungstaste und halten Sie sie gedrückt. Heben Sie den Projektor auf den gewünschten Projektionswinkel an und lassen Sie dann die Höhenregulierungstaste los. Die Stütze rastet dabei ein. Mit Hilfe des Einstellrads können Sie eine Feineinstellung des Anzeigewinkels vornehmen.
Einstellen von Zoom und Bildschärfe WARNUNG: Um den Projektor vor Schäden zu schützen, stellen Sie sicher, dass das Zoomobjektiv und der höhenverstellbare Fuß vollständig eingezogen sind, bevor Sie den Projektor an einen anderen Ort tragen oder in seine Tragetasche einpacken. Drehen Sie den Zoom-Regler, um das Projektionsbild zu vergrößern bzw.
Seite 120
Sie sich an Dell. • Wenn die TEMP-Anzeige orange blinkt, ist der Projektorlüfter ausgefallen und der Projektor schaltet sich automatisch aus. Besteht das Problem weiterhin, wenden Sie sich an Dell. 10 LAMP-Warnleuchte Wenn die LAMP-Anzeige orange leuchtet, wechseln Sie die Lampe.
13 Auf Mit diesen Tasten wählen Sie die Einträge im OSD-Menü aus. 14 Helligkeit und Kontrast Zum Einstellen von Helligkeit und Kontrast drücken sie zunächst oder und passen dann mit den Tasten entsprechenden Wert an. Verwenden der Fernbedienung Ein/Aus Hiermit schalten Sie den Projektor ein und aus. Weitere Informationen hierzu finden Sie auf seite 19.
Seite 122
Drücken Sie die Taste, um die Lautstärke zu verringern. Rechtsklick Rechtsklick mit der Maus. Videomodus Der Mikroprojektor Dell 5100MP wurde mit solchen Einstellungen vorkonfiguriert, dass eine optimale Wiedergabe von Daten (PC-Grafiken) und Videos (Filme, Spiele usw.) möglich ist. Drücken Sie auf Grafik-Modus, um zwischen den Modi PC, Film, Spiel, sRGB und Nutzer (für das...
Seite 123
Mit dieser Taste wählen Sie die Einträge im OSD-Menü aus. Page Drücken Sie diese Taste, um zur vorhergehenden Seite zu wechseln. Page Drücken Sie diese Taste, um zur nächsten Seite zu wechseln. Maussteuerung des Mit dieser Taste können Sie die Mausbewegungen steuern.
Seite 124
Laser-Warnung Die Fernbedienung ist mit einem Laser der Klasse II ausgestattet, der Laserstrahlung aussendet. Vermeiden Sie mögliche Verletzungsrisiken, indem Sie niemals direkt in das Laserlicht blicken und den Laserstrahl nicht auf die Augen dritter Personen richten. Starten Sie den Learning-Modus auf der Prgm-Taste Fernbedienung, um den HF-Übertragungskanal durch Drücken der Prgm-Taste umzustellen.
Abdeckung für Hintere Abdeckplatte für die Fernbedienung. Fernbedienung Batteriefach Fach zum Einlegen der Batterien. Verwenden des Bildschirmmenüs Der Projektor hat ein mehrsprachiges Bildschirmmenü (OSD), das mit und ohne angeschlossene Eingangsquelle angezeigt werden kann. Wenn Sie sich im Hauptmenü befinden, können Sie mit den Tasten zwischen den Menüeinträgen wechseln.
Seite 126
—Mit den Tasten ELLIGKEIT können Sie die Helligkeit des Bilds einstellen. —Mit den Tasten wird ONTRAST der Unterschied zwischen den hellsten und dunkelsten Stellen des Bildes geregelt. Durch Einstellen des Kontrasts werden die Anteile von Schwarz und Weiß auf dem Projektionsbild verändert.
Seite 127
• Verwenden Sie die Taste „Auf “, „Ab“, „Links“ oder „Rechts“, um eine Ecke auszuwählen und drücken Sie die Enter-Taste, um den Trapezkorrekturmodus aufzurufen. • Verwenden Sie die Taste „Auf “, „Ab“, „Links“ oder „Rechts“, um den Projektionswinkel zu verschieben und bestätigen Sie mit der Enter-Taste. —Drücken Sie , um das Bild auf dem Projektionsbildschirm auf das bis zu Zehnfache zu vergrößern oder...
Menü „Audio“ , um —Drücken Sie die Taste AUTSTÄRKE die Lautstärke zu verringern, und die Taste , um die Lautstärke zu erhöhen. —Steuern Sie die höheren Frequenzen ÖHEN Drücken Sie die Taste Ihrer Audioquelle. , um die Höhen zu verringern, und ddrücken Sie die Taste , um die Höhen zu verstärken.
Menü „Kontrolle“ .—Hiermit wählen Sie die Position ENÜ des OSD auf dem Bildschirm. —Hiermit wählen Sie die Art, in ODUS der das Bild angezeigt wird. • Frontprojektion-Desktop (Standard). • Rückprojektion-Desktop – Der Projektor invertiert das Bild, so dass Sie es von der Rückseite eines Rückproschirms aus projizieren können.
Seite 130
Siehe seite 39. RF_C — EARNING ECO-M —Wählen Sie Ein, um den Projektor bei niedrigerer Leistungsstufe ODUS (250 Watt) zu nutzen. Dadurch verlängert sich die Lampennutzungsdauer, er läuft leiser und die Luminanzleistung auf dem Bildschirm wird verringert. Wählen Sie Aus, um mit normaler Leistungsstufe (300 Watt) zu arbeiten. —Wählen Sie Ein (Standard), um die verfügbaren Eingangssignale UELLE automatisch zu erkennen.
Menü „Sprache“ Drücken Sie die Taste oder , um die bevorzugte Sprache für das OSD auszuwählen. PIP-Einstellungsmenü HINWEIS 1: Die Option PIP-Bild ist nur aktiviert, wenn die beiden folgenden Signaltypen an den Projektor angeschlossen sind. Typ 1: S-Video-, Mischsignal-Video-, M1-D- Signale und Typ 2: D-sub-, BNC-, Komponenten-, HDMI-, M1-Signale.
Wählen Sie Ein, um Optionen PIP-B — aufzurufen und die folgenden Einstellungen vorzunehmen. Wählen Sie Aus, um die Bild-in-Bild-Anzeige (PIP) zu deaktivieren. PIP-Q —Verwenden Sie die Option PIP- UELLE Quelle, um nacheinander zwischen den Anzeigequellen für die Vordergrundanzeige zu wechseln. Je nach aktueller primärer Eingangsquelle steht die mögliche PIP-Quelle in der OSD-Auswahl zur Verfügung.
Projektor verbunden ist. Es werden 12 Ziffern verwendet. Ä —Drücken Sie diese Option, um die Einstellungen zu NDERUNGEN ÜBERNEHMEN bestätigen. —Drücken Sie diese Option, um die ETZWERKEINSTELLUNGEN ZURÜCKSETZEN Standardeinstellung wiederherzustellen. Menü „Werkseinstellung“ —Wählen Sie Ja, um den ERKSEINSTELLUNG Projektor auf die Werkseinstellungen zurückzusetzen.
nach unten zu verschieben, und drücken Sie die Taste , um die vertikale Position des Bildes nach oben zu verschieben. Menü „Videoquelle“ HINWEIS: Dieses Menü steht nur zur Verfügung, wenn das S-Video-, Video- (Composite-)Signal angeschlossen ist. —Das Videobild kann mit ARBSÄTTIGUNG Abstufungen zwischen einer schwarz-weißen Darstellung und einem Bild mit satten Farben...
RF_Ch Learning Automatisch lernen, den HF-Kanal zwischen Fernbedienung und Projektor umzuschalten • Schalten Sie den Projektor ein. • Drücken Sie die Menu-Taste auf dem Bedienfeld und öffnen Sie das Menü Kontrolle–>RF_Ch Learning. • Wählen Sie mit den Steuertasten Ja, um den Modus Learning Standby aufzurufen.
Seite 136
Automatisch lernen, den HF-Kanal zwischen Fernbedienung und drahtlosem USB-Dongle umzuschalten Schritt 1 Öffnen Sie die Abdeckung für die Fernbedienung. Schritt 2 Drücken Sie auf den Dongle. Schritt 3 Nehmen Sie den Dongle aus der Fernbedienung. Schritt 4 Schließen Sie den Dongle an Ihren PC oder Ihr Notebook an. Der Dongle ist rot markiert.
So verwalten Sie den Projektor über Web-Management Konfigurieren der Netzwerkeinstellungen Wenn der Projektor an ein Netzwerk angeschlossen ist, können Sie über einen Webbrowser auf den Projektor zugreifen, wenn Sie die Netzwerkeinstellungen (TCP/IP) konfigurieren. Bei Verwendung der Netzwerkfunktion sollte die IP-Adresse eindeutig sein. Informationen zur Konfiguration der Netzwerkeinstellungen finden Sie unter „Menü...
Seite 139
Verwalten von Eigenschaften Anfang Zeigt den Gruppennamen, Projektornamen, Standort, Kontakt, Lampenstunden, Firmware-Version, IP-Adresse, MAC-Adresse und das Administratorkennwort an. Bedienen des Projektors...
Seite 140
Netzwerkeinstellungen Siehe OSD-Abschnitt auf seite 36. • Richten Sie den Gruppennamen, den Projektornamen, den Standort und die Kontaktinformatinen auf dieser Registerkarte ein um bestätigen Sie die Einstellungen mit OK. • Wählen Sie DHCP, um dem Projektor über einen DHCP-Server automatisch eine IP-Adresse zuweisen zu lassen, oder wählen Sie Manuell, um manuell eine IP-Adresse zuzuweisen.
Seite 141
Projektorstatus und -kontrolle Die Funktion entspricht der Bildschirmanzeige. Verwalten Sie den Projektorstatus, die Bildkontrolle und die Audiokontrolle über „Projektorstatus und -kontrolle“. Bedienen des Projektors...
Seite 142
E-Mail-Warnung Richten Sie die E-Mail-Adresse, den Eigentümer, den Betreff und den Alert Condition (Warnzustand)ein, um automatische E-Mail-Warnungen an den voreingestellten Administrator zu senden. Bedienen des Projektors...
Seite 143
Kennworteinstellung Verwenden Sie die Kennworteinstellung, um ein Administratorkennwort für den Zugriff auf Web-Management einzurichten. Bevor Sie das Kennwort das erste Mal aktivieren, sollten Sie es einrichten. Wenn die Kennwortfunktion aktiviert ist, ist das Administratorkennwort für den Zugriff auf Web-Management erforderlich. Bedienen des Projektors...
Bild angezeigt Objektivabdeckung entfernt und der Projektor eingeschaltet wurde. • Vergewissern Sie sich, dass die externe Grafikschnittstelle aktiviert wurde. Wenn Sie mit einem tragbaren Dell-Computer arbeiten, drücken Sie . Bei anderen Computern sehen Sie in der Dokumentation nach. • Vergewissern Sie sich, dass die Kabel richtig angeschlossen sind.
Seite 146
Falls Sie Schwierigkeiten dabei haben, die Auflösung zu ändern, oder das Monitorbild hängen bleibt, starten Sie alle Geräte und den Projektor neu. Wenn Sie nicht mit einem tragbaren Dell- Computer arbeiten, lesen Sie in Ihrer Dokumentation nach. Die Präsentation wird nicht...
Seite 147
(Fortsetzung) (Fortsetzung) Problem Mögliche Lösung Die Bildfarbe stimmt nicht • Wenn das Ausgangssignal der Grafikkarte ein Sync-on-Green-Signal ist und Sie VGA bei einem 60-Hz-Signal anzeigen möchten, wählen Sie auf dem OSD unter Kontrolle die Option Signaltypen und dann RGB. • Führen Sie den Selbstdiagnosetest aus (siehe „Selbstdiagnose für Video“), um eine Vorabdiagnose für das Problem mit der Bildfarbe zu erhalten.
Seite 148
Wenn die Anzeige LAMP orangefarben blinkt, ist die Lampenabdeckung nicht richtig geschlossen. Schließen Sie die Lampenabdeckung richtig. Wenn das Problem weiterhin besteht, wenden Sie sich an Dell. TEMP-Anzeige leuchtet Der Projektor ist überhitzt. Der Projektor dauerhaft orangefarben schaltet sich dann automatisch ab. Sie können ihn wieder einschalten, wenn er sich abgekühlt hat.
Selbstdiagnose für Video Der Projektor Dell 5100MP bietet einen Selbstdiagnosetest für die Videoanzeige des Projektors (für Video, S-Video, Component-i). Verwenden Sie diese erweiterte Funktion für die vorläufige Selbstdiagnose Ihres Projektors, falls ein Problem mit der Videoanzeige auftritt. Drücken Sie nach dem Einschalten des Projektors gleichzeitig drei Sekunden lang die Tasten „+“...
Seite 150
DIE LAMPEN IN DIESEM PRODUKT ENTHALTEN QUECKSILBER. SIE MÜSSEN DAHER GEMÄSS ÖRTLICHEN, LANDES- ODER BUNDESVORSCHRIFTEN ODER -GESETZEN WIEDERAUFBEREITET ODER ENTSORGT WERDEN. WEITERE INFORMATIONEN HIERZU FINDEN SIE UNTER WWW.DELL.COM/HG ODER WENDEN SIE SICH AN DIE ELECTRONIC INDUSTRIES ALLIANCE UNTER WWW.EIAE.ORG. INFORMATIONEN ZUR LAMPENENTSORGUNG FINDEN SIE UNTER WWW.LAMPRECYCLE.ORG. Fehlerbeseitigung...
Technische Daten Lichtröhre Einchip 0,95" SXGA+DLP™ LVDS- Technologie (Low-Voltage Differential Signaling) Helligkeit 3300 ANSI-Lumen (max.) Kontrastverhältnis 2500:1 Standard (Full On/Full Off) Gleichmäßigkeit 80 % Standard (Japan. Standard – JBMA) Lampe Austauschbare Lampe, 300 Watt, 1700 Stunden Nutzungsdauer (bis zu 2200 Stunden im Stromsparmodus) Bildpunkte 1400 x 1050 (SXGA+)
Seite 152
Versorgungsspannung Universell 90–240 V Wechselspannung 50–60 Hz mit PFC-Eingang Stromverbrauch 400 Watt (Standard), 335 Watt im Stromsparmodus Audio-Anschluss 2 Lautsprecher, 2 Watt eff. Geräuschpegel 37 dB(A) Full-On-Modus, 31 dB(A) Stromsparbetrieb Gewicht 3,73 kg Abmessungen (B x H x T) Extern 329,8 x 261,4 x 115,2 ±1 mm Umgebungsbedingungen Betriebstemperatur: 5 C bis 35...
Seite 153
Computereingang: ein M1-DA- Anschluss für analog/digital/Komponente, HDTV- Eingangssignale, ein 15-poliger D-Sub- Anschluss für analogen Eingang/Komponente, HDTV- Eingangssignale, ein BNC R/G/B/H/V- Anschluss für analoge RGB- Eingangssignale. Computerausgang: ein 15-poliger D- Video-Eingang: 3 RCA-Anschlüsse für Komponentenvideo-/HDTV-Eingang, ein 4-poliger Mini-DIN-Anschluss für den S-Video-Eingang, eine RCA- Buchse für Mischsignal-Video-Eingang Audio-Eingang eine Klinkenbuchse (3,5 mm Durchmesser)
Seite 155
Hinweis:Wenn der Projektor im Standby-Modus ist, wird vom Projektor keine Bestätigungsantwort (NACK) gesendet. • Projektorantwort Lampenstunden: Byte0, Byte1, Byte2, Byte3 Byte0: 0x00 (Erfolg) Byte1: 0x2F (Kopf der Lampenstunden) Byte2: LSB (Hex) Byte3: MSB (Hex) Beispiel: 800 (3x256+2x16=800) Stunden --> 0x00, 0x2F, 0x20, 0x03 •...
Seite 156
Steuerbefehlsliste Kopf Adresse Größe der CRC16 MsG ID Befe- Befehlsbeschreibung ncode Nutzdaten für gesa- (WORT) Größe hlscode (WORT) (BYTE) (WORT) mtes (WORT) (BYTE) Paket (WORT) 0xefbe 0x10 0x0005 0xffc6 0x1111 0x0001 0x01 Power 0xbfc7 0x02 Menu 0x7e07 0x03 0x3fc5 0x04 Down 0xfe05 0x05...
Seite 157
PIP-Kombinationsquellen Signalquelle HDMI Komponente Computer Komponente Komponente Komponente S-Video Composite M1 Digital HINWEIS: Falls die Kombination von zwei der Quellen die Bandbreite der Skalierung übersteigt, zeigt der Projektor ein schwarzes Bild. Technische Daten...
Seite 158
Kompatibilitätsmodi Übertragung Auflösung (ANALOG) (DIGITAL) smodus Vert. Frequenz Hor. Frequenz Vert. Frequenz Hor. Frequenz (Hz) (KHz) (Hz) (KHz) 640 x 350 31,5 31,5 640 x 350 37,9 37,9 640 x 400 37,9 37,9 640 x 480 31,5 31,5 640 x 480 37,9 37,9 640 x 480...
Seite 159
MAC G4 640 x 480 68,03 MAC G4 640 x 480 97,09 IMAC DV 640 x 480 IMAC DV 800 x 600 IMAC DV 1024 x 768 IMAC DV 1152 x 870 68,49 IMAC DV 1280 x 960 IMAC DV 1280 x 1024 91,1 *Komprimiertes Computerbild...
Ländern aufgeführt. Wenn keine Telefonnummer speziell für den Computertyp Inspiron XPS aufgeführt ist, kontaktieren Sie die technische Hilfe von Dell, Sie werden dann an eine zuständige Stelle weitergeleitet. Wenn Sie sich an Dell wenden möchten, entnehmen Sie die angegebenen E-Mail- und Web-Adressen, Telefonnummern und Vorwahlen aus der nachfolgenden Tabelle.
Seite 162
Bezeichnung der Abteilung oder des Vorwahlen, Internationale Servicebereiches, regionale Nummern Vorwahl Website und E-Mail-Adresse Landesvorwahl gebührenfreie Ortsvorwahl Nummern Argentinien Website: www.dell.com.ar (Buenos Aires) E-Mail: us_latin_services@dell.com Internationale E-Mail für Desktop-Computer und Vorwahl: 00 Notebooks: Landesvorwahl: la-techsupport@dell.com ® E-Mail für Server und EMC Ortsvorwahl: 11 Speicher: la_enterprise@dell.com...
Seite 163
Bereich PAD (Preferred Accounts Gebührenfrei: 1-800- Division) 060-889 Kundendienst Gebührenfrei: 1-800- 819-339 Technische Hilfe (Notebooks und Gebührenfrei: 1-300- Desktop-Computer) 655-533 Technische Hilfe (Server und Gebührenfrei: 1-800- Workstations) 733-314 Verkauf Wirtschaft Gebührenfrei: 1-800- 808-385 Transaktionsverkäufe Gebührenfrei: 1-800- 808-312 Gebührenfrei: 1-800- 818-341 Dell kontaktieren...
Seite 164
Bezeichnung der Abteilung oder des Vorwahlen, Internationale Servicebereiches, regionale Nummern Vorwahl Website und E-Mail-Adresse Landesvorwahl gebührenfreie Ortsvorwahl Nummern Österreich Website: support.euro.dell.com (Wien) E-Mail: Internationale tech_support_central_europe@ Vorwahl: 900 dell.com Landesvorwahl: Privathaushalte/Kleinunternehmen 0820 240 530 00 Privathaushalte/Kleinunternehmen - 0820 240 530 49...
Seite 165
Technische Hilfe nur für Inspiron 02 481 92 96 Ortsvorwahl: 2 Technische Hilfe für alle anderen 02 481 92 88 Computer von Dell Technische Hilfe Fax 02 481 92 95 Kundendienst 02 713 15 .65 Verkauf Wirtschaft 02 481 91 00...
Seite 166
Verkauf Gebührenfrei: 1-800- (Privathaushalte/Kleinunternehmen) 387-5752 Verkauf (Mittlere Gebührenfrei: 1-800- Unternehmen/Großunternehmen, 387-5755 Regierung) Verkauf Ersatzteile und erweiterter 1 866 440 3355 Kundendienst Cayman-Inseln Allgemeine Hilfe 1-800-805-7541 Chile (Santiago) Verkauf, Kundendienst und Gebührenfrei: 1230- Technische Hilfe 020-4823 Landesvorwahl: Ortsvorwahl: 2 Dell kontaktieren...
Seite 167
Technische Hilfe Fax 592 818 1350 Technische Hilfe (Dell™ Gebührenfrei: 800 858 Dimension™ und Inspiron) 2969 Technische Hilfe (OptiPlex™, Gebührenfrei: 800 Latitude™ und Dell Precision™) 858 0950 Technische Hilfe (Server und Gebührenfrei: 800 Speicher) 858 0960 Technische Hilfe (Projektoren, Gebührenfrei: 800 858 PDAs, Schalter, Router usw.)
Seite 168
Gebührenfrei: 800 858 2811 Großkunden Ersatzteile Gebührenfrei: 800 858 2621 Kolumbien Allgemeine Hilfe 980-9-15-3978 Costa Rica Allgemeine Hilfe 0800-012-0435 Tschechische Website: support.euro.dell.com Republik (Prag) E-mail: czech_dell@dell.com Internationale Technische Hilfe 22537 2727 Vorwahl: 00 Kundendienst 22537 2707 Landesvorwahl: 22537 2714 Technik Fax...
Seite 169
Internationale support.euro.dell.com/dk/da/ Vorwahl: 00 emaildell/ Landesvorwahl: Technische Hilfe nur für Inspiron 7010 0074 Technische Hilfe für alle anderen 7023 0182 Computer von Dell Kundendienst (Relational) 7023 0184 Privathaushalte/Kleinunternehmen - 3287 5505 Kundendienst Vermittlung (Relational) 3287 1200 Vermittlung Fax (Relational) 3287 1201...
Seite 170
Bezeichnung der Abteilung oder des Vorwahlen, Internationale Servicebereiches, regionale Nummern Vorwahl Website und E-Mail-Adresse Landesvorwahl gebührenfreie Ortsvorwahl Nummern Finnland Website: support.euro.dell.com (Helsinki) E-Mail: support.euro.dell.com/fi/fi/ emaildell/ Internationale Vorwahl: 990 Technische Hilfe 09 253 313 60 Landesvorwahl: Kundendienst 09 253 313 38 09 253 313 99...
Seite 171
Landesvorwahl: Technische Hilfe nur für Inspiron 0825 387 129 Ortsvorwahlen: Technische Hilfe für alle anderen 0825 387 270 (1) (4) Computer von Dell Kundendienst 0825 823 833 Vermittlung 0825 004 700 Vermittlung (für Anrufe, von 04 99 75 40 00 außerhalb von Frankreich)
Seite 172
Vorwahl: 00 dell.com Landesvorwahl: Technische Hilfe nur für Inspiron 06103 766-7222 Ortsvorwahl: Technische Hilfe für alle anderen 06103 766-7200 6103 Computer von Dell Privathaushalte/Kleinunternehmen - 0180-5-224400 Kundendienst Global-Segment Kundendienst 06103 766-9570 Preferred Accounts - Kundendienst 06103 766-9420 Großkunden - Kundendienst 06103 766-9560 Öffentliche Einrichtungen...
Seite 173
Technische Hilfe E-Mail: Vorwahl: 001 apsupport@dell.com Landesvorwahl: Technische Hilfe (Dimension und 2969 3188 Inspiron) Technische Hilfe (OptiPlex, Latitude 2969 3191 und Dell Precision) Technische Hilfe (PowerApp™, 2969 3196 PowerEdge™, PowerConnect™ und PowerVault™) Kundendienst 3416 0910 Großunternehmen 3416 0907 Globale Kundenprogramme...
Seite 174
Vorwahl: 16 Technische Hilfe nur für Inspiron 1850 200 722 Landesvorwahl: Technische Hilfe für alle anderen 1850 543 543 Ortsvorwahl: 1 Computer von Dell U.K. Technische Hilfe (nur innerhalb 0870 908 0800 U.K.) Kundendienst Privathaushalte 01 204 4014 Kundendienst Kleinunternehmen 01 204 4014 U.K.
Seite 175
Bezeichnung der Abteilung oder des Vorwahlen, Internationale Servicebereiches, regionale Nummern Vorwahl Website und E-Mail-Adresse Landesvorwahl gebührenfreie Ortsvorwahl Nummern Italien (Mailand) Website: support.euro.dell.com Internationale E-Mail: support.euro.dell.com/it/it/ Vorwahl: 00 emaildell/ Landesvorwahl: Privathaushalte und Kleinunternehmen Ortsvorwahl: 02 Technische Hilfe 02 577 826 90 Kundendienst...
Seite 176
(Server) Ortsvorwahl: 44 Technische Hilfe (Dimension und Gebührenfrei: 0120- Inspiron) 198-226 Technische Hilfe außerhalb Japans 81-44-520-1435 (Dimension und Inspiron) Technische Hilfe (Dell Precision, Gebührenfrei:0120- OptiPlex und Latitude) 198-433 Technische Hilfe außerhalb Japans 81-44-556-3894 (Dell Precision, OptiPlex und Latitude) Dell kontaktieren...
Seite 177
Individualnutzer 044-556-1760 Vermittlung 044-556-4300 Korea (Seoul) Technische Hilfe Gebührenfrei: 080- 200-3800 Internationale Vorwahl: 001 Verkauf Gebührenfrei: 080- 200-3600 Landesvorwahl: Kundendienst (Penang, Malaysia) 604 633 4949 Ortsvorwahl: 2 2194-6202 Vermittlung 2194-6000 Technische Hilfe (Electronik und Gebührenfrei: 080- Zubehör) 200-3801 Dell kontaktieren...
Seite 178
Fax (Technische Hilfe und 512 728-3883 Kundendienst) (Austin, Texas, USA) Verkauf (Austin, Texas, USA) 512 728-4397 Verkauf Fax (Austin, Texas, USA) 512 728-4600 oder 512 728-3772 Luxemburg Website: support.euro.dell.com Internationale E-mail: tech_be@dell.com Vorwahl: 00 Technische Hilfe (Brüssel, Belgien) 3420808075 Landesvorwahl: Privathaushalte/Kleinunternehmen Gebührenfrei: 080016 Verkauf (Brüssel, Belgien)
Seite 179
Vorwahl Website und E-Mail-Adresse Landesvorwahl gebührenfreie Ortsvorwahl Nummern Malaysia Website: support.ap.dell.com (Penang) Technische Hilfe (Dell Precision, Gebührenfrei: 1 800 8 Internationale OptiPlex und Latitude) 8 0193 Vorwahl: 00 Technische Hilfe (Dimension, Gebührenfrei: 1 800 8 Landesvorwahl: Inspiron, Electronik und Zubehör)
Seite 180
Technische Hilfe nur für Inspiron 020 674 45 94 Internationale Vorwahl: 00 Technische Hilfe für alle anderen 020 674 45 00 Landesvorwahl: Computer von Dell Technische Hilfe Fax 020 674 47 66 Ortsvorwahl: 20 Privathaushalte/Kleinunternehmen - 020 674 42 00 Kundendienst...
Seite 181
Vorwahlen, Internationale Servicebereiches, regionale Nummern Vorwahl Website und E-Mail-Adresse Landesvorwahl gebührenfreie Ortsvorwahl Nummern Nicaragua Allgemeine Hilfe 001-800-220-1006 Norwegen Website: support.euro.dell.com (Lysaker) E-Mail: Internationale support.euro.dell.com/no/no/ Vorwahl: 00 emaildell/ Landesvorwahl: Technische Hilfe 671 16882 Kundendienst (Relational) 671 17575 Privathaushalte/Kleinunternehmen - 23162298 Kundendienst...
Seite 182
Gebührenfrei: 1800 39 Internationale Inspiron, Electronik und Zubehör) 4 7430 Vorwahl: 005 Technische Hilfe (OptiPlex, Latitude Gebührenfrei: 1800 39 Landesvorwahl: und Dell Precision) 4 7488 Technische Hilfe (PowerApp, Gebührenfrei: 1800 39 PowerEdge, PowerConnect und 4 7478 PowerVault) Kundendienst (Penang, Malaysia) 604 633 4949 Transaktionsverkäufe...
Seite 183
Vorwahlen, Internationale Servicebereiches, regionale Nummern Vorwahl Website und E-Mail-Adresse Landesvorwahl gebührenfreie Ortsvorwahl Nummern Slovakei (Prag) Website: support.euro.dell.com Internationale E-mail: czech_dell@dell.com Vorwahl: 00 Technische Hilfe 02 5441 5727 Landesvorwahl: Kundendienst 420 22537 2707 02 5441 8328 Technik Fax 02 5441 8328...
Seite 184
Bezeichnung der Abteilung oder des Vorwahlen, Internationale Servicebereiches, regionale Nummern Vorwahl Website und E-Mail-Adresse Landesvorwahl gebührenfreie Ortsvorwahl Nummern Spanien Website: support.euro.dell.com (Madrid) E-Mail: support.euro.dell.com/es/es/ emaildell/ Internationale Vorwahl: 00 Privathaushalte und Landesvorwahl: Kleinunternehmen Technische Hilfe 902 100 130 Ortsvorwahl: 91 Kundendienst...
Seite 185
Bezeichnung der Abteilung oder des Vorwahlen, Internationale Servicebereiches, regionale Nummern Vorwahl Website und E-Mail-Adresse Landesvorwahl gebührenfreie Ortsvorwahl Nummern Schweiz (Genf) Website: support.euro.dell.com Internationale E-Mail: Vorwahl: 00 Tech_support_central_Europe@ dell.com Landesvorwahl: E-Mail für französischsprechende Kunden (Privathaushalte/Klein- und Ortsvorwahl: 22 Großunternehmen): support.euro.dell.com/ch/fr/ emaildell/...
Seite 186
Ortsvorwahl Nummern Thailand Website: support.ap.dell.com Internationale Technische Hilfe (OptiPlex, Latitude Gebührenfrei: 1800 00 Vorwahl: 001 und Dell Precision) 60 07 Landesvorwahl: Technische Hilfe (PowerApp, Gebührenfrei: 1800 06 PowerEdge, PowerConnect und 00 09 PowerVault) Kundendienst (Penang, Malaysia) 604 633 4949 Verkauf Wirtschaft Gebührenfrei: 1800 00...
Seite 187
Land (Stadt) Bezeichnung der Abteilung oder des Vorwahlen, Internationale Servicebereiches, regionale Nummern Vorwahl Website und E-Mail-Adresse Landesvorwahl gebührenfreie Ortsvorwahl Nummern U.K. (Bracknell) Website: support.euro.dell.com Internationale Kundendienst-Website: Vorwahl: 00 support.euro.dell.com/uk/en/ECare/Form/Home.asp Landesvorwahl: E-mail: Ortsvorwahl: dell_direct_support@dell.com 1344 Technische Hilfe 0870 908 0500 (Geschäftskunden/Preferred...
Anhang: Betriebsbestimmungen FCC-Hinweise (nur USA) Die meisten Computersysteme von Dell sind von der Federal Communications Commission (FCC, US-Behörde für das Fernmeldewesen) als digitale Geräte der Klasse B klassifiziert. Sehen Sie auf den FCC-Hinweisetiketten auf der Unter- bzw. Rückseite des Computers, auf den Montageblechen oder auf den Karten selbst nach, um herauszufinden, welcher Klasse Ihr Computer zugerechnet wird.
Exporteur: Dell Inc. One Dell Way Round Rock, TX 78682, USA Importeur: Dell Computer de México, S.A. de C.V. Paseo de la Reforma 2620 - 11° Piso Col. Lomas Altas 11950 México, D.F. Versandadresse: Dell Computer de México, S.A. de C.V.
Glossar ANSI-Lumen — Eine Maßeinheit für die Lichtabgabe; sie dient dem Vergleich von Projektoren. Seitenverhältnis —Das am häufigsten verwendete Seitenverhältnis ist 4:3 (4 zu 3). Alte Fernseh- und Computervideoformate haben das Seitenverhältnis 4:3. Das bedeutet, dass die Breite zur Höhe im Verhältnis 4 zu 3 ist. Hintergrundlicht (Backlight) —...
Seite 194
Kontrastverhältnis — Der Bereich zwischen den Werten für Dunkelheit und Helligkeit in einem Bild, bzw. das Verhältnis zwischen dem minimalen und maximalen Wert. In der Projektorindustrie gibt es zwei Verfahren, das Verhältnis zu messen: Full On/Off (Voll Ein/Aus) — Das Verhältnis des Lichts auf einem ganz weißen Bild (full on) zum Licht auf einem ganz schwarzen (full off) Bild.
Seite 195
Trapezkorrektur — Mit Hilfe der Trapezkorrektur kann die Bildverzerrung (normalerweise ist das verzerrte Bild wie ein Trapez oben breiter und unten schmaler) eines Projektionsbilds korrigiert werden, die durch einen ungünstigen Winkel des Projektors zur Projektionsfläche hervorgerufen wird. Laser-Pointer— Ein kleiner Stift oder ein Zeigegerät in der Größe einer Zigarre, der einen kleinen, batteriebetriebenen Laser enthält.
Seite 196
SECAM— Ein französischer und internationaler Sendestandard für die Übertragung von Filmen. Die Auflösung ist hier höher als bei NTSC. SVGA— "Super Video Graphics Array" — 800 x 600 Pixel SXGA— "Super Ultra Graphics Array" — 1280 x 1024 Pixel UXGA— "Ultra Extended Graphics Array" — 1600 x 1200 Pixel VGA—...
Stichwortverzeichnis Anschließen des Projektors M1-auf-HDTV-Kabel An Computer Mischsignal-Videokabel Anschließen an einen DVD- Netzkabel Player Anschließen an einen PC RCA-auf-RCA-Komponen- tenkabel Anschließen eines Computers über ein D-Sub-auf- RS232-Kabel D-Sub-Kabel Anschlüsse Anschließen eines Computers 12 Volt Gleichstromrelais- über M1-auf-D-Sub-/ Ausgang USB-Kabel Audio-Ausgang Anschließen eines DVD-Play- Audio-Eingang ers über ein M1-auf-...
Seite 198
Höhenregulierungstaste Objektiv Objektivabdeckung Dell Zoom-Regler kontaktieren Störungen beheben Ein-/Ausschalten des Projektors Selbstdiagnose Ausschalten des Projektors wenden Sie sich an Dell Einschalten des Projektors Einstellen des Projektionsbildes Absenken des Projektors Technische Daten Einstellen der Projektorhöhe Abmessungen Anzeigbare Farben Projektor absenken Audio-Anschluss Einstellrad für die...
Seite 201
Projecteur Dell™ 5100MP Manuel Utilisateur Model XXX w w w . d e l l . c o m | s u p p o r t . d e l l . c o m...
Seite 202
à Dell par le fabricant et n'ont pas été indépendamment vérifiés ou testés par Dell. Dell rejette toute responsabilité concernant les anomalies pouvant apparaître dans ces informations.
Seite 203
Table des matières 1 Votre projecteur Dell ....7 A propos de votre projecteur ... . .
Seite 204
Connexion avec un boîtier de commande Commercial RS232 : ....3 Utilisation de votre projecteur ..19 Mise en marche de votre projecteur .
Seite 205
5 Spécifications ..... 53 6 Contacter Dell ..... 63 7 Appendice : notices de réglementation .
Votre projecteur Dell Votre projecteur est livré avec tous les éléments présentés ci-dessous. Assurez-vous que votre appareil est complet, et contactez Dell s'il manquait un des composants. Contenu de l'emballage Cordon d'alimentation de 1,8 m Câble de 1,8 m M1 vers D-sub/USB (3 m en Amérique)
(suite) Contenu de l'emballage Documentation Piles (2) A propos de votre projecteur Panneau de contrôle Bouton élévateur Émetteur récepteur de télécommande Objectif Cache de l'objectif Bague de mise au point Ergot du zoom Votre projecteur Dell...
Connexion à un ordinateur Connexion d'un ordinateur à l'aide d'un câble M1 vers D-sub/USB Cordon d'alimentation Câble M1A vers D- sub/USB REMARQUE: Le câble USB ne peut pas être connecté si la clé électronique USB est utilisée. Pour plus d'informations sur la connexion de la clé électronique USB, voir page 38.
Connexion d'un ordinateur à l'aide d'un câble D-sub vers D-sub Cordon d'alimentation Câble D-sub vers D-sub REMARQUE: Le câble USB ne peut pas être connecté si la clé électronique USB est utilisée. Pour plus d'informations sur la connexion de la clé électronique USB, voir page 38.
Connexion d'un lecteur DVD à l'aide d'un câble D-sub vers YPbPr Cordon d'alimentation Câble D-sub vers YPbPr REMARQUE: Le câble D-sub vers YPbPr n'est pas fourni par Dell. Faites appel à un installateur professionnel pour le câble. Connexion de votre projecteur...
Connexion d'un lecteur DVD à l'aide d'un câble RCA vers RCA Cordon d'alimentation Câble composantes RCA vers RCA REMARQUE: Le câble RCA vers RCA n'est pas fourni par Dell. Faites appel à un installateur professionnel pour le câble. Connexion d'un lecteur DVD à l'aide d'un câble S-vidéo Cordon d'alimentation Câble S-vidéo...
Connexion d'un lecteur DVD à l'aide d'un câble BNC vers VGA Cordon d'alimentation Câble BNC vers VGA REMARQUE: Le câble BNC vers VGA n'est pas fourni par Dell. Faites appel à un installateur professionnel pour le câble. Connexion de votre projecteur...
Options d'installation professionnelles : installation de l'écran automatique Cordon d'alimentation Jack CC 12 volts Ecran automatique REMARQUE: Utilisez un jack CC 12 volts - 1.7mm (Diam. Int.) x 4.0mm (Diam. Ext.) x 9.5mm (Axe) - pour connecter l'écran automatique avec le projecteur. Jack CC 12 volts Connexion de votre projecteur...
Installation de la télécommande RS232 : connexion avec un PC Cordon d'alimentation Câble RS232 REMARQUE: Le câble RS232 n'est pas fourni par Dell. Faites appel à un installateur professionnel pour le câble. Connexion de votre projecteur...
Connexion avec un boîtier de commande Commercial RS232 : Cordon d'alimentation Câble RS232 Boîtier de commande Commercial RS232 REMARQUE: Le câble RS232 n'est pas fourni par Dell. Faites appel à un installateur professionnel pour le câble. Connexion de votre projecteur...
9. Appuyez sur le bouton d'alimentation (voir page 23 pour repérer le bouton d'alimentation). Le logo Dell s'affiche pendant 30 secondes. Allumez votre source (ordinateur, lecteur DVD, etc.). Le projecteur détecte automatiquement votre source.
Réglage de l'image projetée Réglage de la hauteur du projecteur Appuyez le bouton élévateur. Elevez le projecteur de l'angle d'affichage désiré, puis relâchez le bouton afin de verrouiller le pied élévateur dans la position voulue. Utilisez la molette de réglage d'inclinaison pour régler avec précision l'angle d'affichage.
Réglage du zoom et de la mise au point du projecteur PRÉCAUTION: pour éviter d'endommager le projecteur, assurez-vous que le zoom de l'objectif et le pied élévateur sont entièrement rétractés avant de déplacer le projecteur ou de le ranger dans son étui de transport. Tournez l'ergot du zoom pour rapprocher et éloigner l'image.
Seite 224
L'affichage s'éteint automatiquement. Essayez de rallumer l'affichage quand le projecteur aura refroidi. Si le problème persiste, contactez Dell. • Si l'indicateur TEMP clignote en orange, cela signifie qu'un ventilateur du projecteur est tombé en panne. Le projecteur s'éteindra automatiquement.
14 Contrôle de la Appuyez pour contrôler la luminosité et le luminosité et du contraste, appuyez sur pour régler la contraste luminosité ou le contraste, puis sur les boutons pour régler la valeur. Utilisation de la télécommande Alimentation Appuyez pour allumer et éteindre le projecteur. Pour plus d'informations, voir page 19.
Seite 226
Mode Vidéo Le Microprojecteur Dell 5100MP dispose de configurations préréglées optimisées pour afficher des données (Graphismes PC) ou vidéo (films, jeux, etc.). Appuyez sur le bouton mode Vidéo pour permuter entre le mode PC, le mode Film, le mode Jeu, le mode sRVB ou le mode Utilisateur (vous permettant d'enregistrer vos propres paramètres).
Seite 227
23 Correction Appuyez pour corriger la déformation de l'image. trapézoïdale 24 PIP Appuyez sur le bouton PIP pour allumer/éteindre l'écran PIP . 25 Activer/Désactiver Appuyez sur le bouton Activer/Désactiver mode mode PIP PIP pour basculer entre le premier plan et l'arrière-plan.
Avertissement La télécommande est équipée d'un laser de classe concernant le laser II émettant des radiations laser. Pour éviter tout risque de blessure, ne regardez pas directement le faisceau laser et ne le dirigez pas vers les yeux d'une autre personne. Bouton Programme Initialise le mode d'apprentissage sur la télécommande pour permuter le canal de...
Paramètres de l'image pour —Utilisez régler la UMINOSITÉ luminosité de l'image. —Utilisez pour ONTRASTE contrôler la différence entre les parties les plus lumineuses et les parties les plus sombres de l'image. Le réglage du contraste modifie la quantité de noir et de blanc dans l'image.
Seite 230
V.—Permet de régler la déformation de l'image due à l'inclinaison du RAPÈZE projecteur. H.—Permet de régler la déformation de l'image due au décalage horizontal RAPÈZE de l'orientation du projecteur. —Sélectionnez Act pour activer la correction auto de la déformation RAPÈZE AUTO verticale de l'image due à...
—Sélectionnez 0 pour optimiser la reproduction de couleur et 10 NTENSITÉ DE BLANC pour optimiser la luminosité. —Sélectionnez entre 1 et 4 pour changer les performances de couleur de EGAMMA l'affichage. La valeur par défaut est 3. Menu Audio pour diminuer le —Appuyez sur OLUME volume et sur...
Menu Gestion —Permet de sélectionner MPLAC l'emplacement de l'OSD à l'écran. —Permet de sélectionner la ROJECT manière dont l'image apparaît : • Projection Avant-Bureau (par défaut). • Projection Arrière-Bureau — Le projecteur inverse l'image de sorte que vous pouvez projeter derrière un écran translucide. •...
Seite 233
—Sélectionnez Act pour utiliser le projecteur à un niveau d'intensité plus faible (250 Watts), ce qui peut offrir une plus grande durabilité de la lampe, un fonctionnement plus silencieux et une luminance plus faible à l'écran. Sélectionnez Désac pour une utilisation à un niveau d'intensité normal (300 Watts).
Menu Langue Appuyez sur pour sélectionner la langue de votre choix pour l'OSD. Menu Paramètres PIP REMARQUE 1 : l'option Image IPI est activée uniquement lorsque le projecteur reçoit les deux types de signaux suivants. Type 1 : S-Vidéo, Vidéo composite, M1-D Type 2 : signaux D-sub, BNC, Composantes, HDMI, M1.
Sélectionnez Act pour afficher PIP — MAGE le menu Options et sélectionner les paramètres suivants. Sélectionnez Désac pour désactiver la fonction d'affichage image par image. PIP —Utilisez l'option Source PIP pour OURCE faire défiler une par une les sources d'affichage au premier plan.
DNS—Entrez l'adresse IP du serveur DNS sur le réseau connecté au projecteur. Vous utilisez 12 caractères numériques. —Appuyez pour confirmer les paramètres. PPLIQUER LES MODIFICATIONS )— ÉINITIALISATION PARAM RÉSEAU ÉINITIALISATION DES PARAMÈTRES DU RÉSEAU Appuyez pour appliquer les paramètres par défaut. Menu Réinit.
Menu Source vidéo REMARQUE: ce menu est uniquement disponible avec les signaux S-vidéo, vidéo (composite) connectés. —Permet de régler la couleur d'une ATURATION source vidéo depuis le noir et blanc à une couleur complètement saturée. Appuyez sur pour diminuer la quantité de couleur dans l'image et sur pour augmenter la quantité...
Seite 238
Retour aux paramètres par défaut du canal RF • Sélectionnez Oui dans le menu Paramètre Apprentis RF, puis ouvrez le menu Rétablir RF par défaut. Sélectionnez Rétablir RF par défaut pour rétablir les paramètres par défaut du canal sur le projecteur. •...
Pour contrôler le projecteur à l'aide de Web Management Configuration des réglages réseau Si le projecteur est connecté à un réseau, vous pouvez y accéder à l'aide d'un navigateur Web en configurant les réglages réseau (TCP/IP). Lorsque vous utilisez la fonction réseau, l'adresse IP doit être unique. Pour la configuration des réglages réseau, reportez-vous au menu Réglages réseau à...
Seite 241
Gestion des propriétés Accueil Affiche les informations Nom du groupe, Nom du projecteur, Emplacement, Contact, Heures lampe, Version firmware, Adresse IP, Adresse MAC et Mot de passe Admin. Utilisation de votre projecteur...
Seite 242
Réglages réseau Voir la section OSD page 35. • Spécifiez les informations des champs Nom du groupe, Nom du projecteur, Emplacement et Contact dans cet onglet, puis appuyez sur Soumettre pour confirmer les réglages. • Choisissez DHCP pour attribuer automatiquement une adresse IP au projecteur à...
Seite 243
Etat et commande projecteur Cette fonction est identique à la fonction Affichage à l'écran. Gérez l'état du projecteur, le contrôle de l'image et de l'audio à l'aide de la fonction Etat et commande projecteur. Utilisation de votre projecteur...
Seite 244
Alerte E-mail Définissez les champs Adresse E-mail, Propriétaire, Objet et Condition d'alerte pour envoyer automatiquement des alertes par E-mail à un administrateur désigné. Utilisation de votre projecteur...
Seite 245
Réglage du mot de passe Utilisez la fonction Réglage du mot de passe pour définir un mot de passe d'administrateur afin d'accéder à Web Management. Vous devez créer un mot de passe avant de l'activer pour la première fois. Lorsque la fonction de mot de passe est activée, le mot de passe de l'administrateur est requis pour accéder à...
Dépanner votre projecteur Si vous rencontrez des problèmes avec le projecteur, reportez-vous aux conseils de dépannage suivants. Si le problème persiste, contactez Dell. Problème Solution possible Aucune image n'apparaît à • Assurez-vous que le cache de l'objectif est l'écran. retiré et que le projecteur est allumé.
Seite 248
• Appuyez sur le bouton Resync sur la affichée de façon incorrecte. télécommande ou sur le panneau de contrôle. Si vous utilisez un ordinateur portable Dell, • paramétrez la résolution de l'ordinateur sur XGA (1024 x 768) : Faites un clic droit sur une portion non utilisée de votre bureau de Windows,...
Seite 249
Système de verrouillage Si le témoin LAMP clignote en orange, le défaillant capot de la lampe n'est pas fermé correctement. Fermez correctement le capot de la lampe. Si le problème persiste, contactez Dell. Dépanner votre projecteur...
En mode Auto-diagnostic, l'écran exécutera un test avec cycle de sept couleurs comme ci-après : Rouge--> Vert--> Bleu--> Blanc--> Bleu Clair--> Vert Foncé--> Jaune. Assurez- vous que les couleurs du modèle de test sont correctes. Contactez Dell si les couleurs ne sont pas affichées correctement. Dépanner votre projecteur...
Remplacez la lampe quand le message suivant apparaît à l'écran "La lampe approche la fin de sa durée de vie en fonctionnement en pleine puissance. Remplacement conseillé !" www.dell.com/lamps" apparaît à l'écran. Si ce problème persiste après avoir remplacé la lampe, contactez Dell.
Seite 252
LES LAMPES À L'INTÉRIEUR DE CE PRODUIT CONTIENNENT DU MERCURE ET DOIVENT ÊTRE RECYCLÉES OU ÉLIMINÉES CONFORMÉMENT AUX LOIS LOCALES, DE L'ÉTAT OU FÉDÉRALES EN VIGUEUR. POUR PLUS D'INFORMATIONS, ALLEZ À WWW.DELL.COM/HG OU CONTACTEZ L'ALLIANCE DES INDUSTRIES ÉLECTRONIQUES À WWW.EIAE.ORG. POUR LES INFORMATIONS D'ÉLIMINATION SPÉCIFIQUE DES LAMPES, ALLEZ À...
Spécifications Valve légère Technologie simple circuit 0.95" SXGA+ DLP™ LVDS (signal différentiel basse tension) Luminosité 3300 Lumens ANSI (max.) Taux de contraste 2500:1 type (Full On / Full Off) Uniformité 80% type (Standard du Japon - JBMA) Lampe Lampe de 300 watts 1700 heures remplaçable par l'utilisateur (jusqu'à...
Seite 254
Alimentation Universelle 90-240 V CA 50-60 Hz avec entrée PFC Consommation de courant 400 watts type, 335 watts en mode éco Audio 2 haut-parleurs, 2 watts RMS Niveau de bruit 37 dB(A) mode Full-on, 31 dB(A) mode Eco Poids 8,2 lbs (3,73 kg) Dimensions (l x H x P) Externe 13 x 10,3 x 4,5 ±...
Seite 255
Entrée ordinateur : un connecteur M1- DA pour signaux d'entrée analogique / numérique / composantes, HDTV, un connecteur D-sub à 15 broches pour signaux d'entrée analogique / composantes, HDTV, un connecteur BNC R/G/B/H/V pour signaux d'entrée RVB analogiques. Sortie ordinateur : un connecteur D- sub à...
Seite 256
Affectation des broches RS232 Protocole RS232 • Paramètres de communication Paramètres de connexion Valeur Débit en bauds : 19200 Bits de données : Parité None Bits d'arrêt • Types de commandes Pour faire apparaître le menu OSD et ajuster les paramètres. •...
Seite 257
0x03: Etat du système - Projecteur allumé (Mode Normal). NACK: Etat du système - Projecteur éteint (Mode Veille). Remarque : Quand le projecteur est en mode veille, aucune réponse d'accusé de non- réception (NACK) est envoyée par le projecteur. • Heure de lampe de réponse de projecteur : Octet0, Octet1, Octet2, Octet3 Octet0: 0x00 (Succès)
Seite 258
Liste de commandes de contrôle En-tête Code Taille de la CRC16 ID MsG Taille Code de Description des d'adresse charge utile pour le (MOT) commande commandes (MOT) (OCTET) (MOT) paquet (MOT) (MOT) complet (MOT) 0xefbe 0x10 0x0005 0xffc6 0x1111 0x0001 0x01 Power 0xbfc7...
Seite 259
Sources de combinaisons PIP Source HDMI composantes ordinateur composantes composantes composantes S-Vidéo Composite numérique REMARQUE: Si des combinaisons de sources dépassent la largeur de bande du scaler, le projecteur affiche une image noire. Spécifications...
Seite 260
Modes de compatibilité Mode Résolution (ANALOGIQUE) (NUMERIQUE) Fréquence V. Fréquence H. Fréquence V. Fréquence H. (Hz) (KHz) (Hz) (KHz) 640X350 31.5 31.5 640X350 37.9 37.9 640X400 37.9 37.9 640X480 31.5 31.5 640X480 37.9 37.9 640X480 37.5 37.5 640X480 43.3 43.3 720X400 31.5 31.5...
Seite 261
MAC G4 640X480 68.03 MAC G4 640X480 97.09 IMAC DV 640X480 IMAC DV 800X600 IMAC DV 1024X768 IMAC DV 1152X870 68.49 IMAC DV 1280X960 IMAC DV 1280X1024 91.1 * Image d'ordinateur compressée. REMARQUE: Le mode UXGA n'est pas pris en charge par le connecteur DVI (M1 vers DVI).
Contacter Dell Pour contacter Dell par ordinateur, rendez-vous sur les sites web suivants : • www.dell.com • support.dell.com (assistance technique) • premiersupport.dell.com (assistance technique pour l'enseignement, le gouvernement, les organismes de la santé et les entreprises moyennes/grosses, notamment les clients Premier, Platine, et Or) Pour obtenir les adresses Web spécifiques à...
Seite 264
Numéros locaux, et international Code site web et adresse e-mail Numéros gratuits du pays Code de la ville Argentine Site Web : www.dell.com.ar (Buenos Aires) E-mail : Code d'accès us_latin_services@dell.com international : 00 E-mail pour ordinateurs de bureau Code du pays : 54 et portables : la-techsupport@dell.com...
Seite 265
655-533 Assistance technique (serveurs et numéro gratuit : 1-800- stations de travail) 733-314 Ventes en entreprise numéro gratuit : 1-800- 808-385 Transaction ventes numéro gratuit : 1-800- 808-312 Télécopie numéro gratuit : 1-800- 818-341 Contacter Dell...
Seite 266
Numéros locaux, et international Code site web et adresse e-mail Numéros gratuits du pays Code de la ville Autriche Site Web : support.euro.dell.com (Vienne) E-mail : Code d'accès tech_support_central_europe@ international : dell.com Ventes Particulier/Petite entreprise 0820 240 530 00...
Seite 267
Numéros locaux, et international Code site web et adresse e-mail Numéros gratuits du pays Code de la ville Belgique Site Web : support.euro.dell.com (Bruxelles) E-mail pour les clients Code d'accès francophones : international : 00 support.euro.dell.com/be/fr/ emaildell/ Code du pays : 32...
Seite 270
: 800 858 2621 Colombie Assistance générale 980-9-15-3978 Costa Rica Assistance générale 0800-012-0435 République Site Web : support.euro.dell.com Tchèque (Prague) E-mail : czech_dell@dell.com Code d'accès Assistance Technique 22537 2727 international : 00 Soin à la clientèle 22537 2707 Code du pays: Télécopie...
Seite 271
Numéros locaux, et international Code site web et adresse e-mail Numéros gratuits du pays Code de la ville Denemark Site Web : support.euro.dell.com (Copenhague) E-mail : Code d'accès support.euro.dell.com/dk/da/ international : 00 emaildell/ Code du pays : 45 Assistance technique pour les...
Seite 272
Code d'accès service, Numéros locaux, et international Code site web et adresse e-mail Numéros gratuits du pays Code de la ville Finlande Site Web : support.euro.dell.com (Helsinki) E-mail : support.euro.dell.com/fi/fi/ Code d'accès international : emaildell/ Assistance Technique 09 253 313 60 Code du pays : Soin à...
Seite 273
Numéros locaux, et international Code site web et adresse e-mail Numéros gratuits du pays Code de la ville France (Paris) Site Web : support.euro.dell.com (Montpellier) E-mail : Code d'accès support.euro.dell.com/fr/fr/ international : 00 emaildell/ Code du pays : 33...
Seite 274
Numéros locaux, et international Code site web et adresse e-mail Numéros gratuits du pays Code de la ville Allemagne Site Web : support.euro.dell.com (Langen) E-mail : Code d'accès tech_support_central_europe@ international : 00 dell.com Code du pays : 49 Assistance technique pour les...
Seite 275
Guatémala Assistance générale 1-800-999-0136 Guyane Assistance générale numéro gratuit : 1-877- 270-4609 Hong Kong Site Web : support.ap.dell.com Code d'accès E-mail de l'assistance technique : international : apsupport@dell.com Assistance technique (Dimension 2969 3188 Code du pays : et Inspiron)
Seite 276
Numéros locaux, et international Code site web et adresse e-mail Numéros gratuits du pays Code de la ville Irlande Site Web : support.euro.dell.com (Cherrywood) E-mail : Code d'accès dell_direct_support@dell.com international : 16 Assistance technique pour les 1850 200 722...
Seite 277
Numéros locaux, et international Code site web et adresse e-mail Numéros gratuits du pays Code de la ville Italie (Milan) Site Web : support.euro.dell.com Code d'accès E-mail : international : 00 support.euro.dell.com/it/it/ emaildell/ Code du pays : 39 Particulier et petite entreprise...
Seite 278
Numéros locaux, et international Code site web et adresse e-mail Numéros gratuits du pays Code de la ville Japon (Kawasaki) Site Web : support.jp.dell.com Code d'accès Assistance technique (serveurs) numéro gratuit : 0120- international : 198-498 Assistance technique à l'extérieur...
Seite 279
Ventes division Comptes préférés 044-556-3433 (plus de 400 employés) Ventes comptes grandes 044-556-3430 entreprises (plus de 3500 employés) Ventes publiques (agences 044-556-1469 gouvernementales, institutions éducatives, et institutions médicales) Japon Segment global 044-556-3469 Utilisateur individuel 044-556-1760 Menu général 044-556-4300 Contacter Dell...
Seite 280
512 728-4093 (Austin, Texas, U.S.A.) Service clientèle (Austin, Texas, 512 728-3619 U.S.A.) Télécopie (Assistance technique 512 728-3883 et service clientèle) (Austin, Texas, U.S.A.) Ventes (Austin, Texas, U.S.A.) 512 728-4397 Télécopie Ventes (Austin, Texas, 512 728-4600 U.S.A.) ou 512 728-3772 Contacter Dell...
Seite 281
Numéros locaux, et international Code site web et adresse e-mail Numéros gratuits du pays Code de la ville Luxembourg Site Web : support.euro.dell.com Code d'accès E-mail : tech_be@dell.com international : 00 Assistance technique (Bruxelles, 3420808075 Code du pays : Belgique) Ventes Particulier/Petite entreprise numéro gratuit :...
Seite 282
Numéros locaux, et international Code site web et adresse e-mail Numéros gratuits du pays Code de la ville Malaisie Site Web : support.ap.dell.com (Penang) Assistance technique (Dell numéro Code d'accès Precision, OptiPlex, et Latitude) gratuit : 1 800 88 0193...
Seite 283
Numéros locaux, et international Code site web et adresse e-mail Numéros gratuits du pays Code de la ville Pays-Bas Site Web : support.euro.dell.com (Amsterdam) Assistance technique pour les 020 674 45 94 Code d'accès ordinateurs Inspiron XPS international : 00...
Seite 284
Gouvernement et entreprise 0800 444 617 Ventes 0800 441 567 Télécopie 0800 441 566 Nicaragua Assistance générale 001-800-220-1006 Norvège Site Web : support.euro.dell.com (Lysaker) E-mail : Code d'accès support.euro.dell.com/no/no/ international : 00 emaildell/ Code du pays : 47 Assistance technique 671 16882 Soin à...
Seite 285
Numéros locaux, et international Code site web et adresse e-mail Numéros gratuits du pays Code de la ville Polone (Varsovie) Site Web : support.euro.dell.com Code d'accès E-mail : international : pl_support_tech@dell.com Téléphone Service clientèle 57 95 700 Code du pays : 48 Soin à...
Seite 286
Numéros locaux, et international Code site web et adresse e-mail Numéros gratuits du pays Code de la ville Singapour Site Web : support.ap.dell.com (Singapour) Assistance technique (Dimension, numéro Code d'accès Inspiron, et électronique et gratuit : 1800 394 7430 international :...
Seite 287
Numéros locaux, et international Code site web et adresse e-mail Numéros gratuits du pays Code de la ville Afrique du Sud Site Web : support.euro.dell.com (Johannesburg) E-mail : Code d'accès dell_za_support@dell.com international : File d'attente Or 011 709 7713...
Seite 288
Numéros locaux, et international Code site web et adresse e-mail Numéros gratuits du pays Code de la ville Suède (Upplands Site Web : support.euro.dell.com Vasby) E-mail : support.euro.dell.com/se/sv/ Code d'accès international : 00 emaildell/ Code du pays : 46...
Seite 289
Numéros locaux, et international Code site web et adresse e-mail Numéros gratuits du pays Code de la ville Taïwan Site Web : support.ap.dell.com Code d'accès E-mail : ap_support@dell.com international : Assistance technique (OptiPlex, numéro Latitude, Inspiron, Dimension, et gratuit : 00801 86 1011 Code du pays : électronique et accessoires)
Seite 290
Code site web et adresse e-mail Numéros gratuits du pays Code de la ville Royaume Uni Site Web : support.euro.dell.com (Bracknell) Site web de soin à la clientèle : support.euro.dell.com/uk/en/ECare/Form/Home.asp Code d'accès international : 00 Code du pays : 44...
Seite 291
Site web des services financiers : www.dellfinancialservices.com Services Financiers (location numéro gratuit : 1-877- vente/prêt) 577-3355 Services Financiers (Comptes numéro gratuit : 1-800- préférés de Dell [DPA]) 283-2210 Commerce Service clientèle et assistance numéro gratuit : 1-800- technique 822-8965 Clients du programme d'achat des numéro gratuit : 1-800-...
Seite 292
Service étendu et garantie de numéro gratuit : 1-800- vente 247-4618 Télécopie numéro gratuit : 1-800- 727-8320 Services Dell pour les sourds, mal- numéro gratuit : 1-877- entendants, ou pour personnes DELLTTY présentant des troubles du langage (1-877-335-5889) U.S. Îles Vierges Assistance générale...
Notices de la FCC (U.S. uniquement) La plupart des systèmes informatiques de Dell sont classés par la FCC (Federal Communications Commission [Commission fédérale des communications]) en appareils numériques de Classe B. Pour déterminer la classification à appliquer à votre système informatique, examinez tous les labels d'enregistrement FCC situés sur la base, sur le côté...
Exportateur : Dell Inc. One Dell Way Round Rock, TX 78682 Importateur : Dell Computer de México, S.A. de C.V. Paseo de la Reforma 2620 - 11° Piso Col. Lomas Altas 11950 México, D.F. Livraison à : Dell Computer de México, S.A. de C.V.
Glossaire Lumens ANSI — Un standard pour mesurer la sortie de lumière, utilisé pour comparer les projecteurs. Format de l'image—Le format d'image le plus populaire est 4:3 (4 par 3). Les premiers formats vidéo de télévisions et d'ordinateur étaient un format d'image de 4:3, ce qui signifie que la largeur de l'image est de 4/3 de fois la hauteur.
Seite 296
XGA compressé — Se trouve sur les projecteurs SVGA, la gestion de XGA compressé permet à ces projecteurs de gérer jusqu'à la résolution de 1024x768 XGA. Apport de contraste— Plage des valeurs claires et foncées dans une image, ou le rapport entre leurs valeurs maximum et minimum.
Seite 297
Correction trapézoïdale — Dispositif qui corrigera une image par rapport à la déformations (habituellement un effet de sommet large et de base étroite) d'une image projetée causé par l'angle incorrect du projecteur par rapport à l'écran. Pointeur laser — Un petit pointeur de la taille d'un stylo ou d'un cigare contenant une petit laser alimenté...
Seite 298
SECAM— Un standard français et international d'émission pour la vidéo et la projection. Résolution supérieure à NTSC. SVGA— Super Video Graphics Array— Comptage de pixels de 800 x 600. SXGA— Super Ultra Graphics Array,—Comptage de pixels de 1280 x 1024. UXGA—...
HDTV 12 connexion d'un ordinateur à assistance l'aide d'un câble D- sub vers D-sub 11 contacter Dell 63 connexion d'un ordinateur à l'aide d'un câble M1 vers D-sub/USB 10 Connexion du projecteur cordon d'alimentation 10, 11, à...
Seite 300
50 réglage de la hauteur du projecteur 20 contacter Dell 47 Réglage du zoom et de la mise au point du projecteur 21 bague de mise au point 21 Panneau de contrôle 23 ergot du zoom 21 Port de connexion...
Seite 301
valve légère 53 bague de mise au point 8 vitesse de roue chromatique bouton élévateur 8 cache de l'objectif 8 Émetteur récepteur de télécommande 8 Télécommande 25 ergot du zoom 8 objectif 8 panneau de contrôle 8 Unité principale 8 Index...
Seite 303
Proyector Dell™ 5100MP Manual del propietario Model XXX w w w . d e l l . c o m | s u p p o r t . d e l l . c o m...
Seite 304
Otras marcas y nombres comerciales pueden usarse en este documento para referirse a entidades ya sea a las entidades que reclaman las marcas o a sus productos. Dell Inc. niega cualquier interés de propiedad de las marcas y nombres de marcas distintas a las suyas.
Seite 305
Tabla de contenidos 1 Su proyector Dell ....7 Acerca de su proyector ....
Seite 306
Conexión con la caja de control comercial RS232: 3 Uso del proyector ....19 Encendido del proyector ....Apagado del proyector .
Seite 307
5 Especificaciones ....53 6 Cómo ponerse en contacto con Dell . . . 63 7 Apéndice: Avisos reguladores ..93 Información de la FCC (sólo para EE.UU.)
Su proyector Dell El proyector incluye todos los elementos que se muestran a continuación. Asegúrese de tenerlos todos y comuníquese con Dell en caso de que algo falte. Contenido del paquete Cable de alimentación de 1,8 m Cable M1-A a D-sub/USB de 1,8 m (3 m en los modelos para América)
(continuación) Contenido del paquete Documentación Pilas (2) Acerca de su proyector Panel de control Botón del elevador Transmisor-receptor del control remoto Lente Tapa para la lente Anillo de enfoque Lengüeta de zoom Su proyector Dell...
Conexión del proyector Conector de red RJ45 Conector HDMI Conector de entrada VGA Conector de entrada de señal M1 Conector de entrada de video Conector de entrada S-video Conector de salida VGA Conector RS232 Receptor IR/Transmisor-receptor RF Agujero de bloqueo Kensington Conector del cable de alimentación Salida del relé...
Conexión a la computadora Conexión de una computadora con un cable M1 a D-sub/USB Cable de alimentación Cable M1-A a D-sub/USB NOTA: El cable USB no puede conectarse si se usa el dongle USB. Para obtener información acerca del dongle USB, consulte la página 38. Conexión del proyector...
Conexión de una computadora con un cable D-sub a D-sub Cable de alimentación Cable D-sub a D-sub NOTA: El cable USB no puede conectarse si se usa el dongle USB. Para obtener información acerca del dongle USB, consulte la página 38. Conexión del proyector...
Cable M1 a HDTV Conexión de un reproductor de DVD con un cable D-sub a YPbPr Cable de alimentación Cable D-sub a YPbPr NOTA: Dell no incluye el cable D-sub a YPbPr. Consulte a un instalador profesional. Conexión del proyector...
Conexión de un reproductor de DVD con un cable RCA a RCA Cable de alimentación Cable componente RCA a RCA NOTA: Dell no incluye el cable RCA a RCA. Consulte a un instalador profesional. Conexión de un reproductor de DVD con un cable S-video Cable de alimentación Cable S-video Conexión del proyector...
Cable de video compuesto Conexión de un reproductor de DVD con un cable BNC a VGA Cable de alimentación Cable BNC a VGA NOTA: Dell no incluye el cable BNC a VGA. Consulte a un instalador profesional. Conexión del proyector...
Opciones de instalación profesional: Instalación para la pantalla automática de conducción. Cable de alimentación Conector de 12 VCC Pantalla automática NOTA: Use un nivel de 12 VCC con conector de 1.7mm(DI) x 4.00mm(DE) x 9.5mm (eje) para conectar la pantalla automática con el proyector. Conector de 12 VCC Conexión del proyector...
Instalación del control remoto con cable RS232: Conexión de la PC Cable de alimentación Cable RS232 NOTA: Dell no incluye el cable RS232. Consulte a un instalador profesional. Conexión del proyector...
Conexión con la caja de control comercial RS232: Cable de alimentación Cable RS232 Caja de control comercial RS232 NOTA: Dell no incluye el cable RS232. Consulte a un instalador profesional. Conexión del proyector...
9. Pulse el botón de alimentación (consulte la página 23 para localizar el botón de alimentación). El logotipo de Dell aparece durante 30 segundos. Encienda el dispositivo fuente (computadora, reproductor de DVD, etc.). El proyector lo detecta automáticamente.
Ajuste de la imagen proyectada Aumento de la altura del proyector Mantenga pulsado el botón del elevador. Suba el proyector al ángulo de visualización deseado, luego suelte el botón para bloquear el pie elevador en la posición. Utilice la rueda de ajuste de la inclinación para ajustar el ángulo de visualización. Disminución de la altura del proyector Mantenga pulsado el botón del elevador.
Ajuste del enfoque y zoom del proyector PRECAUCIÓN: Para evitar daños en el proyector, asegúrese de que la lente de zoom y el pie elevador estén completamente retraídos antes de trasladar o colocar el proyector en su maleta de transporte. Gire la lengüeta de zoom para alejar o acercar la imagen.
Seite 326
La pantalla se apaga automáticamente. Vuelva a encender la pantalla cuando el proyector se enfríe. Si el problema persiste, comuníquese con Dell. • Si la luz de temperatura parpadea de color naranjo, significa que ha ocurrido una falla en un ventilador y el proyector se apaga automáticamente.
14 Control de brillo y Pulse para controlar el brillo y el contraste, pulse contraste para ajustar el brillo o el contraste y luego pulse los botones para ajustar el valor. Uso del control remoto Alimentación Enciende y apaga el proyector. Para obtener más información, consulte la página 19.
Seite 328
Pulse para hacer clic con el botón derecho del derecho mouse. Modo Video El Microproyector Dell 5100MP cuenta con configuraciones predefinidas optimizadas para la visualización de datos (gráficos de PC) o de video (películas, juegos, etc.). Pulse el botón Modo Video para alternar entre Modo PC, Modo Pelíc,...
Seite 329
21 Clic con el botón Pulse para hacer clic con el botón derecho izquierdo izquierdo del mouse. 22 Fuente Pulse para alternar entre fuentes RGB analógica, RGB digital, Compuesta, Componente-i, S-video e YPbPr analógica. 23 Corrección de clave Pulse para corregir la distorsión de la imagen. 24 PIP Pulse el botón PIP para encender/apagar la pantalla PIP .
Advertencia de láser El control remoto está equipado con un láser de Clase II que emite radiación láser. Para disminuir el riesgo de sufrir lesiones, no mire directamente la luz del láser ni apunte con ella a los ojos de otras personas.
Configuración de la imagen para —Use ajustar el brillo de RILLO la imagen. —Use para controlar el ONTRASTE grado de diferencia entre las partes más brillantes y más oscuras de la imagen. Al ajustar el contraste, se modifica la cantidad de blanco y negro de la imagen.
Seite 332
V.—Ajuste la distorsión de la imagen causada por la inclinación del LAVE proyector. H.—Ajuste la distorsión de la imagen causada al cambiar la orientación LAVE horizontal del proyector. .—Seleccione Act. para activar la corrección automática de la LAVE AUTOM distorsión vertical de la imagen a causa de la inclinación del proyector. Seleccione Des.
automáticamente al modo Usu. )—Ajuste en 0 para maximizar la reproducción LANCO NTENSIDAD DEL BLANCO del color y en 10 para maximizar el brillo. —Ajuste entre 1 y 4 para cambiar el rendimiento de color de la pantalla. EGAMMA El ajuste predeterminado es 3. Menú...
Menú Administración —Selecciona la ubicación del BICACIÓN MENÚ Menú en pantalla. )— ODO PROYEC ODO DE PROYECCIÓN Seleccione la manera en que aparece la imagen: • Presentación frontal escritorio (valor predeterminado). • Presentación posterior escritorio: el proyector invierte la imagen para que pueda proyectar desde detrás de una pantalla translúcida.
Seite 335
—Seleccione Act. (valor predeterminado) para detectar UTOFUENTE automáticamente las señales de entrada disponibles. Si el proyector está encendido y usted pulse FUENTE, encuentra automáticamente la siguiente señal de entrada disponible. Seleccione Des. para bloquear la señal de entrada actual. Si selecciona Des.
Menú Lenguaje Pulse para seleccionar el idioma preferido para el menú en pantalla. Menú Configuración PIP NOTA 1: La imagen PIP se activa sólo cuando los dos tipos de señales siguientes están conectados al proyector. Tipo 1: S-Video, Video compuesto, M1-D y Tipo 2: D-sub, BNC, Componente, HDMI, NOTA 2: Al intercambiar entre las visualizaciones de primer y segundo plano,...
Seleccione Act para ingresar a PIP— MAGEN Opciones y seleccionar las configuraciones siguientes. Seleccione Des. para desactivar la función de visualización Picture-in- Picture. PIP —Use Fuente PIP para recorrer una UENTE a una las fuentes de visualización de la imagen en primer plano.
DNS—Escriba la dirección IP del servidor DNS de la red conectada al proyector. Se usan 12 caracteres numéricos. —Pulse para confirmar la configuración. PLICAR CAMBIOS —Pulse para volver a la configuración EINICIAR CONFIGURACIÓN DE RED predeterminada. Menú Restaurar —Seleccione Sí para restaurar el ESTAURAR proyector a sus valores predeterminados de fábrica.
Menú Fuente: vídeo NOTA: Este menú sólo está disponible con las señales S-video, video (compuesto) conectadas. —Ajuste una fuente de video desde ATURACIÓN blanco y negro hasta color completamente saturado. Pulse para disminuir la cantidad de color en la imagen y para aumentarla.
Seite 340
Volver a la configuración de fábrica para el Canal de RF • Seleccione Sí en el menú Configuración de Aprend. RF e ingrese al menú Restablecer RF a predeterminado. Seleccione Restablecer a canal predeterminado, el proyector volverá al canal predeterminado de fábrica.
Para manejar el proyector desde la Administración Web Ajuste de la Configuración de Red Si el proyector está conectado a una red, puede acceder al proyector a través de un explorador de Internet si ajusta la configuración de la red (TCP/IP). Al usar la función de red, la dirección IP debe ser única.
Seite 343
Propiedades de administración Inicio Muestra la información de Nombre de grupo, Nombre de proyector, Localización, Contacto, Horas de lámpara, Versión de Firmware, Dirección IP, Dirección MAC y Contraseña de Admin. Uso del proyector...
Seite 344
Configuración de Red Consulte la sección de Menú en pantalla en la página 35. • Defina el Nombre de grupo, Nombre de proyector, Localización e información de Contacto en esta ficha y pulse Enviar para confirmar la configuración. • Seleccione DHCP para asignar una dirección IP al proyector automáticamente desde un servidor DHCP o Manual para asignar una dirección IP de manera manual.
Seite 345
Control y Estado del Proyector La función es la misma que la del Menú en pantalla. Administre el estado del proyector, el control de imagen y el control de audio usando Control y Estado del Proyector. Uso del proyector...
Seite 346
Alerta de E-Mail Defina la Dirección de e-mail, Propietario, Tema y Condición de alerta para enviar alertas de e-mail automáticas al administrador predefinido. Uso del proyector...
Seite 347
Configuración de Contraseña Use Configuración de Contraseña para definir una contraseña para que el administrador ingrese a la Administración Web . Al activar la contraseña por primera vez, defina la contraseña antes de activarla. Una vez que se activa la función de contraseña, se solicita una contraseña de administrador para acceder a la Administración Web.
Solución de problemas del proyector Si experimenta problemas con el proyector, consulte las siguientes sugerencias para solucionarlos. Si el problema persiste, comuníquese con Dell. Problema Solución posible No aparece la imagen en la • Compruebe que haya quitado la tapa de la pantalla lente y que el proyector esté...
Seite 350
Si está usando una computadora portátil • Dell, ajuste la resolución de la computadora en XGA (1024 x 768): Haga clic con el botón derecho en la parte no utilizada del escritorio de Windows, haga clic en Propiedades y luego seleccione la ficha Configuración.
Seite 351
Falla de interbloqueo Si la luz de lámpara parpadea de color naranja, significa que la tapa de la lámpara no está cerrada correctamente. Ciérrela bien. Si el problema persiste, comuníquese con Dell. Solución de problemas del proyector...
2 pilas AA. Autodiagnóstico de video El Proyector Dell 5100MP incluye una prueba de autodiagnóstico de la pantalla de video del proyector (para Video, S-video, Componente-i). Use esta avanzada función para realizar pruebas de autodiagnóstico preliminares de su proyector cuando experimente problemas de visualización de video.
Seite 353
DEBEN SER RECICLADAS O ELIMINADAS EN CONFORMIDAD CON LAS LEYES LOCALES, ESTATALES Y FEDERALES. PARA OBTENER MÁS INFORMACIÓN, VISITE WWW.DELL.COM/HG O COMUNÍQUESE CON LA ALIANZA DE INDUSTRIAS ELECTRÓNICAS EN WWW.EIAE.ORG. PARA CONOCER DETALLES ESPECÍFICOS SOBRE LA ELIMINACIÓN DE LAS LÁMPARAS, VISITE WWW.LAMPRECYCLE.ORG.
Especificaciones Válvula de luz Tecnología de un solo chip de 0,95" SXGA+ DLP™ LVDS (señalización diferencial de bajo voltaje) Brillo 3300 ANSI lúmenes (máx.) Tasa de contraste 2500:1 típica (Completo/Apagado) Uniformidad 80% típica (estándar de Japón - JBMA) Lámpara Lámpara de 300 vatios de 1700 horas reemplazable por el usuario (hasta 2200 horas en modo económico) Número de píxeles...
Seite 356
Fuente de alimentación Entrada universal CA 50-60 Hz de 90- 240V con PFC Consumo de energía 400 vatios típica, 335 vatios en modo económico Audio 2 altavoces, 2 vatios RMS Nivel de ruido 37dB(A) en modo Completo, 31dB(A) en modo económico Peso 8,2 lbs (3,73 k) Dimensiones (Ancho x Alto x...
Seite 357
Entrada de computadora: una M1-DA para señales de entrada analógica/digital/componente, HDTV, una D-sub de 15 contactos para señales de entrada analógica/componente, HDTV, una BNC R/G/B/H/V para señales de entrada analógica RGB. Salida de computadora: una D-sub de 15 contactos Entrada de video: 3 conectores RCA para entrada de video componente/HDTV, una entrada de S- video mini-DIN de 4 contactos, una...
Seite 358
Asignación de contactos RS232 Protocolo RS232 • Configuración de la comunicación Configuración de la conexión Valor Tasa de baudios: 19200 Bits de datos: Paridad Ninguno Bits de parada • Tipos de comandos Para abrir el menú OSD y ajustar la configuración. •...
Seite 359
Nota: Cuando el proyector está en el modo suspendido, el proyector no envía respuesta de reconocimiento (NACK). • Respuesta del proyector de horas de lámpara: Byte0, Byte1, Byte2, Byte3 Byte0: 0x00 (Éxito) Byte1: 0x2F (la cabecera de las horas de lámpara) Byte2: LSB (Hex) Byte3: MSB (Hex) Ejemplo: 800 (3x256+2x16=800) horas -->...
Seite 360
Lista de comandos de control Cabeza Código de Tamaño del CRC16 Identificad Tamaño Código del Descripción del dirección payload para todo or MsG comando comando (WORD) (BYTE) (WORD) el paquete (WORD) (WORD) (BYTE) (WORD) 0xefbe 0x10 0x0005 0xffc6 0x1111 0x0001 0x01 Power 0xbfc7...
Seite 361
Fuentes de combinación de PIP Fuente HDMI Componente Computadora Componente Componente Componente S-Video Compuesto M1 Digital NOTA: Si la combinación de dos fuentes supera el ancho de banda del escalador, el proyector mostrará una imagen negra. Especificaciones...
Seite 362
Modos de compatibilidad Modo Resolución (ANALÓGICO) (DIGITAL) Frecuencia V. Frecuencia H. Frecuencia V. Frecuencia H. (Hz) (KHz) (Hz) (KHz) 640 X 350 31.5 31.5 640 X 350 37.9 37.9 640 X 400 37.9 37.9 640 X 480 31.5 31.5 640 X 480 37.9 37.9 640 X 480...
Seite 363
MAC G4 640 X 480 68.03 MAC G4 640 X 480 97.09 IMAC DV 640 X 480 IMAC DV 800 X 600 IMAC DV 1024 X 768 IMAC DV 1152 X 870 68.49 IMAC DV 1280 X 960 IMAC DV 1280 X 1024 91.1 * Imagen de computadora comprimida.
Seite 365
Insporon TM XPS está disponible en un número telefónico separado listado para países participantes. Si usted no ve un número telefónico listado que sea específico para las computadoras Inspiron XPS, puede usted contactar a Dell a través del número de soporte técnico listado y su llamada será transferida en forma apropiada.
Seite 366
® ciudad: 11 de almacenamiento EMC la_enterprise@dell.com Servicio al cliente sin cargo: 0-800-444- 0730 Soporte técnico sin cargo: 0-800-444-0733 Servicios de soporte técnico sin cargo: 0-800-444-0724 Ventas 0-810-444-3355 Aruba Soporte general sin cargo: 800-1578 Cómo ponerse en contacto con Dell...
1-800-819-339 Soporte técnico (portátiles y de sin cargo: 1-300-655-533 escritorio) Soporte técnico (servidores y sin cargo: 1-800-733-314 estaciones de trabajo) Ventas corporativas sin cargo: 1-800-808-385 Ventas de transacciones sin cargo: 1-800-808-312 sin cargo: 1-800-818-341 Cómo ponerse en contacto con Dell...
Seite 368
Soporte técnico para pequeñas y 0820 240 530 14 micro empresas Soporte técnico para cuentas 0660 8779 preferentes y corporativas Conmutador 0820 240 530 00 Bahamas Soporte general sin cargo: 1-866-278-6818 Barbados Soporte general 1-800-534-3066 Cómo ponerse en contacto con Dell...
Seite 369
Fax de soporte técnico 51 481 5470 Código del país: Fax de servicio al cliente 51 481 5480 Ventas 0800 90 3390 Código de la ciudad: 51 Islas Vírgenes Soporte general sin cargo: 1-866-278-6820 Británicas Cómo ponerse en contacto con Dell...
Seite 370
Ventas (pequeñas y micro sin cargo: 1-800-387-5752 empresas) Ventas (mediana y gran empresa, sin cargo: 1-800-387-5755 gobierno) Venta de repuestos y de servicios 1 866 440 3355 extendidos Islas Caimán Soporte general 1-800-805-7541 Cómo ponerse en contacto con Dell...
Seite 371
Pequeñas y micro empresas Sin cargo: 800 858 2222 División de cuentas preferentes Sin cargo: 800 858 2557 Grandes cuentas corporativas sin cargo: 800 858 2055 Grandes cuentas corporativas sin cargo: 800 858 2628 cuentas claves Cómo ponerse en contacto con Dell...
Seite 372
República Checa Sitio web: support.euro.dell.com (Praga) E-mail: czech_dell@dell.com Código de acceso Soporte técnico 22537 2727 internacional: 00 Servicio al cliente 22537 2707 Código del país: 22537 2714 Tech Fax 22537 2728 Conmutador 22537 2711 Cómo ponerse en contacto con Dell...
Seite 373
3287 5000 empresas) Fax de conmutador (pequeñas y 3287 5001 micro empresas) Dominica Soporte general sin cargo: 1-866-278-6821 República Soporte general 1-800-148-0530 Dominicana Ecuador Soporte general sin cargo: 999-119 El Salvador Soporte general 01-899-753-0777 Cómo ponerse en contacto con Dell...
Seite 374
990 emaildell/ Código del país: Soporte técnico 09 253 313 60 Servicio al cliente 09 253 313 38 Código de la 09 253 313 99 ciudad: 9 Conmutador 09 253 313 00 Cómo ponerse en contacto con Dell...
Seite 376
Servicio al cliente de segmento 06103 766-9570 global Servicio al cliente para cuentas 06103 766-9420 preferentes Servicio al cliente para grandes 06103 766-9560 cuentas Servicio al cliente para cuentas 06103 766-9555 públicas Conmutador 06103 766-7000 Cómo ponerse en contacto con Dell...
Seite 377
Soporte técnico servicio dorado 00800-44 14 00 83 Conmutador 2108129810 Conmutador de servicio dorado 2108129811 Ventas 2108129800 2108129812 Grenada Soporte general sin cargo: 1-866-540-3355 Guatemala Soporte general 1-800-999-0136 Guyana Soporte general sin cargo: 1-877-270-4609 Cómo ponerse en contacto con Dell...
Seite 378
División de medianas empresas 3416 0912 División de pequeñas y micro 2969 3105 empresas La India Soporte técnico 1600 33 8045 Ventas (grandes cuentas 1600 33 8044 corporativas) Ventas (pequeñas y micro 1600 33 8046 empresas) Cómo ponerse en contacto con Dell...
Seite 379
(discar dentro del R.U. solamente) Ventas en Irlanda 01 204 4444 Ventas en el Reino Unido (discar 0870 907 4000 dentro del R.U. solamente) Fax de ventas 01 204 0103 Conmutador 01 204 4444 Cómo ponerse en contacto con Dell...
Seite 380
02 696 821 12 Corporativo Soporte técnico 02 577 826 90 Servicio al cliente 02 577 825 55 02 575 035 30 Conmutador 02 577 821 Jamaica Soporte general (discar dentro de 1-800-682-3639 Jamaica solamente) Cómo ponerse en contacto con Dell...
Seite 381
Código de la Inspiron) ciudad: 44 Soporte técnico fuera de Japón 81-44-520-1435 (Dimension and Inspiron) Soporte técnico ((Dell Precision, sin cargo:0120-198-433 OptiPlex, y Latitude) Soporte técnico fuera de Japón 81-44-556-3894 (Dell Precision, OptiPlex, y Latitude) Cómo ponerse en contacto con Dell...
Seite 382
044-556-3433 preferentes (más de 400 empleados) Ventas de grandes cuentas 044-556-3430 corporativas (más de 3500 empleados) Ventas públicas (agencias 044-556-1469 gubernamentales, instituciones educativas y médicas) Segmento global Japón 044-556-3469 Usuario individual 044-556-1760 Conmutador 044-556-4300 Cómo ponerse en contacto con Dell...
Seite 384
Código de acceso o 001-877-269-3383 internacional: 00 Ventas 50-81-8800 Código del país: o 01-800-888-3355 Servicio al cliente 001-877-384-8979 o 001-877-269-3383 Principal 50-81-8800 o 01-800-888-3355 Montserrat Soporte general sin cargo: 1-866-278-6822 Antillas Soporte general 001-800-882-1519 Holandesas Cómo ponerse en contacto con Dell...
Seite 385
020 674 50 00 Fax de ventas a pequeñas y micro 020 674 47 75 empresas Fax de ventas relacionales 020 674 47 50 Conmutador 020 674 50 00 Fax del conmutador 020 674 47 50 Cómo ponerse en contacto con Dell...
Seite 386
Soporte técnico 671 16882 Servicio al cliente relacional 671 17575 Servicio al cliente para pequeñas y 23162298 micro empresas Conmutador 671 16800 Fax del conmutador 671 16865 Panamá Soporte general 001-800-507-0962 Perú Soporte general 0800-50-669 Cómo ponerse en contacto con Dell...
Seite 387
21 422 07 10 21 424 01 12 Puerto Rico Soporte general 1-800-805-7545 St. Kitts and Soporte general sin cargo: 1-877-441-4731 Nevis Sta. Lucia Soporte general 1-800-882-1521 St. Vincent and Soporte general sin cargo: 1-877-270-4609 the Grenadines Cómo ponerse en contacto con Dell...
Seite 388
011 709 7713 09/091 Soporte técnico 011 709 7710 Código del país: Servicio al cliente 011 709 7707 Ventas 011 709 7700 Código de la 011 706 0495 ciudad: 11 Conmutador 011 709 7700 Cómo ponerse en contacto con Dell...
Seite 390
0844 811 411 empresas) Soporte técnico (corporativo) 0844 822 844 Servicio al cliente (pequeñas y 0848 802 202 micro empresas) Servicio al cliente (corporativo) 0848 821 721 022 799 01 90 Conmutador 022 799 01 01 Cómo ponerse en contacto con Dell...
Seite 391
604 633 4949 Malasia) Ventas corporativas sin cargo: 1800 006 009 Ventas de transacciones sin cargo: 1800 006 006 Trinidad y Soporte general 1-800-805-8035 Tobago Islas Turks y Soporte general sin cargo: 1-866-540-3355 Caicos Cómo ponerse en contacto con Dell...
Seite 392
Servicio al cliente de salud 01344 373 194 Ventas (pequeñas y micro 0870 907 4000 empresas) Ventas al secotr 01344 860 456 público/corporativo Fax para pequeñas y micro 0870 907 4006 empresas Cómo ponerse en contacto con Dell...
Seite 393
Clñientes del programa de sin cargo: 1-800-695-8133 compras de empleados (EPP) Soporte técnico de impresoras y sin cargo: 1-877-459-7298 proyectores Público (gobierno, educación y salud) Servicio al cliente y soporte sin cargo: 1-800-456-3355 técnico Cómo ponerse en contacto con Dell...
Seite 394
Ventas de servicio extendido y sin cargo: 1-800-247-4618 garantía sin cargo: 1-800-727-8320 Servicios Dell para sordos, sin cargo: 1-877- impedidos auditivos o del habla DELLTTY (1-877-335-5889) Islas Vírgenes de Soporte general 1-877-673-3355 los EE.UU. Venezuela Soporte general 8001-3605 Cómo ponerse en contacto con Dell...
Luego de determinar la clasificación de su sistema según la FCC, lea el aviso de la FCC correspondiente. Tenga en cuenta que, según las regulaciones de la FCC, los cambios o modificaciones que se realicen al sistema sin la aprobación expresa de Dell podrían anular su autoridad para operarlo.
Exportador: Dell Inc. One Dell Way Round Rock, TX 78682 Importador: Dell Computer de México, S.A. de C.V. Paseo de la Reforma 2620 - 11° Piso Col. Lomas Altas 11950 México, D.F. Enviar a: Dell Computer de México, S.A. de C.V.
Glosario ANSI Lumens— Un estándar para medir la salida de luz, usada para comparar proyectores. Aspect Ratio (relación de aspecto)—La relación de aspecto más popular es 4:3 (4 por 3). Los primeros formatos de televisión y de computadoras eran en una relación de aspecto 4:3, lo que significa que el ancho de la imagen es 4/3 veces la altura.
Seite 398
manejo del XGA comprimido permite a estos proyectores manejar hasta una resolución de 1024x768 XGA. Contrast Ratio o relación de contraste— Rango de valores de luz y oscuridad en una imagen, o la relación entre sus valores máximo y mínimo. Hay dos métodos usados en la industria de proyectores para medir la relación: Full On/Off —...
Seite 399
una imagen proyectada causada por un ángulo inapropiado del proyector a la pantalla. Laser Pointer o apuntador láser— Un pequeño puntero del tamaño de una lapicera que contiene un láser alimentado por una pequeña batería, que puede proyectar un haz láser pequeño y típicamente rojo de gran intensidad que es muy visible inmediatamente sobre la pantalla.
Seite 400
SECAM— Un estándar francés e internacional para transmisión de video y broadcasting. Mayor resolución que el NTSC. SVGA— Super Video Graphics Array— 800 x 600 pixels. SXGA— Super Ultra Graphics Array— 1280 x 1024 pixels. UXGA— Ultra Extended Graphics Array—1600 x 1200 pixels. VGA—...
Pantalla automática 15 Conexión del proyector Control remoto 25 A la computadora 10 Cable BNC a VGA 14 Dell Cable componente RCA a RCA contacto 63 Cable de alimentación 10, 11, 12, 13, 14, 15, 16, 17 Encendido/Apagado del proyector...
Seite 402
Válvula de luz 53 Velocidad de la rueda del color 53 Solución de problemas 47 Autodiagnóstico 50 Menú en pantalla contacto con Dell 47 Menú Administración 32 soporte Menú Audio 31 cómo ponerse en contacto con Menú Configuración de Red 35 Dell 63 Menú...
Seite 403
Proiettore Dell™ 5100MP Manuale di istruzioni Model XXX w w w . d e l l . c o m | s u p p o r t . d e l l . c o m...
Seite 404
Marchi utilizzati in questo testo: Dell, il logo DELL, Dimension, OptiPlex, Dell Precision, Latitude, Inspiron, DellNet, PowerApp, PowerEdge, PowerConnect e PowerVault sono marchi di fabbrica di Dell Inc.; DLP e Texas Instruments sono marchi di fabbrica di Texas Instruments Corporation; Microsoft e Windows sono marchi registrati di Microsoft Corporation; Macintosh è...
Seite 405
Sommario 1 Descrizione del proiettore Dell ..7 Informazioni sul proiettore ....2 Collegamento del proiettore ... 9 Collegamento a un computer .
Seite 406
..Regolazione della messa a fuoco del proiettore . . . Regolazione delle dimensioni dell'immagine ..Utilizzo del pannello di controllo ...
Descrizione del proiettore Dell Il proiettore viene fornito con gli elementi indicati di seguito. Assicurarsi che la fornitura sia completa e rivolgersi a Dell se manca qualcosa. Contenuto della confezione Cavo di alimentazione da 1,8 m Cavo da M1 a D-sub/USB da 1,8 m...
(continua) Contenuto della confezione Documentazione Batterie (2) Informazioni sul proiettore Pannello di controllo Pulsante di elevazione Ricetrasmettitore del telecomando Obiettivo Copriobiettivo Ghiera di messa a fuoco Linguetta dello zoom Descrizione del proiettore Dell...
Collegamento del proiettore Connettore di rete RJ45 Connettore HDMI Connettore di ingresso VGA Connettore M1 per segnale in ingresso Connettore di ingresso video Connettore di ingresso S-Video Connettore di uscita VGA Connettore RS232 Ricevitore infrarossi/Ricetrasmettitore RF Foro per lucchetto Kensington Connettore di alimentazione Uscita di relè...
Collegamento a un computer Collegamento di un computer mediante cavo da M1 a D-sub/USB Cavo di alimentazione Cavo da M1A a D- Sub/USB N.B.: il cavo USB non può essere collegato se si utilizza il dongle USB. Per informazioni sul collegamento del dongle USB fare riferimento a pagina 40. Collegamento del proiettore...
Collegamento di un computer mediante cavo da D-sub a D-sub Cavo di alimentazione Cavo da D-sub a D-sub N.B.: il cavo USB non può essere collegato se si utilizza il dongle USB. Per informazioni sul collegamento del dongle USB fare riferimento a pagina 40. Collegamento del proiettore...
Collegamento di un lettore DVD mediante cavo da D-sub a YPbPr Cavo di alimentazione Cavo da D-sub a YPbPr N.B.: il cavo da D-sub a YPbPr non viene fornito da Dell. Rivolgersi a un installatore professionista per procurarsi il cavo. Collegamento del proiettore...
Cavo di alimentazione Cavo Component da RCA a RCA N.B.: il cavo da RCA a RCA non viene fornito da Dell. Rivolgersi a un installatore professionista per procurarsi il cavo. Collegamento di un lettore DVD mediante cavo S-Video Cavo di alimentazione...
Collegamento di un lettore DVD mediante cavo da BNC a VGA Cavo di alimentazione Cavo da BNC a VGA N.B.: il cavo da BNC a VGA non viene fornito da Dell. Rivolgersi a un installatore professionista per procurarsi il cavo. Collegamento del proiettore...
Opzioni di installazione professionali: Installazione per alimentazione automatica dello schermo Cavo di alimentazione Connettore 12V DC Schermo automatico N.B.: Utilizzare la dimensione del connettore 12V DC in 1,7mm(ID) x 4,00mm(OD) x 9,5mm (Shaft) per collegare lo schermo automatico al proiettore. Connettore 12V DC Collegamento del proiettore...
Installazione per telecomando RS232 cablato: Collegamento con il Cavo di alimentazione Cavo RS232 N.B.: il cavo RS232 non viene fornito da Dell. Rivolgersi a un installatore professionista per procurarsi il cavo. Collegamento del proiettore...
Collegamento con control box RS232 commerciale: Cavo di alimentazione Cavo RS232 Control box RS232 commerciale N.B.: il cavo RS232 non viene fornito da Dell. Rivolgersi a un installatore professionista per procurarsi il cavo. Collegamento del proiettore...
Per informazioni sul collegamento del proiettore, vedere pagina 9. Premere il pulsante di alimentazione (vedere pagina 23 per individuare l'ubicazione del pulsante). Viene visualizzato il logo Dell per 30 secondi. Accendere la sorgente video (computer, lettore DVD, ecc.). Il proiettore rileva automaticamente la sorgente.
Premere il pulsante di elevazione. Sollevare il proiettore fino all'angolo di proiezione desiderato, quindi lasciare il pulsante per bloccare il piedino di elevazione in posizione. Utilizzare la rotellina di regolazione dell'inclinazione per mettere a punto l'angolatura dello schermo. Ridurre l'altezza del proiettore Premere il pulsante di elevazione.
Regolazione della messa a fuoco del proiettore ATTENZIONE: prima di rimuovere o riporre il proiettore nella sua custodia, per evitare di danneggiarlo, assicurarsi che le lenti dello zoom e il piedino di elevazione siano completamente rientrati. Ruotare la linguetta dello zoom per ingrandire o ridurre la visualizzazione. Ruotare la ghiera di messa a fuoco fin quando l'immagine non è...
Max. 36.9" 83.7" 135.3" 189.5" 612,5 cm 750,0 cm Schermo (93,8 cm) (212,5 cm) (343,8 cm) (481,3 cm) (diagonale) Min. 30.8" 69.7" 112.8" 157.9" 510,4 cm 625,0 cm (78,1 cm) (177,1 cm) (286,5 cm) (401,0 cm) Max. 29,5" x 22,1" 66,9"...
Seite 426
Lo schermo si spegne automaticamente. Riaccendere lo schermo solo dopo che il proiettore si è raffreddato. Se il problema persiste, rivolgersi a Dell. • Se la spia TEMP di colore arancione lampeggia, una ventola del proiettore è guasta e il proiettore si spegne automaticamente.
Puntare il telecomando verso lo schermo e tenere premuto questo pulsante per attivare un raggio laser. Volume Premere questo pulsante per alzare il volume. Mute Premere questo pulsante per azzerare/ripristinare il volume dell'altoparlante del proiettore. Volume Premere questo pulsante per abbassare il volume. Uso del proiettore...
Seite 428
Pulsante che esegue il clic del pulsante destro del destro mouse. Modalità video Il microproiettore Dell 5100MP è dotato di configurazioni preimpostate ottimizzate per la visualizzazione di dati (grafica PC) o video (filmati, giochi, ecc.). Premere il pulsante Modalità video per attivare la modalità PC, Movie , Gioco, sRGB o Utente (questa modalità...
Seite 429
19 Pagina Premere questo pulsante per passare alla pagina successiva. 20 Controllo PC/Mouse Il controllo PC/Mouse può essere utilizzato per controllare lo spostamento del puntatore del mouse. La funzione mouse viene abilitata quando il computer e il proiettore vengono collegati mediante il cavo M1.
Seite 430
Avviso laser Il telecomando è dotato di un laser Classe II che emette radiazioni laser. Per ridurre il rischio di lesioni, non guardare direttamente la luce del laser e non rivolgerla contro gli altri. Pulsante Programma Avviare la modalità Programmazione sul telecomando per cambiare il canale di trasmissione RF premendo il pulsante Prgm.
Coperchio del Il coperchio posteriore del telecomando. telecomando Vano batteria Il vano della batteria. Utilizzo del menu a schermo Il proiettore dispone di un menu a schermo multilingue che può essere visualizzato con o senza la presenza di una sorgente d'ingresso. Nel Menu Principale, premere per passare da una scheda all'altra.
Seite 432
)—Selezionare TRAPEZ AUTO REGOLAZIONE AUTOMATICA DISTORSIONE TRAPEZOIDALE On per attivare la correzione automatica della distorsione verticale dell'immagine dovuta all'inclinazione del proiettore. Selezionare Off per disattivare la correzione automatica. )— TRAP SEMI...
Seite 433
—Selezionare una modalità per ottimizzare lo schermo sulla base IDEO dell'uso che si sta facendo del proiettore: Movie, Gioco, PC, sRGB (offre una rappresentazione dei colori più accurata) e Utente (consente all'utente di impostare le regolazioni che desidera). Se si regolano le impostazioni di Intensità...
Menu Audio per abbassare il volume —Premere OLUME per alzare il volume. —Controlla le frequenze più alte della Premere per ridurre gli sorgenteaudio. alti e premere per aumentare gli alti. —Controlla le frequenze più basse della ASSI per ridurre i bassi sorgente audio.
(250 Watt), il che consente di prolungare la vita della lampadina e di ottenere un funzionamento più silenzioso e una luminanza meno intensa dell'immagine a schermo. Selezionare Off per il funzionamento al livello normale (300 Watt). Uso del proiettore...
Seite 436
)—Selezionare On (impostazione predefinita) per AUTO SORGENTE AUTOMATICA rilevare automaticamente i segnali in ingresso disponibili. Quando il proiettore è acceso e si preme il pulsante SORGENTE, esso trova automaticamente il successivo segnale in ingresso disponibile. Selezionare Off per bloccare il segnale in ingresso corrente.
Menu Lingua Premere per selezionare la lingua desiderata per il menu a schermo. Menu Impostazioni PIP N.B. 1: la funzione Immagine PIP è abilitata solo quando i seguenti tipi di segnali sono entrambi collegati al proiettore. Tipo 1: S-Video, Video Composito, M1-D, e Tipo 2: D-sub, BNC, Component, HDMI, N.B.
X PIP —Consente di regolare orizzontalmente la posizione OSIZIONE dell'immagine della visualizzazione PIP . Y PIP —Consente di regolare verticalmente la posizione dell'immagine OSIZIONE della visualizzazione PIP . PBP —Selezionare On per abilitare la modalità di visualizzazione MMAGINE Picture-By-Picture (PBP).
posizione del numero, e i pulsanti Su o Giù per modificare il numero. DNS—Immettere l'indirizzo IP del server DNS della rete collegata al proiettore. Sono utilizzati 12 caratteri numerici. —Premere questo pulsante per confermare le impostazioni scelte. PPLICA MODIFICA —Premere questo pulsante per ripristinare la IPRISTINA IMPOSTAZIONI DI RETE impostazioni predefinite.
O.—Premere OSIZIONE verso sinistra e per regolarla verso destra. per regolare la posizione verticale dell'immagine V.—Premere OSIZIONE verso il basso e per regolarla verso l'alto. Menu Sorgente video N.B.: questo menu è disponibile solo quando sono connessi segnali S-Video o Video (Composito).
Connessioni di programmazione RF Cambiare automaticamente il canale RF dal telecomando al proiettore • Accendere il proiettore. • Premere il pulsante "Menu" sul pannello di controllo, quindi aprire il menu "Gestione-->Appr. canale RF ". • Selezionare Sì con i pulsanti di controllo per attivare la modalità...
Seite 442
Programmazione automatica per cambiare il canale RF dal telecomando al dongle wireless USB Passaggio 1 Aprire il coperchio del telecomando. Passaggio 2 Esercitare pressione sul dongle. Passaggio 3 Estrarre il dongle dal telecomando. Passaggio 4 Inserire il dongle nella porta USB del computer desktop o portatile;...
Gestione del proiettore dal Web Configurazione delle impostazioni di rete Se il proiettore è collegato a una rete, è possibile accedervi utilizzando un browser Web e configurando le impostazioni di rete (TCP/IP). Se si utilizza la funzione di rete, l'indirizzo IP deve essere univoco. Per configurare le impostazioni di rete, fare riferimento al Menu Impostazioni di rete a pagina 36.
Seite 445
Gestione delle proprietà Home In questa pagina sono visualizzate le informazioni relative al nome gruppo, nome proiettore, posizione, contatti, ore lampada, versione firmware, indirizzo IP, indirizzo MAC e password Admin. Uso del proiettore...
Seite 446
Impostazioni di rete Fare riferimento alla sezione OSD a pagina 36. • In questa scheda, inserire le informazioni relative al nome gruppo, nome proiettore, posizione e contatti, quindi fare clic sul pulsante Submit per confermare le impostazioni. • Scegliere DHCP per assegnare automaticamente un indirizzo IP al proiettore da un server DHCP, oppure Manual per assegnare un indirizzo IP manualmente.
Seite 447
Stato e controllo del proiettore La funzione è la stessa del menu a schermo. Nella pagina relativa allo stato e al controllo del proiettore, è possibile gestire lo stato del proiettore e controllare le immagini e l'audio. Uso del proiettore...
Seite 448
Avvisi mediante la posta elettronica È possibile impostare l'indirizzo di posta elettronica, il proprietario, l'oggetto e il tipo di avviso in modo da inviare avvisi automatici mediante posta elettronica all'amministratore indicato. Uso del proiettore...
Seite 449
Impostazione della password Utilizzare la finestra di impostazione della password per impostare una password amministratore per accedere alla gestione via Web. Alla prima attivazione della password, impostare la password prima di attivarla. Quando la funzione password è abilitata, la password amministratore è richiesta per accedere alla gestione via Web.
Risoluzione dei problemi del proiettore Se si verificano problemi con il proiettore, consultare i seguenti consigli per la risoluzione dei problemi. Se il problema persiste, rivolgersi a Dell. Problema Possibile soluzione Assenza di immagine sullo • Assicurarsi che il coperchio dell'obiettivo sia schermo stato rimosso e che il proiettore sia acceso.
Seite 452
Se si incontrano delle difficoltà nel cambiare la risoluzione o il monitor si blocca, riavviare tutte le apparecchiature e il proiettore. Se non si utilizza un computer portatile Dell, vedere la documentazione corrispondente al prodotto utilizzato. Lo schermo non visualizza la...
Seite 453
(continua) Problema Possibile soluzione L'immagine non è a fuoco Regolare la ghiera di messa a fuoco dell'obiettivo del proiettore. Assicurarsi che lo schermo del proiettore sia entro la distanza richiesta dal proiettore (da 1,5 a 12 m). L'immagine proiettata è...
AA. Autodiagnostica per video Il Proiettore Dell 5100MP dispone di un test di autodiagnostica per il display del videoproiettore (per Video, S-Video e Component-I). Usare questa funzionalità avanzata per eseguire una prova diagnostica preliminare sul proiettore in caso di problemi di visualizzazione video.
Sostituire la lampadina quando sullo schermo compare il seguente messaggio: "La lampada sta per terminare la propria vita di esercizio in funzionamento alla massima energia. Sostituzione consigliata! www.dell.com/lamps". Se il problema persiste anche dopo la sostituzione della lampadina, contattare Dell. ATTENZIONE: Durante l'uso, la lampadina diventa molto calda. Non cercare di sostituire la lampadina prima di aver lasciato raffreddare il proiettore per almeno 30 minuti.
Seite 456
LE LAMPADINE CONTENUTE ALL'INTERNO DI QUESTO APPARECCHIO CONTENGONO MERCURIO E DEVONO ESSERE RICICLATE O SMALTITE NEL RISPETTO DELLE LEGGI VIGENTI LOCALI, STATALI O FEDERALI. PER ULTERIORI INFORMAZIONI, VISITARE IL SITO WEB ALL'INDIRIZZO WWW.DELL.COM/HG OPPURE CONTATTARE L'ENTE EIAE ACCEDENDO ALL'INDIRIZZO WWW.EIAE.ORG. PER INFORMAZIONI SPECIFICHE SULLO SMALTIMENTO DELLE LAMPADINE, VISITARE IL SITO WWW.LAMPRECYCLE.ORG.
Specifiche tecniche Valvola luminosa Tecnologia LVDS (low-voltage differential signaling) SXGA+ DLP™ 0,95" a chip singolo Luminosità 3300 ANSI Lumens (max.) Rapporto di contrasto 2500:1 tipico (completamente acceso/completamente spento) Uniformità 80% Tipica (standard Giappone - JBMA) Lampadina Lampadina da 1700 ore, 300 Watt, sostituibile dall'utente (fino a 2200 ore in modalità...
Seite 458
Frequenza verticale 43Hz-120Hz (analogica) 43Hz-85Hz (digitale) Alimentatore Universale 90-240 V c.a., 50-60Hz con ingresso PFC Consumo di energia 400 Watt (tipica), 335 W (in modalità ECO) Audio 2 altoparlanti, 2 Watt RMS Livello di disturbo 37dB(A) modalità completamente acceso, 31dB(A) modalità ECO Peso 3,73 kg Dimensioni (L x A x P)
Seite 459
Ingresso computer: un M1-DA per analogico/digitale/Component, segnali ingresso HDTV, un D-sub a 15 pin per ingresso analogico/Component, segnali ingresso HDTV, un BNC R/G/B/H/V per segnali ingresso analogico RGB Uscita computer: un D-sub a 15 pin Ingresso video: 3 connettori RCA per ingresso video Component/HDTV, un ingresso S-video mini-DIN a 4 pin, un jack RCA per ingresso video composito...
Seite 460
Assegnazione di pin RS232 Protocollo RS232 • Impostazioni di comunicazione Impostazioni di connessione Valore Velocità di trasmissione in baud: 19200 Bit di dati: Parità Nessuno Bit di stop • Tipi di comandi Per visualizzare il menu OSD e regolare le impostazioni. •...
Seite 461
Nessun Riconoscimento (NACK, No Acknowledgement). • Ora lampada risposta del proiettore: Byte0, Byte1, Byte2, Byte3 Byte0: 0x00 (Esito positivo) Byte1: 0x2F (l'intestazione dell'ora della lampada) Byte2: LSB (Hex) Byte3: MSB (Hex) Esempio: 800 (3x256+2x16=800) ore --> 0x00, 0x2F, 0x20, 0x03 •...
Seite 462
Elenco dei comandi di controllo Intestazi- Codice Dimen- CRC16 ID Messag- Dimen- Codice Descrizione del indi- sione del sioni Mes- Comando comando rizzo payload l'intero (WORD) saggio (BYTE) (WORD) (BYTE) (WORD) pacchetto (WORD) (WORD) 0xefbe 0x10 0x0005 0xffc6 0x1111 0x0001 0x01 Power 0xbfc7...
Seite 463
Sorgenti di combinazioni PIP Sorgente Computer HDMI Component Component Component Component S-Video Composito Digitale N.B.: se la combinazione di due sorgenti sorpassa la larghezza di banda del demoltiplicatore, il proiettore visualizzerà un'immagine nera. Specifiche tecniche...
MAC G4 640x480 68,03 MAC G4 640x480 97,09 IMAC DV 640x480 IMAC DV 800x600 IMAC DV 1024x768 IMAC DV 1152x870 68,49 IMAC DV 1280X960 IMAC DV 1280x1024 91,1 * Compressione immagine computer. N.B.: la modalità UXGA non è supportata in DVI (M1-to-DVI). Specifiche tecniche...
Inspiron XPS, è possibile contattare Dell attraverso il numero di assistenza tecnica elencato e la chiamata sarà addebitamente instradata. Per contattare la Dell, usare i numeri di telefono, i prefissi e gli indirizzi di posta elettronica riportati nella seguente tabella. Per ulteriori informazioni sui prefissi da usare, contattare un operatore locale o internazionale.
Seite 468
Internazionale sito Web numeri verdi Indicativo del Paese Prefisso Teleselettivo Argentina Sito Web: www.dell.com.ar (Buenos Aires) E-mail: Prefisso us_latin_services@dell.com Internazionale: 00 E-mail per computer desktop e Indicativo del portatili: Paese: 54 la-techsupport@dell.com...
Seite 470
Internazionale sito Web numeri verdi Indicativo del Paese Prefisso Teleselettivo Austria (Vienna) Sito Web: support.euro.dell.com Prefisso E-mail: Internazionale: tech_support_central_europe@ dell.com Indicativo del Commerciale piccole imprese 0820 240 530 00 Paese: 43...
Internazionale sito Web numeri verdi Indicativo del Paese Prefisso Teleselettivo Belgio (Brussels) Sito Web: support.euro.dell.com Prefisso E-mail per clienti in lingua Internazionale: 00 francese: support.euro.dell.com/be/fr/ Indicativo del emaildell/ Paese: 32 Assistenza tecnica solo per...
Seite 472
Commerciale (piccole imprese) num. verde: 1-800-387- 5752 Commerciale (medie e grandi num. verde: 1-800-387- imprese, governative) 5755 Vendita pezzi di ricambio e servizi 1 866 440 3355 estesi Isole Cayman Assistenza generale 1-800-805-7541 Contattare Dell...
Seite 473
Assistenza tecnica (Dell™ num. verde: 800 858 2969 Dimension™ e Inspiron) Assistenza tecnica (OptiPlex™, num. verde: 800 858 0950 Latitude™ e Dell Precision™) Assistenza tecnica (server e num. verde: 800 858 0960 storage) Assistenza tecnica (proiettori, num. verde: 800 858 2920 palmari, switch, router, e così...
Seite 474
Large Corporate Accounts Pezzi di num. verde: 800 858 2621 ricambio Colombia Assistenza generale 980-9-15-3978 Costa Rica Assistenza generale 0800-012-0435 Repubblica Ceca Sito Web: support.euro.dell.com (Praga) E-mail: czech_dell@dell.com Prefisso Assistenza tecnica 22537 2727 Internazionale: 00 Servizio clienti 22537 2707 Indicativo del...
Seite 475
Internazionale sito Web numeri verdi Indicativo del Paese Prefisso Teleselettivo Danimarca Sito Web: support.euro.dell.com (Copenhagen) E-mail: Prefisso support.euro.dell.com/dk/da/ Internazionale: 00 emaildell/ Indicativo del Assistenza tecnica solo per 7010 0074 Paese: 45...
Seite 476
Prefisso indirizzo di posta elettronica e del numeri locali e Internazionale sito Web numeri verdi Indicativo del Paese Prefisso Teleselettivo Finlandia Sito Web: support.euro.dell.com (Helsinki) E-mail: Prefisso support.euro.dell.com/fi/fi/ emaildell/ Internazionale: Assistenza tecnica 09 253 313 60 Indicativo del Servizio clienti...
Seite 477
Internazionale sito Web numeri verdi Indicativo del Paese Prefisso Teleselettivo Francia (Parigi) Sito Web: support.euro.dell.com (Montpellier) E-mail: Prefisso support.euro.dell.com/fr/fr/ Internazionale: 00 emaildell/ Indicativo del Piccole imprese Paese: 33 Assistenza tecnica solo per...
Seite 478
Internazionale sito Web numeri verdi Indicativo del Paese Prefisso Teleselettivo Germania Sito Web: support.euro.dell.com (Langen) E-mail: Prefisso tech_support_central_europe@ Internazionale: 00 dell.com Indicativo del Assistenza tecnica solo per 06103 766-7222 Paese: 49...
Seite 479
Internazionale: apsupport@dell.com Assistenza tecnica (Dimension e 2969 3188 Indicativo del Inspiron) Paese: 852 Assistenza tecnica (OptiPlex, 2969 3191 Latitude e Dell Precision) Assistenza tecnica (PowerApp™, 2969 3196 PowerEdge™, PowerConnect™ e PowerVault™) Servizio clienti 3416 0910 Large Corporate Accounts 3416 0907...
Seite 480
Internazionale sito Web numeri verdi Indicativo del Paese Prefisso Teleselettivo Irlanda Sito Web: support.euro.dell.com (Cherrywood) E-mail: Prefisso dell_direct_support@dell.com Internazionale: 16 Assistenza tecnica solo per 1850 200 722 Indicativo del computer Inspiron XPS...
Seite 481
Prefisso indirizzo di posta elettronica e del numeri locali e Internazionale sito Web numeri verdi Indicativo del Paese Prefisso Teleselettivo Italia (Milano) Sito Web: support.euro.dell.com Prefisso E-mail: Internazionale: 00 support.euro.dell.com/it/it/ emaildell/ Indicativo del Paese: 39 Piccole imprese Prefisso Assistenza tecnica...
Seite 482
Indicativo del Inspiron) Paese: 81 Assistenza tecnica fuori del 81-44-520-1435 Prefisso Giappone (Dimension e Inspiron) teleselettivo: 44 Assistenza tecnica (Dell Precision, num. verde: 0120-198- OptiPlex e Latitude) Assistenza tecnica fuori del 81-44-556-3894 Giappone (Dell Precision, OptiPlex e Latitude) Contattare Dell...
Seite 483
(fino a 400 impiegati) Commerciale divisione Preferred 044-556-3433 Accounts (oltre 400 impiegati) Commerciale Large Corporate 044-556-3430 Accounts (oltre 3500 impiegati) Commerciale pubblico (agenzie 044-556-1469 governative, istituzioni scolastiche e istituzioni mediche) Giappone segmento globale 044-556-3469 Utenti singoli 044-556-1760 Centralino 044-556-4300 Contattare Dell...
Seite 484
512 728-4093 Texas, USA) Servizio clienti (Austin, Texas, 512 728-3619 USA) Fax (assistenza tecnica e servizio 512 728-3883 clienti ) (Austin, Texas, U.S.A.) Commerciale (Austin, Texas, 512 728-4397 U.S.A.) Fax Commerciale (Austin, Texas, 512 728-4600 U.S.A.) oppure 512 728-3772 Contattare Dell...
Seite 486
Assistenza generale num. verde: 1-866-278- 6822 Paesi Bassi Assistenza generale 001-800-882-1519 Antille Paesi Bassi Sito Web: support.euro.dell.com (Amsterdam) Assistenza tecnica solo per 020 674 45 94 Prefisso computer Inspiron XPS Internazionale: 00 Assistenza tecnica per tutti gli altri 020 674 45 00...
Seite 488
Internazionale sito Web numeri verdi Indicativo del Paese Prefisso Teleselettivo Polonia Sito Web: support.euro.dell.com (Varsavia) E-mail: Prefisso pl_support_tech@dell.com Internazionale: Telefono servizio clienti 57 95 700 Servizio clienti 57 95 999 Indicativo del...
Seite 489
Assistenza tecnica (Dimension, num. Prefisso Inspiron e Elettronica e accessori) verde: 1800 394 7430 Internazionale: Assistenza tecnica (OptiPlex, num. Latitude e Dell Precision) verde: 1800 394 7488 Indicativo del Assistenza tecnica (PowerApp, num. Paese: 65 PowerEdge, PowerConnect e verde: 1800 394 7478...
Seite 490
Internazionale sito Web numeri verdi Indicativo del Paese Prefisso Teleselettivo Sud Africa Sito Web: support.euro.dell.com (Johannesburg) E-mail: Prefisso dell_za_support@dell.com Internazionale: Gold Queue 011 709 7713 09/091 Assistenza tecnica 011 709 7710...
Seite 491
Internazionale sito Web numeri verdi Indicativo del Paese Prefisso Teleselettivo Svezia (Upplands Sito Web: support.euro.dell.com Vasby) E-mail: Prefisso support.euro.dell.com/se/sv/ Internazionale: 00 emaildell/ Indicativo del Assistenza tecnica 08 590 05 199 Paese: 46...
Seite 492
00801 651 227 Thailandia Sito Web: support.ap.dell.com Prefisso Assistenza tecnica (OptiPlex, num. verde: 1800 0060 07 Internazionale: Latitude e Dell Precision) Assistenza tecnica (PowerApp, num. verde: 1800 0600 09 Indicativo del PowerEdge, PowerConnect e Paese: 66 PowerVault) Servizio clienti (Penang, Malaysia)
Seite 493
Internazionale sito Web numeri verdi Indicativo del Paese Prefisso Teleselettivo Regno Unito Sito Web: support.euro.dell.com (Bracknell) Sito Web servizio clienti: Prefisso support.euro.dell.com/uk/en/ECare/Form/Home.asp Internazionale: 00 Indicativo del E-mail: Paese: 44 dell_direct_support@dell.com Prefisso...
Seite 494
1-800-695- Program) 8133 Sito Web servizi finanziari: www.dellfinancialservices.com Servizi Finanziari num. verde: 1-877-577- (leasing/finanziamenti) 3355 Servizi Finanziari (Dell Preferred num. verde: 1-800-283- Accounts [DPA]) 2210 Business Servizio clienti e Assistenza num. verde: 1-800-822- tecnica 8965 Clienti EPP (Employee Purchase num.
Seite 495
Commerciale parti di ricambio num. verde: 1-800-357- 3355 Servizio esterni e garanzia num. verde: 1-800-247- 4618 num. verde: 1-800-727- 8320 Servizi Dell per persone con num. verde: 1-877- disabilità di udito e parlato DELLTTY (1-877-335-5889) Stati Uniti Isole Assistenza generale 1-877-673-3355...
Appendice: Avvisi normativi Dichiarazione FCC (solo Stati Uniti) Quasi tutti i computer Dell sono classificati dalla commissione FCC (Federal Communications Commission) come dispositivi digitali di classe B. Per determinare la classificazione applicata a un computer, esaminare tutte le etichette di registrazione FCC situate nella parte inferiore, laterale o posteriore del computer, sulle staffe di montaggio delle schede e sulle schede stesse.
Esportatore: Dell Inc. One Dell Way Round Rock, TX 78682 Importatore: Dell Computer de México, S.A. de C.V. Paseo de la Reforma 2620 - 11° Piso Col. Lomas Altas 11950 México, D.F. Spedire a: Dell Computer de México, S.A. de C.V.
(307.000 contro 480.000). L'immagine risultante sono dimensioni di pagina SVGA, ma a scapito di parte della qualità dell'immagine. Se si utilizza un computer SVGA, collegare VGA a un proiettore VGA per ottenere risultati ottimali.
Seite 500
Rapporto di contrasto — Gamma di valori chiari e scuri di un'immagine, oppure rapporto tra i rispettivi valori massimo e minimo. Nell'industria della proiezione sono utilizzati due metodi per misurare il rapporto: Completamente acceso/spento — Misura il rapporto della luce emessa di un'immagine completamente bianca (completamente acceso) e di un'immagine completamente nera (completamente spento).
Seite 501
Dimensioni massime immagine — L'immagine più grande ottenibile da un proiettore in una stanza senza luce. Di solito è limitata dalla gamma focale dell'obiettivo. Lampada all'alogenuro di metallo — Tipo di lampada utilizzata in molti proiettore medi e in tutti quelli alti e portatili. Queste lampade hanno tipicamente un "periodo di emivita"...
Seite 502
risoluzione è più elevata rispetto a NTSC. SVGA — Super Video Graphics Array — Risoluzione di 800 x 600 pixel. SXGA — Super Ultra Graphics Array — Risoluzione di 1280 x 1024 pixel. UXGA — Ultra Extended Graphics Array — Risoluzione di 1600 x 1200 pixel. VGA —...
Accensione del proiettore 19 DVD mediante cavo Spegnimento del proiettore 19 da D-sub a YPbPr 12 assistenza Collegamento di un lettore contattare Dell 65 DVD mediante cavo da M1 a HDTV 12 Control box RS232 Collegamento del proiettore commerciale 17...
Seite 504
Menu Sorgente video 38 Regolazione dell'altezza del proiettore 20 Ridurre l'altezza del proiettore Pannello di controllo 23 Porte di collegamento Regolazione della messa a fuoco Connettore BNC 9 del proiettore 21 Connettore di alimentazione 9 Ghiera di messa a fuoco 21...
Seite 505
Obiettivo di proiezione 55 Peso 56 Unità principale 8 Protocollo di rete 56 Copriobiettivo 8 Protocollo RS232 58 Ghiera di messa a fuoco 8 Rapporto di contrasto 55 Linguetta dello zoom 8 Sorgenti di combinazioni PIP Obiettivo 8 Pannello di controllo 8 Uniformità...
Seite 507
Dell™ 5100MP-projector Gebruiksaanwijzing Model XXX w w w . d e l l . c o m | s u p p o r t . d e l l . c o m...
Seite 508
Merken die in deze tekst worden gebruikt: Dell, het DELL-logo, Dimension, OptiPlex, Dell Precision, Latitude, Inspiron, DellNet, PowerApp, PowerEdge, PowerConnect en PowerVault zijn merken van Dell Inc.; DLP en Texas Instruments zijn gedeponeerde merken van Texas Instruments Corporation; Microsoft en Windows zijn merken van Microsoft Corporation;...
Seite 509
Inhoudsopgave 1 Uw Dell-projector ....5 Over uw projector ....
Seite 510
Installatie voor bekabelde RS232-afstandsbediening: Aansluiten op de PC ....Aansluiting op een commerciële RS232-besturingsbox: ....3 Uw projector gebruiken .
Seite 511
5 Specificaties ..... . 49 6 Contact opnemen met Dell ... 57 7 Bijlage: Reglementerende verklaringen .
Uw Dell-projector Uw projector wordt geleverd met alle onderstaande items. Controleer of u alle items hebt en neem contact op met Dell als er iets ontbreekt. Inhoud verpakking Voedingskabel 1,8 m (3 m in Noord- en M1 naar D-sub/USB-kabel 1,8 m...
Aansluiten op een computer Een computer aansluiten met een M1 naar D-sub/USB-kabel. Voedingskabel M1A naar D-sub/USB- kabel OPMERKING: De USB-kabel kan niet worden aangesloten als de USB-dongle wordt gebruikt. Zie pagina 35 voor meer informatie over de aansluiting van de USB-dongle.
Een computer aansluiten met een D-sub naar D-sub-kabel Voedingskabel D-sub naar D-sub-kabel OPMERKING: De USB-kabel kan niet worden aangesloten als de USB-dongle wordt gebruikt. Zie pagina 35 voor meer informatie over de aansluiting van de USB-dongle. Uw projector aansluiten...
Een DVD-speler aansluiten met een M1 naar HDTV-kabel Voedingskabel M1 naar HDTV-kabel Een DVD-speler aansluiten met een D-sub naar YpbPr-kabel Voedingskabel D-sub naar YPbPr-kabel OPMERKING: De D-sub naar YPbPr-kabel wordt niet geleverd door Dell. Raadpleeg een professionele installateur voor het aanschaffen van de kabel. Uw projector aansluiten...
Een DVD-speler aansluiten met een RCA naar RCA-kabel Voedingskabel RCA naar RCA component-kabel OPMERKING: De RCA naar RCA-kabel wordt niet geleverd door Dell. Raadpleeg een professionele installateur voor het aanschaffen van de kabel. Aansluiten op een DVD-speler met een S-videokabel Voedingskabel...
Een DVD-speler aansluiten met een composietkabel Voedingskabel Composiet videokabel Een DVD-speler aansluiten met een BNC naar VGA-kabel Voedingskabel BNC naar VGA-kabel OPMERKING: De BNC naar VGA-kabel wordt niet geleverd door Dell. Raadpleeg een professionele installateur voor het aanschaffen van de kabel. Uw projector aansluiten...
Professionele installatieopties: Installatie voor het besturen van het automatische scherm Voedingskabel 12V DC-stekker Automatisch scherm: OPMERKING: Gebruik een 12V DC-stekker met de afmetingen 1,7mm(binnen) x 4,00mm(buiten) x 9,5mm (schacht) om het automatische scherm op de projector aan te sluiten. 12V DC-stekker Uw projector aansluiten...
Seite 522
Installatie voor bekabelde RS232-afstandsbediening: Aansluiten op de PC Voedingskabel RS232-kabel OPMERKING: De RS232-kabel wordt niet geleverd door Dell. Raadpleeg een professionele installateur voor het aanschaffen van de kabel. Uw projector aansluiten...
Seite 523
Aansluiting op een commerciële RS232-besturingsbox: Voedingskabel RS232-kabel Commerciële RS232-besturingsbox OPMERKING: De RS232-kabel wordt niet geleverd door Dell. Raadpleeg een professionele installateur voor het aanschaffen van de kabel. Uw projector aansluiten...
Druk op de voedingsknop (zie pagina 21 voor de locatie van de voedingsknop). Het Dell-logo wordt gedurende 30 seconden weergegeven. Schakel uw bron in (bijvoorbeeld uw computer of DVD-speler). De projector detecteert uw bron automatisch.
Het geprojecteerde beeld aanpassen De projector verhogen Druk op de knop voor de regelbare voet. Verhoog de projector naar de gewenste weergavehoek en laat vervolgens de knop los om de voet in deze positie te vergrendelen. Gebruik het wiel voor het regelen van de kantelhoek om de weergavehoek fijn af te stellen.
De zoom en de focus van de projector aanpassen WAARSCHUWING: Om schade aan de projector te voorkomen, dient u te controleren of de zoomlens en de afstelvoet volledig zijn ingetrokken voordat u de projector verplaatst of voordat u de projector in zijn draagkoffer stopt. Draai het zoomwiel om in en uit te zoomen.
Max. 36.9" 83.7" 135.3" 189.5" 612,5 cm 750,0 cm Scherm (93,8 cm) (212,5 cm) (343,8 cm) (481,3 cm) (diagonaal) Min. 30.8" 69.7" 112.8" 157.9" 510,4 cm 625,0 cm (78,1 cm) (177,1 cm) (286,5 cm) (401,0 cm) Max. 29,5 X 22,1 inch 66,9 X 50,2 inch 108,3 X 81,2 inch 151,6 X 113,7 192,9 X 144,7...
Seite 530
TEMP automatisch uitgeschakeld. Schakel het scherm opnieuw in nadat de projector is afgekoeld. Neem contact op met Dell als het probleem zich blijft voordoen. • Als het lampje voor TEMP oranje knippert, betekent dit dat een projectorventilator defect is en wordt de projector automatisch afgesloten.
De afstandsbediening gebruiken Voeding Schakel de projector in en uit. Zie pagina 17 voor meer informatie. Druk hierop om de OSD-instelling aan te passen. Laser Richt de afstandsbediening op het scherm en houd de knop Laser ingedrukt om het laserlicht te activeren.
Seite 532
Videomodus De Dell 5100MP-microprojector heeft vooraf ingestelde configuraties die zijn geoptimaliseerd om informatie (PC-afbeeldingen) of video (bijvoorbeeld films of spelletjes) weer te geven. Druk op de knop Videomodus om te schakelen tussen de PC-modus, Filmmodus, Spelmodus, sRGB en Gebruikersmodus (de gebruiker kan in deze modus de voorkeursinstellingen configureren en opslaan).
Seite 533
PIP wisselen Druk op de knop PIP wisselen om te schakelen tussen de voorgrond en de achtergrond. Waarschuwing voor De afstandsbediening is voorzien van een Klasse de laser II-laser die laserstraling uitzendt. Kijk niet direct in het licht van de laser en richt het laserlicht niet op de ogen van andere personen om letsel te vermijden.
Draadloze USB- Het draadloze USB-apparaat voor de besturing muisdongle van de muis van PC of notebook via de afstandsbediening. Klep van de De achterklep van de afstandsbediening. afstandsbediening Batterijruimte De ruimte waarin de batterij wordt geplaatst. Het OSD (On-Screen Display, weergave op het scherm) gebruiken De projector beschikt over een meertalig OSD (On Screen Display) dat kan worden weergegeven met of zonder aanwezige invoerbron.
Seite 535
—Gebruik ELDERHEID helderheid van het beeld aan te passen. —Gebruik om het ONTRAST verschil tussen de helderste en donkerste gedeelten van het beeld te regelen. Als u het contrast aanpast, wordt de hoeveelheid zwart en wit in het beeld gewijzigd. .—Hiermee kunt u de LEURTEMP kleurtemperatuur aanpassen.
– VGA-kabel en een computer met een resolutie die lager is dan SXGA+ (1400 x 1050) – Componentkabel (720p, 576i/p, 480i/p) – S-videokabel – Composietkabel • 16:9— Het beeld van de invoerbron wordt geschaald om het aan te passen aan de breedte van het scherm.
Menu Beheer —Selecteert de locatie van het OCATIE OSD op het scherm. —Selecteer de manier waarop ROJECTIEMODUS het beeld wordt weergegeven: • Projectie vooraan-bureau (standaard). • Projectie achteraan-bureau: het beeld wordt omgedraaid zodat u kunt projecteren vanachter een doorzichtig scherm. •...
Seite 538
Zie pagina 34. — KANAAL LEREN —Selecteer Aan om de projector te gebruiken met een laag verbruik MODUS (250 watt) zodat de levensduur van de lamp mogelijk wordt verlengd, het toestel stiller werkt en de lichtuitvoer op het scherm wordt gedimd. Selecteer Uit om met een normaal stroomniveau te werken (300 watt).
.—Selecteer Aan ACHTW INSCHAK om één wachtwoord voor een persoon in te stellen. Selecteer Uit om de wachtwoordfunctie uit te schakelen. —Druk hierop IJZIG WACHTWOORD om het wachtwoord naar wens te wijzigen. Menu Taal Druk op om de voorkeurstaal voor het OSD te selecteren. Menu PIP-instellingen OPMERKING 1: PIP-beeld wordt alleen ingeschakeld wanneer beide...
OPMERKING 2: Als u de weergaven op de voorgrond en achtergrond wisselt, is de grootte van het kleinste schermformaat van de voorgrondweergave afhankelijk van de verschillende combinaties van de signaalbronnen voor PIP. PIP- —Selecteer Aan om de opties te BEELD openen zodat u de volgende instellingen kunt selecteren.
DNS—Typ het IP-adres van de DNS-server in het netwerk waarop de projector is aangesloten. Er worden 12 cijfers gebruikt. —Druk hierop om de instellingen te bevestigen. ERANDERING TOEPASSEN —Druk hierop om de standaardinstelling te kiezen. ETWERKINSTELLING RESETTEN Menu Standaardwaarden —Selecteer Ja om de TANDAARDWAARDEN projector opnieuw in te stellen op de standaardwaarden.
verplaatsen en op om de verticale positie van het beeld omhoog te verplaatsen. Menu Videobron OPMERKING: Dit menu is alleen beschikbaar wanneer er een S-video-, videosignaal (composiet) is aangesloten. —Hiermee kunt u een videobron ERZADIGING aanpassen van zwart-wit naar volledig verzadigde kleuren.
Seite 543
Terug naar standaardinstellingen voor het RF-kanaal Selecteer Ja in het menu Instelling RF Lerenen open vervolgens het • menu Standaardwaarden RF opnieuw instellen. Selecteer Opnieuw instellen naar standaardkanaal, waarna de projector teruggaat naar het in de fabriek ingestelde standaardkanaal. • Houd de knop Prgm op de afstandsbediening vijf seconden ingedrukt om de zender opnieuw in te stellen op het standaardkanaal.
De projector beheren vanuit Webbeheer De netwerkinstelling configureren Als de projector is aangesloten op een netwerk, hebt u toegang tot de projector met een webbrowser wanneer u de netwerkinstelling (TCP/IP) hebt geconfigureerd. Als u de netwerkfunctie gebruikt, moet het IP-adres uniek zijn.
Seite 546
Eigenschappen beheren Introductiepagina Hier worden de groepsnaam, de projectornaam, de locatie, de contactinformatie, de lampuren, de firmwareversie, het IP-adres, het MAC- adres en het beheerderswachtwoord weergegeven. Uw projector gebruiken...
Seite 547
Netwerkinstelling Zie het gedeelte over OSD op pagina 32. • Geef op dit tabblad de informatie op voor de groepsnaam, de projectornaam, de locatie en de contactinformatie en druk op Verzenden om de instellingen te bevestigen. • Kies DHCP om automatisch een IP-adres te laten toewijzen aan de projector vanaf een DHCP-server, of Handmatig als u handmatig een IP-adres wilt toewijzen.
Seite 548
Status en bediening projector De werking is gelijk aan die van het OSD. Met Status en bediening projector beheert u de projectorstatus, beeldbesturing en geluidsbesturing. Uw projector gebruiken...
Seite 549
E-mailwaarschuwing Stel het e-mailadres, de eigenaar, het onderwerp en de waarschuwingsconditie in om automatisch waarschuwingen per e-mail naar de vooraf ingestelde beheerder te sturen. Uw projector gebruiken...
Seite 550
Wachtwoordinstelling Met Wachtwoordinstelling stelt u een beheerderswachtwoord in voor toegang tot Webbeheer. U moet een wachtwoord instellen voordat u de wachtwoordfunctie inschakelt. Als de wachtwoordfunctie is ingeschakeld, hebt u het beheerderswachtwoord nodig om toegang te krijgen tot Webbeheer. Uw projector gebruiken...
Problemen met uw projector oplossen Als u problemen ondervindt met uw projector, raadpleeg dan de volgende tips voor het oplossen van problemen. Neem contact op met Dell als het probleem zich blijft voordoen. Probleem Mogelijke oplossing Er verschijnt geen beeld op •...
Seite 552
• Druk op de knop Opnieuw synchroniseren onjuist weergegeven beeld op de afstandsbediening of op het bedieningspaneel. Als u een draagbare computer van Dell • gebruikt, stel dan de resolutie van de computer in op XGA (1024 x 768): Klik met de rechtermuisknop op een...
Seite 553
De projector is oververhit. Het scherm wordt oranje. automatisch uitgeschakeld. Schakel het scherm opnieuw in nadat de projector is afgekoeld. Neem contact op met Dell als het probleem zich blijft voordoen. Het lampje van TEMP knippert Een ventilator van de projector is defect en de oranje.
Red (Rood)--> Green (Groen)--> Blue (Blauw)--> White (Wit)--> Watchet Blue (Marineblauw)--> Dark Green (Donkergroen)--> Yellow (Geel). Controleer of de kleuren van het testpatroon correct zijn. Neem contact op met Dell als de kleuren niet correct worden weergegeven. De lamp vervangen Vervang de lamp als het bericht 'Lamp is approaching the end of its useful life in full power operation.
Seite 555
De lampen in dit product bevatten kwik en moeten worden gerecycleerd of verwijderd volgens de lokale, regionale of nationale wetten. GA NAAR WWW.DELL.COM/HG VOOR MEER INFORMATIE OF NEEM CONTACT OP MET DE ELECTRONIC INDUSTRIES ALLIANCE OP WWW.EIAE.ORG. RAADPLEEG DE SITE WWW.LAMPRECYCLE.ORG VOOR SPECIFIEKE INFORMATIE OVER HET VERWIJDEREN VAN LAMPEN.
Specificaties Lampklep 0,95-inch SXGA+ DLP™ LVDS- technologie (Low-Voltage Differential Signaling) met één chip Helderheid 3300 ANSI-lumen (max.) Contrastverhouding 2500:1 standaard (volledig aan/volledig uit) Gelijkvormigheid 80% standaard (Japan standaard - JBMA) Lamp 300-watt 1700-urenlamp, door gebruiker vervangbaar (tot 2200 uur in energiebesparingsmodus) Aantal pixels 1400 x 1050 (SXGA+)
Seite 558
Energieverbruik 400 watt standaard, 335 watt in energiebesparingsmodus Audio 2 luidsprekers, 2-watt RMS Geluidsniveau 37dB(A) modus volledig vermogen, 31dB(A) energiebesparingsmodus Gewicht 3,73 kg Afmetingen (B x H x D) Extern 329,8 x 261,4 x 115,2 ± 1 mm (13 x 10,3 x 4,5 ± 0,04 inch) Omgeving Bedrijfstemperatuur: 5 C - 35...
Seite 559
Video-ingang: 3 RCA-aansluitingen voor component video/HDTV-invoer, één mini- DIN 4-pins S-video-invoer, één RCA- aansluiting voor composiet video-invoer Audio-ingang één telefoonstekker (diameter 3,5 mm) Gelijkstroomaansluiting 12 volt bij 200mA uitvoer, relaisbeheer voor besturing automatisch projectiescherm Eén RJ45-aansluiting voor een netwerk Eén HDMI-ingang Eén mini-DIN RS232 voor bekabelde afstandsbediening van projector vanaf pc Toewijzing RS232-pin...
Seite 560
Adrescode "10" ==> pt_OEM Grootte nuttige belasting "05 00"==> van wMsgID tot einde CRC "C6 FF" ==> bij CRC-waarde van "C6 (Lage byte) FF (Hoge byte)" MsgID "11 11" MsgSize "01 00"==> van opdracht tot einde. Opdracht "01"==> "Stroom AAN"-opdracht. •...
Seite 561
Lijst met bedieningsopdrachten Adrescode Grootte van CRC16 voor Bericht-id Berichtgrootte Opdrachtcode Beschrijving van nuttige het gehele (WOORD) (WOORD) (BYTE) opdracht (WOORD) (BYTE) belasting pakket (WOORD) (WOORD) 0xefbe 0x10 0x0005 0xffc6 0x1111 0x0001 0x01 Power 0xbfc7 0x02 Menu 0x7e07 0x03 0x3fc5 0x04 Down 0xfe05...
Seite 562
Combinatiebronnen voor PIP Bron HDMI component computer component component component S-Video Composiet M1 digitaal OPMERKING: Als een combinatie van twee bronnen de bandbreedte van de scaler overschrijdt, laat de projector een zwart beeld zien. Specificaties...
Seite 563
Compatibiliteitsmodi Modus Resolutie (ANALOOG) (DIGITAAL) V. frequentie H. frequentie V. frequentie H. frequentie (Hz) (KHz) (Hz) (KHz) 640X350 31.5 31.5 640X350 37.9 37.9 640X400 37.9 37.9 640X480 31.5 31.5 640X480 37.9 37.9 640X480 37.5 37.5 640X480 43.3 43.3 720X400 31.5 31.5 720X400 37.9...
Seite 564
MAC G4 640X480 68.03 MAC G4 640X480 97.09 IMAC DV 640X480 IMAC DV 800X600 IMAC DV 1024X768 IMAC DV 1152X870 68.49 IMAC DV 1280X960 IMAC DV 1280X1024 91.1 *Gecomprimeerd computerbeeld OPMERKING: UXGA wordt niet ondersteund in de DVI (M1-naar-DVI). Specificaties...
Gratis nummers kunnen alleen worden gebruikt voor het land waarbij ze worden vermeld. Als u contact wilt opnemen met Dell, gebruik dan de e-mailadressen, telefoonnummers en codes die in de volgende tabel worden vermeld. Als u hulp nodig hebt bij het bepalen welke codes u wilt gebruiken, neem dan contact op met een lokale of internationale operator.
Seite 583
Algemene ondersteuning 001-800-220-1006 Noorwegen Website: support.euro.dell.com (Lysaker) E-mail: support.euro.dell.com/no/no/ Internationale emaildell/ toegangscode: 00 Technische ondersteuning 671 16882 Landcode: 47 Klantendienst relaties 671 17575 Klantendienst thuisgebruikers/kleine 23162298 ondernemingen Centrale 671 16800 Faxcentrale 671 16865 Panama Algemene ondersteuning 001-800-507-0962 Contact opnemen met Dell...
Seite 584
800 300 412 of 21 422 07 10 21 424 01 12 Puerto Rico Algemene ondersteuning 1-800-805-7545 St. Kitts en Nevis Algemene ondersteuning gratis: 1-877-441-4731 St. Lucia Algemene ondersteuning 1-800-882-1521 St. Vincent en de Algemene ondersteuning gratis: 1-877-270-4609 Grenadines Contact opnemen met Dell...
Seite 585
Technische ondersteuning gratis: 1800 394 7430 (Dimension, Inspiron en elektronica Internationale en accessoires) toegangscode: Technische ondersteuning gratis: 1800 394 7488 (OptiPlex, Latitude en Dell Landcode: 65 Precision) Technische ondersteuning gratis: 1800 394 7478 (PowerApp, PowerEdge, PowerConnect en PowerVault) Klantendienst (Penang, Maleisië)
Als u de FCC-classificatie van uw systeem hebt vastgesteld, leest u de bijbehorende FCC- verklaring. De FCC-voorschriften vermelden dat wijzigingen of aanpassingen die niet uitdrukkelijk door Dell zijn goedgekeurd uw machtiging voor het gebruik van dit apparaat kunnen opheffen. Dit apparaat voldoet aan Deel 15 van de FCC-voorschriften. Het gebruik is onderhevig aan de volgende twee voorwaarden: •...
Exporteur: Dell Inc. One Dell Way Round Rock, TX 78682 Importeur: Dell Computer de México, S.A. de C.V. Paseo de la Reforma 2620 - 11° Piso Col. Lomas Altas 11950 Mexico, D.F. Verzenden naar: Dell Computer de México, S.A. de C.V.
Woordenlijst ANSI Lumens— Een standaard voor het meten van lichtuitvoer, die wordt gebruikt voor het vergelijken van projectors. Aspect Ratio—De populairste hoogte-breedteverhouding is 4:3 (4 bij 3). De eerste televisie- en computervideoformaten hebben een hoogte- breedteverhouding van 4:3. Dit betekent dat de breedte van het beeld 4/3 is van de hoogte.
Seite 594
Contrastverhouding— Het bereik van lichte en donkere waarden in een beeld, of de verhouding tussen hun maximum- en minimumwaarden. Om deze verhouding te meten worden door de projectiesector twee methoden gebruikt: Volledig aan/uit - meet de verhouding van de lichtuitvoer van een volledig wit beeld (volledig aan) en de lichtuitvoer van een volledig zwart beeld (volledig uit).
Seite 595
zijn die nodig is om een beeld te projecteren dat bruikbaar (helder genoeg) is in een volledig verduisterde kamer. Maximale beeldgrootte — Het grootste beeld dat een projector kan projecteren in een verduisterde kamer. Dit is doorgaans beperkt door het focusbereik van de optische onderdelen.
Seite 596
Zoomlens— Lens met een variabele brandpuntsafstand waarmee operator zijn beeld kan in- of uitzoomen om het kleiner of groter te maken. Verhouding zoomlens— Is de verhouding tussen het kleinste en grootste beeld dat een lens kan projecteren vanaf een vaste afstand. Een zoomlensverhouding van 1.4:1 betekent bijvoorbeeld dat een beeld van 10 ft.
Seite 597
Index Aansluiten op een DVD-speler Aansluitingspoorten Aansluiting op een commer- 12 Volt gelijkstroomrelais ciële RS232-bestur- Aansluiting component video- ingsbox: ingang Automatisch scherm: Aansluiting M1-ingangssig- BNC naar VGA-kabel naal Commerciële RS232-bestur- Aansluiting S-video-ingang ingsbox Aansluiting VGA-ingang Composiet videokabel Aansluiting video-ingang D-sub naar D-sub-kabel Aansluiting voedingskabel D-sub naar YPbPr-kabel Aansluiting voor de audio-in-...
Seite 598
Menu PIP-instellingen tor aanpassen Menu Standaardwaarden Scherpstelring Menu Taal Zoomring Menu Videobron Het geprojecteerde beeld aanpas- Probleemoplossing Contact opnemen met Dell de projector verlagen Afstelbare voet Zelfdiagnose Regelknop voor voet Regelwiel voor kantelhoek Specificaties De projectorhoogte regelen Aantal pixels Afmetingen...
Προβολέας Dell™ 5100MP Οδηγίες Χρήσης ÌïíôÝëï XXX w w w . d e l l . c o m | s u p p o r t . d e l l . c o m...
Seite 602
Όλες οι δηλώσεις ή οι απαιτήσεις σε σχέση µε τις ιδιότητες, δυνατότητες, ταχύτητες ή τα προσόντα του αντικειµένου που αναφέρονται σε αυτό το έγγραφο γίνονται από τον κατασκευαστή και όχι από την Dell. Η Dell αποκηρύσσει ρητά οποιαδήποτε γνώση για την ακρίβεια, την πληρότητα ή την τεκµηρίωση τέτοιων δηλώσεων.
Seite 603
Περιεχόµενα 1 Ο Προβολέας Σας Dell ... 5 Σχετικά Με Τον Προβολέα Σας ..2 Σύνδεση του Προβολέα Σας ..7 Σύνδεση...
Seite 604
Επιλογές Επαγγελµατικής Εγκατάστασης: Εγκατάσταση για Οδήγηση Αυτόµατης Οθόνης ....Εγκατάσταση για ενσύρµατο RS232 τηλεχειριστήριο: Σύνδεση µε Η/Υ ..Σύνδεση...
Seite 605
....5 Προδιαγραφές ....49 6 Επικοινωνία µε τη Dell ..57 7 Παράρτηµα: Κανονιστικές...
Ο Προβολέας Σας Dell Ο προβολέας σας συνοδεύεται από όλα τα αντικείµενα που εµφανίζονται παρακάτω. Σιγουρευτείτε πως έχετε όλα τα αντικείµενα και επικοινωνήστε µε την Dell αν κάτι λείπει. Περιεχόµενα Συσκευασίας Καλώδιο τροφοδοσίας 1,8µ (3,0µ στην Καλώδιο M1 σε D-sub/USB 1,8µ...
Seite 608
Περιεχόµενα Συσκευασίας Τεκµηρίωση Μπαταρίες (2) Σχετικά Με Τον Προβολέα Σας Πίνακας ελέγχου Κουµπί ανύψωσης Ποµποδέκτης Τηλεχειριστήριου Φακός Καπάκι Φακών ∆αχτυλίδι εστίασης Κουµπί ζουµ Ο Προβολέας Σας Dell...
Σύνδεση µε Υπολογιστή Σύνδεση Υπολογιστή µε Καλώδιο M1 σε D-sub/USB Καλώδιο τροφοδοσίας Καλώδιο M1A σε D-sub/USB ΣΗΜΕΙΩΣΗ : ∆εν είναι δυνατή η σύνδεση του καλωδίου USB αν χρησιµοποιείται το USB Dongle. Για τη σύνδεση του USB dongle ανατρέξτε στη σελίδα 35. Σύνδεση...
Seite 611
Σύνδεση Υπολογιστή µε Καλώδιο D-sub σε D-sub Καλώδιο τροφοδοσίας Καλώδιο D-sub σε D-sub ΣΗΜΕΙΩΣΗ : ∆εν είναι δυνατή η σύνδεση του καλωδίου USB αν χρησιµοποιείται το USB Dongle. Για τη σύνδεση του USB dongle ανατρέξτε στη σελίδα 35. Σύνδεση του Προβολέα Σας...
Σύνδεση Συσκευής DVD µε Καλώδιο D-sub σε YPbPr Καλώδιο τροφοδοσίας Καλώδιο D-sub σε YPbPr ΣΗΜΕΙΩΣΗ : Το καλώδιο D-sub σε YPbPr δεν παρέχεται από την Dell. Για να βρείτε το καλώδιο, συµβουλευτείτε έναν επαγγελµατία που ασχολείται µε εγκαταστάσεις. Σύνδεση του Προβολέα Σας...
Seite 613
Σύνδεση Συσκευής DVD µε Καλώδιο RCA σε RCA Καλώδιο τροφοδοσίας Καλώδιο component RCA σε RCA ΣΗΜΕΙΩΣΗ : Το καλώδιο RCA σε RCA δεν παρέχεται από την Dell. Για να βρείτε το καλώδιο, συµβουλευτείτε έναν επαγγελµατία που ασχολείται µε εγκαταστάσεις. Σύνδεση Συσκευής DVD µε Καλώδιο S-video Καλώδιο...
Seite 614
Σύνδεση Συσκευής DVD µε Καλώδιο BNC σε VGA Καλώδιο τροφοδοσίας Καλώδιο BNC σε VGA ΣΗΜΕΙΩΣΗ : Το καλώδιο BNC σε VGA δεν παρέχεται από την Dell. Για να βρείτε το καλώδιο, συµβουλευτείτε έναν επαγγελµατία που ασχολείται µε εγκαταστάσεις. Σύνδεση του Προβολέα Σας...
Seite 615
Επιλογές Επαγγελµατικής Εγκατάστασης: Εγκατάσταση για Οδήγηση Αυτόµατης Οθόνης Καλώδιο τροφοδοσίας Φις 12V DC Αυτόµατη οθόνη ΣΗΜΕΙΩΣΗ : Χρησιµοποιήστε 12V DC φις µε διάσταση 1,7mm(ID) x 4,00mm(OD) x 9,5mm (άξονας) για να συνδέσετε την αυτόµατη οθόνη µε τον προβολέα. Φις 12V DC Σύνδεση...
Seite 616
Εγκατάσταση για ενσύρµατο RS232 τηλεχειριστήριο: Σύνδεση µε Η/Υ Καλώδιο τροφοδοσίας Καλώδιο RS232 ΣΗΜΕΙΩΣΗ : Το καλώδιο RS232 δεν παρέχεται από την Dell. Για να βρείτε το καλώδιο, συµβουλευτείτε έναν επαγγελµατία που ασχολείται µε εγκαταστάσεις. Σύνδεση του Προβολέα Σας...
Seite 617
Σύνδεση µε πλαίσιο ελέγχου Commercial RS232: Καλώδιο τροφοδοσίας Καλώδιο RS232 Πλαίσιο ελέγχου Commercial RS232 ΣΗΜΕΙΩΣΗ : Το καλώδιο RS232 δεν παρέχεται από την Dell. Για να βρείτε το καλώδιο, συµβουλευτείτε έναν επαγγελµατία που ασχολείται µε εγκαταστάσεις. Σύνδεση του Προβολέα Σας...
σχετικά µε τη σύνδεση του προβολέα, ανατρέξτε στην ενότητα σελίδα 7. Πατήστε το κουµπί τροφοδοσίας (ανατρέξτε στην ενότητα σελίδα 21" για να εντοπίσετε το κουµπί τροφοδοσίας). Το λογότυπο της Dell εµφανίζεται για 30 δευτερόλεπτα. Ανάψτε την πηγή σας (υπολογιστής, συσκευή DVD, κλπ.). Ο προβολέας εντοπίζει...
Ρύθµιση της Προβαλλόµενης Εικόνας Αύξηση του Ύψους του Προβολέα Πατήστε το κουµπί ανύψωσης. Ανυψώστε τον προβολέα στη γωνία προβολής που επιθυµείτε και έπειτα απελευθερώστε το κουµπί για να κλειδώσει το πόδι ανύψωσης στη θέση του. Χρησιµοποιήστε τον τροχό ρύθµισης της κλίσης για µικρορύθµιση της γωνίας προβολής.
Seite 621
Ρύθµιση του Ζουµ και της Εστίασης του Προβολέα ΠΡΟΣΟΧΗ: Για να αποφύγετε να προκαλέσετε ζηµιά στον προβολέα, σιγουρευτείτε πως ο φακός ζουµ και το πόδι ανύψωσης έχουν µαζευτεί πλήρως πριν µετακινήσετε τον προβολέα ή τον τοποθετήσετε στη θήκη µεταφοράς του. Περιστρέψτε...
Seite 622
Ρύθµιση Μεγέθους της Προβαλλόµενης Εικόνας Χρήση του Προβολέα Σας...
Seite 624
• Αν το φωτάκι TEMP (ΘΕΡΜΟΚΡΑΣΙΑ) αναβοσβήνει πορτοκαλί, παρουσιάστηκε βλάβη σε έναν ανεµιστήρα του προβολέα και ο προβολέας θα σβήσει αυτόµατα. Αν το πρόβληµα δεν επιλυθεί, επικοινωνήστε µε την Dell. Προειδοποιητικό φωτάκι Αν το φωτάκι LAMP (ΛΑΜΠΑ) είναι σταθερά LAMP (ΛΑΜΠΑ) πορτοκαλί, αντικαταστήστε...
Χρήση του Τηλεχειριστηρίου Τροφοδοσία Ανάβει και σβήνει τον προβολέα. Για περισσότερες πληροφορίες, ανατρέξτε στην ενότητα σελίδα 17. Πατήστε το για να προσαρµόσετε τις ρυθµίσεις της OSD. Λέιζερ Σηµαδέψτε το τηλεχειριστήριο στην οθόνη, πατήστε και κρατήστε πατηµένο το κουµπί λέιζερ για να ενεργοποιήσετε...
Seite 626
Κατάσταση Βίντεο Ο Μικρο-προβολέας Dell 5100MP έχει προεπιλεγµένες ρυθµίσεις που έχουν βελτιστοποιηθεί για την απεικόνιση δεδοµένων (Γραφικών Η/Υ) ή βίντεο (ταινιών, παιχνιδιών, κτλ.). Πατήστε το κουµπί Video Mode (Κατάσταση Βίντεο) για εναλλαγή µεταξύ των PC mode (Κατάσταση Η/Υ), Movie mode (Κατάσταση Ταινίας), Game Mode (Κατάσταση...
Seite 627
Πατήστε το κουµπί PIP για να ενεργοποιήσετε/απενεργοποιήσετε την οθόνη PIP. PIP Swap (Αντιστροφή Πατήστε το κουµπί PIP Swap (Αντιστροφή PIP) για PIP) εναλλαγή µεταξύ του προσκηνίου και του φόντου. Προειδοποίηση Το τηλεχειριστήριο διάθετει ένα λέιζερ Λέιζερ Κατηγορίας II που εκπέµπει ακτινοβολία λέιζερ. Για...
Seite 628
Ασύρµατο USB Η ασύρµατη συσκευή USB για τον έλεγχο του dongle ποντικιού ποντικιού του Η/Υ ή του φορητού υπολογιστή µέσω του τηλεχειριστηρίου. Κάλυµµα Το πίσω κάλυµµα του τηλεχειριστηρίου. τηλεχειριστηρίου Θήκη µπαταριών Η θήκη των µπαταριών. Χρήση της Προβολής στην Οθόνη Ο...
Seite 629
(Φωτεινότητα)— RIGHTNESS και για να Χρησιµοποιήστε τα κάνετε αλλαγές στη φωτεινότητα της εικόνας. (Αντίθεση)—Χρησιµοποιήστε ONTRAST και τα για να ελέγξετε το βαθµό της διαφοράς ανάµεσα στα φωτεινότερα και τα σκοτεινότερα σηµεία της εικόνας. Η ρύθµιση της αντίθεσης αλλάζει την ποσότητα του µαύρου...
Seite 630
• 1:1 — Η πηγή εισόδου προβάλλεται χωρίς να είναι σε κλίµακα. Χρησιµοποιήστε την αναλογία εικόνας 1:1 αν χρησιµοποιείτε ένα από τα παρακάτω: – Καλώδιο VGA και ο υπολογιστής έχει ανάλυση µικρότερη της SXGA+ (1400 x 1050) – Καλώδιο Component (720p, 576i/p, 480i/p) –...
Seite 631
Management Menu (Μενού ∆ιαχείρισης) (Θέση του Μενού)— OCATION Επιλέξτε τη θέση της OSD στην οθόνη. (Κατάσταση ROJECTION Προβολής)—Επιλέξτε πώς εµφανίζεται η εικόνα: • Μπροστινή Προβολή-Επιφάνεια Εργασίας (η προεπιλογή). • Οπίσθια Προβολή-Επιφάνεια Εργασίας -- Ο προβολέας αντιστρέφει την εικόνα ώστε να µπορείτε...
Seite 632
(Χειροκίνητη OURCE ELECT Πηγή)—Επιλέξτε το Απενεργοποίηση Αυτόµατης Πηγής για να επιλέξετε την είσοδο σήµατος µε το χέρι. Κρατήστε πατηµένο για 3 δευτερόλεπτα το κουµπί στον πίνακα ελέγχου ή πατήστε το κουµπί στο τηλεχειριστήριο και θα εµφανιστεί ένα υποµενού SOURCE SELECT (ΕΠΙΛΟΓΗ ΠΗΓΗΣ). Πατήστε το...
Seite 633
(Ρύθµιση ASSWORD NABLE Κωδικού Πρόσβασης)— Επιλέξτε On για να ορίσετε έναν κωδικό πρόσβασης. Επιλέξτε Off για να απενεργοποιήσετε τη λειτουργία του κωδικού πρόσβασης. (Αλλαγή HANGE ASSWORD Κωδικού Πρόσβασης)— Πατήστε το για να αλλάξετε τον κωδικό σύµφωνα µε τις προτιµήσεις σας. Language Menu (Μενού...
Seite 634
PIP I (Εικόνα PIP)—Επιλέξτε On για MAGE να µεταβείτε στο µενού Options (Επιλογές) και να επιλέξτε τις ακόλουθες ρυθµίσεις. Επιλέξτε Off για να απενεργοποιήσετε τη λειτουργία εµφάνισης εικόνας σε εικόνα. PIP S (Πηγή PIP) —Χρησιµοποιήστε OURCE το στοιχείο PIP Source (Πηγή PIP) για να επιλέξετε...
Seite 635
Factory Reset Menu (Μενού Επαναφοράς Εργοστασιακών Ρυθµίσεων) (Επαναφορά ACTORY ESET Εργοστασιακών Ρυθµίσεων)—Επιλέξτε Ναι για να επαναφέρετε τον προβολέα στις προεπιλεγµένες εργοστασιακές του ρυθµίσεις. Τα στοιχεία επαναφοράς περιλαµβάνουν τόσο τις ρυθµίσεις εικόνας υπολογιστή όσο και εικόνας βίντεο. Computer Source Menu (Μενού Πηγής Υπολογιστή) ΣΗΜΕΙΩΣΗ...
Seite 636
Video Source Menu (Μενού Πηγής Βίντεο) ΣΗΜΕΙΩΣΗ : Αυτό το µενού είναι διαθέσιµο µόνο µε συνδεδεµένο σήµα S-video, Video (composite). (Κορεσµός)—Ρυθµίστε µια ATURATION πηγή εικόνας από µαύρο και άσπρο σε πλήρως κορεσµένο χρώµα. Πατήστε για να µειώσετε την ποσότητα του χρώµατος στην εικόνα και για...
Seite 637
Επιλέξτε Reset to Default Channel (Επαναφορά Προεπιλεγµένου Καναλιού) για να επαναφέρει ο προβολέας το προεπιλεγµένο εργοστασιακό κανάλι. • Πατήστε το κουµπί Προγραµµατισµός στο τηλεχειριστήριο για 5 δευτερόλεπτα για να επαναφέρετε τον ποµπό στο προεπιλεγµένο εργοστασιακό κανάλι. • Η επιτυχής επαναφορά του προεπιλεγµένου καναλιού και στις δύο συσκευές...
Seite 639
Για ∆ιαχείριση του Προβολέα από το Web Management (∆ιαχείριση Web) ∆ιαµόρφωση των Ρυθµίσεων ∆ικτύου Αν ο προβολέας είναι συνδεδεµένος σε δίκτυο, µπορείτε να έχετε πρόσβαση σε αυτόν από ένα πρόγραµµα περιήγησης στο Web διαµορφώνοντας τις ρυθµίσεις δικτύου (TCP/IP). Όταν χρησιµοποιείτε τη λειτουργία δικτύου, η διεύθυνση IP πρέπει...
Seite 640
∆ιαχείριση Ιδιοτήτων Home (Αρχική Σελίδα) Εµφανίζει πληροφορίες Group name (Όνοµα οµάδας), Projector name (Όνοµα προβολέα), Location (Θέση), Contact (Επαφή), Lamp hours (Ώρες λάµπας), Firmware version (Έκδοση υλικολογισµικού), IP address (∆ιεύθυνση IP), MAC address (∆ιεύθυνση MAC) και Admin password (Κωδικός πρόσβασης διαχειριστή).
Seite 641
Network Setting (Ρυθµίσεις ∆ικτύου) Ανατρέξτε στην ενότητα OSD στη σελίδα 32. • Ορίστε τις πληροφορίες Group Name (Όνοµα Οµάδας), Projector Name (Όνοµα Προβολέα), Location (Θέση) και Contact (Επαφή) σε αυτή την καρτέλα και πατήστε Submit (Υποβολή) για να επιβεβαιώσετε τις ρυθµίσεις. •...
Seite 642
Projector Status and Control (Κατάσταση και Έλεγχος Προβολέα) Η λειτουργία είναι ίδια µε την Προβολή στην Οθόνη. ∆ιαχειριστείτε την κατάσταση του προβολέα, τον έλεγχο της εικόνας και τον έλεγχο του ήχου χρησιµοποιώντας το Projector Status and Control (Κατάσταση και Έλεγχος Προβολέα). Χρήση...
Seite 643
E-mail Alert (Προειδοποίηση E-mail) Ορίστε τις πληροφορίες E-mail address (∆ιεύθυνση E-mail), Owner (Κάτοχος), Subject (Θέµα) και Alert Condition (Συνθήκη Προειδοποίησης) για να αποστέλλονται αυτόµατες ειδοποιήσεις µέσω e-mail στο διαχειριστή που έχει οριστεί. Χρήση του Προβολέα Σας...
Seite 644
Password Setting (Ρύθµιση Κωδικού Πρόσβασης) Χρησιµοποιήστε το Password Setting (Ρύθµιση Κωδικού Πρόσβασης) για να ορίσετε έναν κωδικό πρόσβασης διαχειριστή για πρόσβαση στο Web Management (∆ιαχείριση Web) . Όταν ενεργοποιείτε κωδικό πρόσβασης για πρώτη φορά, ορίστε τον κωδικό πρόσβασης πριν τον ενεργοποιήσετε. Όταν ενεργοποιηθεί...
Seite 645
οθόνη. φακού και πως είναι αναµµένος ο προβολέας. • Σιγουρευτείτε πως είναι ενεργοποιηµένη η εξωτερική θύρα γραφικών. Αν χρησιµοποιείτε φορητό υπολογιστή της Dell, πατήστε . Για άλλους υπολογιστές, ανατρέξτε στην τεκµηρίωσή τους. • Σιγουρευτείτε πως όλα τα καλώδια έχουν συνδεθεί µε ασφάλεια. Ανατρέξτε στην...
Seite 646
(Επανασυγχρονισµός) στο τηλεχειριστήριο ή τον πίνακα ελέγχου. Αν χρησιµοποιείτε φορητό υπολογιστή της • Dell, ρυθµίστε την ανάλυση του υπολογιστή σε XGA (1024 x 768): Κάντε δεξί κλικ σε ένα µη χρησιµοποιούµενο κοµµάτι της επιφάνειας εργασίας των Windows, κάντε κλικ στο Properties (Ιδιότητες) και...
Seite 647
(ΘΕΡΜΟΚΡΑΣΙΑ) είναι σβήνει αυτόµατα. Ανάψτε ξανά την οθόνη αφού σταθερά πορτοκαλί κρυώσει ο προβολέας. Αν το πρόβληµα δεν επιλυθεί, επικοινωνήστε µε την Dell. Το φωτάκι TEMP Παρουσιάστηκε βλάβη σε έναν ανεµιστήρα του (ΘΕΡΜΟΚΡΑΣΙΑ) προβολέα και ο προβολέας θα σβήσει αυτόµατα.
Αυτο-διάγνωση για Βίντεο Ο Προβολέας Dell 5100MP παρέχει αυτο-διαγνωστικό έλεγχο της προβολής βίντεο (για Video, S-video, Component-i). Χρησιµοποιήστε αυτήν την εξελιγµένη λειτουργία για προκαταρτική αυτοδιάγνωση στον προβολέα σας όταν αντιµετωπίσετε πρόβληµα προβολής για το βίντεο. Αφού ανάψετε τον προβολέα, πατήστε ταυτόχρονα για 3 δευτερόλεπτα τα κουµπιά...
Seite 649
ΠΕΡΙΕΧΟΥΝ Υ∆ΡΑΡΓΥΡΟ ΚΑΙ ΠΡΕΠΕΙ ΝΑ ΑΝΑΚΥΚΛΩΝΟΝΤΑΙ Ή ΝΑ ΑΠΟΡΡΙΠΤΟΝΤΑΙ ΣΥΜΦΩΝΑ ΜΕ ΤΟΥΣ ΤΟΠΙΚΟΥΣ, ΠΟΛΙΤΕΙΑΚΟΥΣ Ή ΟΜΟΣΠΟΝ∆ΙΑΚΟΥΣ ΝΟΜΟΥΣ. ΓΙΑ ΠΕΡΙΣΣΟΤΕΡΕΣ ΠΛΗΡΟΦΟΡΙΕΣ ΕΠΙΣΚΕΦΘΕΙΤΕ ΤΗΝ ΤΟΠΟΘΕΣΙΑ WWW.DELL.COM/HG Ή ΕΠΙΚΟΙΝΩΝΗΣΤΕ ΜΕ ΤΗΝ ELECTRONIC INDUSTRIES ALLIANCE ΣΤΗΝ ΤΟΠΟΘΕΣΙΑ WWW.EIAE.ORG. ΓΙΑ ΠΛΗΡΟΦΟΡΙΕΣ ΑΠΟΡΡΙΨΗΣ ΓΙΑ ΣΥΓΚΕΚΡΙΜΕΝΕΣ ΛΑΜΠΕΣ ΕΠΙΣΚΕΦΘΕΙΤΕ ΤΗΝ ΤΟΠΟΘΕΣΙΑ WWW.LAMPRECYCLE.ORG.
Seite 650
Αντιµετώπιση Προβληµάτων Του Προβολέα Σας...
Seite 652
Κατανάλωση Ρεύµατος 400 Watt τυπική, 335 Watt σε κατάσταση eco Ήχος 2 ηχεία, 2 watt RMS Επίπεδο Θορύβου 37dB(A) Πλήρης κατάσταση, 31dB(A) κατάσταση Eco Βάρος 8,2 λίµπρες (3,73 κιλά) ∆ιαστάσεις (Π x Υ x Β) Εξωτερικές 13 x 10,3 x 4,5 ± 0,04 ίντσες (329,8 x 261,4 x 115,2 ±...
Seite 653
Είσοδος βίντεο: 3 υποδοχές RCA για είσοδο component video/HDTV, µία είσοδος mini-DIN 4 ακίδων S-video, µία υποδοχή RCA για είσοδο composite video Είσοδος ήχου: µία υποδοχή ακουστικών (διαµέτρου 3,5 χιλ.) Υποδοχή εξόδου DC 12 volt @ 200mA, έλεγχος αναµετάδοσης για αυτόµατο έλεγχο...
Seite 654
Κωδικός ∆ιεύθυνσης "10" ==> pt_OEM Μέγεθος Ωφέλιµου Φορτίου "05 00"==> Από wMsgID έως το τέλος CRC "C6 FF" ==> Αν η τιµή CRC είναι "C6(Low Byte) FF (High Byte)" MsgID "11 11" MsgSize "01 00"==> Από την εντολή έως το τέλος Εντολή...
Seite 655
Λίστα Εντολών Ελέγχου Κεφαλίδα Κώδικας Μέγεθος του CRC16 για ID Μην. Μέγεθος Κώδικας Περιγραφή Εντολής ∆ιεύθυνσης ωφέλιµου ολόκληρο (WORD) Μην. εντολής (WORD) (BYTE) φορτίου το πακέτο (WORD) (BYTE) (WORD) (WORD) 0xefbe 0x10 0x0005 0xffc6 0x1111 0x0001 0x01 Power 0xbfc7 0x02 Menu 0x7e07 0x03...
Seite 656
Πηγές συνδυασµού PIP Πηγή HDMI Component Υπολογισ Component Component Component τής S-Video Composite Ψηφιακό ΣΗΜΕΙΩΣΗ : Αν δύο πηγές συνδυασµού υπερβαίνουν το εύρος ζώνης του scaler, ο προβολέας θα εµφανίσει µαύρη εικόνα. Προδιαγραφές...
Seite 658
MAC G4 640X480 68.03 MAC G4 640X480 97.09 IMAC DV 640X480 IMAC DV 800X600 IMAC DV 1024X768 IMAC DV 1152X870 68.49 IMAC DV 1280X960 IMAC DV 1280X1024 91.1 * Συµπιεσµένη εικόνα υπολογιστή. ΣΗΜΕΙΩΣΗ : Το UXGA δεν υποστηρίζεται στο DVI (M1 σε DVI). Προδιαγραφές...
Επικοινωνία µε τη Dell Για να επικοινωνήσετε µε τη Dell ηλεκτρονικά, µπορείτε να επισκεφτείτε τις ακόλουθες τοποθεσίες: • www.dell.com • support.dell.com (τεχνική υποστήριξη) • premiersupport.dell.com (τεχνική υποστήριξη για πελάτες στην εκπαίδευση, στο δηµόσιο, στην υγεία και σε µεσαίες/µεγάλες επιχειρήσεις, περιλαµβανοµένων των πελατών Premier, Platinum, και...
Seite 660
Χώρας Κωδικός Πόλης Ανγκουίλλα Γενική Υποστήριξη χωρίς χρέωση: 800- 335-0031 Αντίγκουα και Γενική Υποστήριξη 1-800-805-5924 Μπαρµπούντα Αργεντινή Τοποθεσία: www.dell.com.ar (Μπουένος E-mail: us_latin_services@dell.com Άιρες) E-mail για επιτραπέζιους και φορητούς υπολογιστές: Κωδικός ∆ιεθνούς la-techsupport@dell.com Πρόσβασης: 00 E-mail για διακοµιστές και προϊόντα Κωδικός...
Seite 661
Τεχνική Υποστήριξη (για φορητούς χωρίς χρέωση: 1-300- και επιτραπέζιους υπολογιστές) 655-533 Τεχνική Υποστήριξη (για διακοµιστές χωρίς χρέωση: 1-800- και σταθµούς εργασίας) 733-314 Εταιρικές Πωλήσεις χωρίς χρέωση: 1-800- 808-385 Πωλήσεις Συναλλαγών χωρίς χρέωση: 1-800- 808-312 Φαξ χωρίς χρέωση: 1-800- 818-341 Kontakte Dell...
Seite 662
Κωδικός υπολογιστές Inspiron XPS Περιοχής: 32 Τεχνική Υποστήριξη για όλους τους 02 481 92 88 Κωδικός Πόλης: 2 υπόλοιπους υπολογιστές της Dell Φαξ Τεχνικής Υποστήριξης 02 481 92 95 Εξυπηρέτηση Πελατών 02 713 15 65 Εταιρικές Πωλήσεις 02 481 91 00 Φαξ...
Seite 663
Mail Χρέωση Κωδικός Χώρας Κωδικός Πόλης Βολιβία Γενική Υποστήριξη χωρίς χρέωση: 800-10- 0238 Βραζιλία Τοποθεσία: www.dell.com/br Εξυπηρέτηση Πελατών, Τεχνική 0800 90 3355 Κωδικός ∆ιεθνούς Υποστήριξη Πρόσβασης: 00 Φαξ Τεχνικής Υποστήριξης 51 481 5470 Κωδικός Φαξ Εξυπηρέτησης Πελατών 51 481 5480 Περιοχής: 55...
Seite 674
34 160 910 Κωδικός Πωλήσεις Συναλλαγών (Ξίαµεν, 29 693 115 Περιοχής: 853 Κίνα) Μαλαισία Τοποθεσία: support.ap.dell.com (Πενάνγκ) Τεχνική Υποστήριξη (Dell Precision, χωρίς OptiPlex, και Latitude) χρέωση: 1 800 88 0193 Κωδικός ∆ιεθνούς Τεχνική Υποστήριξη (Dimension, χωρίς Πρόσβασης: 00 Inspiron, και Ηλεκτρονικά και...
Seite 675
020 674 45 94 υπολογιστές Inspiron XPS Κωδικός ∆ιεθνούς Τεχνική Υποστήριξη για όλους τους 020 674 45 00 Πρόσβασης: 00 υπόλοιπους υπολογιστές της Dell Κωδικός Φαξ Τεχνικής Υποστήριξης 020 674 47 66 Περιοχής: 31 Εξυπηρέτηση Πελατών 020 674 42 00 Κωδικός...
Seite 676
Επισκευής, Τοπικοί Αριθµοί, και Κωδικός Τοποθεσία και ∆ιεύθυνση E- Αριθµοί Χωρίς Πρόσβασης Mail Χρέωση Κωδικός Χώρας Κωδικός Πόλης Νορβηγία Τοποθεσία: support.euro.dell.com (Λικασέρ) E-mail: support.euro.dell.com/no/no/ Κωδικός ∆ιεθνούς emaildell/ Πρόσβασης: 00 Τεχνική Υποστήριξη 671 16882 Κωδικός Συσχετιστική Εξυπηρέτηση Πελατών 671 17575 Περιοχής: 47 Εξυπηρέτηση...
Seite 677
Inspiron, και Ηλεκτρονικά και χρέωση: 1800 394 7430 Κωδικός ∆ιεθνούς Εξαρτήµατα) Πρόσβασης: 005 Τεχνική Υποστήριξη (OptiPlex, χωρίς Κωδικός Latitude, και Dell Precision) χρέωση: 1800 394 7488 Περιοχής: 65 Τεχνική Υποστήριξη (PowerApp, χωρίς PowerEdge, PowerConnect, και χρέωση: 1800 394 7478 PowerVault) Υπηρεσίες...
Seite 678
Τοπικοί Αριθµοί, και Κωδικός Τοποθεσία και ∆ιεύθυνση E- Αριθµοί Χωρίς Πρόσβασης Mail Χρέωση Κωδικός Χώρας Κωδικός Πόλης Νότιος Αφρική Τοποθεσία: support.euro.dell.com (Γιοχάνεσµπουργ E-mail: dell_za_support@dell.com κ) Gold Queue (Χρυσή Ουρά) 011 709 7713 Τεχνική Υποστήριξη 011 709 7710 Κωδικός ∆ιεθνούς Πρόσβασης: Εξυπηρέτηση Πελατών...
Seite 679
Τοπικοί Αριθµοί, και Κωδικός Τοποθεσία και ∆ιεύθυνση E- Αριθµοί Χωρίς Πρόσβασης Mail Χρέωση Κωδικός Χώρας Κωδικός Πόλης Σουηδία Τοποθεσία: support.euro.dell.com (Απλαντς E-mail: support.euro.dell.com/se/sv/ Βασµπι) emaildell/ Τεχνική Υποστήριξη 08 590 05 199 Κωδικός ∆ιεθνούς Συσχετιστική Εξυπηρέτηση Πελατών 08 590 05 642 Πρόσβασης: 00 Εξυπηρέτηση...
Seite 680
Εταιρικές Πωλήσεις χωρίς χρέωση: 00801 651 227 Ταϊλάνδη Τοποθεσία: support.ap.dell.com Τεχνική Υποστήριξη (OptiPlex, χωρίς Κωδικός ∆ιεθνούς Latitude, και Dell Precision) χρέωση: 1800 0060 07 Πρόσβασης: 001 Τεχνική Υποστήριξη (PowerApp, χωρίς Κωδικός PowerEdge, PowerConnect, και χρέωση: 1800 0600 09 Περιοχής: 66 PowerVault) Υπηρεσίες...
Seite 681
Τοπικοί Αριθµοί, και Κωδικός Τοποθεσία και ∆ιεύθυνση E- Αριθµοί Χωρίς Πρόσβασης Mail Χρέωση Κωδικός Χώρας Κωδικός Πόλης Η.Β. (Μπακνελ) Τοποθεσία: support.euro.dell.com Τοποθεσία Εξυπηρέτησης Πελατών: Κωδικός ∆ιεθνούς support.euro.dell.com/uk/en/ECare/Form/Home.asp Πρόσβασης: 00 Κωδικός E-mail: Περιοχής: 44 dell_direct_support@dell.com Κωδικός Πόλης: Τεχνική Υποστήριξη 0870 908 0500 1344 (Εταιρικών/Προτιµώµενων...
Seite 682
(EPP) Πελάτες 695-8133 Τοποθεσία Οικονοµικών υπηρεσιών: www.dellfinancialservices.com Οικονοµικές Υπηρεσίες χωρίς χρέωση: 1-877- (εκµισθώσεις/δάνεια) 577-3355 Οικονοµικές Υπηρεσίες χωρίς χρέωση: 1-800- (Προτιµώµενοι Λογαριασµοί της Dell 283-2210 [DPA]) Επαγγελµατικές Εξυπηρέτηση Πελατών και Τεχνική χωρίς χρέωση: 1-800- Υποστήριξη 822-8965 Πρόγραµµα Αγορών Υπαλλήλων χωρίς χρέωση: 1-800- (EPP) Πελάτες...
Seite 683
χωρίς χρέωση: 1-800- 357-3355 Πωλήσεις Εκτεταµένων Υπηρεσιών χωρίς χρέωση: 1-800- και Εγγυήσεων 247-4618 Φαξ χωρίς χρέωση: 1-800- 727-8320 Υπηρεσίες της Dell για Κωφούς, Βαρήκοους, ή Βουβούς χωρίς χρέωση: 1-877-DELLTTY (1-877-335-5889) Παρθένοι Νήσοι Γενική Υποστήριξη 1-877-673-3355 των Η.Π.Α. Βενεζουέλα Γενική Υποστήριξη...
Seite 685
Αφού έχετε καθορίσει την ταξινόµηση του συστήµατός σας σύµφωνα µε την FCC, διαβάστε την αντίστοιχη ανακοίνωση της FCC. Σηµειώστε πως οι κανονισµοί της FCC ορίζουν πως αλλαγές ή τροποποιήσεις που δεν έχουν εγκριθεί ρητά από την Dell µπορούν να ακυρώσουν το δικαίωµά σας να λειτουργείτε αυτήν τη συσκευή.
Εξαγωγέας: Dell Inc. One Dell Way Round Rock, TX 78682 Εισαγωγέας: Dell Computer de Mexico, S.A. de C.V. Paseo de la Reforma 2620 - 11° Piso Col. Lomas Altas 11950 Mιxico, D.F. Αποστολή προς: Dell Computer de Mιxico, S.A. de C.V.
Seite 687
Γλωσσάριο ANSI Lumens— Ένα πρότυπο για τη µέτρηση της εξόδου φωτός, που χρησιµοποιείται για τη σύγκριση προβολέων. Aspect Ratio (Αναλογία Εικόνας)—Η πιο δηµοφιλής αναλογία εικόνας είναι 4:3 (4 προς 3). Οι πρώτες τηλεοράσεις και οι µορφές εικόνας υπολογιστή είναι σε αναλογία...
Seite 688
Compressed XGA (Συµπιεσµένη XGA)— Ο χειρισµός συµπιεσµένης XGA, η οποία συναντάται σε SVGA προβολείς, επιτρέπει σε αυτούς τους προβολείς να χειριστούν XGA αναλύσεις µέχρι 1024x768. Contrast Ratio (Αναλογία Αντίθεσης)— Το εύρος των φωτεινών και των σκοτεινών τιµών σε µια εικόνα ή η αναλογία ανάµεσα στις µέγιστες και τις ελάχιστες τιµές...
Seite 689
Focal Length (Εστιακή Απόσταση)— Η απόσταση από την επιφάνεια ενός φακού µέχρι το σηµείο εστίασής του. Frequency (Συχνότητα)— Είναι ο ρυθµός της επανάληψης των ηλεκτρικών σηµάτων σε κύκλους ανά δευτερόλεπτο. Μετριέται σε Hz. Hz — Συχνότητα ενός εναλλασσόµενου σήµατος. Ανατρέξτε στο λήµµα Συχνότητα. Keystone Correction (∆ιόρθωση...
Seite 690
Reverse Image (Αντίστροφη Εικόνα)— Λειτουργία που σας επιτρέπει να αντιστρέψετε την εικόνα οριζοντίως. Όταν χρησιµοποιείται σε κανονικό περιβάλλον πρόσθιας προβολής, το κείµενο, τα γραφικά κτλ είναι ανάποδα. Η αντίστροφη εικόνα χρησιµοποιείται για οπίσθια προβολή. RGB— Red, Green, Blue (Κόκκινο, Πράσινο, Μπλε)— χρησιµοποιείται συνήθως για...
Seite 691
Ευρετήριο Ρ Αλλαγή της Λάµπας 46 Ρύθµιση της Προβαλλόµενης Αντιµετώπιση προβληµάτων 43 Εικόνας 18 επικοινωνία µε την Dell 43 χαµήλωµα του προβολέα Αυτοδιάγνωση 46 Ðüäé áíýøùóçò 18 Êïõìðß áíýøùóçò 18 Ôñï÷üò ñýèìéóçò êëßóçò Dell επικοινωνία 57 Μείωση του Ύψους του...
Seite 692
Σύνδεση µε Η/Υ 14 HDTV 10 Σύνδεση µε Συσκευή DVD 10 Σε Υπολογιστή 8 Τ Σύνδεση Υπολογιστή µε Καλώδιο D-sub σε D- Τηλεχειριστήριο 23 sub 9 υ Σύνδεση Υπολογιστή µε υποστήριξη Καλώδιο M1 σε D- επικοινωνία µε τη Dell 57 sub/USB 8 Ευρετήριο...
Seite 693
Projector Dell™ 5100MP Manual do Utilizador Modelo XXX w w w . d e l l . c o m | s u p p o r t . d e l l . c o m...
Seite 694
Todas as declarações ou alegações relativas às propriedades, capacidades, velocidades ou qualificações da peça referida neste manual são feitas pelo fabricante e não pela Dell. A Dell rejeita especificamente qualquer conhecimento da precisão, integridade ou fundamentação de tais declarações.
Seite 695
Índice 1 O Projector Dell ..... 5 Acerca do Projector ....
Seite 696
Ligação com Caixa de Controlo Comercial RS232: 3 Utilizar o Projector ....17 Ligar o Projector ....Desligar o Projector .
Seite 697
5 Especificações ....49 6 Como entrar em contato com a Dell ..57 7 Apêndice: Avisos de Regulamentação . . 85 Avisos da FCC (somente para os Estados Unidos da América)
Seite 699
O Projector Dell O projector é fornecido com todos os itens mostrados abaixo. Certifique-se de que tem todos os itens e entre em contacto com a Dell caso algum deles esteja em falta. Componentes do Produto Cabo de alimentação de 1,8 m (3 m na Cabo M1 para D-Sub/USB de 1,8 m América)
Seite 700
(continuação) Componentes do Produto Documentação Pilhas (2) Acerca do Projector Painel de controlo Botão de elevação Transmissor/receptor por controlo remoto Lente Tampa da Lente Anel de focagem Patilha de zoom O Projector Dell...
Ligar o Projector Conector de rede RJ45 Conector HDMI Conector de entrada VGA Conector de entrada de sinal M1 Conector de entrada de vídeo Conector de entrada S-Video Conector de saída VGA Conector RS232 Receptor IF / Transmissor RF Orifício de cadeado Kensington Conector do cabo de alimentação Saída de relé...
Ligar a um Computador Ligar um Computador com um Cabo de M1 para D-sub/USB Cabo de alimentação Cabo M1A para D-Sub/USB NOTA: O cabo USB não pode ser ligado se o Dongle USB estiver a ser utilizado, para informações sobre a ligação do dongle USB, consulte a página Ligar o Projector...
Seite 703
Ligar um Computador com um Cabo de D-sub para D-sub Cabo de alimentação Cabo D-sub para D-sub NOTA: O cabo USB não pode ser ligado se o Dongle USB estiver a ser utilizado, para informações sobre a ligação do dongle USB, consulte a página Ligar o Projector...
Seite 704
Ligar um Leitor de DVD com um Cabo D-sub para YPbPr Cabo de alimentação Cabo D-sub para YPbPr NOTA: O cabo D-sub para YPbPr cable não é fornecido pela Dell. Consulte um instalador profissional para obter o cabo. Ligar o Projector...
Seite 705
Ligar um Leitor de DVD com um Cabo RCA para RCA Cabo de alimentação Cabo componente RCA para RCA NOTA: O cabo RCA para RCA não é fornecido pela Dell. Consulte um instalador profissional para obter o cabo. Ligar um Leitor de DVD com um cabo S-Video Cabo de alimentação...
Seite 706
Ligar um Leitor de DVD com um cabo BNC para VGA Cabo de alimentação Cabo BNC para VGA NOTA: O cabo BNC para VGA não é fornecido pela Dell. Consulte um instalador profissional para obter o cabo. Ligar o Projector...
Seite 707
Opções de Instalação Profissional: Instalação para Controlo de Ecrã Automático Cabo de alimentação Ficha d.c. 12 V Ecrã automático NOTA: Utilize a ficha d.c. 12 V de 1,7 mm(diâmetro interno) x 4,00 mm (diâmetro externo) x 9,5 mm (eixo) para ligar o ecrã automático ao projector. Ficha d.c.
Seite 708
Instalação para controlo remoto RS232: Ligação ao PC Cabo de alimentação Cabo RS232 NOTA: O cabo RS232 não é fornecido pela Dell. Consulte um instalador profissional para obter o cabo. Ligar o Projector...
Seite 709
Ligação com Caixa de Controlo Comercial RS232: Cabo de alimentação Cabo RS232 Caixa de controlo Comercial RS232: NOTA: O cabo RS232 não é fornecido pela Dell. Consulte um instalador profissional para obter o cabo. Ligar o Projector...
7. Prima o botão de alimentação (consulte a página 21 para localizar o botão de alimentação). O logótipo da Dell é apresentado durante 30 segundos. Ligue a fonte (computador, leitor de DVD, etc.). O projector detecta a fonte automaticamente.
Ajustar a Imagem Projectada Elevar o Projector Prima o botão de elevação. Eleve o projector até atingir o ângulo de projecção pretendido e, em seguida, liberte o botão para bloquear o pé de elevação nessa posição. Utilize a roda de ajuste da inclinação para ajustar o ângulo de projecção. Baixar o Projector Prima o botão de elevação.
Seite 713
Ajustar o Zoom e a Focagem do Projector ATENÇÃO: Para não danificar o projector, certifique-se de que a lente de zoom e o pé de elevação estão completamente retraídos antes de mover o projector ou de colocá-lo na respectiva mala de transporte. Rode a patilha de zoom para ampliar ou reduzir.
Seite 716
O ecrã desliga-se automaticamente. Volte a ligá-lo depois de o projector arrefecer. Se o problema persistir, entre em contacto com a Dell. • Se a luz TEMP ficar cor-de-laranja intermitente, significa que uma das ventoinhas do projector falhou e que este será...
Utilizar o Controlo Remoto Alimentação Ligar e desligar o projector. Para mais informações, consulte a página 17. Prima para ajustar a definição do OSD. Laser Aponte o controlo remoto para o ecrã, mantenha premido o botão de laser para activar a luz laser. Volume Prima para aumentar o volume.
Seite 718
Modo de vídeo O Micro-projector Dell 5100MP inclui configurações predefinidas que foram optimizadas para a apresentação de dados (gráficos de computador) ou vídeo (filmes, jogos, etc.). Prima o botão Video Mode (Modo de Vídeo) para alternar entre os modos PC, Vídeo, Jogo, sRGB ou Utiliz (para o utilizador configurar e guardar as definições pretendidas).
Seite 719
24 PIP Prima o botão PIP para ligar/desligar o ecrã PIP . 25 Comutação PIP Prima o botão de Comutação PIP para alternar entre o primeiro plano e o segundo plano. Advertência do Laser O controlo remoto está equipado com um laser Classe II laser que emite radiações laser.
Seite 720
Dongle para rato sem O dispositivo sem fios USB para controlar o rato fios USB do PC ou portátil através do controlo remoto. Tampa do controlo A tampa posterior controlo remoto. remoto Compartimento das O compartimento das pilhas. pilhas Utilizar o OSD (“On-Screen Display”) O projector possui um OSD (“On-Screen Display”) em vários idiomas que pode ser exibido com ou sem uma fonte de entrada presente.
Seite 721
para —Utilize ajustar o RILHO brilho da imagem. —Utilize para controlar o ONTRASTE grau de diferença existente entre as partes mais claras e mais escuras da imagem. O ajuste do contraste altera a quantidade de preto e branco existente na imagem. —Ajusta a temperatura da cor.
Seite 722
– Cabo S-Video; – Cabo composto • 16:9 — A fonte de entrada é redimensionada para se ajustar à largura do ecrã. • 4:3 — A fonte de entrada é redimensionada para se ajustar ao ecrã. Utilize 16:9 ou 4:3 se estiver a utilizar: –...
Seite 723
Menu de Gestão —Seleccione a localização do OCAL OSD no ecrã. çã —Selecciona a forma como a ROJEC imagem é apresentada: • Projecção frontal-mesa (predefinição). • Retroprojecção-mesa-- O projector inverte a imagem para que possa projectar a partir da parte de trás de um ecrã translúcido. •...
Seite 724
Consulte a página 34. — PRENDIZAGEM POR ó —Seleccione Ligar para utilizar o projector a um nível de MICO consumo mais baixo (250 watts), que pode fazer com que a lâmpada dure mais tempo, tenha um funcionamento mais silencioso e uma luminosidade menor na tela.
Seite 725
—Seleccione Ligar CTIVAR ENHA para definir uma senha pessoal. Seleccione Desligar para desactivar a função de senha. —Prima para LTERAR A ENHA alterar a senha conforme sua preferência. Menu de Idiomas Prima para seleccionar o idioma preferido para o OSD. Menu de Definição PIP NOTA 1: A imagem PIP é...
Seite 726
NOTA 2: Quando alternar entre a visualização do primeiro plano e do segundo plano, o tamanho de ecrã mais pequeno de visualização do primeiro plano irá variar dependendo das diferentes combinações das fontes de sinal para PIP. Seleccione Ligar para activar PIP —...
Seite 727
utilizados 12 caracteres numéricos. çã —Prima para confirmar as definições. PLICAR LTERA çõ —Prima para activar a predefinição. EPOR EFINI ES DE Menu de Predefinições çõ —Seleccione Sim para repor as REDEFINI predefinições do projector. Os itens repostos incluem as definições da imagem do computador e da imagem do vídeo.
Seite 728
Menu da Fonte de Vídeo NOTA: Este menu apenas está disponível com o sinal S-Video ou de vídeo (composto) ligado. çã —Ajusta a fonte de vídeo a partir do ATURA preto e do branco para obter uma cor totalmente saturada. Prima para diminuir a intensidade das cores na imagem e para...
Seite 729
• Prima o botão Prgm no controlo remoto durante 5 segundos para repor o canal predefinido do transmissor. • A reposição bem sucedida do canal predefinido em ambas as opções pode ser confirmada quando o transmissor do controlo remoto controlar o projector. Aprendizagem Automática para Alternar o Canal RF entre o Controlador Remoto e o Dongle sem fios USB Passo 1...
Seite 731
Para Gerir o Projector a partir da Gestão Web Configurar a Definição de Rede Se o projector estiver ligado a uma rede, pode aceder ao mesmo utilizando um browser da web e configurando a definição de rede (TCP/IP). Sempre que utilizar a função de rede, deverá ter um endereço IP exclusivo. Para configurar a definição de rede, consulte o Menu Definição de Rede na página 32.
Seite 732
Propriedades de Gestão Home Apresenta informações sobre o Nome do grupo, Nome do projector, Localização, Contacto, Número de horas da lâmpada, Versão do firmware, Endereço IP, Endereço MAC e Senha do administrador. Utilizar o Projector...
Seite 733
Definições de rede Consulte a secção OSD na página 32. • Configure as informações do Nome do Grupo, Nome do Projector, Localização e Contacto nesta opção, prima Submeter para confirmar as definições. • Escolha DHCP para atribuir automaticamente um endereço IP ao projector a partir de um servidor DHCP ou Manual para atribuir manualmente um endereço IP.
Seite 734
Estado do Projector e Controlo A função é idêntica ao OSD “On Screen Display”. Gerir o estado do projector, controlo da imagem e controlo de áudio utilizando o Estado do Projector e Controlo. Utilizar o Projector...
Seite 735
Alerta por Correio Electrónico Definir o Endereço de correio electrónico, Proprietário, Assunto e Condição do Alerta para enviar alertas automáticos por correio electrónico para o administrador predefinido. Utilizar o Projector...
Seite 736
Definição da senha Utilize a Definição da Senha para configurar uma senha de administrador para aceder à Gestão Web. Quando activar a senha pela primeira vez, defina-a antes de activar. Quando a função de senha estiver activada, a senha do administrador será solicitada para aceder à Gestão Web. Utilizar o Projector...
Resolução de Problemas do Projector Se tiver problemas com o projector, consulte as seguintes sugestões para resolução de problemas. Se o problema persistir, entre em contacto com a Dell. Problema Possível Solução Não aparece nenhuma • Certifique-se de que a tampa da lente foi imagem no ecrã...
Seite 738
Se estiver a utilizar um computador portátil • Dell, defina a resolução para XGA (1024x768): Clique com o botão direito numa parte vazia da área de trabalho do Windows, clique em Propriedades e, em seguida, seleccione o separador Definições.
Seite 739
O projector sobreaqueceu. O ecrã desliga-se laranja consistente. automaticamente. Volte a ligá-lo depois de o projector arrefecer. Se o problema persistir, entre em contacto com a Dell. A luz TEMP está cor-de- Uma ventoinha do projector falhou e o laranja intermitente.
Diagnóstico automático para vídeo O projector Dell 5100MP possui um teste de diagnóstico automático para a apresentação de vídeo do projector (para os sinais do tipo Vídeo, S-Video e Componente-i). Utilize este recurso avançado para executar um diagnóstico automático preliminar do projector sempre que se deparar com problemas de apresentação de vídeo.
Seite 741
SER RECICLADA OU ELIMINADA DE ACORDO COM AS LEIS LOCAIS, ESTADUAIS OU FEDERAIS. PARA MAIS INFORMAÇÕES, CONSULTE O SITE WWW.DELL.COM/HG OU ENTRE EM CONTACTO COM A ELECTRONIC INDUSTRIES ALLIANCE EM WWW.EIAE.ORG. PARA OBTER INFORMAÇÕES RELATIVAS À ELIMINAÇÃO DA LÂMPADA, CONSULTE O SITE WWW.LAMPRECYCLE.ORG.
Especificações Válvula de Luz Chip único de 0.95" com a tecnologia SXGA+ DLP™ LVDS (sinal diferencial de baixa voltagem ) Brilho 3300 ANSI Lumens (Máx.) Relação de Contraste 2500:1, típico (branco integral/preto integral) Uniformidade 80%, típico (Norma japonesa - JBMA) Lâmpada Lâmpada de 300 W substituível pelo utilizador e com uma duração de 1700...
Seite 744
Fonte de Alimentação Universal entre 90 e 240 V CA e entre 50 e 60 Hz com entrada PFC Consumo de Energia 400 W, típico, 335 W no modo económico Áudio 2 altifalantes, 2 watts de RMS Nível de Ruído 37 dB(A) no modo de funcionamento normal, 31 dB(A) no modo económico Peso...
Seite 745
Entrada de vídeo: 3 conectores RCA para vídeo componente/entrada HDTV, uma entrada S-video mini-DIN de 4 pinos, uma tomada RCA para entrada de vídeo composto Entrada de áudio: uma tomada telefónica (diâmetro de 3,5 mm) tomada de saída DC de 12 volts a 200mA, controlo de transmissão para ecrã...
Seite 746
Tamanho do payload "05 00"==> De wMsgID para o fim CRC "C6 FF" ==> Se o valor CRC for "C6 (Byte inferior) FF (Byte superior)" MsgID "11 11" MsgSize "01 00"==> Do comando para o fim. Comando "01"==> Do comando para o fim. •...
Seite 747
Lista dos comandos de controlo Cabeçalho Códigod Tamanho do CRC16 ID do MsG Tamanho Código do Descrição do comando payload para todo o (PALAVRA) do MsG comando (PALAVRA) endereço (PALAVRA) pacote (PALAVRA) (BYTE) (BYTE) (PALAVRA) 0xefbe 0x10 0x0005 0xffc6 0x1111 0x0001 0x01 Power...
Seite 748
Combinação de fontes PIP Fonte Componente Computador Componente Componente Componente HDMI S-Video Composto M1 Digital NOTA: Se a combinação de duas fontes ultrapassar a largura de banda do circuito electrónico, o projector irá mostrar uma imagem preta. Especificações...
Seite 750
MAC G4 640X480 68.03 MAC G4 640X480 97.09 IMAC DV 640X480 IMAC DV 800X600 IMAC DV 1024X768 IMAC DV 1152X870 68.49 IMAC DV 1280X960 IMAC DV 1280X1024 91.1 *Imagem de computador comprimida. NOTA: UXGA não é suportado em DVI (M1 para DVI). Especificações...
Seite 751
Como entrar em contato com a Dell Para entrar em contacto com a Dell electronicamente, aceda aos seguintes Websites: • www.dell.com • support.dell.com (suporte técnico) premiersupport.dell.com (suporte técnico para instituições de ensino, • governamentais, de saúde, e médias/grandes empresas, incluindo clientes Premier, Platinum e Gold) Para ter acesso a endereços web específicos do seu país, procure a secção do...
Seite 752
Código da cidade: la_enterprise@dell.com Atendimento ao cliente Ligação gratuita: 0- 800-444-0730 Suporte técnico Ligação gratuita: 0-800- 444-0733 Serviços de suporte técnico Ligação gratuita: 0-800- 444-0724 Vendas 0-810-444-3355 Aruba Suporte geral Ligação gratuita: 800- 1578 Como entrar em contato com a Dell...
Seite 753
655-533 Suporte técnico (servidores e Ligação gratuita: 1-800- estações de trabalho) 733-314 Vendas corporativas Ligação gratuita: 1-800- 808-385 Vendas de transação Ligação gratuita: 1-800- 808-312 Ligação gratuita: 1-800- 818-341 Como entrar em contato com a Dell...
Seite 754
Fax do suporte técnico 02 481 92 95 Atendimento ao Cliente 02 713 15 65 Vendas Corporativas 02 481 91 00 02 481 92 99 Central 02 481 91 00 Bermudas Suporte geral 1-800-342-0671 Como entrar em contato com a Dell...
Seite 755
Ligação gratuita: 1-866- Britânicas 278-6820 Brunei Serviço técnico ao cliente (Penang, 604 633 4966 Malásia) Código do país: Serviço ao cliente (Penang, Malásia) 604 633 4949 Vendas de transação (Penang, 604 633 4955 Malásia) Como entrar em contato com a Dell...
Seite 756
Vendas de peças sobresselentes e 1 866 440 3355 vendas de serviço estendido Ilhas Cayman Suporte geral 1-800-805-7541 Chile (Santiago) Vendas, suporte ao cliente e suporte Ligação gratuita: 1230- técnico 020-4823 Código do país: Código da cidade: Como entrar em contato com a Dell...
Seite 757
800 858 2669 ensino Equipa de fila de contas de grandes Ligação empresas gratuita: 800 858 2572 Contas de grandes empresas - Sul Ligação gratuita: 800 858 2355 Como entrar em contato com a Dell...
Seite 758
Central (Relacional) 3287 1200 Fax da central (Relacional) 3287 1201 Central (Clientes 3287 5000 domésticos/pequenas empresas) Fax da central (Clientes 3287 5001 domésticos/pequenas empresas) Dominica Suporte geral Ligação gratuita: 1-866- 278-6821 Como entrar em contato com a Dell...
Seite 759
Código de acesso Suporte técnico 09 253 313 60 internacional: 990 Atendimento ao cliente 09 253 313 38 Código do país: 09 253 313 99 Central 09 253 313 00 Código da cidade: Como entrar em contato com a Dell...
Seite 760
04 99 75 40 01 Corporativo Suporte técnico 0825 004 719 Atendimento ao cliente 0825 338 339 Central 01 55 94 71 00 Vendas 01 55 94 71 00 01 55 94 71 01 Como entrar em contato com a Dell...
Seite 761
Suporte técnico de serviços Gold 00800-44 14 00 83 Central 2108129810 Central de Serviços Gold 2108129811 Vendas 2108129800 2108129812 Granada Suporte geral Ligação gratuita: 1-866- 540-3355 Guatemala Suporte geral 1-800-999-0136 Guiana Suporte geral Ligação gratuita: 1-877- 270-4609 Como entrar em contato com a Dell...
Seite 762
3416 0912 Divisão de Clientes Domésticos e 2969 3105 Pequenas Empresas Índia Suporte técnico 1600 33 8045 Vendas (Contas de grandes 1600 33 8044 empresas) Vendas (Clientes domésticos e 1600 33 8046 pequenas empresas) Como entrar em contato com a Dell...
Seite 763
Vendas para a Irlanda 01 204 4444 Vendas para o Reino Unido 0870 907 4000 (somente para ligações realizadas dentro do Reino Unido) Fax/Fax de vendas 01 204 0103 Central 01 204 4444 Como entrar em contato com a Dell...
Seite 764
Corporativo Suporte técnico 02 577 826 90 Atendimento ao cliente 02 577 825 55 02 575 035 30 Central 02 577 821 Jamaica Suporte geral (somente para ligações 1-800-682-3639 realizadas dentro da Jamaica) Como entrar em contato com a Dell...
Seite 765
Preferenciais (acima de 400 empregados) Vendas realizadas a contas de 044-556-3430 grandes empresas (acima de 3500 empregados) Vendas públicas (agências 044-556-1469 governamentais, instituições de ensino e de saúde) Segmento global no Japão 044-556-3469 Utilizador individual 044-556-1760 Como entrar em contato com a Dell...
Seite 766
(Bruxelas, Bélgica) Vendas corporativas (Bruxelas, 02 481 91 00 Bélgica) Atendimento ao cliente (Bruxelas, 02 481 91 19 Bélgica) Fax (Bruxelas, Bélgica) 02 481 92 99 Central (Bruxelas, Bélgica) 02 481 91 00 Como entrar em contato com a Dell...
Seite 767
PowerEdge, PowerConnect e gratuita: 1800 88 1386 PowerVault) Serviço ao cliente (Penang, Malásia) 04 633 4949 Vendas de transação Ligação gratuita: 1 800 888 202 Vendas corporativas Ligação gratuita: 1 800 888 213 Como entrar em contato com a Dell...
Seite 768
020 674 50 00 Fax de vendas a clientes 020 674 47 75 domésticos/pequenas empresas Fax de vendas relacionais 020 674 47 50 Central 020 674 50 00 Fax central 020 674 47 50 Como entrar em contato com a Dell...
Seite 769
Código do país: Atendimento ao cliente relacional 671 17575 Atendimento ao cliente a clientes 23162298 domésticos/pequenas empresas Central 671 16800 Central de fax 671 16865 Panamá Suporte geral 001-800-507-0962 Peru Suporte geral 0800-50-669 Como entrar em contato com a Dell...
Seite 770
21 424 01 12 Porto Rico Suporte geral 1-800-805-7545 São Kitts e Nevis Suporte geral Ligação gratuita: 1-877- 441-4731 Santa Lúcia Suporte geral 1-800-882-1521 São Vicente e Suporte geral Ligação gratuita: 1-877- Granadinas 270-4609 Como entrar em contato com a Dell...
Seite 771
Código do país: 011 706 0495 Central 011 709 7700 Código da cidade: Países do Sudeste Suporte técnico ao cliente, serviço ao 604 633 4810 da Ásia e do cliente e vendas (Penang, Malásia) Pacífico Como entrar em contato com a Dell...
Seite 772
Código do país: domésticos/pequenas empresas Suporte ao Programa de Aquisição 20 140 14 44 Código da cidade: por Empregados (EAE) Fax do suporte técnico 08 590 05 594 Vendas 08 590 05 185 Como entrar em contato com a Dell...
Seite 773
00801 86 1011 Código do país: acessórios) Suporte técnico (PowerApp, Ligação PowerEdge, PowerConnect e gratuita: 00801 60 1256 PowerVault) Vendas de transação Ligação gratuita: 00801 65 1228 Vendas corporativas Ligação gratuita: 00801 651 227 Como entrar em contato com a Dell...
Seite 774
604 633 4949 Vendas corporativas Ligação gratuita: 1800 006 009 Vendas de transação Ligação gratuita: 1800 006 006 Trinidad e Suporte geral 1-800-805-8035 Tobago Ilhas Turks e Suporte geral Ligação gratuita: 1-866- Caicos 540-3355 Como entrar em contato com a Dell...
Seite 775
Vendas a clientes domésticos e 0870 907 4000 pequenas empresas Vendas corporativas/sector público 01344 860 456 Fax para clientes domésticos e 0870 907 4006 pequenas empresas Uruguai Suporte geral Ligação gratuita: 000- 413-598-2521 Como entrar em contato com a Dell...
Seite 776
Ligação gratuita: 1-877- projectores 459-7298 Público (instituições governamentais , de ensino e de saúde) Serviço ao cliente e suporte técnico Ligação gratuita: 1-800- 456-3355 Clientes do Programa de Aquisição por Empregados (PAE) Ligação gratuita: 1-800-234-1490 Como entrar em contato com a Dell...
Seite 777
247-4618 Ligação gratuita: 1-800- 727-8320 Serviços Dell para surdos e Ligação gratuita: 1-877- portadores de deficiência auditiva e DELLTTY da fala (1-877-335-5889) Ilhas Virgens Suporte geral 1-877-673-3355 E.U.A. Venezuela Suporte geral 8001-3605 Como entrar em contato com a Dell...
Seite 779
Depois de determinar a classificação FCC do sistema, leia o aviso adequado da FCC. Note que os regulamentos da FCC especificam que alterações ou modificações não aprovadas explicitamente pela Dell podem cancelar sua permissão para operar o equipamento. Este dispositivo está em conformidade com a secção 15 das normas da FCC. O funcionamento está...
Seite 780
Exportador: Dell Inc. One Dell Way Round Rock, TX 78682 Importador: Dell Computer de México, S.A. de C.V. Paseo de la Reforma 2620 - 11° Piso Col. Lomas Altas 11950 México, D.F. Enviar para: Dell Computer de México, S.A. de C.V.
Seite 781
Glossário Lumens ANSI— Norma para medição da intensidade luminosa; utilizada para comparar projectores. Relação largura/altura das formas dos pixels—A relação largura/altura das formas dos pixels mais popular é 4:3 (4 por 3). Os formatos de vídeo de televisores e computadores mais antigos apresentam uma relação largura/altura das formas dos pixels de 4:3, o que significa que a largura da imagem é...
Seite 782
Relação de contraste— Intervalo de valores claros e escuros numa imagem ou a relação entre seus valores máximos e mínimos. Há dois métodos que a indústria de projectores utiliza para medir a relação: Branco integral/preto integral — Mede a intensidade da luz produzida por uma imagem toda branca (branco integral) e a intensidade da luz produzida por uma imagem toda preta (preto integral).
Seite 783
(normalmente) e de alta intensidade que é imediatamente visível no ecrã. Distância máxima— A distância de um ecrã em que o projector pode projectar uma imagem utilizável (com luminosidade suficiente) numa sala totalmente escura. Tamanho máximo da imagem— A maior imagem que um projector pode produzir numa sala escura.
Seite 784
Lente de zoom— Lente com uma distância focal variável que permite ao operador ampliar ou reduzir a imagem. Relação da lente de zoom— É a relação existente entre a menor e a maior imagem que uma lente consegue projectar a partir de uma distância fixa. Por exemplo, uma relação 1,4:1 significa que uma imagem de 3 m sem zoom mediria 4 m com o zoom máximo.
Seite 785
Índice Frequência Horizontal Ajustar a Imagem Projectada Frequência Vertical Ajustar a Altura do Projector Lâmpada Lente de Projecção Baixar o Projector Modos de Compatibilidade baixar o projector Botão de elevação Nível de Ruído Pé de elevação Número de Pixels Roda para ajuste da incli- Peso nação Protocolo de Ligação em Rede...
Seite 786
Cabo de alimentação 12V DC Menu da Fonte do Computa- Cabo de vídeo composto Menu de Áudio Cabo D-sub para D-sub Menu de Definição PIP Cabo D-sub para YPbPr Menu de Definições da Ima- Cabo M1 para HDTV Menu de Definições de Rede Cabo M1A para D-Sub/USB 14, 15 Cabo RS232...
Seite 787
Saída de relé DC de 12 volts Unidade Principal Anel de focagem Resolução de problemas Botão de elevação Diagnóstico automático Lente entrar em contacto com a Dell Painel de controlo Patilha de zoom Receptor do controlo remoto Substituição da Lâmpada Tampa da Lente Índice...
Seite 789
Dell™ 5100MP Projector Brugervejledning Model XXX w w w . d e l l . c o m | s u p p o r t . d e l l . c o m...
Seite 790
Alle erklæringer eller krav vedrørende egenskaber, evner, hastigheder eller kvalifikationer for den del, der er refereret til i dette dokument, er givet af fabrikanten og ikke af Dell. Dell fraskriver sig specifikt ansvaret for kendskab til nøjagtighed, fuldstændighed eller dokumentation for sådanne angivelser.
Seite 791
Indhold 1 Din Dell-projektor ....5 Om din projektor ....
Seite 792
Tilslutning til RS232-kontrolboks: ..3 Brug af din projektor ....17 Sådan tænder du for projektoren ... Sådan slukker du for projektoren .
Seite 793
5 Specifikationer ....49 6 Kontakt Dell ..... . . 57 7 Tillæg: Godkendelsesbemærkninger .
Din Dell-projektor Din projektor leveres med alle de dele, der er vist nedenfor. Kontroller at du har alle delene, og kontakt Dell, hvis der mangler noget. Pakkeindhold 1,8 m strømkabel (3,0 m i Amerika) 1,8 m M1 til D-sub/USB-kabel 2,0 m S-videokabel...
(fortsat) Pakkeindhold Dokumentation Batterier (2) Om din projektor Kontrolpanel Hæveknap Sender til fjernbetjening Linse Linsehætte Fokusring Zoomtap Din Dell-projektor...
Tilslutning af din projektor RJ45-netværksstik HDMI-stik VGA-inputstik Stik til M1-inputsignal Videoinputstik S-videoinputstik VGA-outputstik RS232-stik IR modtager/ RF sender Hul til Kensington-lås Netledningsstik Relæoutput, 12 volt jævnstrøm Lydoutputstik Lydinputstik Inputstik til komponentvideo BNC-stik Tilslutning af din projektor...
Tilslutning til en computer Tilslutning af en computer med et M1 til D-sub/USB-kabel Netledning M1A til D-sub/USB-kabel BEMÆRK: USB-kablet kan ikke tilsluttes, hvis USB-hardwarelåsen bruges. Oplysninger om tilslutning af USB-hardwarelåsen finder du på side 875. Tilslutning af din projektor...
Tilslutning af en computer med et D-sub til D-sub-kabel Netledning D-sub til D-sub-kabel BEMÆRK: USB-kablet kan ikke tilsluttes, hvis USB-hardwarelåsen bruges. Oplysninger om tilslutning af USB-hardwarelåsen finder du på side 875. Tilslutning af din projektor...
Tilslutning af en dvd-afspiller med et M1 til HDTV-kabel Netledning M1 til HDTV-kabel Tilslutning af en dvd-afspiller med et D-sub til YPbPr-kabel Netledning D-sub til YPbPr-kabel BEMÆRK: D-sub til YPbPr-kablet leveres ikke af Dell. Kontakt en professionel tekniker vedrørende kablet. Tilslutning af din projektor...
Tilslutning af en dvd-afspiller med et RCA til RCA-kabel Netledning RCA til RCA-komponentkabel BEMÆRK: RCA til RCA-kablet leveres ikke af Dell. Kontakt en professionel tekniker vedrørende kablet. Tilslutning af en dvd-afspiller med et S-videokabel Netledning S-videokabel Tilslutning af din projektor...
Tilslutning af en dvd-afspiller med et kompositkabel Netledning Kompositvideokabel Tilslutning af en dvd-afspiller med et BNC til VGA-kabel Netledning BNC til VGA-kabel BEMÆRK: BNC til VGA-kablet leveres ikke af Dell. Kontakt en professionel tekniker vedrørende kablet. Tilslutning af din projektor...
Professionelle installationsmuligheder: Installation til automatisk skærm Netledning 12V-jævnstrømsstik Automatisk skærm BEMÆRK: Brug 12V-jævnstrømsstik med dimensionerne 1,7 mm(ID) x 4,00 mm(OD) x 9,5 mm (tap) til at forbinde den automatiske skærm til projektoren. 12V-jævnstrømsstik Tilslutning af din projektor...
Installation til RS232-fjernbetjening med kabel: Forbindelse med pc Netledning RS232-kabel BEMÆRK: RS232-kablet leveres ikke af Dell. Kontakt en professionel tekniker vedrørende kablet. Tilslutning af din projektor...
Tilslutning til RS232-kontrolboks: Netledning RS232-kabel RS232-kontrolboks BEMÆRK: RS232-kablet leveres ikke af Dell. Kontakt en professionel tekniker vedrørende kablet. Tilslutning af din projektor...
Tilslut netledningen og de fornødne signalkabler. Yderligere oplysninger om tilslutning af projektoren finder du på side 7. Tryk på strømknappen (se side 21 for at finde strømknappen). Dell-logoet vises i 30 sekunder. Tænd for din kilde (computer, dvd-afspiller, etc.). Projektoren finder automatisk din kilde.
Justering af det projicerede billede Sådan hæver du projektorhøjde Tryk på hæveknappen. Hæv projektoren til den rigtige visningsvinkel, og udløs derefter knappen for at låse hævefoden i positionen. Brug hældningsjusteringshjulet til at finindstille visningsvinklen. Sådan sænker du projektorhøjde Tryk på hæveknappen. Sænk projektoren, og udløs derefter knappen til låsning af hævefoden i positionen.
Justering af projektorzoom og fokus ADVARSEL: For at undgå beskadigelse af projektoren skal du kontrollere, at zoomlinsen og hævefoden er helt trukket sammen, før du flytter projektoren eller placerer projektoren i dens bæretaske. Drej zoomtappen til zoom ind og ud. Drej fokusringen, indtil billedet er klart.
Seite 812
Hvis problemet fortsætter, skal du kontakte Dell. • Hvis TEMP-lyset blinker orange, er der fejl ved en projektorventilator, og projektoren lukker automatisk ned. Hvis problemet fortsætter, skal du kontakte Dell. 10 LAMPE-advarselslys Hvis LAMPE-lyset er helt orange, skal du udskifte lampen. 11 Knapperne Tryk for at justere OSD-indstilling.
Brug af fjernbetjening Strøm Tænd og sluk for projektoren. Yderligere oplysninger finder du på side 17. Tryk for at justere OSD-indstillingen. Laser Ret fjernbetjeningen mod skærmen, tryk og hold på laserknappen for at aktivere laserlyset. Tryk for at øge lyden. Lyd til/fra Tryk for at slå...
Seite 814
Videofunktion Dell 5100MP Micro-projector har forudindstillede konfigurationer, der er optimeret til visning af data (pc-grafik) eller video (film, spil osv.). Tryk på knappen Video Mode (Videofunktion) for at skifte mellem Pc-funktion, Filmfunktion], Spilfunktion, sRGB eller Brugerfunktion (for brugeropsætning og for at gemme foretrukne indstillinger).
Seite 815
25 PIP-skift Tryk på knappen PIP Swap (PIP-skift) for at skifte mellem for- og baggrund. Laseradvarsel Fjernbetjeningen er udstyret med en laser i klasse II, som udsender laserstråling. Se ikke direkte ind i laserlyset, og ret ikke laserlyset mod nogens øjne for at formindske risikoen for personskade.
Trådløs USB- Den trådløse USB-enhed til at styre musen for hardwarelås til mus pc'en eller den bærbare computer via fjernbetjeningen. Dæksel til Fjernbetjeningens bagdæksel. fjernbetjening Batterirum Rummet til batteriet. Brug af skærmvisning Projektoren har en flersproget skærmvisning, der kan vises med eller uden en inputkilde tilstede.
Seite 817
) —Brug RIGHTNESS YSSTYRKE at justere billedets lysstyrke. ) —Brug til at ONTRAST ONTRAST kontrollere graden af forskel mellem de lyseste og de mørkeste dele af billedet. Justering af kontrast ændrer mængden af sort og hvid i billedet. ) —Juster OLOR ARVETEMPERATUR farvetemperatur.
– S-videokabel – Kompositkabel • 16:9 – Inputkilden skaleres, så den passer med bredden af skærmen. • 4:3 – Inputkilden skaleres, så den passer til skærmen. Brug 16:9 eller 4:3, hvis du bruger en af de følgende: – Computeropløsning større end SXGA+ –...
Menuen Management (Styring) )—Vælg OCATION ENUPLACERING placering af OSD på skærmen. )— ROJECTION ROJEKTIONSFUNKTION Vælg, hvordan billedet vises: • Frontprojektionsdesktop (standard). • Bagprojektionsdesktop – projektoren spejlvender billedet, så du kan projicere bag en gennemsigtig skærm. • Frontprojektion – loftmonteret – projektoren vender billedet på...
Seite 820
Se side 34. RF_C (RF_C æ )— EARNING INDL RING )—Vælg On (Til) for at bruge projektoren ved et lavere FUNKTION strømniveau (250 Watt), som kan give et længere lampeliv, mere lydsvag drift og svagere lysstyrkeoutput på skærmen. Vælg Off (Fra) for at arbejde på normalt strømniveau (300 Watt).
ASSWORD NABLE NDSTILLING AF )—Vælg On (Til) for at ADGANGSKODE angive en adgangskode for personer. Vælg Off (Fra) for at deaktivere adgangskodefunktionen. HANGE ASSWORD KIFT )—Tryk for at ændre ADGANGSKODE adgangskoden. Menuen Language (Sprog) Tryk på eller for at vælge det foretrukne sprog for OSD.
BEMÆRKNING 2: Når der skiftes mellem forgrunds- og baggrundsvisning, varierer forgrundsvisningens mindste skærmstørrelse i forhold til forskellige kombinationer af signalkilder til PIP. Vælg On (Til) for at PIP I (PIP- )— MAGE BILLEDE åbne Options (Indstillinger) og vælge følgende indstillinger. Vælg Off (Fra) for at deaktivere PIP-funktionen (Picture-In- Picture).
æ )—Tryk for at bekræfte indstillingerne. PPLY HANGE NVEND NDRING æ )—Tryk for at bruge ESET ETWORK ETTING ULSTIL NETV RKSINDSTILLING standardindstillingen. Menuen Factory Reset (Fabriksnulstilling) )—Vælg Yes ACTORY ESET ABRIKSNULSTILLING (Ja) for at nulstille projektoren til standardindstillingerne. Nulstillede elementer omfatter indstillinger for både computerbilleder og videobilleder.
Menuen Video Source (Videokilde) BEMÆRK: Denne menu er kun tilgængelig med signalerne S-video og video (komposit) tilsluttet. æ ). Justerer en videokilde ATURATION ARVEM TNING fra sort og hvid til fuld farvemætning. Tryk på for at sænke mængden af farve i et billede og at øge mængden af farve i et billede.
Seite 825
Default (Nulstil RF til standard). Vælg Reset to Default Channel (Nulstil til standardkanal), hvorefter projektorens standardkanal bruges. • Tryk på knappen Prgm på fjernbetjeningen i 5 sekunder for at nulstille senderen til standardkanalen. • Korrekt nulstilling til standardkanalen i begge ender kan bekræftes, når fjernbetjeningens sender styrer projektoren.
Sådan styres projektoren fra Web Management Konfiguration af netværksindstillingen Hvis projektoren er tilsluttet et netværk, kan du få adgang til den via en webbrowser ved at konfigurere netværksindstillingen (TCP/IP). Når netværksfunktionen bruges, skal IP-adressen være entydig. Se Menuen Network Settings (Netværksindstillinger) på side 34 for at få oplysninger om konfiguration af netværksindstillinger.
Seite 828
Håndtering af egenskaber Home (Startside) Viser gruppenavn, projektornavn, placering, kontakt, lampetimer, firmwareversion, IP-adresse, MAC-adresse og oplysninger om administratoradgangskode. Brug af din projektor...
Seite 829
Network Setting (Netværksindstilling) Se afsnit om OSD på side 32. • Angiv gruppenavn, projektornavn, placering og kontaktoplysninger under denne fane, og tryk på Submit (Send) for at bekræfte indstillingerne. • Vælg DHCP for at tildele projektoren en IP-adresse fra en DHCP- server automatisk eller Manual (Manuel) for at tildele en IP- adresse manuelt.
Seite 830
Projector Status and Control (Projektorstatus og -kontrol) Funktionen er den samme som On Screen Display (Skærmvisning). Håndter projektorstatus, billedkontrol og lydkontrol med Projector Status and Control (Projektorstatus og -kontrol). Brug af din projektor...
Seite 831
E-mail Alert (E-mail-besked) Angiv e-mail-adresse, ejer, emne og Alert Condition (Advarselstilstand) for at sende automatiske e-mail-beskeder til den forudindstillede administrator. Brug af din projektor...
Seite 832
Password Setting (Indstilling af adgangskode) Brug Password Setting (Indstilling af adgangskode) til at oprette en administratoradgangskode og få adgang til Web Management. Du skal oprette en adgangskode, inden du kan aktivere den første gang. Når adgangskodefunktionen er aktiveret, skal administratoradgangskoden angives for at få...
Fejlfinding på din projektor Hvis du oplever problemer med din projektor, skal du se følgende fejlfindingstip. Hvis problemet fortsætter, skal du kontakte Dell. Problem Mulig løsning Der vises intet billede på • Kontroller, at linsehætten er fjernet, og at skærmen der er tændt for projektoren.
Seite 834
Hvis du oplever problemer med at ændre opløsninger, eller hvis din skærm fryser, skal du genstarte alt udstyr og projektoren. Hvis du ikke bruger en Dell bærbar computer, skal du se dokumentationen. Skærmen viser ikke din Hvis du bruger en bærbar computer, skal du præsentation...
Seite 835
Dell. TEMP-lyset blinker orange Der fejl ved en projektorventilator, og projektoren lukker automatisk ned. Hvis problemet fortsætter, skal du kontakte Dell. Fjernbetjeningen fungerer Batteriet er måske lavt. Kontroller, om ikke jævnt eller kun inden for laserstrålen, der transmitteres fjernt fra, er for et meget lille område...
Rød--> Grøn--> Blå--> Hvid--> Klar blå--> Mørkegrøn--> Gul. Kontroller, at farverne på testmønstret er korrekte. Kontakt Dell, hvis farverne ikke vises korrekt. Udskiftning af lampe Udskift lampen, når du ser "Lampen er ved at nå afslutningen af dens brugbare levetid ved fuld funktion.
Seite 837
LAMPE(R) INDEN I DETTE PRODUKT INDEHOLDER KVIKSØLV OG SKAL GENBRUGES ELLER BORTSKAFFES I OVERENSSTEMMELSE MED LOKALE, STATSLIGE ELLER FØDERALE LOVE. HVIS DU VIL HAVE YDERLIGERE INFORMATION, SKAL DU SE WWW.DELL.COM/HG ELLER KONTAKTE ELECTRONIC INDUSTRIES ALLIANCE PÅ WWW.EIAE.ORG. SE WWW.LAMPRECYCLE.ORG FOR AT FÅ SPECIFIK INFORMATION OM BORTSKAFFELSE AF LAMPE.
Specifikationer Lysventil 0,95" SXGA+ DLP™ LVDS-teknologi (Low-Voltage Differential Signaling) med enkelt chip Lysstyrke 3300 ANSI Lumens (maks.) Kontrastområde 2500:1 Typisk (Fuld Til/Fuld Fra) Ensartethed 80% Typisk (Japan-standard - JBMA) Lampe Udskiftelig 300-watt-lampe til 1700 timer (op til 2200 timer i eco-funktion) Antal pixels 1400 x 1050 (SXGA+) Farvevisning...
Seite 840
Strømforbrug 400 watt typisk, 335 watt i eco-funktion 2 højttalere, 2 watt RMS Støjniveau 37dB(A) Fuld-Til-funktion, 31dB(A) Eco-funktion Vægt 3,73 kg Mål (B x H x D) Udvendig 329,8 x 261,4 x 115,2 ± 1 mm Miljøforhold Driftstemperatur: 5 C - 35 C (41 Luftfugtighed: 80% maximum Opbevaringstemperatur: -20...
Seite 841
Videoinput: 3 RCA-stik til komponentvideo/HDTV-input, ét 4- bens mini-DIN til S-videoinput, ét RCA-jackstik til kompositvideoinput Lydinput: et hovedtelefonstik (diameter 3,5 mm) 12 volt jævnstrøms-jackstik ved 200 mA output, relæstyring til automatisk styring af projektionsskærm Ét RJ45-stik til netværk Ét HDMI-input Ét mini-DIN RS232-stik til fjernbetjening af projektor med kabel fra pc...
Seite 842
Hoved "BE EF" Adresse kode "10" ==> pt_OEM Belastningsstørrelse "05 00"==> Fra wMsgID til ende CRC "C6 FF" ==> Hvis CRC værdien er "C6(Lav byte) FF (Høj byte)" MsgID "11 11" MsgSize "01 00"==> Fra kommando til ende. Kommando "01"==> "TÆND" kommando. •...
Seite 843
Liste over kontrolkommandoer Hoved Adresse Størrelse af CRC16 Kommando Kommandobeskrivelse kode belastning for den ID(ORD) størrelse( kode (ORD) (BYTE) (ORD) samlede ORD) (BYTE) pakke (ORD) 0xefbe 0x10 0x0005 0xffc6 0x1111 0x0001 0x01 Power 0xbfc7 0x02 Menu 0x7e07 0x03 0x3fc5 0x04 Down 0xfe05 0x05...
Seite 844
PIP-kombinationskilder Kilde VGA- VGA- BNC- RCA- HDMI komponent computer komponent komponent komponent S-video Komposit M1 digital BEMÆRK: Hvis en kombination af to kilder overstiger skaleringsenhedens båndbredde, viser projektoren det sorte billede. Specifikationer...
Seite 845
Kompatiblitetsfunktioner Funktion Opløsning (ANALOG) (DIGITAL) V. Frekvens H. Frekvens V. Frekvens H. Frekvens (Hz) (KHz) (Hz) (KHz) 640X350 31,5 31,5 640X350 37,9 37,9 640X400 37,9 37,9 640X480 31,5 31,5 640X480 37,9 37,9 640X480 37,5 37,5 640X480 43,3 43,3 720X400 31,5 31,5 720X400 37,9...
Seite 846
MAC G4 640X480 68,03 MAC G4 640X480 97,09 IMAC DV 640X480 IMAC DV 800X600 IMAC DV 1024X768 IMAC DV 1152X870 68,49 IMAC DV 1280X960 IMAC DV 1280X1024 91,1 * Komprimeret computerbillede. BEMÆRK: UXGA understøttes ikke i DVI (M1-til-DVI). Specifikationer...
Kontakt Dell Hvis du ønsker at kontakte Dell elektronisk, kan du gå ind på følgende hjemmesider: • www.dell.com • support.dell.com (teknisk support) • premiersupport.dell.com (teknisk support til undervisningssektoren, det offentlige eller sundhedsvæsenet og mellemstore/store virksomhedskunder, herunder Premier-, Platinum- og Gold-kunder) For specifikke hjemmesider for dit land, så...
Seite 848
Lokalnumre, og landetilvalgskode Frikaldsnumre Bykode Anguilla Generel support frikaldsnummer: 800-335-0031 Antigua og Generel support 1-800-805-5924 Barbuda Argentina Hjemmeside: wsalgww.dell.com.ar (Buenos Aires) E-mail: us_latin_sTransaktionssalgervices@ International dell.com landekode: 00 E-mail til desktop- og bærbare Landekode: 54 computere: Bykode 11 la-techsupport@dell.com ® E-mail for servere og EMC lagringsprodukter: la_enterprise@dell.com...
Seite 849
Land (By) Afdelingsnavn og serviceområde, Områdekoder, International Hjemmeside og e-mail-adresse Lokalnumre, og landetilvalgskode Frikaldsnumre Bykode Australien E-mail: au_tech_support@dell.com (Sydney) E-mail: nz_tech_support@dell.com Hjem og mindre virksomheder 1-300-655-533 International Det offentlige og virksomheder frikaldsnummer: landekode: 0011 1-800-633-559 Landekode: 61 Preferred Accounts Division (PAD)
Seite 850
00 emaildell/ Country Code: Kun teknisk support for Inspiron 02 481 92 96 XPS-computere City Code: 2 Teknisk support for alle andre Dell- 02 481 92 88 computere Technical Support Fax 02 481 92 95 Kundepleje 02 713 15 65...
Seite 851
Hjemmeside og e-mail-adresse Lokalnumre, og landetilvalgskode Frikaldsnumre Bykode Bolivia GeneKundeserviceral Support frikaldsnummer: 800- 10-0238 Brazil Hjemmeside:: www.dell.com/br Customer Support, Technical 0800 90 3355 International Support Access Code: 00 Technical Support Fax 51 481 5470 Country Code: Kundepleje Fax 51 481 5480...
Seite 852
Technical Support E-mail: cn_support@dell.com Kundepleje E-mail: customer_cn@dell.com City Code: 592 Technical Support Fax 592 818 1350 Teknisk support (Dell™ Dimension og frikaldsnummer: 800 858 2969 Inspiron) Teknisk support (OptiPlex™, Latitude™ og frikaldsnummer: 800 858 0950 Dell Precision™) Technical Support (servers and storage)
Seite 853
E-mail: support.euro.dell.com/dk/da/ International emaildell/ Access Code: 00 Kun teknisk support for Inspiron 7010 0074 Country Code: XPS-computere Teknisk support for alle andre Dell- 7023 0182 computere Kundepleje (Relational) 7023 0184 Home/Small Business Kundepleje 3287 5505 Omstilling (Relational) 3287 1200 Omstilling Fax (Relational)
Seite 854
International Home and Small Business Access Code: 00 Kun teknisk support for Inspiron 0825 387 129 Country Code: XPS-computere Teknisk support for alle andre Dell- 0825 387 270 City Codes: (1) computere Kundepleje 0825 823 833 Omstilling 0825 004 700...
Seite 855
E-mail: tech_support_central_europe@dell. International Access Code: 00 Kun teknisk support for Inspiron 06103 766-7222 Country Code: XPS-computere Teknisk support for alle andre Dell- 06103 766-7200 City Code: 6103 computere Home/Small Business Kundepleje 0180-5-224400 Global Segment Kundepleje 06103 766-9570 Preferred Accounts Kundepleje...
Seite 856
International apsupport@dell.com Access Code: 001 Technical Support (Dimension and 2969 3188 Country Code: Inspiron) Technical Support (OptiPlex, 2969 3191 Latitude, and Dell Precision) Teknisk support (PowerApp™, 2969 3196 PowerEdge™, PowerConnect™ og PowerVault™) Kundepleje 3416 0910 Large Corporate Accounts 3416 0907...
Seite 857
International Kun teknisk support for Inspiron 1850 200 722 Access Code: 16 XPS-computere Country Code: Teknisk support for alle andre Dell- 1850 543 543 computere City Code: 1 U.K. Technical Support (dial within 0870 908 0800 U.K. only) Home User Kundepleje...
Seite 858
City Code: 44 Technical Support (Dimension and frikaldsnummer: 0120- Inspiron) 198-226 Technical Support outside of Japan 81-44-520-1435 (Dimension and Inspiron) Technical Support (Dell Precision, frikaldsnummer:0120- OptiPlex, and Latitude) 198-433 Technical Support outside of Japan 81-44-556-3894 (Dell Precision, OptiPlex, and Latitude)
Seite 859
512 728-3883 Kundeservice) (Austin, Texas, U.S.A.) salg (Austin, Texas, U.S.A.) 512 728-4397 salgFax (Austin, Texas, U.S.A.) 512 728-4600 eller 512 728-3772 Luxembourg Hjemmeside: support.euro.dell.com E-mail: tech_be@dell.com International Technical Support (Brussels, 3420808075 Access Code: 00 Belgium) Country Code: Home/Small Business salg (Brussels,...
Seite 860
Country Code: Kundeservice (Xiamen, China) 34 160 910 Transaktionssalg (Xiamen, China) 29 693 115 Malaysia Hjemmeside: support.ap.dell.com (Penang) Technical Support (Dell Precision, frikaldsnummer: OptiPlex, and Latitude) 1 800 88 0193 International Technical Support (Dimension, frikaldsnummer: Access Code: 00 Inspiron, and Electronics and...
Seite 861
Netherlands Hjemmeside: support.euro.dell.com (Amsterdam) Kun teknisk support for Inspiron 020 674 45 94 XPS-computere International Teknisk support for alle andre Dell- 020 674 45 00 Access Code: 00 computere Country Code: Technical Support Fax 020 674 47 66 Home/Small Business Kundepleje...
Seite 862
Land (By) Afdelingsnavn og serviceområde, Områdekoder, International Hjemmeside og e-mail-adresse Lokalnumre, og landetilvalgskode Frikaldsnumre Bykode Norway (Lysaker) Hjemmeside: support.euro.dell.com E-mail: International support.euro.dell.com/no/no/ Access Code: 00 emaildell/ Country Code: Technical Support 671 16882 Relational Kundepleje 671 17575 Home/Small Business Kundepleje 23162298...
Seite 863
Land (By) Afdelingsnavn og serviceområde, Områdekoder, International Hjemmeside og e-mail-adresse Lokalnumre, og landetilvalgskode Frikaldsnumre Bykode Portugal Hjemmeside: support.euro.dell.com E-mail: International support.euro.dell.com/pt/en/ Access Code: 00 emaildell/ Country Code: Technical Support 707200149 Kundepleje 800 300 413 salg 800 300 410 eller 800 300 411 eller...
Seite 864
Inspiron, and Electronics and 1800 394 7430 International Accessories) Access Code: 005 Technical Support (OptiPlex, frikaldsnummer: Country Code: Latitude, and Dell Precision) 1800 394 7488 Technical Support (PowerApp, frikaldsnummer: PowerEdge, PowerConnect, and 1800 394 7478 PowerVault) Kundeservice (Penang, Malaysia) 604 633 4949...
Seite 865
Land (By) Afdelingsnavn og serviceområde, Områdekoder, International Hjemmeside og e-mail-adresse Lokalnumre, og landetilvalgskode Frikaldsnumre Bykode Spain (Madrid) Hjemmeside: support.euro.dell.com E-mail: support.euro.dell.com/es/es/ International emaildell/ Access Code: 00 Home and Small Business Country Code: Technical Support 902 100 130 Kundepleje 902 118 540...
Seite 866
Land (By) Afdelingsnavn og serviceområde, Områdekoder, International Hjemmeside og e-mail-adresse Lokalnumre, og landetilvalgskode Frikaldsnumre Bykode Switzerland Hjemmeside: support.euro.dell.com (Geneva) E-mail: Tech_support_central_Europe@dell International .com Access Code: 00 E-mail for French-speaking HSB and Country Code: Corporate Customers: support.euro.dell.com/ch/fr/ City Code: 22 emaildell/...
Seite 867
00801 65 1228 Corporate salg frikaldsnummer: 00801 651 227 Thailand Hjemmeside: support.ap.dell.com Technical Support (OptiPlex, frikaldsnummer: International Latitude, and Dell Precision) 1800 0060 07 Access Code: 001 Technical Support (PowerApp, frikaldsnummer: Country Code: PowerEdge, PowerConnect, and 1800 0600 09 PowerVault)
Seite 868
Land (By) Afdelingsnavn og serviceområde, Områdekoder, International Hjemmeside og e-mail-adresse Lokalnumre, og landetilvalgskode Frikaldsnumre Bykode U.K. (Bracknell) Hjemmeside: support.euro.dell.com Kundepleje Hjemmeside: International support.euro.dell.com/uk/en/ECare/Form/Home.asp Access Code: 00 Country Code: E-mail: dell_direct_support@dell.com City Code: 1344 Technical Support 0870 908 0500 (Corporate/Preferred Accounts/PAD...
Seite 869
Software and Peripherals salg frikaldsnummer: 1-800-671-3355 Spare Parts salg frikaldsnummer: 1-800-357-3355 Extended Service and Warranty salg frikaldsnummer: 1-800-247-4618 frikaldsnummer: 1-800-727-8320 Dell Services for the Deaf, Hard-of- frikaldsnummer: 1-877- DELLTTY(1-877-335-5889) Hearing, or Speech-Impaired U.S. Virgin General Support 1-877-673-3355 Islands Venezuela...
Når du har fastslået dit systems FCC-klassificering, skal du læse den tilsvarende FCC- bemærkning. Bemærk, at FCC-regler, der medfører ændringer, der ikke udtrykkeligt er godkendt af Dell, kan annullere din ret til at bruge dette udstyr. Dette udstyr overholder del 15 af FCC-reglerne. Ved betjening af udstyret skal følgende to betingelser overholdes: •...
Eksportør: Dell Inc. One Dell Way Round Rock, TX 78682 Importør: Dell Computer de México, S.A. de C.V. Paseo de la Reforma 2620 - 11° Piso Col. Lomas Altas 11950 México, D.F. Afsendes til: Dell Computer de México, S.A. de C.V.
Ordliste ANSI Lumens— En standard for måling af lysoutput, der bruges til at sammenligne projektorer. Billedformat—Det mest populære billedformat er 4:3 (4 til 3). Tidlige tv- og computervideoformater er billedformatet 4:3, hvilket betyder, at bredden af billedet er 4/3 gange højden. Baggrundslys—Refererer til en fjernbetjening, eller et projektorkontrolpanel, der har knapper og indstillinger, der er oplyst.
Seite 874
Kontrastområde—Område for lyse og mørke værdier i et billede, eller området mellem deres maksimum- og minimumværdier. Der er to metoder, der bruges af projektionsindustrien til måling af området: Full On/Off [Fuld Til/Fra] — måler området for lyseffekt på et helt hvidt billede (fuld Til), og lyseffekt på...
Seite 875
Maksimal afstand—Den afstand fra en skærm, som projektoren skal bruge til at vise et brugbart billede (lyst nok) i et helt mørklagt rum. Maksimal billedstørrelse— Det største billede en projektor kan vise i et mørklagt rum. Denne størrelse er sædvanligvis begrænset af optikkens fokale rækkevidde. Metalhaloidlampe—Den type lampe, der bruges i mange projektorer i mellemstørrelsen og alle avancerede bærbare projektorer.
Seite 876
Zoomlinse—Linse med variabel fokallængde, der sætter operatøren i stand til at flytte visningen ind eller ud ved at gøre billedet mindre eller større. Zoomlinsestørrelsesforhold—Er forholdet mellem det mindste og det største billede en linse kan projicere fra en fast afstand. For eksempel betyder et 1.4:1 zoomlinseforhold, at et 10 fods billede uden zoom ville være et 14 fods billede med fuld zoom.
Seite 877
Indeks Fejlfinding Skærmvisning kontakt Dell Audio (Lyd), menu Selv-diagnose Billedindstilling, menu fjernbetjening Computer Source (Com- puterkilde), menu Factory Reset (Fabriksnulstill- Hovedenhed ing), menu Fjernbetjeningsmodtager Language (Sprog), menu Fokusring Menuen Management (Sty- Hæveknap ring) Kontrolpanel Network Settings Linse (Netværksindstill- Linsehætte inger), menu...
Seite 878
Lysstyrke 14, 15 Lysventil RS232-kabel Mål RS232-kontrolboks Miljøforhold Til computer Netværksprotokol Tilslutning af en computer med et D-sub til D- PIP-kombinationskilder sub-kabel Projektionsafstand Tilslutning af en computer Projektionslinse med et M1 til D-sub/ Projektionsskærmstørrelse USB-kabel RS232-protokol Tilslutning af en dvd-afspiller Støjniveau med et D-sub til YPb- Strømforbrug...
Seite 879
S-videoinputstik VGA-inputstik Udskiftning af lampe Videoinputstik Indeks...
Seite 881
Dell™ 5100MP -projektori Käyttäjän ohjekirja Malli XXX w w w . d e l l . c o m | s u p p o r t . d e l l . c o m...
Seite 882
Tämän asiakirjan sisältämät tiedot, mukaan lukien kaikki ohjeet, varoitukset, säännösten hyväksynnät ja sertifikaatit, perustuvat lausuntoihin, jotka valmistaja on Dellille toimittanut, eikä Dell ole varmistanut tai testannut niitä itse. Dell sanoutuu irti kaikesta vastuusta, joka liittyy puutteisiin tai virheisiin sellaisissa tiedoissa.
Seite 883
Sisältö 1 Dell-projektorisi ..... 5 Tietoja projektoristasi ....
Seite 884
3 Projektorin käyttäminen ... . . 17 Projektorin kytkeminen päälle ... . Projektorin kytkeminen pois ... . . Projektoidun kuvan asettaminen .
Seite 885
4 Projektorin vianmääritys ... . . 43 Itsediagnoosi videolle ....Lampun vaihtaminen ....5 Tekniset tiedot .
Dell-projektorisi Projektorisi mukana tulee kaikki seuraavat osat. Varmista, että sinulla on kaikki osat, ja ota yhteyttä Delliin, jos jotakin puuttuu. Pakkauksen sisältö 1,8 metrin virtajohto (3,0 metriä M1 D-sub/USB-kaapeliin (1,8 metriä) Yhdysvalloissa) 2,0 metrin S-videokaapeli 1,8 metrin komposiittivideokaapeli RCA audiokaapeliin (1,8 metriä) 1,8 metrin mininastakaapeli 1,8 metriä...
Tietokoneeseen kytkeminen Tietokoneeseen kytkeminen M1:n ja D-sub:n/USB:n välisellä kaapelilla Virtajohto M1A:n ja D-sub:n/USB:n välinen kaapeli HUOM.: USB-kaapelia ei voi kytkeä, ellei USB-dongle ole käytössä. Lisätietoja USB-donglen käytöstä on kohdassa sivu 35. Projektorin kytkeminen...
Tietokoneen kytkeminen D-sub-kaapelilla Virtajohto D-sub-kaapeli HUOM.: USB-kaapelia ei voi kytkeä, ellei USB-dongle ole käytössä. Lisätietoja USB-donglen käytöstä on kohdassa sivu 35. Projektorin kytkeminen...
DVD-soittimeen kytkeminen DVD-soittimeen kytkeminen M1:n ja HDTV:n välisellä kaapelilla Virtajohto M1:n ja HDTV:n välinen kaapeli DVD-soittimeen kytkeminen D-sub:n ja YPbPr:n välisellä kaapelilla Virtajohto D-sub:n ja YPbPr:n välinen kaapeli HUOM.: D-sub:n ja YPbPr:n välistä kaapelia ei saa Delliltä toimitettuna. Ota yhteys ammattiasentajaan kaapelia varten. Projektorin kytkeminen...
DVD-soittimeen kytkeminen RCA-kaapelilla Virtajohto RCA-komponenttikaapeli HUOM.: RCA-kaapelia ei saa Delliltä toimitettuna. Ota yhteys ammattiasentajaan kaapelia varten. DVD-soittimeen kytkeminen S-videokaapelilla Virtajohto S-videokaapeli Projektorin kytkeminen...
DVD-soittimeen kytkeminen komposiittikaapelilla Virtajohto Komposiittivideokaapeli DVD-soittimeen kytkeminen BNC:n ja VGA:n välisellä kaapelilla Virtajohto BNC:n ja VGA:n välinen kaapeli HUOM.: BNC:n ja VGA:n välistä kaapelia ei saa Delliltä toimitettuna. Ota yhteys ammattiasentajaan kaapelia varten. Projektorin kytkeminen...
Kiinteä RS232-kaukosäädinasennus: Kytkeminen tietokoneeseen Virtajohto RS232-kaapeli HUOM.: RS232-kaapelia ei saa Delliltä toimitettuna. Ota yhteys ammattiasentajaan kaapelia varten. Projektorin kytkeminen...
Kytkeminen kaupasta saatavaan RS232-ohjauslaitteeseen: Virtajohto RS232-kaapeli Kaupasta saatava RS232-ohjauslaite HUOM.: RS232-kaapelia ei saa Delliltä toimitettuna. Ota yhteys ammattiasentajaan kaapelia varten. Projektorin kytkeminen...
Poista linssisuojus. Kytke virtajohto ja sopivat signaalikaapelit. Lisätietoja projektorin kytkemisestä löydät osasta sivu 7. Paina virtapainiketta (katso sivu 21 virtapainikkeen sijaintia varten). Dell-logo näkyy 30 sekunnin ajan. Kytke lähteesi päälle (tietokone, DVD-soitin, jne.). Projektori tunnistaa automaattisesti lähteesi.
Projektorin zoomin ja tarkennuksen asettaminen VAROITUS: Voit välttää projektorille aiheutuvia vaurioita varmistamalla, että zoom-linssi ja nostojalka ovat kokonaan vedetty sisään ennen kuin liikutat projektoria tai asetat projektorin kantolaukkuun. Pyörittämällä zoomauspainiketta voit zoomata lähemmäs ja kauemmas. Pyöritä tarkennusrengasta kunnes kuva on selkeä. Projektori tarkentaa etäisyyksillä 4,9 jalkaa –...
Kaukosäätimen käyttäminen Virta Kytke projektori päälle ja pois päältä. Katso lisätietoja osasta sivu 17. Painamalla painikkeita voit säätää kuvaruutunäytön asetusta. Laser Tähtäämällä kaukosäätimellä ruudulle ja painamalla laserpainikkeen pohjaan voit aktivoida laservalon. Äänenvoimakkuus Painamalla painiketta voit nostaa äänenvoimakkuutta. Mute (Vaimennus) Painamalla painiketta voit vaimentaa ja poistaa vaimennuksen projektorin kaiuttimelta.
Seite 906
Videotila Dell 5100MP –mikroprojektorilla on esiasetettuja säätöjä, jotka on optimoitu näyttämään dataa (PC- grafiikkaa) tai videota (elokuvat, pelit jne.). Painamalla Videotila-painiketta voit muuttaa tilaksi jonkin seuraavista: PC mode (PC-tila), Movie mode (elokuvatila), Game Mode (pelitila), sRGB, or User mode (käyttäjätila; käyttäjän itse tallentamat asetukset).
Seite 907
25 PIP Swap -painike Painamalla PIP Swap -painiketta voit vaihtaa etu- ja taka-alalla olevia kuvia keskenään. Laservaroitus Kaukosäädin sisältää luokan 2 laserlaitteen, joka lähettää lasersäteilyä. Välttääksesi vammoja älä katso suoraan laserin valoon äläkä osoita laseria kenenkään silmiin. Ohjelmointipainike Siirry kaukosäätimen Ohjelmointitilaan, jolloin RF-lähetyskanavaa voidaan vaihtaa, painamalla Prgm-painiketta.
Langaton USB- Langaton USB-laite, jonka avulla voit ohjata hiiridongle tietokoneen tai kannettavan tietokoneen hiirtä kaukosäätimellä. Kaukosäätimen kansi Kaukosäätimen takakansi. Patterikotelo Patterin kotelo. Kuvaruutunäytön käyttäminen Projektroissa on monikielinen kuvaruutunäyttö, jonka saa näkyviin siitä riippumatta, onko lähde kiinni projektorissa. Päävalikossa (Main Menu) voit navigoida välilehtiä painamalla Painamalla Enter-painiketta ohjauspaneelista tai kaukosäätimestä...
Seite 909
)—Painikkeilla RIGHTNESS IRKKAUS voit säätää kuvan kirkkautta. )—Painikkeilla ONTRAST ONTRASTI voit säätää kuvan kirkkaiden ja tummien osien välistä aste-eroa. Kontrastin säätäminen muuttaa kuvassa olevan mustan ja valkoisen määrää. . (Vä ä ö )—Säädä OLOR TILA värilämpötilaa. Mitä korkeampi lämpötila on, sitä sinisemmältä kuvaruudun väri näyttää.
• 1:1 — Lähdekuva näkyy ilman skaalausta. Käytä 1:1-kuvasuhdetta, jos käytät jotakin seuraavista: – VGA-kaapelia ja tietokoneen resoluutio on alle SXGA+ (1400 x 1050) – Komponenttikaapelia (720p, 576i/p, 480i/p) – S-videokaapelia – Komposiittikaapelia • 16:9 — Lähdekuva skaalataan täyttämään ruudun leveys. •...
Management Menu (Hallintavalikko) )—Valitse OCATION ALIKON SIJAINTI kuvaruutunäytön sijainti ruudulla. )—Valitse ROJECTION ROJEKTIOTILA kuinka kuva näkyy: • Front Projection-Desktop (etuprojektio; oletus). • Rear Projection-Desktop (takaprojektio) - Projektori kääntää kuvan peilikuvaksi, jolloin sitä voi käyttää läpinäkyvän ruudun takaa. • Front Projection-Ceiling Mount (kattoripusteinen etuprojektio)- Projektori kääntää...
Seite 912
Katso sivu 34. RF_C ä )— EARNING HETYSKANAVAN OHJELMOINTI (Sää ö )—Valitsemalla On projektori toimii vähemmällä TILA virtamäärällä (250 wattia), jonka ansiosta lampun käyttöikä voi olla pidempi, projektori hiljaisempi ja kuva himmeämpi ruudulla. Valitsemalla Off projektori toimii tavallisella virtamäärällä (300 wattia). ä...
ASSWORD NABLE SALASANA )—Valitsemalla On voit ASETUS asettaa yhden salasanan. Valitsemalla Off voit kytkeä salasanatoiminnon pois päältä. HANGE ASSWORD ALASANAN )—Painamalla MUUTTAMINEN painiketta voit muuttaa salasanan haluamaksesi. Language Menu (Kielivalikko) Painamalla voit valita haluamasi kielen kuvaruutunäyttöön. PIP Setting (PIP-asetus) -valikko HUOMAUTUS 1: PIP-kuva on käytössä...
Tyyppi 2: D-sub, BNC, komponentti, HDMI ja M1. HUOMAUTUS 2: Vaihdettaessa etu- ja taka-alan kuvia etualan näytön pienimmän ruudun koko vaihtelee PIP:n signaalilähteiden yhdistelmien mukaan. Valitse On, jos haluat PIP I (PIP- )— MAGE KUVA siirtyä Options (asetus) -valikkoon, jossa voit määrittää...
Video Source Menu (Videolähdevalikko) HUOM.: Tämä valikko on saatavilla vain kun S-video- tai video(komposiitti)- signaali on kytketty. (Vä ä )—Säädä ATURATION RIKYLL ISYYS videolähdettä mustavalkoisesta täysin värikylläiseen kuvaan. Painamalla voit vähentää kuvassa olevan värin määrää ja painamalla voit lisätä kuvassa olevan värin määrää.
Seite 917
RF-kanavan tehdasasetuksen palauttaminen Valitse Yes RF Learning Setting -valikosta ja siirry RF Reset to • Default (RF-oletusasetusten palauttaminen) -valikkoon. Valitse Reset to Default Channel (palauta oletuskanava), jolloin projektori käyttää jälleen tehdasasetuksien mukaista kanavaa. • Voit palauttaa lähettimeen tehdasasetusten mukaisen kanavan painamalla kaukosäätimen Prgm-painiketta 5 sekuntia.
Projektorin hallinta Web-hallinnan avulla Verkkoasetusten määrittäminen Jos projektori on yhteydessä verkkoon, voit käyttää projektoria Web-selaimen avulla määrittämällä verkkoasetukset (TC/IP). Verkkotoimintoa käytettäessä IP-osoitteen tulee olla yksilöllinen. Katso sivulta 34 kohdasta Network Setting Menu (verkkoasetusvalikko), kuinka verkkoasetukset määritetään. Web-hallinnan käyttäminen Käytä Internet Explorer 5.0 -selainta tai sitä uudempaa versiota tai Netscape Navigator 7.0 -selainta tai sitä...
Seite 920
Hallinnan ominaisuudet Home (pääsivu) Sisältää tiedot Group name (ryhmän nimi), Projector name (projektorin nimi), Location (sijainti), Contact (yhteyshenkilö), Lamp hours (lampun käyttötunnit), Firmware version (ohjelmistoversio), IP address (IP-osoite), MAC address (MAC-osoite) ja Admin password (järjestelmänvalvojan salasana). Projektorin käyttäminen...
Seite 921
Network Setting (verkkoasetus) Katso osaa kuvaruutunäyttö kohdassa sivu 32. • Tässä välilehdessä voit määrittää asetukset Group Name, Projector Name, Location ja Contact. Paina Submit (käytä), jos haluat vahvistaa asetukset. • DHCP määrittää projektorille IP-osoitteen automaattisesti DHCP-palvelimen avulla, Manual määrittää IP-osoitteen manuaalisesti.
Seite 922
Projector Status and Control (projektorin tila ja hallinta) Toiminto on sama kuin kuvaruutunäyttö. Projektorin tila ja hallinta -sivun avulla voit hallita projektorin tilaa ja kuvan sekä äänen asetuksia. Projektorin käyttäminen...
Seite 923
E-mail Alert (sähköposti-ilmoitukset) Voit määrittää järjestelmänvalvojalle automaattisesti lähetettävien sähköposti-ilmoitusten osoitteen, omistajan, aiheen ja ilmoituksen ehdot (Alert Condition). Projektorin käyttäminen...
Seite 924
Password Setting (salasana-asetus) Salasana-asetuksen avulla voit määrittää Web-hallinnassa käytettävän järjestelmänvalvojan salasanan. Ottaessasi salasanan ensimmäistä kertaa käyttöön, määritä salasana ennen sen käyttöönottoa. Kun salasanatoiminto on käytössä, järjestelmänvalvojan salasana vaaditaan Web-hallinnan käyttämiseen. Projektorin käyttäminen...
Projektorin vianmääritys Jos sinulla on ongelmia projektorisi kanssa, katso seuraavat vianmääritysohjeet. Jos ongelma ei häviä, ota yhteyttä Delliin. Ongelma Mahdollinen ratkaisu Ruudulle ei tule kuvaa • Varmista, että linssin suojus on otettu pois ja että projektori on päällä. • Varmista, että ulkoinen grafiikkaportti on toiminnassa.
Seite 926
(jatkuu) (jatkuu) Ongelma Mahdollinen ratkaisu Osittainen, liukuva tai väärin • Paina Resync-painiketta kaukosäätimestä tai näytetty kuva ohjauspaneelista. Jos käytät Dellin kannettavaa tietokonetta, • aseta tietokoneen resoluutioksi XGA (1024 x 768): Napsauta hiiren oikealla painikkeella Windows-työpöydän käyttämätöntä osiota, valitse Ominaisuudet ja valitse sitten Asetukset-välilehti.
Seite 927
(jatkuu) (jatkuu) Ongelma Mahdollinen ratkaisu Kuva on venytetty katseltaessa Projektori tunnistaa automaattisesti 16:9- 16:9-suhteen DVD:tä suhteen DVD:n ja säätää kuvasuhteeksi kokoruudun 4:3-suhteella (letter-box) oletusasetuksilla. Jos kuva on yhä venytetty, säädä kuvasuhdetta seuraavasti: • Jos toistat 16:9-suhteen DVD:tä, valitse DVD-soittimestasi 4:3-kuvasuhdetyypiksi (jos mahdollista).
Itsediagnoosi videolle Dell 5100MP -projektorin mukana tulee itsediagnoosi projektorin videonäytön testaamiseen (videolle, S-videolle ja komponentille). Käytä tätä kehittynyttä ominaisuutta alustavaan itsediagnoosiin, kun projektori ei näytä videota ongelmitta. Kun olet kytkenyt projektorin päälle, paina ohjauspaneelin ”+”- ja ”-”-painikkeita yhtä aikaa kolmen sekunnin ajan ja vapauta painikkeet, kun ruutu tyhjenee.
Seite 929
Lampun hävittäminen (koskee vain Yhdysvaltoja) TÄMÄN TUOTTEEN SISÄLLÄ OLEVA LAMPPU TAI LAMPUT SISÄLTÄVÄT ELOHOPEAA, JA NE TÄYTYY KIERRÄTTÄÄ TAI HÄVITTÄÄ PAIKALLISTEN SÄÄDÖSTEN TAI LAKIEN MUKAAN. LISÄTIETOJA SAAT OSOITTEESTA WWW.DELL.COM/HG TAI OTTAMALLA YHTEYTTÄ ELECTRONIC INDUSTRIES ALLIANCEEN OSOITTEESSA WWW.EIAE.ORG. LAMPPUKOHTAISIA TIETOJA SAAT OSOITTEESTA WWW.LAMPRECYCLE.ORG. Projektorin vianmääritys...
Virrankulutus 400 wattia tyypillisesti, 335 wattia säästötilassa Audio 2 kaiutinta, 2 watin RMS Melutaso 37 dB(A) täysillä, 31 dB(A) säästötilassa Paino 8,2 paunaa (3,73 kiloa) Mitat (L x K x S) Ulkomitat 13 x 10,3 x 4,5 ± 0,04 tuumaa (329,8 x 261,4 x 115,2 ±...
Seite 933
Videotulo: 3 RCA-liitäntää komponenttivideota/HDTV-sisääntuloa varten, yksi 4 nastan mini-DIN S-videotuloa varten, yksi RCA-liitäntä komposiittivideosisääntuloa varten. Audiotulo: yksi ääniliitäntä (halkaisija 3,5 Tasavirtaliitäntä 12 volttia @ 200 mA, releohjattu automaattisten projektiruutujen ohjaamista varten Yksi RJ45-liitäntä tietoliikenneverkkoja varten Yksi HDMI-tulo Yksi mini-DIN RS232 kiinteää tietokoneen avulla tehtävää...
Seite 934
Osoitekoodi "10" ==> pt_OEM Hyötykuorman koko "05 00"==> wMsgID:stä alkaen loppuun CRC "C6 FF" ==> Jos CRC-arvo on "C6(alempi tavu) FF (ylempi tavu)" MsgID "11 11" MsgSize "01 00"==> Komennosta loppuun. Komento "01"==> "Virta PÄÄLLE" -komento. • Projektorin vastausviestiluettelo: 0x00: Onnistui 0x01: Virheellinen komento (on hallintakomentolistassa, mutta ei kelvollinen, esim.
Seite 935
Ohjauskomentojen luettelo Header Osoite- Hyötykuor CRC16 MsG koko Komento- Komennon kuvaus koodi man koko koko ID(SANA) koodi (SANA) (SANA) paketille (TAVU) (SANA) (TAVU) (SANA) 0xefbe 0x10 0x0005 0xffc6 0x1111 0x0001 0x01 Power 0xbfc7 0x02 Menu 0x7e07 0x03 0x3fc5 0x04 Down 0xfe05 0x05 Left...
PIP-yhdistelmien lähteet Lähde VGA- VGA- BNC- RCA- HDMI komponentti tietokone komponentti komponentti komponentti S-video Komposiitti digitaalinen HUOM.: Jos kahden lähteen yhdistelmä ylittää skaalaajan kaistanleveyden, projektori näyttää mustan kuvan. Tekniset tiedot...
Yhteensopivuustilat Tila Resoluutio (ANALOGINEN) (DIGITAALINEN) Pystytaajuus Vaakataajuus Pystytaajuus Vaakataajuus (Hz) (kHz) (Hz) (kHz) 640 X 350 31.5 31.5 640 X 350 37.9 37.9 640 X 400 37.9 37.9 640 X 480 31.5 31.5 640 X 480 37.9 37.9 640 X 480 37.5 37.5 640 X 480...
Seite 938
MAC G4 640 X 480 68.03 MAC G4 640 X 480 97.09 IMAC DV 640 X 480 IMAC DV 800 X 600 IMAC DV 1024 X 768 IMAC DV 1152 X 870 68.49 IMAC DV 1280 X 960 IMAC DV 1280 X 1024 91.1 * Pakattu tietokonekuva.
Voit ottaa yhteyttä Delliin sähköisesti seuraavilta verkkosivuilta: • www.dell.com • support.dell.com (tekninen tuki) • premiersupport.dell.com (tekninen tuki opetuksen, hallinnon ja terveydenhoidon alojen asiakkaille sekä keskisuurille/suurille yritysasiakkaille, mukana lukien Premier-, Platinum- ja Gold-asiakkaat) Omaa maatasi varten tarkoitetun Internet-osoitteen löydät seuraavasta taulukosta oman maasi kohdalta. HUOM.: Maksuttomat numerot ovat käytössä...
Seite 940
Paikalliset numerot ja Maatunnus Maksuttomat numerot Suuntanumero Anguilla Yleinen tuki maksuton: 800-335-0031 Antigua ja Yleinen tuki 1-800-805-5924 Barbuda Argentiina Verkkosivu: www.dell.com.ar (Buenos Aires) Sähköposti: us_latin_services@dell.com Ulkomaantunnus Sähköposti pöytätietokoneille ja : 00 kannettaville: Maatunnus: 54 la-techsupport@dell.com ® Suuntanumero: Sähköposti EMC tallennuslaitteille ja palvelimille: la_enterprise@dell.com...
Seite 941
Osaston nimi tai Palvelualue, Suuntanumero, Ulkomaantunnus Verkkosivu ja Sähköpostiosoite Paikalliset numerot ja Maatunnus Maksuttomat numerot Suuntanumero Australia Sähköposti (Australia): (Sydney) au_tech_support@dell.com Sähköposti (Uusi-Seelanti): Ulkomaantunnus nz_tech_support@dell.com : 0011 Kotiyritykset ja pienet yritykset 1-300-655-533 Maatunnus: 61 Hallinto ja yritykset maksuton: Suuntanumero: 2...
Seite 942
Maa (Kaupunki) Osaston nimi tai Palvelualue, Suuntanumero, Ulkomaantunnus Verkkosivu ja Sähköpostiosoite Paikalliset numerot ja Maatunnus Maksuttomat numerot Suuntanumero Austria [Itävalta] Verkkosivu: support.euro.dell.com (Vienna) Sähköposti: tech_support_central_europe@ Ulkomaantunnus dell.com : 900 Kotiyritysten ja pienten yritysten 0820 240 530 00 Maatunnus: 43 myynti...
Seite 943
Maatunnus: 32 emaildell/ Suuntanumero: 2 Tekninen tuki vain Inspiron XPS - 02 481 92 96 tietokoneille Tekninen tuki kaikille muille Dell- 02 481 92 88 tietokoneille Teknisen tuen faksi 02 481 92 95 Asiakaspalvelu 02 713 15 .65 Yritysmyynti...
Seite 944
Paikalliset numerot ja Maatunnus Maksuttomat numerot Suuntanumero Bermuda Yleinen tuki 1-800-342-0671 Bolivia Yleinen tuki maksuton: 800-10-0238 Brasilia Verkkosivu: www.dell.com/br Asiakastuki, tekninen tuki 0800 90 3355 Ulkomaantunnus Teknisen tuen faksi 51 481 5470 : 00 Asiakaspalvelun faksi 51 481 5480 Maatunnus: 55 Myynti...
Seite 945
Maa (Kaupunki) Osaston nimi tai Palvelualue, Suuntanumero, Ulkomaantunnus Verkkosivu ja Sähköpostiosoite Paikalliset numerot ja Maatunnus Maksuttomat numerot Suuntanumero Canada Tilauksen status verkossa: [Kanada] (North www.dell.ca/ostatus York, Ontario) AutoTech (automaattinen tekninen maksuton: tuki) 1-800-247-9362 Ulkomaantunnus Asiakaspalvelu (kotiyritykset/pienet maksuton: : 011 yritykset) 1-800-847-4096 Asiakaspalvelu (suuret ja keskis.
Seite 946
Maatunnus: 86 cn_support@dell.com Suuntanumero: Asiakaspalvelun sähköposti: customer_cn@dell.com Teknisen tuen faksi 592 818 1350 Tekninen tuki (Dell™ Dimension™ ja maksuton: 800 858 2969 Inspiron) Tekninen tuki (OptiPlex™, maksuton: 800 858 0950 Latitude™ ja Dell Precision™) Tekninen tuki (palvelimet ja maksuton: 800 858 0960...
Seite 947
Maa (Kaupunki) Osaston nimi tai Palvelualue, Suuntanumero, Ulkomaantunnus Verkkosivu ja Sähköpostiosoite Paikalliset numerot ja Maatunnus Maksuttomat numerot Suuntanumero Czech Republic Verkkosivu: support.euro.dell.com [Tšekki] (Praha) Sähköposti: czech_dell@dell.com Tekninen tuki 22537 2727 Ulkomaantunnus Asiakaspalvelu 22537 2707 : 00 Faksi 22537 2714 Maatunnus: 420...
Seite 948
(Kööpenhamina) support.euro.dell.com/dk/da/ emaildell/ Ulkomaantunnus Tekninen tuki vain Inspiron XPS - 7010 0074 : 00 tietokoneille Maatunnus: 45 Tekninen tuki kaikille muille Dell- 7023 0182 tietokoneille Asiakaspalvelu (suhteet) 7023 0184 Kotiyritysten ja pienten yritysten 3287 5505 asiakaspalvelu Puhelinvaihde (suhteet) 3287 1200...
Seite 949
Maa (Kaupunki) Osaston nimi tai Palvelualue, Suuntanumero, Ulkomaantunnus Verkkosivu ja Sähköpostiosoite Paikalliset numerot ja Maatunnus Maksuttomat numerot Suuntanumero Finland [Suomi] Verkkosivu: support.euro.dell.com (Helsinki) Sähköposti: support.euro.dell.com/fi/fi/ Ulkomaantunnus emaildell/ : 990 Tekninen tuki 09 253 313 60 Maatunnus: 358 Asiakaspalvelu 09 253 313 38...
Seite 950
Ulkomaantunnus Kotiyritykset ja pienet yritykset : 00 Tekninen tuki vain Inspiron XPS - 0825 387 129 Maatunnus: 33 tietokoneille Suuntanumerot: Tekninen tuki kaikille muille Dell- 0825 387 270 (1) (4) tietokoneille Asiakaspalvelu 0825 823 833 Puhelinvaihde 0825 004 700 Puhelinvaihde (puhelut Ranskan...
Seite 951
(Langen) Sähköposti: tech_support_central_europe@dell. Ulkomaantunnus : 00 Tekninen tuki vain Inspiron XPS - 06103 766-7222 Maatunnus: 49 tietokoneille Suuntanumero: Tekninen tuki kaikille muille Dell- 06103 766-7200 6103 tietokoneille Kotiyritysten ja pienten yritysten 0180-5-224400 asiakaspalvelu Kansainvälisen segmentin 06103 766-9570 asiakaspalvelu Suuryritysten asiakaspalvelu...
Seite 952
Ulkomaantunnus apsupport@dell.com : 001 Tekninen tuki (Dimension ja 2969 3188 Maatunnus: 852 Inspiron) Tekninen tuki (OptiPlex™, 2969 3191 Latitude™ ja Dell Precision™) Tekninen tuki (PowerApp™, 2969 3196 PowerEdge™, PowerConnect™ ja PowerVault™) Asiakaspalvelu 3416 0910 Suuryritysten tilit 3416 0907 Kansainväliset asiakasohjelmat...
Seite 953
Sähköposti: dell_direct_support@dell.com Ulkomaantunnus Tekninen tuki vain Inspiron XPS - 1850 200 722 : 16 tietokoneille Maatunnus: 353 Tekninen tuki kaikille muille Dell- 1850 543 543 Suuntanumero: 1 tietokoneille Yhdistyneen kuningaskunnan 0870 908 0800 tekninen tuki (ei ulkomailta) Kotikäyttäjän asiakaspalvelu 01 204 4014...
Seite 954
Maa (Kaupunki) Osaston nimi tai Palvelualue, Suuntanumero, Ulkomaantunnus Verkkosivu ja Sähköpostiosoite Paikalliset numerot ja Maatunnus Maksuttomat numerot Suuntanumero Italia (Milan) Verkkosivu: support.euro.dell.com Sähköposti: Ulkomaantunnus support.euro.dell.com/it/it/ : 00 emaildell/ Maatunnus: 39 Kotiyritykset ja pienet yritykset Suuntanumero: Tekninen tuki 02 577 826 90...
Seite 955
Maatunnus: 81 Tekninen tuki (Dimension ja maksuton: Suuntanumero: Inspiron) 0120-198-226 Tekninen tuki Japanin ulkopuolelta 81-44-520-1435 (Dimension ja Inspiron) Tekninen tuki (Dell Precision, maksuton: OptiPlex ja Latitude) 0120-198-433 Tekninen tuki Japanin ulkopuolelta 81-44-556-3894 (Dell Precision, OptiPlex ja Latitude) Tekninen tuki (PDA:t, projektorit,...
Seite 956
Maa (Kaupunki) Osaston nimi tai Palvelualue, Suuntanumero, Ulkomaantunnus Verkkosivu ja Sähköpostiosoite Paikalliset numerot ja Maatunnus Maksuttomat numerot Suuntanumero Korea (Seoul) Tekninen tuki maksuton: 080-200-3800 Ulkomaantunnus Myynti maksuton: : 001 080-200-3600 Maatunnus: 82 Asiakastuki (Penang, Malesia) 604 633 4949 Suuntanumero: 2 Faksi 2194-6202 Puhelinvaihde...
Seite 957
Maatunnus: 853 Liiketoimintamyynti (Xiamen, 29 693 115 Kiina) Malesia Verkkosivu: support.ap.dell.com (Penang) Tekninen tuki (Dell Precision, maksuton: 1 800 88 0193 OptiPlex ja Latitude) Ulkomaantunnus Tekninen tuki (Dimension, Inspiron maksuton: 1 800 88 1306 : 00 sekä elektroniikka ja lisälaitteet) Maatunnus: 60 Tekninen tuki (PowerApp™,...
Seite 958
Antillit] Netherlands Verkkosivu: support.euro.dell.com [Alankomaat] Tekninen tuki vain Inspiron XPS - 020 674 45 94 (Amsterdam) tietokoneille Tekninen tuki kaikille muille Dell- 020 674 45 00 Ulkomaantunnus tietokoneille : 00 Teknisen tuen faksi 020 674 47 66 Maatunnus: 31 Kotiyritysten ja pienten yritysten...
Seite 959
0800 446 255 Hallinto ja yritykset 0800 444 617 Myynti 0800 441 567 Faksi 0800 441 566 Nicaragua Yleinen tuki 001-800-220-1006 Norja (Lysaker) Verkkosivu: support.euro.dell.com Sähköposti: Ulkomaantunnus support.euro.dell.com/no/no/ : 00 emaildell/ Maatunnus: 47 Tekninen tuki 671 16882 Asiakaspalvelu (suhteet) 671 17575...
Seite 960
Maa (Kaupunki) Osaston nimi tai Palvelualue, Suuntanumero, Ulkomaantunnus Verkkosivu ja Sähköpostiosoite Paikalliset numerot ja Maatunnus Maksuttomat numerot Suuntanumero Poland [Puola] Verkkosivu: support.euro.dell.com (Varsova) Sähköposti: pl_support_tech@dell.com Ulkomaantunnus Asiakastukipuhelin 57 95 700 : 011 Asiakaspalvelu 57 95 999 Maatunnus: 48 Myynti 57 95 999...
Seite 961
Tekninen tuki (Dimension, Inspiron maksuton: sekä elektroniikka ja lisälaitteet) 1800 394 7430 Ulkomaantunnus Tekninen tuki (OptiPlex™, maksuton: : 005 Latitude™ ja Dell Precision™) 1800 394 7488 Maatunnus: 65 Tekninen tuki (PowerApp™, maksuton: PowerEdge™, PowerConnect™ ja 1800 394 7478 PowerVault™) Asiakastuki (Penang, Malesia)
Seite 962
Maa (Kaupunki) Osaston nimi tai Palvelualue, Suuntanumero, Ulkomaantunnus Verkkosivu ja Sähköpostiosoite Paikalliset numerot ja Maatunnus Maksuttomat numerot Suuntanumero Spain [Espanja] Verkkosivu: support.euro.dell.com (Madrid) Sähköposti: support.euro.dell.com/es/es/ Ulkomaantunnus emaildell/ : 00 Kotiyritykset ja pienet yritykset Maatunnus: 34 Tekninen tuki 902 100 130...
Seite 963
Maa (Kaupunki) Osaston nimi tai Palvelualue, Suuntanumero, Ulkomaantunnus Verkkosivu ja Sähköpostiosoite Paikalliset numerot ja Maatunnus Maksuttomat numerot Suuntanumero Sveitsi (Geneve) Verkkosivu: support.euro.dell.com Sähköposti: Ulkomaantunnus tech_support_central_europe@dell. : 00 Maatunnus: 41 Sähköposti ranskankielisille pienten Suuntanumero: ja keskisuurten yritysten asiakkaille: support.euro.dell.com/ch/fr/ emaildell/ Tekninen tuki (kotiyritykset/pienet...
Seite 964
Paikalliset numerot ja Maatunnus Maksuttomat numerot Suuntanumero Thaimaa Verkkosivu: support.ap.dell.com Tekninen tuki (OptiPlex™, maksuton: Ulkomaantunnus Latitude™ ja Dell Precision™) 1800 0060 07 : 001 Tekninen tuki (PowerApp™, maksuton: Maatunnus: 66 PowerEdge™, PowerConnect™ ja 1800 0600 09 PowerVault™) Asiakastuki (Penang, Malesia)
Seite 965
Maa (Kaupunki) Osaston nimi tai Palvelualue, Suuntanumero, Ulkomaantunnus Verkkosivu ja Sähköpostiosoite Paikalliset numerot ja Maatunnus Maksuttomat numerot Suuntanumero U.K. [Yhdistynyt Verkkosivu: support.euro.dell.com kuningaskunta] Asiakaspalvelun verkkosivu: (Bracknell) support.euro.dell.com/uk/en/ECare/Form/Home.asp Ulkomaantunnus : 00 Sähköposti: dell_direct_support@dell.com Maatunnus: 44 Tekninen tuki (suuryritykset [yli 0870 908 0500 Suuntanumero: 1000 työntekijää])
Seite 966
1-877-Dellnet (1-877-335-5638) Työntekijöiden osto-ohjelman (EPP) maksuton: 1-800-695-8133 asiakkaat Talouspalvelujen verkkosivu: www.dellfinancialservices.com Talouspalvelut (leasing/laina) maksuton: 1-877-577-3355 Talouspalvelut (Dell Preferred Accounts maksuton: 1-800-283-2210 [DPA]) Liiketoiminta Asiakastuki ja tekninen tuki maksuton: 1-800-822-8965 Työntekijöiden osto-ohjelman (EPP) maksuton: 1-800-695-8133 asiakkaat Tulostimien ja projektorien tekninen tuki maksuton: 1-877-459-7298...
Kun olet määrittänyt järjestelmäsi FCC-luokituksen, lue siihen kuuluvat FCC-säännökset. Huomaa, että FCC-säännösten mukaan muutokset tai muokkaukset, joita Dell ei ole nimenomaisesti hyväksynyt, saattavat mitätöidä valtuutesi käyttää tätä laitteistoa. Tämä laite noudattaa FCC-säännösten osaa 15. Käyttö edellyttää seuraavaa kahta ehtoa: •...
Maastaviejä: Dell Inc. One Dell Way Round Rock, TX 78682 Maahantuoja: Dell Computer de México, S.A. de C.V. Paseo de la Reforma 2620 - 11° Piso Col. Lomas Altas 11950 México, D.F. Postiosoite: Dell Computer de México, S.A. de C.V.
Sanasto ANSI-lumenit— Valomäärän mittauksen standardi, käytetään projektorien vertailuun. Kuvasuhde—Yleisin kuvasuhde on 4:3. Varhaiset televisiot ja tietokonenäytöt käyttävät kuvasuhdetta 4:3, joka tarkoittaa että kuvan leveys on 4/3 kertaa sen korkeus. Taustavalaistu (Taustavalo)—Viittaa kaukosäätimeen tai projektorin ohjauspaneeliin, jonka painikkeet ja ohjaimet ovat valaistuja. Kaistanleveys—...
Seite 970
Kontrastisuhde— Valoisten ja pimeiden arvojen vaihteluala, tai niiden maksimi- ja minimiarvojen välinen suhde. Projektioalalla käytetään näitä kahta tapaa suhteen mittaamiseen: Full On/Off (kokonaan päällä/pois) — mittaa suhteen valonlähteen ollessa täysin valkoinen kuva (full on/kokonaan päällä) ja valonlähteen ollessa kokonaan musta kuva (full off/kokonaan pois).
Seite 971
ylälaitaa ja kapeaa alalaitaa), joka aiheutuu projektoituun kuvaan projektorin ja kankaan välisestä väärästä kulmasta. Laserosoitin— Pieni kynän tai sikarin kokoinen, pattereilla toimiva osoitin, joka heijastaa (yleensä) punaisen, voimakkaan valonsäteen, joka on välittömästi erittäin näkyvä ruudulla. Maksimietäisyys— Etäisyys ruudusta, jolta projektori voi vielä heijastaa käyttökelpoisen kuvan (riittävän kirkkaan) täysin pimennetyssä...
Seite 972
Zoom-linssi— Linssi, jossa on muuttuva polttoväli, joka mahdollistaa käyttäjän liikuttavan kuvaa eteen tai taaksepäin tehden kuvasta suuremman tai pienemmän. Zoom-linssin suhde— Suhde suurimman ja pienimmän kuvan välillä, jotka linssi voi projektoida tietyltä etäisyydeltä. Esimerkiksi zoom-linssin suhde 1,4:1 tarkoittaa, että 10 jalan kuva ilman zoomia olisi 14 jalan kuva täydellä zoomilla. Sanasto...
Seite 973
Sisällysluettelo BNC-liitäntä Kaukosäädin HDMI-liitäntä Kuvaruutunäyttö Infrapunavastaanotin Audio Menu (Audiovalikko) Kensington-lukon paikka Komponenttivideoliitäntä Computer Source Menu RJ45-verkkoliitäntä (Tietokonelähdeva- RS232-liitäntä likko) Saapuvan M1-signaalin Factory Reset Menu (Teh- itäntä dasasetusten palau- S-videoliitäntä tusvalikko) VGA-tuloliitäntä Image Settings Menu (Kuva- Videotuloliitäntä asetusvalikko) Virtaliitäntä Language Menu (Kielivalikko) Management Menu (Hal-...
Seite 974
14, 15 säätäminen RS232-kaapeli projektorin madaltaminen Tietokoneen kytkeminen D- sub-kaapelilla Kallistuksen säätöpyörä Tietokoneeseen Nostojalka Tietokoneeseen kytkeminen Nostopainike M1:n D-sub:n/ Projektorin kytkeminen USB:n välisellä kaape- 12V tasavirtajohto lilla 8, 9, 10, 11, Automaattinen ruutu Virtajohto 12, 13, 14, 15 Automaattista ruutua ohjaava asennus Projektorin zoomin ja tarkennuks- en asettaminen...
Seite 975
Valoventtiili Väripyörän nopeus Vianmääritys Verkkoprotokolla Itsediagnoosi Videoyhteensopivuus Ota yhteyttä Delliin Virrankulutus Virran kytkeminen päälle/pois Virranotto Projektorin kytkeminen päälle Yhdenmukaisuus Projektorin kytkeminen pois Yhteensopivuustilat päältä Sisällysluettelo...
Seite 977
Dell™ 5100MP Projector Instruksjonsbok Modell XXX w w w . d e l l . c o m | s u p p o r t . d e l l . c o m...
Seite 978
Alle utsagn eller krav som gjelder egenskaper, kapasiteter, hastigheter eller kvalifikasjoner for enheten som er omtalt i dette dokumentet, er fremsatt av produsenten og ikke av Dell. Dell fraskriver seg spesielt enhver kjennskap til nøyaktigheten, fullstendigheten og substansen i alle slike utsagn.
Seite 979
Innhold 1 Dell-projektoren ....5 Om projektoren ....
Seite 980
3 Bruke projektoren ....17 Slå på projektoren ....Slå...
Dell-projektoren Projektoren leveres med de enhetene som er vist nedenfor. Forsikre deg om at du har alle tingene, og kontakt Dell dersom noe mangler. Innhold i pakken 1,8 m strømledning (3,0 m i Amerika) 1,8 m M1 til D-sub/USB-kabel 2,0 m S-videokabel...
Koble til en datamaskin Koble til en datamaskin med en M1-til-D-sub/USB-kabel Strømledning M1A-til-D-sub/USB-kabel OBS! USB-kabelen kan ikke kobles til hvis USB-donglen brukes; se side 35 om tilkobling av USB-donglen. Koble til projektoren...
Koble til en datamaskin med en D-sub-til-D-sub-kabel Strømledning D-sub-til-D-sub-kabel OBS! USB-kabelen kan ikke kobles til hvis USB-donglen brukes. Se side 35 om tilkobling av USB-donglen. Koble til projektoren...
Koble til en DVD-spiller Koble til en DVD-spiller med en M1-til-HDTV-kabel Strømledning M1-til-HDTV-kabel Koble til en DVD-spiller med en D-sub-til-YPbPr-kabel Strømledning D-sub-til-YPbPr-kabel OBS! D-sub-til-YPbPr-kabelen leveres ikke av Dell. Rådfør deg med en profesjonell installatør om kabelen. Koble til projektoren...
Koble til en DVD-spiller med en RCA-til-RCA-kabel Strømledning RCA-til-RCA-komponentkabel OBS! RCA-til-RCA-kabelen leveres ikke av Dell. Rådfør deg med en profesjonell installatør om kabelen. Koble til en DVD-spiller med en S-videokabel Strømledning S-videokabel Koble til projektoren...
Koble til en DVD-spiller med en komposittkabel Strømledning Komposittvideokabel Koble til en DVD-spiller med en BNC-til-VGA-kabel Strømledning BNC-til-VGA-kabel OBS! BNC-til-VGA-kabelen leveres ikke av Dell. Rådfør deg med en profesjonell installatør om kabelen. Koble til projektoren...
Profesjonelle installasjonsvalg: Installasjon for å drive automatisk filmlerret Strømledning 12V DC-kontakt Automatisk lerret OBS! Bruk dimensjonen fra 12V DC-kontakten i 1,7mm(ID) x 4,00mm(OD) x 9,5mm (skaft) for å koble den automatiske skjermen til projektoren. 12V DC-kontakt Koble til projektoren...
Installasjon for fjernkontroll koblet til med RS232-kabel: Kobling til Strømledning RS232-kabel OBS! RS232-kabelen leveres ikke av Dell. Rådfør deg med en profesjonell installatør om kabelen. Koble til projektoren...
Koble til med en kommersiell RS232-kontrollboks: Strømledning RS232-kabel Kommersiell RS232-kontrollboks OBS! RS232-kabelen leveres ikke av Dell. Rådfør deg med en profesjonell installatør om kabelen. Koble til projektoren...
Koble til strømledningen og aktuelle signalkabler. Se side 7 for informasjon om hvordan du kobler til projektoren. Trykk på på/av-knappen (se side 21 om hvordan du finner på/av-knappen). Dell- logoen vises i 30 sekunder. Slå på kilden (datamaskin, DVD-spiller osv.) Projektoren oppdager kilden automatisk.
Justere det projiserte bildet Heve projektoren Trykk på heiseknappen. Hev projektoren til ønsket visningsvinkel, og slipp knappen for å låse heisefoten i stilling. Bruk justeringsrattene til å finjustere visningsvinkelen. Senke projektoren Trykk på heiseknappen. Senk projektoren, og slipp knappen for å låse heisefoten i stilling. Heiseknapp Heisefot Justeringsratt...
Justere projektorens zooming og fokus ADVARSEL: For å unngå skade på projektoren må du sørge for at zoomobjektivet og heisefoten står i innerste stilling før du flytter projektoren eller legger den i bærevesken. Drei zoometappen for å zoome inn og ut. Drei fokuseringsringen til bildet er skarpt.
Seite 1000
• Hvis TEMP-lampen lyser fast oransje, er projektoren overopphetet. Visningen slår seg av automatisk. Slå på visningen igjen når projektoren har kjølt seg ned. Kontakt Dell hvis problemet vedvarer. • Hvis TEMP-lampen blinker oransje, har en vifte i projektoren sviktet, og projektoren vil automatisk slå...