Herunterladen Inhalt Inhalt Diese Seite drucken
Inhaltsverzeichnis

Werbung

Verfügbare Sprachen
  • DE

Verfügbare Sprachen

  • DEUTSCH, seite 41
AXIS Q1775-E Network Camera
Installation Guide

Werbung

Inhaltsverzeichnis
loading

Inhaltszusammenfassung für Axis Q1775-E

  • Seite 1 AXIS Q1775-E Network Camera Installation Guide...
  • Seite 2 Low Voltage (LVD) Directive 2006/95/EC. See Safety Every care has been taken in the preparation of this on page 3. document. Please inform your local Axis office of any • Restrictions of Hazardous Substances (RoHS) Directive inaccuracies or omissions. Axis Communications AB cannot 2011/65/EU.
  • Seite 3 Search by product, category, or phrase 자 또는 사용자는 이 점을 주의하시기 바라며, 가 • report problems to Axis support staff by logging in to 정외의 지역에서 사용하는 것을 목적으로 합니다. your private support area 적절히 접지된 STP (shielded twisted pair) 케이블...
  • Seite 5: Hazard Levels

    AXIS Q1775-E Network Camera Safety Information Read through this Installation Guide carefully before installing the product. Keep the Installation Guide for future reference. Hazard Levels DANGER Indicates a hazardous situation which, if not avoided, will result in death or serious injury.
  • Seite 6 TICE • The Axis product shall be used in compliance with local laws and regulations. • To use the Axis product outdoors, or in similar environments, it shall be installed in an approved outdoor housing. • Store the Axis product in a dry and ventilated environment.
  • Seite 7 WARNING • Risk of explosion if the battery is incorrectly replaced. • Replace only with an identical battery or a battery which is recommended by Axis. • Dispose of used batteries according to local regulations or the battery manufacturer's instructions.
  • Seite 9: Installation Steps

    Installation Guide This Installation Guide provides instructions for installing AXIS Q1775–E Network Camera on your network. For other aspects of using the product, see the User Manual available at www.axis.com. Installation Steps 1. Make sure the package contents, tools and other materials necessary for the installation are in order.
  • Seite 10: Hardware Overview

    AXIS Q1775-E Network Camera Hardware Overview Status LED 1/4” screw mount for wall/ceiling stand Power connector (blocked in AXIS Q1775-E) RS-485/422 connector I/O connector Control button Network indicator LED Power indicator LED Audio in 10. SD card slot 11. Audio out 12.
  • Seite 11 AXIS Q1775-E Network Camera Sunshield adjustment screw (2x) Sunshield Top cover Network camera Network connector (PoE) Safety wire tab Cable hole Bottom cover screws (4x) Heater Caution! May be hot 10. Bottom cover 11. Cable cover 12. Gasket 13. Network cable (route through wall bracket) 14.
  • Seite 12: Led Indicators

    AXIS Q1775-E Network Camera LED Indicators Note • The Status LED can be configured to be unlit during normal operation. To configure, go to Setup > System Options > Ports & Devices > LED. See the online help for more information.
  • Seite 13 Double flash: Fan error Triple flash: General error Alarm events will be triggered through the camera’s input port. Contact your Axis reseller for information about spare parts and troubleshooting. Status LED Behavior and Buzzer Signal for Levelling Assistant For information on using the control button to start levelling of the camera, see page 15.
  • Seite 14 Set up an action rule in the camera to configure which action the signal shall trigger. For information about events and action rules, see the User Manual available on www.axis.com Audio Connector The Axis product has the following audio connectors: •...
  • Seite 15: Specifications

    The camera is level when the buzzer beeps continuously. • Connecting to an AXIS Video Hosting System service or AXIS Internet Dynamic DNS Service. For more information about these services, see the User Manual. SD Card Slot...
  • Seite 16: Power Consumption

    AXIS Q1775-E Network Camera Power Consumption NO TICE TICE TICE Use a limited power source (LPS) with either a rated output power limited to ≤100 W or a rated output current limited to ≤5 A. Power over Ethernet (PoE) IEEE 802.3at Type 2 Class 4 max. 25.5W...
  • Seite 17 AXIS Q1775-E Network Camera 3– Configurable Digital input – Connect to pin 1 to activate, 0 to max 30 V DC (Input or or leave floating (unconnected) to deactivate. Output) Digital output – Connected to pin 1 when 0 to max 30 V DC, open...
  • Seite 18: Connection Diagrams

    AXIS Q1775-E Network Camera Connection Diagrams I/O Connector 0 V DC (-) DC output 12 V, max 50 mA I/O configured as input I/O configured as output Install the Hardware Install Wall Bracket To install the wall bracket, follow the steps below:...
  • Seite 19 • Always use a shielded network cable (STP) intended for outdoor use between the Axis product and the end point and ensure that the end point is properly grounded. Installations of Axis products using a shielded network cable (STP) and a properly grounded end point have been tested to comply with industry immunity standard levels such as surge protection.
  • Seite 20: Connect The Cables

    (STP) and intended for their specific use. Access the Product AXIS IP Utility and AXIS Camera Management are recommended methods for finding Axis products on the network and assigning them IP addresses in Windows®. Both applications are free and can be downloaded from www.axis.com/techsup...
  • Seite 21: Further Information

    Further Information The User Manual is available at www.axis.com Visit www.axis.com/techsup to check if there is updated firmware available for your network product. To see the currently installed firmware version, go to Setup > About. Visit Axis learning center www.axis.com/academy for useful trainings, webinars, tutorials and guides.
  • Seite 23: Niveaux De Risques

    AXIS Q1775-E Network Camera Informations sur la sécurité Lisez attentivement ce guide d'installation avant d'installer l'appareil. Conservez le guide d'installation pour toute référence ultérieure. Niveaux de risques DANGER Indique une situation dangereuse qui, si elle n'est pas évitée, entraînera le décès ou des blessures graves.
  • Seite 24 • Le produit Axis doit être utilisé conformément aux lois et règlementations locales en vigueur. • Pour pouvoir utiliser le produit Axis à l'extérieur, ou dans des environnements similaires, il doit être installé dans un boîtier d'extérieur homologué. • Conserver ce produit Axis dans un environnement sec et ventilé.
  • Seite 25 AXIS Q1775-E Network Camera La batterie doit être remplacée uniquement en cas de besoin, et pour ce faire, contactez l'assistance technique d'Axis à l'adresse www.axis.com/techsup et obtenir de l'aide. AVERTISSEMENT • Risque d'explosion si la batterie est remplacée de façon incorrecte.
  • Seite 27: Procédures D'installation

    AXIS Q1775-E Network Camera Guide d’installation Ce guide d'installation explique comment installer la caméra réseau AXIS Q1775–E sur votre réseau. Pour toute autre information relative à l’utilisation du produit, consultez le manuel de l’utilisateur disponible sur le site www.axis.com. Procédures d’installation 1.
  • Seite 28: Aperçu Du Matériel

    AXIS Q1775-E Network Camera Aperçu du matériel Voyant d'état Monture à vis 1/4 pouce pour support mur/plafond Connecteur d'alimentation (bloqué dans l'AXIS Q1775-E) Connecteur RS-485/422 Connecteur E/S Bouton de commande Voyant DEL réseau Voyant DEL d’alimentation Entrée audio 10. Emplacement pour carte SD 11.
  • Seite 29 AXIS Q1775-E Network Camera Vis de réglage du pare-soleil (x2) Pare-soleil Couvercle supérieur Caméra réseau Connecteur réseau (PoE) Patte de fil de sécurité Trou de câble Vis du couvercle inférieur (x4) Régulateur de chaleur Attention ! Peut être chaud 10. Couvercle inférieur 11.
  • Seite 30 AXIS Q1775-E Network Camera Voyants Note • Le voyant d'état peut être éteint pendant le fonctionnement normal. Pour ce faire, rendez-vous dans Setup > System Options > Ports & Devices > LED (Configuration > Options système > Ports et dispositifs > DEL). Consultez l'aide en ligne pour plus d'informations.
  • Seite 31 Les évènements d'alarmes seront déclenchés par le biais du port d'entrée de la caméra. Contactez votre revendeur Axis pour obtenir de plus amples informations sur les pièces de rechange et les services de dépannage. Comportement du voyant d'état et du signal sonore pour l'assistant de nivellement Pour plus d'information sur l'utilisation du bouton Fonction pour régler le niveau de la caméra,...
  • Seite 32 événements et les règles d'action, consultez le manuel disponible à l'adresse suivante : www.axis.com Connecteur audio Le produit Axis dispose des connecteurs audio suivants : • Entrée audio (rose) – entrée de 3,5 mm pour microphone mono ou signal d'entrée mono.
  • Seite 33 • Réinitialisation du produit aux paramètres d’usine par défaut. Cf. page 38. • Connexion au service du Système d'hébergement vidéo AXIS ou au service AXIS Internet Dynamic DNS. Pour plus d'informations sur ces services, reportez-vous au Manuel de l'utilisateur. Emplacement pour carte SD A A A VIS •...
  • Seite 34: Caractéristiques Techniques

    AXIS Q1775-E Network Camera Caractéristiques techniques Conditions d’utilisation Température Humidité Humidité relative de 10 à 100 % De -40 °C à 50 °C (-40 °F à 122 °F) (sans condensation) Consommation électrique A A A VIS Utilisez une source d'alimentation limitée (LPS) dont la puissance de sortie nominale est limitée à...
  • Seite 35 AXIS Q1775-E Network Camera Connecteur d'E/S Bloc terminal à 4 broches Pour un exemple de schéma, consultez Schémas de connexion page 36. Fonction Bro- Notes Caractéristiques 0 V CC 0 V CC (-) Sortie CC Peut servir à alimenter le matériel auxiliaire.
  • Seite 36: Schémas De Connexion

    AXIS Q1775-E Network Camera Fonction Broche Notes RS485/RS422 RX/TX A (RX) Pour duplex intégral RS485/RS422 (RX/TX) pour semi-duplex RS485 RS485/RS422 RX/TX B RS485/RS422 TX A (TX) Pour duplex intégral RS485/RS422 RS485/RS422 TX B Schémas de connexion Connecteur d'E/S 0 V CC (-) Sortie CC 12 V, maxi.
  • Seite 37 • Utilisez toujours un câble réseau à paires torsadées blindé prévu pour une utilisation à l’extérieur afin de relier le produit Axis et le point terminal. Assurez-vous également que le point terminal est correctement mis à la terre. Les installations des caméras Axis à l’aide d’un câble réseau à...
  • Seite 38: Utilisez Le Produit

    électriques exigeants doivent être blindés (STP) et destinés à leur usage spécifique. Utilisez le produit Si vous souhaitez rechercher des produits Axis sur le réseau ou leur affecter des adresses IP sous Windows®, nous recommandons l’utilisation des applications AXIS IP Utility et AXIS Camera Management.
  • Seite 39: Informations Sur La Garantie

    Pour connaître la version du microprogramme actuellement installée, reportez-vous à la page Setup > About (Configuration > À propos de). Visitez le centre de formation en ligne Axis sur le site www.axis.com/academy pour en savoir plus sur les formations, les webinaires, les tutoriels et les guides.
  • Seite 41: Gefährdungsstufen

    AXIS Q1775-E Network Camera Sicherheitsinformation Lesen Sie das Installationshandbuch sorgfältig durch bevor sie das Produkt installieren. Bewahren Sie das Installationshandbuch für zukünftige Zwecke auf. Gefährdungsstufen GEFAHR Weist auf eine gefährliche Situation hin, die, falls nicht verhindert, zu Tod oder schweren Verletzungen führt.
  • Seite 42 Produkts, wenn ein Batteriewechsel erforderlich ist. Weitere Informationen über den Serverbericht finden Sie auf den Setup-Seiten des Produkts, oder wenden Sie sich an den Axis Support. Die Batterie sollte nur bei Bedarf ersetzt werden. Wenden Sie sich in diesem Fall an den Axis Support unter www.axis.com/techsup.
  • Seite 43 AXIS Q1775-E Network Camera WARNUNG • Explosionsgefahr bei fehlerhaftem Batteriewechsel. • Die Batterie darf nur durch eine identische Batterie oder eine von Axis empfohlene Batterie ersetzt werden. • Verbrauchte Batterien sind gemäß den örtlichen Vorschriften oder den Anweisungen des Herstellers zu entsorgen.
  • Seite 45: Installationsschritte

    AXIS Q1775-E Network Camera Installationsanleitung In dieser Anleitung wird die Installation der AXIS Q1775-E-Netzwerk-Kamera in Ihrem Netzwerk beschrieben. Weitere Informationen zur Verwendung dieses Produkts finden Sie im Benutzerhandbuch unter www.axis.com. Installationsschritte 1. Stellen Sie sicher, dass die Packungsinhalte, Werkzeuge und andere notwendige Materialien für die Installation in Ordnung sind.
  • Seite 46: Übersicht Über Die Hardware

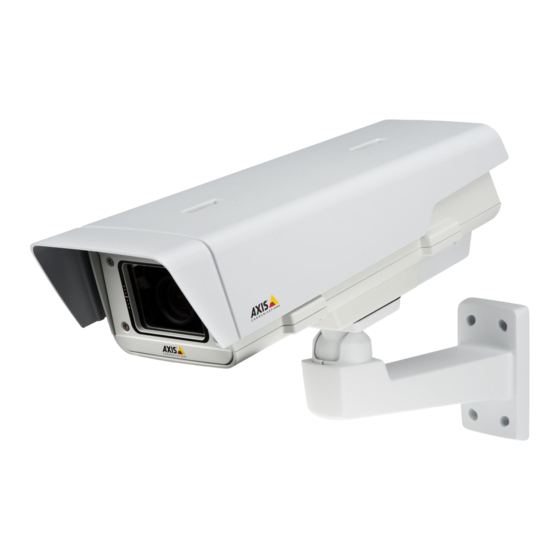
    AXIS Q1775-E Network Camera Übersicht über die Hardware Status-LED 1/4"-Gewinde für Wand-/Deckenstativ Netzanschluss (bei AXIS Q1775-E blockiert) RS-485/422-Anschluss E/A-Anschluss Steuertaste Netzwerk-LED Stromversorgungs-LED Audioeingang 10. SD-Kartensteckplatz 11. Audioausgang 12. CVBS-Taste 13. Netzwerkanschluss (PoE) 14. Video-Ausgang Y/Pb/Pr 15. Bestellnummer (P/N) und Seriennummer (S/N). Die Seriennummer wird für die Installation benötigt.
  • Seite 47 AXIS Q1775-E Network Camera Einstellschrauben für Sonnenschutz (2x) Sonnenschutz Obere Abdeckung Netzwerk-Kamera Netzwerkanschluss (PoE) Sicherheitsdrahtlasche Kabeldurchführung Schrauben für untere Abdeckung (4x) Heizelement Vorsicht! Kann heiß sein. 10. Untere Abdeckung 11. Kabelabdeckung 12. Dichtung 13. Netzwerkkabel (durch Wandhalterung führen) 14. Halterungsadapter 15.
  • Seite 48 AXIS Q1775-E Network Camera LEDs Beachten • Die Status-LED kann so eingestellt werden, dass sie während des Normalbetriebs nicht leuchtet. Diese Konfiguration können Sie unter Setup > System Options > Ports & Devices > LED (Setup > Systemoptionen > Ports & Geräte > LED) einstellen. Weitere Informationen finden Sie in der Online-Hilfe.
  • Seite 49: Verhalten Der Led-Statusanzeige Und Summton Für Den Ausrichtungsassistenten

    Doppeltes Blinken: Probleme mit dem Lüfter Dreifaches Blinken: Allgemeiner Fehler Alarmereignisse werden durch den Eingangsport der Kamera ausgelöst. Wenden Sie sich an Ihren Axis Händler, wenn Sie weitere Informationen zu Ersatzteilen und zur Problemlösung benötigen. Verhalten der LED-Statusanzeige und Summton für den Ausrichtungsassistenten Für Informationen zur Verwendung der Steuertaste bei der Ausrichtung der Kamera siehe Seite 51.
  • Seite 50 Aktion durch das Signal ausgelöst werden soll. Weitere Informationen zu Ereignissen und Aktionsregeln finden Sie im Benutzerhandbuch unter www.axis.com Audioanschlüsse Das Axis-Produkt ist mit den folgenden Audioanschlüssen ausgestattet: • Audioeingang (rosa) – 3,5-mm-Anschluss für ein Monomikrofon oder ein Monosignal. •...
  • Seite 51 Die Steuertaste hat folgende Funktionen: • Zurücksetzen des Produkts auf die Werkseinstellungen. Siehe Seite 57. • Verbinden mit einem AXIS Video Hosting System-Service oder einem AXIS Internet Dynamic DNS-Service. Weitere Informationen zu diesen Diensten finden Sie in der Bedienungsanleitung. SD-Kartensteckplatz...
  • Seite 52: Technische Daten

    AXIS Q1775-E Network Camera Technische Daten Betriebsbedingungen Temperatur Luftfeuchtigkeit -40 °C bis 50 °C 10 bis 100 % rF (nicht kondensierend) Stromverbrauch HINWEIS HINWEIS HINWEIS Verwenden Sie eine Stromquelle mit begrenzter Leistung (LPS), entweder mit einer Nennausgangsleistung von ≤100 W oder einem dauerhaft auf ≤5 A begrenzten Nennausgangsstrom.
  • Seite 53 AXIS Q1775-E Network Camera E/A-Anschluss 4-poliger Anschlussblock Ein Beispielschaltbild finden Sie unter Anschlussschaltbilder auf Seite 54. Funktion Kon- Hinweise Technische Daten takt 0 V DC 0 V DC (-) Gleichstrom- Kann für die Stromversorgung von 12 V DC ausgang Zusatzgeräten verwendet werden.
  • Seite 54: Anschlussschaltbilder

    AXIS Q1775-E Network Camera Funktion Kontakt Hinweise RS485/RS422 RX/TX A (RX) RS485/RS422 für Vollduplex (RX/TX) RS485 für Halbduplex RS485/RS422 RX/TX B RS485/RS422 TX A (TX) RS485/RS422 für Vollduplex RS485/RS422 TX B Anschlussschaltbilder E/A-Anschluss 0 V (-) DC DC-Ausgang 12 V, max. 50 mA...
  • Seite 55: Verlegen Des Netzwerkkabels Und Weiterer Kabel

    Gewicht zu tragen. • Verwenden Sie immer ein abgeschirmtes Netzwerkkabel (STP), das für den Einsatz zwischen dem Axis Produkt und dem Endpunkt im Außenbereich bestimmt und ordnungsgemäß geerdet ist. Installationen von Axis-Produkten mit einem abgeschirmten Netzwerkkabel (STP) und einem ordnungsgemäß geerdeten Endpunkt wurden getestet, um den Störfestigkeitsanforderungen der Industrie wie z.
  • Seite 56: Anschließen Der Kabel

    Anwendung eingesetzt werden. Zugriff auf das Produkt Für die Suche nach Axis Produkten im Netzwerk und zur Zuweisung einer IP-Adresse unter Windows® werden AXIS IP Utility und AXIS Camera Management empfohlen. Beide Anwendungen sind kostenlos und können von unserer Website unter www.axis.com/techsup heruntergeladen werden.
  • Seite 57: Zurücksetzen Auf Werkseinstellungen

    Firmware-Version zu sehen, gehen Sie auf Einrichten > Über. Besuchen Sie das Axis-Schulungszentrum www.axis.com/academy für anregende Schulungen, Webinare, Lernprogramme und Anleitungen. Gewährleistungsinformationen Informationen zur Gewährleistung der Axis Produkte und andere, hierzu relevante Informationen, finden Sie unter www.axis.com/warranty/...
  • Seite 59: Livelli Di Pericolo

    AXIS Q1775-E Network Camera Informazioni di sicurezza Leggere con attenzione questa guida all'installazione prima di installare il dispositivo. Conservare questo documento per usi futuri. Livelli di pericolo PERICOLO Indica una situazione pericolosa che, se non evitata, provoca morte o lesioni gravi.
  • Seite 60 • Durante il trasporto del dispositivo Axis, utilizzare l'imballaggio originale o equivalente per evitare danni al dispositivo. Batteria Il dispositivo Axis utilizza una batteria al litio da 3,0 V BR/CR1220 come alimentazione per il suo real-time clock (RTC) interno. In condizioni normali questa batteria avrà una durata minima di cinque anni.
  • Seite 61 • Rischio di esplosione se la batteria viene sostituita in modo errato. • Sostituire solo con una batteria identica o una batteria consigliata da Axis. • Smaltire le batterie usate in base alle normative locali o alle istruzioni del produttore...
  • Seite 63: Procedura Di Installazione

    Guida all'installazione La presente Guida all'installazione fornisce le istruzioni necessarie per installare la telecamera di rete AXIS Q1775-E nella rete in uso. Per ulteriori informazioni sull'utilizzo del dispositivo, consultare la Guida per l'utente disponibile sul sito Web www.axis.com. Procedura di installazione 1.
  • Seite 64: Panoramica Dell'hardware

    AXIS Q1775-E Network Camera Panoramica dell'hardware LED di stato Foro per vite da 1/4" per supporto a parete/soffitto Connettore di alimentazione (bloccato in AXIS Q1775-E) Connettore RS-485/422 Connettore I/O Pulsante di comando Indicatore LED di rete Indicatore LED di alimentazione Ingresso audio 10.
  • Seite 65 AXIS Q1775-E Network Camera Vite di regolazione e rondella (2x) Parasole Coperchio superiore Telecamera di rete Connettore di rete (PoE) Linguetta per il cavo di sicurezza Foro per il cavo Viti del coperchio inferiore (4x) Riscaldatore Attenzione! Può essere caldo 10.
  • Seite 66: Indicatori Led

    AXIS Q1775-E Network Camera Indicatori LED Nota • Lo stato del LED può essere configurato per essere spento durante il normale funzionamento. Per configurarlo, selezionare Setup > System Options > Ports & Devices > LED (Configurazione > Opzioni di sistema > Porte & Dispositivi > LED). Per ulteriori informazioni, consultare l'aiuto in linea.
  • Seite 67 Lampeggio triplo: Errore generale Gli eventi di allarme vengono attivati attraverso la porta di input della telecamera. Contattare il rivenditore Axis per informazioni su pezzi di ricambio e risoluzione dei problemi. Comportamento del LED di stato e del segnale acustico per Levelling Assistant Per informazioni sull'utilizzo del pulsante di comando per avviare il livellamento della telecamera, consultare pagina 69.
  • Seite 68 Per informazioni sugli eventi e le regole di azione, consultare la Guida per l'utente disponibile all'indirizzo www.axis.com Connettore audio Il prodotto Axis dispone dei seguenti connettori audio: • Ingresso audio (rosa) - Ingresso audio da 3,5 mm per microfono in mono o segnale mono line-in.
  • Seite 69 Ripristino del dispositivo alle impostazioni predefinite di fabbrica. Consultare pagina 75. • Collegamento a un servizio AXIS Video Hosting System o AXIS Internet Dynamic DNS Service. Per ulteriori informazioni su questi servizi, consultare il Manuale Utente. Slot per scheda SD...
  • Seite 70: Dati Tecnici

    AXIS Q1775-E Network Camera Dati tecnici Condizioni di funzionamento Temperatura Umidità Da -40 °C a 50 °C 10 - 100% (umidità relativa (da -40 °F a 122 °F) senza condensa) Consumo energetico A A A VVISO VVISO VVISO Utilizzare una sorgente di alimentazione limitata (LPS) con una potenza di uscita nominale limitata a ≤...
  • Seite 71 AXIS Q1775-E Network Camera Connettore I/O Morsettiera a 4 pin Per un esempio di schema, consultare Schema delle connessioni alla pagina 72. Funzione Note Specifiche 0 V CC 0 V CC (-) Uscita CC Può essere utilizzato anche per alimentare 12 V CC una periferica ausiliaria.
  • Seite 72 AXIS Q1775-E Network Camera Funzione Note RS485/RS422 RX/TX (RX) Per RS485/RS422 full duplex (RX/TX) Per RS485 half duplex RS485/RS422 RX/TX RS485/RS422 TX A (TX) Per RS485/RS422 full-duplex RS485/RS422 TX B Schema delle connessioni Connettore I/O 0 V CC (-) Uscita CC 12 V, max 50 mA...
  • Seite 73: Installazione Dell'hardware

    • Utilizzare sempre un cavo di rete schermato (STP) adatto all'uso esterno tra il dispositivo Axis e il punto terminale e assicurarsi che tale punto disponga di una corretta messa a terra. Le installazioni dei dispositivi Axis mediante un cavo di rete schermato (STP) e un punto terminale con corretta messa a terra sono state testate per essere conformi ai livelli standard delle norme di immunità...
  • Seite 74 (STP) e destinati al loro uso specifico. Accedere al dispositivo AXIS IP Utility e AXIS Camera Management sono i metodi consigliati per trovare i dispositivi Axis in rete e assegnare loro un indirizzo IP in Windows®. Queste applicazioni sono entrambe gratuite e possono essere scaricate da www.axis.com/techsup...
  • Seite 75: Ripristino Dei Valori Predefiniti Di Fabbrica

    Setup (Impostazioni) > About (Informazioni su). Visitare il centro di apprendimento Axis alla pagina www.axis.com/academy per servizi di formazione utili, webinar, tutorial e guide. Informazioni sulla garanzia Per informazioni sulla garanzia del dispositivo Axis e informazioni ad esso relative, consultare la pagina www.axis.com/warranty/...
  • Seite 77 AXIS Q1775-E Network Camera Información de seguridad Lea esta Guía de instalación con atención antes de instalar el producto. Guarde la Guía de instalación para poder consultarla en otro momento. Niveles de peligrosidad PELIGRO Indica una situación peligrosa que, si no se evita, provocará...
  • Seite 78 Batería Este producto de Axis utiliza una batería de litio BR/CR1220 de 3,0 V como fuente de alimentación del reloj interno en tiempo real. En condiciones normales, esta batería durará un mínimo de cinco años.
  • Seite 79 ADVERTENCIA • La sustitución incorrecta de la batería implica riesgo de explosión. • Sustituya la batería por una batería idéntica u otra batería recomendada por Axis. • Deseche las baterías usadas de conformidad con la normativa local o las instrucciones...
  • Seite 81: Contenido Del Paquete

    AXIS Q1775-E Network Camera Guía de instalación Esta Guía de instalación incluye las instrucciones necesarias para instalar la cámara de red AXIS Q1775–E en su red. Para conocer otros aspectos de uso del producto, consulte el Manual del usuario, disponible en www.axis.com.
  • Seite 82: Información General Del Hardware

    AXIS Q1775-E Network Camera Información general del hardware LED de estado Soporte de montaje con tornillos de 10,16 cm para pared/techo Conector de alimentación (bloqueado en la AXIS Q1775-E) Conector RS-485/422 Conector de E/S Botón de control LED indicador de red...
  • Seite 83 AXIS Q1775-E Network Camera Tornillo de ajuste del parasol (2) Parasol Cubierta superior Cámara de red Conector de red (PoE) Lengüeta para cable de seguridad Orificio para cable Tornillos de cubierta inferior (4) Calefactor ¡Cuidado! Puede estar caliente. 10. Cubierta inferior 11.
  • Seite 84: Indicadores Led

    AXIS Q1775-E Network Camera Indicadores LED Nota • Se puede configurar el LED de estado para que se apague durante el funcionamiento normal. Para ello, vaya a Setup > System Options > Ports & Devices > LED (Configuración > Opciones del sistema > Puertos y dispositivos > LED). Vea la ayuda en línea para obtener más información.
  • Seite 85 Los eventos de alarma se activarán a través del puerto de entrada de la cámara. Póngase en contacto con su distribuidor de Axis para obtener información sobre repuestos y solución de problemas. Comportamiento del indicador LED de estado y la señal del avisador acústico con el Asistente de nivelación...
  • Seite 86 Para obtener información sobre eventos y reglas de acción, consulte el Manual de usuario disponible en www.axis.com. Conector de audio El producto de Axis integra los siguientes conectores de audio: • Entrada de audio (rosa): entrada de 3,5 mm para micrófono mono, o entrada de línea de señal mono.
  • Seite 87 Restablecer el producto a la configuración predeterminada de fábrica. Vea página 93. • Conectarse a un servicio AXIS Video Hosting System o al Servicio de DNS dinámico de Internet de AXIS. Para obtener más información sobre estos servicios, consulte el Manual del usuario.
  • Seite 88: Especificaciones

    AXIS Q1775-E Network Camera Especificaciones Condiciones de funcionamiento Temperatura Humedad Humedad relativa del 10 al De -40 °C a 50 °C 100 % (sin condensación) Consumo A A A VISO VISO VISO Utilice una fuente de alimentación limitada (LPS) con una potencia nominal de salida limitada a ≤100 W o una corriente nominal de salida limitada a ≤5 A.
  • Seite 89 AXIS Q1775-E Network Camera Conector de E/S Bloque de terminales de 4 pines Para ver un ejemplo del diagrama, consulte Diagramas de conexión en la página 90. Notas Función Especificaciones 0 V CC 0 V CC (-) Salida de CC...
  • Seite 90: Diagramas De Conexión

    AXIS Q1775-E Network Camera Notas Función RS485/RS422 RX/TX (RX) para dúplex completo RS485/RS422 (RX/TX) para semidúplex RS485 RS485/RS422 RX/TX RS485/RS422 TX A (TX) para dúplex completo RS485/RS422 RS485/RS422 TX B Diagramas de conexión Conector de E/S 0 V CC (-) Salida de CC 12 V, 50 mA máx.
  • Seite 91: Instalación Del Hardware

    • Utilice siempre un cable de red blindado (STP) específico para exteriores entre el producto de Axis y el punto final y asegúrese de que dicho punto esté conectado a tierra correctamente. Las instalaciones de productos Axis que utilizan un cable de red blindado (STP) y un punto final correctamente conectado a tierra se han probado de conformidad con los niveles de inmunidad exigidos por el sector, tales como la protección...
  • Seite 92: Conexión De Los Cables

    Acceso al producto Se recomiendan AXIS IP Utility y AXIS Camera Management como métodos para buscar los productos de Axis en la red y asignarles direcciones IP en Windows®. Ambas aplicaciones son gratuitas y pueden descargase de www.axis.com/techsup El producto se puede utilizar con la mayoría de los sistemas operativos y navegadores. Los navegadores recomendados son ®...
  • Seite 93: Restablecimiento A La Configuración Predeterminada De Fábrica

    Visite el centro de aprendizaje de www.axis.com/academy para consultar guías, tutoriales, seminarios web y cursos que pueden resultarle útiles. Información de garantía Para obtener más detalles sobre la garantía del producto de Axis y la información relacionada con ella, consulte www.axis.com/warranty/...
  • Seite 95 AXIS Q1775-E Network Camera 安 安 安 全 全 全 情 情 情 報 報 報 本製品を設置する前に、このインストールガイドをよくお読みください。 インス トールガイドは、後で参照できるように保管しておいてください。 危 危 危 険 険 険 レ レ レ ベ ベ ベ ル ル ル 回避しない場合、死亡または重傷につながる危険な状 危 危 危 険 険 険...
  • Seite 96 AXIS Q1775-E Network Camera 安 安 安 全 全 全 手 手 手 順 順 順 注 注 注 記 記 記 • 本製品は、お使いになる地域の法律や規制に準拠して使用してください。 • 本製品を屋外またはそれに準じる環境で使用する場合は、認定済みの屋外用 筐体に収納して設置する必要があります。 • 本製品は乾燥した換気のよい環境に保管してください。 • 本製品に衝撃または強い圧力を加えないでください。 • 本製品を不安定なブラケット、表面、または壁に設置しないでください。 • 本製品を設置する際には、適切な工具のみを使用してください。 電動工具を 使用して過剰な力をかけると、製品が損傷することがあります。 • 化学薬品、腐食剤、噴霧式クリーナーは使用しないでください。 • 清掃には、きれいな水に浸した清潔な布を使用してください。...
  • Seite 97 AXIS Q1775-E Network Camera 警 警 警 告 告 告 • バッテリーは、正しく交換しないと爆発する危険があります。 • 交換用バッテリーとしては、同一品またはAxisが推奨するバッテリーのみを 使用してください。 • 使用済みバッテリーは、地域の規制またはバッテリーメーカーの指示に 従って廃棄してください。...
  • Seite 99 AXIS Q1775-E Network Camera イ イ イ ン ン ン ス ス ス ト ト ト ー ー ー ル ル ル ガ ガ ガ イ イ イ ド ド ド このインストールガイドでは、AXIS Q1775–Eネットワークカメラをお使いのネット ワークにインストールする手順について説明します。 製品の使用の詳細については、 www.axis.com Axisのホームページ ( ) でユーザーズマニュアルを参照してください。...
  • Seite 100 AXIS Q1775-E Network Camera ハ ハ ハ ー ー ー ド ド ド ウ ウ ウ ェ ェ ェ ア ア ア の の の 概 概 概 要 要 要 ステータスLED 壁/天井スタンド用1/4”ネジ穴 電源コネクタ (AXIS Q1775‑Eでブロックされている) RS‑485/422コネクタ I/Oコネクタ コントロールボタン ネットワークインジケーターLED 電源インジケーターLED...
  • Seite 101 AXIS Q1775-E Network Camera サンシールド調節ネジ (×2) サンシールド 上蓋 ネットワークカメラ ネットワークコネクタ (PoE) 安全ワイヤータブ ケーブル孔 裏蓋ネジ (×4) ヒーター 注意! 高温になることがあります 10. 裏蓋 11. ケーブルカバー 12. ガスケット 13. ネットワークケーブル (壁面ブラケットに通す) 14. ブラケットアダプター 15. ブラケットネジ (×4) 16. ブラケット調節ネジ 17. 壁面ブラケット...
  • Seite 102 AXIS Q1775-E Network Camera LED イ イ イ ン ン ン ジ ジ ジ ケ ケ ケ ー ー ー タ タ タ ー ー ー 注意 • ステータスLEDは、正常動作時に消灯させることができます。 設定は、 [Setup [Setup [Setup ‑ ‑ ‑ System System System Options Options ‑...
  • Seite 103 AXIS Q1775-E Network Camera 電 電 電 源 源 源 LED 説 説 説 明 明 明 緑 正常動作。 黄 ファームウェアアップグレード中は緑と黄の交互点滅。 LED イ イ イ ン ン ン ジ ジ ジ ケ ケ ケ ー ー ー タ タ タ ー ー ー...
  • Seite 104 AXIS Q1775-E Network Camera ネ ネ ネ ッ ッ ッ ト ト ト ワ ワ ワ ー ー ー ク ク ク コ コ コ ネ ネ ネ ク ク ク タ タ タ 注 注 注 記 記 記...
  • Seite 105 コントロールボタンは、以下の用途で使用します。 111ページ 製品を工場出荷時の設定にリセットする。 を参照してください。 • AXIS Video Hosting SystemサービスまたはAXIS Internet Dynamic DNSサービ • スに接続する。 これらのサービスの詳細については、ユーザーズマニュ アルを参照してください。 SD カ カ カ ー ー ー ド ド ド ス ス ス ロ ロ ロ ッ ッ ッ ト ト ト 注 注 注 記 記 記...
  • Seite 106 AXIS Q1775-E Network Camera 仕 仕 仕 様 様 様 動 動 動 作 作 作 条 条 条 件 件 件 温 温 温 度 度 度 湿 湿 湿 度 度 度 ‑40 °C~50 °C 10~100% (結露不可) 消 消 消 費 費 費 電 電 電 力 力 力...
  • Seite 107 AXIS Q1775-E Network Camera I/O コ コ コ ネ ネ ネ ク ク ク タ タ タ 4ピンターミナルブロック 108ページの、接続図 接続例の図については、 を参照してください。 機 機 機 能 能 能 ピ ピ ピ 備 備 備 考 考 考 仕 仕 仕 様 様 様...
  • Seite 108 AXIS Q1775-E Network Camera 機 機 機 能 能 能 ピ ピ ピ ン ン ン 備 備 備 考 考 考 RS485/RS422 (RX) 全二重RS485/RS422用 RX/TX A (RX/TX) 半二重RS485用 RS485/RS422 RX/TX B RS485/RS422 TX A (TX) 全二重RS485/RS422用 RS485/RS422 TX B 接...
  • Seite 109 AXIS Q1775-E Network Camera ハ ハ ハ ー ー ー ド ド ド ウ ウ ウ ェ ェ ェ ア ア ア の の の 設 設 設 置 置 置 壁 壁 壁 面 面 面 ブ ブ ブ ラ ラ ラ ケ ケ ケ ッ ッ ッ ト ト ト の の の 取 取 取 り り り 付 付 付 け け け...
  • Seite 110 ネットワークケーブル (STP) の使用が推奨または必須になります。 野外または 電気的に厳しい環境にネットワークケーブルを配線する場合は、個別の用途 に合ったシールドネットワークケーブル (STP) を使用してください。 製 製 製 品 品 品 へ へ へ の の の ア ア ア ク ク ク セ セ セ ス ス ス ネットワーク上でAXIS製品を検索したり、Windows®でそれにIPアドレスを割り当て るには、AXIS IP UtilityまたはAXIS Camera Managementの使用をお勧めします。 いず www.axis.com/techsup れのアプリケーションも無料で、 からダウンロードできます 本製品は、ほとんどのオペレーティングシステムとブラウザーでご利用いただけま...
  • Seite 111 AXIS Q1775-E Network Camera 工 工 工 場 場 場 出 出 出 荷 荷 荷 時 時 時 の の の 設 設 設 定 定 定 に に に リ リ リ セ セ セ ッ ッ ッ ト ト ト す す す る る る...
  • Seite 112 Installation Guide Ver. M1.3 AXIS Q1775-E Network Camera Date: June 2015 © Axis Communications AB, 2015 Part No. 62889...

Inhaltsverzeichnis