Herunterladen Inhalt Inhalt Diese Seite drucken
VDO Cyclecomputing M4WR Kurzbedienungsanleitung
Vorschau ausblenden Andere Handbücher für M4WR:

Werbung

Verfügbare Sprachen
  • DE

Verfügbare Sprachen

  • DEUTSCH, seite 4
Kurz-Bedienungsanleitung
Short instruction manual
Notice d'utilisation abrégée
Guida rapida
Manual de instrucciones breve
Beknopte gebruiksaanwijzing
Krótka instrukcja obsługi
www.vdocyclecomputing.com/service
Attachment video
Operating video
Settings video
1

Werbung

Inhaltsverzeichnis
loading

Inhaltszusammenfassung für VDO Cyclecomputing M4WR

  • Seite 1 Kurz-Bedienungsanleitung Short instruction manual Notice d’utilisation abrégée Guida rapida Manual de instrucciones breve Beknopte gebruiksaanwijzing Krótka instrukcja obsługi Attachment video Operating video Settings video www.vdocyclecomputing.com/service...
  • Seite 2 Content Deutsch ............04 English ............00 Francais ............. 00 Italiano ............00 Espanol ............00 Nederlands ..........00 Polski ............00...
  • Seite 3 Montage / Installation / Installation / Montaggio / Montaje / Installatie Reifengrößen-Tabelle / Wheelsize Chart / Tableau des pneus / Tabella dimensioni ruote / Tabla de tamaños de neumáticos / Tabel met wielmaten / Tabeli rozmiarów kół ... 000 Montage der Halterung / Handlebar mount / Montage du support / Montaggio del supporto / Montaje del soporte / Montage van de houder / Montaż...
  • Seite 4 Verpackungsinhalt Eine ausführliche Anleitung finden Sie auf: www.vdocyclecomputing.com/service...
  • Seite 5: Wichtiger Hinweis

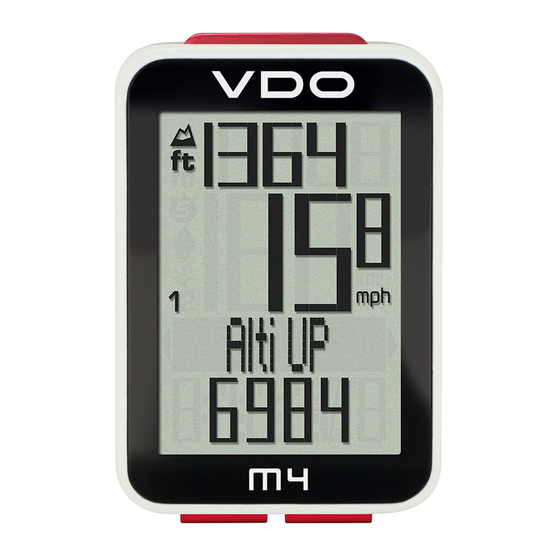
    Display Aktuelle Aktuelle Höhe Geschwin- digkeit Ausgewählte Funktion Wert der ausgewählten Funktion Wichtiger Hinweis: Nach dem Einschalten des M4 dauert es ca. 2 Sekunden, bis die aktuelle Höhe berechnet und im Display angezeigt wird.
  • Seite 6 Icons – „KMH/MPH“: zeigt gewählte Geschwindig- keitseinheit – „ “ oder „ “: zeigt gewähltes Rad 1 oder Rad 2 – „ “: Vergleich der aktuellen Geschwin- digkeit mit der Durchschnitts-Geschwindigkeit – „ “-Icon: Zeigt, dass der Trip-Section-Zähler aktiv ist –...
  • Seite 7 Tasten Taste SET: kurz drücken: rückwärts durch die Funktionen blättern Taste ALTI: Taste BIKE: Abruf der Höhen- Abruf der Bike- Funktionen Funktionen...
  • Seite 8 Funktionen auf der BIKE-Taste (kurz drücken) BIKE...
  • Seite 9 Funktionen auf der ALTI-Taste (kurz drücken) ALTI...
  • Seite 10: Einstellungen Mit Der Set-Taste

    Einstellungen mit der SET-Taste – Einstell-Menü öffnen: SET-Taste gedrückt halten, bis sich das Menü öffnet – Blättern von Totalwerte zu Einstellung: Mit der BIKE- oder der ALTI-Taste – Einstell-Menü öffnen: Mit der SET-Taste – Blättern im Einstell-Menü: Mit der BIKE-Taste –...
  • Seite 11 Einstell-Menüs ALTI BIKE...
  • Seite 12: Einstellen Der Sprache

    Einstellen der Sprache – Menü öffnen: SET-Taste gedrückt halten – Blättern von Totalwerte zu Einstellung: Mit der BIKE- oder der ALTI-Taste – Einstell-Menü öffnen: Mit der SET-Taste ALTI BIKE – Blättern im Menü bis Language: Mit der BIKE- oder der ALTI-Taste –...
  • Seite 13: Einstellen Der Maßeinheit

    Einstellen der Maßeinheit – Menü öffnen: SET-Taste gedrückt halten – Blättern von Totalwerte zu Einstellung: Mit der BIKE- oder der ALTI-Taste – Einstell-Menü öffnen: Mit der SET-Taste ALTI BIKE – Blättern im Menü bis Masseinheit Mit der BIKE- oder der ALTI-Taste –...
  • Seite 14: Einstellen Der Radgröße

    Einstellen der Radgröße – Menü öffnen: SET-Taste gedrückt halten – Blättern von Totalwerte zu Einstellung: Mit der BIKE- oder der ALTI-Taste – Einstell-Menü öffnen: Mit der SET-Taste – Blättern im Menü zu Radgröße: Mit der BIKE- oder der ALTI-Taste – Einstellung Radgröße öffnen: mit der Set Taste –...
  • Seite 15 Einstellen der Radgröße Eingabe des Radumfangs in ALTI BIKE mm (KMH) oder inch (mph). Eingabe des Radumfangs durch Auswahl einer Reifen- größe aus einer Reifenliste. Manuelle Eingabe des Radumfangs oder Auswahl aus Reifen-Liste. Siehe auch Seite 228-229.
  • Seite 16: Einstellen Der Uhrzeit

    Einstellen der Uhrzeit – Menü öffnen: SET-Taste gedrückt halten – Blättern von Totalwerte zu Einstellung: Mit der BIKE- oder der ALTI-Taste – Einstell-Menü öffnen: Mit der SET-Taste ALTI BIKE – Blättern im Menü bis Uhrzeit: Mit der BIKE- oder der ALTI-Taste –...
  • Seite 17: Einstellen Der Starthöhe

    Einstellen der Starthöhe – Menü öffnen: SET-Taste gedrückt halten – Blättern von Totalwerte zu Einstellung: Mit der BIKE- oder der ALTI-Taste – Einstell-Menü öffnen: Mit der SET-Taste ALTI BIKE – Blättern im Menü bis Starthöhe: Mit der BIKE- oder der ALTI-Taste –...
  • Seite 18: Einstellen Der Aktuelle Höhe

    Einstellen der Aktuelle Höhe – Menü öffnen: SET-Taste gedrückt halten – Blättern von Totalwerte zu Einstellung: Mit der BIKE- oder der ALTI-Taste – Einstell-Menü öffnen: Mit der SET-Taste ALTI BIKE – Blättern im Menü bis Aktuelle Höhe: Mit der BIKE- oder der ALTI-Taste –...
  • Seite 19: Einstellen Der Gesamt-Strecke

    Einstellen der Gesamt-Strecke – Menü öffnen: SET-Taste gedrückt halten – Blättern von Totalwerte zu Einstellung: Mit der BIKE-Taste oder der ALTI-Taste – Einstell-Menü öffnen: Mit der SET-Taste ALTI BIKE – Blättern im Menü zu Gesamt Strecke: Mit der BIKE-Taste oder der ALTI-Taste –...
  • Seite 20: Einstellen Der Gesamt-Fahrzeit

    Einstellen der Gesamt-Fahrzeit – Menü öffnen: SET-Taste gedrückt halten – Blättern von Totalwerte zu Einstellung: Mit der BIKE-Taste oder der ALTI-Taste – Einstell-Menü öffnen: Mit der SET-Taste ALTI BIKE – Blättern im Menü zu Gesamt Zeit: Mit der BIKE-Taste oder der ALTI-Taste –...
  • Seite 21 Einstellen der Gesamt-Höhenmeter bergauf – Menü öffnen: SET-Taste gedrückt halten – Blättern von Totalwerte zu Einstellung: Mit der BIKE-Taste oder der ALTI-Taste – Einstell-Menü öffnen: Mit der SET-Taste ALTI BIKE – Blättern im Menü zu Höhe Up: Mit der BIKE-Taste oder der ALTI-Taste –...
  • Seite 22 Einstellen der Gesamt-Höhenmeter bergab – Menü öffnen: SET-Taste gedrückt halten – Blättern von Totalwerte zu Einstellung: Mit der BIKE-Taste oder der ALTI-Taste – Einstell-Menü öffnen: Mit der SET-Taste ALTI BIKE – Blättern im Menü zu Höhe Down: Mit der BIKE-Taste oder der ALTI-Taste –...
  • Seite 23: Rad-Auswahl Rad 1 Oder Rad

    Rad-Auswahl Rad 1 oder Rad 2 – Halten Sie die BIKE-Taste + SET-Taste gleichzeitig für ein paar Sekunden gedrückt. – Das zuletzt ausgewählte Rad wird angezeigt. – Mit der Bike-Taste oder der BIKE ALTI-Taste wechseln Sie jetzt zu Rad 2 (oder Rad 1, wenn vorher Rad 2 ausgewählt war).
  • Seite 24: Abruf Der Gesamtwerte

    Abruf der Gesamtwerte – Einstell-Menü öffnen: SET-Taste gedrückt halten, bis sich das Menü öffnet – Totalwerte öffnen: Mit der SET-Taste – Blättern in den Total- werten: Mit der BIKE-Taste ALTI BIKE oder der ALTI-Taste – Totalwerte verlassen zurück zum Funktions- menü: SET-Taste gedrückt halten Wenn Sie auch mit Rad 2...
  • Seite 25: Tour Daten Auf Null Zurückstellen

    Tour Daten auf NULL zurückstellen – BIKE-Taste gedrückt halten – Im Display erscheint der Hinweis: Tour Daten RESET – BIKE-Taste weiter gedrückt halten Hinweis: Strecke, Fahrzeit und BIKE die Jahres-Höhen-Meter werden zu den Gesamtdaten hinzu gerechnet.
  • Seite 26 TRIP SECTION Starten/Stoppen – START: BIKE + SET-Taste gleichzeitig kurz drücken – STOPP: BIKE + SET-Taste gleichzeitig kurz drücken – Re-START: Erneut BIKE + SET-Taste gleichzeitig kurz drücken ALTI BIKE – RESET: BIKE-Taste gedrückt halten ACHTUNG: Bei Geschwindigkeit NULL stoppt der Trip-Section-Zähler automatisch.
  • Seite 27: Navigator Einstellen

    NAVIGATOR Einstellen – Mit der BIKE-Taste die Funktion NAVIGATOR in die Anzeige holen – SET-Taste gedrückt halten – Daten verändern: Mit der BIKE-Taste oder der ALTI-Taste ALTI BIKE – Einstellung bestätigen: Mit der SET-Taste – Der M4 kehrt automatisch zum Funktions-Modus zurück...
  • Seite 28: Navigator Auf Null Zurückstellen

    NAVIGATOR auf NULL zurückstellen – Navigator-Funktion in die Anzeige bringen – RESET: BIKE-Taste gedrückt halten BIKE...
  • Seite 29 Licht-Modus EIN/AUS – EIN: ALTI + SET-Taste gleichzeitig drücken – AUS: ALTI + SET-Taste gleichzeitig drücken Nach einer Pause (Schlaf- Modus) wird der Licht-Modus ALTI automatisch ausgeschaltet. Das spart Batterie.
  • Seite 30: Rekalibrieren Der Höhe

    Rekalibrieren der Höhe Warum muss man den M4 rekalibrieren? Der aktuelle Luftdruck wird vom M4 gemessen und in eine Höhenanzeige umgerechnet. Wetterbedingt ändert sich der Luftdruck täglich. Das führt zu einer sich ständig ändernden aktuellen Höhenanzeige. ABER: Ihre Heimat-Starthöhe ist unverändert geblieben.
  • Seite 31 Rekalibrieren der Höhe – ALTI-Taste gedrückt halten Menü wird geöffnet – HÖHE SELECT blinkt – Auswahl zwischen – aktuelle Höhe – Luftdruck über NN – Starthöhe 1 ALTI BIKE – Starthöhe 2 – Daten verändern bei aktuelle Höhe oder Luftdruck über NN: Mit der BIKE-Taste oder der ALTI-Taste –...
  • Seite 32: Garantiebedingungen

    Garantiebedingungen VDO Cycle Parts gewährt für Ihren VDO-Computer eine Garantie von 2 Jahren ab Kaufdatum. Die Garantie erstreckt sich auf Material- und Verar- beitungsfehler am Computer selbst, am Sensor/ Sender und an der Lenkerhalterung. Kabel und Batterien sowie Montagematerialien sind von der Garantie ausgeschlossen.
  • Seite 33 Bitte wenden Sie sich mit allen Reklamationen und Garantieansprüchen an Ihren Fachhändler, bei dem Sie das Gerät gekauft haben. Oder senden Sie Ihre Reklamation direkt an: Cycle Parts GmbH Le Quartier Hornbach 13 67433 Neustadt/Weinstrasse Für technische Fragen stehen wir Ihnen unter folgender Hotline zur Verfügung: +49 (0) 63 21- 95 82 7 - 10 +49 (0) 63 21- 95 82 7 - 18...
  • Seite 34: Korrekte Entsorgung Dieses Produkts (Elektromüll)

    Korrekte Entsorgung dieses Produkts (Elektromüll) (Anzuwenden in den Ländern der Europäischen Union und anderen euro- päischen Ländern mit einem separaten Sammelsystem). Die Kennzeichnung auf dem Produkt bzw. auf der dazugehörigen Literatur gibt an, dass es nach seiner Lebensdauer nicht zusammen mit dem normalen Haushaltsmüll entsorgt werden darf.
  • Seite 36 Pack contents A full instruction manual can be found at: www.vdocyclecomputing.com/service...
  • Seite 37: Important Note

    Display Current Current altitude speed Selected function Value of the selected function Important note: After switching on the M4, it takes approx. two seconds for the current altitude to be calculated and appear on the display.
  • Seite 38 Icons – “KMH/MPH”: shows the selected speed unit – “ ” or “ ”: shows whether bike 1 or bike 2 has been selected – “ ”: comparison of current speed with the average speed – “ ” icon: indicates that the trip section counter is active –...
  • Seite 39 Buttons SET button: Press: Scroll backwards through the functions ALTI button: BIKE button: Access the Access the altitude functions bike functions...
  • Seite 40 BIKE button functions (Press) BIKE...
  • Seite 41 ALTI button functions (Press) ALTI...
  • Seite 42 Settings involving the SET button – Open the settings menu: Press and hold the SET button until the menu opens – Scroll from Total values to Settings: Press the BIKE or ALTI button – Open the settings menu: Press SET –...
  • Seite 43 Setting menus ALTI BIKE...
  • Seite 44: Setting The Language

    Setting the language – Open the menu: Press and hold the SET button – Scroll from Total values to Settings: Press the BIKE or ALTI button – Open the settings menu: Press the SET button ALTI BIKE – Scroll to Language in the menu: Press the BIKE or ALTI button –...
  • Seite 45: Setting The Unit

    Setting the unit – Open the menu: Press and hold the SET button – Scroll from Total values to Settings: Press the BIKE or ALTI button – Open the settings menu: Press the SET button ALTI BIKE – Scroll to Dimension in the menu: Press the BIKE or ALTI button –...
  • Seite 46 Setting the wheel size – Open the menu: Press and hold the SET button – Scroll from Total values to Settings: Press the BIKE or ALTI button – Open the settings menu: Press the SET button – Scroll to Wheel size in the menu: Press the BIKE or ALTI button –...
  • Seite 47 Setting the wheel size Enter the wheel ALTI BIKE circumference in mm (kmh) or inches (mph). Enter the wheel circumference by selecting a tyre size from a tyre list. Manual entry of the wheel circumference or selection from a tyre list. See also page 228-229.
  • Seite 48: Setting The Time

    Setting the time – Open the menu: Press and hold the SET button – Scroll from Total values to Settings: Press the BIKE or ALTI button – Open the settings menu: Press the SET button ALTI BIKE – Scroll to Clock in the menu: Press the BIKE or ALTI button –...
  • Seite 49 Setting the start altitude – Open the menu: Press and hold the SET button – Scroll from Total values to Settings: Press the BIKE or ALTI button – Open the settings menu: Press the SET button ALTI BIKE – Scroll to Home Alti in the menu: Press the BIKE or ALTI button –...
  • Seite 50 Setting the current altitude – Open the menu: Press and hold the SET button – Scroll from Total values to Settings: Press the BIKE or ALTI button – Open the settings menu: Press the SET button ALTI BIKE – Scroll to Actual Alti in the menu: Press the BIKE or ALTI button –...
  • Seite 51 Setting the total distance – Open the menu: Press and hold the SET button – Scroll from Total values to Settings: Press the BIKE or ALTI button – Open the settings menu: Press the SET button ALTI BIKE – Scroll to Total distance in the menu: Press the BIKE or ALTI button –...
  • Seite 52 Setting the total ride time – Open the menu: Press and hold the SET button – Scroll from Total values to Settings: Press the BIKE or ALTI button – Open the settings menu: Press the SET button ALTI BIKE – Scroll to Total time in the menu: Press the BIKE or ALTI button –...
  • Seite 53 Setting the total altitude ascent – Open the menu: Press and hold the SET button – Scroll from Total values to Settings: Press the BIKE or ALTI button – Open the settings menu: Press the SET button ALTI BIKE – Scroll to Altitude Up in the menu: Press the BIKE or ALTI button –...
  • Seite 54 Setting the total altitude descent – Open the menu: Press and hold the SET button – Scroll from Total values to Settings: Press the BIKE or ALTI button – Open the settings menu: Press the SET button ALTI BIKE – Scroll to Altitude Down in the menu: Press the BIKE or ALTI button –...
  • Seite 55 Bike selection: bike 1 or bike 2 – Press and hold the BIKE and SET buttons simultaneously for a few seconds. – The most recently selected bike is displayed. – Press the BIKE or ALTI BIKE button to change to bike 2 (or bike 1 if bike 2 was previously selected).
  • Seite 56: Accessing The Total Values

    Accessing the total values – Open the settings menu: Press and hold the SET button until the menu opens – Open the total values: Press the SET button – Scroll in the total values: Press the BIKE or ALTI button ALTI BIKE –...
  • Seite 57 Resetting trip data to zero – Press and hold the BIKE button – The text Tour Data RESET appears on the display. – Continue to hold down the BIKE button BIKE Note: the distance, ride time and altitude for the year are added to the totals.
  • Seite 58 Starting/stopping a trip section – START: Simultaneously press the BIKE + SET buttons – STOP: Simultaneously press the BIKE + SET buttons – RE-START: Simultaneously press the BIKE + SET buttons again ALTI BIKE – RESET: Press and hold the BIKE button ATTENTION: if the speed is zero, the trip section...
  • Seite 59: Setting The Navigator

    Setting the navigator – Press the BIKE button to view the Navigator function on the display – Press and hold the SET button – Change the data: Press the BIKE or ALTI ALTI BIKE button – Confirm the setting: Press the SET button –...
  • Seite 60: Resetting The Navigator To Zero

    Resetting the navigator to zero – Display the Navigator function – RESET: Press and hold the BIKE button BIKE...
  • Seite 61 Light mode ON/OFF – ON: Simultaneously press the ALTI + SET buttons – OFF: Simultaneously press the ALTI + SET buttons Light mode is automatically disabled after a break (sleep ALTI mode) to conserve the battery.
  • Seite 62 Recalibrating the altitude Why is it necessary to recalibrate the M4? The M4 measures the current air pressure and converts it into an altitude measurement. The air pressure changes daily depending on the weather. This leads to a constantly changing current altitude measurement.
  • Seite 63 Recalibrating the altitude – Press and hold the ALTI button: Menu opens – Altitude SELECT flashes – Choose between – Current altitude – Sea level pressure ALTI BIKE – Start altitude 1 – Start altitude 2 – Amend data for current altitude or sea level pressure: Press the BIKE or ALTI...
  • Seite 64: Terms Of Guarantee

    Terms of guarantee VDO Cycle Parts offers a 2-year guarantee on your VDO computer, starting from date of purchase. This guarantee covers material and processing defects on the computer itself, the sensor/transmitter and the handlebar bracket. Cables, batteries and mounting materials are not covered by the guarantee.
  • Seite 65 guarantee claims. Alternatively, send your complaint directly to: Cycle Parts GmbH Le Quartier Hornbach 13 67433 Neustadt/Weinstrasse If you have any technical questions, please do not hesitate to call our hotline on: +49 (0) 63 21- 95 82 7 - 10 +49 (0) 63 21- 95 82 7 - 18 Our telephone hotline is available to assist you 10:00-12:00 and 15:00-17:00,...
  • Seite 66 Correct disposal of this product (electrical waste) (To be used in EU countries and other European countries with a separate collection system). The labelling on the product and the relevant literature indicates that it must not be disposed of with normal household waste at the end of its service life.
  • Seite 68 Contenu de l’emballage Vous trouverez des instructions détaillées sur le site : www.vdocyclecomputing.com/service...
  • Seite 69 Ecran Altitude Vitesse actuelle actuelle Fonction sélectionnée Valeur de la fonction sélectionnée Note importante : Après avoir démarré le M4, il faut env. 2 sec. pour que l’altitude actuelle soit calculée et s’affiche à l’écran.
  • Seite 70 Icônes – “KMH / MPH” : affichage de l’unité de vitesse choisie – “ ” ou “ ” : affichage du vélo sélectionné (1 ou 2) – “ ” : comparaison de la vitesse actuelle avec la vitesse moyenne – Icône “ ” : indique lorsque le compteur partiel est actif.
  • Seite 71 Touches Touche SET : Pression courte : Retour en arrière dans les fonctions Touche ALTI : Touche BIKE : Consultation des Consultation fonctions “Altitude” des fonctions “Cycle”...
  • Seite 72 Fonctions de la touche BIKE (pression courte) BIKE...
  • Seite 73 Fonctions de la touche ALTI (pression courte) ALTI...
  • Seite 74 Réglages touche SET – Ouverture du menu “Réglages” : maintenir la touche SET enfoncée jusqu’à ce que le menu s’ouvre. – Passage de “Totals” à “Réglages” : touches BIKE ou ALTI. – Ouverture du menu “Réglages” : touche SET. – Consultation du menu “Réglages” : touche BIKE ou ALTI.
  • Seite 75 Menus “Réglages” ALTI BIKE...
  • Seite 76: Réglage De La Langue

    Réglage de la langue – Ouverture du menu : main- tenir la touche SET enfoncée. – Passage de “Totals” à “Réglages” : touches BIKE ou ALTI. – Ouverture du menu “Réglages” : touche SET. – Défilement du menu ALTI BIKE jusqu’à...
  • Seite 77: Réglage De L'unité De Mesure

    Réglage de l’unité de mesure – Ouverture du menu : main- tenir la touche SET enfoncée. – Passage de “Totals” à “Réglages” : touches BIKE ou ALTI. – Ouverture du menu “Réglages” : touche SET. – Défilement du menu ALTI BIKE jusqu’à...
  • Seite 78 Réglage de la taille des roues – Ouverture du menu : maintenir la touche SET enfoncée. – Passage de “Totals” à “Réglages” : touches BIKE ou ALTI. – Ouverture du menu “Réglages” : touche SET. – Défilement du menu jusqu’à “Taille des roues”...
  • Seite 79 Réglage de la taille des roues Saisie de la circonférence ALTI BIKE de la roue en mm (KMH) ou pouces (mph). Saisie de la circonférence de la roue en sélectionnant la taille de la roue dans la liste des pneus. Saisie manuelle de la taille des roues ou sélection dans la liste des pneus.
  • Seite 80: Réglage De L'heure

    Réglage de l’heure – Ouverture du menu : main- tenir la touche SET enfoncée. – Passage de “Totals” à “Réglages” : touche BIKE ou ALTI. – Ouverture du menu “Réglages” : touche SET. – Défilement du menu ALTI BIKE jusqu’à “Heure” : touches BIKE ou ALTI.
  • Seite 81 Réglage de l’altitude de départ – Ouverture du menu : main- tenir la touche SET enfoncée. – Passage de “Totals” à “Réglages” : touche BIKE ou ALTI. – Ouverture du menu “Réglages” : touche SET. ALTI BIKE – Défilement du menu jusqu’à...
  • Seite 82 Réglage de l’altitude actuelle – Ouverture du menu : main- tenir la touche SET enfoncée. – Passage de “Totals” à “Réglages” : touches BIKE ou ALTI. – Ouverture du menu “Réglages” : touche SET. – Défilement du menu ALTI BIKE jusqu’à...
  • Seite 83 Réglage de la distance totale – Ouverture du menu : main- tenir la touche SET enfoncée. – Passage de “Totals” à “Réglages” : touches BIKE ou ALTI. – Ouverture du menu “Réglages” : touche SET. – Défilement du menu ALTI BIKE jusqu’à...
  • Seite 84 Réglage du temps total – Ouverture du menu : main- tenir la touche SET enfoncée. – Passage de “Totals” à “Réglages” : touches BIKE ou ALTI. – Ouverture du menu “Réglages” : touche SET. – Défilement du menu ALTI BIKE jusqu’à...
  • Seite 85 Réglage du dénivelé total en montée – Ouverture du menu : main- tenir la touche SET enfoncée. – Passage de “Totals” à “Réglages” : touches BIKE ou ALTI. – Ouverture du menu “Réglages” : touche SET. – Défilement du menu ALTI BIKE jusqu’à...
  • Seite 86 Réglage du dénivelé total en descente – Ouverture du menu : main- tenir la touche SET enfoncée. – Passage de “Totals” à “Réglages” : touches BIKE ou ALTI. – Ouverture du menu “Réglages” : touche SET. – Défilement du menu ALTI BIKE jusqu’à...
  • Seite 87 Choix du vélo – Vélo 1 ou Vélo 2 – Maintenez les touches BIKE et SET enfoncées simultanément pendant quelques secondes. – Le dernier vélo sélectionné s’affiche. – Passez alors au vélo 2 BIKE (ou au vélo 1 si le vélo 2 était sélectionné) au moyen des touches BIKE ou ALTI.
  • Seite 88 Consultation des valeurs totales – Ouverture du menu “Réglages” : maintenir la touche SET enfoncée jusqu’à ce que le menu s’ouvre. – Ouverture des Totals : touche SET. – Consultation des Totals : ALTI BIKE touche BIKE ou ALTI. – Fermeture des Totals / Retour au menu “Fonctions”...
  • Seite 89 Mise à zéro des données du tour – Maintenir la touche BIKE enfoncée. – Le message “Données RESET” apparaît à l’écran. – Continuer à maintenir la touche BIKE enfoncée. BIKE Attention : La distance, le temps et le dénivelé annuel sont ajoutés aux valeurs totales.
  • Seite 90 Démarrage / Arrêt du compteur partiel – DEMARRAGE : enfoncer brièvement les touches BIKE et SET simultanément. – ARRÊT : enfoncer brièvement les touches BIKE et SET simultanément. – REDEMARRAGE : enfoncer ALTI BIKE à nouveau brièvement les touches BIKE et SET simultanément.
  • Seite 91 Réglage du navigateur – Avec la touche BIKE, afficher la fonction NAVIGATOR à l’écran. – Maintenir la touche SET enfoncée. – Modification des données : touches BIKE ou ALTI. ALTI BIKE – Confirmation d’un réglage : touche SET. – Le M4 revient automatique- ment au mode “Fonctions”.
  • Seite 92 Mise à zéro du navigateur – Afficher la fonction “Navigator” à l’écran – MISE A ZERO : maintenir la touche BIKE enfoncée. BIKE...
  • Seite 93 Activation / Désactivation du mode d’éclairage – MARCHE : appuyer simultanément sur les touches ALTI et SET – ARRÊT : appuyer simultanément sur les touches ALTI et SET ALTI Après une pause (“mode veille”), le mode d’éclairage est auto- matiquement désactivé. Ceci vous permet d’économiser la pile.
  • Seite 94 Recalibrage de l’altitude Pourquoi le M4 doit-il être recalibré ? La pression atmosphérique actuelle est mesurée par le M4et convertie en une valeur d’altitude. En fonction de la météo, la pression atmos- phérique change chaque jour. L’affichage de l’altitude actuelle change donc en permanence. MAIS : L’altitude de départ de votre domi- cile reste cependant toujours la même.
  • Seite 95 Recalibrage de l’altitude – Maintenir la touche ALTI enfoncée: Le menu s’ouvre. – Altitude SELECT clignote. – Choix entre : – Altitude actuelle – Pression atmosphérique au-dessus du niveau de l ALTI BIKE a mer – Altitude de départ 1 –...
  • Seite 96: Conditions De Garantie

    Conditions de garantie VDO Cycle Part offre une garantie de 2 ans à compter de la date d’achat pour votre compteur VDO. La garantie porte sur les défaillances du matériel ou les erreurs de traitement sur le compteur lui-même, sur le capteur/l’émetteur ou sur le support pour guidon.
  • Seite 97 Veuillez vous adresser à votre revendeur pour toute réclamation ou exercice du droit à la garantie. Ou envoyez votre réclamation directement à : Cycle Parts GmbH Le Quartier Hornbach 13 67433 Neustadt/Weinstrasse Notre hotline est à votre disposition pour toute questions technique : +49 (0) 63 21- 95 82 7 - 10 +49 (0) 63 21- 95 82 7 - 18...
  • Seite 98 Elimination correcte de ce produit (déchets électriques) (S’applique dans les pays de l’Union Européenne, ainsi que dans les autres pays européens présentant un système de collecte séparé). Le marquage du produit ou des documents correspondants indique que celui-ci ne peut pas être éliminé avec les déchets ménagers normaux à...
  • Seite 100 Contenuto della confezione Per istruzioni più dettagliate consultare il sito: www.vdocyclecomputing.com/service...
  • Seite 101: Nota Importante

    Display Altitudine Velocità corrente attuale Funzione selezionata Valore della funzione selezionata Nota importante: dopo l’accensione dell’M4, sono necessari circa 2 secondi prima che l’altitudine corrente venga misurata e visualizzata sul display.
  • Seite 102 Icone – “KM/H / MI/H”: indica l’unità selezionata per la velocità – “ ” o “ ”: indica la Bici 1 o la Bici 2 selezionata – “ ”: confronto tra la velocità attuale e la velocità media – Icona “ ”: indica che è attivo il contatore Trip-Section –...
  • Seite 103 Pulsanti Pulsante SET: premere brevemente: scorre indietro attraverso le funzioni Pulsante ALTI: Pulsante BIKE: richiamo delle funzioni altitudine richiamo delle funzioni della bici...
  • Seite 104 Funzioni con il pulsante BIKE (premere brevemente) BIKE...
  • Seite 105 Funzioni con il pulsante ALTI (premere brevemente) ALTI...
  • Seite 106 Impostazioni con il pulsante SET – Aprire il menu di impostazione: tenere premuto il pulsante SET fino a quando si apre il menu – Scorrere da Dati Totale a Impostazioni: usare il pulsante BIKE o ALTI – Aprire il menu di impostazione: usare SET –...
  • Seite 107: Menu Di Impostazione

    Menu di impostazione ALTI BIKE...
  • Seite 108 Impostazione della lingua – Aprire il menu: tenere premuto il pulsante SET – Scorrere da Dati Totale a Impostazioni: usare il pulsante BIKE o ALTI – Aprire il menu di impostazione: usare il SET – Scorrere nel menu fino a ALTI BIKE Language: usare il pulsante...
  • Seite 109: Impostazione Dell'unità Di Misura

    Impostazione dell’unità di misura – Aprire il menu: tenere premuto il pulsante SET – Scorrere da Dati Totale a Impostazioni: usare il pulsante BIKE o ALTI – Aprire il menu di impostazione: usare il SET – Scorrere nel menu fino a ALTI BIKE Misurazione: usare il...
  • Seite 110 Impostazione della dimensione della ruota – Aprire il menu: tenere premuto il pulsante SET – Scorrere da Dati Totale a Impostazioni: usare il pulsante BIKE o ALTI – Aprire il menu di impostazione: usare il pulsante SET – Scorrere nel menu fino a Dimensione ruota (Circ.
  • Seite 111 Impostazione della dimensione della ruota Immissione della ALTI BIKE circonferenza della ruota in mm (KM/H) o pollici (mi/h). Immissione della circonferenza della ruota selezionando una dimensione da un apposito elenco. Immissione manuale della circonferenza della ruota oppure selezione da un elenco corrispondente.
  • Seite 112: Impostazione Dell'ora

    Impostazione dell’ora – Aprire il menu: tenere premuto il pulsante SET – Scorrere da Dati Totale a Impostazioni: usare il pulsante BIKE o ALTI – Aprire il menu di impostazione: usare il SET – Scorrere nel menu fino ALTI BIKE a Orologio: usare il pulsante BIKE o ALTI –...
  • Seite 113 Impostazione dell’altitudine di partenza – Aprire il menu: tenere premuto il pulsante SET – Scorrere da Dati Totale a Impostazioni: usare il pulsante BIKE o ALTI – Aprire il menu di impostazione: usare il SET ALTI BIKE – Scorrere nel menu fino a Altit Base: usare il pulsante BIKE o ALTI –...
  • Seite 114 Impostazione dell’altitudine corrente – Aprire il menu: tenere premuto il pulsante SET – Scorrere da Dati Totale a Impostazioni: usare il pulsante BIKE o ALTI – Aprire il menu di impostazione: usare il SET – Scorrere nel menu fino a ALTI BIKE Altit Attuale: usare il...
  • Seite 115 Impostazione della distanza totale – Aprire il menu: tenere premuto il pulsante SET – Scorrere da Dati Totale a Impostazioni: usare il pulsante BIKE o ALTI – Aprire il menu di impostazione: usare il SET – Scorrere nel menu fino a ALTI BIKE Dist.
  • Seite 116 Impostazione del tempo di corsa totale – Aprire il menu: tenere premuto il pulsante SET – Scorrere da Dati Totale a Impostazioni: usare il pulsante BIKE o ALTI – Aprire il menu di impostazione: usare il SET – Scorrere nel menu fino a ALTI BIKE Tempo Total: usare il...
  • Seite 117 Impostazione dell’altimetria totale – Aprire il menu: tenere premuto il pulsante SET – Scorrere da Dati Totale a Impostazioni: usare il pulsante BIKE o ALTI – Aprire il menu di impostazione: usare il SET – Scorrere nel menu fino a ALTI BIKE Alti Salita: usare il pulsante...
  • Seite 118 Impostazione del dislivello totale – Aprire il menu: tenere premuto il pulsante SET – Scorrere da Dati Totale a Impostazioni: usare il pulsante BIKE o ALTI – Aprire il menu di impostazione: usare il SET – Scorrere nel menu fino a ALTI BIKE Alti Discesa: usare il...
  • Seite 119 Selezione Bici 1 o Bici 2 – Tenere premuti i pulsanti BIKE + SET contemporaneamente per un paio di secondi. – Viene visualizzata l’ultima bici selezionata. – Con il pulsante Bike o il BIKE pulsante ALTI è possibile passare a Bici 2 (oppure Bici 1, se era stata selezionata Bici 2).
  • Seite 120 Richiamo dei valori complessivi – Aprire il menu di impostazione: Tenere premuto il pulsante SET fino a quando si apre il menu – Aprire i valori totali (Dati Totale): usare il pulsante SET ALTI BIKE – Sfogliare i Dati Totale: usare il pulsante BIKE o ALTI –...
  • Seite 121 Azzeramento dei dati del percorso – Tenere premuto il pulsante BIKE – Sul display appare la nota: Dati tour RESET dati percorso – Tenere premuto il pulsante BIKE BIKE Nota: distanza, tempo di corsa e dislivello annuale rientrano nei dati totali.
  • Seite 122 Avvio/arresto TRIP SECTION – START: tenere premuti brevemente i pulsanti BIKE + SET – STOP: tenere premuti brevemente i pulsanti BIKE + SET – Re-START: tenere premuti ALTI BIKE di nuovo brevemente i pulsanti BIKE + SET – RESET: tenere premuto il pulsante BIKE ATTENZIONE: in caso di velocità...
  • Seite 123 Impostazione del NAVIGATORE – Con il pulsante BIKE richiamare la funzione NAVIGATOR – Tenere premuto il pulsante SET – Modificare i dati: usare il pulsante BIKE o il ALTI BIKE pulsante ALTI – Confermare le impostazioni: usare il pulsante SET –...
  • Seite 124 Azzeramento NAVIGATORE – Visualizzare la funzione navigatore – RESET: tenere premuto il pulsante BIKE BIKE...
  • Seite 125 Modalità di illuminazione ON/OFF – ON: premere contemporaneamente i pulsanti ALTI + SET – OFF: premere contemporaneamente i pulsanti ALTI + SET ALTI Dopo una pausa (modalità Sleep) la modalità di illuminazione viene automatica- mente disattivata. Questo permette di risparmiare batteria...
  • Seite 126 Ricalibratura dell’altitudine Perché è necessario ricalibrare l’M4? La pressione dell’aria attuale viene misurata dall’M4 e convertita in un’indicazione dell’altitudine. Le condizioni atmosferiche modificano giornalmente tale pressione. Questo provoca un’indicazione dell’altitudine attuale che cambia costantemente. TUTTAVIA: l’altezza di partenza di casa resta invariata.
  • Seite 127 Ricalibratura dell’altitudine – Tenere premuto il pulsante ALTI: Si apre il menu – Lampeggia Altitudine SELECT – Selezionare tra: – altitudine corrente – pressione dell’aria s.l.m. ALTI BIKE – altitudine di partenza 1 – altitudine di partenza 2 – Modificare i dati per altitudine corrente o pressione dell’aria s.l.m.: usare il pulsante BIKE o il...
  • Seite 128: Condizioni Di Garanzia

    Condizioni di garanzia Per il vostro computer VDO, VDO Cycle Parts offre una garanzia di 2 anni dalla data d’acquisto. La garanzia si estende ai difetti di materiali e di fabbricazione del computer, del sensore e del supporto per manubrio. I cavi e le batterie, nonché...
  • Seite 129 Per qualsiasi reclamo o richiesta di intervento in garanzia rivolgersi al rivenditore specializzato presso il quale è stato effettuato l’acquisto. In alternativa inviare il proprio reclamo direttamente a: Cycle Parts GmbH Le Quartier Hornbach 13 67433 Neustadt/Weinstrasse Per questioni tecniche è a vostra disposizione la nostra hotline ai numeri: +49 (0) 63 21- 95 82 7 - 10 +49 (0) 63 21- 95 82 7 - 18...
  • Seite 130 Corretto smaltimento di questo prodotto (rifiuti da apparecchiature elettriche ed elettroniche) (Da utilizzare nei Paesi dell’Unione europea e negli altri Paesi europei con un sistema di raccolta differenziata). La marcatura sul prodotto e sulla documentazione corrispondente indica che al termine della durata della vita il prodotto non deve essere smaltito con i normali rifiuti domestici.
  • Seite 132 Contenido del paquete Encontrará un manual detallado en: www.vdocyclecomputing.com/service...
  • Seite 133 Display Altitud Velocidad actual actual Función seleccionada Datos de la función seleccionada Observación importante: Después de encender el M4, demora aprox. 2 segundos hasta que se calcula la altitud actual y se la muestra en el display.
  • Seite 134 Íconos – “KMH/MPH”: muestra la unidad de velocidad seleccionada – “ ” o “ ”: muestra la bici 1 o bici 2 seleccionada – “ ”: Comparación de la velocidad actual con la velocidad promedio – Ícono “ ”: Indica que el contador de recorrido está...
  • Seite 135 Teclas Tecla SET: Presionándola brevemente: explorar hacia atrás por las funciones Tecla ALTI: Tecla BIKE: Activación de las Activación de funciones de altitud las funciones de bicicleta...
  • Seite 136 Funciones de la tecla BIKE (Presionándola brevemente) BIKE...
  • Seite 137 Funciones de la tecla ALTI (Presionándola brevemente) ALTI...
  • Seite 138 Ajuste con la tecla SET – Abrir el menú de ajustes: Mantenga presionada la tecla SET hasta que se abra el menú de ajustes – Explorar desde los Datos Total hacia la configuración: con las teclas BIKE o ALTI – Abrir el menú de ajustes: con la tecla SET –...
  • Seite 139 Menús de ajustes ALTI BIKE...
  • Seite 140: Ajustar El Idioma

    Ajustar el idioma – Abrir el menú: mantener presionada la tecla SET – Explorar desde los Datos Total hacia la Ajustes: con las teclas BIKE o ALTI – Abrir el menú de ajustes: con la tecla SET ALTI BIKE – Explorar el menú hasta el Language: con las teclas BIKE o ALTI –...
  • Seite 141 Ajustar la unidad de medida – Abrir el menú: mantener presionada la tecla SET – Explorar desde los Datos Total hacia la Ajustes: con las teclas BIKE o ALTI – Abrir el menú de ajustes: con la tecla SET ALTI BIKE –...
  • Seite 142 Ajustar el tamaño de las ruedas – Abrir el menú: mantener presionada la tecla SET – Explorar desde los valores totales hacia la configuración: con las teclas BIKE o ALTI – Abrir el menú de ajustes: con la tecla SET –...
  • Seite 143 Ajustar el tamaño de las ruedas Ingreso del perímetro de la ALTI BIKE rueda en mm (KMH) o en pulgadas (mph). Ingreso del perímetro de la rueda seleccionando un tamaño de neumático de la lista. Ingreso manual del perímetro de la rueda o selección desde la lista de neumáticos.
  • Seite 144: Ajustar La Hora

    Ajustar la hora – Abrir el menú: mantener presionada la tecla SET – Explorar desde los Datos Total hacia la Ajustes: con las teclas BIKE o ALTI – Abrir el menú de ajustes: con la tecla SET ALTI BIKE – Explorar el menú hasta la Hora: con las teclas BIKE o ALTI –...
  • Seite 145 Ajustar la altitud inicial – Abrir el menú: mantener presionada la tecla SET – Explorar desde los Datos Total hacia la Ajustes: con las telas BIKE o ALTI – Abrir el menú de ajustes: con la tecla SET ALTI BIKE –...
  • Seite 146 Ajustar la altitud actual – Abrir el menú: mantener presionada la tecla SET – Explorar desde los Datos Total hacia la Ajustes: con las teclas BIKE o ALTI – Abrir el menú de ajustes: con la tecla SET ALTI BIKE –...
  • Seite 147 Ajustar el recorrido total – Abrir el menú: mantener presionada la tecla SET – Explorar desde los Datos Total hacia la Ajustes: con las teclas BIKE o ALTI – Abrir el menú de ajustes: con la tecla SET ALTI BIKE –...
  • Seite 148 Ajustar el tiempo total del recorrido – Abrir el menú: mantener presionada la tecla SET – Explorar desde los Datos Total hacia la Ajustes: con las teclas BIKE o ALTI – Abrir el menú de ajustes: con la tecla SET ALTI BIKE –...
  • Seite 149 Ajustar los metros totales de altura en ascenso – Abrir el menú: mantener presionada la tecla SET – Explorar desde los Datos Total hacia la Ajustes: con las teclas BIKE o ALTI – Abrir el menú de ajustes: con la tecla SET ALTI BIKE –...
  • Seite 150 Ajustar los metros totales de altura en descenso – Abrir el menú: mantener presionada la tecla SET – Explorar desde los Datos Total hacia la Ajustes: con las teclas BIKE o ALTI – Abrir el menú de ajustes: con la tecla SET ALTI BIKE –...
  • Seite 151 Elección de bicicleta, bici 1 o bici 2 – Mantenga presionadas las teclas BIKE y SET simultáneamente durante algunos segundos. – Se muestra la última bicicleta elegida. – Con la tecla BIKE o con la BIKE tecla ALTI, vaya ahora a la bici 2 (o a la bici 1 si antes estaba seleccionada la bici 2).
  • Seite 152 Activación de los valores totales – Abrir el menú de ajustes: Mantenga presionada la tecla SET hasta que se abra el menú de ajustes – Abrir los Datos Total: con la tecla SET – Explorar los valores ALTI BIKE totales: con la tecla BIKE o ALTI –...
  • Seite 153 Reiniciar los datos del recorrido – Mantener presionada la tecla BIKE – En el display aparecerá la observación: Datos tour RESET – Continuar manteniendo presionada la tecla BIKE BIKE Atención: la distancia, el tiempo del recorrido y los metros de altura anuales se cuentan dentro de los datos totales.
  • Seite 154 Iniciar/detener CONTADOR DE RECORRIDO – INICIAR: presionar brevemente las teclas BIKE + SET a la vez – PARAR: presionar brevemente las teclas BIKE + SET a la vez – REINICIAR: otra vez, ALTI BIKE presionar brevemente las teclas BIKE + SET a la vez –...
  • Seite 155 Ajustar el NAVIGATOR – Con la tecla BIKE, llevar al display la función de NAVIGATOR – Mantener presionada la tecla SET – Modificar datos: con las teclas BIKE o ALTI ALTI BIKE – Confirmar el ajuste: con la tecla SET –...
  • Seite 156 Reiniciar el NAVIGATOR a CERO – Visualizar la función del Navigator – RESET: Mantener presionada la tecla BIKE BIKE...
  • Seite 157 Modo de iluminación ENC./APAG. – ENC.: presionar las teclas ALTI + SET simultáneamente – APAG.: presionar las teclas ALTI + SET simultáneamente Después de una pausa (modo de espera) el modo de ilumina- ALTI ción se apaga automáticamente. Esto economiza batería.
  • Seite 158 Recalibrar la altitud ¿Por qué se debe recalibrar el M4? La presión atmosférica actual es medida por el M4 y transformada en una indicación de altura. No obstante, la presión atmosférica cambia diariamente según las condiciones climáticas. Esto provoca que la indicación de altura cambie constantemente.
  • Seite 159 Recalibrar la altitud – Mantener presionada la tecla ALTI: Se abre el menú – parpadea Alti SELECT – Confirmar entre – altitud actual – presión atmosférica sobre NN – altitud inicial 1 ALTI BIKE – altitud inicial 2 – Modificar datos con altitud o presión atmosférica sobre NN: con las teclas BIKE o ALTI...
  • Seite 160: Condiciones De La Garantía

    Condiciones de la garantía VDO Cycle Parts le brinda una garantía de 2 años a partir de la fecha de compra por su ordenador VDO. La garantía se refiere a los fallos de material y de procesos en el ordenador mismo, en el sensor/transmisor y en el soporte del manillar.
  • Seite 161 en el que ha adquirido el equipo. O envíe su reclamo directamente a: Cycle Parts GmbH Le Quartier Hornbach 13 67433 Neustadt/Weinstrasse (Alemania) Para consultas técnicas, estamos a su disposición en la siguiente línea de atención: +49 (0) 63 21- 95 82 7 - 10 +49 (0) 63 21- 95 82 7 - 18 El horario de atención telefónica es de 10:00 a 12:00 h y de 15:00 a 17:00 h...
  • Seite 162 Eliminación correcta del producto (basura electrónica) Para ser utilizado en los países de la Unión Europea y en otros países europeos con sistema de recolección discriminada. La marca sobre el pro- ducto o en la respectiva documentación indica que una vez terminada su vida útil, no se debe eliminar junto con la basura doméstica.
  • Seite 164 Verpakkingsinhoud Een uitvoering handleiding vindt u op: www.vdocyclecomputing.com/service...
  • Seite 165: Belangrijke Aanwijzing

    Display Huidige Huidige hoogte snelheid Geselecteerde functie Waarde van de geselecteerde functie Belangrijke aanwijzing: Na het inschakelen van de M4 duurt het ca. 2 seconden, tot de huidige hoogte berekend en op het display weergegeven wordt.
  • Seite 166 Iconen – „KMH/MPH”: toont gekozen snelheids eenheid – „ ” of „ ”: toont gekozen fiets 1 of fiets 2 – „ ”: De huidige snelheid vergelijken met de gemiddelde snelheid – „ “-Icoon: toont, dat de trip-sectie-teller actief is –...
  • Seite 167 Knoppen Knop SET: kort drukken: achteruit door de functies bladeren Knop ALTI: Knop BIKE: Oproepen van de Oproepen hoogte-functies van de bike- functies...
  • Seite 168 Functies met de BIKE-knop (kort indrukken) BIKE...
  • Seite 169 Functies met de ALTI-knop (kort indrukken) ALTI...
  • Seite 170 Instellingen met de SET-knop – Instelmenu openen: SET-knop ingedrukt houden tot het menu opent – Bladeren van Totals naar Instelling: Met de BIKE- of ALTI-knop – Instelmenu openen: Met de SET-knop – Bladeren in het instelmenu: Met de BIKE- of ALTI-knop –...
  • Seite 171 Instelmenu’s ALTI BIKE...
  • Seite 172: Instellen Van De Taal

    Instellen van de taal – Menu openen: SET-knop ingedrukt houden – Bladeren van Totals naar Instelling: Met de BIKE- of ALTI-knop – Instelmenu openen: Met de SET-knop ALTI BIKE – Bladeren in het menu tot Language: Met de BIKE- of ALTI-knop –...
  • Seite 173: Instellen Van De Maateenheid

    Instellen van de maateenheid – Menu openen: SET-knop ingedrukt houden – Bladeren van Totals naar Instelling: Met de BIKE- of ALTI-knop – Instelmenu openen: Met de SET-knop ALTI BIKE – Bladeren in het menu tot maateenheid (Meting): Met de BIKE- of ALTI-knop –...
  • Seite 174 Instellen van de wielmaat – Menu openen: SET-knop ingedrukt houden – Bladeren van Totals naar Instelling: Met de BIKE- of ALTI-knop – Instelmenu openen: Met de SET-knop – Bladeren in het menu naar Wielomtrek: Met de BIKE- of ALTI-knop – Menu Wielomtrek openen: Met de SET-knop –...
  • Seite 175 Instellen van de wielmaat Invoer van de wielomtrek in ALTI BIKE mm (KMH) of inch (mph). Invoer van de wielomtrek door keuze van de banden- maat uit de bandenlijst. Handmatige invoer van de wielomtrek of keuze uit de bandenlijst. Zie ook pagina 228-229.
  • Seite 176: Instellen Van De Tijd

    Instellen van de tijd – Menu openen: SET-knop ingedrukt houden – Bladeren van Totals naar Instelling: Met de BIKE- of de ALTI-knop – Instelmenu openen: Met de SET-knop ALTI BIKE – Bladeren in het menu tot Klok: Met de BIKE- of ALTI-knop –...
  • Seite 177 Instellen van de starthoogte – Menu openen: SET-knop ingedrukt houden – Bladeren van Totals naar Instelling: Met de BIKE- of de ALTI-knop – Instelmenu openen: Met de SET-knop ALTI BIKE – Bladeren in het menu tot Starthoogte: Met de BIKE- of de ALTI-knop –...
  • Seite 178 Instellen van de huidige hoogte – Menu openen: SET-knop ingedrukt houden – Bladeren van Totals naar Instelling: Met de BIKE- of ALTI-knop – Instelmenu openen: Met de SET-knop ALTI BIKE – Bladeren in het menu tot Act. Hoogte: Met de BIKE- of ALTI-knop –...
  • Seite 179 Instellen van de totale afstand – Menu openen: SET-knop ingedrukt houden – Bladeren van Totals naar Instelling: Met de BIKE- of de ALTI-knop – Instelmenu openen: Met de SET-knop ALTI BIKE – Bladeren in het menu naar Total Afstd: Met de BIKE- of de ALTI-knop –...
  • Seite 180 Instellen van de totale rijtijd – Menu openen: SET-knop ingedrukt houden – Bladeren van Totals naar Instelling: Met de BIKE- of de ALTI-knop – Instelmenu openen: Met de SET-knop ALTI BIKE – Bladeren in het menu naar Total Tijd: Met de BIKE- of de ALTI-knop –...
  • Seite 181 Instellen van de totale hoogtemeters bergop – Menu openen: SET-knop ingedrukt houden – Bladeren van Totals naar Instelling: Met de BIKE-knop of de ALTI-knop – Instelmenu openen: Met de SET-knop ALTI BIKE – Bladeren in het menu naar Afst Stijg: Met de BIKE- of de ALTI-knop –...
  • Seite 182 Instellen van de totale hoogtemeters bergaf – Menu openen: SET-knop ingedrukt houden – Bladeren van Totals naar Instelling: Met de BIKE- of de ALTI-knop – Instelmenu openen: Met de SET-knop ALTI BIKE – Bladeren in het menu naar Afst. Daal: Met de BIKE- of de ALTI-knop –...
  • Seite 183 Fiets 1 of fiets 2 selecteren – Houd de BIKE-knop + SET-knop tegelijkertijd enkele seconden lang ingedrukt. – De laatst gebruikte fiets wordt weergegeven. – Met de Bike-knop of de BIKE ALTI-knop schakelt u nu over naar fiets 2 (of fiets 1 als eerst fiets 2 was geselecteerd).
  • Seite 184 Totaalwaarden oproepen – Instelmenu openen: SET-knop ingedrukt houden tot het menu opent – Totale waarden openen: Met de SET-knop – Bladeren in de totale waarden: Met de BIKE-knop ALTI BIKE of de ALTI-knop – Totale waarden verlaten terug naar het functie menu: SET-knop ingedrukt houden Wanneer u met fiets 2 op weg...
  • Seite 185 De ritgegevens op NUL terugstellen – BIKE-knop ingedrukt houden – Op het display verschijnt de opmerking: Tour Data RESET – BIKE-knop verder ingedrukt houden BIKE Opmerking: Afstand, rijtijd en de jaarhoogtemeters worden bij de totale gegevens opgeteld.
  • Seite 186 TRIP SECTIE starten/stoppen – START: BIKE + SET-knop gelijktijdig kort indrukken – STOP: BIKE + SET-knop gelijktijdig kort indrukken – Re-START: Opnieuw BIKE + SET-knop gelijktijdig kort indrukken ALTI BIKE – RESET: BIKE-knop ingedrukt houden PAS OP: Bij snelheid NUL stopt de trip-sectie- teller automatisch.
  • Seite 187 NAVIGATOR instellen – Met de BIKE-knop de functie NAVIGATOR in de weergave halen – SET-knop ingedrukt houden – Gegevens wijzigen: Met de BIKE-knop of de ALTI BIKE ALTI-knop – Instelling bevestigen: Met de SET-knop – De M4 keert automatisch naar de functiemodus terug...
  • Seite 188 NAVIGATOR op NUL terugstellen – Navigator functie in de weergave brengen – RESET: BIKE-knop ingedrukt houden BIKE...
  • Seite 189 Lichtmodus AAN/UIT – AAN: ALTI + SET-knop gelijktijdig indrukken – UIT: ALTI + SET-knop gelijktijdig indrukken Na een pauze (slaap-modus) wordt de lichtmodus ALTI automatisch uitgeschakeld. Dat spaart de batterij.
  • Seite 190 Opnieuw kalibreren van de hoogte Waarom moet de M4 opnieuw gekalibreerd worden? De M4 meet de huidige luchtdruk en rekent hem om naar een hoogteweergave. Afhankelijk van het weer verandert de luchtdruk dagelijks. Dat leidt tot een voortdurend verande- rende huidige hoogteweergave. MAAR: Uw thuis-starthoogte is niet veranderd.
  • Seite 191 Opnieuw kalibreren van de hoogte – ALTI-knop ingedrukt houden: Menu wordt geopend – Hoogte SELECT knippert – Keuze tussen – huidige hoogte – luchtdruk boven NAP ALTI BIKE – starthoogte 1 – starthoogte 2 – Gegevens wijzigen bij huidige hoogte of luchtdruk boven NAP: Met de BIKE-knop of de ALTI-knop...
  • Seite 192: Garantiebepalingen

    Garantiebepalingen VDO Cycle Parts geeft gedurende 2 jaar vanaf de koopdatum garantie op uw VDO computer. De garantie geldt voor materiaal- en fabricagefouten aan de computer zelf, aan de sensor/zender en aan de stuurhouder. Kabels, batterijen en montagematerialen zijn uitgesloten van garantie. De garantie geldt alleen wanneer de betroffen onderdelen niet zijn geopend (uitzondering: batterijvak van de computer), geen geweld is...
  • Seite 193 u het apparaat gekocht heeft. Of stuur uw klacht direct aan: Cycle Parts GmbH Le Quartier Hornbach 13 67433 Neustadt/Weinstrasse (Duitsland) Voor technische vragen zijn wij beschikbaar via onze hotline: +49 (0) 63 21- 95 82 7 - 10 +49 (0) 63 21- 95 82 7 - 18 Onze telefonische hotline is er voor u van 10:00-12:00 uur en van 15:00-17:00 uur, maandag t/m vrijdag...
  • Seite 194 Correcte afvoer van dit product (elektronisch afval) (Van toepassing in landen van de Euro- pese Unie en andere Europese landen met een systeem voor gescheiden in- zameling). Het kenmerk op het product en op de bijbehorende documentatie geeft aan dat het na afloop van de levensduur niet samen met het normale huisvuil mag worden afgevoerd.
  • Seite 196 Zawartość opakowania Szczegółowa instrukcja dostępna jest na stronie: www.vdocyclecomputing.com/service...
  • Seite 197 Wyświetlacz Aktualna Aktualna wysokość prędkość Wybrana funkcja Wartość wybranej funkcji Ważna informacja: Po włączeniu urządzenia M4 po ok. 2 sekundach zostanie obliczona aktualna wysokość i wyświetlona na ekranie.
  • Seite 198 Symbole – „KMH/MPH”: wyświetla wybraną jednostkę dla prędkości – „ ” lub „ ”: wyświetla wybrany rower 1 lub rower 2 – „ ”: porównanie aktualnej prędkości z prędkością średnią – symbol „ ”: pokazuje, że licznik dystansu jest aktywny –...
  • Seite 199 Przyciski Przycisk SET: Krótkie naciśnięcie: przewijanie funkcji wstecz Przycisk ALTI: Przycisk BIKE: Wywołanie funkcji Wywołanie wysokości funkcji roweru...
  • Seite 200 Funkcje przycisku BIKE (krótkie naciśnięcie) BIKE...
  • Seite 201 Funkcje przycisku ALTI (krótkie naciśnięcie) ALTI...
  • Seite 202 Ustawienia za pomocą przycisku SET – Otwieranie menu ustawień: Przytrzymać wciśnięty przycisk SET, dopóki nie otworzy się menu. – Przewijanie od Totals do Ustawien: Za pomocą przycisku BIKE lub ALTI – Otwieranie menu ustawień: Za pomocą przycisku SET – Poruszanie się w menu ustawień: Za BIKE/ALTI –...
  • Seite 203 Menu ustawień ALTI BIKE...
  • Seite 204: Ustawianie Języka

    Ustawianie języka – Otwieranie menu: Przytrzymać wciśnięty przycisk SET – Przewijanie od Totals do Ustawien: Za pomocą przycisku BIKE lub ALTI – Otwieranie menu ustawień: Za pomocą przycisku SET ALTI BIKE – Przewijanie menu do Language: Za pomocą przycisku BIKE lub ALTI –...
  • Seite 205 Ustawianie jednostki miary – Otwieranie menu: Przytrzymać wciśnięty przycisk SET – Przewijanie od Totals do Ustawien: Za pomocą przycisku BIKE lub ALTI – Otwieranie menu ustawień: Za pomocą przycisku SET ALTI BIKE – Przewijanie menu do Wymiary: Za BIKE lub ALTI –...
  • Seite 206 Ustawianie wielkości koła – Otwieranie menu: Przytrzymać wciśnięty przycisk SET – Przewijanie od Totals do Ustawien: Za pomocą przycisku BIKE lub ALTI – Otwieranie menu ustawień: Za pomocą przycisku SET – Przewijanie menu do wielkości koła: Za pomocą przycisku BIKE lub ALTI –...
  • Seite 207 Ustawianie wielkości koła Wprowadzanie obwodu ALTI BIKE koła w mm (KMH) lub inch (mph). Wprowadzanie obwodu koła poprzez wybór wielkości koła z listy. Ręczne wprowadzanie obwodu koła lub wybór z listy. Patrz także strona 228-229.
  • Seite 208: Ustawianie Godziny

    Ustawianie godziny – Otwieranie menu: Przytrzymać wciśnięty przycisk SET – Przewijanie od Totals do Ustawien: Za pomocą przycisku BIKE lub ALTI – Otwieranie menu ustawień: Za pomocą przycisku SET ALTI BIKE – Przewijanie menu do Zegar: Za BIKE lub ALTI –...
  • Seite 209 Ustawianie wysokości startowej – Otwieranie menu: Przytrzymać wciśnięty przycisk SET – Przewijanie od Totals do Ustawien: Za pomocą przycisku BIKE lub ALTI – Otwieranie menu ustawień: Za pomocą przycisku SET ALTI BIKE – Przewijanie menu do Bazowa Wys: Za pomocą przycisku BIKE lub ALTI –...
  • Seite 210 Ustawianie aktualnej wysokości – Otwieranie menu: Przytrzymać wciśnięty przycisk SET – Przewijanie od Totals do Ustawien: Za pomocą przycisku BIKE lub ALTI – Otwieranie menu ustawień: Za pomocą przycisku SET ALTI BIKE – Przewijanie menu do Akt. Wysok: Za BIKE lub ALTI –...
  • Seite 211 Ustawianie całkowitego dystansu – Otwieranie menu: Przytrzymać wciśnięty przycisk SET – Przewijanie od Totals do Ustawien: Za pomocą przycisku BIKE lub ALTI – Otwieranie menu ustawień: Za pomocą przycisku SET ALTI BIKE – Przewijanie menu do Dyst Total: Za BIKE lub ALTI –...
  • Seite 212 Ustawianie całkowitego czasu jazdy – Otwieranie menu: Przytrzymać wciśnięty przycisk SET – Przewijanie od Totals do Ustawien: Za pomocą przycisku BIKE lub ALTI – Otwieranie menu ustawień: Za pomocą przycisku SET ALTI BIKE – Przewijanie menu do Czas Total: Za BIKE lub ALTI –...
  • Seite 213 Ustawianie całkowitego przewyższenia w górę – Otwieranie menu: Przytrzymać wciśnięty przycisk SET – Przewijanie od Totals do Ustawien: Za pomocą przycisku BIKE lub ALTI – Otwieranie menu ustawień: Za pomocą przycisku SET ALTI BIKE – Przewijanie menu do Przewyz: Za BIKE lub ALTI –...
  • Seite 214 Ustawianie całkowitego przewyższenia w dół – Otwieranie menu: Przytrzymać wciśnięty przycisk SET – Przewijanie od Totals do Ustawien: Za pomocą przycisku BIKE lub ALTI – Otwieranie menu ustawień: Za pomocą przycisku SET ALTI BIKE – Przewijanie menu do Spad Wysok: Za BIKE lub ALTI –...
  • Seite 215 Wybór roweru – rower 1 lub rower 2 – Przytrzymać równocześnie wciśnięte przyciski BIKE i SET przez kilka sekund. – Ostatnio wybrany rower zostanie wyświetlony. – Za pomocą przycisku BIKE lub przycisku ALTI można teraz BIKE wybrać rower 2 (lub rower 1, jeśli wcześniej wybrano rower 2).
  • Seite 216 Wywołanie wartości zbiorczych – Otwieranie menu ustawień: Przytrzymać wciśnięty przycisk SET, dopóki nie otworzy się menu. – Otwieranie wartości zbiorczych (Totals): Za SET – Przewijanie wartości ALTI BIKE zbiorczych: Za pomocą przycisku BIKE lub ALTI – Opuszczanie wartości zbiorczych i powrót do menu funkcji: Przytrzymać...
  • Seite 217: Zerowanie Danych Trasy

    Zerowanie danych trasy – Przytrzymać wciśnięty przycisk BIKE. – Na wyświetlaczu pojawi się informacja: Dane Trasy RESET – Przytrzymać nadal wciśnięty przycisk BIKE. BIKE Wskazówka: Dystans, czas jazdy i roczne przewyższenie są doliczane do danych zbiorczych.
  • Seite 218 Uruchamianie/Zatrzymanie licznika dystansu – START: Równocześnie krótko nacisnąć przyciski BIKE + SET – STOP: Równocześnie krótko nacisnąć przyciski BIKE + SET – Re-START: Ponownie równocześnie krótko nacisnąć przyciski BIKE + SET ALTI BIKE – RESET: Przytrzymać wciśnięty przycisk BIKE UWAGA: Jeśli prędkość...
  • Seite 219 Ustawienia NAWIGATORA – Za pomocą przycisku BIKE można wywołać funkcję NAVIGATOR. – Przytrzymać wciśnięty przycisk SET. – Zmiana danych: Za pomocą przycisku BIKE lub ALTI BIKE przycisku ALTI – Potwierdzanie ustawień: Za pomocą przycisku SET – Urządzenie M4 automatycznie powróci do trybu funkcji...
  • Seite 220 Zerowanie NAWIGATORA – Wyświetlanie funkcji NAVIGATOR – RESET: Przytrzymać wciśnięty przycisk BIKE BIKE...
  • Seite 221 Tryb podświetlenia ON/OFF – ON: Równocześnie nacisnąć przyciski ALTI + SET – OFF: Równocześnie nacisnąć przyciski ALTI + SET Po przerwie (tryb oczekiwania) tryb podświetlania zostanie ALTI automatycznie wyłączony. Jest to rozwiązanie umożliwiające oszczędzanie baterii.
  • Seite 222 Rekalibracja wysokości Dlaczego konieczna jest rekalibracja komputera Komputer mierzy aktualne ciśnienie powietrza i przelicza na wartość wysokości. Ciśnienie powietrza atmosferycznego zmienia się codziennie w zależności od pogody. Skutkuje to ciągłą zmianą aktualnego wskazania wysokości. ALE: Wysokość startowa w miejscu zamieszkania pozostaje niezmieniona.
  • Seite 223 Rekalibracja wysokości – Przytrzymać wciśnięty przycisk ALTI. Menu zostanie otwarte – Miga napis Wysokosc SELECT – Wybór między: – aktualną wysokością – ciśnieniem atmosferycznym n.p.m. ALTI BIKE – wysokością startową 1 – wysokością startową 2 – Zmiana danych dla aktualnej wysokości lub ciśnienia atmosferycznego n.p.m.: Za pomocą...
  • Seite 224: Warunki Gwarancji

    Warunki gwarancji VDO Cycle Parts zapewnia 2-letnią gwarancję na komputer VDO liczoną od daty kupna Gwarancja obejmuje wady materiału oraz wady produkcji komputera, czujników/nadajników i uchwytu na kierownicę. Kabel i baterie, a także materiały służące do montażu, nie są objęte gwarancją. Gwarancja jest ważna jedynie wtedy, gdy części, których ona dotyczy, nie były otwierane (wyjątek: komora na baterie komputera), nie użyto siły ani...
  • Seite 225 Reklamację można także przesłać bezpośrednio do producenta: Cycle Parts GmbH Le Quartier Hornbach 13 67433 Neustadt/Weinstrasse W zakresie pytań technicznych jesteśmy zawsze do dyspozycji pod numerem infolinii: +49 (0) 63 21- 95 82 7 - 10 +49 (0) 63 21- 95 82 7 - 18 Nasza infolinia jest dostępna w godzinach 10:00-12:00 oraz 15:00-17:00, od poniedziałku do piątku...
  • Seite 226 Prawidłowa utylizacja produktu (odpady elektroniczne) Przepisy obowiązujące w krajach Unii Europejskiej oraz w innych krajach europejskich posiadających system sortowania odpadów: Oznakowanie na produkcie lub związanej z nim dokumentacji informuje, iż po zakończeniu użytkowania produktu nie wolno go usuwać wraz ze standardowymi odpadami z gospodarstwa domowego.
  • Seite 227 Niniejszy produkt nie może być usuwany wraz z innymi odpadami przemysłowymi.
  • Seite 228 Wheelsize Chart WS in WS in Tire size ETRO inch 16 x 1,75 47-305 1272 50,1 20 x 1,75 47-406 1590 62,6 24 x 1,75 47-507 1907 75,1 26 x 1,5 40-559 2026 79,8 26 x 1,75 47-559 2070 81,5 26 x 1,9 2089 82,2...
  • Seite 229 Wheelsize Chart WS in WS in Tire size ETRO inch 28 x 1,75 47-622 2268 89,3 29 x 2,10 54-622 2295 90,4 29 x 2,25 57-622 2288 90,1 29 x 2,40 62-622 2300 90,6 650 B 2100 82,7 700 x 18C 18-622 2102 82,8...
  • Seite 230 Installation of the sensor and magnet SENSOR 1–5 mm...
  • Seite 231 90°...
  • Seite 232 Battery change bike computer Beim Batteriewechsel gehen KEINE Daten verloren. Sie benötigen eine Batterie 3 V-Type 2450. Achtung: Nach der Entnahme der leeren Batterie bitte 10 Sekunden warten vor dem Einlegen der neuen Batterie. When battery is replaced NO data is lost. You need battery 3 V type 2450.
  • Seite 233 OPEN clOSE 10 SEc.
  • Seite 234: Technical Specifications

    Technical specifications Computer: Approx. 49 H x 33 B x 12 D mm Computer weight: Approx. 30 g Handlebar bracket weight: Approx. 10 g Computer battery: 3V, type 2032 Computer battery service life: Approx. 1 year (approx. 400 ride hours, approx.
  • Seite 235 Ride time measurement range: Up to 99:59:59 HH:MM:SS. Trip distance odometer measurement range: Up to value 9,999.99 km or mi NAVIGATOR measurement range: From -99.99 to +999.99 km or mi Total km measurement range: Up to value 99,999 km or mi Total ride time measurement range: 9999:59 HHHH:MM Wheel circumference setting range:...
  • Seite 236 Cycle Parts GmbH Le Quartier Hornbach 13 67433 Neustadt/Weinstrasse (Germany) www.vdocyclecomputing.com...

Inhaltsverzeichnis