Herunterladen Inhalt Inhalt Diese Seite drucken
Monacor INC-3557PTZ Bedienungsanleitung

Monacor INC-3557PTZ Bedienungsanleitung

Netzwerk-ptz-außenkamera

Werbung

Verfügbare Sprachen

Verfügbare Sprachen

Netzwerk-PTZ-Außenkamera
Outdoor PTZ Network Camera
INC-3557 PTZ
Bestell-Nr. • Order No. 18.4740
BEDIENUNGSANLEITUNG
INSTRUCTION MANUAL
MODE D'EMPLOI
ISTRUZIONI PER L'USO
ELECTRONICS FOR SPECIALISTS ELECTRONICS FOR SPECIALISTS ELECTRONICS FOR SPECIALISTS ELECTRONICS FOR SPECIALISTS

Werbung

Inhaltsverzeichnis
loading

Inhaltszusammenfassung für Monacor INC-3557PTZ

  • Seite 1 Netzwerk-PTZ-Außenkamera Outdoor PTZ Network Camera INC-3557 PTZ Bestell-Nr. • Order No. 18.4740 BEDIENUNGSANLEITUNG INSTRUCTION MANUAL MODE D’EMPLOI ISTRUZIONI PER L’USO ELECTRONICS FOR SPECIALISTS ELECTRONICS FOR SPECIALISTS ELECTRONICS FOR SPECIALISTS ELECTRONICS FOR SPECIALISTS...
  • Seite 2 12 V Audio Input Audio Output Alarm IN 1 IN COM IN 2 OUT COM OUT 1 Ground Alarm IN 1 violett purple violet violetto IN COM grau grey gris grigio IN 2 gelb yellow jaune giallo OUT COM orange orange orange arancio OUT 1...
  • Seite 3 Deutsch . . . . . . . . . . Seite English . . . . . . . . . . . Page Français .
  • Seite 4: Netzwerk-Ptz-Außenkamera

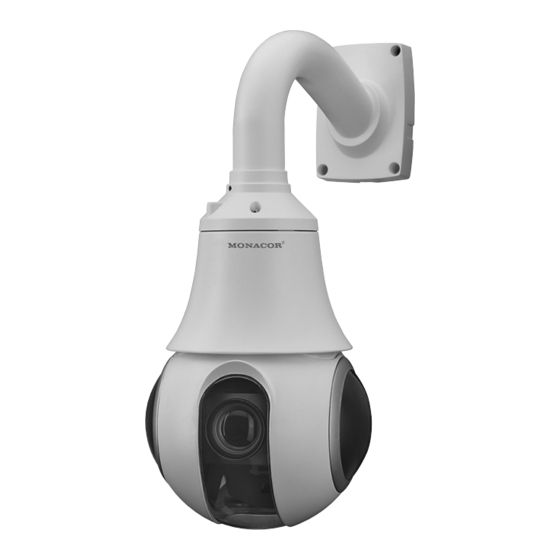
    WARNUNG Das Netzgerät wird mit lebens- 1 Verwendungsmöglichkeiten gefährlicher Netzspannung ver- sorgt . Nehmen Sie daran keine Die Kamera INC-3557PTZ ist speziell für den Eingriffe vor . Es besteht die Ge- Einsatz in Video-Überwachungsanlagen auf der fahr eines elektrischen Schlags .
  • Seite 5: Montage

    • 3 Montage Werden die Geräte zweckentfremdet, nicht richtig angeschlossen, falsch bedient oder 1) Um die optimale Montagestelle festzustel- nicht fachgerecht repariert, kann keine Haf- len, sollte ein Probebetrieb erfolgen . Dazu tung für daraus resultierende Sach- oder Per- die Kamera vorläufig in Betrieb nehmen sonenschäden und keine Garantie für die Ge- ☞...
  • Seite 6: Kamera Anschließen

    4 Kamera anschließen des Fachs auf der Rückseite des Kamerage- häuses nach Lösen der beiden Schrauben Die Anschlüsse (8 –13) und der Kabelverteiler öffnen und eine Speicherkarte vom Typ (7) sind nicht wetterfest . Sie müssen entspre- „micro SD[HC/ XC]“ (max . 64 GB) einsetzen . chend geschützt werden .
  • Seite 7: Kamera In Ein Netzwerk Einbinden

    5 Kamera in ein Netzwerk 4) Die Einstellungen nach Bedarf ändern: IP-Adresse, Teilnetzmaske und Gateway-Ad- einbinden resse können statisch festgelegt werden (Op- Damit die Kamera zum Konfigurieren über tion „Device uses the following IP address“ einen Computer direkt angesprochen werden wählen) .
  • Seite 8: Kamera Über Einen Computer Aufrufen

    6 Kamera über einen Computer (auch auf beiliegender CD) . Für eine schnellere Bildübertragung sowie die Nutzbarkeit aller aufrufen Funktionen ist jedoch die Installation der Ac- Die Bedienoberfläche der Kamera kann durch tiveX-Erweiterungen erforderlich . Diese wer- die Eingabe ihrer IP-Adresse in der Adresszeile den beim erstmaligen Klicken auf die Flash / des Programms Windows Internet Explorer (IE, ☞...
  • Seite 9 Das Klicken mit rechter Maustaste auf das Schaltfläche zum Abmelden Kamera bild zeigt folgendes Menü: Kamerabild mit Informationen zum aktuell übertragenen Stream Menüpunkt Funktion Vollbildansicht (beenden), alternativ: Zum Umschalten zwischen Flash-Player- und Vollbild (schließen) Doppelklick auf das Bild ActiveX-Nutzung für die Darstellung des Sensor-Einstellun- Live-Bildes auf diese Zeile klicken .
  • Seite 10: Rücksetzen Der Kamera

    Kamera-Abmessungen: � � � ⌀146 mm × 220 mm Gewicht: � � � � � � � � � � � � � � 1,5 kg Änderungen vorbehalten . Diese Bedienungsanleitung ist urheberrechtlich für MONACOR INTERNATIONAL GmbH & Co. KG geschützt. ®...
  • Seite 12: Safety Notes

    . Leave ser- vicing to skilled personnel only . 1 Applications Inexpert handling of the unit The camera INC-3557PTZ is specially designed may result in electric shock . for video surveillance systems based on comput- • er networks . Its housing is weatherproof (IP 66);...
  • Seite 13: Installation

    3 Installation • 1) A test operation is recommended in order Never pull the mains cable to disconnect the to find the best mounting location . For this mains plug from the socket, always seize the purpose, operate the camera temporar- plug .
  • Seite 14: Connecting The Camera

    4 Connecting the Camera (1) of the compartment on the rear of the camera housing and insert a memory card The connections (8 –13) and the cable splitter of the type “microSD[HC/XC]” (64 GB max .) . (7) are not weatherproof; protect them accord- Push the card (contacts to the bottom) into ingly .
  • Seite 15: Connecting The Camera To A Network

    5 Connecting the Camera to a 4) Change the settings as required: IP address, subnet mask and gateway address Network can be defined as static values (select the op- To be able to directly address the camera for tion “Device uses the following IP address”) . configuration via computer, its IP address is fac- Enter a unique IP address for each camera .
  • Seite 16 6 Calling up the Camera via loaded from the camera when the Flash/ActiveX ☞ line  fig . 5) is clicked for the first time . If Computer necessary, reduce the security settings of the To call up the user interface of the camera, enter IE accordingly to allow the installation process .
  • Seite 17 Click this line to switch between use of Flash When the camera image is clicked with the right Player and ActiveX for display of the live mouse button, the following menu will appear: image Menu item Function Toolbar with the following functions: Full Screen full-screen image (exit) (Exit Full Screen)
  • Seite 18: Resetting The Camera

    Weight: � � � � � � � � � � � � � � � 1�5 kg Subject to technical modification . All rights reserved by MONACOR INTERNATIONAL GmbH & Co. KG. No part of this instruction manual may ®...
  • Seite 20: Possibilités D'utilisation

    . 1 Possibilités d’utilisation Ne touchez jamais l’intérieur de l’appareil, il y a risque de La caméra INC-3557PTZ est spécialement conçue décharge électrique . pour une utilisation dans des installations de surveillance vidéo basée sur des réseaux infor- •...
  • Seite 21 • 3 Montage Ne débranchez jamais l’appareil en tirant sur le cordon secteur ; retirez toujours le cordon 1) Un test de fonctionnement doit être effectué secteur en tirant la fiche . afin de définir le lieu optimal de montage . •...
  • Seite 22: Branchement De La Caméra

    4 Branchement de la caméra le couvercle (1) du compartiment sur la face arrière du boîtier de la caméra après avoir Les connexions (8 –13) et le répartiteur de câble desserré les deux vis et insérez une carte mé- (7) ne sont pas étanches . Vous devez les protéger moire de type «...
  • Seite 23 5 Intégrer la caméra dans un 4) Si besoin, modifiez les réglages : l’adresse IP, le masque sous-réseau et l’adresse réseau Gateway peuvent être déterminées de ma- Pour que la caméra puisse répondre directe- nière statique (sélectionnez l’option « Device ment lors de la configuration via un ordina- uses the following IP address ») .
  • Seite 24 6 Appeler une caméra via un Adobe existante sur de nombreux ordinateurs (également sur le CD livré) . Pour une transmis- ordinateur sion plus rapide des images et pour l’utilisa- L’interface utilisateur de la caméra peut être ap- tion de toutes les fonctions, l’installation des pelée en saisissant son adresse IP dans la ligne extensions ActiveX est indispensable .
  • Seite 25 Par un clic droit de la souris sur l’image de la Bouton pour quitter caméra, le menu suivant s’affiche : Image de la caméra avec des informations sur le Stream actuellement transmis Point menu Fonction Pour commuter entre utilisation Flash Player Visualisation image plein écran Full Screen et ActiveX pour la visualisation de l’image...
  • Seite 26: Réinitialisation De La Caméra

    Poids : � � � � � � � � � � � � � � � � 1,5 kg Tout droit de modification réservé Notice d’utilisation protégée par le copyright de MONACOR INTERNATIONAL GmbH & Co. KG. Toute repro- ®...
  • Seite 28: Avvertenze Importanti

    AVVERTIMENTO L’alimentatore è alimenta- 1 Possibilità d’impiego to con pericolosa tensione di rete . Non intervenire mai La telecamera INC-3557PTZ è stata realizzata personalmente al suo interno . specialmente per l’impiego in impianti di sor- Esiste il pericolo di una scarica veglianza video sulla base di reti con computer .
  • Seite 29 • 3 Montaggio Nel caso d’uso improprio, di collegamenti sbagliati, d’impiego scorretto o di riparazione 1) Per determinare il punto ottimale per il mon- non a regola d’arte degli apparecchi, non si taggio conviene fare delle prove . A tale scopo assume nessuna responsabilità...
  • Seite 30 4 Collegare la telecamera coperchio (1) del vano sul retro del contenito- re della telecamera dopo aver allentato le due I contatti (8 –13) e il ripartitore del cavo (7) non viti e inserire una scheda di memoria del tipo sono resistenti alle intemperie e devono essere “micro SD[HC/ XC]”...
  • Seite 31 5 Implementare la telecamera 4) Modificare le impostazioni secondo necessità: Indirizzo IP, maschera di sottorete e indirizzo in una rete Gateway possono essere stabiliti in modo sta- Per permettere a un computer l’accesso diretto tico (scegliere l’opzione “Device uses the fol- alla telecamera per la configurazione, l’indirizzo lowing IP address”) .
  • Seite 32 6 Accedere alla telecamera da sul CD in dotazione) . Per una trasmissione più veloce e per poter sfruttare tutte le funzioni è un computer comunque richiesta l’installazione delle estensio- L’interfaccia utente della telecamera può essere ni ActiveX . Queste si scaricano dalla telecamera aperta digitando il suo indirizzo IP nell’apposita cliccando per la prima volta sulla riga per la riga del programma Windows Internet Explo-...
  • Seite 33 Immagine della telecamera con informazioni Cliccando con il tasto destro del mouse sull’im- sullo stream trasmesso attualmente magine della telecamera appare il menu se- guente: Per cambiare fra uso del Flash Player e di ActiveX per la rappresentazione dell’imma- Voce del menu Funzione gine dal vivo, cliccare su questa riga .
  • Seite 34: Dati Tecnici

    Peso: � � � � � � � � � � � � � � � � � 1,5 kg Con riserva di modifiche tecniche . La MONACOR INTERNATIONAL GmbH & Co. KG si riserva ogni diritto di elaborazione in qualsiasi forma ®...
  • Seite 36 MONACOR INTERNATIONAL GmbH & Co. KG • Zum Falsch 36 • 28307 Bremen • Germany Copyright by MONACOR INTERNATIONAL. All rights reserved. A-1785.99.01.09.2017 ©...

Inhaltsverzeichnis