Herunterladen Inhalt Inhalt Diese Seite drucken

Werbung

Verfügbare Sprachen
  • DE

Verfügbare Sprachen

  • DEUTSCH, seite 16
WWW.BEGLEC.COM
Copyright © 2009 by BEGLEC cva.
't Hofveld 2 ~ B1702 Groot-Bijgaarden ~ Belgium
Reproduction or publication of the content in any manner, without express permission of the publisher, is prohibited.
Manual de instrucciones
Version: 1.1
Operation Manual
EN
Mode d'emploi
FR
Gebruiksaanwijzing
NL
Bedienungsanleitung
DE
ES
Manual do utilizador
PT

Werbung

Inhaltsverzeichnis
loading

Inhaltszusammenfassung für JBSYSTEMS Light MICRO LED MANAGER

  • Seite 1 Operation Manual Mode d'emploi Gebruiksaanwijzing Bedienungsanleitung Manual de instrucciones Manual do utilizador WWW.BEGLEC.COM Copyright © 2009 by BEGLEC cva. ‘t Hofveld 2 ~ B1702 Groot-Bijgaarden ~ Belgium Reproduction or publication of the content in any manner, without express permission of the publisher, is prohibited. Version: 1.1...
  • Seite 2 EN - DISPOSAL OF THE DEVICE Dispose of the unit and used batteries in an environment friendly manner according to your country regulations. FR - DÉCLASSER L’APPAREIL Débarrassez-vous de l’appareil et des piles usagées de manière écologique Conformément aux dispositions légales de votre pays. NL - VERWIJDEREN VAN HET APPARAAT Verwijder het toestel en de gebruikte batterijen op een milieuvriendelijke manier conform de in uw land geldende voorschriften.
  • Seite 3: Before Use

    Condense sometimes prevents the unit from working at full  All functions can be controlled: performance or may even cause damages.  Directly on the on the Micro Led Manager  This unit is for indoor use only.  With an optional LED WALL DIMMER (special interface) ...
  • Seite 4: Dip Switch Settings

    8. ANALOG SWITCH INPUT: used to connect any external analog switch. This external switch can be Spectrum random chase Amber used to switch the general output of the Micro LED Manager on/off. (external blackout)  See further for more information on how to connect the analog switch. Spectrum sequence chase Yellow 9.
  • Seite 5: Electrical Installation

    Important: Switch the Micro Led Manager OFF before you install the LED-projectors! The maximum total load of the Micro Led Manager is 50W, spread over 3 colors: each of the 3 colors has a max. load of 16W ~ 17W! Two different types of passive LED projectors can be connected: A.
  • Seite 6  Make sure that ALL DIP-switches are set to OFF position! In most cases the MICRO LED MANAGER will be installed on a wall, close to the LED-projectors. If you  Make sure the DMX cables of all units are connected.
  • Seite 7: Specifications

    DMX.  Toutes les fonctions peuvent être contrôlées de différentes manières :  directement à partir du MICRO LED MANAGER  au moyen d’un gradateur mural encastrable (interface spécial)  au moyen d'une commande à distance, LEDCON-01 ou LEDCON-02 ...
  • Seite 8: Instructions De Securite

    SORTIE DMX: Connecteur XLR femelle à 3 broches qui permet de connecter le MICRO LED électrique ou un dysfonctionnement. Si un corps étranger est introduit dans l’appareil, déconnectez MANAGER à l’unité suivante de la chaîne DMX ou à un autre MICRO LED MANAGER en mode immédiatement de la source d’alimentation.
  • Seite 9: Installation Électrique

    Important: Coupez le MICRO LED MANAGER avant d’installer les projecteurs LED! La charge FADE: les couleurs du motif sélectionné faiblissent progressivement, à la vitesse désirée. maximale du MICRO LED MANAGER est 50W, répartie en 3 couleurs: chacune des 3 couleurs a une charge maximale de 16W ~ 17W! FIXED COLOR: utilisez les interrupteurs DIP 6, 7, 8 &...
  • Seite 10: Adressage Dmx

    5 secondes. (tous les projecteurs clignotes 1x) symétrique.  Fini!  Le premier Micro LED Manager de la chaîne reçoit l’adresse de départ que vous avez choisi. Les adresses de départ des autres projecteurs de la chaîne seront calculés et distribués...
  • Seite 11: Consignes D'utilisation

    C. Reliez le contrôleur avec la commande à distance LEDCON-02 (ou LEDCON)01): Dans la plupart des cas, le MICRO LED MANAGER sera installé sur un mur, près des projecteurs LED. Si vous voulez avoir un accès facile à ses fonctions, vous pouvez relier le contrôleur avec la commande à...
  • Seite 12: Gebruiksaanwijzing

    Het kan soms zelfs schade aan het apparaat  Alle functies kunnen onmiddellijk gecontroleerd worden met: toebrengen.  De Micro LED manager  Gebruik dit apparaat uitsluitend binnenshuis.  De optionele LED WALL DIMMER (speciale sturing) ...
  • Seite 13 De Micro LED Manager kan ook als controller gebruikt worden Snelheid 6 voor andere LED projectoren zoals bijvoorbeeld “LED PAR 56/64” 4. POWER ON LED: wordt gebruikt om te controleren of de Micro LED Manager op het stroomnet is Snelheid 7 aangesloten.
  • Seite 14: Elektrische Installatie

    Zet de Micro Led Manager AF alvorens u de LED projectors installeert! De max. totale belasting van de Micro Led Manager is 50W, verdeeld over 3 kleuren: elk van de 3 kleuren heeft een max. belasting van 16W ~ 17W! Twee verschillende types passieve LED projectors kunnen worden aangesloten: A.
  • Seite 15: Bedieningsvoorschriften

    In de meeste gevallen zal de MICRO LED MANAGER op een muur geïnstalleerd worden, dicht bij de  Druk de “Auto DMX address” toets ( 6 ) in op uw eerste Micro LED Manager in de ketting LED projectors. Als u gemakkelijke toegang tot zijn functies wilt hebben, kan u de LEDCON-01 controller gedurende ongeveer 5 seconden op de (eerste) Micro Led Manager aansluiten.
  • Seite 16: Technische Kenmerken

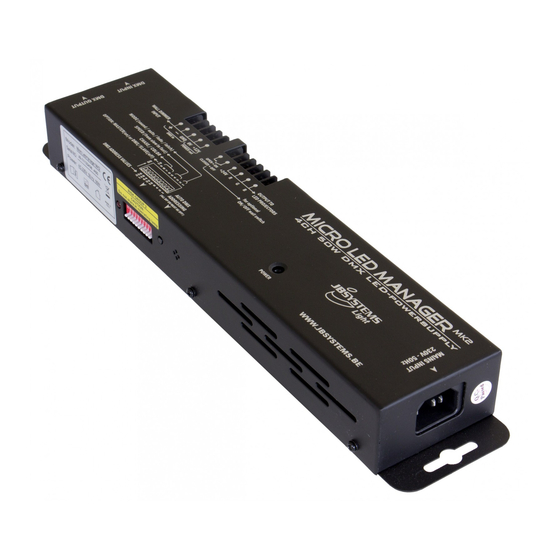
     Mit einer wahlweisen LEDCON-01 oder LEDCON-02 Fernsteuerung  Mit einer 300 Watt LED-Manager  Mit jeder gängigen DMX-Steuerung TECHNISCHE KENMERKEN:  Mehrere Micro Led Manager können im Master/Slavemodus eingesetzt werden, um vollständige synchrone Konfigurationen mit einer höheren Leistung zu erhalten. Netvoeding: AC 100 ~ 250V (50Hz/60Hz) ...
  • Seite 17: Sicherheitshinweise

     Zur Vermeidung von Stromschlag oder Feuer, Gerät bitte nicht Regen oder Feuchtigkeit aussetzen. nächste DMX Gerät in der Kette oder an einen anderen Micro Led Manager, im Master/Slavemodus. Der  Zur Vermeidung von Kondensation, lassen sie bitte nach Transport in eine warme Umgebung das Gerät Micro LED Manager kann auch als Steuerung für andere LED-Scheinwerfer wie zum Beispiel “LED...
  • Seite 18: Elektrische Installation

    Wandlerkabel und verbinden Sie die internen 4 Adern des LED- Auto/Fade Mode Einstellung Scheinwerfers mit den entsprechenden 4 terminals von den MICRO LED MANAGER. Schließen Sie alle Scheinwerfer richtig an und verkettete ihre Ein-/Ausgangskabel, bis die maximale erlaubte Leistung Geschwindigkeit 1 Schnell erreicht ist.
  • Seite 19: Dmx Addressing

     Drücken sie den “Auto DMX address” Taster (6) am ersten Micro LED Manager für 5 Sekunden. von intelligenten Lichtanlagen. Sie müssen Ihren DMX-Controller und alle angeschlossenen Geräte mit  Fertig!  Der erste Micro LED Manager in dieser Kette hat nun die Startadresse die sie gewählt einem hochwertigen, abgeschirmten Kabel „verketten“...
  • Seite 20: Spezifikationen

    C. Anschließen des optionalen LEDCON-02 (oder LEDCON-01) Controller als Fernsteuerung: In den meisten Fällen wird der MICRO LED MANAGER an einer Wand, in der Nähe der LED- Scheinwerfer montiert. Wenn Sie einen einfachen Zugriff auf seinen Funktionen haben möchten, können Sie die Fernsteuerung LEDCON-01 am (ersten) Micro Led Manager anschließen.
  • Seite 21: Manual De Funcionamiento

     Se pueden controlar todas las funciones:  Esta unidad sólo se puede usar en el interior.  Directamente en el Micro Led Manager  No coloque objetos metálicos ni derrame líquidos dentro del reproductor de la unidad. No deberá colocar ...
  • Seite 22: Mantenimiento

    Velocidad 5 3. SALIDA DMX: Se utiliza un conector XLR hembra de 3 pines para conectar el Micro Led Manager con Velocidad 6 el siguiente aparato DMX en la cadena o con otro Micro Led Manager cuando se utiliza en modo maestro/esclavo.
  • Seite 23: Instalación Eléctrica

    Importante: Apague el Micro Led Manager antes de instalar los proyectores LED. La carga total máxima del Micro Led Manager es 50 W, distribuidos en 3 colores: cada uno de los 3 colores tiene una carga máxima de 16W ~ 17W.
  • Seite 24: Instrucciones De Funcionamiento

    Manager, al máximo (valor 255) En la mayoría de los casos el MICRO LED MANAGER se instalará en la pared, cerca de los proyectores  Pulse el botón “Auto DMX address” (6) en el primer Micro LED Manager de la cadena durante LED.
  • Seite 25: Especificaciones

     Com um controlo remoto opcional LEDCON-01 ou LEDCON-02. Toda la información está sujeta a cambios sin previo aviso  Com um MICRO LED MANAGER de 300Watt Puede descargar la última versión de este manual de usuario en nuestra página Web: ...
  • Seite 26: Instruções De Segurança

     Nunca permita que este cabo entre em contacto com outros cabos! analógico.  O MICRO LED MANAGER deve ser ligado à terra de forma a cumprir com os regulamentos de 9. ENTRADA WALL DIMMER: Usado para conectar o nosso LED WALL DIMMER, um pequeno segurança.
  • Seite 27: Instalação Eléctrica

    Importante: Desligue o Micro Led Manager antes de instalar os projectores LED! A carga total AUTO: Os padrões seleccionados correm automaticamente á velocidade desejada máxima do Micro Led Manager é de 50W, distribuídos pelas 3 cores: cada uma das 3 cores tem uma carga máxima de 16W ~ 17W! Podem-se ligar 2 tipos diferentes de projectores LED passivos: FADE: As cores do padrão seleccionado desvanecem á...
  • Seite 28 90Ω a 120Ω no final da cadeia. Nunca use cabos  Feito!  O primeiro Micro LED Manager na cadeia irá receber o endereço inicial DMX 202 e irá divididos em Y, simplesmente não funcionam! calcular automaticamente e programas os endereços DMX de todas as outras unidades na...
  • Seite 29: Instruções De Utilização

    C. Ligado ao controlador opcional LEDCON-02 (or LEDCON-01) para controlo remoto: Estas informações estão sujeitas a alterações sem aviso prévio Na maior parte dos casos o MICRO LED MANAGER será instalado numa parede, junto aos projectores Pode fazer download da versão mais recente deste manual no nosso site: www.beglec.com LED.

Inhaltsverzeichnis