Juwel BEETSYSTEM Bio-Protect 130/60 Aufbauanleitung
Vorschau ausblenden
Andere Handbücher für BEETSYSTEM Bio-Protect 130/60:
- Aufbauanleitung (12 Seiten)
Werbung
Quicklinks
Aufbauanleitung
BEETSYSTEM
Intelligente Produkte
für Garten und Haushalt
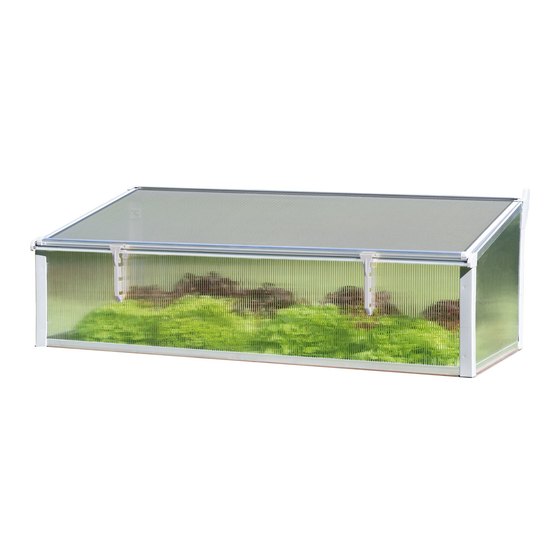
Bio-Protect 130/60
B E E T S Y S T E M
B I O P R O T E C T
1 3 0 / 6 0
Maße: ca. 126 x 58 x H 40/30 cm · Art.-Nr. 20347
JUWEL H. Wüster GmbH · A-6460 Imst, Industriezone 19, Tel. 05412-69400 oder
D-82467 Garmisch- Parten kirchen, Bahnhof str. 31, Tel. 08821-1679 · E-Mail: kund@juwel.com · Internet: www.juwel.com
Werbung

Verwandte Anleitungen für Juwel BEETSYSTEM Bio-Protect 130/60


Inhaltszusammenfassung für Juwel BEETSYSTEM Bio-Protect 130/60
- Seite 1 1 3 0 / 6 0 Maße: ca. 126 x 58 x H 40/30 cm · Art.-Nr. 20347 JUWEL H. Wüster GmbH · A-6460 Imst, Industriezone 19, Tel. 05412-69400 oder D-82467 Garmisch- Parten kirchen, Bahnhof str. 31, Tel. 08821-1679 · E-Mail: kund@juwel.com · Internet: www.juwel.com...
- Seite 2 Teileliste / Part list / Liste des pièces fournies : Aluminium Aluminium Aluminium Aluminium Aluminium Aluminium ~ 1217 mm ~ 1254 mm ~ 540 mm ~ 560 mm ~ 540 mm ~ 1202 mm 21511 21510 21507 21518 12000 12001 12002 10321 22194...
- Seite 3 0 mm 0 mm A – 1 x B – 1 x – 1 x C – 1 x E – 2 x F – 2 x G – 2 x H – 2 x clic! clic! Q – 1 x...
- Seite 4 clic! U – 3 x R – 1 x clic! U – 3 x clic! clic! S – 1 x T – 1 x...
- Seite 5 clic! U – 1 x V – 1 x clic! U – 1 x V – 1 x Auf das Hochbeet … … oder direkt auf die Erde. On raised bed … … or directly on the ground. Sur jardin surélevé … …...
- Seite 6 Montage des Fensters (Abb. 1 - 19) 1) Bitte vorerst die Kunststoffecke N (links) mit den vorspringenden Als zweites die Schmalseite fixieren (auf rechten Winkel achten), Führungsnasen oben in das Profil K einschieben. Achtung: alle 4 dabei das Netz nicht fest spannen – Abstandslehre beachten. Durch Ecken sind unterschiedlich, bitte laut Abbildungen anordnen! das Eindrücken der Profile wird genügend Spannung erzeugt.
- Seite 7 Sufficient tension is generated when the sections are pressed in. wind, the two V clamping bars will detach and release the window Then, fix the opposite narrow side in place and finally the missing to prevent the entire cold frame being blown away by the wind. longitudinal side also.
- Seite 8 Nut / rainure / groove I – 2 x J – 1 x K – 1 x N – 4 x Nut / rainure / groove rainure groove Auf Rechtwinkeligkeit achten! Make sure the frame is right-angled! Veillez à ce que les angles soient bien droits ! 4.
- Seite 9 Tipps für das Fixieren des Gemüsefliegennetzes: you to warm the plastic profiles (e.g. lay them in hot water or place Die Fixierung des Gemüsefliegennetzes erfolgt mit Kunststoff- them some time in the sun) before putting them in. After putting Nutprofilen, die in Nuten des Aluprofils eingedrückt werden, und one end of the plastic profile in, you can use a tool with rounded damit das Netz –...
- Seite 10 P – 2 x Schraube leicht anziehen! Lightly tighten the screw! Serrez légèrement la vis ! c – 1 x b – 1 x...
- Seite 11 W – 2 x Z – 2 x X – 4 x a – 4 x INNENSEITE INSIDE INTÉRIEUR DRÜCKEN PRESS APPUYER ACHTUNG! CAUTION! ATTENTION !
- Seite 12 Må ikke gøres ren med skarpe, ru genstande eller aggressive agresszív tisztítószerekkel. rengøringsmidler! JUWEL H. Wüster GmbH · A-6460 Imst, Industriezone 19, Tel. 05412-69400 oder D-82467 Garmisch- Parten kirchen, Bahnhof str. 31, Tel. 08821-1679 · E-Mail: kund@juwel.com · Internet: www.juwel.com...