Herunterladen Inhalt Inhalt Diese Seite drucken
Inhaltsverzeichnis

Werbung

Verfügbare Sprachen
  • DE

Verfügbare Sprachen

  • DEUTSCH, seite 54

Werbung

Inhaltsverzeichnis
loading

Inhaltszusammenfassung für Telefunken DPF10333

  • Seite 2: Inhaltsverzeichnis

    DIGITAL PHOTO FRAME OPERATING INSTRUCTIONS TELEFUNKEN DPF 10333 Learn about and install your frame ..........2 1. Box contents ......................2 2. Frame diagrams ....................3 3. Remote control ...................... 3 4. Installation ......................4 Use your frame ................. 4 1.
  • Seite 3: Learn About And Install Your Frame

    “Left” key of the digital frame during 3 seconds. Learn about and install your frame Thank you for your recent purchase of a TELEFUNKEN “DIAMOND Series” digital photo frame. Before using your device, please consult these operating instructions and keep them so you may refer to them later.
  • Seite 4: Frame Diagrams

    2. Frame diagrams Light Sensor Control buttons Wall mount Adjustable stand 3. Remote control All functions can be accessed with the remote control. Press the following keys to access the functions: Function ▲ Navigation up in the menus ◄ Navigation left in the menus and skip to the previous file (photo, music or movie) ▼...
  • Seite 5: Installation

    (SLIDESHOW) Start the photo slideshow directly MUSIC Access setup menu (MUSIC) directly VIDEO Access setup menu (VIDEO) directly SETUP Access setup menu (Settings) directly 4. Installation Take your frame and its accessories out of their packaging. Remove the plastic film protecting the front of the frame. Pull the plastic tab protecting the contacts in the remote control.
  • Seite 6: Eco Logic" Mode

    2. “ECO LOGIC” mode ECO LOGIC mode combines 3 essential elements to reduce energy consumption by over 40% compared to a standard frame: A LED screen, which uses less energy while improving picture quality; A low-energy and 'Energy Star'-certified power adapter; A light sensor.
  • Seite 7: Copying Photos To The Internal Memory

    Your photos are now copied into the internal memory and sized to the frame's resolution. Resizing allows the copies to fit the resolution of your frame, considerably reducing their file size. Thanks to this system, you can store over 10,000 photos in the internal memory.
  • Seite 8 5. Choose the directory where you want to store your file using the “Up/ Down” keys and press “Enter”. Your file has been copied. If your memory card contains one or more folders, you can copy them one by one in full. They will be stored in the internal memory folder of your choice, and you can play each back independently of the others.
  • Seite 9: Deleting Photos

    5. Deleting photos You can delete photos that are in your frame's internal memory. Delete your photos from the file manager If you use this method, you can only delete one file at a time. 1. Press the “Exit” key on your remote as many times as necessary for the media selection screen to come up.
  • Seite 10 4. Select the file using the “Up/Down” keys on the remote, and press the “Copy/Del” key. The screen will display “Delete file? YES/NO”. Choose the desired option and press “Enter”. Your file has been deleted. You can also delete one of your personal folders located in one of the preset directories. Delete your photos from the thumbnail mode With this method, you can delete all or a selection of photos in the internal memory.
  • Seite 11: Selecting The Type Of Files To Play

    III. Selecting the type of files to play 1. Internal memory/Removable media If no media has been inserted, the slideshow from the internal memory will launch automatically whenever the frame is turned on. If there is a memory card or a flash drive inserted when the frame is turned on, the card’s content will be played.
  • Seite 12: Videos

    Press the “Enter” key repeatedly to select the play mode as follows:  Photo Slideshow  Slideshow+Music  Single Photo 4. Videos Press the “Exit” key twice to display the main screen. Using the “Left/Right” arrows on the remote, select the “Video”...
  • Seite 13: Settings

    / Use the “Left/Right” keys to select (Previous/Next) on screen, and then press “Enter”. / Use the “Left/Right” keys to select (Rewind/Fast Forward)) on screen, and then press “Enter”.  Use the “Left/Right” keys to select (Volume) on screen, and then press “Enter”...
  • Seite 14 Display mode Select “Display Mode” using the “Up/Down” keys on the remote and press “Enter”, then use the “Up/Down” keys to choose between:  Slideshow: images scroll one after another  Thumbnails: the images display as thumbnails. (Note: When your frame is in this mode, you can access Slideshow, Slideshow+Music or Single by pressing the “Enter”...
  • Seite 15   Grid  Rect  Close Slideshow repeat Select “Slideshow repeat” using the “Up/Down” keys on the remote and press “Enter”, then use the “Up/Down” keys to choose between:  Repeat: the slideshow plays in a loop  Once: the slideshow is played once ...
  • Seite 16: Music Setup

    Repeat one: each track will be played twice Music Effect Your TELEFUNKEN frame has an equalizer to adapt the sound to the type of music being listened to. Select “Music Effect” using the “Up/Down” keys on the remote and press “Enter”, then use the “Up/Down”...
  • Seite 17: Video Setup

    Select “Auto Play” using the “Up/Down” keys on the remote, and then press “Enter” key to select “On” or “Off”. 3. Video Setup In the settings menu, select the “Video Setup” using the “Up/Down” keys on your remote and press “Enter”.
  • Seite 18 The calendar's display mode Select “Display Mode” using the “Up/Down” keys on the remote and press “Enter”, then use the “Up/Down” keys to choose between:  Monthly Calendar  Calendar  Analog clock Date Format Select “Date Format” using the “Up/Down” keys on the remote and press “Enter”, then use the “Up/Down”...
  • Seite 19  Use the “Up/Down” keys to choose between Hour, Min, AM, PM  Use the “Left/Right” keys to set the values for Hour, Min, AM, PM Alarm frequency Select “Alarm Frequency” using the “Up/Down” keys on the remote and press “Enter”, then use the “Up/Down”...
  • Seite 20: System Configuration

    5. System configuration This menu allows you to set the operating parameters of your frame. Light sensor on/off Select “Light sensor” using the “Up/Down” keys on the remote, then press “Enter” key to choose “On” or “Off”. Language Select “Language” using the “Up/Down” keys on the remote and press “Enter”, then use the “Up/Down”...
  • Seite 21 Power on Select “Power on” using the “Up/Down” keys on the remote, then press the “Enter” key to select “On” or “Off”. Auto boot time Select “Auto Boot Time” using the “Up/Down” keys on the remote and press “Enter”, then: ...
  • Seite 22: Connecting To A Computer

    Connecting to a computer It is possible to transfer files to the frame by connecting it to your personal computer. To do so, connect your frame via USB cable (mini-USB port on the frame, and standard USB port for the computer) to the computer, then turn on your frame: the frame's screen will show “PC connection...”...
  • Seite 23: Safety Instructions

    Safety instructions Handle the digital photo frame with care, and avoid touching the screen; fingerprints are difficult to remove. Always set the digital photo frame on a flat and stable surface to prevent it from falling and being damaged. Avoid exposing the digital photo frame to the sun or high temperatures, as these may damage the frame or reduce its operational life.
  • Seite 24: Warranty

    VII. Warranty The warranty does not cover damage caused if you (or any unauthorized person) tried to repair the frame. If the frame is emitting smoke, noise, or an unusual smell, immediately turn it off and unplug it. Contact your store. If you do not use the digital frame for a while, make sure to unplug the power cord.
  • Seite 25 Exclusions Damage or defects caused by the improper use or handling of the digital frame, or by the use of accessories, which are not original or not recommended in these instructions, are not covered by the warranty. The warranty does not cover damage caused by outside elements, like lightning, water, or fire, or any other damage caused during transport.
  • Seite 26: Specifications

    VIII. Specifications Specifications DPF 10333 DIAMOND Screen size 10,4’’ (26,4 cm) Resolution 800 x 600 Screen type Image ratio Internal memory 2 GB Audio/video Cards supported SD/MMC,SDHC, MS, XD, USB sticks Files supported JPEG,/WAV, MP3/MPEG1,4, MOTION JPEG Auto resizing Auto rotation Power input 100-240 V AC 50/60 Hz Power output...
  • Seite 27 MODE D’EMPLOI CADRE PHOTOS NUMERIQUES TELEFUNKEN DPF 10333 Découvrez et installez votre cadre ............2 1. Contenu de la boîte ......................2 2. Schémas ........................... 3 3. Télécommande ......................... 3 4. Installation ......................... 4 Utilisez votre cadre ..................4 1. Sélection de la langue ....................... 4 2.
  • Seite 28: Découvrez Et Installez Votre Cadre

    3 secondes sur la touche « Gauche » du cadre. Découvrez et installez votre cadre Vous venez d’acheter un cadre photo numérique TELEFUNKEN « Série DIAMOND » et nous vous en remercions. Avant d’utiliser votre appareil, veuillez consulter le présent mode d’emploi et le conserver afin de pouvoir vous y reporter ultérieurement.
  • Seite 29: Schémas

    2. Schémas 3. Télécommande Toutes les fonctions peuvent être contrôlées depuis la télécommande. Utilisez les touches suivantes pour accéder aux différentes fonctions : Touche Fonction ▲ Pour sélectionner l’option supérieure du menu. Pour sélectionner l’option de gauche du menu/sélectionner le fichier précédent ◄...
  • Seite 30: Installation

    Pour agrandir l’image, appuyez de manière répétée sur cette touche pour permuter entre les différents modes de zoom : x2, x4, x8 et x16 ; appuyez à nouveau sur cette touche pour afficher l’image sous sa taille normale. Pour diminuer le volume, le niveau de volume s’affiche dès la pression de cette touche.
  • Seite 31: Le Mode « Eco Logic

    2. Le mode « ECO LOGIC » Le mode ECO LOGIC associe 3 éléments essentiels permettant une réduction de la consommation d’énergie de plus de 40% par rapport à un cadre standard : Un écran LED, moins gourmand en énergie tout en améliorant la qualité de l’image Un adaptateur secteur basse consommation certifié...
  • Seite 32: Copie De Photos Vers La Mémoire Interne

    Votre carte mémoire est automatiquement détectée Après quelques secondes, le message «Voulez vous copier dans la mémoire interne ?» s’affiche Sans intervention de votre part au bout de 15 secondes, le diaporama contenu dans la carte sera lu mais les images ne seront pas copiées.
  • Seite 33 Copier vos fichiers à partir du gestionnaire de fichiers Si vous utilisez cette méthode, vous ne pourrez copier les fichiers que un par un et n’aurez pas la possibilité de les redimensionner à la résolution du cadre. 1. Appuyez sur la touche « Exit » de votre télécommande autant de fois que nécessaire pour afficher l’écran de choix des supports.
  • Seite 34: Suppression De Photos

    3. A l’aide des touches « droite gauche », sélectionnez le mode photo et appuyez sur « Enter ». Le diaporama se lance. 4. Appuyez sur la touche « Exit » de la télécommande pour accéder aux vignettes. 5. Appuyez sur la touche « Copy/Del ». L’écran affiche «...
  • Seite 35 appuyez sur « Enter ». 3. Sélectionnez la photo ou le fichier musical ou vidéo pour à l’aide des touches « Haut/Bas » de la télécommande et appuyez sur la touche « Copy/Del ». L’écran affiche « Supprimer fichier ?- Oui/Non ».
  • Seite 36: Sélection Du Type De Fichiers À Lire

    III. Sélection du type de fichiers à lire 1. Mémoire interne/Support amovible Lorsqu’aucun support n’est inséré, le diaporama de la mémoire interne se lance automatiquement à l’allumage du cadre. Si une carte mémoire ou une clé USB est insérée au moment de la mise en route, c’est le contenu de la carte qui sera lu.
  • Seite 37: Les Photos

    3. Les photos Appuyez autant de fois que nécessaire sur la touche « Exit » pour afficher l’écran principal. A l’aide des flèches « Gauche/Droite » de la télécommande, sélectionnez l’icône « Photo ». Appuyez de manière répétée sur la touche « Enter » pour sélectionner le mode de lecture : ...
  • Seite 38: La Musique

    5. La musique Appuyez autant de fois que nécessaire sur la touche « Exit » pour afficher l’écran principal. A l’aide des flèches « Gauche/Droite » de la télécommande, sélectionnez l’icône « Musique ». Appuyez sur la touche « Entée » : la lecture de la musique démarre.
  • Seite 39: Les Réglages

    Les réglages Lorsque vous êtes sur l’écran principal, Sélectionnez l’icône « Regl. » à l’aide des touches « Gauche/Droite » de votre télécommande pour accéder aux différents réglages de votre cadre. En cours de lecture d’un diaporama, appuyez simplement sur la touche «...
  • Seite 40  Recadrer pour remplir : la photo est centrée puis rognée afin de pouvoir être affichée  Plein écran : la photo est modifiée afin de pouvoir être affichée en plein écran Durée du diaporama Sélectionnez « Durée diaporama » à l’aide des touches directionnelles « Haut/Bas » de la télécommande puis appuyez sur la touche «...
  • Seite 41: Réglages Musique

    Répétition du diaporama Sélectionnez « Répéter diaporama » à l’aide des touches directionnelles « Haut/Bas » de la télécommande puis appuyez sur la touche « Enter », utilisez les touches directionnelles « Haut/Bas » pour sélectionner parmi :  Répéter : le diaporama est lu en boucle. ...
  • Seite 42 Répéter une fois : chaque piste est lue deux fois. Effet musical Votre cadre TELEFUNKEN est doté d’un égaliseur permettant d'adapter le son à la musique écoutée. Sélectionnez « Effet musical » à l’aide des touches directionnelles « Haut/Bas » de la télécommande puis appuyez sur la touche «...
  • Seite 43: Configuration Vidéo

    Lecture automatique Lorsque cette option est activée, les fichiers audio sont automatiquement lus dès l’activation du mode Audio. Sélectionnez « Lecture automatique » à l’aide des touches directionnelles « Haut/Bas » de la télécommande puis appuyez sur la touche « Enter » pour sélectionner parmi « Activé » ou «...
  • Seite 44: Configuration Calendrier

    4. Configuration calendrier Sélectionnez l’option « Configuration calendrier » du menu Configuration à l’aide des touches directionnelles « Haut/Bas » de la télécommande, appuyez ensuite sur la touche « Enter ». Utilisez les touches directionnelles ou la touche « Enter » pour régler : Le mode d’affichage du calendrier Sélectionnez «...
  • Seite 45 pour sélectionner parmi le format 12 heures et 24 heures, appuyez sur la touche « Enter » pour confirmer. Heure de l’horloge Sélectionnez « Heure de l’horloge » à l’aide des touches directionnelles « Haut/Bas » de la télécommande, appuyez ensuite sur la touche « Enter », ensuite : ...
  • Seite 46: Configuration Système

    5. Configuration système Ce menu vous permet de régler les paramètres de fonctionnement de votre cadre. L’activation/Désactivation du capteur de luminosité Sélectionnez « Capteur de lumière » à l’aide des touches directionnelles « Haut/Bas » de la télécommande puis appuyez sur la touche « Enter » pour sélectionner parmi «...
  • Seite 47 Saturation Sélectionnez « Saturation » à l’aide des touches directionnelles « Haut/Bas » de la télécommande puis appuyez sur la touche « Enter », utilisez les touches directionnelles « Gauche/Droite » pour régler le niveau de luminosité de 1 à 16. Teinte Sélectionnez «...
  • Seite 48: Connexion À Un Ordinateur

    Fréquence d’alimentation automatique Sélectionnez « Fréquence d’alimentation automatique » à l’aide des touches directionnelles « Haut/Bas » de la télécommande puis appuyez sur la touche « Enter », utilisez les touches directionnelles « Haut/Bas » pour sélectionner parmi :  Une fois ...
  • Seite 49 Cliquez sur « ouvrir le dossier et afficher les fichiers » afin de visualiser le contenu de la mémoire interne. L’écran suivant s’affiche : Ouvrez le répertoire dans lequel sont stockés les fichiers que vous souhaitez transférer dans le cadre, et déposez les dans le dossier voulu par « copier/coller » ou « Glisser/déposer ». Attention ! Les photos ainsi transférées ne seront pas redimensionnées.
  • Seite 50: Instructions De Sécurité

    Instructions de sécurité Manipulez le cadre photo numérique avec précaution et évitez de toucher l’écran ; les traces de doigts sont difficiles à enlever. Placez toujours le cadre photo numérique sur une surface plane et stable pour éviter qu’il ne tombe et ne soit endommagé.
  • Seite 51: Garantie

    VII. Garantie La garantie ne couvre pas les dommages causés si vous (ou toute personne non habilitée) avez tenté de réparer le cadre. Si le cadre émet de la fumée, un bruit ou une odeur inhabituelle, éteignez-le et débranchez-le immédiatement. Contactez votre magasin. Si vous n’utilisez pas le cadre numérique pendant quelques temps, veillez à...
  • Seite 52 La période de garantie n’est pas prolongée en cas de réparation ou d’échange du cadre numérique par notre Service Après vente. Exclusion Les dommages ou défauts causés par une mauvaise utilisation ou manipulation du cadre numérique et par l’utilisation d’accessoires autres que ceux d’origine ou non recommandés par la présente notice ne sont pas couverts par la garantie.
  • Seite 53: Caractéristiques Techniques

    VIII. Caractéristiques techniques Caractéristiques DPF 10333 DIAMOND Taille 10,4 (26,4 cm)˝ Définition 800 x 600 Type d’écran Ratio image Mémoire interne 2 Go Audio/vidéo Cartes compatibles SD/MMC,SDHC, MS, XD, Clés USB Fichiers lus JPEG /WAV, MP3/MPEG1,4, MOTION JPEG Redimensionnement auto Rotation auto Enter alimentation 100-240 V AC 50/60 Hz...
  • Seite 54 GEBRAUCHSANWEISUNG FÜR DIGITALEN BILDERRAHMEN TELEFUNKEN DPF 10333 DIAMOND Auspacken und Installieren Ihres Bilderrahmens ......2 1. Inhalt der Verpackung ....................... 2 2. Abbildungen des Bilderrahmens ..................3 3. Fernbedienung ........................3 4. Installation ........................... 4 Benutzung Ihres Bilderrahmens ............4 1.
  • Seite 55: Auspacken Und Installieren Ihres Bilderrahmens

    HINWEIS FÜR DEN NUTZER: Bei Inbetriebnahme des Rahmens wird die Demo-Animation angezeigt. Um diese zu verlassen und auf die ow“ Funktionen des Rahmens zuzugreifen, drücken Sie einfach die Taste Ihrer Fernbedienung, oder drücken Sie auf dem digitalen Bilderrahmen für 3 Sekunden. Auspacken und Installieren Ihres Bilderrahmens Sie Ihr Gerät benutzen, lesen Sie bitte die vorliegende Gebrauchsanweisung durch und bewahren Sie sie gut auf, um später auf sie zurückgreifen zu können.
  • Seite 56: Abbildungen Des Bilderrahmens

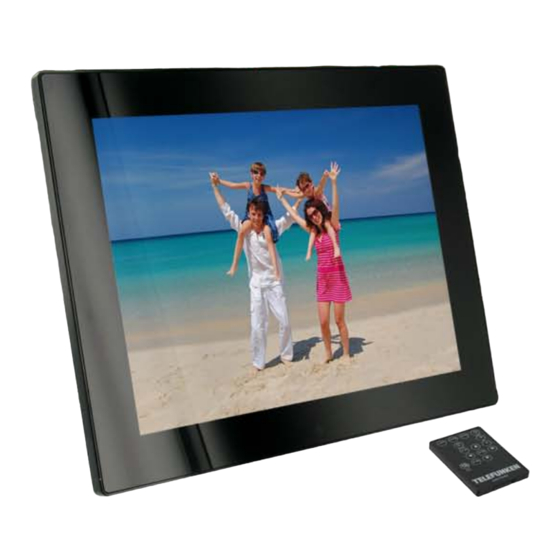
    2. Abbildungen des Bilderrahmens Lichtsensor Kontrolltasten Wandaufhänger Justierbarer Ständer 3. Fernbedienung Alle Funktionen können mit der Fernbedienung ausgeführt werden. Drücken Sie die folgenden Tasten, um die jeweiligen Funktionen zu aktivieren: Taste Funktion ▲ In den Menüs nach oben navigieren In den Menüs nach links navigieren und zur vorherigen Datei (Bild, Musik oder ◄...
  • Seite 57: Installation

    Bild vergrößern, drücken Sie mehrmals, um durch die verschiedenen Zoom-Modi zu schalten x2, x4, x8 und x16. Drücken Sie nochmals, um zur Ausgangsgröße zu gelangen Lautstärke verringern, die Lautstärke wird angezeigt (SLIDESHOW) Diashow direkt starten MUSIC Einstellungsmenü (MUSIC) direkt aufrufen VIDEO Einstellungsmenü...
  • Seite 58: Der Stromsparmodus

    Achtung: Die Demo-Animation befindet sich in einem Ordner mit der Bezeichnung „DEMO“. Diese Animation sollte entfernt werden, um die 2 GB internen Speicher nutzen zu können. 2. Der Stromsparmodus Der Stromsparmodus verbindet drei wesentliche Elemente, die im Vergleich zu einem Standardrahmen für eine Verringerung des Energieverbrauchs um mehr als 40% sorgen: Einen LED-Bildschirm, der bei verbesserter Bildqualität weniger Energie benötigt Einen Energie sparenden Netzadapter mit Energy-Star-Zertifizierung...
  • Seite 59: Kopieren Von Fotos In Den Internen Speicher

    Falls Ihr Rahmen eingeschaltet ist und die Diashow des internen Speichers abspielt: Ihre Speicherkarte wird automatisch erkannt Nach einigen Sekunden erscheint die Nachricht „Möchten Sie die Bilder in den internen Speicher kopieren?“ Falls Sie innerhalb von 15 Sekunden nicht reagieren, werden die auf der Karte enthaltenen Bilder als Diashow abgespielt, die Bilder werden jedoch nicht kopiert.
  • Seite 60 Kopieren Ihrer Fotos über den Dateimanager Falls Sie diese Methode anwenden, können Sie die Dateien nur eine nach der anderen kopieren und haben nicht die Möglichkeit, sie auf die Auflösung des Bilderrahmens zu skalieren. 1. Drücken Sie die „Exit“-Taste Ihrer Fernbedienung so oft, bis die Datenträger-Auswahl auf dem Bildschirm erscheint.
  • Seite 61: Löschen Von Fotos

    2. Wählen Sie mit den Tasten „Links/Rechts“ der Fernbedienung den mobilen Datenträger, auf sich kopierenden Fotos befinden (Speicherkarte oder USB-Stick). Drücken Sie auf „Enter“. 3. Wählen Sie mit den Tasten „Links/Rechts“ den Fotomodus und drücken Sie auf „Enter“. Die Diashow startet.
  • Seite 62 2. Wählen Sie mit den Tasten „Links/Rechts“ der Fernbedienung das Symbol „Dateien“ aus und drücken Sie auf „Enter“. 3. Wählen Sie das Foto mit den Tasten „Hoch/Runter“ der Fernbedienung aus und drücken Sie auf die Taste „Copy/Del“. Auf dem Bildschirm erscheint „Datei löschen? –Ja/Nein“. Wählen Sie die gewünschte Option und drücken Sie auf „Enter“.
  • Seite 63: Auswahl Des Zu Lesenden Dateityps

    III. Auswahl des zu lesenden Dateityps 1. Interner Speicher/Mobiler Datenträger Wenn kein Datenträger eingeschoben ist, startet beim Einschalten des Rahmens automatisch die Diashow des internen Speichers. Falls sich beim Einschalten eine Speicherkarte oder ein USB-Speicher im Rahmen befindet, wird der Inhalt der Karte bzw. des USB-Speichers abgespielt.
  • Seite 64: Fotos

    3. Fotos „Exit“-Taste Drücken oft, Hauptbildschirm gelangen. Wählen Sie mit den Richtungstasten „Links/Rechts“ der Fernbedienung das Symbol „Foto“. Drücken Sie „Enter“ mehrfach, um die Wiedergabemodi auszuwählen:  Diashow  Diashow+Musik  Einzelfoto 4. Videos Drücken Sie die „Exit“-Taste so oft, bis Sie zum Hauptbildschirm gelangen.
  • Seite 65: Musik

    5. Musik Drücken Sie die „Exit“-Taste so oft, bis Sie zum Hauptbildschirm gelangen. Wählen Sie mit den Richtungstasten „Links/Rechts“ der Fernbedienung das Symbol „Musik“. Drücken Sie „Enter“: die Musik wird abgespielt. Wählen Sie mit den „Links/Rechts“ Tasten / (Wiedergabe/Pause) auf dem Bildschirm und drücken Sie „Enter“.
  • Seite 66: Einstellungen

    Einstellungen Wenn Sie sich auf dem Hauptbildschirm befinden, wählen Sie das Symbol „Einst.“ mit den Tasten „Links/Rechts“ und „Hoch/Runter“ Ihrer Fernbedienung, um zu den verschiedenen Einstellungsmöglichkeiten für Ihren Bilderrahmen zu gelangen. Falls Ihre Fotos abgespielt werden, drücken Sie einfach auf die „Setup“-Taste Ihrer Fernbedienung, um auf die Einstellungsmenüs zuzugreifen.
  • Seite 67 Diashowintervall Wählen Sie „Diashow Intervall“ mit den Tasten „Hoch/Runter“ auf der Fernbedienung, drücken Sie „Enter“, wählen Sie mit den Tasten „Hoch/Runter“:  5 Sek.  15 Sek.  30 Sek.  60 Sek.  5 Min.  15 Min. Diashow Bildübergang Wählen Sie „Diashow Bildübergang“...
  • Seite 68: Musikeinstellungen

     1 Wiederholen: Jeder Titel wird zwei Mal abgespielt. Musikeffekt Ihr TELEFUNKEN Bilderrahmen verfügt über einen Equalizer, um den Ton an die abgespielte Musik anzupassen. Wählen Sie „Musikeffekt“ mit den Tasten „Hoch/Runter“ auf der Fernbedienung, drücken Sie „Enter“, wählen Sie mit den Tasten „Hoch/Runter“: Dokument ohne vertraglichen Charakter.
  • Seite 69: Videoeinstellungen

    Sanft Spektrum anzeigen Während der Wiedergabe einer Musikdatei können Sie den Equalizer auf dem Bildschirm Ihres TELEFUNKEN Bilderrahmens anzeigen. Wählen Sie „Spektrum anzeigen“ mit den Tasten „Hoch/Runter“ auf der Fernbedienung, drücken Sie „Enter“, um „Ein“ oder „Aus“ zu wählen. Automatische Wiedergabe Ist diese Funktion aktiviert, spielt der Bilderrahmen Audiodateien automatisch ab, sobald der Audiomodus gewählt wurde.
  • Seite 70: Kalendereinstellungen

     Einmal: Ihr Video wird ein Mal abgespielt. Automatische Wiedergabe Ist diese Funktion aktiviert, spielt der Bilderrahmen Videodateien automatisch ab, sobald der Videomodus gewählt wurde. Wählen Sie „AutoPlay“ mit den Tasten „Hoch/Runter“ auf der Fernbedienung, drücken Sie „Enter“, um „Ein“ oder „Aus“ zu wählen. 4.
  • Seite 71 Zeitformat (12- oder 24-Stunden) Wählen Sie „Zeitformat“ mit den Tasten „Hoch/Runter“ auf der Fernbedienung, drücken Sie „Enter“, drücken Sie nun „Hoch/Runter“, um das 12- oder 24-Stunden-Format zu wählen, drücken Sie „Enter“ zum Bestätigen. Uhrzeit Wählen Sie „Uhrzeit“ mit den Tasten „Hoch/Runter“ auf der Fernbedienung, drücken Sie „Enter“: ...
  • Seite 72: Systemeinstellung

    5. Systemeinstellung Dieses Menü ermöglicht es Ihnen, die Funktionsparameter Ihres Bilderrahmens einzustellen. Aktivierung/Deaktivierung des Helligkeitssensors Wählen Sie „Lichtsensor“ mit den Tasten „Hoch/Runter“ auf der Fernbedienung, drücken Sie „Enter“, um „Ein“ oder „Aus“ zu wählen. Sprache Wählen Sie „Sprache“ mit den Tasten „Hoch/Runter“ auf der Fernbedienung, drücken Sie „Enter“, wählen Sie mit den Tasten „Hoch/Runter“: ...
  • Seite 73 Einschalten Wählen Sie „Einschalten“ mit den Tasten „Hoch/Runter“ auf der Fernbedienung, drücken Sie „Enter“, um „Ein“ oder „Aus“ zu wählen. Automatische Einschaltzeit Wählen Sie „Auto Einschaltzeit“ mit den Tasten „Hoch/Runter“ auf der Fernbedienung, drücken Sie „Enter“: Wählen Sie mit „Hoch/Runter“ Stunde, Minute, AM, PM. ...
  • Seite 74: Verbindung Mit Einem Computer

    Versionsnummer der internen Software (nur zu Ihrer Information). Verbindung mit einem Computer Es ist möglich, Dateien von einem PC auf den Bilderrahmen zu übertragen. Schließen Sie hierfür Ihren Bilderrahmen mit einem USB-Kabel (Mini-USB-Stecker für den Rahmen, Standard-USB-Stecker für den Computer) an den Computer an und schalten Sie den Rahmen ein: auf dem Bildschirm des Rahmens erscheint „PC-Verbindung …“.
  • Seite 75 Öffnen Sie das Verzeichnis, in dem die Dateien gespeichert sind, die Sie auf den Rahmen übertragen wollen, und übertragen Sie sie durch „Kopieren und Einfügen“ oder „Ziehen und Ablegen“ in den gewünschte Ordner. Achtung! Die so übertragenen Fotos werden nicht skaliert. Ziehen Sie das USB-Kabel heraus: Ihr Bilderrahmen nimmt seinen Betrieb automatisch wieder auf.
  • Seite 76: Sicherheitshinweise

    Sicherheitshinweise Behandeln Sie den digitalen Bilderrahmen mit Vorsicht und vermeiden Sie es, den Bildschirm zu berühren, denn Fingerabdrücke lassen sich nur schwer entfernen. Stellen Sie den digitalen Bilderrahmen stets auf einer ebenen und stabilen Fläche auf, um Schäden durch Herunterfallen zu vermeiden. Setzen Sie Ihren Bilderrahmen nicht der Sonne oder hohen Temperaturen aus, da er hierdurch beschädigt oder seine Gebrauchsdauer verringert werden könnte.
  • Seite 77: Garantie

    VII. Garantie Die Garantie deckt keine Schäden ab, die durch einen Reparaturversuch durch Sie (oder eine andere nicht autorisierte Person) entstanden sind. Sollte der Bilderrahmen Rauch, ein ungewöhnliches Geräusch oder einen ungewöhnlichen Geruch abgeben, schalten Sie ihn unverzüglich aus und ziehen Sie das Kabel aus der Steckdose. Kontaktieren Sie Ihren Händler.
  • Seite 78 Ausschluss Schäden oder Defekte, die durch eine unsachgemäße Benutzung oder Handhabung des digitalen Bilderrahmens oder durch die Verwendung von nicht originalen Zubehörteilen oder von Zubehörteilen, die von der vorliegenden Gebrauchsanweisung nicht empfohlen werden, entstehen, sind von der Garantie ausgeschlossen. Die Garantie deckt keine Schäden ab, die durch äußere Einflüsse wie Blitz, Wasser oder Feuer verursacht werden oder während eines Transports entstehen.
  • Seite 79: Technische Merkmale

    VIII. Technische Merkmale Merkmale DPF 10333 DIAMOND 26,4 cm (10,4˝) Größe Auflösung 800 x 600 Bildschirmtyp Bildratio Interner Speicher 2 GB Audio/Video Kompatible Karten SD/MMC,SDHC, MS, XD,USB Stick Abgespielte Dateien JPEG,/WAV, MP3/MPEG1,4, MOTION JPEG Automatische Skalierung Automatisches Drehen Eingangsspannung 100-240 V AC 50/60 Hz Ausgangsspannung 5 V DC, 2 Ah Stromverbrauch im Standby...
  • Seite 80 INSTRUCCIONES DE USO MARCOS DE FOTOS DIGITALES TELEFUNKEN DPF 10333 DIAMOND Descubra e instale su marco............2 1. Contenido de la caja ..................... 2 2. Esquemas del marco .................... 3 3. Mando a distancia ....................3 4. Instalación ......................4 Utilice su marco ................
  • Seite 81: Descubra E Instale Su Marco

    «Izquierda» del marco durante 3 segundos. I. Descubra e instale su marco Le agradecemos la compra de un marco de fotos digital TELEFUNKEN «Serie DIAMOND». Antes de utilizar el aparato, lea las presentes instrucciones de uso, y luego guárdelas para poder consultarlas posteriormente.
  • Seite 82: Esquemas Del Marco

    2. Esquemas del marco Sensor de luminosidad Botones de control Gancho de pared Base ajustable 3. Mando a distancia Puede acceder a todas las funciones con el mando a distancia. Pulse las teclas siguientes para acceder a las funciones: Tecla Función ▲...
  • Seite 83: Instalación

    Agrandar la imagen, púlsela varias veces para pasar por los modos de ampliación x2, x4, x8 y x16; púlsela una vez más para regresar al tamaño normal Bajar el volumen, aparece en pantalla el nivel de volumen (SLIDESHOW) Inicia la presentación de fotos directamente MUSIC Accede al menú...
  • Seite 84: Modo «Eco Logic

    2. Modo «ECO LOGIC» El modo ECO LOGIC asocia 3 elementos esenciales que permiten reducir el consumo de energía más de un 40% en comparación con un marco estándar: Una pantalla LED, que consume menos energía a la vez que mejora la calidad de la imagen Un adaptador de corriente de bajo consumo certificado «Energy Star»...
  • Seite 85: Copia De Fotos En La Memoria Interna

    Al cabo de unos segundos, aparecerá el mensaje «¿Desea copiar los datos en la memoria interna?» Si no realiza ninguna acción durante 15 segundos, se iniciará la presentación de diapositivas desde la tarjeta pero no se copiarán las imágenes. 1. Si responde «Sí» a la petición de copia de las imágenes, aparecerá el mensaje «¿Copiar archivos? »...
  • Seite 86 1. Pulse el botón «Exit» del mando a distancia tantas veces como sea necesario hasta ver la pantalla de selección de soportes. 2. Por medio de los botones «Izquierda/Derecha» del mando a distancia, seleccione el icono «Archivos» y pulse «Enter». 3.
  • Seite 87: Supresión De Fotos

    6. Pulse el botón «Copy/Del». Aparecerá en la pantalla el mensaje «¿Copiar archivos? » (Selección o todas). Seleccione y pulse «Enter». Las miniaturas volverán a aparecer, con una casilla de verificación en la esquina superior izquierda de cada imagen. Seleccione las fotos que desee copiar mediante los botones «Izquierda/Derecha» del mando a distancia, y pulse «Enter»...
  • Seite 88 También puede eliminar una de sus carpetas personales ubicadas en uno de los directorios predefinidos. Suprima sus fotos mediante el modo de viñetas Mediante este método, puede suprimir una selección de fotos de la memoria interna o bien todas ellas. 1.
  • Seite 89: Selección Del Tipo De Archivos A Leer

    III. Selección del tipo de archivos a leer 1. Memoria interna/soporte extraíble Si no se ha insertado ningún soporte, la presentación de diapositivas de la memoria interna se inicia automáticamente al encender el marco. Si en el momento del encendido hay insertada una tarjeta de memoria o un lápiz USB, se reproducirá...
  • Seite 90: Fotos

    3. Fotos Pulse repetidamente el botón «Exit» para volver a la pantalla principal. Por medio de los botones «Izquierda/Derecha» del mando a distancia, seleccione el icono «Foto» . Pulse el botón de «Enter» varias veces para seleccionar el modo de reproducción de la siguiente manera: ...
  • Seite 91: Música

    5. Música Pulse repetidamente el botón «Exit» para volver a la pantalla principal. Por medio de los botones «Izquierda/Derecha» del mando a distancia, seleccione el icono «Música» . Pulse el botón de «Enter»: la música comenzará. Utilice los botones de «Izquierda/Derecha» para seleccionar /...
  • Seite 92: Ajustes

    IV. Ajustes Desde la pantalla principal, seleccione el icono «Ajustes» mediante los botones «Izquierda/Derecha» y «Arriba/Abajo» del mando a distancia para acceder a los distintos ajustes de su marco. Si está reproduciendo una presentación, simplemente pulse el botón de «Configuración» en su mando a distancia para acceder a los menús de configuración.
  • Seite 93 Duración de presentación Seleccione la «Duración de presentación» mediante los botones de «Arriba / Abajo» del mando a distancia y pulse «Enter», a continuación, use los botones de «Arriba / Abajo» para elegir entre:  5 seg.  15 seg. ...
  • Seite 94: Configuración De Música

    Ventana Mágica Seleccione los botones de «Ventana Mágica» mediante los botones de «Arriba / Abajo» del mando a distancia, a continuación, presione el botón de «Enter» para seleccionar «Sí» o «No». Reloj Seleccione «Reloj» mediante los botones de «Arriba / Abajo» del mando a distancia, a continuación, presione el botón de «Enter»...
  • Seite 95: Configuración De Video

    Efecto de la Música Su marco TELEFUNKEN tiene un ecualizador para adaptar el sonido al tipo de música que se escuche. Seleccione «Efecto de la Música» mediante los botones de «Arriba / Abajo» del mando a distancia y presione «Enter», a continuación, use los botones de «Arriba / Abajo» para elegir entre: ...
  • Seite 96: Configuración De Calendario

    Modo de reproducción Seleccione «Modo de reproducción» mediante los botones de «Arriba / Abajo» del mando a distancia y pulse «Enter», a continuación, use los botones de «Arriba / Abajo» para elegir entre:  Repetir: el vídeo se reproducirá en bucle ...
  • Seite 97 Fecha Seleccione «Fecha» mediante los botones de «Arriba / Abajo» del mando a distancia y pulse «Enter», entonces:  Utilice los botones de «Arriba / Abajo» para elegir entre Mes, Día, Año  Utilice los botones de «Derecha / Izquierda» para establecer los valores de Mes, Día, Año Modo de reloj (12 - 24 horas) Seleccione «Modo de reloj»...
  • Seite 98: Configuración Del Sistema

    5. Configuración del sistema Este menú le permite ajustar los parámetros de funcionamiento de su marco. La activación/desactivación del sensor de luminosidad Seleccione «Sensor de luz» mediante los botones de «Arriba / Abajo» del mando a distancia, a continuación, presione «Enter» para seleccionar «Sí»...
  • Seite 99 Tono Seleccione «Tono» mediante los botones de «Arriba / Abajo» del mando a distancia y pulse «Enter», a continuación, pulse el botón de «derecha / izquierda» para ajustar el nivel de tinte (1-100). Encendido Seleccione «Encendido» mediante los botones de «Arriba / Abajo» del mando a distancia, a continuación, presione el botón de «Enter»...
  • Seite 100: Conexión A Un Ordenador

    Restablecer Si el marco se maneja incorrectamente, puede ser útil restablecer la configuración predeterminada. Para ello, seleccione «Por defecto» mediante los botones de «Arriba / Abajo» del mando a distancia y pulse « Enter», entonces se recomienda usar los botones de «Arriba / Abajo» para seleccionar «Sí» o «No». Nota: Después de la restauración, la pantalla de selección de idioma aparecerá...
  • Seite 101 Aparece la siguiente pantalla: Abra el directorio donde estén almacenados los archivos que desee transferir al marco y trasládelos a la carpeta deseada mediante «copiar/pegar» o «Arrastrar/Mover». ¡Atención! Las fotos que se transfieran de este modo no cambiarán de tamaño. Desconecte el cable USB y el marco volverá...
  • Seite 102: Instrucciones De Seguridad

    VI. Instrucciones de seguridad Manipule el marco de fotos digital con precaución y evite tocar la pantalla; las marcas de dedos son difíciles de limpiar. Coloque en todo caso el marco de fotos digital sobre una superficie plana y estable para evitar que se caiga y se dañe.
  • Seite 103: Garantía

    VII. Garantía La garantía no cubre los daños ocasionados si usted (u otra persona no capacitada) intenta reparar el marco. Si el marco emite humo, un ruido o un olor no habitual, apáguelo y desenchúfelo de inmediato. Póngase en contacto con la tienda donde lo ha comprado. Si no utiliza el marco digital durante un tiempo, recuerde desenchufar el cable de alimentación.
  • Seite 104 La garantía no cubre los daños ocasionados por elementos exteriores como rayos, inundaciones o incendios, ni ningún otro daño ocasionado durante un transporte. No se podrá hacer ninguna reclamación de garantía si el número de serie del marco digital ha sido modificado, eliminado o borrado, o es ilegible.
  • Seite 105: Características Técnicas

    VIII. Características técnicas Características DPF 10333 DIAMOND 10,4 (26,4 cm) ” Tamaño Definición 800 x 600 Tipo de pantalla Relación de imagen Memoria interna 2 GB Audio/vídeo Tarjetas compatibles SD/MMC,SDHC, MS, XD, Clés USB Archivos reproducidos JPEG/WAV, MP3/MPEG1,4, MOTION JPEG Cambio de tamaño automático Rotación automática Entrada alimentación...
  • Seite 106 ISTRUZIONI PER L'USO DELLE CORNICI DIGITALI TELEFUNKEN DPF 10333 Descrizione e installazione della cornice ..........2 1. Contenuto della confezione ..................... 2 2. Schemi della cornice ....................... 3 3. Telecomando ........................3 4. Installazione ........................4 Utilizzo della cornice ................4 1.
  • Seite 107: Descrizione E Installazione Della Cornice

    "Sinistra" della cornice digitale per 3 secondi. Descrizione e installazione della cornice Grazie per aver acquistato una cornice digitale TELEFUNKEN "Serie DIAMOND". Prima di utilizzare questa apparecchiatura, consultare le presenti istruzioni per l'uso e conservarle per riferimento futuro.
  • Seite 108: Schemi Della Cornice

    2. Schemi della cornice Sensore di luminosita Pulsanti di comando Attacco a muro Piedino regolabile 3. Telecomando Il telecomando consente di accedere a tutte le funzioni. Premere i seguenti tasti per accedere alle varie funzioni: Tasto Funzione ▲ Navigazione in su nel menu ◄...
  • Seite 109: Installazione

    Diminuzione volume, il livello del volume viene visualizzato (SLIDESHOW) Avvia direttamente la presentazione delle foto MUSIC Accesso diretto al menù di setup (impostazioni) (MUSICA) VIDEO Accesso diretto al menù di setup (impostazioni) (VIDEO) SETUP Accesso diretto al menu di setup (impostazioni) 4.
  • Seite 110: Modalità "Eco Logic

    2. Modalità "ECO LOGIC" La modalità ECO LOGIC combina 3 elementi essenziali che consentono di ridurre il consumo di energia di oltre il 40% rispetto a una cornice standard: uno schermo LED, che migliora la qualità dell’immagine con un ridotto consumo energetico; un trasformatore di rete a basso consumo, certificato "Energy Star";...
  • Seite 111: Copia Di Foto Nella Memoria Interna

    Se non si interviene entro 15 secondi, lo slideshow contenuto nella scheda di memoria verrà letto ma le immagini non verranno copiate. Se si sceglie “si” alla richiesta di copia delle immagini, si visualizza il messaggio “Copiare i file?” Selezionare “Sì” e premere “Enter”.
  • Seite 112 1. Premere il tasto "Exit" del telecomando fino a visualizzare la schermata di selezione dei supporti. 2. Con tasti "Sinistra/Destra" telecomando, selezionare l'icona "File"e premere "Enter" 3. Selezionare il file da copiare con i tasti "Su/Giù" del telecomando e premere "Copy/Del". Viene visualizzato il messaggio seguente: "Copiare?"...
  • Seite 113: Eliminazione Di Foto

    Le miniature riappariranno con un box flaggato nell'angolo in alto a sinistra di ogni immagine. Selezionare le foto da copiare utilizzando i tasti "Sinistra/Destra" del telecomando e premendo "Enter" per ogni foto selezionata. Per ogni immagine selezionata, il quadratino viene contrassegnato da un segno di spunta.
  • Seite 114: Selezione Del Tipo Di File Da Leggere

    Eliminazione delle foto dalla modalità thumbnail Con questo metodo è possibile eliminare una selezione o tutte le foto della memoria interna. 1. Premere il tasto "Exit" del telecomando fino a visualizzare la schermata di selezione dei supporti. Selezionare la memoria interna utilizzando i tasti "Sinistra/Destra"...
  • Seite 115: Selezione Di Una Cartella/Modalità Multimediale

    Se, al momento dell’accensione, è inserita una scheda di memoria oppure una chiave USB, verrà letto il contenuto della scheda di memoria o della chiave USB. In questo caso, è possibile passare dalla scheda di memoria alla memoria interna in questo modo: Premere il tasto "Exit"...
  • Seite 116: Video

     Presentazione  Presentazione +Musica  Immagine singola 4. Video Premere il tasto "Exit" fino a visualizzare la schermata principale. Con le frecce "Sinistra/Destra" del telecomando, selezionare l'icona "Video". Premere il tasto "Enter": il video verrà avviato. / Utilizzare i tasti "Sinistra/Destra" per selezionare (Play/Pausa) sullo schermo, quindi premere “Enter”.
  • Seite 117: Impostazioni

    / Utilizzare i tasti "Sinistra/Destra" per selezionare (Precedente/Successivo) sullo schermo, e quindi premere “Enter”. / Utilizzare i tasti "Sinistra/Destra" per selezionare (Riavvolgimento/Avanzamento rapido) sullo schermo, quindi premere “Enter”.  Utilizzare i tasti "Sinistra/Destra" per selezionare (Volume) sullo schermo, quindi premere per abbassare il volume.
  • Seite 118 Quindi sarà possibile di modificare le impostazioni utilizzando i tasti freccia sul telecomando. Modalità visualizzazione Selezionare "Modalità visualizzazione" utilizzando i tasti "Su/Giù" sul telecomando e premete “Enter”, quindi utilizzare i tasti "Su/Giù" per scegliere tra:  Presentazione: le immagini scorrono una dopo l'altra ...
  • Seite 119  Partizione  Cancellare  Persiane   Griglia  Rect.  Chiudi Ripeti presentazione Selezionare "Ripeti presentazione" utilizzando i tasti "Su/Giù" sul telecomando e premete “Enter”, quindi utilizzate i tasti "Su/Giù" per scegliere tra:  Ripeti: la presentazione viene riprodotta di continuamente ...
  • Seite 120: Impostazioni Musica

    Ripeti una volta: ogni traccia sarà riprodotta due volte Effetto Musica La vostra cornice TELEFUNKEN è dotata di un equalizzatore per adattare la resa audio al tipo di musica che state ascoltando. Selezionate "Effetto musica" utilizzando i tasti "Su/Giù" sul telecomando e premere “Enter”, quindi utilizzare i tasti"Su/Giù"...
  • Seite 121: Impostazioni Video

    Selezionare "Auto Play" utilizzando i tasti "Su/Giù" sul telecomando, quindi premere il tasto “Enter” per selezionare”Acceso” o “Spento”. 3. Impostazioni Video All'interno del menu di impostazione, selezionare la riga "Impostaz. Video" con i tasti "Su/Giù" del telecomando e premere "Enter". Modalità...
  • Seite 122 Modalità di visualizzazione dell'agenda Selezionare "Modalità visualizzazione" utilizzando i tasti "Su/Giù" sul telecomando, premere il tasto “Enter” quindi utilizzare i tasti "Su/Giù" per scegliere tra:  Agenda mensile  Agenda  Orologio analogico Formato Data Selezionare "Formato Data " utilizzando i tasti "Su/Giù"sul telecomando e premere “Enter”, quindi utilizzare i tasti "Su/Giù"...
  • Seite 123  Utilizzare i tasti "Sinistra/Destra" per impostare i valori per Ora, Min, AM, PM Frequenza Sveglia Selezionare la "Frequenza Sveglia" utilizzando i tasti "Su/Giù" sul telecomando e premete ”Enter”, quindi utilizzate i tasti "Su/Giù" per scegliere tra:  Una volta ...
  • Seite 124: Configurazione Sistema

    5. Configurazione sistema Questo menu consente di impostare i parametri di funzionamento della cornice. Attivazione/disattivazione del sensore di luminosità Selezionare il "Sensore di luminosità" utilizzando i tasti "Su/Giù" sul telecomando, quindi premere il tasto “Enter” per scegliere "Acceso" o "Spento". Lingua Selezionare "Lingua"...
  • Seite 125 Accensione Selezionare "Accensione" utilizzando i tasti "Su/Giù" sul telecomando, quindi premere il tasto ”Enter” per selezionare "On" o "Off". Ora avvio automatico Selezionare "Ora avvio automatico" utilizzando i tasti "Su/Giù" sul telecomando e premere “Enter”, quindi:  Utilizzare i tasti "Su/Giù" per scegliere tra Ora, Minuto, AM, PM ...
  • Seite 126 Numero di versione del software interno (a titolo informativo) Documento non contrattuale soggetto a modifiche in caso di errori tipografici (Mktg1011) COPYRIGHT SOPEG 2011 Il produttore si riserva il diritto di modificare le caratteristiche del prodotto senza preavviso.
  • Seite 127: Collegamento Al Computer

    Collegamento al computer È possibile trasferire dei file nella cornice collegandola al portatile. Collegare la cornice al computer tramite un cavo USB (con l’attacco mini USB lato cornice e l’attacco USB standard lato computer) quindi accendere la cornice e attendere la comparsa della schermata "Collegamento al PC…" Ritorno a funzionamento normale dopo scollegamento Sul computer comparirà...
  • Seite 128: Istruzioni Di Sicurezza

    Istruzioni di sicurezza Manipolare con attenzione la cornice digitale, evitando di toccare lo schermo: le impronte digitali sono difficili da togliere. Posizionare sempre la cornice digitale su una superficie piana e stabile, per evitare cadute o danni. Non esporre la cornice digitale ai raggi del sole o a temperature elevate, per evitare di danneggiarla o di ridurne la durata.
  • Seite 129: Garanzia

    VII. Garanzia La garanzia non copre i danni causati dai tentativi di riparazione della cornice da parte dell'utente o di persone non autorizzate. Se la cornice emette fumo, rumori o odori inusuali, spegnerla e scollegarla immediatamente. Rivolgersi al rivenditore. Se non si utilizza la cornice digitale per un periodo prolungato, scollegare il cavo di alimentazione. La garanzia copre la cornice digitale e non include gli accessori.
  • Seite 130 Esclusioni I danni o i difetti provocati da utilizzo o manipolazione non corretti della cornice digitale nonché dall'utilizzo di accessori non originali o non consigliati nelle presenti istruzioni non sono coperti dalla garanzia. La garanzia non copre i danni provocati da agenti esterni quali fulmini, acqua, fuoco e i danni provocati durante il trasporto.
  • Seite 131: Caratteristiche Tecniche

    VIII. Caratteristiche tecniche Caratteristiche DPF 10333 DIAMOND Dimensioni 10,4 (26,4 cm)˝ Definizione 800 x 600 Tipo di schermo Rapporto immagine Memoria interna 2 GB Audio/video Schede compatibili SD/MMC,SDHC, MS, XD, Clés USB File letti JPEG/WAV, MP3/MPEG1,4, MOTION JPEG Ridimensionamento automatico Rotazione automatica Ingresso alimentazione 100-240 V AC 50/60 Hz...
  • Seite 132 GEBRUIKSAANWIJZING DIGITALE FOTOLIJST TELEFUNKEN DPF 10333 DIAMOND Uw fotolijst uitpakken en installeren ............2 1. Inhoud van de doos......................2 Uitzicht van de fotolijst ..................... 3 3. Afstandsbediening......................3 4. Installatie ........................... 4 Uw fotolijst gebruiken ................4 1. Selecteren van de taal ...................... 4 2.
  • Seite 133: Uw Fotolijst Uitpakken En Installeren

    3 seconden. Uw fotolijst uitpakken en installeren U hebt zojuist een digitale fotolijst uit de DIAMOND-serie van TELEFUNKEN aangekocht, waarvoor onze dank. Wij raden u aan deze gebruiksaanwijzing grondig door te nemen alvorens uw apparaat in gebruik te nemen en ze daarna te bewaren voor toekomstig gebruik.
  • Seite 134: Uitzicht Van De Fotolijst

    2. Uitzicht van de fotolijst Lichtsensor Bedieningsknoppen Gaatje voor muurbevestiging Instelbare voet 3. Afstandsbediening Met de afstandsbediening kunt u alle functies verrichten. Druk op de volgende toets voor toegang tot de functies: Toets Functie ▲ Navigatie omhoog in de menu's Navigatie naar links in de menu's en naar het vorige bestand (foto, muziek of film) ◄...
  • Seite 135: Installatie

    Volume omlaag, het geluidsniveau wordt weergegeven (SLIDESHOW) Start de foto diashow onmiddellijk op MUSIC Geeft toegang tot het instellingenmenu (MUZIEK) VIDEO Geeft toegang tot het instellingenmenu (VIDEO) SET-UP Directe toegang tot het instellingenmenu (instellingen) 4. Installatie Verwijder de fotolijst en de accessoires uit hun verpakking. Verwijder de plastic beschermfolie van de voorkant van de fotolijst.
  • Seite 136: De 'Eco Logic' Modus

    2. De „ECO LOGIC‟ modus De ‘ECO LOGIC’ modus combineert drie essentiële elementen die zorgen voor een 40% lager energieverbruik in vergelijking met een standaard fotolijst: Een LED-scherm, dat energiezuiniger is en een betere beeldkwaliteit biedt Een energiezuinige netadapter gecertificeerd door ‘Energy Star’ Een lichtsensor Deze sensor, die standaard geactiveerd is, zorgt ervoor dat uw fotolijst zich 's nachts automatisch uitschakelt.
  • Seite 137: Kopiëren Van Foto's Naar Het Interne Geheugen

    Uw geheugenkaart wordt automatisch gedetecteerd. Na enkele seconden verschijnt het bericht ‘Wilt u kopiëren naar het interne geheugen?’ op het display. Als u binnen de 15 seconden niet reageert, dan zal de diashow op de kaart worden weergegeven maar zullen de foto's niet worden gekopieerd.
  • Seite 138 Uw foto‟s kopiëren vanuit bestandsbeheer Als u deze methode gebruikt, kunt u de bestanden slechts één voor één kopiëren en hebt u niet de mogelijkheid om hun formaat aan te passen aan de resolutie van de fotolijst. 1. Druk zo veel als nodig op de toets „Exit‟ op uw afstandsbediening totdat u toegang krijgt tot het scherm waar u gegevensdragers kunt selecteren.
  • Seite 139: Foto's Verwijderen

    met behulp van de toetsen „Links/Rechts‟ op de afstandsbediening. Druk op „Enter‟. 3. Selecteer met behulp van de toetsen „Links/Rechts‟ de fotomodus en druk op „Enter‟. De diashow start. 4. Druk op de toets „Exit‟ op de afstandsbediening om toegang te krijgen tot de miniaturen. Druk op de toets „Copy/Del‟.
  • Seite 140 Selecteer met behulp van de toetsen „Links/Rechts‟ op de afstandsbediening het pictogram „Bestand‟ en druk op “Enter”. Selecteer de foto met behulp van de toetsen „Omhoog/Omlaag‟ op de afstandsbediening en druk vervolgens op de toets „Copy/Del‟. Het scherm geeft „Best. verwijderen?-Ja/Nee‟ weer. Kies de gewenste optie en druk op „Enter‟.
  • Seite 141 Selecteer de gewenste optie met behulp van de toetsen „Omhoog/Omlaag‟ op de afstandsbediening. Druk op „Enter‟. Uw foto’s worden nu uit het interne geheugen verwijderd. Niet-contractueel document onderworpen aan wijzigingen in geval van drukfouten (Mktg1011) COPYRIGHT SOPEG 2011 De fabrikant behoudt zich het recht voor om de kenmerken van het product zonder voorafgaande kennisgeving te wijzigen...
  • Seite 142: Selecteren Van Het Type Te Lezen Bestanden

    III. Selecteren van het type te lezen bestanden 1. Intern geheugen/gegevensdrager Wanneer er geen enkele gegevensdrager is ingevoerd, wordt automatisch de diashow van het interne geheugen opgestart bij het inschakelen van de fotolijst. Als er een geheugenkaart of een USB-stick is ingevoerd op het moment dat de fotolijst wordt ingeschakeld, dan wordt de inhoud van de kaart of stick gelezen.
  • Seite 143: Foto's

    3. Foto‟s Druk zo veel als nodig is op de toets „Exit‟ om het hoofdscherm weer te geven. Selecteer met behulp van de pijltjestoetsen „Links/Rechts‟ op de afstandsbediening het pictogram „Foto‟. Druk meerdere keren op de "Enter" toets om de speelwijze op de beschreven wijze te selecteren: ...
  • Seite 144: Muziek

    5. Muziek Druk zo veel als nodig is op de toets „Exit‟ om het hoofdscherm weer te geven. Selecteer met behulp van de pijltjestoetsen „Links/Rechts‟ op de afstandsbediening het pictogram „Muziek‟. Druk op de "Enter" toets: de muziek wordt afgespeeld. Gebruik de "Links/Rechts"...
  • Seite 145: Instellingen

    Instellingen Wanneer u zich in het hoofdscherm bevindt, selecteer dan het pictogram „Inst.‟ met behulp van de toetsen „Links/Rechts‟ en „Omhoog/Omlaag‟ op uw afstandsbediening om toegang te krijgen tot de verschillende instellingen van uw fotolijst. Druk tijdens een diashow op de "Instellingen" toets op de afstandsbediening voor toegang tot het instellingenmenu.
  • Seite 146 Duur diavertoning Selecteer " Duur diavertoning " met de toetsen "Omhoog/Omlaag" op de afstandsbediening en druk op "Enter". Gebruik vervolgens de "Omhoog/Omlaag" toetsen om een keuze te maken uit:  5 Sec.  15 Sec.  30 Sec.  60 Sec. ...
  • Seite 147: Muziekinstellingen

    Magisch Venster Selecteer "Magisch Venster" met de toetsen "Omhoog/Omlaag" op de afstandsbediening en druk vervolgens op "Enter" om voor "Aan" of "Uit" te kiezen. Klok Selecteer "Klok" met de toetsen "Omhoog/Omlaag" op de afstandsbediening en druk vervolgens op "Enter" om voor "Aan" of "Uit" te kiezen. Ander formaat Selecteer "Ander formaat"...
  • Seite 148: Video-Instellingen

     Soft Spectrum tonen Tijdens het afspelen van muziek kan de equalizer op het scherm van uw TELEFUNKEN fotolijst worden weergegeven. Selecteer "Spectrum Tonen" met de toetsen "Omhoog/Omlaag" op de afstandsbediening en druk vervolgens op "Enter" om voor "Aan" of "Uit" te kiezen.
  • Seite 149: Kalenderinstelling

     Originele Grootte: uw video wordt weergegeven in het originele formaat Afspeelmodus Selecteer "Afspeelmodus" met de toetsen "Omhoog/Omlaag" op de afstandsbediening en druk op "Enter". Gebruik vervolgens de "Omhoog/Omlaag" toetsen om een keuze te maken uit:  Herhalen: uw video wordt continu herhaald ...
  • Seite 150 Datum Selecteer "Datum" met de toetsen "Omhoog/Omlaag" op de afstandsbediening en druk vervolgens op "Enter".  Gebruik de "Omhoog/Omlaag" toetsen om te kiezen voor Maand, Dag of Jaar  Gebruik de "Links/Rechts" toetsen om de waarde voor de Maand, Dag, Jaar in te stellen Klokmodus (12- of 24-uur) Selecteer "Klokmodus"...
  • Seite 151: Systeemconfiguratie

    5. Systeemconfiguratie In dit menu kunt u de werkingsparameters van uw fotolijst instellen. In-/uitschakelen van de lichtsensor Selecteer "Lichtsensor" met de toetsen "Omhoog/Omlaag" op de afstandsbediening en druk vervolgens op "Enter" om voor "Aan" of "Uit" te kiezen. Taal Selecteer "Taal" met de toetsen "Omhoog/Omlaag" op de afstandsbediening en druk op "Enter". Gebruik vervolgens de "Omhoog/Omlaag"...
  • Seite 152 Aanzetten Selecteer "Aanzetten" met de toetsen "Omhoog/Omlaag" op de afstandsbediening en druk vervolgens op "Enter" om voor "Aan" of "Uit" te kiezen. Auto opstarttijd Selecteer "Auto opstarttijd" met de toetsen "Omhoog/Omlaag" op de afstandsbediening en druk vervolgens op "Enter".  Gebruik de "Omhoog/Omlaag"...
  • Seite 153 Het versienummer van de interne software (ter info) Niet-contractueel document onderworpen aan wijzigingen in geval van drukfouten (Mktg1011) COPYRIGHT SOPEG 2011 De fabrikant behoudt zich het recht voor om de kenmerken van het product zonder voorafgaande kennisgeving te wijzigen...
  • Seite 154: Aansluiten Op Een Computer

    Aansluiten op een computer Het is mogelijk om bestanden over te zetten naar de fotolijst door deze aan te sluiten op uw pc. Sluit hiervoor uw fotolijst aan op de computer via een USB-kabel (mini-USB-aansluiting van de fotolijst en standaard USB-aansluiting van de pc). Schakel vervolgens uw fotolijst in: het scherm van de fotolijst geeft ‘Verbinden met pc …’...
  • Seite 155: Veiligheidsinstructies

    Opgelet! Het formaat van de foto’s die op deze manier worden overgezet zal niet worden aangepast. Koppel de USB-kabel los: uw fotolijst zal weer normaal werken. Veiligheidsinstructies Hanteer de fotolijst voorzichtig en vermijd het aanraken van het scherm. Vingerafdrukken zijn moeilijk te verwijderen.
  • Seite 156: Garantie

    VII. Garantie De garantie dekt geen schade die voortvloeit uit pogingen om de fotolijst zelf te repareren (of pogingen door niet-bevoegde personen). Als de fotolijst een ongewone geur afgeeft of een vreemd geluid maakt of als er rook uit de fotolijst komt, schakel deze dan onmiddellijk uit en trek de stekker uit.
  • Seite 157 Uitsluiting Schade of defecten veroorzaakt door een foutief gebruik of hanteren van de digitale fotolijst en door het gebruik van andere dan de oorspronkelijke accessoires of accessoires die niet worden aanbevolen door deze instructies worden niet gedekt door de garantie. De garantie dekt geen schade die veroorzaakt wordt door externe elementen zoals bliksem, water, brand of alle andere schade veroorzaakt tijdens transport.
  • Seite 158: Technische Specificaties

    VIII. Technische specificaties Kenmerken DPF 10333 DIAMOND Diagonaal 10,4 (26,4 cm)˝ Resolutie 800 x 600 Type scherm Beeldverhouding Intern geheugen Audio/video Compatibele kaarten SD/MMC,SDHC, MS, XD, USB sticks Gelezen bestanden JPEG,/WAV, MP3/MPEG1,4, MOTION JPEG Automatische formaataanpassing Automatisch roteren Stroomingang 100-240 V AC 50/60 Hz Stroomuitgang 5V DC 2Ah Verbruik in stand-by...
  • Seite 159 MANUAL DE UTILIZAÇÃO MOLDURAS FOTOGRÁFICAS DIGITAIS TELEFUNKEN DPF 10333 Diamond Conheça e instale a sua moldura .............. 2 1. Conteúdo da embalagem ....................2 Esquema da moldura ....................... 3 3. Controlo remoto ........................ 3 4. Instalação .......................... 4 Utilização da moldura ................4 1.
  • Seite 160: Conheça E Instale A Sua Moldura

    "Esquerda" da Moldura durante 3 segundos. Conheça e instale a sua moldura Acaba de adquirir uma moldura fotográfica digital TELEFUNKEN DPF 10333, pelo que lhe estamos gratos. Antes de utilizar o seu dispositivo, queira consultar este manual de utilização, conservando-o para futuras consultas.
  • Seite 161: Esquema Da Moldura

    2. Esquema da moldura Sensor de luminosidade Botões de controlo Fixação mural Suporte ajustável 3. Controlo remoto Todas as funções podem ser acedidas através do controlo remoto. Primas as teclas a seguir para ter acesso às funções: Tecla Função ▲ Navegação pelos menus Navegar à...
  • Seite 162: Instalação

    Diminuir volume; o volume é mostrado no ecrã (SLIDESHOW) Iniciar directamente a apresentação de fotografias MUSIC Aceder directamente o menu de configuração (MÚSICA) VIDEO Aceder directamente o menu de configuração (VÍDEO) SETUP Entrar no menu de configurações (Config) directamente 4. Instalação Retire a moldura e respectivos acessórios da embalagem Retire o filme plástico de protecção da parte da frente da moldura Puxe a fita plástica destinada a proteger os contactos do telecomando...
  • Seite 163: O Modo "Eco Logic

    2. O modo "ECO LOGIC" O modo ECO LOGIC associa 3 elementos essenciais que permitem uma redução do consumo de energia de mais de 40% em comparação com uma moldura padrão: Um ecrã LED, menos ávido por energia mas que melhora a qualidade da imagem Um adaptador de alimentação de baixo consumo certificado "Energy Star"...
  • Seite 164: Cópia De Fotos Para A Memória Interna

    Após 15 segundos sem intervenção da sua parte, o diaporama contido no cartão será lido mas as imagens não serão copiadas. 1. Se escolher “Sim” para a cópia das imagens, aparecerá a mensagem “Copiar ficheiros?” Seleccione “Sim” e prima “Enter”. 2.
  • Seite 165 1. Prima a tecla "Exit" do telecomando tantas vezes quantas necessárias para visualizar o ecrã de escolha dos suportes. 2. Através das setas "Esquerda/Direita" do telecomando, seleccione o ícone "Ficheiros" e prima "Enter". 3. Seleccione o ficheiro a ser copiado através das teclas "Cima/Baixo"...
  • Seite 166: Eliminação De Fotos

    Prima a tecla "Copy/Del". O ecrã apresenta "Copiar ficheiros?" (Selecção ou tudo). Seleccione e prima "Enter". As fotos minimizadas aparecerão de novo, com uma caixa de verificação no canto superior esquerdo de cada imagem. Seleccione as fotos a copiar através das teclas "Esquerda/Direita" do telecomando premindo "Enter"...
  • Seite 167: Selecção Do Tipo De Ficheiros A Serem Lidos

    Eliminaras suas fotos a partir do modo miniaturas Com este método, pode suprimir uma selecção ou todas as fotos da memória interna. 1. Prima a tecla "Exit" do telecomando tantas vezes quantas necessárias para visualizar o ecrã de escolha dos suportes. Seleccione a memória interna através das teclas "Esquerda/Direita"...
  • Seite 168: Selecção De Uma Pasta/Modo Multimídia

    Se for inserido um cartão de memória ou um disco USB ao se ligar a moldura, é o conteúdo do cartão/disco USB que será lido. De qualquer maneira, pode sempre passar do cartão/disco USB para a memória interna da seguinte forma: Prima a tecla "Exit"...
  • Seite 169: Os Vídeos

    Premir a tecla "Enter" repetidamente para seleccionar o modo de leitura como se segue:  Apresentação  Apresentação+Música  Foto única 4. Os vídeos Premir tantas vezes quantas necessárias a tecla "Exit" para visualizar o ecrã principal. Através das setas cdo telecomando, seleccione o ícone "Vídeo".
  • Seite 170: Os Ajustes

    / Usar as teclas "Esquerda/Direita" para seleccionar (Ler/Pausa) no ecrã, e depois premir “Enter”. / Usar as teclas "Esquerda/Direita" para seleccionar (Anterior/Seguinte) no ecrã, e depois premir “Enter”. / Usar as teclas "Esquerda/Direita" para seleccionar (Retroceder/Avançar Rápido) no ecrã, e depois premir “Enter”.
  • Seite 171: Definição De Fotos

    1. Definição de Fotos Seleccionar "Configuração de Foto" usando as teclas "Cima/Baixo" no controlo remoto, depois premir "Enter". Aparecerá o ecrã oposto: Ser-lhe-á então possível alterar as definições usando as teclas com setas no controlo remoto. Modo Visualizar Seleccionar "Configuração de Ecrã" usando as teclas "Cima/Baixo" no controlo remoto e premir “Enter”, depois usar as teclas "Cima/Baixo"...
  • Seite 172 Efeito de apresentação Seleccionar o "Efeito de apresentação" usando as teclas "Cima/Baixo" no controlo remoto e premir “Enter”, depois usar as teclas "Cima/Baixo" para escolher entre os seguintes efeitos:  Aleatório  Nenhum  Desaparecer dentro fora  Serpente  Partição ...
  • Seite 173: Definição Música

    Repetir uma: cada faixa será reproduzida duas vezes Efeito Música A sua moldura TELEFUNKEN tem um equalizador para adaptar o som ao tipo de música que está a ser ouvido. Seleccionar "Efeito de Música" usando as teclas "Cima/Baixo" no controlo remoto e premir “Enter”, depois usar as teclas "Cima/Baixo"...
  • Seite 174: Configuração Do Vídeo

    Visualização do Equalizador Quando está a ler um ficheiro de música, pode visualizar o equalizador no ecrã da sua moldura digital TELEFUNKEN. Seleccionar “Mostrar Espectro" usando as teclas "Cima/Baixo" no controlo remoto, e depois premir a tecla “Enter” para seleccionar “On” ou “Off”.
  • Seite 175: Configuração Do Calendário

    Seleccionar "Auto Reprodução" usando as teclas "Cima/Baixo" no controlo remoto, depois premira tecla ”Enter” para escolher “On” ou “Off”. 4. Configuração do Calendário Seleccionar “Configuração do Calendário” no menu Definições usando as teclas "Cima/Baixo" no controlo remoto e premir "Enter". Pode usar as teclas das setas ou a tecla "Enter"...
  • Seite 176: Configuração Sistema

    As Horas Seleccionar "Hora do Relógio" usando as teclas "Cima/Baixo" no controlo remoto e premir “Enter”, depois:  Usar as teclas"Cima/Baixo" para escolher entre Hora, Min, AM, PM  Usar as teclas "Esquerda/Direita" para definir os valores para Hora, Min, AM, PM Estado do alarme Seleccionar "Estado do Alarme"...
  • Seite 177 Idioma Seleccionar”Idioma" usando as teclas "Cima/Baixo" no controlo remoto e premir “Enter”, depois usar as teclas "Cima/Baixo" para escolher entre:  Inglês  Francês  Alemão  Italiano  Holandês  Português  Espanhol Brilho Seleccionar "Brilho" usando as teclas "Cima/Baixo" no controlo remoto e premir “Enter”, depois premir as teclas "Esquerda/Direita"...
  • Seite 178 Desligar Seleccionar "Desligar" usando as teclas "Cima/Baixo" no controlo remoto, depois premir a tecla “Enter” para escolher “On” ou “Off”. Desligar automático programado Seleccionar "Tempo de Fecho Auto" usando as teclas "Cima/Baixo" no controlo remoto e premir “Enter”, depois:  Usar as teclas"Cima/Baixo"...
  • Seite 179: Ligação A Um Computador

    Ligação a um computador É possível transferir ficheiros para a moldura ligando-a ao seu microcomputador. Para tanto, ligue a sua moldura ao computador através de um cabo USB (tomada mini USB na moldura e tomada USB standard no computador) e ligue a moldura: o ecrã da moldura mostra “Ligação PC…” Retorno ao funcionamento normal após desconexão Aparece a seguinte caixa de diálogo no seu computador: Clique em ”Abrir a pasta para ver os ficheiros”...
  • Seite 180: Instruções De Segurança

    Abra o directório em que estão guardados os ficheiros que pretende transferir para a moldura e coloque-os na pasta escolhida através de “Copiar/Colar” ou “Arrastar/Largar”. Atenção! As fotos transferidas desta maneira não serão redimensionadas. Desligue o cabo USB: a sua moldura volta a ligar-se automaticamente. Instruções de segurança Manipule a moldura fotográfica digital com precaução para evitar tocar no ecrã;...
  • Seite 181 Atenção! Nunca retire a tampa de plástico situada na parte de trás da moldura. A moldura fotográfica digital inclui circuitos eléctricos e poderá lesionar-se caso os toque. Não tente consertar por si mesmo a sua moldura digital. Non contractual document subject to change in case of typographical errors (Mktg1011) COPYRIGHT SOPEG 2011 The manufacturer reserves the right to modify the product specifications without notice.
  • Seite 182: Garantia

    VII. Garantia A garantia não cobre os danos provocados caso o adquirente (ou qualquer pessoa não qualificada) tenha tentado consertar a moldura. Caso a moldura liberte fumo, um ruído ou um odor não habitual, desligue-a e desligue imediatamente o cabo da tomada. Contacte o local onde adquiriu o dispositivo. Caso não utilize a moldura digital durante algum tempo, queira desligar o cabo da tomada.
  • Seite 183 Exclusão Os danos ou defeitos provocados por uma utilização ou manipulação incorrecta da moldura digital e pela utilização de acessórios que não sejam aqueles de origem ou não recomendados pela presente nota não estão cobertos pela garantia. A garantia não cobre os danos provocados por elementos externos, tais como relâmpagos, água ou incêndio ou qualquer outro dano ocorrido durante transporte.
  • Seite 184: Características Técnicas

    VIII. Características técnicas Características DPF 109333 Tamanho 10,4’’ (26,4 cm) Definição 800 x 600 Tipo de ecrã Rácio imagem 16/9 Memória interna 2 GB Áudio/vídeo Cartões compatíveis SD/MMC,SDHC, MS, XD, Clés USB Ficheiros reproduzidos JPEG /WAV, MP3/MPEG1,4, MOTION JPEG Redimensionamento automático Rotação automática Entrada alimentação 100-240 V AC 50/60 Hz...

Inhaltsverzeichnis