Herunterladen Inhalt Inhalt Diese Seite drucken

Werbung

Verfügbare Sprachen
  • DE

Verfügbare Sprachen

  • DEUTSCH, seite 17
REGISTER YOUR PRODUCT!
www
Thank you for choosing this ARNOVA product. We hope that you will enjoy using it and that it will give you satisfaction for many
years to come. Once you unpack your ARNOVA product, we recommend that you take a few minutes to register it
http://arnovatech.com/register
(
?
NEED HELP?
On our Website: See the Frequently Asked Questions section on
Contact our Technical Support Team: Visit
Please register your product before contacting Technical Support (see Register your Product ).
UserGuide_Arnova_7G2_109860_book.indd 1
Ä
On the web at http://arnovatech.com/register
). This will allow you to get access to ARNOVA technical support (
http://arnovatech.com/support
As we are often updating and improving our products, your device's software may have
a slightly different appearance or modified functionality than presented in this Quick Start Guide.
http://arnovatech.com/support
http://arnovatech.com/faq
for e-mail support.
).
1
01/06/2011 16:47:36

Werbung

Inhaltsverzeichnis
loading

Inhaltszusammenfassung für Archos Arnova 7 G2

  • Seite 1 REGISTER YOUR PRODUCT! Ä On the web at http://arnovatech.com/register Thank you for choosing this ARNOVA product. We hope that you will enjoy using it and that it will give you satisfaction for many years to come. Once you unpack your ARNOVA product, we recommend that you take a few minutes to register it http://arnovatech.com/register http://arnovatech.com/support ).
  • Seite 2: Description Of The Device

    DESCRIPTION OF THE DEVICE 1 2 3 Power/Lock: slide left and hold to switch on/off. Slide right to lock the device’s touchscreen. When you slide left and hold, a window appears with a list of options (when the product is on). Tap on “Power Off”...
  • Seite 3 STARTING UP ▲ Before using your ARNOVA for the first time, completely charge the battery! Charging the Battery Connect the supplied power cable to the ARNOVA Power connector and to a wall outlet. The ARNOVA device will turn on and start charging. The Power indicator light is red while the battery is charging. It will turn yellow when the battery is fully charged.
  • Seite 4 CONNECTING TO THE WIFI NETWORK For this procedure to work, you need to be in a WiFi zone that will allow you to connect to it. Every time the ARNOVA is in range of a network that you have already configured once, it will attempt to make a connection. To configure a new WiFi network, go on the Home screen, tap on the Menu icon , then Settings...
  • Seite 5 THE ARNOVA INTERFACE Your ARNOVA device is equipped with a capacitive touchscreen. Use your finger pulp to navigate. Home Screen Settings shortcut These are the default Android™ shortcuts ( Web browser shortcut Browser EMail , etc.). Tap on an icon to open the correspond- Application button ing application.
  • Seite 6 CUSTOMIZING YOUR PRODUCT The extended Home screen Slide your finger horizontally on the screen to go to the left or right side of the extended Home screen. Customizing the Home screen items - To add a Home screen item (shortcuts, widgets, etc.), hold your finger on the screen at an empty location, then choose from the list.
  • Seite 7: Playing Mul Timedia Files

    PLAYING MUL TIMEDIA FILES From the Home screen, tap on the video, audio or photo icon. The ARNOVA will display a list of files or folders corresponding to the selected category. Tap on an item to start playing it. Only in Video and Photo modes: to display/hide the on-screen controls, tap anywhere on the screen. To pause or resume a video, tap on the icon (bottom of screen).
  • Seite 8 TRANSFERRING MEDIA TO YOUR ARNOVA Connect the supplied USB cable to the ARNOVA and to a running computer. The ARNOVA will turn on. Within a few seconds the ARNOVA will appear as an icon on your computer. You can transfer your media files to the ARNOVA either by copy/pasting them into the respective folders using Win- dows®...
  • Seite 9: Enregistrez Votre Produit

    ENREGISTREZ VOTRE PRODUIT ! Ä Sur Internet : http://arnovatech.com/register Merci d’avoir choisi ce produit ARNOVA. Nous espérons que vous aurez plaisir à l’utiliser et qu’il vous donnera satisfaction pendant de nombreuses années. Après avoir déballé votre produit ARNOVA, nous vous conseillons de prendre quelques minutes pour l’enregistrer http://arnovatech.com/register http://arnovatech.com/support ).
  • Seite 10: Description De L'appareil

    DESCRIPTION DE L’APPAREIL 1 2 3 Marche/Arrêt/Verrouillage : Faites glisser vers la gauche et maintenez pour allu- mer/éteindre. Faites glisser vers la droite pour verrouiller l’écran tactile. Lorsque vous faites glisser ce bouton vers la gauche et le maintenez, une fenêtre apparaît avec une liste d’op- tions (lorsque le produit est en marche).
  • Seite 11: Première Utilisation

    PREMIÈRE UTILISATION ▲ Avant d’utiliser votre ARNOVA pour la première fois, chargez complètement sa batterie ! Charger la batterie Branchez le câble d’alimentation fourni sur le connecteur d’alimentation de l’ARNOVA et sur une prise secteur. Votre ARNOVA s’allume et commence à se charger. Le témoin de charge est rouge lorsque que la batterie est en charge. Il est jaune lorsque la batterie est complètement chargée.
  • Seite 12 SE CONNECTER À UN RÉSEAU WIFI Pour suivre cette procédure, vous devez vous situer dans une zone WiFi vous permettant de vous connecter. Chaque fois que l’ARNOVA détectera un réseau que vous avez déjà configuré, il tentera de s’y connecter. Pour configurer un nouveau réseau WiFi, allez sur l’écran d’accueil, appuyez sur l’icône de Menu , puis sélectionnez...
  • Seite 13 L’INTERFACE DE L’ARNOVA Votre ARNOVA est équipé d’un écran tactile capacitif. Utiliser la pulpe de votre doigt pour naviguer. Ecran d’accueil Raccourci Paramètres Voici les raccourcis Android™ Navigateur Web par défaut ( Raccourci Navigateur Web E-mail , etc.). Appuyez sur une icône pour ouvrir l’application Bouton applications correspondante.
  • Seite 14 PERSONNALISATION DE L’APPAREIL L’écran d’accueil étendu Faites glisser votre doigt horizon- talement sur l’écran pour aller sur le côté gauche ou droit de l’écran d’accueil étendu. Personnalisation des éléments de l’écran d’accueil - Pour ajouter un élément (raccourci, widget, etc.), maintenez votre doigt appuyé sur un emplacement vide de l’écran, puis choi- Ajouter sissez parmi la liste d’options.
  • Seite 15 LECTURE DE FICHIERS MUL TIMÉDIA Sur l’écran d’accueil, appuyez sur l’icône vidéo, audio ou photo. L’ARNOVA affiche la liste de fichiers/dossiers correspondant à la catégorie sélectionnée. Appuyez sur un élément pour l’ouvrir. Uniquement dans les modes Vidéo et Photo : pour afficher/masquer les options disponibles, appuyez n’importe où sur l’écran. Pour mettre en pause/relancer une vidéo, appuyez sur l’icône (en bas de l’écran).
  • Seite 16 TRANSFERT DE FICHIERS MUL TIMÉDIA Connectez le câble USB fourni à votre ARNOVA et à un ordinateur allumé. L’ARNOVA s’allume. Après quelques secondes, l’ARNOVA apparaît sous la forme d’une icône sur votre ordinateur. Pour transférer vos fichiers sur l’ARNOVA, vous pouvez les copier/coller directement dans les dossiers respectifs de l’appareil (avec Windows®...
  • Seite 17: Registrieren Sie Ihr Produkt

    REGISTRIEREN SIE IHR PRODUKT! ÄIm Internet unter http://arnovatech.com/register Vielen Dank, dass Sie sich für dieses Produkt von ARNOVA entschieden haben. Wir hoffen, Sie werden viel Freude daran haben und dass es Ihnen für viele Jahre zuverlässige Dienste leisten wird. Nachdem Sie Ihr ARNOVA-Produkt ausgepackt haben, empfehlen wir Ihnen, sich ein paar Minuten Zeit zu nehmen, und es zu registrieren ( http://arnovatech.com/register ).
  • Seite 18: Beschreibung Des Arnova

    BESCHREIBUNG DES ARNOVA 1 2 3 Ein-/Ausschalten/Sperren: nach links schieben und halten, um ein- bzw. auszu- schalten. Nach rechts schieben, um den Touchscreen des Gerätes zu sperren. Wenn Sie den Schalter nach links schieben und festhalten, erscheint ein Auswahlfenster mit Optionen (falls das Produkt eingeschaltet ist).
  • Seite 19 STARTEN ▲ Vor der erstmaligen Verwendung des ARNOVA sollte der Akku vollständig aufgeladen werden! Aufladen des Akkus Verbinden Sie das mitgelieferte Stromkabel mit dem ARNOVA-Stromanschluss und mit einer Steckdose. Daraufhin schaltet sich der ARNOVA-Player ein und startet den Ladevorgang. Während der Akku aufgeladen wird, leuchtet die Leistungsanzeige rot.
  • Seite 20 WIFI-NETZWERKVERBINDUNG Dazu müssen Sie sich in Reichweite eines WiFi befinden. Der ARNOVA wir dann jedesmal eine Verbindung mit einem der bereits konfigurierten Netzwerke herstellen. Um ein neues WiFi Netzwerk einzurichten, tippen Sie auf dem Desktop auf das Menü Icon Einstellungen und wählen anschließend Einstellungen Drahtlos &...
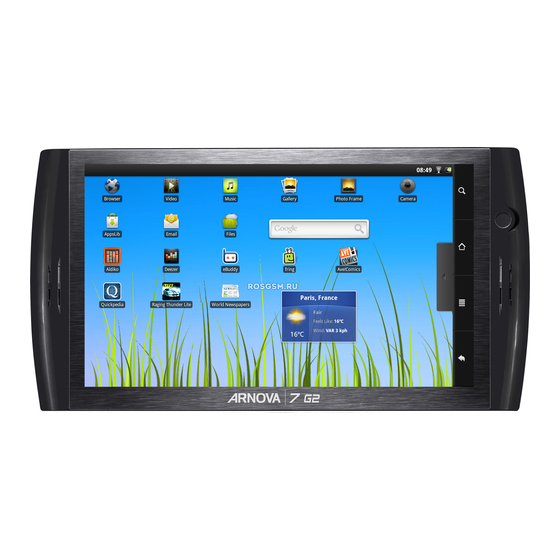
  • Seite 21: Die Arnova Schnittstelle

    DIE ARNOVA SCHNITTSTELLE Ihr ARNOVA-Gerät ist mit einem Kapazitiven Touchscreen ausgerüstet. Benutzen die Fingerbeere. Hauptfenster Web-Browser Shortcut Dies sind Desktop-Verküpfungen Web-Browser von Android™ ( E-Mail , usw.). Tippen Sie auf ein Einstellungen Shortcut Icon, um die entsprechende An- wendung zu öffnen. Sie können Applikationen Taste den Home-Screen nach Ihren Tippen Sie auf dieses Icon, um alle in-...
  • Seite 22 ANPASSEN IHRES PRODUKTES Der erweiterte Desktop Bewegen Sie Ihren Finger hori- zontal auf dem Touchscreen, um auf die linke oder rechte Seite des Desktops zu gelangen. Insgesamt gibt es 3 Desktops. Passen Sie die Elemente auf dem Desktop an - Um ein Element (Shortcuts, Widgets, usw.) auf Ihren Home-Screen hinzuzufügen, wählen Sie eine leere Position, um dann aus der Liste eine Hinzufügen Anwendung auszuwählen.
  • Seite 23: Abspielen Von Mul Timediadateien

    ABSPIELEN VON MUL TIMEDIADATEIEN Tippen Sie auf der Startseite auf Video icon, Audio icon oder Foto icon. Der ARNOVA zeigt nun eine Liste von Dateien oder Ordern an, je nach gewählter Kategorie. Tippen Sie auf eine Datei, um diese abzuspielen. Nur in den Modi Video und Foto: Um Bildschirmsteuerungen ein- oder auszublenden, tippen Sie auf eine beliebige Stelle im Bildschirm.
  • Seite 24: Übertragen Von Mediadateien

    ÜBERTRAGEN VON MEDIADATEIEN Verbinden Sie Ihren ARNOVA mit dem Computer, mit Hilfe des mitgeliefertem USB-Kabels. Daraufhin schaltet sich der ARNOVA ein. Innerhalb weniger Sekunden erscheint der ARNOVA als Symbol auf Ihrem Computer. Sie können Ihre Media-Dateien durch Kopieren/Einfügen in die jeweiligen Ordner auf Ihren ARNOVA entweder mit dem Windows®...
  • Seite 25: Necesita Ayuda

    ¡REGISTRE SU PRODUCTO! ÄEn Internet en http://arnovatech.com/ register Gracias por haber elegido este producto ARNOVA. Esperamos que sea de su total agrado y lo pueda disfrutar durante muchos años. http://arnovatech.com/ Una vez desempaquetado su producto ARNOVA, dedique unos pocos minutos de su tiempo para registrarlo ( register http://arnovatech.com/support ).
  • Seite 26 DESCRIPCIÓN DEL ARNOVA 1 2 3 On / Off / Bloqueo: Arrastre hasta la izquierda y mantenga pulsado para encender / apagar. Arrastre hasta la derecha para bloquear la pantalla táctil. Cuando arrastra el botón a la izquierda y lo mantenga, aparece una ventana con una lista de opciones (cuando el producto se está...
  • Seite 27: Antes De Empezar

    ANTES DE EMPEZAR ▲ Antes de utilizar su ARNOVA por primera vez, cargue completamente la batería. Cargado de la batería Conecte el cable de alimentación suministrado al conector de alimentación del ARNOVA y a una toma eléctrica de pared. El ARNOVA se encenderá y empezará a cargarse. El indicador de carga es de color rojo cuando la batería se está cargando. Es de color amarillo cuando la batería está...
  • Seite 28 CONEXIÓN A UNA RED WIFI Para que este procedimiento funcione, debe encontrarse en una zona WiFi que le permita conectarse. Cuando el ARNOVA se encuentre dentro del alcance de una red que ya haya configurado una vez, intentará realizar una conexión. Para configurar una red WiFi nueva, sitúese en la pantalla de inicio, dé...
  • Seite 29 LA INTERFAZ DEL ARNOVA El dispositivo ARNOVA está equipado con una pantalla táctil capacitiva. Utilizar la pulpa de los dedos. Pantalla principal Icono Ajustes Estos son los accesos directos Android™ predeterminados ( Icono Navegador web vegador web EMail , etc.). Dé un toque en un icono para abrir la Aplicaciones botón aplicación correspondiente.
  • Seite 30 PERSONALIZACIÓN DEL PRODUCTO La pantalla de inicio ampliada Deslice el dedo horizontalmen- te en la pantalla para ir al lado izquierdo o derecho de la pantalla de inicio ampliada. Personalización de los elementos de la pantalla de inicio - Para añadir un elemento a la pantalla de inicio (accesos directos, widgets, etc.), mantenga el dedo en la pantalla en un lugar vacío y, a continuación, elija el elemento en la lista.
  • Seite 31 REPRODUCCIÓN DE ARCHIVOS MUL TIMEDIA En la pantalla principal, pulse el icono de vídeo, audio o fotos. El ARNOVA mostrará una lista de archivos o carpetas correspondientes a la categoría seleccionada. Pinche en un elemento para empezar a reproducirlo. Sólo en los modos Foto y Vídeo: para mostrar/ocultar los controles en pantalla, pinche en cualquier lugar de la pantalla. Para pausar o reanudar un vídeo, pinche en el icono (esquina inferior de la pantalla).
  • Seite 32 TRANSFERENCIA DE ARCHIVOS MUL TIMEDIA Conecte el cable USB suministrado al ARNOVA y a un ordenador encendido. El ARNOVA se encenderá. En unos segundos, aparecerá el icono del ARNOVA en su ordenador. Es posible transferir archivos multimedia al dispositivo ARNOVA copiándolos y pegándolos en las carpetas correspon- dientes mediante el Explorador de Windows®...
  • Seite 33: Registrazione Del Prodotto

    REGISTRAZIONE DEL PRODOTTO Su Internet all'indirizzo http://arnovatech.com/ Ä register Grazie per aver scelto questo prodotto ARNOVA. ARNOVA vi augura di poter sfruttare al massimo le possibilità offerte dal prodotto per molti anni. Dopo aver aperto il vostro prodotto ARNOVA, vi suggeriamo di registrarlo; ci vorranno solo pochi minuti http://arnovatech.com/register ).
  • Seite 34 DESCRIZIONE 1 2 3 Accendere/spegnere/bloccare: fate scorrere verso la sinistra e mantenere questa posizione per accendere/spegnere. Fate scorrere verso la destra per bloccare lo schermo tattile. Quando fate scorrere questo bottone verso la sinistra e mantenete questa posizione, apparirà una finestra con una lista di opzioni (quando il prodotto è...
  • Seite 35 AVVIO ▲ Prima di utilizzare il dispositivo ARNOVA per la prima volta, caricare completamente la batteria. Caricamento della batteria Collegare il cavo di alimentazione fornito al connettore di alimentazione del dispositivo ARNOVA e a una presa a muro. Il dispositivo ARNOVA si accende e viene avviata la ricarica. L’indicatore della carica è rosso quando la batteria è in ricarica. Diventa giallo quando la batteria è...
  • Seite 36 CONNESSIONE A UNA RETE WIRELESS Per procedere è necessario trovarsi in una zona WIFI che permetta la connessione. Ogni qualvolta ARNOVA si trova in un raggio di rete che avete già configurato una volta, cercherà una connessione. Per configurare una nuova rete WIFI, andare allo schermo principale, sfiorare sul Menu l’icona quindi selezionare Impostazioni...
  • Seite 37 INTERFACCIA Il dispositivo ARNOVA è dotato di uno capacitivo schermo a sfioramento. Utilizzando la polpa delle dita. Schermata Home [Pagina iniziale] Icona Impostazioni Queste sono le scorciatoie Web Browser EMail Android™ ( Icona Web Browser ecc.) - sfiorare un’icona per aprire l’applicazione corrispon- Applicazioni pulsante dente.
  • Seite 38 PERSONALIZZA IL PRODOTTO Schermo intero Fare scivolare il dito in senso orizzontale sullo schermo per posizionarsi sulla parte sinistra o destra dello schermo. Personalizza le voci dello schermo - Per aggiungere scorciatoie, congegni e altro al vostro schermo, tenere premuto il dito in una parte libera dello schermo, quindi sceglie- Aggiungi re dall’elenco.
  • Seite 39 LETTURA DEI FILES MUL TIMEDIA Sulllo schermo tattile, premete sull’icona video, audio o foto. Verrà visualizzato un elenco di fi le o cartelle corrispondenti alla categoria selezionata. Toccare un elemento per riprodurlo. Solo nelle modalità Video e Photo [Foto]: per visualizzare/nascondere i comandi sullo schermo, toccare un’area qualsiasi dello schermo.
  • Seite 40 TRASFERIMENTO DI CONTENUTI MUL TIMEDIALI Collegare il cavo USB in dotazione ad il ARNOVA e ad un computer funzionante. Il dispositivo ARNOVA si accende. Dopo qualche secondo, verrà visualizzata l'icona ARNOVA sul computer. I file multimediali possono essere trasferiti nel dispositivo ARNOVA copiandoli/incollandoli nelle rispettive cartelle usando Windows®...
  • Seite 41 UW PRODUCT REGISTREREN Op het internet op http://arnovatech.com/register Ä Dank u voor het kiezen van dit ARNOVA-product. Wij hopen dat u er nog jarenlang plezier aan zult mogen beleven. Wij raden u aan om uw ARNOVA-product te registreren zodra u het uit de verpakking hebt gehaald ( http://arnovatech.com/register ).
  • Seite 42 BESCHRIJVING ARNOVA 1 2 3 Power/Lock [Aan/uit/Vergrendelen]: schuif naar links en blijf vasthouden om het toestel in of uit te schakelen. Schuif naar rechts om het aanraakscherm van het toestel te vergrendelen. Wanneer u de schakelaar naar links verschuift en blijft vasthouden, verschijnt er een venster met een optielijst (wanneer het toestel ingeschakeld is).
  • Seite 43 OPSTARTEN ▲ Laad de batterij volledig op alvorens de ARNOVA voor de eerste maal te gebruiken. De batterijen laden Sluit het meegeleverde netsnoer aan op de stroomaansluiting van de ARNOVA en op een stopcontact. Uw ARNOVA zal worden ingeschakeld en starten met laden. Het aan/uit-lampje brandt rood wanneeer de batterij aan het opladen is.
  • Seite 44 WIFI-NETWERKVERBINDING Hiervoor dient u zich in een WiFi-zone te bevinden, zodat u verbinding kunt maken. Telkens dat uw ARNOVA zich in een zone bevindt met een netwerk dat u al geconfigureerd hebt, zal het proberen om hier verbinding mee te maken. Om een nieuw WiFi-netwerk te configureren, gaat u naar het beginscherm, drukt u op het Menu-pictogram en selecteert u...
  • Seite 45 DE ARNOVA-INTERFACE Uw ARNOVA-apparaat is uitgerust met een capacitieve aanraakscherm. Gebruik de vinger pulp. Startscherm Snelkoppeling Instellingen Dit zijn de standaard Android™- Web Browser snelkoppelingen ( EMail , enz.). Druk op een Snelkoppeling Web Browser pictogram om de betreffende Applicaties knop applicatie te openen.
  • Seite 46 PERSONALISEER UW PRODUCT Het uitgebreide beginscherm Schuif met uw vinger horizontaal over het scherm om naar de linker- of de rechterkant van uw uitgebreide beginscherm te gaan. De items op het beginscherm personaliseren - Om een item toe te voegen aan het beginscherm (snelkoppelingen, widgets, enz.) houdt u uw vinger op een lege plek op Toevoegen het scherm en kiest u vervolgens een item uit de lijst.
  • Seite 47 MUL TIMEDIABESTANDEN Tik in het Beginscherm de video-, audio- of fotopictogram aan. De ARNOVA zal een lijst van bestanden of mappen weergeven die overeenstemmen met de geselecteerde categorie. Tik een item aan om het af te spelen. Alleen in de modus Video en Foto: tik om het even welke plek op het scherm aan om de bedieningsknoppen op het scherm weer te geven of te verbergen.
  • Seite 48 MEDIA OVERZETTEN NAAR UW ARNOVA Verbind de meegeleverde USB-kabel met de ARNOVA en met een computer die aan staat. De ARNOVA zal worden ingeschakeld. Binnen enkele seconden verschijnt de ARNOVA als een pictogram op uw compu- ter. U kunt uw mediabestanden op de ARNOVA plaatsen door ze ofwel in de betreffende map te kopiëren/met behulp van Windows®...
  • Seite 49 National restrictions This device is intended for home and office use in all EU countries (and other countries following the EU directive 1999/5/EC) without any limitation except for the countries mentioned below: Country Restriction Reason/remark Bulgaria None General authorization required for outdoor use and public service France Outdoor use lim-...

Inhaltsverzeichnis