Odys Slim 6L Pro Benutzerhandbuch
Digitalkamera
Inhaltsverzeichnis
Verfügbare Sprachen
Verfügbare Sprachen
Quicklinks
Kapitel
Inhaltsverzeichnis
Fehlerbehebung

Verwandte Anleitungen für Odys Slim 6L Pro


Inhaltszusammenfassung für Odys Slim 6L Pro
- Seite 1 Digitalkamera ODYS Slim 6L Pro ODYS Slim 6L Pro Digital Camera BENUTZERHANDBUCH USER MANUAL...
- Seite 2 ODYS Slim 6L Pro...
-
Seite 3: Inhaltsverzeichnis
ODYS Slim 6L Pro Inhaltsverzeichnis Danke, dass Sie sich für unser Produkt entschieden haben. Bitte lesen Sie diese Anleitung sorgfältig durch, um alle Funktionen des Produkts nutzen zu können und um eine lange Lebensdauer zu gewährleisten. Bitte bewahren Sie die Anleitung für späteres Nachschlagen gut auf. - Seite 4 ODYS Slim 6L Pro Menüoptionen ändern ............22 Liste der Menüoptionen............23 Belichtungskorrektur...............26 Sprache wählen..............26 Bildauflösung einstellen ............27 Bildqualität einstellen..............27 Bildeffekte einstellen ..............28 5.10 Treiber einstellen..............29 5.11 Fotos vor dem versehentlichen Löschen schützen....29 5.12 Bilder auf dem Fernseher betrachten ........30 5.13 Einstellen von Datum und Zeit ..........30 5.14 LOGO einstellen..............31...
-
Seite 5: Lieferumfang
ODYS Slim 6L Pro 1 Lieferumfang Bitte überprüfen Sie den Karton auf folgenden Inhalt: 1 x Digitalkamera ODYS Slim 6L Pro 1 x Benutzerhandbuch 2 x AAA Batterien 1 x USB-Kabel 1 x AV-Kabel 1 x CD-ROM (Treiber + Anwendungssoftware) -
Seite 6: Einleitung
ODYS Slim 6L Pro 2 Einleitung Dieses Produkt ist ein digitales Bildgerät mit integrierter Digitalkamera, digitalem Videorecorder, digitaler Tonaufzeichnung und PC-Kamera. Mit diesem Gerät können Sie digitale Fotos schießen, Videos auf- nehmen, Sprache aufzeichnen oder es als Web-Kamera verwenden. Produkteigenschaften •... -
Seite 7: Inbetriebnahme
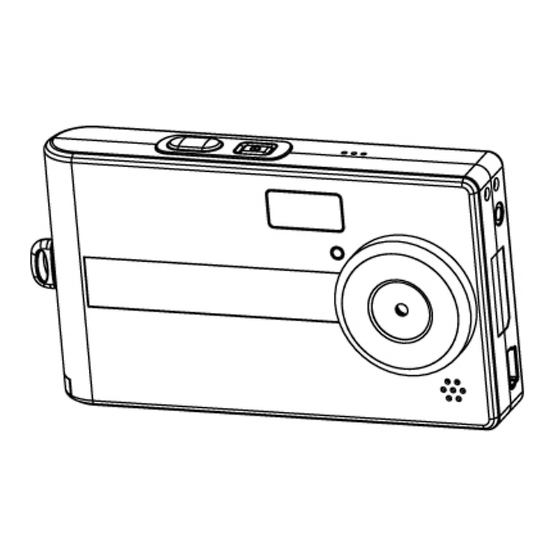
ODYS Slim 6L Pro 3 Inbetriebnahme Kamerakomponenten Lernen Sie bitte vor Gebrauch Ihre Kamerakomponenten kennen. Dies erleichtert die Bedienung der Kamera. Auslöser Ein/Aus-Taste Blitzlicht TV-Ausgang Anzeige für Selbst- auslöser Objektiv USB-Buchse Batteriefach Kartenfach Lautsprecher Modustaste Modustaste Wiedergabe Bild/Einstellung Modustaste Video/... -
Seite 8: Einlegen Der Batterien
ODYS Slim 6L Pro Einlegen der Batterien Verwenden Sie zwei Batterien des Typs AAA (Micro). Schieben Sie den Batterie- fachdeckel in die angezeigte Richtung, um das Fach zu öffnen. Öffnen Sie den Batteriefach- deckel. Legen Sie die Batterien in das Batteriefach ein und achten Sie dabei auf deren Polarität. -
Seite 9: Einlegen Und Entfernen Der Sd/Mmc-Karte
ODYS Slim 6L Pro Einlegen und Entfernen der SD/MMC-Karte Zur Erhöhung der Speicherkapazität können Sie SD- oder MMC-Karten verwenden. Schalten Sie die Kamera ab, bevor Sie eine Karte ein- legen. Legen Sie die Karte wie folgt ein (die Bilder, Videos und Ton- aufnahmen werden dann nicht mehr im internen Speicher, sondern auf der Karte gespeichert). -
Seite 10: Anbringen Des Trageriemens
ODYS Slim 6L Pro Anbringen des Trageriemens Bringen Sie bitte für Ihre Bequemlichkeit und aus Sicherheitsgründen den Trageriemen an. Führen Sie die Trage- riemenschleife durch die Halterung, wie in der Abbildung angezeigt. Ziehen Sie das andere Ende des Trage- riemens durch die Schlaufe der dünnen Riemenschnur... -
Seite 11: Grundbedienung
ODYS Slim 6L Pro 4 Grundbedienung Ein- und Ausschalten Einschalten Ein/Aus-Taste Drücken Sie die Ein/Aus- Taste, um die Kamera einzuschalten. Falls das Gerät nicht einschaltet, prüfen Sie bitte die Batterien auf Füllung und Polarität. Ausschalten Drücken Sie die Ein/Aus- Taste, um die Kamera abzuschalten. -
Seite 12: Verwenden Der Modustasten
ODYS Slim 6L Pro Verwenden der Modustasten Diese Kamera bietet fünf Verwendungsmodi an. Wenn keine USB- Verbindung zum Computer besteht, aktiviert die Kamera beim Einschalten automatisch den Bild-Modus. Drücken Sie die folgenden Modustasten, um den gewünschten Modus zu wählen. Modustasten... -
Seite 13: Aufnehmen Von Bildern
ODYS Slim 6L Pro Aufnehmen von Bildern 4.3.1 Beschreibungen der LCD-Anzeige Status-Symbole im Bild-Modus Anzahl aufgenommener 0,5 Megapixel Bild-Modus bzw. verfügbarer Bilder 2,0 Megapixel Bild-Modus Batteriestatus 3,0 Megapixel Bild-Modus Einzelbildmodus 4,0 Megapixel Bild-Modus Serienbildmodus 5,0 Megapixel Bild-Modus Selbstauslösermodus 6,0 Megapixel Bild-Modus Automatischer Blitz Automatischer Weißabgleich... -
Seite 14: Fotos Machen
ODYS Slim 6L Pro 4.3.2 Fotos machen Schalten Sie Ihre Kamera ein, indem Sie auf die Ein/Aus-Taste drücken. Wählen Sie den Modustaste Einzelbildmodus Bild/Einstellung Nach dem Einschalten der Kamera wird der Bild-Modus automatisch gewählt. Wenn nicht, drücken Sie die Modus-... - Seite 15 ODYS Slim 6L Pro Die mit der Kamera aufgenommenen Bilder werden im Format JPEG gespeichert. Wenn Sie im Bild-Modus die Menütaste drücken, können Sie folgende Menü-Funktionen auswählen: Menüseite 1 Menüseite 2 • Capture Mode (Bild-Modus) • WB (Weißabgleich) • Strobe (Blitz-Einstellung) •...
-
Seite 16: Aufnehmen Von Audio
ODYS Slim 6L Pro Aufnehmen von Audio Die Funktion „Digital Recor- ding“ (Digitale Tonaufnah- me) aktivieren Sie mit der Taste . Das Symbol erscheint nun auf der LCD- Anzeige. Vor der Aufnahme sehen Sie die rechts abgebil- dete Information. Zum Start der Tonaufnahme drücken... -
Seite 17: Aufnehmen Von Videoclips
ODYS Slim 6L Pro Aufnehmen von Videoclips 4.5.1 Beschreibungen der LCD-Anzeige Rechts oben wird die abgelaufene Zeit angezeigt. Links unten wird die verbleibende Zeit angezeigt. Die Information ändert sich während der Aufnahme nicht. Erst nach deren Ende wird sie aktualisiert. -
Seite 18: Wiedergabe Von Bildern, Audio Und Videos
ODYS Slim 6L Pro Wiedergabe von Bildern, Audio und Videos 4.6.1 Beschreibungen der LCD-Anzeige Status-Symbole im Wiedergabe-Modus 2004:02:11 Aktuelle Systemzeit: 11.02.2004, 12:02:47 12:02:47 01/10 Anzahl vorhandener Bilder / Anzahl aller Bilder Foto ist geschützt Foto ist ungeschützt Aktuelle Datei ist ein Bild (jpg) -
Seite 19: Fotos Löschen
ODYS Slim 6L Pro Miniaturansicht Während des Abspielens von Fotos, Videos und Tonaufzeich- nungen können Sie die Miniaturansicht mit der Bestätigungs- taste (OK-Taste) aufrufen. In diesem Modus können mehrere Fotos, Videos oder Tonaufzeichnungen gleichzeitig aufgelistet werden. Mit den Steuertasten kann nun eine Datei gewählt und mit OK wiedergegeben werden. - Seite 20 ODYS Slim 6L Pro Alle Fotos löschen Um alle Fotos zu löschen, drücken Sie die Menütaste, wählen „DELETE“ (LÖSCHEN) und dann „All“ (Alle Bilder). Nun werden alle Fotos entfernt. Speicher formatieren Mit der Taste rufen Sie den Einstellungsmodus auf. Wählen Sie „Format“, drücken Sie die OK-Taste und...
-
Seite 21: Erweiterte Bedienung
ODYS Slim 6L Pro 5 Erweiterte Bedienung Aufnahmen mit Blitzlicht Wenn das Umgebungslicht für die Aufnahme Ihres Bildes nicht aus- reicht, kann der Blitz das benötigte zusätzliche Licht geben. Schalten Sie die Kamera ein und wählen Sie den Bild-Modus (Einzelbild oder Selbstauslösermodus). -
Seite 22: Menüoptionen Ändern
ODYS Slim 6L Pro Schnellwahl der Blitzbetriebsart Bei Einzelbild und Selbstauslöser kann der Blitz mit der Taste „Auto“ , „Permanent“ oder „Aus“ eingestellt werden. Das entsprechende Symbol erscheint gleichzeitig auf der LCD-Anzeige. Menüoptionen ändern Die Kamera besitzt ein Bild-, Wiedergabe- und Einstellungsmenü. -
Seite 23: Liste Der Menüoptionen
ODYS Slim 6L Pro Liste der Menüoptionen Je nach Betriebsmodus unterscheiden sich die Menüinhalte. Der Menüinhalt kann je nach Kameramodell leicht variieren. Näheres unter „Technische Daten“ in Kap. 8. Bild-Modus Menü Einstellung Beschreibung Single (Einzel) Einzelbildaufnahme Capture Mode Sequence (Serie) - Seite 24 ODYS Slim 6L Pro Fluorescent Weißabgleich für (Fluoreszent) Fluoreszenzmodus Cloudy (Bewölkt) Weißabgleich für bewölkten Modus −2.0 EV bis +2.0 EV Achtstufige (Belichtung) Einstellungsmöglichkeit Wiedergabe-Modus Menü Einstellung Beschreibung Lock Current Aktuelles Foto gegen versehent- (Aktuelles sichern) liches Löschen schützen Sicherung für aktuelles Foto...
-
Seite 25: Einstellungsmodus
ODYS Slim 6L Pro Einstellungsmodus Menü Einstellung Beschreibung Date&Time Datum und Uhrzeit für aktuelles Foto einstellen (Datum/Uhrzeit) On (An) Symbol des aktuellen Status einblenden Status ICON (Statussymbol) Off (Aus) Symbol des aktuellen Status ausblenden NTSC/PAL NTSC TV-Ausgang auf NTSC setzen... -
Seite 26: Belichtungskorrektur
ODYS Slim 6L Pro Belichtungskorrektur Mit der Korrektur des Belichtungswertes (EV – Exposure Value) können zu hell oder zu dunkel erscheinende Bilder korrigiert werden. Bild-Modus wählen Drücken Sie im Bild-Modus die Menütaste EV-Eintrag wählen Wählen Sie im Menü den Eintrag EV und drücken Sie die OK- Taste, um die Belichtungsoption aufzurufen. -
Seite 27: Bildauflösung Einstellen
ODYS Slim 6L Pro Wählen Sie den Menüpunkt „Language“ (Sprache) und bestätigen Sie mit der OK-Taste. Wählen Sie die gewünschte Sprache aus. Bildauflösung einstellen Die Grundeinstellung für die Bildauflösung beträgt 5,0 Megapixel. Drücken Sie im Bild-Modus auf die Menütaste. Wählen Sie mit den Tasten die Option „Resolution“... -
Seite 28: Bildeffekte Einstellen
ODYS Slim 6L Pro Wählen Sie mit den Tasten „Hoch“ bzw. „Runter“ die Qualität und bestätigen Sie mit OK. • „Superfine“ (Superfein): höchste Qualität mit dem höchsten Speicherbedarf • „Fine“ (Fein): mittlere Qualität mit einem mittleren Speicherbedarf • „Economy“ (Standard): normale Qualität mit geringem... -
Seite 29: Treiber Einstellen
ODYS Slim 6L Pro 5.10 Treiber einstellen Der Treiber der Grundeinstellung ist MASS. a) Kamera ohne USB-Verbindung zum Computer: Aktivieren Sie mit der Taste das Einstellungsmenü. Wählen Sie im Menü den Eintrag „Driver Type“ (Laufwerkstyp) und bestätigen Sie mit der OK-Taste. -
Seite 30: Bilder Auf Dem Fernseher Betrachten
ODYS Slim 6L Pro Wählen Sie aus der nun angezeigten Liste die gewünschte Option. Die Liste besteht aus vier Optionen: „Lock Current“ (Aktuelles sichern), „Unlock Current“ (Aktuelles entsichern), „Lock All“ (Alle sichern), „Unlock All“ (Alle entsichern) (siehe auch Liste der Menü-Optionen Kap. 5.4). -
Seite 31: Logo Einstellen
ODYS Slim 6L Pro Wählen Sie im Menü den Eintrag „Date&Time“ (Datum/Uhrzeit) und bestätigen Sie mit der OK-Taste. Ändern Sie nun die Zeiteinstel- lung. Wählen Sie mit den Steuertasten gewünschte Einstellung und ändern Sie dann den Wert mit den Steuertasten Bestätigen Sie nach Abschluss... - Seite 32 ODYS Slim 6L Pro Dabei gibt es zwei Wahlmöglichkeiten: • Aktivieren: das vom Nutzer gewählte Bild wird Startbild. • Deaktivieren: das vorgegebene Bild wird Startbild. Das Startbild wird beim Löschen oder Formatieren nicht entfernt. Um ein anderes Startbild zu definieren, muss der...
-
Seite 33: Software-Installation
ODYS Slim 6L Pro 6 Software-Installation Unterstützte Betriebssysteme • Windows 98 (inklusive Second Edition) • Windows Me • Windows 2000 • Windows XP Microsoft Windows 98, Windows 98 SE, Windows 2000 Professional, Windows Me oder Windows XP Systeme sind vorinstalliert. - Seite 34 ODYS Slim 6L Pro Befindet sich die Kamera im MASS- Modus und ist sie mit dem Computer verbunden, erscheint die Meldung „New hardware found“ (Neue Hardware gefunden) auf dem PC-Monitor. Klicken Sie auf „Next“ (Weiter), um das nächste Fenster aufzurufen.
-
Seite 35: Installation Im Twain-Modus
ODYS Slim 6L Pro Klicken Sie nun auf „Next“ (Weiter). Das System installiert den Treiber und folgendes Fenster erscheint: Klicken Sie auf „Finish“ (Fertig stellen), um die Installation abzuschließen. Während der Installation kann es auch vorkommen, dass der Rechner die Windows 98-CD verlangt: 6.2.2... - Seite 36 ODYS Slim 6L Pro Bei Windows 2000 kann eine Anfrage wegen der digitalen Signatur des Treibers erscheinen. Klicken Sie auf „Yes“ (Ja), um den Treiber zu installieren. Bei der Treiberinstallation unter Windows XP erscheint „Neue Hardware gefunden“ Wählen Sie dann „Treiber automatisch installieren (empfohlen)“.
-
Seite 37: Dateiübertragung Zum Pc
ODYS Slim 6L Pro Es können zwei Treibermodi bei der Kamera gewählt werden. Der TWAIN-Modus nutzt die Videokomponenten beim PC (WebCam). Im MASS-Modus wird der interne Speicher als mobiler Speicher verwendet. Er kann wie eine Festplatte behandelt werden. Kopieren, Löschen, Ausschneiden und das Laden von Fotos/ Filmen von der Kamera sind möglich. - Seite 38 ODYS Slim 6L Pro Ziehen Sie nun mit der linken Maustaste die gewünschten Dateien (Bild, Ton oder Video) zu einem geeigneten Ordner auf Ihren PC, z.B. in den Ordner „Eigene Dateien“. Sie können dazu auch die Dateien markieren und danach die Windows-Befehle „Kopieren“...
-
Seite 39: Technische Daten
ODYS Slim 6L Pro 8 Technische Daten Sensor 1/1,8" CMOS Pixel 5,1 Millionen Effektive 2560x1920, 2304x1728, 2048x1536, Bildauflösung 1600x1200, 800x600 Interpolierte 2816x2112 Auflösung Foto: JPEG (Version E X1F2.1) Dateiformate Video: AVI/Motion JPEG 640*480 Ton: WAV-Format Standard-Modus, Schwarzweiß-Modus, Spezialeffekte Sepia-Modus Zoomfaktor... - Seite 40 ODYS Slim 6L Pro kristallklare Tonaufnahme erweiterbarer Speicher PC-Kamera für Internet-Chat und -Konferenz Weitere Funktionen (WebCam) frei wählbares Startbild Stromversorgung über USB-Schnittstelle Speichermedium 32 MB intern (inklusive Systemspeicher), SD- oder MMC-Karte...
-
Seite 41: Speicherbedarf
ODYS Slim 6L Pro 9 Speicherbedarf Auflösung Qualität Bildgröße 16MB 32MB 64MB 128MB Superfein ca. 830 kB 2560x1920 Fein ca. 600 kB Standard ca. 510 kB Superfein ca. 620 kB 2304x1728 Fein ca. 480 kB Standard ca. 400 kB Superfein ca. 530 kB... -
Seite 42: Fehlerbehebung
ODYS Slim 6L Pro 10 Fehlerbehebung Falls Ihre Kamera nicht korrekt funktioniert, überprüfen Sie bitte die folgenden Punkte. Falls das Problem danach immer noch besteht, wenden Sie sich bitte an Ihren Händler. Symptome Ursache und Lösung Ursache: Die Lichtstärke ist nicht ausreichend. -
Seite 43: Weitere Informationen
ODYS Slim 6L Pro Fehler G PC oder Kamera sind ausgelastet und Kamera startet nicht Ursache: die Verbindung zwischen beiden besteht nach dem Anschluss nicht. an PC. USB-Kabel vom PC trennen, PC auf Kameraanzeige Lösung: Überlastung überprüfen und Kabel neu leuchtet und LCD einstecken. -
Seite 44: Wartung Und Pflege
ODYS Slim 6L Pro 11.2 Wartung und Pflege Bitte reinigen Sie Gehäuse, Objektiv und LCD-Anzeige wie folgt: • Keine Verdünner oder Reiniger verwenden, die Benzin enthalten. Das kann die Kamera beschädigen. • Kameragehäuse mit einem weichen Tuch reinigen. • Objektiv: zunächst mit einem Objektivpinsel den Staub entfernen. -
Seite 45: Batteriehinweise
ODYS Slim 6L Pro 11.4 Batteriehinweise Falsche Handhabung der Batterien kann sie lecken, heiß werden oder platzen lassen. Beachten Sie folgende Sicherheitshinweise: • Batterien nicht erhitzen oder ins Feuer werfen. • Batterien nicht zusammen mit Metallobjekten transportieren, da diese mit den Batteriepolen in Berührung kommen und Schäden auftreten können. - Seite 46 ODYS Slim 6L Pro...
- Seite 90 ODYS Slim 6L Pro...