LD ROAD BUDDY 10 Bedienungsanleitung

Verwandte Anleitungen für LD ROAD BUDDY 10


Inhaltszusammenfassung für LD ROAD BUDDY 10
- Seite 1 USER´S MANUAL BEDIENUNGSANLEITUNG MANUEL D`UTILISATION MANUAL DE USUARIO INSTRUKCJA OBSŁUGI MANUALE D‘ USO ROAD BUDDY 10 BATTERY POWERED BLUETOOTH LOUDSPEAKER WITH MIXER AND WIRELESS MICROPHONE LDRBUD10 / LDRBUD10HS...
-
Seite 2: Preventive Measures
You‘ve made the right choice! We have designed this product to operate reliably over many years. LD Systems stands for this with its name and many years of experience as a manufacturer of high-quality audio products. Please read this User‘s Manual carefully, so that you can begin making optimum use of your LD Systems product quickly. -
Seite 3: Sicherheitshinweise
FOR EQUIPMENT THAT CONNECTS TO THE POWER MAINS 22. CAUTION: If the power cord of the device is equipped with an earthing contact, then it must be connected to an outlet with a protective ground. Never deactivate the protective ground of a power cord. 23. -
Seite 4: Bei Geräten Mit Netzanschluss
Dieses Gerät darf nur von autorisiertem Fachpersonal repariert werden. 19. Verwenden Sie zur Reinigung des Geräts ein trockenes Tuch. 20. Beachten Sie alle in Ihrem Land geltenden Entsorgungsgesetze. Trennen Sie bei der Entsorgung der Verpackung bitte Kunststoff und Papier bzw. Kartonagen voneinander. - Seite 5 respectez les instructions correspondantes ci après) Ne mettez pas l‘appareil en contact avec des matériaux, des liquides ou des gaz inflammables. 12. Vérifiez qu‘aucune projection ou liquide ne puisse s‘introduire dans l‘appareil. Ne posez sur l‘appareil aucun objet renfermant du liquide : vase, verre d‘eau... 13.
-
Seite 6: Medidas De Seguridad
MEDIDAS DE SEGURIDAD 1. Lea atentamente las instrucciones de este manual. 2. Guarde toda la información en un lugar seguro para futuras consultas. 3. Siga las instrucciones indicadas. 4. Siga todas las advertencias. No quite las instrucciones de seguridad ni cualquier otra información indicada en el equipo. 5. -
Seite 7: Środki Ostrożności
Daños auditivos por exposición prolongada a un nivel SPL alto: este equipo puede generar fácilmente un nivel de presión sonora (SPL) lo suficiente- mente elevado como para causar daños auditivos permanentes a los artistas, el personal de producción y el público. Deben tomarse precauciones para evitar la exposición prolongada a un SPL de más de 90 dB. -
Seite 8: Misure Precauzionali
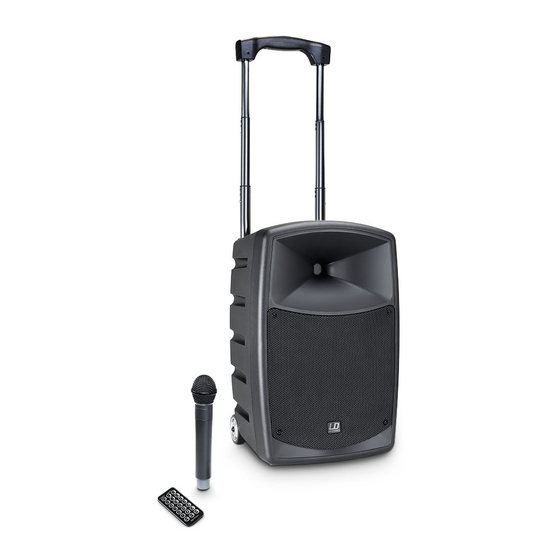
Trójkąt równoramienny z symbolem błyskawicy oznacza niezaizolowane, „niebezpieczne” napięcie w urządzeniu, które może spowodować niebezpieczne dla zdrowia porażenie prądem. Trójkąt równoramienny z wykrzyknikiem oznacza ważne wskazówki dotyczące obsługi i wskazówki ostrzegawcze. UWAGA NA WYSOKI POZIOM GŁOŚNOŚCI PRODUKTÓW AUDIO! To urządzenie przewidziane jest do profesjonalnych zastosowań. Komercyjne stosowanie tego urządzenia podlega obowiązującym w danym kraju przepisom i wytycznym dotyczącym zapobiegania wypadkom. - Seite 9 Introduction The LD Systems Roadbuddy is the ideal solution for voice and music transmission on the go. The 2-way speaker with a 10" custom woofer and a 1" compression driver is operated with a rechargeable battery for up to 8 hours and is powered by a class D power amplifier with a highly efficient power supply.
- Seite 10 Introducción El Roadbuddy de LD Systems es la solución portátil ideal para transmitir música y voz. El altavoz de 2 vías con un woofer Custom Made de 10" y un mo- tor de agudos de 1" está alimentado por una batería recargable que proporciona hasta 8 horas de funcionamiento continuo. Incorpora un amplificador de clase D con fuente de alimentación conmutada de alto rendimiento.
- Seite 11 MIXER UNIT / MISCHPULT-EINHEIT / SECTION MIXEUR / MÓDULO MEZCLADOR / JEDNOSTKA PULPITU MIKSERSKIEGO / UNITÀ MIXER CH 1 CD / TAPE IN Unbalanced line input (RCA) for connecting an external audio source (e.g. CD player, laptop). An incoming stereo signal is mono summed internally.
- Seite 12 CH 1 AUX / MP3 Select the input source for channel 1 (CH 1). When the switch is pressed down, the MP3 player is selected as a signal source; when the switch is not pressed down, the RCA or mini-jack input is selected. Wahl der Signal-Quelle für Kanal 1 (CH 1).
- Seite 13 CH 3 INPUT / MIC 2 IN Balanced microphone or line input (XLR / 6.3 mm jack combo) It is also possible to use an unbalanced microphone cable (mono jack). Pay attention to the setting of the switch 9, as described below. Symmetrischer Mikrofon-, bzw.
-
Seite 14: Master Volume
Korektor tonów niskich dla kanału sumy (master). Obrót w lewo powoduje zmniejszenie poziomu tonów niskich, a obrót w prawo jego zwiększenie. W pozycji środkowej (kliknięcie) korektor jest nieaktywny. Equalizzatore bassi per canale di missaggio (master). Ruotare a sinistra per abbassare i bassi e a destra per alzarli. In posizione intermedia (si sente un clic), l'equalizzatore è... - Seite 15 Wyjście liniowe z gniazdem jack 6,3 mm. Wyjście sygnału ogólnego. Uscita di linea con presa jack da 6,3 mm. Uscita del segnale complessivo. 115V / 230V Switch for setting the operating voltage. The mains voltage of your power supplier and the operating voltage of the device must be the same! Schalter für die Einstellung der Betriebsspannung.
- Seite 16 S'allume pendant la charge de l'accumulateur intégré. Une fois l'accumulateur complètement chargé, l'indicateur CHARGE s'éteint. Pour charger l'accumulateur, il faut brancher un câble secteur à l'embase (18). La charge de l'accumulateur s'effectue quelle que soit la position de l'interrupteur ON/OFF. Se ilumina durante el proceso de carga de la batería interna.
- Seite 17 CH 1 AUX / MP3 Select the input source for channel 1 (CH 1). When the switch is pressed down, the MP3 player is selected as a signal source; when the switch is not pressed down, the RCA or mini-jack input is selected. Wahl der Signal-Quelle für Kanal 1 (CH 1).
- Seite 18 Playback of the current track is stopped by pressing the STOP button. Durch Drücken der STOP-Taste wird die Wiedergabe des laufenden Titels gestoppt. Appuyez sur STOP pour arrêter la lecture du morceau en cours. Pulse el botón Detener para detener la reproducción de la pista en curso. Po naciśnięciu przycisku STOP odtwarzanie bieżącej ścieżki zostanie zatrzymane.
- Seite 19 DISPLAY / PANTALLA / WYŚWIETLACZ Multifunctional LC display with backlight. Multifunktionales LC-Display mit Beleuchtung. Écran LCD rétro-éclairé multifonctions Pantalla LCD multifuncional retroiluminada. Wielofunkcyjny wyświetlacz LCD z podświetleniem. Display LCD multifunzione con illuminazione. RADIO RECEIVER / FUNKEMPFÄNGER / SECTION RÉCEPTEUR HF / RECEPTOR INALÁMBRICO / ODBIORNIK RADIOWY / RICEVITORE RADIO UP AND DOWN / UP UND DOWN / UP ET DOWN / UP Y DOWN / UP I DOWN / UP E DOWN Using the UP and DOWN arrow buttons, one of the 16 available radio channels can be selected.
-
Seite 20: Mute Level
Um den Funkkanal von Empfänger und Handsender zu synchronisieren, wählen Sie am Empfänger den gewünschten Funkkanal aus (siehe Punkt 32) und drücken anschließend die ASC-Taste, während Sie die Infrarot-Schnittstelle des Handsenders in direktem Sichtkontakt auf die Infrarot-Schnittstelle des Empfängers richten. Die Infrarot-Schnittstelle des Handsenders befindet sich oberhalb des Batteriefachs im Gehäuse des Handsenders (Gehäusedeckel abschrauben). - Seite 21 The Mute level controller is set to the left at the factory, therefore, the noise reduction is set at minimum strength. This setting is suitable for the majority of applications and changes are only needed in rare cases. ACHTUNG: Bevor Sie den Mute-Pegel verändern, stellen Sie zunächst die Lautstärke des Lautsprechers auf ein Minimum. Die Mute-Funktion (Rauschunterdrückung / Squelch) verhindert, dass bei ausgeschaltetem Sender Störgeräusche auftreten.
- Seite 22 NOTE / HINWEIS / REMARQUE / NOTA / WSKAZÓWKA / NOTA The TNC antenna connector is located directly beneath the receiver module. Der TNC-Antennenanschluss befindet sich direkt unter dem Empfänger-Modul. Le connecteur TNC pour antenne se trouve sous le module récepteur. El conector de antena TNC se encuentra directamente debajo del módulo receptor.
- Seite 23 Sensor de infrarrojos para sincronizar el canal de radio entre receptor y micrófono transmisor de mano. Interfejs podczerwieni do synchronizacji kanału radiowego odbiornika i nadajnika ręcznego. Interfaccia infrarossi per sincronizzare il canale radio da ricevitore e trasmettitore a mano. BATTERY COMPARTMENT / BATTERIEFACH / COMPARTIMENT PILES / COMPARTIMENTO DE PILAS / KOMORA BATERII / SCOMPARTO BATTERIE Insert two 1.5 V AA size alkaline batteries (LR6 Mignon) as in the illustration inside the battery compartment.
- Seite 24 BELT PACK TRANSMITTER INCL. HEADSET (LDRBUD10HS) / TASCHENSENDER INKL. HEADSET (LDRBUD10HS) / ÉMETTEUR DE POCHE AVEC SERRE-TÊTE (LDRBUD10HS) / PETACA TRANSMISORA CON MICRÓFONO DE DIADEMA (LDRBUD10HS) / NADAJNIK KIESZONKOWY Z ZESTAWEM NAGŁOWNYM (LDRBUD10HS) / TRASMETTITORE TASCABILE CON MICROFONO AD ARCHETTO (LDRBUD10HS) 50 51 TRANSMITTER ANTENNA / SENDERANTENNE / ANTENNE ÉMETTEUR / ANTENA TRANSMISORA / ANTENA NADAJNIKA / ANTENNA TRASMETTITORE...
- Seite 25 LED acceso in verde: trasmettitore tascabile acceso e stato batterie ok. Il LED lampeggia in verde: sincronizzazione del canale radio tramite infrarossi attiva. Il LED lampeggia in rosso: stato della batteria basso. Sostituire immediatamente le pile usate con pile cariche. AUDIO INPUT / AUDIO-EINGANG / ENTRÉE AUDIO / ENTRADA DE AUDIO / WEJŚCIE AUDIO / INGRESSO AUDIO 3-pin mini XLR socket to connect a headset, lavalier or instrument microphone, as well as guitar cable.
- Seite 26 Dès que la LED s'allume en rouge, il faut remplacer les piles. Pour ce faire, soulevez le capot du compartiment à piles du côté marqué OPEN, puis faites glisser sur le côté. Placez alors deux piles alcalines 1,5 Volt de type AA (LR06, Mignon) conformément à la disposition indiquée sur l'arrière de l'émetteur, puis refermez le compartiment à...
- Seite 27 N = Normal. Alle auf dem Speichermedium befindlichen Titel werden nacheinander abgespielt. Nachdem der letzte Titel abgelaufen ist, stoppt die Wiedergabe. R = Random. Die auf dem Speichermedium befindlichen Titel werden in zufälliger Reihenfolge abgespielt. I = Browse. Die ersten 10 Sekunden jedes auf dem Speichermedium befindlichen Titels werden nacheinander angespielt. A = All.
- Seite 28 EQUALIZER / EQUALIZER / ÉGALISEUR / ECUALIZADOR / KOREKTOR / EQUALIZZATORE Displays the currently selected equalizer presets. Anzeige des aktuell ausgewählten Equalizer-Presets. Affichage du preset d'égaliseur en cours. Muestra el preajuste del ecualizador actualmente seleccionado. Wskazanie aktualnie wybranych ustawień korektora. Visualizzazione del preset dell'equalizzatore selezionato.
-
Seite 29: Pause-Taste
OPERATING THE MP3-PLAYER / BEDIENUNG MP3-PLAYER / UTILISATION DU LECTEUR MP3 / OPERACIÓN DEL REPRODUCTOR MP3 / OBSŁUGA ODTWARZACZA MP3 / FUNZIONAMENTO LETTORE MP3 EQUALIZER (Eq) To select one of seven equalizer presets, press and hold the MODE button for about 1 second. Using the buttons, select the menu item "Eq"... - Seite 30 Do wyboru jest sześć różnych trybów odtwarzania (Normal/Random/Browse/All/Repeat One/Repeat Folder). Przytrzymać wciśnięty przycisk MODE przez ok. 1 sekundę. Za pomocą przycisków wybrać punkt menu „Play Mode” (zaznaczony jasnym kolorem) i potwierdzić wybór przyciskiem PLAY/PAUSE . Następnie aktywować jeden z sześciu trybów odtwarzania, wybierając go poprzez naciśnięcie przycisków i potwierdzając wybór przyciskiem PLAY/PAUSE M u s i c M u s i c...
- Seite 31 MODE button until "Bluetooth" and "BT NOT LINK" appears in the display. Activate Bluetooth on your Bluetooth device and search on the user interface for available devices. Select "LD SYSTEMS" and pair your Bluetooth device with the MP3 player. In the MP3 player display, "Connecting"...
- Seite 32 C h a n g e D e v i c e Bluetooth sul proprio dispositivo Bluetooth e cercare i dispositivi disponibili sull'interfaccia utente. Selezionare l'inserimento "LD SYSTEMS" e C h a n g e D e v i c e...
- Seite 33 Pour se reconnecter à l'appareil auquel le lecteur MP3 était précédemment connecté, appuyez, alors que le lecteur MP3 se trouve en mode Bluetooth, sur la touche MODE pendant environ 1 seconde, et choisissez, avec les touches , l'élément de menu "Recently reconnection".
- Seite 34 "Device Information" menu item and confirm by pressing the PLAY / PAUSE button. The display now shows "Name: LD SYSTEMS“. This name appears on the MP3 player of the Roadbuddy speaker on your Bluetooth device (smartphone, tablet).
- Seite 35 INFRARED REMOTE CONTROL (USB, SD CARD) / INFRAROT FERNBEDIENUNG (USB, SD-CARD) / TÉLÉCOMMANDE INFRAROUGE (CLÉ USB, CARTE SD) / MANDO A DISTANCIA POR INFRARROJOS (USB, TARJETA SD) / PILOT NA PODCZERWIEŃ (USB, KARTA SD) / TELECOMANDO A INFRAROSSI (USB, SCHEDA SD) Point the infrared remote control directly at the USB slot or at the infrared sensor built in under the front grille.
- Seite 36 PREV / NEXT To select the previous track, press briefly on the PREV button; to select the next track, press briefly on the NEXT button. By pressing and holding the buttons, fast rewind and fast forward are activated. Um den vorherigen Titel anzuwählen, drücken Sie kurz die PREV-Taste, um den nächsten Titel anzuwählen die NEXT-Taste. Halten Sie die Tasten gedrückt, werden schneller Rück- und schneller Vorlauf aktiviert.
- Seite 37 PLAYBACK MODE (Play Mode) / WIEDERGABEMODUS (Play Mode) / MODE DE LECTURE (Play Mode) / MODO DE REPRODUCCIÓN (Play Mode) / TRYB ODTWARZANIA (Play Mode) / MODALITÀ DI RIPRODUZIONE (Play Mode) Six different playback modes are available for selection (Normal / Random / Browse / All / Repeat One / Repeat Folder). Press the ENTER button, and using the PREV and NEXT buttons, select the menu item "Play Mode"...
- Seite 38 1. Pour quitter le menu, choisissez avec les touches PREV et NEXT l'élément de menu "EXIT", puis validez avec la touche PLAY / PAUSE. 2. Au bout d'environ 8 secondes, le menu est quitté automatiquement, et l'affichage revient sur l'écran principal. 1.
- Seite 39 Appuyez sur la touche PLAY / PAUSE pou rlancer la lecture d'un morceau. Appuyer de nouveau sur la touche place le lecteur de MP3 en mode Pause, la lecture est alors suspendue. Pulse el botón PLAY/PAUSE para iniciar la reproducción de una pista. Pulse de nuevo este botón para poner en modo Pausa el reproductor MP3; la reproducción se detiene.
- Seite 40 1. Po krótkim naciśnięciu przycisku MODE odtwarzacz MP3 zmieni źródło sygnału (gniazdo karty SD/gniazdo pendrive’a/Bluetooth). Aktywne źródło sygnału wskazywane jest na wyświetlaczu. 2. Przytrzymać wciśnięty przycisk przez ok. 2 sekundy, aby wyłączyć lub włączyć odtwarzacz MP3. Odtwarzacz MP3 można włączyć lub wyłączyć tylko za pomocą pilota na podczerwień, nie ma takiej funkcji na odtwarzaczu. Po włączeniu głośnika Roadbuddy odtwarzacz MP3 uruchamia się...
- Seite 41 By clicking the button in the middle of the telescope-like trolley handle, this is unlocked and can be pulled out to its full length (see figure). Trolley handle and rubber rollers now provide for a comfortable transport. 2 rubber feet and rubber rollers on the bottom ensure stability when positioned on the floor;...
- Seite 42 LDWS1616MD Handheld Transmitter LDWS1616MD Handsender LDWS1616MD Émetteur à main LDWS1616MD Micrófono transmisor de mano LDWS1616MD Nadajnik ręczny LDWS1616MD Trasmettitore a mano LDWS1616MD LDHSAE1 Water-resistant Aerobic-Headset LDHSAE1 Wasserabweisendes Aerobic-Headset LDHSAE1 Serre-tête résistant à l'eau pour aérobic LDHSAE1 Micrófono de diadema resistente al agua adecuado para aerobic LDHSAE1 Wodoodporny zestaw nagłowny do aerobiku LDHSAE1 Microfono ad archetto impermeabile per aerobica LDHSAE1 LDHSM1...
- Seite 43 SPECIFICATIONS / TECHNISCHE DATEN / CARACTÉRISTIQUES / CARACTERÍSTICAS TÉCNICAS / SPECYFIKACJE / SPECIFICHE...
- Seite 55 MANUFACTURER´S DECLARATIONS / HERSTELLERERKLÄRUNGEN / DECLARATIONS / DECLARACIÓN DEL FABRICANTE / DEKLARACJE PRODUCENTA / DICHIARAZIONI DEL PRODUTTORE MANUFACTURER‘S WARRANTY & LIMITATIONS OF LIABILITY You can find our current warranty conditions and limitations of liability at: http://www.adamhall.com/media/shop/downloads/documents/manufactur- ersdeclarations.pdf. To request warranty service for a product, please contact Adam Hall GmbH, Daimler Straße 9, 61267 Neu Anspach / Email: Info@adamhall.com / +49 (0)6081 / 9419-0.
- Seite 56 GWARANCJA PRODUCENTA I OGRANICZENIE ODPOWIEDZIALNOŚCI Nasze aktualne warunki gwarancji i informacje dotyczące ograniczenia odpowiedzialności znajdą Państwo na stronie: http://www.adamhall.com/ media/shop/downloads/documents/manufacturersdeclarations.pdf. W razie konieczności skorzystania z serwisu proszę skontaktować się z firmą Adam Hall GmbH, Daimlerstraße 9, 61267 Neu Anspach / e-mail Info@adamhall.com / +49 (0)6081 / 9419-0. PRAWIDŁOWA UTYLIZACJA NINIEJSZEGO PRODUKTU (Obowiązuje w Unii Europejskiej i innych krajach europejskich stosujących system sortowania odpadów) Niniejszy symbol na produkcie lub związanych z nim dokumentach wskazuje, iż...
- Seite 60 WWW.LD-SYSTEMS.COM Adam Hall GmbH | Daimlerstrasse 9 | 61267 Neu-Anspach | Germany Tel. +49(0)6081/9419-0 | Fax +49(0)6081/9419-1000 web : www.adamhall.com | e-mail : mail@adamhall.com REV: 01...