Herunterladen Inhalt Inhalt Diese Seite drucken
Inhaltsverzeichnis

Werbung

Verfügbare Sprachen
  • DE

Verfügbare Sprachen

  • DEUTSCH, seite 24
USER´S MANUAL
BEDIENUNGSANLEITUNG
MANUEL D`UTILISATION
MANUAL DE USUARIO
INSTRUKCJA OBSŁUGI
MANUALE D' USO
LDMEI1000G²
WIRELESS IN EAR MONITORING SYSTEM

Werbung

Inhaltsverzeichnis
loading

Inhaltszusammenfassung für LD MEI1000G2

  • Seite 1 USER´S MANUAL BEDIENUNGSANLEITUNG MANUEL D`UTILISATION MANUAL DE USUARIO INSTRUKCJA OBSŁUGI MANUALE D‘ USO LDMEI1000G² WIRELESS IN EAR MONITORING SYSTEM...
  • Seite 2 You‘ve made the right choice! We have designed this product to operate reliably over many years. LD Systems stands for this with its name and many years of experience as a manufacturer of high-quality audio products. Please read this User‘s Manual carefully, so that you can begin making optimum use of your LD Systems product quickly.
  • Seite 3 LDMEI 1000G² WIRELESS IN EAR MONITORING SYSTEM...
  • Seite 4: Preventive Measures

    PREVENTIVE MEASURES: 1. Please read these instructions carefully. 2. Keep all information and instructions in a safe place. 3. Follow the instructions. 4. Observe all safety warnings. Never remove safety warnings or other information from the equipment. 5. Use the equipment only in the intended manner and for the intended purpose. 6.
  • Seite 5 SAFETY: to clean the equipment. Always unplug the power cord and power adapter from the power outlet at the plug or adapter and not by pulling on the cord. Never touch the power cord and power adapter with wet hands. 27.
  • Seite 6: System Components

    SYSTEM COMPONENTS: POWER Transmitter Antenna 2 "AA" batteries POWER Power supply Belt pack receiver Earplugs...
  • Seite 7: Connections, Controls, And Indicators

    CONNECTIONS, CONTROLS, AND INDICATORS: TRANSMITTER: Front Panel POWER POWER-BUTTON Switch on: Press and hold button for two seconds. Switch off: Press and hold button for two seconds. ARROW DOWN BUTTON See Chapter "System Setup". ARROW UP BUTTON See Chapter "System Setup". SET (PROGRAMMING BUTTON) See Chapter "System Setup".
  • Seite 8 CONNECTIONS, CONTROLS, AND INDICATORS: TRANSMITTER: POWER Rear panel LOW VOLTAGE CONNECTOR Power supply connector for 12 - 18V DC (included). BALANCED INPUT LEFT / RIGHT Left and right-hand balanced inputs (XLR / 6.3 mm jack combo). In the mono mode, only the right input (RIGHT) may be used.
  • Seite 9 CONNECTIONS, CONTROLS, AND INDICATORS: BELT PACk RECEIVER: ON/OFF - VOLUME On / Off switch and volume control. To switch on, turn the knob to the right (clockwise) past the snap-in point. To switch off, turn the knob to the left (counter clockwise) past the snap-in point.
  • Seite 10: System-Setup

    SYSTEM SETUp: TRANSMITTER PROGRAMMING: MAIN MENU In the main menu the radio frequency, the operating mode (mono/ stereo) and signal level (AF L and AF R) are displayed. SELECTING A FREQUENCY GROUP 1 - 8 Press the SET button repeatedly until "GROUP SELECT" appears in the display.
  • Seite 11 SYSTEM SETUp: RECEIVER PROGRAMMING: To change settings on the receiver, press gently on the marked spots on the sides of the battery cover and flip it forward. The Escape (ESC) and SET buttons are now accessible. To return to the main menu after a setting change, press the Escape button (ESC).
  • Seite 12 SYSTEM SETUp: LIMITER Press the SET button repeatedly until "LIMITER" appears in the display and flashes. Using the button, you can enable (Limiter ON) or disable (limiter OFF) the limiter. LOCkING THE RECEIVER Press the SET button repeatedly until the lock symbol appears in the display.
  • Seite 13: Stereo Mode

    SYSTEM SETUp: RECEIVER PROGRAMMING: STEREO MODE Select the stereo mode for the transmission of a stereo- phonic audio signal. Press the SET button repeatedly until "FO OFF" or "FO ON" appears in the display and flashes. Using the buttons, you can now activate the stereo mode (FO OFF). In stereo mode, the two input signals of the transmitter can be heard through headphones (on the left and right) connected to the receiver...
  • Seite 14 SYSTEM SETUp: FOCUS MODE (ALSO kNOWN AS "DUAL MONO") Select the Focus mode in order to listen to two mono signals in the centre of the panoramic field, and to customize their volume. Example Rock Band (user is the lead singer): the first mono audio signal comprises a mix of drums, bass and guitar (the mixer is fed by a monitor signal 1).
  • Seite 15 SETTING UP AND TROUBLEShOOTING: SETUP For optimal transmission, position the transmitter at a minimum height of 1 m and point the antenna upwards. If multiple wireless systems are used in an installation, please make sure that the antennas do not touch or cross. Do not position the transmitter in the direct vicinity of metal objects and digitally controlled devices (CD players, computers, digital consoles, etc.).
  • Seite 16: Troubleshooting

    TROUBLESHOOTING: Stereo and Focus mode: Only the right input signal of the transmitter is heard, Transmitter: The transmitter is in Switch the transmitter to the stereo mode. although the receiver the mono mode. is in the stereo mode and both inputs of the transmitter are used.
  • Seite 17 FREQUENCY LIST: Group 1 Group 2 Group 3 Group 4 Group 5 Group 6 Group 7 Group 8 Channel 1 863.100 863.100 863.200 863.150 863.150 863.100 863.250 863.250 Channel 2 863.500 863.500 863.700 863.550 863.950 863.700 863.650 863.850 Channel 3 864.300 864.000 864.100...
  • Seite 18: Specifications

    SPECIFICATIONS: Model name: LDMEI1000G2 Product type In-Ear Monitoring Set Radio frequency range 823 - 832 MHz, 863 - 865 MHz Weight 1,3 kg LDMEI1000G2BPR Product type Belt pack receiver Channels: 96 (8 groups of 12 channels) Transmission technology FM, stereo Frequency range 60 Hz - 16000 Hz S/N ratio...
  • Seite 19 speciFications: LDMEI1000G2T Product type Transmitter Channels: 96 (8 groups of 12 channels) Transmission technology FM, stereo HF output power 10 mW Frequency range 60 Hz - 16000 Hz S/N ratio 85 dB Inputs Input connections: 6.3 mm TRS, XLR Input impedance (kOhm) 14 kOhm Antenna connector Controls...
  • Seite 20: Manufacturer´s Declarations

    MANUFACTURER´S DECLARATIONS: MANUFACTURER‘S WARRANTY This warranty covers the Adam Hall, LD Systems, Defender, Palmer, and Cameo brands. It applies to all products distributed by Adam Hall. This warranty declaration does not affect the statutory warranty claims against the manufacturer, but expands them with additional warranty claims vis-a-vis Adam Hall.
  • Seite 21: Limitation Of Liability

    MANUFACTURER´S DECLARATIONS: LIMITATION OF LIABILITY If your Adam Hall branded hardware product fails to work as warranted above, your sole and exclusive remedy shall be repair or replacement. Adam Halls’ maximum liability under this limited warranty is expressly limited to the lesser of the price you have paid for the product or the cost of repair or replacement of any components that malfunction under conditions of normal use.
  • Seite 22 MANUFACTURER´S DECLARATIONS: PROPER DISPOSAL OF THIS PRODUCT (Valid in the European Union and other European countries with waste separation) This symbol on the product, or the documents accompanying the product, indicates that this appliance may not be treated as household waste. This is to avoid environmental damage or personal injury due to uncontrolled waste disposal.
  • Seite 24 Mehr Informationen zu LD SYSTEMS finden Sie auf unserer Internetseite WWW.LD-SYSTEMS.COM Einführung Das LD Systems MEI1000G2 ist ein In-Ear Monitoring-System mit 96 UHF-Kanälen und bietet einen natürlichen Klang, einen großen Dynamikumfang und ein hervorragendes Übersprechverhalten in den Frequenzbändern 823 – 832 und 863 –...
  • Seite 25 LDMEI 1000G² WIRELESS IN EAR MONITORING SYSTEM...
  • Seite 26 sicherheitsHINWEISE: 1. Lesen Sie diese Anleitung bitte sorgfältig durch. 2. Bewahren Sie alle Informationen und Anleitungen an einem sicheren Ort auf. 3. Befolgen Sie die Anweisungen. 4. Beachten Sie alle Warnhinweise. Entfernen Sie keine Sicherheitshinweise oder andere Informationen vom Gerät. 5.
  • Seite 27 sicherheitsHINWEISE: buchse bzw. am Netzadapter und der Gerätebuchse nicht geknickt werden. 26. Achten Sie bei der Verkabelung des Geräts immer darauf, dass das Netzkabel bzw. der Netzadapter stets frei zugänglich ist. Trennen Sie das Gerät stets von der Stromzuführung, wenn das Gerät nicht benutzt wird, oder Sie das Gerät reinigen möchten.
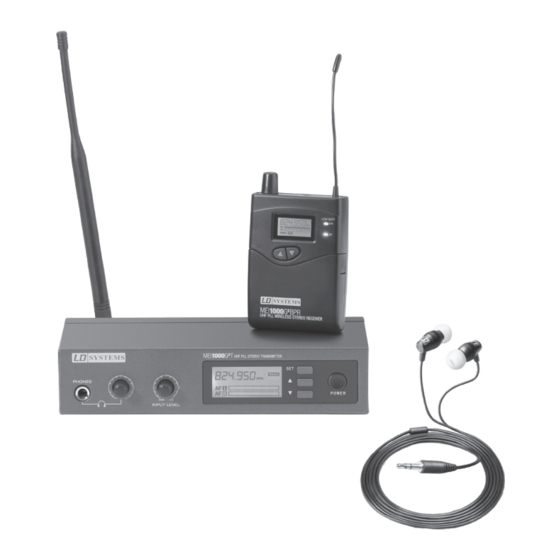
  • Seite 28: Systemkomponenten

    SYSTEMkOMPONENTEN: POWER Sender Antenne 2“AA“ Batterien POWER Netzteil Taschenempfänger Ohrhöhrer...
  • Seite 29: Anschlüsse, Bedien- Und Anzeigeelemente

    ANSChLüSSE, BEDIEN- UND ANZEIGEELEMENTE: SENDER: Vorderseite POWER POWER-TASTE Zum Einschalten Taste zwei Sekunden gedrückt halten. Zum Ausschalten Taste zwei Sekunden gedrückt halten. TASTE PFEIL NACH UNTEN Bedienung siehe Kapitel „Systemeinstellungen”. TASTE PFEIL NACH OBEN Bedienung siehe Kapitel „Systemeinstellungen”. SET (PROGRAMMIERTASTE) Bedienung siehe Kapitel „Systemeinstellungen”.
  • Seite 30 ANSChLüSSE, BEDIEN- UND ANZEIGEELEMENTE: SENDER: POWER Rückseite kLEINSPANNUNGSBUCHSE Anschluss für Netzteil 12 - 18V DC (im Lieferumfang). BALANCED INPUT LEFT / RIGHT Symmetrische Eingänge links und rechts (XLR / 6,3 mm Klinke Combo). In der Mono Betriebsart ist lediglich der rechte Eingang (RIGHT) verwendbar. Schaltbare Pegeldämpfung für hohe Eingangspegel.
  • Seite 31 ANSChLüSSE, BEDIEN- UND ANZEIGEELEMENTE: TASCHENEMPFÄNGER: ON/OFF - VOLUME Ein- / Ausschalter und Lautstärkeregler. Zum Ein- schalten den Knopf nach rechts (im Uhrzeigersinn) über den Rastpunkt hinaus drehen. Zum Aus- schalten nach links (gegen den Uhrzeigersinn) über den Rastpunkt hinaus drehen. Drehen nach links verringert, Drehen nach rechts erhöht die Laut- stärke.
  • Seite 32: Systemeinstellung

    SYSTEMEINSTELLUNG: SENDEREINSTELLUNGEN: HAUPTMENÜ Im Hauptmenü werden Funkfrequenz, Betriebsart (Mono/Stereo) und Signalpegel (AF L und AF R) angezeigt. AUSWAHL EINER FREQUENZGRUPPE 1 - 8 Drücken sie die SET-Taste so oft, bis „GROUP SELECT“ im Display erscheint. Drücken Sie die Tasten bzw. um die gewünschte Frequenzgruppe auszuwählen.
  • Seite 33: Empfängereinstellungen

    SYSTEMEINSTELLUNG: EMPFÄNGEREINSTELLUNGEN: Um Einstellungen am Empfänger vornehmen zu können, drücken Sie leicht auf die markierten Stellen an den Seiten des Batteriefachdeckels und klappen diesen nach vorne. Die Tasten Escape (ESC) und SET sind nun zugänglich. Um nach einer Einstellungsänderung zum Hauptmenü zurückzukehren, drücken Sie auf Escape (ESC).
  • Seite 34: Sperren Des Empfängers

    SYSTEMEINSTELLUNG: LIMITER Drücken Sie die SET-Taste so oft bis „LIMITER“ im Display erscheint und blinkt. Mit Hilfe der bzw. Taste können Sie den Limiter aktivieren (Limiter ON) bzw. deaktivieren (Limiter OFF). SPERREN DES EMPFÄNGERS Drücken Sie die SET-Taste so oft, bis das Schlosssymbol im Display erscheint.
  • Seite 35: Stereo-Betriebsart

    SYSTEMEINSTELLUNG: EMPFÄNGEREINSTELLUNGEN: STEREO-BETRIEBSART Für die Übertragung eines stereofonen Audiosignals wählen Sie die Stereo-Betriebsart. Drücken Sie die SET-Taste so oft bis „FO OFF“ bzw. “FO ON” im Display erscheint und blinkt. Mit Hilfe der bzw. Tasten können Sie nun die Stereo-Betriebsart aktivieren (FO OFF). In der Stereo-Betriebsart sind die beiden Eingangssignale des Senders jeweils links und rechts über einen am Empfänger angeschlossenen Kopfhörer zu hören.
  • Seite 36 SYSTEMEINSTELLUNG: FOCUS-BETRIEBSART (AUCH ALS “DUAL-MONO” BEkANNT) Um zwei Mono-Signale im Zentrum des Panoramafelds hören und in der Lautstärke individuell anpassen zu können, wählen Sie die Focus-Betriebsart. Beispiel Rockband (Anwender ist der Sänger): Das erste Mono-Audiosignal besteht aus einem Mix aus Schlagzeug, Bass und Gitarre (Mischpult Monitorweg 1).
  • Seite 37: Aufstellung Und Fehlerbehebung

    AUFSTELLUNG UND FEhLERBEhEBUNG: AUFSTELLUNG Für eine optimale Übertragung stellen Sie den Sender in einer Mindesthöhe vom 1 m auf und richten die Antenne senkrecht nach oben. Wenn mehrere drahtlose Systeme in einer Installation verwendet werden, achten Sie bitte darauf, dass sich deren Antennen nicht berühren oder kreuzen. Stellen Sie den Sender nicht in der direkten Nähe von Metallobjekten und digital kontrollierten Geräten auf (CD-Player, Computer, Digitalpult, etc.
  • Seite 38: Fehlerbehebung

    FEhLERBEHEBUNG: Stereo- und Focus-Betriebsart: Ausschließlich rechtes Eingangssignal des Senders ist zu Sender: Sender befindet sich in Den Sender in die Stereo-Betriebsart hören, obwohl der der Mono-Betriebsart. bringen. Empfänger sich in der Stereo-Betriebsart befindet und beide Eingänge des Senders belegt sind. Ein Mono-Signal soll übertragen werden, das Signal ist aber...
  • Seite 39 FREQUENZLISTE: Group 1 Group 2 Group 3 Group 4 Group 5 Group 6 Group 7 Group 8 Channel 1 863.100 863.100 863.200 863.150 863.150 863.100 863.250 863.250 Channel 2 863.500 863.500 863.700 863.550 863.950 863.700 863.650 863.850 Channel 3 864.300 864.000 864.100 864.050...
  • Seite 40: Spezifikationen

    SPEZIFIkATIONEN: Modellbezeichnung: LDMEI1000G2 Produktart In-Ear Monitoring Set Funkfrequenzbereich 823 - 832 MHz, 863 - 865 MHz Gewicht 1,3 kg LDMEI1000G2BPR Produktart Taschenempfänger Kanäle 96 (8 Gruppen à 12 Kanäle) Übertragungsverfahren FM, stereo Frequenzgang 60 Hz - 16000 Hz Geräuschspannungsabstand 80 dB Klirrfaktor (THD) <...
  • Seite 41 speziFiKationen: LDMEI1000G2T Produktart Sender Kanäle 96 (8 Gruppen à 12 Kanäle) Übertragungsverfahren FM, stereo HF-Ausgangsleistung 10 mW Frequenzgang 60 Hz - 16000 Hz Geräuschspannungsabstand 85 dB Eingänge Eingangsanschlüsse 6,3 mm Klinke, XLR Eingangsimpedanz (kOhm) 14 kOhm Antennenanschluss Bedienelemente Input Level, Power, Up, Down, Pad, Set, Volume Headphone Anzeigeelemente LC-Display...
  • Seite 42: Garantiebestimmungen

    GARANTIEBESTIMMUNGEN Diese Garantie erstreckt sich auf die Marken Adam Hall, LD Systems, Defender, Palmer und Cameo. Sie gilt für alle Produkte im Vertrieb von Adam Hall. Diese Garantieerklärung berührt nicht die gesetzlichen Gewährleistungsansprüche an den Hersteller, sondern er- weitert diese um zusätzliche Garantieansprüche gegenüber der Firma Adam Hall.
  • Seite 43: Haftungsbeschränkung

    herstellerERKLÄRUNGEN: HAFTUNGSBESCHRÄNKUNG Falls an Hardware-Produkten von Adam Hall innerhalb der Garantiezeit Material- oder Verarbeitungsfehler (gemäß der Garantieerklärung oben) auftreten, besteht Ihr alleiniger und ausschließlicher Anspruch aus dieser Garantie in der Reparatur oder dem Austausch des Geräts. Die maximale Haftung der Firma Adam Hall ist ent- sprechend dieser Garantie ausdrücklich auf den Kaufpreis oder die Kosten für eine Reparatur oder Ersatz –...
  • Seite 44: Umweltschutz Und Energiesparen

    herstellerERKLÄRUNGEN: kORREkTE ENTSORGUNG DIESES PRODUKTES (Gültig in der Europäischen Union und anderen europäischen Ländern mit Mülltrennung) Dieses Symbol auf dem Produkt oder dazugehörigen Dokumenten weist darauf hin, dass das Gerät am Ende der Produktlebenszeit nicht zusammen mit dem normalen Hausmüll entsorgt werden darf, um Umwelt- oder Perso- nenschäden durch unkontrollierte Abfallentsorgung zu vermeiden.
  • Seite 46 à une réponse en fréquence s'étendant de 60 Hz à 16 kHz, un excellent rapport signal/bruit et un taux de distorsion très faible. Le LD MEI1000G2 permet d'utiliser simultanément jusqu'à 5 systèmes.
  • Seite 47 LDMEI 1000G² SYSTÈME D'IN-EAR MONITORING SANS FIL...
  • Seite 48: Mesures Préventives

    MESURES pRÉVENTIVES : 1. Veuillez lire attentivement ce manuel. 2. Rangez tous les documents d‘information et d‘instructions en lieu sûr. 3. Veuillez suivre toutes les instructions 4. Observez tous les messages d‘avertissement N‘enlevez pas de l‘appareil les étiquettes de sécurité ou autres informations. 5.
  • Seite 49 SÉCURITÉ : 26. Lors du branchement de l‘appareil, vérifiez que l‘accès au câble secteur ou au bloc adaptateur reste facile. Sortez la fiche secteur de la prise murale dès que vous n‘utilisez pas l‘appareil pendant un certain temps, ou si vous désirez nettoyer l‘appareil.
  • Seite 50: Composants Du Système

    COMPOSANTS DU SYSTÈME : POWER Émetteur de poche Antenne 2 piles type LR06 [AA] POWER Alimentation Secteur Récepteur de poche Écouteurs...
  • Seite 51: Connecteurs, Contrôles Et Indicateurs

    CONNECTEURS, CONTRôLES ET INDICATEURS : ÉMETTEUR : Face avant POWER TOUCHE POWER Maintenir enfoncée la touche pendant deux secondes. Maintenir enfoncée la touche pendant deux secondes. TOUCHE FLÈCHE VERS LE BAS Voir le chapitre "Réglages système". TOUCHE FLÈCHE VERS LE HAUT Voir le chapitre "Réglages système".
  • Seite 52: Récepteur De Poche

    CONNECTEURS, CONTRôLES ET INDICATEURS : ÉMETTEUR : POWER Panneau arrière EMBASE ALIMENTATION Prise pour tension continue 12 à 18 Volts (bloc secteur livré) ENTRÉES SYMÉTRIQUES GAUCHE / DROITE Entrées symétriques gauche et droite (connecteur Combo, mixte XLR/jack 6,35 mm) En mode d'utilisation mono, seule l'entrée droite (RIGHT) est utilisable.
  • Seite 53 CONNECTEURS, CONTRôLES ET INDICATEURS : RÉCEPTEUR DE POCHE : ON/OFF - VOLUME Interrupteur marche / arrêt, potentiomètre de réglage de volume Pour allumer le récepteur, tournez le potentiomètre dans le sens des aiguilles d'une montre, après le déclic. Pour éteindre le récepteur, tournez le potentiomètre dans le sens inverse des aiguilles d'une montre, jusqu'au déclic.
  • Seite 54: Menu Principal

    MENUS DE RÉGLAGE DE L'AppAREIL : RÉGLAGES DE L'ÉMETTEUR MENU PRINCIPAL C'est dans ce menu principal que se règlent la fréquence d'émission, le mode de fonctionnement (mono/stéréo) et le gain d'entrée (niveau visualisé sur les indicateurs AF L et AF R). CHOIX D'UN GROUPE DE FRÉQUENCES 1 À...
  • Seite 55 MENUS DE RÉGLAGE DE L'AppAREIL : RÉGLAGES DU RÉCEPTEUR Pour modifier les paramètres du récepteur, appuyez doucement sur les côtés striés du compartiment à piles, puis faites-le pivoter vers l'avant. Les touches Excape (ESC) et SET sont alors accessibles. Pour revenir au menu principal après avoir modifié un paramètre, appuyez sur Escape (ESC).
  • Seite 56 MENUS DE RÉGLAGE DE L'AppAREIL : LIMITER Appuyez plusieurs fois sur la touche SET jusqu'à ce que la mention "LIMITER" apparaisse et se mette à clignoter à l'écran. Choisissez alors avec les touches si le limiteur est activé (Limiter ON) ou désactivé...
  • Seite 57 MENUS DE RÉGLAGE DE L'AppAREIL : RÉGLAGES DU RÉCEPTEUR : MODE STEREO Si vous désirez transporter un signal audio stéréophonique, il faut choisir le mode Stereo. Appuyez plusieurs fois sur la touche SET jusqu'à ce que la mention "FO OFF" ou "FO ON" apparaisse et clignote à l'écran. Avec les touches , activez le mode Stereo (FO OFF).
  • Seite 58 MENUS DE RÉGLAGE DE L'AppAREIL : MODE FOCUS (OU "DOUBLE MONO") Pour écouter deux signaux mono de façon centrée, et pouvoir régler indépendamment leurs niveaux d'écoute, choisissez le mode Focus. Par exemple, dans un groupe de rock (l'utilisateur est le chanteur) : Le premier signal audio mono est un mix de la rythmique (batterie, basse et guitare, via le départ auxiliaire 1 de la console).
  • Seite 59: Installation

    INSTALLATION ET EN CAS DE pROBLÈME : INSTALLATION que leurs antennes ne se gênent pas, ni ne se croisent. Ne placez pas les émetteurs à proximité immédiate d'objets métalliques ni d'appareils numériques (lecteur de CD, ordinateur, console numérique, etc.) L'émetteur et le récepteur devraient se trouver en contact visuel direct.
  • Seite 60: En Casde Problème

    EN CASDE PROBLÈME : Modes Stereo et Focus : On n'entend que le signal d'entrée droit de l'émetteur, alors que le récepteur Émetteur : L'émetteur se trouve en Faire passer l'émetteur en mode Stereo. se trouve en mode mode Mono. Stereo et que les deux entrées de l'émetteur sont alimentées.
  • Seite 61 LISTE DES FRÉqUENCES : Groupe 1 Groupe 2 Groupe 3 Groupe 4 Groupe 5 Groupe 6 Groupe 7 Groupe 8 Canal 1 863.100 863.100 863.200 863.150 863.150 863.100 863.250 863.250 Canal 2 863.500 863.500 863.700 863.550 863.950 863.700 863.650 863.850 Canal 3 864.300 864.000...
  • Seite 62: Caractéristiques

    CARACTÉRISTIQUES : Référence modèle : LDMEI1000G2 Type de produit Système d'In-Ear Monitoring Gamme de fréquences HF : 823 - 832 MHz, 863 - 865 MHz Poids : 1,3 kg LDMEI1000G2BPR Type de produit Récepteur de poche Nombre de canaux : 96 (8 groupes de 12 canaux) Type de liaison HF : FM, stéréo Réponse en fréquence :...
  • Seite 63 caractéristiques : LDMEI1000G2T Type de produit Émetteur Nombre de canaux : 96 (8 groupes de 12 canaux) Type de liaison HF : FM, stéréo Puissance de sortie HF : 10 mW Réponse en fréquence : 60 Hz - 16.000 Hz Rapport signal/bruit : 85 dB Entrées :...
  • Seite 64 DECLARATIONS DECLARATIONS : GARANTIE FABRICANT LIMITÉE Cette garantie concerne tous les produits de marque Adam Hall, LD Systems, Defender, Palmer et Cameo. Elle s‘applique également à tous les produits distribués par Adam Hall. Elle ne concerne pas les droits statutaires relatifs à la garantie envers le vendeur. En fait, elle justifie des requêtes en garantie supplémentaires, indépendantes, envers Adam Hall.
  • Seite 65: Déclaration De Conformité Ce

    DECLARATIONS DECLARATIONS : RESPONSABILITÉ LIMITÉE Si votre appareil de marque Adam Hall présente, pendant la période de garantie, des défaillances au niveau des composants ou de la fabrication, couvertes par les conditions ci avant, le seul recours, exclusif, est sa réparation ou son remplacement au titre de cette garantie.
  • Seite 66: Protection De L'environnement Et Économies D'énergie

    DECLARATIONS DECLARATIONS : MISE AU REBUT DE CE PRODUIT (Applicable dans l‘Union Européenne et les autres pays européens dotés de systèmes de collecte sélective) La présence de ce logo sur le produit ou son manuel d‘utilisation indique qu‘en fin de vie, il ne doit pas être jeté...
  • Seite 68 Los auriculares se ajustan cómodamente y en la pantalla multifunción del receptor se muestra toda la informa- ción relevante. La autonomía es de más de 12 horas con pilas de alta calidad. El sistema MEI1000G2 se suminis- tra con un kit de montaje en rack de 19" y un robusto estuche de transporte de plástico ABS.
  • Seite 69 LDMEI 1000G² SISTEMA INALÁMBRICO DE MONITORADO IN EAR...
  • Seite 70: Medidas De Seguridad

    MEDIDAS DE SEGURIDAD: 1. Lea atentamente las instrucciones de este manual. 2. Guarde toda la información en un lugar seguro para futuras consultas. 3. Siga las instrucciones indicadas. 4. Siga todas las advertencias. No quite las instrucciones de seguridad ni cualquier otra información indicada en el equipo. 5.
  • Seite 71 SEGURIDAD: desconecte el cable eléctrico y el adaptador de corriente del conector del equipo en vez de desenchufar el cable de la toma eléctrica. No tocar el cable eléctrico ni el adaptador de corriente con las manos húmedas. 27. No encienda y apague el equipo en cortos intervalos de tiempo, ya que se reduce así la vida útil del sistema. 28.
  • Seite 72: Componentes Del Sistema

    COMpONENTES DEL SISTEMA: POWER Transmisor Antena 2 baterías AA POWER Adaptador de corriente Receptor de petaca Auriculares...
  • Seite 73: Conexiones, Controles E Indicadores

    CONExIONES, CONTROLES E INDICADORES: TRANSMISOR: Panel frontal POWER BOTÓN POWER Para encender, pulse el botón durante dos segundos. Para apagar, pulse el botón durante dos segundos. FLECHA ABAJO Consulte la sección «Configuración del sistema». FLECHA ARRIBA Consulte la sección «Configuración del sistema». BOTÓN SET (BOTÓN DE PROGRAMACIÓN) Consulte la sección «Configuración del sistema».
  • Seite 74: Receptor De Petaca

    CONExIONES, CONTROLES E INDICADORES: TRANSMISOR: POWER Panel posterior TOMA ELÉCTRICA PARA ADAPTADOR Conector para adaptador de corriente de 12 a 18 VDC (suministrado). BALANCED INPUTS LEFT/RIGHT Entradas balanceadas derecha e izquierda (combo XLR/jack de 6,3 mm). En el modo Mono, sólo se usa la entrada derecha (RIGHT).
  • Seite 75 CONExIONES, CONTROLES E INDICADORES: RECEPTOR DE PETACA: ON/OFF - VOLUMEN Botón de encendido/apagado y control de volumen. Para encender, girar el botón hacia la derecha (sentido horario) hasta oír un clic. Para apagar, girar el botón hacia la izquierda (sentido antihorario) hasta oír un clic.
  • Seite 76: Configuración Del Sistema

    CONFIGURACIÓN DEL SISTEMA: CONFIGURACIÓN DEL TRANSMISOR: MENÚ PRINCIPAL En el menú principal se muestran la frecuencia de RF, el modo de funcionamiento (mono/estéreo) y el nivel de la señal (AF L y AF R). SELECCIÓN DEL GRUPO DE FRECUENCIAS 1 A 8 Pulse varias veces el botón SET hasta que en pantalla se muestre «GROUP SELECT».
  • Seite 77: Configuración Del Receptor

    CONFIGURACIÓN DEL SISTEMA: CONFIGURACIÓN DEL RECEPTOR: Para configurar el receptor, presione suavemente en los puntos marcados de los laterales de la tapa del compartimento de baterías y gírela. Ahora tendrá acceso a los botones ESC y SET. Para volver al menú principal después de realizar un cambio de configuración, pulse el botón ESC.
  • Seite 78 CONFIGURACIÓN DEL SISTEMA: LIMITER Pulse varias veces el botón SET hasta que en pantalla se muestre «LIMITER» parpadeando. Mediante los botones , active (Limiter ON) o desactive (Limiter OFF) el limitador. BLOQUEO DEL RECEPTOR Pulse varias veces el botón SET hasta que en pantalla se muestre el icono del candado.
  • Seite 79: Modo Estéreo

    CONFIGURACIÓN DEL SISTEMA: CONFIGURACIÓN DEL RECEPTOR: MODO ESTÉREO Para transmitir una señal de audio estéreo, seleccione el modo Estéreo. Pulse varias veces el botón SET hasta que en pantalla se muestre «FO OFF» o «FO OFF» parpadeando. Mediante los botones podrá...
  • Seite 80 CONFIGURACIÓN DEL SISTEMA: MODO FOCO (TAMBIÉN CONOCIDO COMO «DUAL-MONO») Para escuchar dos señales mono en el centro del espacio y ajustar el volumen de forma independiente, seleccione el modo Foco. Ejemplo de una banda de rock (el usuario es el cantante): La primera señal de audio mono es la mezcla de batería, bajo y guitarra (vía 1 de monitorado del mezclador).
  • Seite 81: Instalación

    INSTALACIÓN Y RESOLUCIóN DE pROBLEMAS: INSTALACIÓN Para que la transmisión sea óptima, sitúe el transmisor a una altura mínima de 1 m y despliegue la antena hacia arriba. Si se utilizan varios sistemas inalámbricos en una instalación, asegúrese de que las antenas no se tocan ni se cruzan. Sitúe el transmisor de modo que no se encuentre muy cerca de objetos metálicos o de dispositivos de control digital (reproductores de CD, ordenadores, mezcladores digitales, etc.).
  • Seite 82: Resolución De Problemas

    RESOLUCIóN DE PROBLEMAS: Modos Estéreo y Foco: Sólo se es- cucha la entrada de- recha del transmisor, Transmisor: el transmisor está en aunque el receptor Ponga el transmisor en modo Estéreo. modo Mono. está en el modo Estéreo y se utilizan ambas entradas del transmisor.
  • Seite 83: Lista De Frecuencias

    LISTA DE FRECUENCIAS: Grupo 1 Grupo 2 Grupo 3 Grupo 4 Grupo 5 Grupo 6 Grupo 7 Grupo 8 Canal 1 863,100 863,100 863,200 863,150 863,150 863,100 863,250 863,250 Canal 2 863,500 863,500 863,700 863,550 863,950 863,700 863,650 863,850 Canal 3 864,300 864,000 864,100...
  • Seite 84: Especificaciones

    ESPECIFICACIONES: Nombre del modelo: LDMEI1000G2 Tipo de producto Set de monitoraje intraauditivo Banda de radiofrecuencia 823 a 832 MHz, 863 a 865 MHz Peso 1,3 kg LDMEI1000G2BPR Tipo de producto Receptor de petaca Canales 96 (8 grupos de 12 canales) Transmisión FM, estéreo Respuesta en frecuencia...
  • Seite 85 especiFicaciones: LDMEI1000G2T Tipo de producto Transmisor Canales 96 (8 grupos de 12 canales) Transmisión FM, estéreo Potencia de salida RF 10 mW Respuesta en frecuencia 60 Hz a 16.000 Hz Relación señal/ruido 85 dB Entradas Conectores de entrada Jack de 6,3 mm, XLR Impedancia de entrada (Kohmios) 14 Kohmios Conector de antena...
  • Seite 86: Declaración Del Fabricante

    DECLARACIÓN DEL FABRICANTE: GARANTÍA DEL FABRICANTE La presente garantía cubre las marcas Adam Hall, LD Systems, Defender, Palmer y Cameo. Se aplica a todos los productos distribuidos por Adam Hall. No afecta a los derechos de garantía legal que asume el fabricante. De hecho, le concede al usuario derechos adicionales ante Adam Hall, independientes de la garantía legal.
  • Seite 87: Limitación De Responsabilidad

    DECLARACIÓN DEL FABRICANTE: LIMITACIÓN DE RESPONSABILIDAD Si durante el período de garantía aparecen defectos de material o de fabricación en su producto Adam Hall (de acuerdo con las garantías mencionadas en este documento), tendrá derecho exclusivamente a la reparación o sustitución del mismo.
  • Seite 88: Eliminación Correcta De Este Producto

    DECLARACIÓN DEL FABRICANTE: ELIMINACIÓN CORRECTA DE ESTE PRODUCTO (Aplicable en la Unión Europea y en los países europeos que dispongan de un sistema de recogida selectiva) El símbolo que aparece sobre el producto o en la documentación adjunta indica que al final de la vida útil del equipo, no deberá...
  • Seite 90 Dalsze informacje na temat firmy LD SYSTEMS dostępne są na naszej stronie internetowej WWW.LD-SYSTEMS.COM Wprowadzenie LD Systems MEI1000G2 to douszny system monitorowania oferujący 96 kanałów UHF i zapewniający naturalne brzmienie z dużym zakresem dynamiki oraz znakomite warunki przesłuchu w zakresach częstotliwości 823–832 i 863–865 MHz.
  • Seite 91 LDMEI 1000G² BEZpRZEWODOWY DOUSZNY SYSTEM MO- NITOROWANIA...
  • Seite 92: Środki Ostrożności

    ŚRODkI OSTROŻNOŚCI: 1. Należy dokładnie przeczytać niniejszą instrukcję. 2. Wszystkie informacje i instrukcje przechowywać w bezpiecznym miejscu. 3. Należy przestrzegać zaleceń. 4. Należy przestrzegać wszystkich wskazówek ostrzegawczych. Nie wolno usuwać wskazówek bezpieczeństwa ani innych informacji znajdujących się na urządzeniu. 5. Używać urządzenia wyłącznie w sposób zgodny z jego przeznaczeniem. 6.
  • Seite 93 BEZPIECZEńSTWO: 26. Przy podłączaniu urządzenia zawsze należy zadbać o to, aby kabel sieciowy lub adapter sieciowy był zawsze łatwo dostępny. Odłączyć urządzenie od źródła zasilania, gdy nie jest ono używane lub gdy ma zostać poddane czyszczeniu. Zawsze należy wyjmować kabel sieciowy i adapter sieciowy z gniazda, chwytając za wtyczkę lub adapter, a nie za kabel.
  • Seite 94: Elementy Systemu

    ELEMENTY SYSTEMU: POWER Nadajnik Antena 2 baterie AA POWER Zasilacz sieciowy Odbiornik kieszonkowy Słuchawki...
  • Seite 95: Przyłącza, Elementy Obsługi I Wskaźniki

    pRZYŁąCZA, ELEMENTY OBSŁUGI I WSkAźNIkI: NADAJNIk: Panel przedni: POWER WŁąCZNIk Aby włączyć urządzenie, należy przytrzymać przycisk wciśnięty przez dwie sekundy. Aby wyłączyć urządzenie, należy przytrzymać przycisk wciśnięty przez dwie sekundy. PRZYCISk ZE STRZAŁką W DÓŁ Obsługa – patrz punkt „Ustawienia systemu”. PRZYCISk ZE STRZAŁką...
  • Seite 96 pRZYŁąCZA, ELEMENTY OBSŁUGI I WSkAźNIkI: NADAJNIk: POWER Strona tylna GNIAZDO NISkIEGO NAPIĘCIA Przyłącze dla zasilacza 12–18 V DC (w zestawie). BALANCED INPUT LEFT/RIGHT Prawe i lewe wejście symetryczne (XLR/Combo jack 6,3 mm). W trybie pracy mono można użyć jedynie prawego wejścia (RIGHT). Możliwość...
  • Seite 97 pRZYŁąCZA, ELEMENTY OBSŁUGI I WSkAźNIkI: ODBIORNIk kIESZONkOWY: ON/OFF – VOLUME Włącznik/Wyłącznik i regulator głośności. Aby włączyć, należy przekręcić pokrętło w prawo (w kierunku ruchu wskazówek zegara) do momentu kliknięcia. Aby wyłączyć, należy przekręcić pokrętło w lewo (przeciwnie do kierunku ruchu wskazówek zegara) do momentu kliknięcia.
  • Seite 98: Ustawienia Systemu

    USTAWIENIA SYSTEMU: USTAWIENIA NADAJNIkA: MENU GŁÓWNE W menu głównym wyświetlana jest częstotliwość radiowa, tryb pracy (mono/stereo) i poziom sygnału (AF L i AF R). WYBÓR GRUPY CZĘSTOTLIWOŚCI 1–8 Naciskać przycisk SET, dopóki na wyświetlaczu nie pojawi się napis „GROUP SELECT”. Za pomocą przycisku wybrać...
  • Seite 99 USTAWIENIA SYSTEMU: USTAWIENIA ODBIORNIkA: W celu ustawienia odbiornika należy lekko nacisnąć zaznac- zone miejsca po bokach pokrywy komory na baterie i wysunąć pokrywę do przodu. Teraz dostępne są przyciski Escape (ESC) i SET. Aby powrócić do menu głównego po dokonaniu zmian w ustawieniach, należy nacisnąć...
  • Seite 100 USTAWIENIA SYSTEMU: LIMITER Naciskać przycisk SET, dopóki na wyświetlaczu nie pojawi się migający napis „LIMITER”. Za pomocą przycisku można włączyć (Limiter ON) lub wyłączyć (Limiter OFF) limiter. BLOkADA ODBIORNIkA Naciskać przycisk SET, dopóki na wyświetlaczu nie pojawi się symbol kłódki. Za pomocą przycisku zablokować...
  • Seite 101 USTAWIENIA SYSTEMU: USTAWIENIA ODBIORNIkA: TRYB PRACY STEREO W celu transmisji stereofonicznego sygnału audio należy wybrać tryb pracy stereo. Naciskać przycisk SET, dopóki na wyświetlaczu nie pojawi się migający napis „FO OFF” lub „FO ON”. Za pomocą przycisku można teraz włączyć tryb pracy stereo (FO OFF). W trybie pracy stereo oba sygnały wejściowe nadajnika są...
  • Seite 102 USTAWIENIA SYSTEMU: TRYB PRACY FOCUS (ZWANY TAkŻE „DUAL MONO”) Aby słyszeć dwa sygnały mono w centrum panoramy i móc indywidualnie dostosowywać ich głośność, należy wybrać tryb pracy focus. Przykład: zespół rockowy (użytkownikiem jest wokalista): pierwszy sygnał audio mono składa się z perkusji, gitary basowej i gitary (pulpit mikserski –...
  • Seite 103 USTAWIENIE I USUWANIE USTEREK: USTAWIENIE W celu zapewnienia optymalnej transmisji należy umieścić nadajnik na wysokości co najmniej 1 m i skierować antenę pionowo w górę. W przypadku użycia kilku systemów bezprzewodowych w ramach jednej instalacji, należy pamiętać o tym, aby ich anteny się nie dotykały ani nie krzyżowały. Nie umieszczać nadajnika w bezpośredniej bliskości obiektów metalowych i sterowanych cyfrowo urządzeń...
  • Seite 104: Usuwanie Usterek

    USUWANIE USTEREk: Tryb pracy stereo i focus: słychać wyłącznie prawy sygnał wejściowy Nadajnik: nadajnik pracuje w nadajnika, mimo że Ustawić nadajnik w trybie pracy stereo. trybie mono. odbiornik pracuje w trybie stereo, a sygnał jest podawany do obu wejść nadajnika. Transmitowany ma być...
  • Seite 105 WYkAZ CZęSTOTLIWOŚCI: Grupa 1 Grupa 2 Grupa 3 Grupa 4 Grupa 5 Grupa 6 Grupa 7 Grupa 8 Kanał 1 863.100 863.100 863.200 863.150 863.150 863.100 863.250 863.250 Kanał 2 863.500 863.500 863.700 863.550 863.950 863.700 863.650 863.850 Kanał 3 864.300 864.000 864.100...
  • Seite 106 SPECYFIkACJA: Oznaczenie modelu: LDMEI1000G2 Rodzaj produktu Douszny system monitorowania Zakres częstotliwości radiowych 823–832 MHz i 863–865 MHz Waga 1,3 kg LDMEI1000G2BPR Rodzaj produktu Odbiornik kieszonkowy Kanały 96 (8 grup po 12 kanałów) Technologia transmisji FM, stereo Charakterystyka częstotliwościowa 60 Hz–16.000 Hz Stosunek sygnału do szumu 80 dB Współczynnik zniekształceń...
  • Seite 107 specYFiKacJa: LDMEI1000G2T Rodzaj produktu Nadajnik Kanały 96 (8 grup po 12 kanałów) Technologia transmisji FM, stereo Moc wyjściowa HF 10 mW Charakterystyka częstotliwościowa 60 Hz–16.000 Hz Stosunek sygnału do szumu 85 dB Wejścia Przyłącza wejściowe jack 6,3 mm, XLR Impedancja wejściowa (kΩ) 14 kΩ...
  • Seite 108: Deklaracje Producenta

    DEkLARACJE pRODUCENTA: GWARANCJA PRODUCENTA Niniejsza gwarancja dotyczy marek Adam Hall, LD Systems, Defender, Palmer i Cameo. Obejmuje ona wszystkie marki znajdujące się w ofercie firmy Adam Hall. Niniejsze oświadczenie gwarancyjne nie ogranicza ustawowych roszczeń wobec producenta wynikających z rękojmi, lecz rozszerza je o dodatkowe roszczenia gwarancyjne wobec firmy Adam Hall.
  • Seite 109: Ograniczenie Odpowiedzialności

    DEkLARACJE pRODUCENTA: OGRANICZENIE ODPOWIEDZIALNOŚCI Jeśli w produktach sprzętowych firmy Adam Hall w trakcie trwania okresu gwarancji wystąpią szkody materiałowe lub technologiczne (zgodnie z powyższym oświadczeniem gwarancyjnym), jedyne i wyłączne prawo klienta wynikające z niniejszej gwarancji dotyczy naprawy lub wymiany urządzenia. Maksymalna odpowiedzialność...
  • Seite 110 DEkLARACJE pRODUCENTA: PRAWIDŁOWA UTYLIZACJA NINIEJSZEGO PRODUKTU (dotyczy Unii Europejskiej i innych krajów europejskich, w których stosuje się segregację odpadów) Niniejszy symbol na produkcie lub związanych z nim dokumentach wskazuje, iż po zakończeniu okresu użytkowania urządzenie nie może być utylizowane razem ze standardowymi odpadami domowymi, ponieważ mogłoby to spowodować...
  • Seite 112 Introduzione MEI1000G2 di LD Systems è un sistema di monitoraggio in-ear con 96 canali UHF che offre un suono naturale, un ampio intervallo dinamico e una bassa diafonia nelle bande di frequenza da 823 a 832 e da 863 a 865 MHz.
  • Seite 113 LDMEI 1000G² SISTEMA WIRELESS DI MONITORAGGIO IN EAR...
  • Seite 114: Misure Precauzionali

    MISURE PRECAUZIONALI: 1. Leggere attentamente il presente manuale di istruzioni. 2. Conservare tutte le indicazioni e le istruzioni in un luogo sicuro. 3. Seguire le istruzioni. 4. Rispettare tutte le avvertenze. Non rimuovere dal dispositivo le indicazioni sulla sicurezza o altre informazioni. 5.
  • Seite 115 SICUREZZA: 27. Evitare per quanto possibile di accendere e spegnere velocemente il dispositivo per non pregiudicarne la durata. 28. NOTA IMPORTANTE: Sostituire i fusibili esclusivamente con fusibili dello stesso tipo e valore. Se un fusibile continua a saltare, rivolgersi a un centro di assistenza autorizzato. 29.
  • Seite 116: Componenti Di Sistema

    COMpONENTI DI SISTEMA: POWER Trasmettitore Antenna 2 batterie AA POWER Alimentatore Ricevitore portatile Auricolari...
  • Seite 117 CONNESSIONI, COMANDO E VISUALIZZAZIONE: TRASMETTITORE: Pannello anteriore POWER TASTO POWER Per accendere, tenere premuto il pulsante per due secondi. Per spegnere, tenere premuto il pulsante per due secondi. TASTO FRECCIA GIÙ Per l'utilizzo, v. il capitolo "Impostazioni del sistema". TASTO FRECCIA SU Per l'utilizzo, v.
  • Seite 118: Ricevitore Portatile

    CONNESSIONI, COMANDO E VISUALIZZAZIONE: TRASMETTITORE: POWER Pannello posteriore PRESA DI BASSA TENSIONE Connessione per alimentatore 12 - 18V DC (fornito in dotazione). BALANCED INPUTS LEFT/RIGHT (INGRESSO BILANCIATO DESTRO/SINISTRO) Ingressi bilanciati a destra e sinistra (combo jack XLR/6,3 mm). In modalità Mono è possibile utilizzare unicamente l'ingresso destro (RIGHT).
  • Seite 119 CONNESSIONI, COMANDO E VISUALIZZAZIONE: RICEVITORE PORTATILE: ON/OFF - VOLUME Interruttore di accensione/spegnimento e regolatore del volume. Per accendere, ruotare la manopola verso destra (senso orario) finché non si sente un clic. Per spegnere, ruotare la manopola verso sinistra (senso antiorario) finché non si sente un clic. Ruotare la manopola verso sinistra per diminuire il volume e verso destra per aumentarlo.
  • Seite 120: Impostazioni Di Sistema

    IMPOSTAZIONI DI SISTEMA: IMPOSTAZIONI DEL TRASMETTITORE: MENU PRINCIPALE Nel menu principale vengono visualizzate radiofrequenza, modalità di funzionamento (Mono/Stereo) e livello del segnale (AF L e AF R). SELEZIONE DI UN GRUPPO DI FREQUENZA 1 - 8 Premere il tasto SET fino a quando sul display non appare "GROUP SELECT".
  • Seite 121 IMPOSTAZIONI DI SISTEMA: IMPOSTAZIONI DEL RICEVITORE: Per poter eseguire le impostazioni del ricevitore, premere leggermente sui punti marcati sui lati del coperchio del comparto della batteria e sollevarlo. Ora i tasti Escape (ESC) e SET sono accessibili. Per tornare al menu principale dopo aver modificato le impostazioni, premere Escape (ESC).
  • Seite 122 IMPOSTAZIONI DI SISTEMA: LIMITER Premere il tasto SET fino a quando sul display non appare "LIMITER" e lampeggia. Con il tasto è possibile attivare (Limiter ON) o disattivare (Limiter OFF) il limitatore. BLOCCO DEL RICEVITORE Premere il tasto SET fino a quando sul display non appare il simbolo del lucchetto.
  • Seite 123: Modalità Stereo

    IMPOSTAZIONI DI SISTEMA: IMPOSTAZIONI DEL RICEVITORE: MODALITÀ STEREO Per la trasmissione di un segnale audio in stereofonia, selezionare la modalità Stereo. Premere il tasto SET fino a quando sul display appare "FO OFF" o "FO ON" e lampeggia. Con il tasto ora è...
  • Seite 124 IMPOSTAZIONI DI SISTEMA: MODALITÀ FOCUS (NOTA ANCHE COME "DUAL-MONO") Per ascoltare due segnali Mono al centro del campo Panorama e per poterne regolare il volume singolarmente, selezionare la modalità Focus. Esempio di un complesso Rock (l'utente è il cantante): Il primo segnale audio Mono è...
  • Seite 125 MONTAGGIO ED ELIMINAZIONE DEI GUASTI: MONTAGGIO Per una trasmissione ottimale, collocare il trasmettitore ad almeno 1 m di altezza e stendere l'antenna in verticale, verso l'alto. Se in una installazione si utilizzano più sistemi senza fili, prestare attenzione al fatto che le rispettive antenne non si tocchino né si incrocino. Non collocare il trasmettitore in prossimità di oggetti metallici e dispositivi con comando digitale (lettori CD, computer, consolle e così...
  • Seite 126: Eliminazione Dei Guasti

    ELIMINAZIONE DEI GUASTI: Modalità Stereo e Focus: Si deve sentire solamente il segnale di ingresso destro del trasmettitore, anche Trasmettitore: Il trasmettitore si Portare il trasmettitore in modalità Stereo. se il trasmettitore trova in modalità Mono. si trova in modalità Stereo e si utilizzano entrambi gli ingressi del trasmettitore.
  • Seite 127 ELENCO DELLE FREqUENZE: Gruppo 1 Gruppo 2 Gruppo 3 Gruppo 4 Gruppo 5 Gruppo 6 Gruppo 7 Gruppo 8 Canale 1 863,100 863,100 863,200 863,150 863,150 863,100 863,250 863,250 Canale 2 863,500 863,500 863,700 863,550 863,950 863,700 863,650 863,850 Canale 3 864,300 864,000 864,100...
  • Seite 128 SPECIFICHE: Nome del modello: LDMEI1000G2 Tipo di prodotto Set di monitoraggio in-ear Campo di radiofrequenze 823 - 832 MHz, 863 - 865 MHz Peso 1,3 kg LDMEI1000G2BPR Tipo di prodotto Ricevitore portatile Canali 96 (8 gruppi da 12 canali) Modo di trasmissione FM, stereo Risposta in frequenza 60 Hz - 16.000 Hz...
  • Seite 129 speciFiche: LDMEI1000G2T Tipo di prodotto Trasmettitore Canali 96 (8 gruppi da 12 canali) Modo di trasmissione FM, stereo Potenza in uscita ad alta frequenza 10 mW Risposta in frequenza 60 Hz - 16.000 Hz Rapporto segnale/rumore 85 dB Ingressi Connessioni ingressi Jack da 6,3 mm, XLR Impedenza di ingresso (kOhm) 14 kOhm...
  • Seite 130: Dichiarazioni Del Produttore

    DICHIARAZIONI DEL pRODUTTORE: GARANZIA DEL PRODUTTORE La presente garanzia copre i marchi Adam Hall, LD Systems, Defender, Palmer e Cameo. Essa è valida per tutti i prodotti distribuiti da Adam Hall. La presente dichiarazione di garanzia non influisce sui diritti legali di garanzia verso il produttore, bensì li estende con ulteriori diritti di garanzia nei confronti della ditta Adam Hall.
  • Seite 131: Limitazione Di Responsabilità

    DICHIARAZIONI DEL pRODUTTORE: LIMITAZIONE DI RESPONSABILITÀ Laddove nei prodotti hardware Adam Hall insorgessero difetti di materiale o di fabbricazione (in conformità con la dichiarazione di garanzia di cui sopra) durante il periodo di garanzia, il Cliente usufruirebbe, come unico ed esclusivo diritto previsto dalla presente garanzia, della riparazione o sostituzione dell‘apparecchio.
  • Seite 132: Corretto Smaltimento Del Prodotto

    DICHIARAZIONI DEL pRODUTTORE: CORRETTO SMALTIMENTO DEL PRODOTTO (In vigore nell‘Unione Europea e in altri paesi europei in cui si attui la raccolta differenziata) Questo simbolo apposto sul prodotto o sui relativi documenti indica che, per evitare danni all‘ambiente e alle persone causati da uno smaltimento incontrollato dei rifiuti, alla fine del suo ciclo di vita l‘apparecchio non deve essere smaltito insieme ai normali rifiuti domestici.
  • Seite 134 WWW.lD-sYstems.COM adam hall Gmbh | Daimlerstrasse 9 | 61267 Neu-Anspach | Germany Tel. +49(0)6081/9419-0 | Fax +49(0)6081/9419-1000 web : www.adamhall.com e-mail : mail@adamhall.com...

Inhaltsverzeichnis