
Verwandte Anleitungen für Cisco Linksys WPC54GS


Inhaltszusammenfassung für Cisco Linksys WPC54GS
- Seite 1 ® A Division of Cisco Systems, Inc. Wireless-G 802.11g Notebook Adapter User Guide with SpeedBooster WIRELESS WPC54GS (EU/UK/LA) Model No.
- Seite 2 Specifications are subject to change without notice. Linksys is a registered trademark or trademark of Cisco Systems, Inc. and/or its affiliates in the U.S. and certain other countries. Copyright © 2005 Cisco Systems, Inc. All rights reserved. Other brands and product names are trademarks or registered trademarks of their respective holders.
-
Seite 3: Inhaltsverzeichnis
Wireless-G Notebook Adapter with SpeedBooster Table of Contents Chapter 1: Introduction Welcome What’s in this Guide? Chapter 2: Planning your Wireless Network Network Topology Roaming Network Layout Chapter 3: Getting to Know the Wireless-G Notebook Adapter The LED Indicators Chapter 4: Setting up and Connecting the Wireless-G Notebook Adapter Starting the Setup Connecting the Adapter Setting up the Adapter... - Seite 4 Wireless-G Notebook Adapter with SpeedBooster Appendix F: Warranty Information Appendix G: Regulatory Information Appendix H: Contact Information...
-
Seite 5: List Of Figures
Wireless-G Notebook Adapter with SpeedBooster List of Figures Figure 3-1: Front Panel Figure 4-1: Setup Wizard’s Welcome Screen Figure 4-2: Setup Wizard’s License Agreement Figure 4-3: Connecting the Adapter Figure 4-4: Available Wireless Network Figure 4-5: SecureEasySetup Screen Figure 4-6: SecureEasySetup Logo Figure 4-7: SecureEasySetup Logo Location Figure 4-8: SecureEasySetup Congratulations Figure 4-9: Available Wireless Network... - Seite 6 Wireless-G Notebook Adapter with SpeedBooster Figure 5-5: The SecureEasySetup button Figure 5-6: Locate the Cisco Logo Figure 5-7: Where can I find the button? Figure 5-8: The SecureEasySetup Logo and Location Figure 5-9: SecureEasySetup Figure 5-10: Site Survey Figure 5-11: WEP Key Needed for Connection...
- Seite 7 Wireless-G Notebook Adapter with SpeedBooster Figure 5-38: Congratulations for New Profile...
-
Seite 8: Chapter 1: Introduction
Wireless-G Notebook Adapter with SpeedBooster Chapter 1: Introduction Welcome Thank you for choosing the Wireless-G Notebook Adapter with SpeedBooster. With this Adapter, your wireless networking experience will be faster and easier than ever. network: a series of computers or devices Like all wireless products, the Adapter allows for greater range and mobility within your wireless network. -
Seite 9: What's In This Guide
Wireless-G Notebook Adapter with SpeedBooster What’s in this Guide? This user guide covers the steps for setting up and using the Wireless-G Notebook Adapter with SpeedBooster. • Chapter 1: Introduction This chapter describes the Adapter’s applications and this User Guide. •... - Seite 10 Wireless-G Notebook Adapter with SpeedBooster • Appendix H: Contact Information This appendix provides contact information for a variety of Linksys resources, including Technical Support. Chapter 1: Introduction What’s in this Guide?
-
Seite 11: Chapter 2: Planning Your Wireless Network
Wireless-G Notebook Adapter with SpeedBooster Chapter 2: Planning your Wireless Network Network Topology A wireless network is a group of computers, each equipped with one wireless adapter. Computers in a wireless network must be configured to share the same radio channel. Several PCs equipped with wireless cards or adapters can communicate with one another to form an ad-hoc network. -
Seite 12: Network Layout
Wireless-G Notebook Adapter with SpeedBooster Network Layout Linksys wireless access points and wireless routers have been designed for use with 802.11a, 802.11b, and 802.11g products. With 802.11g products communicating with the 802.11b standard and some products incorporating both “a” and “g”, products using these standards can communicate with each other. Access points and wireless routers are compatible with 802.11a, 802.11b and 802.11g adapters, such at the PC Cards for your laptop computers, PCI Card for your desktop PC, and USB Adapters for when you want to enjoy USB connectivity. -
Seite 13: Chapter 3: Getting To Know The Wireless-G Notebook Adapter
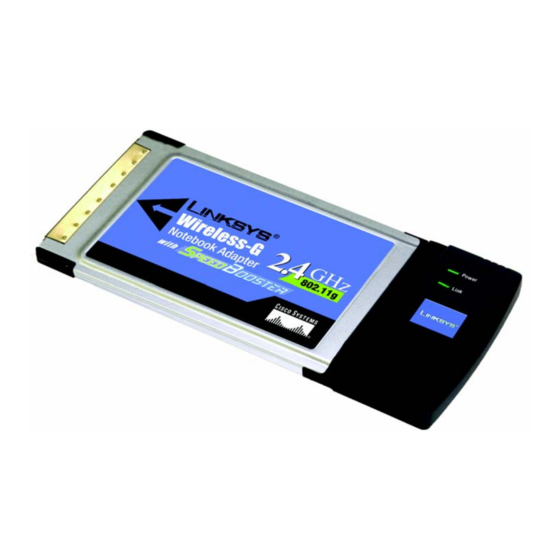
Wireless-G Notebook Adapter with SpeedBooster Chapter 3: Getting to Know the Wireless-G Notebook Adapter The LED Indicators The Network Adapter's LEDs display information about network activity. Figure 3-1: Front Panel Power Green. The Power LED lights up when the Adapter is powered on. Link Green. -
Seite 14: Chapter 4: Setting Up And Connecting The Wireless-G Notebook Adapter
Wireless-G Notebook Adapter with SpeedBooster Chapter 4: Setting up and Connecting the Wireless-G Notebook Adapter Starting the Setup The Wireless-G Notebook Adapter Setup Wizard will guide you through the installation procedure. The Setup Wizard will install the driver and Wireless Network Monitor, as well as connect and configure the Adapter. IMPORTANT: Do not connect the Adapter until you are instructed to do so or the setup will not work. -
Seite 15: Connecting The Adapter
Wireless-G Notebook Adapter with SpeedBooster Connecting the Adapter 1. Locate an available CardBus slot on your notebook PC. 2. With the connector pin end facing the CardBus slot and the label facing up, slide the Adapter into the CardBus slot until it locks in place. 3. -
Seite 16: Figure 4-6: Secureeasysetup Logo
Wireless-G Notebook Adapter with SpeedBooster Setting Up the Adapter with SecureEasySetup With SecureEasySetup, setting up the Adapter is as simple as pushing a couple of buttons. Before you press any buttons, though, you should locate the SecureEasySetup button on the device you’re connecting the Adapter to, such as a wireless router or access point. -
Seite 17: Figure 4-8: Secureeasysetup Congratulations
Wireless-G Notebook Adapter with SpeedBooster 4. When SecureEasySetup is complete, you may save your configuration to a text file by clicking the Save button, or print the configuration by clicking the Print button. Click Connect to Network to connect to your network. -
Seite 18: Figure 4-10: Wep Key Needed For Connection
Wireless-G Notebook Adapter with SpeedBooster 2. If your network has the wireless security WEP (Wired Equivalent Privacy) enabled, this screen will appear. Select 64-bit or 128-bit. Then enter a passphrase or WEP key. Passphrase - Enter a passphrase in the Passphrase field, so a WEP key is automatically generated. The passphrase is case-sensitive and should not be longer than 16 alphanumeric characters. -
Seite 19: Figure 4-12: Automatic Setup's Congratulations
Wireless-G Notebook Adapter with SpeedBooster 3. After the software has been successfully installed, the Congratulations screen will appear. Click Connect to Network to connect to your network. For more information about the Wireless Network Monitor, refer to Chapter 5: Using the Wireless Network Monitor. Congratulations! The setup is complete. -
Seite 20: Figure 4-14: Network Settings
Wireless-G Notebook Adapter with SpeedBooster 2. The Network Settings screen from the Wireless Network Monitor will appear. If your network has a router or other DHCP server, click the radio button next to Obtain network settings automatically (DHCP). If your network does not have a DHCP server, click the radio button next to Specify network settings. Enter an IP Address, Subnet Mask, Default Gateway, and DNS addresses appropriate for your network. -
Seite 21: Figure 4-16: Ad-Hoc Mode Settings
Wireless-G Notebook Adapter with SpeedBooster Select the correct operating channel for your wireless network. The channel you choose should match the channel set on the other devices in your wireless network. If you are unsure about which channel to use, keep the default setting. -
Seite 22: Figure 4-18: Wireless Security - Wpa Personal
Wireless-G Notebook Adapter with SpeedBooster TX Key - The default transmit key number is 1. If your network’s access point or wireless router uses transmit key number 2, 3, or 4, select the appropriate number from the TX Key drop-down box. Authentication -The default is set to Auto, so it will auto-detect for Shared Key or Open System authentication. -
Seite 23: Figure 4-19: Wireless Security - Wpa Enterprise - Eap-Tls
Wireless-G Notebook Adapter with SpeedBooster WPA Enterprise WPA Enterprise features WPA security used in coordination with a RADIUS server. (This should only be used when a RADIUS server is connected to the Router.) WPA Enterprise offers two authentication methods, EAP- TLS and PEAP, as well as two encryption methods, TKIP and AES, with dynamic encryption keys. -
Seite 24: Figure 4-21: Wireless Security - Radius - Eap-Tls
Wireless-G Notebook Adapter with SpeedBooster RADIUS RADIUS features use of a RADIUS server. (This should only be used when a RADIUS server is connected to the Router.) RADIUS offers two authentication types: EAP-TLS and PEAP. Authentication - Select the authentication method your network is using, EAP-TLS or PEAP. EAP-TLS If you selected EAP-TLS, enter the login name of your wireless network in the Login Name field. -
Seite 25: Figure 4-23: Wireless Security - Leap
Wireless-G Notebook Adapter with SpeedBooster LEAP If you selected LEAP, then enter the Username and Password that will authenticate you on your wireless network. Username - Enter the username used for authentication. Password - Enter the password used for authentication. Confirm - Enter the password again. -
Seite 26: Figure 4-25: Congratulations Screen
Wireless-G Notebook Adapter with SpeedBooster 7. After the software has been successfully installed, the Congratulations screen will appear. Click Connect to Network to connect to your network. Clicking Return to Profile will open the Wireless Network Monitor’s Profiles screen. For more information about the Wireless Network Monitor, refer to Chapter 5: Using the Wireless Network Monitor. -
Seite 27: Chapter 5: Using The Wireless Network Monitor
Wireless-G Notebook Adapter with SpeedBooster Chapter 5: Using the Wireless Network Monitor Use the Wireless Network Monitor to check the link information, search for available wireless networks, or create profiles that hold different configuration settings. Accessing the Wireless Network Monitor After installing the Adapter, the Wireless Network Monitor icon will appear in the system tray of your computer. -
Seite 28: Figure 5-3: More Information - Wireless Network Status
Wireless-G Notebook Adapter with SpeedBooster Wireless Network Status The Wireless Network Status screen provides information on your current network settings. Status - This shows the status of the wireless network connection. SSID - This is the unique name of the wireless network. Wireless Mode - The mode of the wireless network currently in use is displayed here. -
Seite 29: Figure 5-4: More Information-Network Statistics
Wireless-G Notebook Adapter with SpeedBooster Wireless Network Statistics The Wireless Networks Statistics screen provides statistics on your current network settings. Transmit Rate - This is the data transfer rate of the current connection. (In Auto mode, the Adapter dynamically shifts to the fastest data transfer rate possible at any given time.) Receive Rate - This is the rate at which data is received. -
Seite 30: Secureeasysetup
1. After clicking the SecureEasySetup button, you will be asked to locate the SecureEasySetup button or Cisco logo button on the device with which the Adapter will be communicating. If you are not sure where to Figure 5-5: The SecureEasySetup button find this button, click Where can I find the button?. -
Seite 31: Figure 5-8: The Secureeasysetup Logo And Location
Wireless-G Notebook Adapter with SpeedBooster 2. Press the Router or Access Point’s SecureEasySetup button on its front panel. After approximately two to ten seconds, the button will turn white and begin to blink. If your other SecureEasySetup device is not yet installed, Click the Next button to continue and finish the Router’s installation. -
Seite 32: Site Survey
Wireless-G Notebook Adapter with SpeedBooster Site Survey The Site Survey screen displays a list of available networks in the table on the left. The table shows each network’s SSID, Channel, and the quality of the wireless signal the Adapter is receiving. You may click SSID, CH (Channel), or Signal, to sort by that field. -
Seite 33: Profiles
Wireless-G Notebook Adapter with SpeedBooster Profiles The Profiles screen lets you save different configuration profiles for different network setups. The table on the left displays a list of available profiles with their profile names and SSIDs. Profile - The name of the profile is displayed here. SSID - The SSID or unique name of the wireless network is displayed here. -
Seite 34: Creating A New Profile
Wireless-G Notebook Adapter with SpeedBooster Creating a New Profile On the Profiles screen, click the New button to create a new profile. Enter a name for the new profile, and click the OK button. Click the Cancel button to return to the Profiles screen without entering a name. The Available Wireless Network screen will appear. -
Seite 35: Figure 5-18: Available Wireless Network
1. After clicking the SecureEasySetup button, you will be asked to locate the SecureEasySetup button or Cisco logo button on the device with which the Adapter will be communicating. If you are not sure where to find this button, click Where can I find the button?. - Seite 36 Wireless-G Notebook Adapter with SpeedBooster 2. Press the Gateway’s SecureEasySetup button on its front panel. After approximately two seconds, the button will turn white and begin to blink. If your other SecureEasySetup device is not yet installed, Click the Next button to continue and finish the Router’s installation.
- Seite 37 Wireless-G Notebook Adapter with SpeedBooster Chapter 5: Using the Wireless Network Monitor Click Exit to close the Setup Wizard.
-
Seite 38: Figure 5-22: Available Wireless Network
Wireless-G Notebook Adapter with SpeedBooster Setting Up the Adapter with Available Networks If you’re not setting up the Adapter with SecureEasySetup, another method for setting up the Adapter is with the available networks listed on the Available Wireless Network screen. The available networks are listed in the table on the center of the screen by SSID. - Seite 39 Wireless-G Notebook Adapter with SpeedBooster If your network has the wireless security WPA Personal (Wi-Fi Protected Access) enabled, this screen will appear. Encryption - Select the type of algorithm you want to use, TKIP or AES, from the Encryption drop-down menu.
- Seite 40 Wireless-G Notebook Adapter with SpeedBooster DNS 1 and DNS 2 - Enter the DNS address of your wired Ethernet network here. Click the Next button to continue, or click the Back button to return to the previous screen. 2. The Wireless Mode screen shows a choice of two wireless modes. Click the Infrastructure Mode radio button if you want to connect to a wireless router or access point.
- Seite 41 Wireless-G Notebook Adapter with SpeedBooster If your wireless network doesn’t have wireless security, select Disabled and then click the Next button to continue. Proceed to Step 5. If your wireless network has wireless security, select the method of security used: WEP, WPA-Personal, WPA-Enterprise, RADIUS, or LEAP.
- Seite 42 Wireless-G Notebook Adapter with SpeedBooster WPA Personal WPA Personal offers two encryption methods, TKIP and AES, with dynamic encryption keys. Select TKIP or AES for encryption. Then enter a Passphrase that is 8-63 characters in length. Encryption - Select the type of algorithm you want to use, TKIP or AES, from the Encryption drop-down menu.
- Seite 43 Wireless-G Notebook Adapter with SpeedBooster WPA Enterprise WPA Enterprise features WPA security used in coordination with a RADIUS server. (This should only be used when a RADIUS server is connected to the Router.) WPA Enterprise offers two authentication methods, EAP- TLS and PEAP, as well as two encryption methods, TKIP and AES, with dynamic encryption keys.
- Seite 44 Wireless-G Notebook Adapter with SpeedBooster RADIUS RADIUS features use of a RADIUS server. (This should only be used when a RADIUS server is connected to the Router.) RADIUS offers two authentication types: EAP-TLS and PEAP. Authentication - Select the authentication method your network is using, EAP-TLS or PEAP. EAP-TLS If you selected EAP-TLS, enter the login name of your wireless network in the Login Name field.
- Seite 45 Wireless-G Notebook Adapter with SpeedBooster LEAP If you selected LEAP, then enter the Username and Password that will authenticate you on your wireless network. Username - Enter the username used for authentication. Password - Enter the password used for authentication. Confirm - Enter the password again.
- Seite 46 Wireless-G Notebook Adapter with SpeedBooster 4. The Congratulations screen will appear next. Click Connect to Network to implement the new settings immediately and return to the Link Information screen. Click Return to Profiles Screen to keep the current settings active and return to the Profiles screen. You have successfully created a connection profile.
-
Seite 47: Appendix A: Troubleshooting
Wireless-G Notebook Adapter with SpeedBooster Appendix A: Troubleshooting This appendix consists of two parts: “Common Problems and Solutions” and “Frequently Asked Questions.” This appendix provides solutions to problems that may occur during the installation and operation of the Wireless-G Notebook Adapter. Read the description below to solve your problems. If you can't find an answer here, check the Linksys website at www.linksys.com/international. -
Seite 48: Frequently Asked Questions
Wireless-G Notebook Adapter with SpeedBooster Frequently Asked Questions Can I run an application from a remote computer over the wireless network? This will depend on whether or not the application is designed to be used over a network. Consult the application’s user guide to determine if it supports operation over a network. - Seite 49 Wireless-G Notebook Adapter with SpeedBooster maintain contact with the wireless network even when not actually transmitting data. Achieving these functions simultaneously requires a dynamic RF networking technology that links access points and nodes. In such a system, the user’s end node undertakes a search for the best possible access to the system. First, it evaluates such factors as signal strength and quality, as well as the message load currently being carried by each access point and the distance of each access point to the wired backbone.
- Seite 50 Wireless-G Notebook Adapter with SpeedBooster Would the information be intercepted while transmitting on air? WLAN features two-fold protection in security. On the hardware side, as with Direct Sequence Spread Spectrum technology, it has the inherent security feature of scrambling. On the software side, WLAN offers the encryption function (WEP) to enhance security and access control.
-
Seite 51: Appendix B: Wireless Security
Wireless-G Notebook Adapter with SpeedBooster Appendix B: Wireless Security Linksys wants to make wireless networking as safe and easy for you as possible. The current generation of Linksys products provide several network security features, but they require specific action on your part for implementation. - Seite 52 Wireless-G Notebook Adapter with SpeedBooster 1. Disable Broadcast 2. Make it unique 3. Change it often Most wireless networking devices will give you the option of broadcasting the SSID. While this option may be more convenient, it allows anyone to log into your wireless network. This includes hackers. So, don’t broadcast the SSID.
- Seite 53 Wireless-G Notebook Adapter with SpeedBooster WPA-Personal. If you do not have a RADIUS server, Select the type of algorithm, TKIP or AES, and enter a password in the Passphrase field of 8-63 characters. WPA-Enterprise. WPA used in coordination with a RADIUS server. (This should only be used when a RADIUS server is connected to the Router or other device.) WPA-Enterprise offers two encryption methods, TKIP and AES, with dynamic encryption keys.
-
Seite 54: Appendix C: Windows Help
Wireless-G Notebook Adapter with SpeedBooster Appendix C: Windows Help All wireless products require Microsoft Windows. Windows is the most used operating system in the world and comes with many features that help make networking easier. These features can be accessed through Windows Help and are described in this appendix. -
Seite 55: Appendix D: Glossary
Wireless-G Notebook Adapter with SpeedBooster Appendix D: Glossary 802.11a - An IEEE wireless networking standard that specifies a maximum data transfer rate of 54Mbps and an operating frequency of 5GHz. 802.11b - An IEEE wireless networking standard that specifies a maximum data transfer rate of 11Mbps and an operating frequency of 2.4GHz. - Seite 56 Wireless-G Notebook Adapter with SpeedBooster Buffer - A shared or assigned memory area that is used to support and coordinate different computing and networking activities so one isn't held up by the other. Byte - A unit of data that is usually eight bits long Cable Modem - A device that connects a computer to the cable television network, which in turn connects to the Internet.
- Seite 57 Wireless-G Notebook Adapter with SpeedBooster DTIM (Delivery Traffic Indication Message) - A message included in data packets that can increase wireless efficiency. Dynamic IP Address - A temporary IP address assigned by a DHCP server. EAP (Extensible Authentication Protocol) - A general authentication protocol used to control network access. Many specific authentication methods work within this framework.
- Seite 58 Wireless-G Notebook Adapter with SpeedBooster IEEE (The Institute of Electrical and Electronics Engineers) - An independent institute that develops networking standards. Infrastructure - A wireless network that is bridged to a wired network via an access point. IP (Internet Protocol) - A protocol used to send data over a network. IP Address - The address used to identify a computer or device on a network.
- Seite 59 Wireless-G Notebook Adapter with SpeedBooster OFDM (Orthogonal Frequency Division Multiplexing) - Frequency transmission that separates the data stream into a number of lower-speed data streams, which are then transmitted in parallel to prevent information from being lost in transit. Packet - A unit of data sent over a network. Passphrase - Used much like a password, a passphrase simplifies the WEP encryption process by automatically generating the WEP encryption keys for Linksys products.
- Seite 60 Wireless-G Notebook Adapter with SpeedBooster Software - Instructions for the computer. A series of instructions that performs a particular task is called a "program". SOHO (Small Office/Home Office) - Market segment of professionals who work at home or in small offices. SPI (Stateful Packet Inspection) Firewall - A technology that inspects every incoming packet of information before allowing it to enter the network.
- Seite 61 Wireless-G Notebook Adapter with SpeedBooster UDP (User Datagram Protocol) - A network protocol for transmitting data that does not require acknowledgement from the recipient of the data that is sent. Upgrade - To replace existing software or firmware with a newer version. Upload - To transmit a file over a network.
-
Seite 62: Appendix E: Specifications
Wireless-G Notebook Adapter with SpeedBooster Appendix E: Specifications Standards IEEE 802.11g, IEEE 802.11b, CardBus Channels 11 Channels (Most of North, South, and Central America) 13 Channels (Most of Europe, and Asia) LEDs Power, Link Transmit Power 18 dBm Protocols 802.11b: CCK (11 Mbps), DQPSK (2 Mbps), DBPSK (1 Mbps); 802.11g: OFDM Security Features WEP, AES, TKIP, 802.1x WEP Key Bits... - Seite 63 Wireless-G Notebook Adapter with SpeedBooster Appendix F: Warranty Information Linksys warrants to You that, for a period of three years (the “Warranty Period”), your Linksys Product will be substantially free of defects in materials and workmanship under normal use. Your exclusive remedy and Linksys' entire liability under this warranty will be for Linksys at its option to repair or replace the Product or refund Your purchase price less any rebates.
- Seite 64 Wireless-G Notebook Adapter with SpeedBooster Appendix G: Regulatory Information FCC Statement This product has been tested and complies with the specifications for a Class B digital device, pursuant to Part 15 of the FCC Rules. These limits are designed to provide reasonable protection against harmful interference in a residential installation.
- Seite 65 Wireless-G Notebook Adapter with SpeedBooster Compliance Information for 2.4-GHz Wireless Products Relevant to the EU and Other Countries Following the EU Directive 1999/5/EC (R&TTE Directive) Declaration of Conformity with Regard to the EU Directive 1995/5/EC (R&TTE Directive) Appendix G: Regulatory Information...
- Seite 66 Wireless-G Notebook Adapter with SpeedBooster NOTE: For all products, the Declaration of Conformity is available through one or more of these options: • A pdf file is included on the product's CD. • A print copy is included with the product. •...
- Seite 67 Wireless-G Notebook Adapter with SpeedBooster CE Marking For the Linksys Wireless-B and Wireless-G products, the following CE mark, notified body number (where applicable), and class 2 identifier are added to the equipment. Check the CE label on the product to find out which notified body was involved during the assessment. National Restrictions This product may be used in all EU countries (and other countries following the EU directive 1999/5/EC) without any limitation except for the countries mentioned below:...
- Seite 68 Wireless-G Notebook Adapter with SpeedBooster France In case the product is used outdoors, the output power is restricted in some parts of the band. See Table 1 or check http://www.art-telecom.fr/ for more details. Dans la cas d’une utilisation en extérieur, la puissance de sortie est limitée pour certaines parties de la bande. Reportez- vous à...
- Seite 69 Wireless-G Notebook Adapter with SpeedBooster Power Output of Your Device To comply with your country’s regulations, you may have to change the power output of your wireless device. Proceed to the appropriate section for your device. NOTE: The power output setting may not be available on all wireless products. For more information, refer to the documentation on your product’s CD or http://www.linksys.com/international.
- Seite 70 Wireless-G Notebook Adapter with SpeedBooster Technical Documents on www.linksys.com/international Follow these steps to access technical documents: 1. Browse to http://www.linksys.com/international. 2. Click the region in which you reside. 3. Click the name of the country in which you reside. 4. Click Products. 5.
- Seite 71 Wireless-G Notebook Adapter with SpeedBooster Appendix H: Contact Information Need to contact Linksys? Visit us online for information on the latest products and updates to your existing products at: http://www.linksys.com/international If you experience problems with any Linksys product, you can e-mail us at: In Europe E-mail Address Austria...
- Seite 72 ® A Division of Cisco Systems, Inc. Wireless-G 802.11g Notebook-Adapter Benutzerhandbuch mit SpeedBooster WIRELESS WPC54GS (DE) Modell-Nr.
- Seite 73 Technische Änderungen vorbehalten. Linksys ist eine eingetragene Marke bzw. eine Marke von Cisco Systems, Inc. und/oder deren Zweigunternehmen in den USA und anderen Ländern. Copyright © 2005 Cisco Systems, Inc. Alle Rechte vorbehalten. Andere Handelsmarken und Produktnamen sind Marken bzw. eingetragene Marken der jeweiligen Inhaber.
- Seite 74 Wireless-G Notebook-Adapter mit SpeedBooster Inhaltsverzeichnis Kapitel 1: Einführung Willkommen Der Inhalt dieses Handbuchs Kapitel 2: Planen Ihres Wireless-Netzwerks Netzwerktopologie Roaming Netzwerkanordnung Kapitel 3: Beschreibung des Wireless-G Notebook-Adapters Die LED-Anzeigen Kapitel 4: Einrichten und Anschließen des Wireless-G Notebook-Adapters Starten der Installation Anschließen des Adapters Einrichten des Adapters Kapitel 5: Verwenden des Wireless-Netzwerkmonitors...
- Seite 75 Wireless-G Notebook-Adapter mit SpeedBooster Anhang F: Garantieinformationen Anhang G: Zulassungsinformationen Anhang H: Kontaktinformationen...
- Seite 76 Wireless-G Notebook-Adapter mit SpeedBooster Abbildungsverzeichnis Abbildung 3-1: Vorderseite Abbildung 4-1: Das Willkommensfenster des Setup-Assistenten Abbildung 4-2: Lizenzvereinbarung des Setup-Assistenten Abbildung 4-3: Anschließen des Adapters Abbildung 4-4: Verfügbares Wireless-Netzwerk Abbildung 4-5: Position der Taste Abbildung 4-6: SecureEasySetup-Logo Abbildung 4-7: Position des SecureEasySetup-Logos Abbildung 4-8: SecureEasySetup–Herzlichen Glückwunsch Abbildung 4-9: Verfügbares Wireless-Netzwerk Abbildung 4-10: WEP-Schlüssel für Verbindung erforderlich...
- Seite 77 Wireless-G Notebook-Adapter mit SpeedBooster Abbildung 5-8: SecureEasySetup-Logo und dessen Position Abbildung 5-9: SecureEasySetup–Glückwunschfenster Abbildung 5-10: Netzwerksuche Abbildung 5-11: WEP-Schlüssel für Verbindung erforderlich Abbildung 5-12: WPA Personal für Verbindung erforderlich Abbildung 5-13: Profile Abbildung 5-14: Importieren eines Profils Abbildung 5-15: Exportieren eines Profils Abbildung 5-16: Erstellen eines neuen Profils Abbildung 5-17: Verfügbares Wireless-Netzwerk Abbildung 5-18: Taste „SecureEasySetup“...
-
Seite 78: Kapitel 1: Einführung
Wireless-G Notebook-Adapter mit SpeedBooster Kapitel 1: Einführung Willkommen Vielen Dank, dass Sie sich für einen Wireless-G Notebook-Adapter mit SpeedBooster entschieden haben. Mit diesem Adapter wird Ihr Wireless-Netzwerk noch schneller und einfacher als je zuvor. Netzwerk: Mehrere Computer oder Geräte, die miteinander Wie alle Wireless-Produkte ermöglicht dieser Adapter größere Reichweiten und mehr Mobilität in Ihrem Wireless- verbunden sind, so dass Benutzer Daten gemeinsam Netzwerk. -
Seite 79: Der Inhalt Dieses Handbuchs
Wireless-G Notebook-Adapter mit SpeedBooster Der Inhalt dieses Handbuchs In diesem Benutzerhandbuch sind die zur Installation und Verwendung des Wireless-G Notebook-Adapters mit SpeedBooster erforderlichen Schritte aufgeführt. • Kapitel 1: Einführung In diesem Kapitel werden die Anwendungen des Adapters sowie dieses Benutzerhandbuchs beschrieben. •... - Seite 80 Wireless-G Notebook-Adapter mit SpeedBooster • Anhang G: Zulassungsinformationen In diesem Anhang sind die für den Adapter geltenden Zulassungsinformationen aufgeführt. • Anhang H: Kontaktinformationen In diesem Anhang finden Sie Kontaktinformationen zu einer Reihe von Linksys Ressourcen, darunter auch zum Kundendienst. Kapitel 1: Einführung Der Inhalt dieses Handbuchs...
-
Seite 81: Kapitel 2: Planen Ihres Wireless-Netzwerks
Wireless-G Notebook-Adapter mit SpeedBooster Kapitel 2: Planen Ihres Wireless-Netzwerks Netzwerktopologie Bei einem Wireless-Netzwerk handelt es sich um eine Gruppe von Computern, die jeweils über einen Wireless-Adapter verfügen. Computer in einem Wireless-Netzwerk müssen so konfiguriert sein, dass sie den gleichen Funkkanal verwenden. Es können mehrere PCs, die über Wireless-Karten oder -Adapter verfügen, Topologie: Die physische Anordnung eines Netzwerks. -
Seite 82: Netzwerkanordnung
Wireless-G Notebook-Adapter mit SpeedBooster Netzwerkanordnung Die Wireless Access Points und Wireless-Router von Linksys wurden zur Verwendung mit 802.11a-, 802.11b- und 802.11g-Produkten entwickelt. Da 802.11g-Produkte mit dem 802.11b-Standard kommunizieren können und einige Produkte sowohl „a“ als auch „g“ verwenden, können Produkte, die diese Standards verwenden, miteinander kommunizieren. -
Seite 83: Kapitel 3: Beschreibung Des Wireless-G Notebook-Adapters
Wireless-G Notebook-Adapter mit SpeedBooster Kapitel 3: Beschreibung des Wireless-G Notebook- Adapters Die LED-Anzeigen Auf den LEDs werden Informationen über die Netzwerkaktivität des Netzwerk-Adapters angezeigt. Abbildung 3-1: Vorderseite Power (Netzstrom) Grün. Die LED für den Netzstrom leuchtet auf, wenn der Adapter eingeschaltet wird. Link (Verbindung) Grün. -
Seite 84: Kapitel 4: Einrichten Und Anschließen Des Wireless-G Notebook-Adapters
Wireless-G Notebook-Adapter mit SpeedBooster Kapitel 4: Einrichten und Anschließen des Wireless-G Notebook-Adapters Starten der Einrichtung Der Setup-Assistent für den Wireless-G Notebook-Adapter führt Sie durch den Installationsvorgang. Der Setup- Assistent führt die Installation des Treibers und des Wireless-Netzwerkmonitors sowie den Anschluss und die Konfiguration des Adapters durch. -
Seite 85: Anschließen Des Adapters
Wireless-G Notebook-Adapter mit SpeedBooster Anschließen des Adapters 1. Suchen Sie nach einem verfügbaren CardBus-Steckplatz auf Ihrem Notebook. 2. Stecken Sie den Adapter mit der Pin-Seite des Steckers (Etikett nach oben) in den CardBus-Steckplatz, bis er einrastet. 3. Benutzer von Windows 98 und Windows ME werden u. U. aufgefordert, ihren PC neu zu starten. Sobald der Adapter korrekt installiert ist, sollte die Netzstrom-LED leuchten. -
Seite 86: Einrichten Des Adapters Mit Secureeasysetup
Vorderseite des Wireless-Routers oder des Access Point befindet. Abbildung 4-6: SecureEasySetup-Logo 3. Drücken Sie auf dem Wireless-Router oder auf dem Access Point die Tasten für das Cisco Logo oder SecureEasySetup. Wenn sich diese weiß verfärben und blinken, klicken Sie im Fenster Setup Wizard (Setup- Assistent) auf die Schaltfläche Next (Weiter). -
Seite 87: Abbildung 4-8: Secureeasysetup-Herzlichen Glückwunsch
Wireless-G Notebook-Adapter mit SpeedBooster 4. Wenn SecureEasySetup abgeschlossen ist, können Sie Ihre Konfiguration als Textdatei speichern, indem Sie auf die Schaltfläche Save (Speichern) klicken; oder klicken Sie auf die Schaltfläche Print (Drucken), um die Konfiguration zu drucken. Klicken Sie auf Connect to Network (Mit Netzwerk verbinden), um eine Verbindung mit Ihrem Netzwerk herzustellen. -
Seite 88: Abbildung 4-10: Wep-Schlüssel Für Verbindung Erforderlich
Wireless-G Notebook-Adapter mit SpeedBooster 2. Wenn auf Ihrem Netzwerk die Wireless-Sicherheitsmethode WEP (Wired Equivalent Privacy) aktiviert ist, wird dieses Fenster angezeigt. Wählen Sie 64-bit (64-Bit) oder 128-bit (128-Bit) aus. Geben Sie anschließend eine Passphrase oder einen WEP-Schlüssel ein. Passphrase: Geben Sie eine Passphrase in das Feld Passphrase ein, so dass automatisch ein WEP-Schlüssel generiert wird. -
Seite 89: Abbildung 4-12: Glückwunschfenster Der Automatischen Einrichtung
Wireless-G Notebook-Adapter mit SpeedBooster 3. Nach erfolgreicher Installation der Software wird das Glückwunschfenster angezeigt. Klicken Sie auf Connect to Network (Mit Netzwerk verbinden), um eine Verbindung mit Ihrem Netzwerk herzustellen. Weitere Informationen zum Wireless-Netzwerkmonitor finden Sie im Kapitel 5: Verwenden des Wireless- Netzwerkmonitors. -
Seite 90: Abbildung 4-14: Netzwerkeinstellungen
Wireless-G Notebook-Adapter mit SpeedBooster 2. Das Fenster Network Settings (Netzwerkeinstellungen) des Wireless-Netzwerkmonitors wird angezeigt. Wenn Ihr Netzwerk über einen Router oder einen anderen DHCP-Server verfügt, klicken Sie auf die Optionsschaltfläche neben Obtain network settings automatically (DHCP) (Netzwerkeinstellungen automatisch beziehen (DHCP)). Wenn Ihr Netzwerk über keinen DHCP-Server verfügt, klicken Sie auf die Optionsschaltfläche neben Specify the network settings (Netzwerkeinstellungen angeben). -
Seite 91: Abbildung 4-16: Einstellungen Für Den Ad-Hoc-Modus
Wireless-G Notebook-Adapter mit SpeedBooster 4. Wenn Sie die Option Infrastructure Mode (Infrastrukturmodus) ausgewählt haben, fahren Sie jetzt mit Schritt 5 fort. Wenn Sie die Option Ad-Hoc Mode (Ad-Hoc-Modus) ausgewählt haben, wird das Fenster Ad-Hoc Mode Settings (Einstellungen für Ad-Hoc-Modus) angezeigt. Wählen Sie den korrekten Betriebskanal für Ihr Wireless-Netzwerk aus. -
Seite 92: Abbildung 4-18: Wireless-Sicherheit-Wpa Personal
Wireless-G Notebook-Adapter mit SpeedBooster TX Key (Übertragungsschlüssel): Die Standardnummer des Übertragungsschlüssels ist 1. Wenn der Access Point bzw. der Wireless-Router Ihres Netzwerks die Nummern 2, 3 oder 4 als Übertragungsschlüssel verwendet, wählen Sie aus dem Dropdown-Menü TX Key (TX-Schlüssel) die entsprechende Nummer aus. Authentication (Authentifizierung): Standardmäßig ist die Option Auto (Automatisch) ausgewählt, wobei Shared Key (Freigegebener Schlüssel) bzw. -
Seite 93: Abbildung 4-19: Wireless-Sicherheit-Wpa Enterprise-Eap-Tls
Wireless-G Notebook-Adapter mit SpeedBooster WPA Enterprise Bei der Verschlüsselungsmethode WPA Enterprise wird WPA-Sicherheit in Kombination mit einem RADIUS- Server verwendet. (Diese Vorgehensweise sollte nur verwendet werden, wenn ein RADIUS-Server mit dem Router verbunden ist.) WPA Enterprise bietet zwei Authentifizierungsmethoden, EAP-TLS und PEAP, sowie zwei Verschlüsselungsmethoden, TKIP und AES, mit dynamischen Codierschlüsseln. -
Seite 94: Abbildung 4-21: Wireless-Sicherheit: Radius-Eap-Tls
Wireless-G Notebook-Adapter mit SpeedBooster RADIUS Bei RADIUS wird ein RADIUS-Server verwendet. (Diese Vorgehensweise sollte nur verwendet werden, wenn ein RADIUS-Server mit einem Router verbunden ist.) RADIUS bietet zwei Authentifizierungsarten: EAP-TLS und PEAP. Authentication (Authentifizierung): Wählen Sie die in Ihrem Netzwerk verwendete Authentifizierungsmethode, EAP-TLS oder PEAP, aus. -
Seite 95: Abbildung 4-23: Wireless-Sicherheit: Leap
Wireless-G Notebook-Adapter mit SpeedBooster LEAP Geben Sie bei Auswahl von LEAP Benutzername und Passwort ein, mit denen Sie sich in Ihrem Wireless- Netzwerk authentifiziert haben. Username (Benutzername): Geben Sie den zur Authentifizierung verwendeten Benutzernamen ein. Password (Passwort): Geben Sie das zur Authentifizierung verwendete Passwort ein. Confirm (Bestätigen): Geben Sie das Passwort erneut ein. -
Seite 96: Abbildung 4-25: Glückwunschfenster
Wireless-G Notebook-Adapter mit SpeedBooster 7. Nach erfolgreicher Installation der Software wird das Glückwunschfenster angezeigt. Klicken Sie auf Connect to Network (Mit Netzwerk verbinden), um eine Verbindung mit Ihrem Netzwerk herzustellen. Wenn Sie auf Return to Profiles (Zum Fenster „Profile“ zurückkehren) klicken, wird das Fenster Profiles (Profile) des Wireless-Netzwerkmonitors geöffnet. -
Seite 97: Kapitel 5: Verwenden Des Wireless-Netzwerkmonitors
Wireless-G Notebook-Adapter mit SpeedBooster Kapitel 5: Verwenden des Wireless-Netzwerkmonitors Verwenden Sie den Wireless-Netzwerkmonitor, um die Verbindungsdaten zu überprüfen, nach verfügbaren Wireless-Netzwerken zu suchen oder Profile zu erstellen, die verschiedene Konfigurationseinstellungen enthalten. Zugreifen auf den Wireless-Netzwerkmonitor Nach der Installation des Adapters wird das Symbol für den Wireless-Netzwerkmonitor in der Taskleiste Ihres Computers angezeigt. -
Seite 98: Abbildung 5-3: Weitere Informationen-Status Des Wireless-Netzwerks
Wireless-G Notebook-Adapter mit SpeedBooster Status des Wireless-Netzwerks Das Fenster Wireless Network Status (Status des Wireless-Netzwerks) enthält Informationen zu Ihren aktuellen Netzwerkeinstellungen. Status: Hier wird der Status der Wireless-Netzwerkverbindung angezeigt. SSID: Dies ist der individuelle Name des Wireless-Netzwerks. Wireless Mode (Wireless-Modus): Der derzeit verwendete Modus des Wireless-Netzwerks wird hier angezeigt. Transfer Rate (Übertragungsrate): Hier wird die Datenübertragungsrate der aktuellen Verbindung angezeigt. -
Seite 99: Abbildung 5-4: Weitere Informationen-Statistiken Für Das Wireless-Netzwerk
Wireless-G Notebook-Adapter mit SpeedBooster Statistiken für das Wireless-Netzwerk Das Fenster Wireless Networks Statistics (Statistiken für das Wireless-Netzwerk) enthält Statistiken zu Ihren aktuellen Netzwerkeinstellungen. Transmit Rate (Übertragungsrate): Die Datenübertragungsrate der aktuellen Verbindung. (Im automatischen Modus wechselt der Adapter dynamisch zur schnellstmöglichen Datenübertragungsrate.) Receive Rate (Empfangsrate): Die Rate, mit der Daten empfangen werden. -
Seite 100: Secureeasysetup
Wireless-Router oder Access Point), nach der Taste SecureEasySetup suchen. 1. Nachdem Sie auf die Schaltfläche SecureEasySetup geklickt haben, werden Sie aufgefordert, die Taste SecureEasySetup oder die Taste für das Cisco Logo auf dem Gerät zu suchen, mit dem der Adapter Abbildung 5-5: Schaltfläche „SecureEasySetup“... -
Seite 101: Abbildung 5-8: Secureeasysetup-Logo Und Dessen Position
Wireless-G Notebook-Adapter mit SpeedBooster 2. Drücken Sie auf dem Wireless-Router oder Access Point die Tasten für das Cisco Logo oder SecureEasySetup. Wenn sich diese weiß verfärben und blinken, klicken Sie im Fenster Setup Wizard (Setup-Assistent) auf die Schaltfläche Next (Weiter). Das Logo oder die Taste auf dem Wireless-Router oder Access Point hören auf zu blinken, sobald der Adapter erfolgreich zum Netzwerk hinzugefügt wurde. -
Seite 102: Netzwerksuche
Wireless-G Notebook-Adapter mit SpeedBooster Netzwerksuche Im Fenster Site Survey (Netzwerksuche) wird links in der Tabelle eine Liste der verfügbaren Netzwerke angezeigt. In dieser Tabelle werden die SSID des Netzwerks, der Kanal und die Qualität des vom Adapter empfangenen Wireless-Signals dargestellt. Sie können auf SSID, CH (Channel) (Kanal) oder Signal klicken, um nach dem entsprechenden Feld zu sortieren. -
Seite 103: Profile
Wireless-G Notebook-Adapter mit SpeedBooster Profile Im Fenster Profiles (Profile) können Sie verschiedene Konfigurationsprofile für verschiedene Netzwerkeinrichtungen speichern. In der Tabelle links wird eine Liste der verfügbaren Profile mit den entsprechenden Profilnamen und SSIDs angezeigt. Profile (Profil): Hier wird der Name des Profils angezeigt. SSID: Hier wird die SSID, d. -
Seite 104: Erstellen Eines Neuen Profils
Wireless-G Notebook-Adapter mit SpeedBooster Erstellen eines neuen Profils Klicken Sie im Fenster Profiles (Profile) auf die Schaltfläche New (Neu), um ein neues Profil zu erstellen. Geben Sie einen Namen für das neue Profil ein, und klicken Sie auf die Schaltfläche OK. Klicken Sie auf die Schaltfläche Abbrechen, um zum Fenster Profiles (Profile) zurückzukehren, ohne einen Namen einzugeben. -
Seite 105: Abbildung 5-18: Taste „Secureeasysetup
1. Nachdem Sie auf die Schaltfläche SecureEasySetup geklickt haben, werden Sie aufgefordert, die Taste SecureEasySetup oder die Taste für das Cisco Logo auf dem Gerät zu suchen, mit dem der Adapter verbunden wird. Wenn Sie sich nicht sicher sind, wo Sie diese Taste finden, klicken Sie auf Where can I find Abbildung 5-18: Taste „SecureEasySetup“... -
Seite 106: Abbildung 5-20: Position Von Secureeasysetup
Wireless-G Notebook-Adapter mit SpeedBooster 2. Drücken Sie auf dem Wireless-Router oder Access Point die Tasten für das Cisco Logo oder SecureEasySetup. Wenn sich diese weiß verfärben und blinken, klicken Sie im Fenster Setup Wizard (Setup- Assistent) auf die Schaltfläche Next (Weiter). Das Logo oder die Taste auf dem Wireless-Router oder Access Point hören auf zu blinken, sobald der Adapter erfolgreich zum Netzwerk hinzugefügt wurde. -
Seite 107: Einrichten Des Adapters Mit Verfügbaren Netzwerken
Wireless-G Notebook-Adapter mit SpeedBooster Einrichten des Adapters mit verfügbaren Netzwerken Wenn Sie den Adapter nicht mit SecureEasySetup einrichten, können Sie diesen mithilfe der verfügbaren Netzwerke, die im Fenster Available Wireless Network (Verfügbares Wireless-Netzwerk) angezeigt werden, einrichten. Die verfügbaren Netzwerke sind in der Tabelle in der Fenstermitte nach SSID aufgelistet. Wählen Sie das Wireless-Netzwerk aus, mit dem Sie eine Verbindung herstellen möchten, und klicken Sie auf die Schaltfläche Connect (Verbinden). -
Seite 108: Abbildung 5-24: Wpa Personal Für Verbindung Erforderlich
Wireless-G Notebook-Adapter mit SpeedBooster Wenn in Ihrem Netzwerk die Wireless-Sicherheitsmethode WPA Personal (Wi-Fi Protected Access) aktiviert ist, wird dieses Fenster angezeigt. Encryption (Verschlüsselung): Wählen Sie den gewünschten Algorithmus (TKIP oder AES) aus dem Dropdown-Menü Encryption (Verschlüsselung) aus. Passphrase: Geben Sie eine Passphrase, auch als vorläufiger gemeinsamer Schlüssel bezeichnet, in das Feld Passphrase ein. -
Seite 109: Abbildung 5-27: Wireless-Modus Für Neues Profil
Wireless-G Notebook-Adapter mit SpeedBooster DNS 1 und DNS 2: Geben Sie die DNS-Adresse Ihres verdrahteten Ethernet-Netzwerks hier ein. Klicken Sie auf die Schaltfläche Next (Weiter), um fortzufahren, oder klicken Sie auf die Schaltfläche Back (Zurück), um zum vorherigen Fenster zurückzukehren. 2. -
Seite 110: Abbildung 5-29: Wireless-Sicherheit Für Neues Profil
Wireless-G Notebook-Adapter mit SpeedBooster Wenn Ihr Wireless-Netzwerk über keine Wireless-Sicherheitsmethode verfügt, wählen Sie Disabled (Deaktiviert) aus und klicken Sie dann auf die Schaltfläche Next (Weiter), um fortzufahren. Fahren Sie mit Schritt 5 fort. Wenn in Ihrem Wireless-Netzwerk eine Wireless-Sicherheitsmethode aktiviert ist, wählen Sie die entsprechende Methode aus: WEP, WPA Personal, WPA Enterprise, RADIUS oder LEAP. -
Seite 111: Abbildung 5-31: Wireless-Sicherheit: Wpa Personal Für Neues Profil
Wireless-G Notebook-Adapter mit SpeedBooster WPA Personal WPA Personal bietet zwei Verschlüsselungsmethoden (TKIP und AES) mit dynamischen Codierschlüsseln. Wählen Sie für die Verschlüsselung TKIP oder AES aus. Geben Sie eine Passphrase ein, die mindestens 8 und maximal 63 Zeichen enthält. Encryption (Verschlüsselung): Wählen Sie den gewünschten Algorithmus (TKIP oder AES) aus dem Dropdown-Menü... -
Seite 112: Abbildung 5-32: Wireless-Sicherheit: Wpa Enterprise Unter Verwendung Von Eap-Tls Für Neues Profil
Wireless-G Notebook-Adapter mit SpeedBooster WPA Enterprise Bei der Verschlüsselungsmethode WPA Enterprise wird WPA-Sicherheit in Kombination mit einem RADIUS- Server verwendet. (Diese Vorgehensweise sollte nur verwendet werden, wenn ein RADIUS-Server mit dem Router verbunden ist.) WPA Enterprise bietet zwei Authentifizierungsmethoden, EAP-TLS und PEAP, sowie zwei Verschlüsselungsmethoden, TKIP und AES, mit dynamischen Codierschlüsseln. -
Seite 113: Abbildung 5-34: Wireless-Sicherheit: Radius Unter Verwendung Von Eap-Tls Für Neues Profil
Wireless-G Notebook-Adapter mit SpeedBooster RADIUS Bei RADIUS wird ein RADIUS-Server verwendet. (Diese Vorgehensweise sollte nur verwendet werden, wenn ein RADIUS-Server mit einem Router verbunden ist.) RADIUS bietet zwei Authentifizierungsarten: EAP-TLS und PEAP. Authentication (Authentifizierung): Wählen Sie die in Ihrem Netzwerk verwendete Authentifizierungsmethode, EAP-TLS oder PEAP, aus. -
Seite 114: Abbildung 5-36: Wireless-Sicherheit: Leap Für Neues Profil
Wireless-G Notebook-Adapter mit SpeedBooster LEAP Geben Sie bei Auswahl von LEAP Benutzername und Passwort ein, mit denen Sie sich in Ihrem Wireless- Netzwerk authentifiziert haben. Username (Benutzername): Geben Sie den zur Authentifizierung verwendeten Benutzernamen ein. Password (Passwort): Geben Sie das zur Authentifizierung verwendete Passwort ein. Confirm (Bestätigen): Geben Sie das Passwort erneut ein. -
Seite 115: Abbildung 5-38: Herzlichen Glückwunsch Zum Neu Erstellten Profil
Wireless-G Notebook-Adapter mit SpeedBooster 4. Das Glückwunschfenster wird als nächstes angezeigt. Klicken Sie auf Connect to Network (Mit dem Netzwerk verbinden), um die neuen Einstellungen umgehend zu übernehmen und zum Fenster Link Information (Verbindungsdaten) zurückzukehren. Klicken Sie auf Return to Profiles Screen (Zum Fenster „Profile“... -
Seite 116: Anhang A: Fehlerbehebung
Wireless-G Notebook-Adapter mit SpeedBooster Anhang A: Fehlerbehebung Dieser Anhang besteht aus zwei Teilen: „Behebung häufig auftretender Probleme“ und „Häufig gestellte Fragen“. Er enthält Lösungsvorschläge zu Problemen, die während der Installation und des Betriebs des Wireless-G Notebook-Adapters auftreten können. Lesen Sie sich zur Fehlerbehebung die unten aufgeführte Beschreibung durch. -
Seite 117: Häufig Gestellte Fragen
Wireless-G Notebook-Adapter mit SpeedBooster Häufig gestellte Fragen Kann ich Anwendungen von standortfernen Computern über das Wireless-Netzwerk ausführen? Dies ist abhängig davon, ob die Anwendung für die Verwendung in Netzwerken entwickelt wurde. Weitere Informationen dazu, ob die Anwendung in einem Netzwerk verwendet werden kann, finden Sie im Benutzerhandbuch zur Anwendung. - Seite 118 Wireless-G Notebook-Adapter mit SpeedBooster Um eine dauerhafte nahtlose Verbindung zu erzielen, muss das Wireless-LAN eine Reihe an unterschiedlichen Funktionen besitzen. So müssen z. B. alle Nachrichten von jedem Knoten und jedem Access Point bestätigt werden. Jeder Knoten muss den Kontakt mit dem Wireless-Netzwerk aufrechterhalten, auch wenn keine Datenübertragung stattfindet.
- Seite 119 Wireless-G Notebook-Adapter mit SpeedBooster Was ist DSSS? Was ist FHSS? Worin liegt der Unterschied? Bei FHSS wird ein Schmalbandträger verwendet, der nach einem für Sender und Empfänger bekannten Muster die Frequenz ändert. Bei ordnungsgemäßer Synchronisation wird jeweils ein einziger logischer Kanal aufrechterhalten.
-
Seite 120: Anhang B: Sicherheit Im Wireless-Netzwerkbetrieb
Wireless-G Notebook-Adapter mit SpeedBooster Anhang B: Sicherheit im Wireless-Netzwerkbetrieb Linksys hat es sich zum Ziel gesetzt, den Wireless-Netzwerkbetrieb für Sie so sicher und einfach wie möglich zu gestalten. Die aktuellen Produkte von Linksys bieten verschiedene Netzwerksicherheitsfunktionen. Um diese anzuwenden, müssen Sie jedoch bestimmte Schritte ausführen. Beachten Sie daher Folgendes beim Einrichten bzw. - Seite 121 Wireless-G Notebook-Adapter mit SpeedBooster 1. Deaktivieren Sie die Übertragung. 2. Wählen Sie eine individuelle SSID. 3. Ändern Sie sie regelmäßig. Bei den meisten Geräten für den Wireless-Netzwerkbetrieb gibt es die Option, die SSID zu übertragen. Diese Option ist zwar recht praktisch, bedeutet jedoch, dass sich jeder in Ihr Wireless-Netzwerk einklinken kann. Jeder, auch Hacker.
- Seite 122 Wireless-G Notebook-Adapter mit SpeedBooster WPA Personal: Wenn Sie nicht über einen RADIUS-Server verfügen, wählen Sie den gewünschten Algorithmus (TKIP oder AES) aus, und geben Sie in das Feld für die Passphrase ein Passwort mit einer Länge von 8 bis 63 Zeichen ein. WPA Enterprise: WPA wird in Verbindung mit einem RADIUS-Server verwendet.
-
Seite 123: Anhang C: Windows-Hilfe
Wireless-G Notebook-Adapter mit SpeedBooster Anhang C: Windows-Hilfe Für alle Wireless-Produkte ist Microsoft Windows erforderlich. Windows ist das weltweit am häufigsten verwendete Betriebssystem und bietet zahlreiche Funktionen, die den Netzwerkbetrieb vereinfachen. Diese Funktionen können über die Windows-Hilfe aufgerufen werden und werden im vorliegenden Anhang erläutert. TCP/IP Ein Computer kann nur dann mit einem Access Point oder einem Wireless-Router kommunizieren, wenn TCP/IP aktiviert ist. -
Seite 124: Anhang D: Glossar
Wireless-G Notebook-Adapter mit SpeedBooster Anhang D: Glossar 802.11a: IEEE-Standard für den Wireless-Netzwerkbetrieb, der eine maximale Datenübertragungsrate von 54 Mbit/s sowie eine Betriebsfrequenz von 5 GHz festlegt. 802.11b: IEEE-Standard für den Wireless-Netzwerkbetrieb, der eine maximale Datenübertragungsrate von 11 Mbit/s sowie eine Betriebsfrequenz von 2,4 GHz festlegt. 802.11g: IEEE-Standard für den Wireless-Netzwerkbetrieb, der eine maximale Datenübertragungsrate von 54 Mbit/s und eine Betriebsfrequenz von 2,4 GHz festlegt sowie Abwärtskompatibilität mit Geräten garantiert, die dem 802.11b-Standard entsprechen. - Seite 125 Wireless-G Notebook-Adapter mit SpeedBooster Browser: Eine Anwendung, mit der auf alle im World Wide Web enthaltenen Informationen interaktiv zugegriffen werden kann. Byte: Eine Dateneinheit, die üblicherweise aus acht Bit besteht. CSMA/CA (Carrier Sense Multiple Access/Collision Avoidance): Eine Datenübertragungsmethode, die verwendet wird, um Datenkollisionen zu verhindern.
- Seite 126 Wireless-G Notebook-Adapter mit SpeedBooster EAP (Extensible Authentication Protocol): Ein allgemeines Authentifizierungsprotokoll zur Steuerung des Netzwerkzugriffs. Viele spezielle Authentifizierungsmethoden greifen auf dieses Protokoll zurück. EAP-PEAP (Extensible Authentication Protocol-Protected Extensible Authentication Protocol): Eine gegenseitige Authentifizierungsmethode, bei der eine Kombination von digitalen Zertifikaten sowie ein anderes System, z. B. Passwörter, verwendet werden.
- Seite 127 Wireless-G Notebook-Adapter mit SpeedBooster Infrastruktur: Ein Wireless-Netzwerk, das über einen Access Point mit einem verdrahteten Netzwerk verbunden ist. IP (Internet Protocol): Ein Protokoll zum Senden von Daten über Netzwerke. IP-Adresse: Die Adresse, anhand der ein Computer oder ein Gerät im Netzwerk identifiziert werden kann. IPCONFIG: Ein Dienstprogramm für Windows 2000 und Windows XP, das die IP-Adresse von bestimmten Geräten im Netzwerk anzeigt.
- Seite 128 Wireless-G Notebook-Adapter mit SpeedBooster NNTP (Network News Transfer Protocol): Das Protokoll, mit dem eine Verbindung zu Usenet-Gruppen im Internet hergestellt wird. OFDM (Orthogonal Frequency Division Multiplexing): Eine Frequenzübertragungstechnologie, die den Datenstrom in mehrere Datenströme von geringerer Geschwindigkeit aufteilt, die dann parallel übertragen werden, um zu verhindern, dass Informationen während der Übertragung verloren gehen.
- Seite 129 Wireless-G Notebook-Adapter mit SpeedBooster RTS (Request To Send): Eine Methode zur Koordination von großen Datenpaketen in einem Netzwerk mithilfe der RTS-Schwelle. Server: Ein beliebiger Computer, der innerhalb eines Netzwerks dafür sorgt, dass Benutzer auf Dateien zugreifen, kommunizieren sowie Druckvorgänge und andere Aktionen ausführen können. SMTP (Simple Mail Transfer Protocol): Das standardmäßige E-Mail-Protokoll im Internet.
- Seite 130 Wireless-G Notebook-Adapter mit SpeedBooster TKIP (Temporal Key Integrity Protocol): Eine Wireless-Verschlüsselungsmethode, bei der für jedes übertragene Datenpaket dynamische Codierschlüssel zur Verfügung stehen. Topologie: Die physische Anordnung eines Netzwerks. TX-Rate: Übertragungsrate. UDP (User Datagram Protocol): Ein Netzwerkprotokoll zur Datenübertragung, bei dem keine Bestätigung vom Empfänger der gesendeten Daten erforderlich ist.
-
Seite 131: Anhang E: Spezifikationen
Wireless-G Notebook-Adapter mit SpeedBooster Anhang E: Spezifikationen Standards IEEE 802.11g, IEEE 802.11b, CardBus Kanäle 11 Kanäle (Nord-, Mittel- und Südamerika) 13 Kanäle (in den meisten Teilen Europas, Asiens und Afrikas) LEDs Power (Netzstrom), Link (Verbindung) Übertragungsleistung 18 dBm Protokolle 802.11b: CCK (11 Mbit/s), DQPSK (2 Mbit/s), DBPSK (1 Mbit/s); 802.11g: OFDM Sicherheitsmerkmale WEP, AES, TKIP, 802.1x... -
Seite 132: Anhang F: Garantieinformationen
Wireless-G Notebook-Adapter mit SpeedBooster Anhang F: Garantieinformationen Linksys sichert Ihnen für einen Zeitraum von drei Jahren (die „Gewährleistungsfrist“) zu, dass dieses Linksys Produkt bei normaler Verwendung keine Material- oder Verarbeitungsfehler aufweist. Im Rahmen dieser Gewährleistung beschränken sich Ihre Rechtsmittel und der Haftungsumfang von Linksys wie folgt: Linksys kann nach eigener Wahl das Produkt reparieren oder austauschen oder Ihnen den Kaufpreis abzüglich etwaiger Nachlässe zurückerstatten. -
Seite 133: Anhang G: Zulassungsinformationen
Wireless-G Notebook-Adapter mit SpeedBooster Anhang G: Zulassungsinformationen FCC-Bestimmungen Dieses Gerät wurde geprüft und entspricht den Bestimmungen für ein digitales Gerät der Klasse B gemäß Teil 15 der FCC-Bestimmungen. Die Grenzwerte wurden so festgelegt, dass ein angemessener Schutz gegen Störungen in einer Wohngegend gewährleistet ist. - Seite 134 Wireless-G Notebook-Adapter mit SpeedBooster Informationen zur Einhaltung gesetzlicher Vorschriften bei 2,4-GHz-Wireless-Produkten für den Bereich der EU und anderer Länder gemäß der EU-Richtlinie 1999/5/EG (R&TTE-Richtlinie) Konformitätserklärung zur EU-Richtlinie 1995/5/EG (R&TTE-Richtlinie) Anhang G: Zulassungsinformationen...
- Seite 135 Wireless-G Notebook-Adapter mit SpeedBooster HINWEIS: Die Konformitätserklärung liegt für alle Produkte in einer der folgenden drei Formen vor: • Auf der CD des Produkts befindet sich eine PDF-Datei. • Im Lieferumfang des Produkts ist eine Druckversion enthalten. • Auf der Website des Produkts steht eine PDF-Datei zur Verfügung. Rufen Sie www.linksys.com/international auf, und wählen Sie Ihr Land oder Ihre Region aus.
- Seite 136 Wireless-G Notebook-Adapter mit SpeedBooster CE-Kennzeichnung Die Wireless-B- und Wireless-G-Produkte von Linksys sind mit der folgenden CE-Kennzeichnung, der Nummer der Überwachungs- und Zertifizierungsstelle (sofern zutreffend) und der Kennung der Klasse 2 versehen. oder oder Überprüfen Sie das CE-Etikett auf dem Produkt, um die Überwachungs- und Zertifizierungsstelle zu ermitteln, die in die Bewertung einbezogen wurde.
- Seite 137 Wireless-G Notebook-Adapter mit SpeedBooster Frankreich Bei Verwendung des Produkts im Freien gelten für die Ausgangsleistung in bestimmten Bandbereichen Beschränkungen. Weitere Informationen finden Sie in Tabelle 1 oder unter http://www.art-telecom.fr/. Dans le cas d’une utilisation en extérieur, la puissance de sortie est limitée pour certaines parties de la bande. Reportez-vous à...
- Seite 138 Wireless-G Notebook-Adapter mit SpeedBooster Ausgangsleistung des Geräts Zur Einhaltung der jeweiligen nationalen Vorschriften müssen Sie u. U. die Ausgangsleistung Ihres Wireless-Geräts anpassen. Fahren Sie mit dem entsprechenden Abschnitt für Ihr Gerät fort. HINWEIS: Die Einstellungen für die Ausgangsleistung sind u. U. nicht für alle Wireless-Produkte verfügbar. Weitere Informationen finden Sie in der Dokumentation auf der Produkt-CD oder unter http://www.linksys.com/international.
- Seite 139 Wireless-G Notebook-Adapter mit SpeedBooster Technische Dokumente unter www.linksys.com/international Führen Sie die folgenden Schritte aus, um auf die gewünschten technischen Dokumente zuzugreifen: 1. Navigieren Sie mit dem Browser zur Website http://www.linksys.com/international. 2. Klicken Sie auf Ihre Region. 3. Klicken Sie auf den Namen Ihres Landes. 4.
-
Seite 140: Anhang H: Kontaktinformationen
Wireless-G Notebook-Adapter mit SpeedBooster Anhang H: Kontaktinformationen Möchten Sie sich persönlich an Linksys wenden? Informationen zu den aktuellen Produkten und Aktualisierungen für bereits installierte Produkte finden Sie online unter: http://www.linksys.com/international Wenn Sie im Zusammenhang mit Linksys Produkten auf Probleme stoßen, können Sie uns unter folgenden Adressen eine E-Mail senden: In Europa E-Mail-Adresse... - Seite 141 ® A Division of Cisco Systems, Inc. Sans fil 802.11g Adaptateur pour Guide de l'utilisateur ordinateur portable SANS FIL avec SpeedBooster WPC54GS (FR) Modèle...
- Seite 142 Cisco Systems, Inc. et/ou ses filiales aux Etats-Unis et dans certains autres pays. Copyright © 2005 Cisco Systems, Inc. Tous droits réservés. Les autres noms de marque et de produit sont des marques commerciales, déposées ou non, de leurs détenteurs respectifs.
- Seite 143 Adaptateur pour ordinateur portable sans fil - G avec SpeedBooster Table des matières Chapitre 1 : Introduction Bienvenue Contenu de ce guide Chapitre 2 : Planification de votre réseau sans fil Topologie réseau Itinérance Configuration du réseau Chapitre 3 : Présentation de l'adaptateur pour ordinateur portable sans fil - G 6 Voyants Chapitre 4 : Configuration et connexion de l'adaptateur pour ordinateur portable sans fil - G...
- Seite 144 Adaptateur pour ordinateur portable sans fil - G avec SpeedBooster Annexe C : Aide de Windows Annexe D : Glossaire Annexe E : Spécifications Annexe F : Informations de garantie Annexe G : Réglementation Annexe H : Contacts...
- Seite 145 Adaptateur pour ordinateur portable sans fil - G avec SpeedBooster Liste de Figures Figure 3-1 : Panneau avant Figure 4-1 : Ecran de bienvenue de l'assistant de configuration Figure 4-2 : Accord de licence de l'assistant de configuration Figure 4-3 : Connexion de l'adaptateur Figure 4-4 : Réseaux sans fil disponibles Figure 4-5 : Emplacement du bouton Figure 4-6 : Logo SecureEasySetup...
- Seite 146 Adaptateur pour ordinateur portable sans fil - G avec SpeedBooster Figure 5-6 : Localisation du bouton Figure 5-7 : Où se trouve le bouton ? Figure 5-8 : Logo SecureEasySetup et localisation du bouton Figure 5-9 : Ecran de félicitations Figure 5-10 : Recherche de site Figure 5-11 : Clé...
-
Seite 147: Chapitre 1 : Introduction
Adaptateur pour ordinateur portable sans fil - G avec SpeedBooster Chapitre 1 : Introduction Bienvenue Merci d'avoir choisi l'adaptateur pour ordinateur portable sans fil G avec SpeedBooster. Grâce à cet adaptateur, vous allez découvrir une mise en réseau sans fil plus rapide et plus simple que jamais. réseau : groupe d'ordinateurs ou de périphériques reliés Comme tous les produits sans fil, l'adaptateur offre une plus grande portée et une plus grande mobilité... -
Seite 148: Contenu De Ce Guide
Adaptateur pour ordinateur portable sans fil - G avec SpeedBooster Contenu de ce guide Ce guide de l'utilisateur présente les étapes inhérentes à l'installation et à l'utilisation de l'adaptateur pour ordinateur portable sans fil G avec SpeedBooster. • Chapitre 1 : Introduction Ce chapitre présente les applications de l'adaptateur ainsi que le présent guide de l'utilisateur. - Seite 149 Adaptateur pour ordinateur portable sans fil - G avec SpeedBooster • Annexe G : Réglementation Cette annexe détaille la réglementation relative à l'adaptateur. • Annexe H : Contacts Cette annexe fournit des informations sur diverses ressources Linksys que vous pouvez contacter, notamment le support technique.
-
Seite 150: Chapitre 2 : Planification De Votre Réseau Sans Fil
Adaptateur pour ordinateur portable sans fil - G avec SpeedBooster Chapitre 2 : Planification de votre réseau sans fil Topologie réseau Un réseau sans fil est un groupe d'ordinateurs, équipés chacun d'un adaptateur sans fil. Les ordinateurs d'un réseau sans fil doivent être configurés de façon à partager le même canal radio. Plusieurs ordinateurs équipés de cartes ou d'adaptateurs sans fil peuvent communiquer entre eux et constituer ainsi un réseau point à... -
Seite 151: Configuration Du Réseau
Adaptateur pour ordinateur portable sans fil - G avec SpeedBooster Configuration du réseau Les points d'accès et les routeurs sans fil de Linksys ont été conçus pour être utilisés avec les produits 802.11a, 802.11b et 802.11g. Les produits 802.11g sont compatibles avec la norme 802.11b et certains produits sont à la fois compatibles 802.11a et 802.11g pour une intercommunication maximale. -
Seite 152: Chapitre 3 : Présentation De L'adaptateur Pour Ordinateur Portable Sans Fil - G
Adaptateur pour ordinateur portable sans fil - G avec SpeedBooster Chapitre 3 : Présentation de l'adaptateur pour ordinateur portable sans fil - G Voyants Les voyants de l'adaptateur réseau fournissent des informations sur l'activité du réseau. Figure 3-1 : Panneau avant Power (Alimentation) Vert. -
Seite 153: Chapitre 4 : Configuration Et Connexion De L'adaptateur Pour Ordinateur Portable Sans Fil - G
Adaptateur pour ordinateur portable sans fil - G avec SpeedBooster Chapitre 4 : Configuration et connexion de l'adaptateur pour ordinateur portable sans fil - G Lancement de la configuration L'assistant de configuration de l'adaptateur pour ordinateur portable sans fil G vous guidera tout au long de la procédure d'installation. -
Seite 154: Connexion De L'adaptateur
Adaptateur pour ordinateur portable sans fil - G avec SpeedBooster Connexion de l'adaptateur 1. Localisez un connecteur CardBus disponible sur votre ordinateur portable. 2. Après avoir orienté les broches du connecteur face à l'emplacement CardBus, étiquette vers le haut, faites glisser l'adaptateur dans l'emplacement CardBus jusqu'à... -
Seite 155: Figure 4-5 : Emplacement Du Bouton
Figure 4-6 : Logo SecureEasySetup 3. Appuyez sur le logo Cisco ou sur le bouton SecureEasySetup sur le routeur ou point d'accès sans fil. Lorsqu'il devient blanc et commence à clignoter, cliquez sur le bouton Next (Suivant) dans l'écran de l'assistant de configuration. -
Seite 156: Figure 4-8 : Ecran De Félicitations
Adaptateur pour ordinateur portable sans fil - G avec SpeedBooster 4. Lorsque vous avez terminé, vous pouvez enregistrer votre configuration dans un fichier texte en cliquant sur le bouton Save (Enregistrer) ou l'imprimer en cliquant sur le bouton Print (Imprimer). Cliquez sur Connect to Network (Connecter au réseau) pour vous connecter au réseau. -
Seite 157: Figure 4-10 : Clé Wep Requise Pour La Connexion
Adaptateur pour ordinateur portable sans fil - G avec SpeedBooster 2. Si la sécurité sans fil WEP (Wired Equivalent Privacy) est activée sur votre réseau, l'écran ci-contre s'affiche. Sélectionnez 64-bit (64 bits) ou 128-bit (128 bits). Saisissez une phrase mot de passe ou une clé WEP. Passphrase (Phrase mot de passe) : saisissez une phrase mot de passe dans le champ Passphrase (Phrase mot de passe). -
Seite 158: Figure 4-12 : Ecran De Félicitations De La Configuration Automatique
Adaptateur pour ordinateur portable sans fil - G avec SpeedBooster 3. Une fois l'installation du logiciel terminée, l'écran Congratulations (Félicitations) s'affiche. Cliquez sur Connect to Network (Connecter au réseau) pour vous connecter au réseau. Pour plus d'informations sur l'application Wireless Network Monitor, reportez-vous au « Chapitre 5 : Utilisation de Wireless Network Monitor ». -
Seite 159: Figure 4-14 : Paramètres Réseau
Adaptateur pour ordinateur portable sans fil - G avec SpeedBooster 2. L'écran Network Settings (Paramètres réseau) de Wireless Network Monitor s'affiche. Si votre réseau utilise un routeur ou un autre serveur DHCP, cliquez sur le bouton radio situé en regard de Obtain network settings automatically (DHCP) (Obtenir les paramètres réseau automatiquement (DHCP)). -
Seite 160: Figure 4-16 : Paramètres Du Mode Ad Hoc
Adaptateur pour ordinateur portable sans fil - G avec SpeedBooster Sélectionnez le canal d'utilisation de votre réseau sans fil. Le canal que vous choisissez doit correspondre au canal défini pour les autres périphériques de votre réseau sans fil. Si vous ne savez pas quel canal utiliser, conservez le paramètre par défaut. -
Seite 161: Figure 4-18 : Sécurité Sans Fil - Wpa Personnel
Adaptateur pour ordinateur portable sans fil - G avec SpeedBooster TX Key (Clé de transmission) : la clé de transmission par défaut est la clé 1. Si le point d'accès ou le routeur sans fil de votre réseau utilise la clé de transmission 2, 3 ou 4, sélectionnez le numéro approprié dans la liste déroulante TX Key (Clé... -
Seite 162: Figure 4-19 : Sécurité Sans Fil - Wpa Entreprise - Eap-Tls
Adaptateur pour ordinateur portable sans fil - G avec SpeedBooster WPA entreprise Le mode WPA Enterprise (WPA entreprise) associe le système de sécurité WPA à l'utilisation d'un serveur RADIUS (à utiliser uniquement lorsqu'un serveur RADIUS est connecté au routeur). Le mode WPA entreprise propose deux méthodes d'authentification (EAP-TLS et PEAP) et deux méthodes de cryptage (TKIP et AES) avec des clés de cryptage dynamiques. -
Seite 163: Figure 4-21 : Sécurité Sans Fil - Radius - Eap-Tls
Adaptateur pour ordinateur portable sans fil - G avec SpeedBooster RADIUS Les fonctions RADIUS utilisent un serveur RADIUS (à n'utiliser que lorsqu'un serveur RADIUS est connecté au routeur). RADIUS offre deux types d'authentification : EAP-TLS et PEAP. Authentication (Authentification) : sélectionnez la méthode d'authentification que vous utilisez sur votre réseau, EAP-TLS ou PEAP. -
Seite 164: Figure 4-23 : Sécurité Sans Fil - Leap
Adaptateur pour ordinateur portable sans fil - G avec SpeedBooster LEAP Si vous avez sélectionné LEAP, saisissez le nom d'utilisateur et le mot de passe qui vous authentifieront sur votre réseau sans fil. Username (Nom d'utilisateur) : saisissez le nom d'utilisateur utilisé pour l'authentification. Password (Mot de passe) : saisissez le mot de passe utilisé... -
Seite 165: Figure 4-25 : Ecran De Félicitations
Adaptateur pour ordinateur portable sans fil - G avec SpeedBooster 7. Une fois l'installation du logiciel terminée, l'écran Congratulations (Félicitations) s'affiche. Cliquez sur Connect to Network (Connecter au réseau) pour vous connecter au réseau. En cliquant sur Return to Profiles Screen (Revenir à l'écran Profils), vous ouvrez l'écran Profiles (Profils) de l'application Wireless Network Monitor. -
Seite 166: Chapitre 5 : Utilisation De Wireless Network Monitor
Adaptateur pour ordinateur portable sans fil - G avec SpeedBooster Chapitre 5 : Utilisation de Wireless Network Monitor Le logiciel Wireless Network Monitor permet de vérifier les informations de liaison, de rechercher les réseaux sans fil disponibles et de créer des profils présentant différents paramètres de configuration. Accès au logiciel Wireless Network Monitor Une fois l'adaptateur installé, l'icône Wireless Network Monitor apparaît dans la barre d'état système de votre ordinateur. -
Seite 167: Figure 5-3 : Plus D'informations - Etat Du Réseau Sans Fil
Adaptateur pour ordinateur portable sans fil - G avec SpeedBooster Etat du réseau sans fil L'écran Wireless Network Status (Etat du réseau sans fil) fournit des informations sur vos paramètres réseau. Status (Etat) : état de la connexion au réseau sans fil. SSID (Nom SSID) : nom unique du réseau sans fil. -
Seite 168: Figure 5-4 : Plus D'informations - Statistiques Du Réseau
Adaptateur pour ordinateur portable sans fil - G avec SpeedBooster Statistiques du réseau sans fil L'écran Wireless Network Statistics (Statistiques du réseau sans fil) fournit des statistiques sur vos paramètres réseau. Transmit Rate (Taux de transmission) : débit de transfert de données de la connexion actuelle. (En mode Auto, l'adaptateur sélectionne à... -
Seite 169: Secureeasysetup
1. Après avoir cliqué sur le bouton SecureEasySetup, vous êtes invité à localiser le bouton SecureEasySetup ou le logo Cisco sur le périphérique avec lequel l'adaptateur communiquera. Si vous ne savez pas où trouver Figure 5-5 : Bouton SecureEasySetup ce bouton, cliquez sur Where can I find the button? (Où... -
Seite 170: Figure 5-8 : Logo Secureeasysetup Et Localisation Du Bouton
Adaptateur pour ordinateur portable sans fil - G avec SpeedBooster 2. Appuyez sur le logo Cisco ou le bouton SecureEasySetup sur le routeur ou point d'accès sans fil. Lorsqu'il devient blanc et commence à clignoter, cliquez sur le bouton Next (Suivant) dans l'écran de l'assistant de configuration. -
Seite 171: Recherche De Site
Adaptateur pour ordinateur portable sans fil - G avec SpeedBooster Recherche de site L'écran Site Survey (Recherche de site) affiche une liste des réseaux disponibles dans le tableau de gauche. Ce tableau contient le SSID et le canal de chaque réseau ainsi que la qualité du signal sans fil reçu par l'adaptateur. Vous pouvez cliquer sur SSID, CH (Canal) ou Signal pour effectuer un tri selon le champ choisi. -
Seite 172: Profils
Adaptateur pour ordinateur portable sans fil - G avec SpeedBooster Profils L'écran Profiles (Profils) permet d'enregistrer différents profils de configuration pour différentes installations réseau. Le tableau de gauche contient la liste des profils disponibles avec leurs noms et SSID. Profile (Profil) : nom du profil. SSID : SSID ou nom unique du réseau sans fil. -
Seite 173: Création D'un Profil
Adaptateur pour ordinateur portable sans fil - G avec SpeedBooster Création d'un profil Dans l'écran Profiles (Profils), cliquez sur New (Nouveau) pour créer un profil. Saisissez le nom de ce profil et cliquez sur OK. Cliquez sur le bouton Cancel (Annuler) pour revenir à l'écran Profiles (Profils) sans saisir de nom. L'écran Available Wireless Network (Réseaux sans fil disponibles) s'affiche. -
Seite 174: Figure 5-18 : Bouton Secureeasysetup
1. Après avoir cliqué sur le bouton SecureEasySetup, vous êtes invité à localiser le bouton SecureEasySetup ou le logo Cisco sur le périphérique avec lequel l'adaptateur communiquera. Si vous ne savez pas où trouver Figure 5-18 : Bouton SecureEasySetup ce bouton, cliquez sur Where can I find the button? (Où... -
Seite 175: Figure 5-20 : Localisation Du Bouton Secureeasysetup
Adaptateur pour ordinateur portable sans fil - G avec SpeedBooster 2. Appuyez sur le logo Cisco ou sur le bouton SecureEasySetup sur le routeur ou point d'accès sans fil. Lorsqu'il devient blanc et commence à clignoter, cliquez sur le bouton Next (Suivant) dans l'écran de l'assistant de configuration. -
Seite 176: Figure 5-22 : Réseaux Sans Fil Disponibles
Adaptateur pour ordinateur portable sans fil - G avec SpeedBooster Configuration de l'adaptateur avec les réseaux disponibles Si vous ne configurez pas l'adaptateur à l'aide de la fonction SecureEasySetup, vous pouvez le faire à partir de la liste des réseaux disponibles de l'écran Available Wireless Network (Réseaux sans fil disponibles). Ceux-ci sont répertoriés par SSID dans le tableau au centre de l'écran. -
Seite 177: Figure 5-24 : Wpa Personnel Requis Pour La Connexion
Adaptateur pour ordinateur portable sans fil - G avec SpeedBooster Si la sécurité sans fil WPA personnel (Wi-Fi Protected Access) est activée sur votre réseau, l'écran ci-contre s'affiche. Encryption (Cryptage) : sélectionnez le type d'algorithme que vous souhaitez utiliser, TKIP ou AES, dans le menu déroulant Encryption (Cryptage). -
Seite 178: Figure 5-27 : Mode Sans Fil Du Nouveau Profil
Adaptateur pour ordinateur portable sans fil - G avec SpeedBooster DNS 1 et DNS 2 : saisissez l'adresse DNS de votre réseau Ethernet câblé. Cliquez sur le bouton Next (Suivant) ou cliquez sur le bouton Back (Précédent) pour revenir à la page précédente. -
Seite 179: Figure 5-29 : Sécurité Sans Fil Du Nouveau Profil
Adaptateur pour ordinateur portable sans fil - G avec SpeedBooster Si votre réseau sans fil n'utilise pas la sécurité sans fil, sélectionnez Disabled (Désactivée), puis cliquez sur le bouton Next (Suivant) pour continuer. Passez à l'étape 5. Si votre réseau sans fil utilise la sécurité sans fil, sélectionnez la méthode appropriée : WEP, WPA-Personal (WPA personnel), WPA-Enterprise (WPA entreprise), RADIUS ou LEAP. -
Seite 180: Figure 5-31 : Sécurité Sans Fil - Wpa Personnel Du Nouveau Profil
Adaptateur pour ordinateur portable sans fil - G avec SpeedBooster WPA personnel L'option WPA-Personal (WPA personnel) vous offre deux méthodes de cryptage, nommées TKIP et AES, associées à des clés de cryptage dynamiques. Sélectionnez TKIP ou AES pour le cryptage. Saisissez ensuite une phrase mot de passe contenant de 8 à... -
Seite 181: Figure 5-32 : Sécurité Sans Fil - Wpa Entreprise Utilisant Eap-Tls Pour Un Nouveau Profil
Adaptateur pour ordinateur portable sans fil - G avec SpeedBooster WPA entreprise Le mode WPA Enterprise (WPA entreprise) associe le système de sécurité WPA à l'utilisation d'un serveur RADIUS (à utiliser uniquement lorsqu'un serveur RADIUS est connecté au routeur). Le mode WPA entreprise propose deux méthodes d'authentification (EAP-TLS et PEAP) et deux méthodes de cryptage (TKIP et AES) avec des clés de cryptage dynamiques. -
Seite 182: Figure 5-34 : Sécurité Sans Fil - Radius Utilisant Eap-Tls Pour Un Nouveau Profil
Adaptateur pour ordinateur portable sans fil - G avec SpeedBooster RADIUS Les fonctions RADIUS utilisent un serveur RADIUS (à n'utiliser que lorsqu'un serveur RADIUS est connecté au routeur). RADIUS offre deux types d'authentification : EAP-TLS et PEAP. Authentication (Authentification) : sélectionnez la méthode d'authentification que vous utilisez sur votre réseau, EAP-TLS ou PEAP. -
Seite 183: Figure 5-36 : Sécurité Sans Fil - Leap Pour Le Nouveau Profil
Adaptateur pour ordinateur portable sans fil - G avec SpeedBooster LEAP Si vous avez sélectionné LEAP, saisissez le nom d'utilisateur et le mot de passe qui vous authentifieront sur votre réseau sans fil. Username (Nom d'utilisateur) : saisissez le nom d'utilisateur utilisé pour l'authentification. Password (Mot de passe) : saisissez le mot de passe utilisé... -
Seite 184: Figure 5-38 : Félicitations Pour La Création De Votre Nouveau Profil
Adaptateur pour ordinateur portable sans fil - G avec SpeedBooster 4. L'écran Congratulations (Félicitations) s'affiche. Cliquez sur Connect to Network (Connecter au réseau) pour appliquer immédiatement les nouveaux paramètres et revenir à l'écran Link Information (Informations de liaison). Cliquez sur Return to Profiles Screen (Revenir à l'écran Profils) pour conserver les paramètres actuels actifs et revenir à... -
Seite 185: Annexe A : Dépannage
Adaptateur pour ordinateur portable sans fil - G avec SpeedBooster Annexe A : Dépannage Cette annexe est composée de deux sections, l'une abordant les problèmes courants et les solutions à y apporter, l'autre traitant des questions fréquemment posées. Cette annexe apporte des solutions aux problèmes susceptibles de survenir lors de l'installation et de l'utilisation de l'adaptateur pour ordinateur portable sans fil G. -
Seite 186: Questions Fréquemment Posées
Adaptateur pour ordinateur portable sans fil - G avec SpeedBooster Questions fréquemment posées Puis-je exécuter une application à partir d'un ordinateur distant via le réseau sans fil ? Cela dépend si votre application est conçue ou non pour une utilisation en réseau. Consultez la documentation de l'application pour déterminer si elle prend en charge le fonctionnement en réseau. - Seite 187 Adaptateur pour ordinateur portable sans fil - G avec SpeedBooster Pour garantir une connectivité parfaite et harmonieuse, le réseau local (LAN) sans fil doit incorporer différentes fonctions. Chaque nœud et point d'accès, par exemple, doit toujours accuser réception de chaque message. Chaque nœud doit maintenir le contact avec le réseau sans fil, même en l'absence de transmission de données.
- Seite 188 Adaptateur pour ordinateur portable sans fil - G avec SpeedBooster Qu'est-ce que le système DSSS ? Qu'est-ce que le système FHSS ? Et quelles sont leurs différences ? Le système FHSS (Frequency-Hopping Spread-Spectrum) utilise une porteuse à bande étroite qui modifie la fréquence en un modèle connu à...
-
Seite 189: Annexe B : Sécurité Sans Fil
Adaptateur pour ordinateur portable sans fil - G avec SpeedBooster Annexe B : Sécurité sans fil Linksys souhaite rendre la mise en réseau sans fil aussi fiable et facile que possible. La génération actuelle de produits Linksys intègre plusieurs fonctions de sécurité réseau, que vous devez cependant mettre en œuvre vous-même. - Seite 190 Adaptateur pour ordinateur portable sans fil - G avec SpeedBooster SSID. Gardez à l'esprit les précautions suivantes en matière de SSID : 1. Désactivez l'option de diffusion. 2. Définissez un SSID unique. 3. Modifiez-le régulièrement. La plupart des périphériques sans fil vous donnent la possibilité de diffuser le SSID. Bien que cette option puisse s'avérer pratique, elle permet à...
- Seite 191 Adaptateur pour ordinateur portable sans fil - G avec SpeedBooster WPA personnel. Si vous ne disposez pas d'un serveur RADIUS, sélectionnez le type d'algorithme (TKIP ou AES) et saisissez un mot de passe de 8 à 63 caractères. WPA entreprise. Système WPA utilisé conjointement avec un serveur RADIUS (ne doit être utilisé que lorsqu'un serveur RADIUS est connecté...
-
Seite 192: Annexe C : Aide De Windows
Adaptateur pour ordinateur portable sans fil - G avec SpeedBooster Annexe C : Aide de Windows Tous les produits sans fil exigent l'utilisation de Microsoft Windows. Windows est le système d'exploitation le plus répandu au monde. Il propose un grand nombre de fonctionnalités qui facilitent la mise en réseau. Vous pouvez accéder à... -
Seite 193: Annexe D : Glossaire
Adaptateur pour ordinateur portable sans fil - G avec SpeedBooster Annexe D : Glossaire 802.11a : norme réseau sans fil IEEE spécifiant un débit de transfert de données maximum de 54 Mbit/s et une fréquence de 5 GHz. 802.11b : norme de mise en réseau sans fil IEEE qui spécifie un débit de transfert de données maximum de 11 Mbit/s et une fréquence de 2,4 GHz. - Seite 194 Adaptateur pour ordinateur portable sans fil - G avec SpeedBooster Commutateur : 1. commutateur de données qui relie les périphériques informatiques aux ordinateurs hôtes, permettant ainsi à de nombreux périphériques de partager un nombre limité de ports. 2. dispositif permettant d'établir, interrompre ou modifier les connexions au sein d'un circuit électrique.
- Seite 195 Adaptateur pour ordinateur portable sans fil - G avec SpeedBooster Etalement de spectre : technique de fréquence radio à large bande utilisée pour une transmission plus fiable et sécurisée des données. Ethernet : protocole réseau IEEE qui spécifie le mode de placement et d'extraction des données via un support de transmission courant.
- Seite 196 Adaptateur pour ordinateur portable sans fil - G avec SpeedBooster LEAP (Lightweight Extensible Authentication Protocol) : méthode d'authentification mutuelle utilisant un système avec nom d'utilisateur et mot de passe. Logiciel : instructions destinées à l'ordinateur. Série d'instructions destinée à la réalisation d'une tâche donnée appelée "...
- Seite 197 Adaptateur pour ordinateur portable sans fil - G avec SpeedBooster Pare-feu SPI (Stateful Packet Inspection) : technologie inspectant tous les paquets d'informations entrants avant de les autoriser à pénétrer le réseau. Passerelle par défaut : périphérique utilisé pour transférer un trafic de données Internet depuis votre réseau local.
- Seite 198 Adaptateur pour ordinateur portable sans fil - G avec SpeedBooster Réseau : groupe d'ordinateurs ou de périphériques reliés entre eux dans le but de partager et de stocker des données et/ou de permettre la transmission de données entre des utilisateurs. RJ-45 (Registered Jack-45) : connecteur Ethernet pouvant accueillir jusqu'à...
- Seite 199 Adaptateur pour ordinateur portable sans fil - G avec SpeedBooster TFTP (Trivial File Transfer Protocol) : version du protocole FTP TCP/IP n'offrant aucune fonction de répertoire ou de mot de passe. TKIP (Temporal Key Integrity Protocol) : protocole de cryptage sans fil qui fournit des clés de cryptage dynamiques pour chaque paquet transmis.
-
Seite 200: Annexe E : Spécifications
Adaptateur pour ordinateur portable sans fil - G avec SpeedBooster Annexe E : Spécifications Normes IEEE 802.11g, IEEE 802.11b, CardBus Canaux 11 canaux (Amérique du Nord, Amérique centrale et Amérique du Sud) 13 canaux (dans la plupart des pays d'Europe, d'Asie et d'Afrique) Voyants Power (Alimentation), Link (Liaison) -
Seite 201: Annexe F : Informations De Garantie
Adaptateur pour ordinateur portable sans fil - G avec SpeedBooster Annexe F : Informations de garantie Linksys garantit que vos produits Linksys sont, pour l'essentiel, exempts de vices matériels et de fabrication, sous réserve d'une utilisation normale, pendant une période de trois années consécutives (« Période de garantie »). Votre unique recours et l'entière responsabilité... -
Seite 202: Annexe G : Réglementation
Adaptateur pour ordinateur portable sans fil - G avec SpeedBooster Annexe G : Réglementation Déclaration FCC Cet équipement a été testé et déclaré conforme aux normes des équipements numériques de catégorie B, conformément à la section 15 des règlements FCC. L'objectif de ces normes est de fournir une protection raisonnable contre toute interférence nuisible dans une installation résidentielle. - Seite 203 Adaptateur pour ordinateur portable sans fil - G avec SpeedBooster Informations de conformité pour les produits sans fil 2,4 GHz concernant l'Union européenne et les autres pays se conformant à la directive européenne 1999/5/CE (R&TTE) Déclaration de conformité concernant la directive européenne 1995/5/CE (R&TTE) Annexe G : Réglementation...
- Seite 204 Adaptateur pour ordinateur portable sans fil - G avec SpeedBooster REMARQUE : La déclaration de conformité est mise à votre disposition sous différentes formes : • Un fichier PDF figure sur le CD du produit. • Une copie imprimée est fournie avec le produit. •...
- Seite 205 Adaptateur pour ordinateur portable sans fil - G avec SpeedBooster Marquage CE Pour les produits Linksys sans fil B et G, le marquage CE, le numéro de l'organisme notifié (le cas échéant) et l'identifiant de classe 2 suivants sont ajoutés à l'équipement. Vérifiez l'étiquette CE sur le produit pour déterminer le numéro d'organisme notifié...
- Seite 206 Adaptateur pour ordinateur portable sans fil - G avec SpeedBooster France In case the product is used outdoors, the output power is restricted in some parts of the band. See Table 1 or check http://www.art-telecom.fr/ for more details. Dans le cas d’une utilisation en extérieur, la puissance de sortie est limitée pour certaines parties de la bande. Reportez- vous au tableau 1 ou visitez le site Web http://www.art-telecom.fr/ pour plus de détails.
- Seite 207 Adaptateur pour ordinateur portable sans fil - G avec SpeedBooster Sortie de votre périphérique Afin de respecter les réglementations de votre pays, vous devrez peut-être modifier la sortie de votre périphérique sans fil. Reportez-vous à la section consacrée à votre périphérique. REMARQUE : Le réglage de la puissance de sortie n'est peut-être pas disponible sur tous les produits sans fil.
- Seite 208 Adaptateur pour ordinateur portable sans fil - G avec SpeedBooster Documents techniques disponibles sur le site www.linksys.com/international Pour accéder aux documents techniques, procédez comme suit : 1. Ouvrez la page http://www.linksys.com/international. 2. Cliquez sur votre région de résidence. 3. Cliquez sur le nom de votre pays de résidence. 4.
-
Seite 209: Annexe H : Contacts
Adaptateur pour ordinateur portable sans fil - G avec SpeedBooster Annexe H : Contacts Besoin de contacter Linksys ? Consultez notre site Web pour obtenir des informations sur les derniers produits et les mises à jour disponibles pour vos produits existants à l'adresse suivante : http://www.linksys.com/international. Si vous rencontrez des problèmes avec un produit Linksys, adressez un e-mail au service de support technique du pays où...