Citizen CBM-272 Benutzerhandbuch
Inhaltsverzeichnis
Quicklinks
Inhaltsverzeichnis

Verwandte Anleitungen für Citizen CBM-272


Inhaltszusammenfassung für Citizen CBM-272
- Seite 1 CBM-272 — 1 —...
-
Seite 2: Declaration Of Conformity
Manufacturer’s Address : CBM Bldg., 5-68-10, Nakano, Nakano-ku Tokyo, 164-0001, Japan Declare the Product Product Name Line Thermal Printer Model Number(s) CBM-272 Series (CBM-272R, CBM-272P) (S.No.0190001 ~ ) Conform to the following Standards : EN60950 : A4: 1997, A11: 1997... -
Seite 3: Important Safety Instructions
IMPORTANT SAFETY INSTRUCTIONS • Read all of these instructions and save them for future reference. • Follow all warnings and instructions marked on the product. • Unplug the product from the wall outlet before cleaning. Do not use liquid or aerosol cleaners. -
Seite 4: Wichtige Sicherheitsanweisungen
WICHTIGE SICHERHEITSANWEISUNGEN • Lesen Sie die nachfolgenden Anweisungen sorgfältig durch und bewahren Sie sie auf. • Befolgen Sie alle auf dem Drucker vermerkten Hinweise und Anweisungen. Vor dem Reinigen grundsätzlich Stecker aus der Steckdose ziehen. Keine Flüssigkeiten oder Aerosolreiniger benutzen. Nut mit einem feuchten Tuch abwischen. •... - Seite 5 IMPORTANT: This equipment generates, uses, and can radiate radio frequency energy and if not installed and used in accordance with the instruction manual, may cause interference to radio communications. It has been tested and found to comply with the limits for a Class A computing device pursuant to Subpart J of Part 15 off FCC Rules, which are designed to provide reasonable protection against such interference when operated in a commercial environment.
- Seite 6 <CAUTIONS> • Prior to using the printer, be sure to read this User's Manual thoroughly. Please keep it handy for reference whenever it may be needed. • The information contained herein may be changed without prior notice. • Reproduction of part or all of this User's Manual without permission is strictly prohibited.
-
Seite 7: Safety Precautions
SAFETY PRECAUTIONS BE SURE TO OBSERVE — In order to prevent hazards to an operator or other persons and damage to property, be sure to observe the following precautions. • The following describes the degrees of hazard and damages that can occur if the given instructions are neglected or the printer is incorrectly operated. - Seite 8 WARNING Never handle the printer in the following manners, as it may break, become out of order, or overheat causing smoke and resulting in fire or electric shock. If the printer is used in an abnormal condition, such as when broken, then problems, smoke emission, abnormal odor/noise, and fire can result.
-
Seite 9: Precautions For Installation
PRECAUTIONS FOR INSTALLATION • Do not use or store the printer in a place exposed to fire, moisture, or direct sunshine, or in a place near a heater or thermal device where the prescribed operating temperature and humidity are not met, or in a place exposed to much oil, iron powder, or dust. - Seite 10 PRECAUTIONS FOR HANDLING Do not handle the printer in the following manners, because problems may result. • Do not use any other power source besides the accessory AC adapter. Also, do not use the AC adapter for other purposes. • Do not print without paper. •...
-
Seite 11: Daily Maintenance
DAILY MAINTENANCE • At the time of maintenance, be sure to turn off the power switch of the printer and unplug it from the socket. • Use a dry soft cloth to wipe off stains and dust from the surfaces of the main body case. - Seite 12 SAFETY CAUTIONS ON THE BATTERY PACK This printer can operate on a rechargeable battery pack (nickel-hydrogen batteries). To ensure maximum safety, observe the following safety precautions: DANGER To prevent electrolyte leakage, heat build-up, or bursting: • Do not throw battery packs into fire or expose to any heat source. •...
- Seite 13 WARNINGS If the printer or its internal battery pack shows any sign of electrolyte leakage, discoloration, deformation, or odd smell, immediately stop using the printer. Then call your dealer. If a charging cycle does not complete within the specified time, stop charging at that point.
- Seite 14 CAUTIONS Do not give the battery pack a severe jolt or drop it on a hard surface. To prevent electrolyte leakage or lowered battery performance, do not use or leave the battery pack exposed under direct sunlight, in a hot car compartment, or in the path of hot airflow from a heater.
- Seite 15 BATTERY PACK LIFE • The battery pack is designed to have life span of more than 300 recharging cycles or 3 to 5 years (at room temperature), provided that it is properly used without overcharging or over-discharging (charging capacity is lowered to 60% or more). It should be noted, however, that actual battery life could be less depending on cycle frequency or operating conditions.
-
Seite 16: Inhaltsverzeichnis
CONTENTS 1. OUTLINE ..................1 1.1 Features ..................... 1 1.2 Unpacking ....................2 2. BASIC SPECIFICATIONS ............3 2.1 Model Classifications ................3 2.2 Basic Specifications .................. 4 2.3 Paper Specifications ................. 6 2.3.1 Recommended Paper ............... 6 2.3.2 Printing Position ................7 2.3.3 Printing Head and Paper Cutter Layout ........... - Seite 17 4.11 Paper End Function ................24 4.12 Paper Near End Function ..............25 4.13 Auto-Loading Function ................. 27 4.14 Self-Print Function ................27 4.15 Operation Panel and Display of Error ..........28 4.16 Red/Black Print (Precautions for Use) ..........30 5.
- Seite 18 10. PRINT CONTROL FUNCTIONS ..........44 10.1 Command List ..................44 10.2 Command Details .................. 46 10.2.1 Descriptions of Each Items ............46 10.2.2 Command Details ................47 11. CHARACTER CODES TABLE ..........95 11.1 International ..................95 11.2 Code Page Katakana (Japanese) ............96 11.3 International Character Codes Table ...........
- Seite 19 <<<German>>> 4. BETRIEB .................. 112 4.1 Anschließen des Netzteils ..............112 4.2 Auswechseln des Akkus ............... 113 4.2.1 Entnehmen des Akkus ..............113 4.2.2 Einsetzen des Akkus ..............114 4.3 Laden des Akkus ................... 115 4.3.1 Ungepuffertes Laden ..............115 4.3.2 Gepuffertes Laden .................
-
Seite 20: Outline
1. OUTLINE This compact battery-powered line thermal printer is designed for use with data terminals and instrumentation equipment. Its abundant built-in features allow you to widely use this printer for different applications. Prior to using it, read and understand this manual thoroughly. 1.1 Features 1. -
Seite 21: Unpacking
1.2 Unpacking When unpacking the package, confirm that the following parts are provided: • Printer body (including battery pack) 1 unit • Sample paper roll 1 roll • AC adapter 1 piece • AC cord 1 piece • User's manual 1 copy CAUTION •... -
Seite 22: Basic Specifications
2. BASIC SPECIFICATIONS 2.1 Model Classifications The models are classified by the following designation method: CBM-272 Model Name CBM-272: Battery-powered model AC Power Cord 120: 120 V AC 230: 230 V AC International Characters F: International Interface R: Serial (RS-232C) -
Seite 23: Basic Specifications
Charging monitor: POWER lamp (Red) lit in charging, goes off when fully charged. Recharging cycles: Over 300 cycles (at room temperature) Charger: Built in the CBM-272 Printer. Charger power supply: Power adapter (27AD) The printer can be powered while the batteries are charging (floating). - Seite 24 CBM-272-RF120 CBM-272-RF230 Model Item CBM-272-PF120 CBM-272-PF230 AC adapter Rated input : 100 ~ 240 V, 50/60 Hz, 40 VA Rated output : 7.2 V DC, 2 A Type 27 AD AC cord 2-core cord (Depends on the destination) Supply voltage 120 V AC +/–...
-
Seite 25: Paper Specifications
2.3 Paper Specifications 2.3.1 Recommended Paper • Type : Thermal paper • Paper width : 58 + 0/– 1 mm • Paper thickness : 60~75µm • Roll diameter : ø83 mm or less • Printing surface : Outside of the roll (Surface) •... -
Seite 26: Printing Position
2.3.2 Printing Position Thermal paper Paper Width: 58 mm About 4 mm About 6 mm Printing Area: 48 mm 2.3.3 Printing Head and Paper Cutter Layout Paper Cutter Position Paper Feed About 13.5 mm Direction Head Position — 7 —... -
Seite 27: Outer Appearance And Component Parts
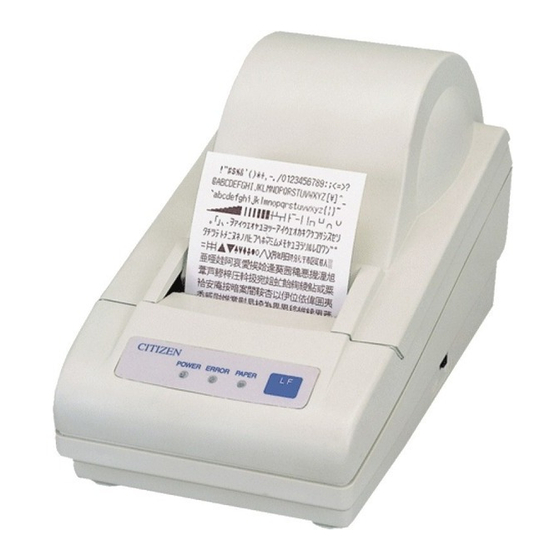
3. OUTER APPEARANCE AND COMPONENT PARTS (14) Printer Cover Upper Cover Bottom Cover (1) POWER Switch (2) POWER Lamp (3) ERROR Lamp (4) PAPER lamp (5) FEED Switch (8) DIP Switch (7) PNE Sensor (6) Paper Holder Printer Mechanism (11) Paper Cutter (10) Head-up Lever (9) Platen Roller Unit (13) Interface Connector... - Seite 28 (1) POWER switch Turns on/off the power for the printer body. (2) POWER lamp (Green/Red) Comes on in green when the POWER switch is set to ON. This light is lit in red while the battery is charging, and goes off when it is fully charged up.
-
Seite 29: Operation
4. OPERATION 4.1 Connecting AC Adapter Turn off the power. Connect the cable connector of the AC adapter to the power connector located on the back of the printer. Connect the AC power cord of the AC adapter, and plug it into a socket. (For the details of printer status, see “Operation Panel and Display of Error”... -
Seite 30: Replacing The Battery Pack
4.2 Replacing the Battery Pack 4.2.1 Removing the Battery Pack Unplug the AC cord from the wall outlet. Set POWER switch to OFF. Remove the battery cover. (While pressing down section A, slide the battery cover in the direction of the arrow.) Remove battery pack from compartment and disconnect its connecter. -
Seite 31: Installing The Battery Pack
4.2.2 Installing the Battery Pack With the labeled side of battery pack facing up, connect the battery connecter. Insert the battery pack into the battery compartment. (Tuck the battery connecter tidily in the extra space of the compartment.) Place the battery cover back over the compartment by sliding it from the back of the printer. -
Seite 32: Charging The Battery Pack
4.3 Charging the Battery Pack The battery pack can be charged in either non-floating or floating modes. In floating mode, the battery pack can be charged while the printer is operating. 4.3.1 Non-Floating Charging Turn off the power. Plug the cable connector of the AC adapter into the power connector at the back of printer. -
Seite 33: Battery-Powered Operation
4.3.3 Battery-Powered Operation The printer is powered only from the battery pack if the AC adapter is left disconnected. The printer is ready to be run by the battery when its POWER switch is pressed ON (POWER lamp lit in green). Be sure to press the POWER switch OFF (POWER lamp goes off) after every use. -
Seite 34: Battery Voltage Check
4.3.4 Battery Voltage Check If the battery voltage drops below 5.6 V, the voltage check feature automatically shuts off the printer (POWER switch is left at ON). While the printer may be repowered by cycling the POWER switch, the battery pack will require recharging at this point. - Seite 35 CAUTION: • If a charging cycle does not complete within the specified time, stop charging at that point. This will help prevent electrolyte leakage, heat build-up, or bursting. • The battery pack has a limited life. If charging cycle time is significantly shortened although the specified charging requirements are satisfied, it is most likely that the battery life has expired.
-
Seite 36: Reset
4.4 Reset 4.4.1 Reset during a Printing Task The printer, when operating on battery power, may reset (POWER lamp goes off) while it is printing dense patterns or images. This is because the battery voltage drops below 5.6 V due to dense pattern, tripping the battery protection circuit. This phenomenon is more likely to occur after the battery voltage starts dropping. -
Seite 37: Power Save And Auto Power Off
4.5 Power Save and Auto Power Off To save unnecessary battery consumption, the printer automatically enters the power save mode if it receives no print data, or is not operated, for approx. 10 minutes. If the same inactive state continues for another 10 minutes, the auto power off feature automatically turns the printer off. -
Seite 38: Connecting Interface Cable
4.6 Connecting Interface Cable Turn off the power. (Mating side included) Check the top and bottom of cable terminals, and connect to the interface connector. Fix the cable terminals. Serial interface : Tighten screws, to fix it. Parallel interface : Turn a stopper, to fix it. Connect the cable to the host computer. -
Seite 39: Inserting The Paper
4.7 Inserting the Paper CAUTION: • Be sure to use the specified paper roll. • Use of non-specified paper may not guarantee the print quality, printing head life, and so on. Hold the convexity on the rear of the printer cover, and raise it upward. Cut the front end of the paper roll almost at a right angle. - Seite 40 Put back the head-up lever. The paper roll is automatically pulled in by the platen roller to feed a constant amount of paper. (When auto-loading is enabled.) Put back the printer cover. CAUTION: • If the paper roll is still slack, rewind the paper to remove the slack. •...
-
Seite 41: How To Remove Remaining Paper Roll
4.8 How to Remove Remaining Paper Roll Remove the printer cover. Raise the head-up lever. Gently pull out the paper to the near side. If the paper roll is still remaining, cut it just before the paper insertion slot before pulling it out. CAUTION: •... -
Seite 42: Eliminating The Paper Jam
4.9 Eliminating the Paper Jam Turn off the power. Detach the printer cover. Cut the paper roll near the paper insertion slot. Raise the head-up lever. Raise the blue levers located on both sides of the platen roller unit, to gently detach the unit. -
Seite 43: Feed Switch Function
CAUTION: • Do not carry out this work just after printing because the printing head is very hot. • Be sure to turn off the power when detaching the platen roller unit. • When eliminating remaining paper, do not touch the heating surface of the head with a bare hand or metal piece. -
Seite 44: Paper Near End Function
4.12 Paper Near End Function If the paper is running out, the PNE sensor informs the host computer that the paper is running out, by means of a signal output or the PAPER lamp on the panel. The PAPER lamp is illuminated unconditionally. If the PNE sensor detects that the paper is running out, the PAPER lamp will be illuminated. - Seite 45 (2) Print amount after detecting PNE When PNE is enabled, a printable amount after PNE detection can be adjusted. PNE is detected when the remaining amount of the paper roll is about 2~3 m. (It depends on the paper quality used, paper thickness, and operating environment.) An initial value is 1.5 m.
-
Seite 46: Auto-Loading Function
4.13 Auto-Loading Function This printer has a function to automatically set the paper. If the paper end sensor, near paper end sensor, and head-up lever are cancelled, the paper will be automatically fed by a constant amount in about 1 second. In order to smooth operation, cancel the head-up mechanism last. -
Seite 47: Operation Panel And Display Of Error
4.15 Operation Panel and Display of Error 1. POWER lamp (Green/Red) The POWER lamp indicates printer status with 2 colors. (1) When powered by AC adapter (battery pack is charged in floating mode) POWER POWER POWER Item Status Lamp Lamp Remarks Switch (Green) - Seite 48 2. ERROR lamp (Red), PAPER lamp (Red) Indicates an error by illuminating or blinking the lamps. Display Error Reset ERROR Lamp PAPER Lamp Memory check error Cannot be reset Quick blinking Head-up Lower the head-up lever. Automatically reset by a Head overheat Blinking temperature drop...
-
Seite 49: Red/Black Print (Precautions For Use)
4.16 Red/Black Print (Precautions for Use) (1) Types of paper The red and black two-color thermal paper changes its colors by controlling the energy applied to the thermal head. It is largely divided into two types, depending on the color development order. Select either of them to suit your application. -
Seite 50: Dip Switch Setting
5. DIP SWITCH SETTING 5.1 Location of DIP Switch Turn off the power. Detach the printer cover, and take out the paper roll. (The switch is found under the paper roll.) There are 2 switches (8-pole and 4-pole) for the serial interface, and 2 switches (8- pole and 4-pole) for the parallel interface. - Seite 51 DS2 (Serial Interface) Function Upon Shipment Baud rate and parity See Table2 Power save and auto See Table3 power off features Not used — — — — Not used Table2 DS2-4 DS2-3 DS2-2 DS2-1 Parity Baud Rate None 9,600 bps None 1,200 None...
- Seite 52 DS2 (Parallel Interface) Function Upon Shipment Power save and auto See Table4 power off features Not used — — Not used — — Table4 DS2-1 DS2-2 No data, No operation Power Save Auto Power Off Remarks 10 min. No time limit Auto Power Off is inactive ↑...
-
Seite 53: Jumper Wire Function
5.3 Jumper Wire Function The jumper wires have been set at shipment. The following lists the basic settings at shipment. Check the settings by performing self-printing. Jumper Wires Function Short Open Upon Shipment Short See Table 5 Short International character Short Data bit length 7 bits... -
Seite 54: Parallel Interface
6. PARALLEL INTERFACE 6.1 Specifications • Data input system : 8-bit parallel (DATA1 to DATA8) • Control signals : ACK, BUSY, STROBE, FAULT, SELECT, PE, RESET • Applicable connectors : Printer side : 57LE-40360 (Anphenol) or its equivalent Cable side : 57-30360 (Anphenol) or its equivalent 6.2 Connector's Pin Configuration Signal Name... -
Seite 55: Input And Output Signals
6.3 Input and Output Signals 6.3.1 Input and Output Signals (1) Input signals to the printer • DATA : 8-bit parallel signal (Positive logic) • STROBE : Strobe signal to read the 8-bit data (Negative logic) • RESET : Signal to reset the entire printer (Negative logic); 1 ms or more (2) Output signals from the printer •... -
Seite 56: Timing Chart
[Printer Side] [Host Side] Twist Pair Wire 6.3.3 Timing Chart Data Input and Print Timings Power DATA BUSY 0.5 µs MIN 270 ns MAX 2.3 µs TYP 500 ms MIN (At power-on) 6.3.4 Data Receiving Control The data can be received from the host when the BUSY signal is at “Low,” but cannot be received when it is “High.”... -
Seite 57: Serial Interface
7. SERIAL INTERFACE 7.1 Specifications (1) Synchronous system : Asynchronous (2) Baud rate : 1,200, 2,400, 4,800, 9,600, 19,200 bps (Selected by the user) (3) 1-word configuration Start bits : 1 bit Data bits : 8 bits or 7 bits (Setting upon shipment) Parity bits : Odd, even, or no parity (Selected by the user) Stop bits... -
Seite 58: Input And Output Signals
[Note] 1. The RS-232C signals are based on the EIA RS-232C. 2. The received data should be always maintained in the Mark status when no data is being transferred. Applicable connectors (D-Sub connectors) Printer side : 17LE-13250 (Anphenol) or its equivalent Cable side : 17JE-23250 (Anphenol) or its equivalent 7.3 Input and Output Signals... -
Seite 59: Data Configuration
7.3.2 Data Configuration Mark , ..Space (1) Start Bit (2) Data Bit (+ Parity Bit) (3) Stop Bit (1 or More) (1) Start bit The system reads the status again after a lapse of 1/2 bit from a fall edge from the mark to space, and if it is a space, this bit will be recognized as the start bit. -
Seite 60: Data Receiving Control
7.3.4 Data Receiving Control If DTR/DSR control has been selected, the data from the host side will be received when the BUSY signal is at “Low,” but not received when at “High.” If DTR/DSR has not been selected, the data from the host side will be received after sending XON, but not after sending XOFF. -
Seite 61: Power Connector
8. POWER CONNECTOR This connector is to supply the power from the special AC adapter(27AD). Connector Schematic Function 7.2V Inner terminal : Minus Pole (GND) Outer terminal : Plus pole Jack used : HEC0470-01-640 (HOSHIDEN) or its equivalent Applicable plug : JXP series type A (I.D.: 2.45 mm, O.D.: 5.5 mm) (HOSHIDEN) or its equivalent CAUTION:... -
Seite 62: Maintenance And Service
9. MAINTENANCE AND SERVICE For the information on maintenance and service, please contact our dealer or at the following address. North America Other Areas CBM America Corporation Japan CBM Corporation Service Center Information Systems Division 363 Van Ness Way CBM Bldg., 5-68-10,Nakano Suite 404 Nakno-ku, Tokyo 164-0001 Torrance, CA 90501, U.S.A... -
Seite 63: Print Control Functions
10. PRINT CONTROL FUNCTIONS 10.1 Command List Command Function Code Page Horizontal tab Printing and paper feed Print ESC SP Setting the right spacing of the character 1BH 20H n ESC ! Collective Specifying the printing mode 1BH 21H n ESC % Specifying/Canceling download character set 1BH 25H n... - Seite 64 Command Function Code Page 1DH 6BH n [‘d’] k GS k Printing the bar code Specifying the horizontal size (Scale factor) of 1DH 77H n GS w bar code GS h Specifying the height of the bar code 1DH 68H n GS H Selecting the print position of HRI code 1DH 48H n...
-
Seite 65: Command Details
10.2 Command Details 10.2.1 Descriptions of Each Item XXXXX [Function] Command Function [Code] A sequence of code constituting a command is represented in hexadecimal number for < >H, binary number for < >B, and decimal number for < >, respectively; [ ]k represents a repeat count of k-times. -
Seite 66: Command Details
10.2.2 Command Details [Function] Horizontal tab [Code] <09> H [Outline] Shifts the printing position to the next horizontal tab position. • Ignored when the next horizontal tab position has not been set. The horizontal tab position is set by ESC D. [Caution] Initial setting of the horizontal tab position is each 8 [Default]... - Seite 67 [Function] Printing and Paper Feed [Code] <0A>H [Outline] Prints data inside the input buffer and feeds lines based on the line feed amount having been set. The head of the line becomes the next print starting [Caution] position. ESC 2, ESC 3 [See Also] LPRINT "AAA"...
- Seite 68 [Function] Print [Code] <0D>H [Outline] 1) When DS1-2 is OFF: This command is ignored. 2) When DS1-2 is ON: With data held inside the internal print buffer, printing and line feed are performed. Without data inside the internal print buffer, however, no printing is performed.
- Seite 69 ESC SP n [Function] Setting the right spacing of the character [Code] <1B> H <20> H <n> 0 ≤ n ≤ 32 [Range] [Outline] The rightward space amount is set in dot unit (1/203 inch unit). In the initial value, it is n=0. •...
- Seite 70 ESC ! n [Function] Collective specifying the printing mode [Code] <1B> H <21> H <n> 0 ≤ n ≤ 255 [Range] [Outline] Printing mode is assigned. Each n bit indicates the following: Value Function Font B Font A Character Font —...
- Seite 71 [Print Results] Font A Font B Font A + Emphasis ∨ ∨ ∨ Font B + Emphasis + Quadruple + Underline Font A + Underline Font A + Double Width Font A + Double Height — 52 —...
- Seite 72 ESC % n [Function] Specifying/Canceling download character set [Code] <1B> H <25> H <n> 0 ≤ n ≤ 255 [Range] [Outline] Specifying/canceling download characters. • Further, only the lowest bit (n0) is valid for n. • The lowest bit (n0) indicates the following. Function Canceling download character set Specifying download character set...
- Seite 73 ESC & s n m [a [p] s x a] m–n+1 [Function] Defining the download characters [Code] <1B> H <26> H <s> <n> <m> [<a> <p1> <p2> ... <ps x a>] m- s = 3 [Range] 32 ≤ n ≤ m ≤ 126 0 ≤...
- Seite 74 [Example] Create each data bit by setting “1” for a printed dot and “0” for an unprinted dot. [Sample Program] See Sample Program and Print Results for ESC %. [Print Results] — 55 —...
- Seite 75 ESC * m n1 n2 [ d ] k [Function] Specifying the bit image mode [Code] <1B> H <2A> H <m> <n1> <n2> [<d>] k [Range] m= 0, 1, 32, 33 0 ≤ n1 ≤ 255 0 ≤ n2 ≤ 1 0 ≤...
- Seite 76 [Example] For 8-dot Mode For 24-dot mode Single Double Single Double Density Dnesity Density Density [Sample Program] LPRINT CHR$ (&H1B) ; "*" ; LPRINT CHR$ (0) ; CHR$ (20); CHR$ (0) ; *IMG1: GOSUB *IMG1 LPRINT CHR$ (&HFF) ; LPRINT CHR$ (&HA) ; FOR I=1 TO 18 LPRINT CHR$ (&H1B) ;...
- Seite 77 ESC – n [Function] Specifying/Canceling underline [Code] <1B> H <2D> H <n> 0 ≤ n ≤ 2 [Range] [Outline] Specifying/canceling an underline. • Types of underlines by n value are shown below: Type Canceling an underline. Specifying an underline for 1-dot width Specifying an underline for 2-dot width •...
- Seite 78 ESC 2 [Function] Specifying 1/6-inch line feed rate [Code] <1B> H <32> H [Outline] The line feed rate per line is specified by 1/6 inch. [See Also] ESC 3, ESC J [Sample Program] LPRINT "AAAAA" ; CHR$ (&HA) ; LPRINT CHR$ (&H1B) ; "3" ; CHR$ (0) ; LPRINT "AAAAA"...
- Seite 79 ESC 3 n [Function] Setting line feed rate of minimum pitch [Code] <1B> H <33> H <n> 0 ≤ n ≤ 255 [Range] [Outline] The line feed rate per line is specified by n/360 inch. Since an actual mechanical pitch is 1/203 inch, it is internally converted approximate to the value specified with this command.
- Seite 80 ESC = n [Function] Data input control [Code] <1B> H <3D> H <n> 0 ≤ n ≤ 255 [Range] [Outline] Selecting equipment in which data input from the host is effective. • Each bit of n indicates as follows: Value Equipment Valid Printer...
- Seite 81 ESC @ [Function] Initializing the printer [Code] <1B> H <40> H [Outline] Clears data stored in the print buffer and brings various settings to the initial state (Default state). • Dip switches setting are not read once again. [Caution] • Data inside the internal input buffer are not cleared. •...
- Seite 82 ESC D [ n ] k NUL [Function] Setting horizontal tab position [Code] <1B> H <44> H [<n>] k <00> H 1 ≤ n ≤ 255 [Range] 0 ≤ k ≤ 32 Specifying a horizontal tab position. [Outline] • “n” indicates the no. of columns from the beginning to the horizontal tab position.
- Seite 83 ESC E n [Function] Specifying/Canceling highlighting [Code] <1B> H <45> H <n> 0 ≤ n ≤ 255 [Range] [Outline] Specifying/canceling the highlighting characters. • “n” is valid only for the lowest bit (n0). • Control by the lowest bit (n0) is shown as follows: Type Canceling highlighting Specifying highlighting...
- Seite 84 ESC G n [Function] Specifying/Canceling double printing [Code] <1B> H <47> H <n> 0 ≤ n ≤ 255 [Range] [Outline] Specifying/canceling the double printing. • “n” is valid only for the lowest bit (n0). • Control by the lowest bit (n0) is shown as follows. Type Canceling double printing Specifying double printing...
- Seite 85 ESC J n [Function] Printing and Feeding paper n/203 inch [Code] <1B> H <4A> H <n> 0 ≤ n ≤ 255 [Range] [Outline] Prints data inside the print buffer and feeds paper by n/360 inch. Since an actual mechanical pitch is 1/203 inch, it is internally converted approximate to the value specified with this command.
- Seite 86 ESC R n [Function] Selecting the international character set [Code] <1B> H <52> H <n> 0 ≤ n ≤ 10 [Range] [Outline] Depending on the value of n, following character sets are specified. Character Set U.S.A. France Germany U.K. Denmark I Sweden Italy Spain...
- Seite 87 ESC V n [Function] Specifying/Canceling 90°-right- turned characters [Code] <1B> H <56> H <n> 0 ≤ n ≤ 1 [Range] [Outline] Specifying/canceling characters 90°-right- turned character. • “n” means the followings. Condition Canceling 90°-right- turned Characters Specifying 90°-right- turned Characters No underlines are attached to 90°-right- turned characters .
- Seite 88 ESC a n [Function] Aligning the characters [Code] <1B> H <61> H <n> 0 ≤ n ≤ 2 [Range] [Outline] All the printed data within one line are aligned in the specified position. • Depending on n value, positional alignment is carried out as in the table below: Position Left end alignment...
- Seite 89 ESC c 3 n (Parallel Interface Only) [Function] Selecting the paper near end sensor valid for a paper end signal output <1B>H<63>H<33>H<n> [Code] 0 ≤ n ≤ 255 [Range] This command selects at which paper near end sensor a [Outline] paper end signal should be output.
- Seite 90 ESC c 5 n [Function] Enabling/Disabling the panel switches [Code] <1B> H <63> H <35> H <n> 0 ≤ n ≤ 255 [Range] [Outline] Selecting the FEED switch valid/invalid. • “n” is valid only in the lowest bit (n0). • Control by the lowest bit (n0) is shown as follows. Condition FEED switch valid.
- Seite 91 ESC d n [Function] Printing and feeding the paper by n lines [Code] <1B> H <64> H <n> 0 ≤ n ≤ 255 [Range] [Outline] Prints data inside the buffer and feeds paper by n lines. • Specified line does not remain. •...
- Seite 92 ESC n n [Function] Setting a remaining amount of printout [Code] <1B>H<6E>H<n> 0 ≤ n ≤ 255 (“n” in the 2nd byte denotes this command) [Range] [Outline] This command sets a print remaining amount after detecting PNE. n is set in units of cm. [Caution] If the paper near end sensor is disabled, this command will not function.
- Seite 93 ESC t n [Function] Selecting the character code table [Code] <1B> H <74> H <n> 0 ≤ n ≤ 1 [Range] [Outline] Selecting Page n on the character code table: The character code table is selected depending on the value of n.
- Seite 94 ESC v (Serial Interface Only) [Function] Transmitting the printer status [Code] <1B> H <76> H [Outline] • Current printer status is transmitted. • Status sent out consists of 1 byte whose content is as in the table below. Value Function Not defined Not defined Without paper...
- Seite 95 ESC { n [Function] Specifying/Canceling Inverted Characters [Code] <1B> H <7B> H <n> 0 ≤ n ≤ 255 [Range] [Outline] Specifying/Canceling inverted characters. • “n” is valid only for the lowest bit (n0). • Control by the lowest bit (n0) is shown as follows. Condition Canceling inverted characters Specifying inverted characters...
- Seite 96 ESC $ n1 n2 [Function] Specifying the absolute positions [Code] <1B> H <24> H < n1> <n2> 0 ≤ n1 ≤ 255 [Range] 0 ≤ n2 ≤ 1 The printing start position is specified in the number of dots [Outline] (1/203 inch unit) from the beginning of line.
- Seite 97 ESC \ n1 n2 [Function] Specifying the relative positions [Code] <1B> H <5C> H <n1> <n2> 0 ≤ n1 ≤ 255 [Range] 0 ≤ n2 ≤ 255 The printing start position is specified in the number of dots [Outline] (1/203 inch unit) from the current position. •...
- Seite 98 GS k n [ d ] k NUL [Function] Printing the bar code [Code] <1D> H <6B> H <n> [ <d> ] k <00> H * <d> = character code 0 ≤ n ≤ 7 [Range] Specifying a type of bar code and printing bar codes. [Outline] •...
- Seite 99 [Print Results] When the data “123” is printed with the code 39 [Description of Bar <For print examples, see Page 82.> Codes] This bar code, consisting of numerals only, has a fixed UPC-A length of 12 columns; a 11-column number entered from the host or application software plus a check column (12th column) automatically calculated inside the printer.
- Seite 100 This bar code, consisting of numerals only, has a variable length of even columns. If an odd-column code is transferred, nothing will be printed. CODABAR (NW-7) This bar code, consisting of alphanumeric characters, has a variable length of columns. Available characters include “0 1 2 3 4 5 6 7 8 9 A B C D $ + –...
- Seite 101 Example) When initially testing with the code subset B, and then, printing the bar code, “123,” with the code subset A • Input code TEST <85h> • Bar code data : <CODE B>TEST<CODE A>123 [Description of UPC-A, UPC-E, JAN-13 (EAN), JAN-8 (EAN), CODE39, ITF, Bar Codes] CODABAR, CODE128 Type...
- Seite 102 GS w n [Function] Specifying the horizontal size (Scale factor) of bar code [Code] <1D> H <77> H <n> 2 ≤ n ≤ 4 [Range] [Outline] Selecting bar code width. n denotes the number of dots in fine element width. n = 3 [Default] GS k, GS h...
- Seite 103 GS h n [Function] Specifying the height of the bar code [Code] <1D> H <68> H <n> 1 ≤ n ≤ 255 [Range] [Outline] • Selecting bar code height. • n denotes the number of dots in the vertical direction. n = 162 [Default] GS k, GS w...
- Seite 104 GS H n [Function] Selecting the printing position of HRI characters [Code] <1D> H <48> H <n> 0 ≤ n ≤ 3 [Range] [Outline] • Selecting printing position of HRI characters in printing bar codes. • “n” means the followings. Printing Position No printing Above the bar code...
- Seite 105 [Print Results] No Visible code Printed above Printed below Printed above And below — 86 —...
- Seite 106 GS f n [Function] Selecting the font of HRI code [Code] <1D> H <66> H <n> 0 ≤ n ≤ 1 [Range] [Outline] • Selecting the font of HRI code in printing bar code. • The type of font can be printed by selecting n is as follows. Font Font A Font B...
- Seite 107 GS * n1 n2 [ d ] n1 x n2 x 8 [Function] Defining the download, bit image [Code] <1D> H <2A> H <n1> <n2> [ <d> ] n1 x n2 x 8 1 ≤ n1 ≤ 255 [Range] 1 ≤ n2 ≤ 48 n1 x n2 ≤...
- Seite 108 [Sample Program] GOSUB *IMG LPRINT CHR$ (&H1D) ; "/" ; CHR$ (0) ; LPRINT CHR$ (&H1D) ; "/" ; CHR$ (1) ; LPRINT CHR$ (&H1D) ; "/" ; CHR$ (2) ; LPRINT CHR$ (&H1D) ; "/" ; CHR$ (3) ; *IMG : N1 = 8 : N2= 8 LPRINT CHR$ (&H1D) ;...
- Seite 109 GS / m [Function] Printing the download, bit image [Code] <1D> H <2F> H <m> 0 ≤ m ≤ 3 [Range] [Outline] Prints download bit image in a mode specified by m. • Modes can be selected by m are shown below. Dot Density In Dot Density In Mode Name...
- Seite 110 GS : [Function] Starting/Ending macro definition [Code] <1D> H <3A> H [Outline] Specifying starting / ending macro definition. Means termination when received while defining a macro. Maximum content available for macro definition is 2048 [Caution] bytes. A portion exceeding 2048 bytes is not defined. •...
- Seite 111 GS ^ n1 n2 n3 [Function] Executing the macro [Code] <1D> H <5E> H <n1> <n2> <n3> 0 ≤ n1 ≤ 255 [Range] 0 ≤ n2 ≤ 255 0 ≤ n3 ≤ 1 [Outline] Executing contents defined in macro. • “n1–n3” indicate as follows: n1: The number of times of macro execution n2: Waiting time on macro execution Waiting time of n2 x 100 msec is given for every...
- Seite 112 DC2 A n [Function] Selecting a printing speed [Code] <12>H<41>H<n> 0 ≤ n ≤ 1 [Range] [Outline] This command specifies a printing command. n is valid only for the least significant bit. High-speed print Standard print High-speed print If a printing amount is too much for one line, a standard [Caution] speed will be assumed.
- Seite 113 DC3 n [Function] Switching the Red/Black printing [Code] <13>H<n> 0 ≤ n ≤ 255 [Range] [Outline] This command selects/deselects black/red printout. n is valid only for the least significant bit (n0). Black based paper Red based paper Deselects red printout Deselects black printout Selects red printout Selects black printout...
-
Seite 114: Character Codes Table
11. CHARACTER CODES TABLE 11.1 International — 95 —... -
Seite 115: Code Page Katakana (Japanese)
11.2 Code Page Katakana (Japanese) — 96 —... -
Seite 116: International Character Codes Table
11.3 International Character Codes Table — 97 —... -
Seite 117: Appendix 1. Block Diagram
APPENDIX 1. BLOCK DIAGRAM Japanese Only OSC 16MHz Kanji Operation Panel Print Head Paper Near End DIP Switch Interface Paper End Head-up Driver Stepping Motor DC 7.2V DC5V Power 7.2V Reset Source Power Control Ni-MH *1 Serial Interface --- RS-232C compliant Parallel Interface --- Centronics compliant —... -
Seite 118: Appendix 2. Outline Drawing
APPENDIX 2. OUTLINE DRAWING — 99 —... -
Seite 119: Drawing
APPENDIX 3. WALL MOUNTING HOLES LAYOUT DRAWING R5.75 R3.75 R3.75 5.75 17.25 ø10 ø12 43.9 — 100 —... - Seite 120 GERMAN — 101 —...
- Seite 121 <VORSICHT> • Bitte lesen Sie diese Bedienungsanleitung vor dem Betrieb des Druckers aufmerksam durch und bewahren Sie die Anleitung anschließend für späteres Nachschlagen an einem sicheren Platz auf. • Änderungen des Inhalts dieser Anleitung bleiben ohne Vorankündigung vorbehalten. • Die Vervielfältigung dieser Bedienungsanleitung ohne vorherige Genehmigung verstößt, auch auszugsweise, gegen das Urheberschutzrecht.
-
Seite 122: Zu Beachtende Sicherheitsmassregeln
ZU BEACHTENDE SICHERHEITSMASSREGELN Zur Vermeidung von Gefahren gegenüber dem Bediener und anderen Personen und Sachschäden sind die folgenden Vorsichtsmaßregeln unbedingt zu beachten. • Der folgende Text beschreibt das Ausmaß der Gefahren und potentiellen Sachschäden, die durch Mißachtung der Bedienungshinweise oder durch unsachgemäße Handhabung des Druckers entstehen können. - Seite 123 WARNUNG Beim Betrieb des Druckers sind die nachfolgenden Vorsichtsmaßregeln unbedingt zu beachten. Eine Mißachtung dieser Hinweise kann zu Schäden, Funktionsstörungen, Rauchentwicklung, Brandgefahr durch Überhitzen und elektrischen Schlägen führen. Der fortgesetzte Betrieb des Druckers in anormalem Zustand, wie z.B. nach einer Beschädigung, kann Funktionsstörungen, Rauchentwicklung, fremde Gerüche/Geräusche und Brände verursachen.
-
Seite 124: Vorsichtsmassregeln Für Die Aufstellung
VORSICHTSMASSREGELN FÜR DIE AUFSTELLUNG • Den Drucker nicht an Plätzen abstellen oder betreiben, an denen er Feuer, Feuchtigkeit oder direkter Sonnenbestrahlung ausgesetzt ist. Ebenso sind Plätze in der Nähe von Heizkörpern und sonstigen Wärmequellen zu vermeiden, an denen Umgebungstemperatur und Luftfeuchtigkeit nicht den vorgeschriebenen Betriebsbedingungen entsprechen, sowie Plätze, an denen der Drucker Öl, Metallspänen oder Staub ausgesetzt ist. -
Seite 125: Vorsichtsmassregeln Für Die Handhabung
VORSICHTSMASSREGELN FÜR DIE HANDHABUNG Zur Vermeidung von Problemen sind bei der Handhabung des Druckers die folgenden Vorsichtsmaßregeln zu beachten. • Keine andere Betriebsstromquelle als das mitgelieferte Netzteil verwenden. Das Netzteil nicht für andere Zwecke verwenden. • Nicht ohne eingelegte Papier drucken. •... - Seite 126 TÄGLICHE WARTUNG • Bei der Wartung immer den Netzschalter des Druckers auf Aus stellen und den Stecker aus der Steckdose ziehen. • Schmutz und Staub mit einem trockenen, weichen Tuch vom Druckergehäuse abwischen. Bei starker Verschmutzung einen Lappen in Wasser anfeuchten, auswringen und damit abwischen.
-
Seite 127: Sicherheitsmassregeln Zum Akku
SICHERHEITSMASSREGELN ZUM AKKU Der Drucker kann mit einem wiederaufladbaren Akku (Nickel-Wasserstoff) betrieben werden. Um maximale Sicherheit zu gewährleisten, sind die folgenden Sicherheitsmaßregeln zu beachten: GEFAHR! Zum Schutz vor einem Austreten von Batterieflüssigkeit und Heißwerden oder Platzen des Akkus: • Akkus nicht verbrennen oder Wärmequellen aussetzen. •... - Seite 128 WARNUNGEN Wenn am Drucker oder dem enthaltenen Akku Spuren von auslaufender Batterieflüssigkeit, Verfärbungen, Verformungen oder ungewöhnlicher Geruch festzustellen sind, die Benutzung des Druckers sofort einstellen und sich an den Händler wenden. Wenn der Ladezyklus nicht innerhalb der angegebenen Zeit endet, brechen Sie ihn bitte zu diesem Zeitpunkt ab.
- Seite 129 VORSICHT Den Akku keinen heftigen Stößen aussetzen und nicht auf harte Flächen fallen lassen. Den Akku keiner direkten Sonnenbestrahlung aussetzen und nicht im heißen Fahrzeuginnenraum oder im Heißluftstrom eines Heizgerätes belassen, da anderenfalls Batterieflüssigkeit austreten oder sich das Leistungsvermögen der Batterie verschlechtern kann.
-
Seite 130: Entsorgen Des Akkus
AKKU-LEBENSDAUER • Der Akku ist für eine Lebensdauer von über 300 Lade-/Entladezyklen über 3 bis 5 Jahre (bei Raumtemperatur) bei sachgemäßer Verwendung ohne Überladen oder Überentladen (Ladekapazität auf 60 % oder mehr verringert) konstruiert. Zu beachten ist allerdings, daß die tatsächliche Lebensdauer je nach Zyklushäufigkeit und Betriebsbedingungen auch kürzer sein kann. -
Seite 131: Betrieb
4. BETRIEB 4.1 Anschließen des Netzteils Das Gerät ausschalten. Den Kabelstecker des Netzteils in den Betriebsstromeingang an der Rückseite des Druckers einstecken. Das Netzkabel des Netzteils zwischen Netzteil und Netzstecker anschließen. (Näheres zum Druckerstatus siehe “Bedienfeld und Fehleranzeigen” in Abschnitt 4.15.) VORSICHT: •... -
Seite 132: Auswechseln Des Akkus
4.2 Auswechseln des Akkus 4.2.1 Entnehmen des Akkus Den Netzstecker aus der Netzsteckdose ziehen. Den POWER-Schalter auf OFF stellen. Den Akkufachdeckel entfernen. (Den Deckel in Bereich A andrücken und in Pfeilrichtung abziehen.) Den Akku aus dem Fach entnehmen und die Stecker des Kabelsatzes trennen. -
Seite 133: Einsetzen Des Akkus
4.2.2 Einsetzen des Akkus Den Akku mit der Etikettseite nach oben richten und die Stecker des Kabelsatzes miteinander verbinden. Den Akku in das Akkufach einsetzen. (Den Kabelsatz sorgfältig im Freiraum des Akkufachs verstauen.) Den Akkufachdeckel von der Druckerrückseite her wieder über das Akkufach schieben. -
Seite 134: Laden Des Akkus
4.3 Laden des Akkus Der Akku kann gepuffert und ungepuffert geladen werden. Durch gepuffertes Laden kann er während des laufenden Betriebs aufgeladen werden. 4.3.1 Ungepuffertes Laden Den Drucker einschalten. Den Stecker des Netzteilkabels an den Betriebsstromeingang auf der Rückseite des Druckers anschließen. Das Netzteil über das Netzkabel an eine Netzsteckdose anschließen. -
Seite 135: Akkugespeister Betrieb
4.3.3 Akkugespeister Betrieb Der Drucker wird nur dann aus dem Akku mit Strom versorgt, wenn das Netzteil nicht angeschlossen ist. Nach dem Einschalten mit dem POWER-Schalter (POWER-Lampe leuchtet grün) ist der Drucker bereit für akkugespeisten Betrieb. Nach jeder Verwendung ist der POWER-Schalter unbedingt wieder auszuschalten (POWER-Lampe erlischt). -
Seite 136: Prüfen Der Akkuspannung
4.3.4 Prüfen der Akkuspannung Wenn die Akkuspannung unter 5.6 V absinkt, schaltet die Spannungsprüffunktion den Drucker automatisch aus (POWER-Schalter bleibt in Stellung ON). Der Drucker kann zwar noch durch Hin- und Herschalten des POWER-Schalters neu eingeschaltet werden, der Akku muß aber aufgeladen werden. Während des Druckbetriebs ist eine Aktivierung der Spannungsprüffunktion wahrscheinlicher als im Bereitschaftmodus. - Seite 137 VORSICHT: • Wenn am Drucker oder dem enthaltenen Akku Spuren von auslaufender Batterieflüssigkeit, Verfärbungen, Verformungen oder ungewöhnlicher Geruch festzustellen sind, die Benutzung des Druckers sofort einstellen und sich an den Händler wenden. • Wenn der Ladezyklus nicht innerhalb der angegebenen Zeit endet, brechen Sie ihn bitte zu diesem Zeitpunkt ab.
-
Seite 138: Rückstellungen
4.4 Rückstellungen 4.4.1 Rückstellungen bei laufendem Druckbetrieb Bei akkugespeistem Betrieb kann es vorkommen, daß während des Druckens dichter Muster oder Bilder eine Rückstellung des Druckers erfolgt. Dies geht darauf zurück, daß die Akkuspannung bei einem hohen Dichtegrad unter 5.6 V abfallen kann, wodurch die Akku-Schutzschaltung aktiviert wird. -
Seite 139: Stromsparmodus Und Automatische Abschaltung
4.5 Stromsparmodus und automatische Abschaltung Um einen unnötigen Verbrauch von Akkusstrom zu vermeiden, schaltet sich der Drucker automatisch auf den Stromsparmodus, wenn er ca. 10 Minuten keine Daten empfängt und nicht bedient wird. Dauert dieser Ruhezustand weitere 10 Minuten an, spricht die automatische Abschaltung an und schaltet den Drucker aus. -
Seite 140: Anschließen Des Schnittstellenkabels
4.6 Anschließen des Schnittstellenkabels Das Gerät ausschalten. (Paßseite eingeschlossen) Die Ober- und Unterseite der Kabelkontakte prüfen, und an den Schnittstellenkontakt anschließen. Die Kabelkontakte befestigen. Serielle Schnittstelle: Die Schrauben zum Befestigen festziehen. Parallelschnittstelle: Einen Befestigungsring zum Befestigen in Pfeilrichtung drehen. Das Kabel an den Hostcomputer anschließen. VORSICHT: •... -
Seite 141: Einsetzen Des Papiers
4.7 Einsetzen des Papiers VORSICHT: • Immer die vorgeschriebene Papierrolle verwenden. • Bei Verwendung von nicht vorschriftsgemäßem Papier kann die Druckqualität, die Lebensdauer des Druckkopfes usw. nicht garantiert werden. Die Konvexfläche hinten an der Druckerabdeckung halten und nach oben heben. Die Vorderseite der Papierrolle fast im rechten Winkel halten. - Seite 142 Den Kopfanhebe-Hebel zurückschieben. Die Papierrolle wird automatisch durch die Druckwalze eingezogen, um eine konstante Papiermenge vorzuschieben. (Wenn Auto-Laden aktiviert ist.) Die Druckerabdeckung anbringen. VORSICHT: • Wenn die Papierrolle schlaff ist, das Papier zurückwickeln, um den Durchhang zu beheben. • Wenn die Papierrolle geneigt ist, den Kopfanhebe-Hebel heben, um die Papierrollenposition zu korrigieren oder die Papierrolle herausnehmen und erneut einsetzen.
-
Seite 143: Entnehmen Der Eingesetzten Papierrolle
4.8 Entnehmen der eingesetzten Papierrolle Die Druckerabdeckung entfernen. Den Kopfanhebe-Hebel heben. Vorsichtig das Papier zur nahen Seite herausziehen. Wenn die Papierrolle verbleibt, vor dem Herausziehen kurz vor dem Papiereinführschacht abschneiden. VORSICHT: • Nicht die Papierrolle in gegenrichtung ziehen. • Niemals das Papier mit gesenktem Kopfanhebe-Hebel herausnehmen, da der Druckkopf beschädigt werden könnte. -
Seite 144: Beseitigen Von Papierstau
4.9 Beseitigen von Papierstau Das Gerät ausschalten. Die Druckerabdeckung entfernen. Die Papierrolle in der Nähe des Papiereinzugschachts abschneiden. Den Kopfanhebe-Hebel anheben. Die blauen Hebel an beiden Seiten der Druckwalzeneinheit heben, um die Einheit vorsichtig zu entfernen. Die Druckwalzeneinheit kann durch manuelles Anheben der blauen Hebel abgenommen werden. -
Seite 145: Feed-Schalterfunktion
VORSICHT: • Diese Arbeit nicht sofort nach dem Drucken ausführen, da sich der Druckkopf stark erhitzt. • Beim Abnehmen der Druckwalzeneinheit immer das Gerät ausschalten. • Beim Entfernen von verbleibendem Papier nicht die Heizoberfläche des Kopfes mit bloßen Händen oder Metallgegenständen berühren. •... -
Seite 146: Papiermangel-Funktion
4.12 Papiermangel-Funktion Wenn das Papier fast verbraucht ist, informiert der PNE-Sensor den Hostcomputer, daß das Papier fast verbraucht ist, indem ein Signal ausgegeben wird oder das PAPER-Lämpchen am Bedienfeld aufleuchet. Das PAPER-Lämpchen leuchtet bedingungslos auf. Wenn der PNE-Sensor erkennt, daß das Papier fast verbraucht ist, leuchtet das PAPER-Lämpchen auf. - Seite 147 (2) Druckmenge nach Erkennung von PNE Wenn PNE aktiviert ist, kann eine druckbare Menge nach der PNE-Erkennung eingestellt werden. PNE wird erkannt, wenn die restliche Menge der Papierrolle etwa 2 bis 3 m beträgt. (Diese Betrag hängt von der verwendeten Papierqualität, der Papierdicke und der Betriebsumgebung ab.) Der Standardwert beträgt 1,5 m.
-
Seite 148: Autoladefunktion
4.13 Autoladefunktion Dieser Drucker hat eine Funktion zur automatischen Papiereinstellung. Wenn der Papierendesensor, Papiermangelsensor und Kopfanhebe-Hebel aufgehoben werden, wird das Papier automatisch um eine konstante Menge in ca. 1 Sekunde zugeführt. Um glatten Betrieb zu gewährleisten, den Kopfanhebe-Hebel zuletzt aufheben. Außerdem kann der DIP-Schalter zum Aktivieren/Deaktivieren der Funktion verwendet werden. -
Seite 149: Bedienfeld Und Fehleranzeigen
4.15 Bedienfeld und Fehleranzeigen 1. POWER-Lampe (grün/rot) Die POWER-Lampe zeigt durch zwei Farben den Druckerstatus an. (1) Bei Stromversorgung über das Netzteil (Akku wird im gepufferten Modus geladen) POWER- POWER- POWER- Anmerkungen Funktion Status Schalter Lampe (grün) Lampe (rot) Laden des Laden Leuchtet Erhaltungsladen... - Seite 150 2. ERROR-Lämpchen (rot), PAPER-Lämpchen (rot) Zeigen durch Leuchten oder Blinken einen Fehler an. Anzeige Fehler Rückstellen ERROR-Lämpchen PAPER-Lämpchen Kann nicht rückgestellt Speicherprüfung-Fehler werden Schnelles Blinken Kopfanhebe-Hebel Kopfanheben absenken Automatische Rückstellung Kopfüberhitzung Blinken durch Temperaturabfall Nach Druckstopp eine neue Papiermangel Papierrolle einsetzen. Eine neue Papierrolle Papierende einsetzen...
-
Seite 151: Rot/Schwarz-Druck (Vorsichtsmaßregeln)
4.16 Rot/Schwarz-Druck (Vorsichtsmaßregeln) (1) Papiersorten Das rote und schwarze Zweifarb-Thermalpapier ändert seine Farbe durch Steuerung der am Thermalkopf angelegten Energie. Es ist grundsätzlich in zwei Typen unterteilt, entsprechend der Farbentwicklungsreihenfolge. Wählen Sie eine davon entsprechend Ihrer Applikation. 1. Auf Rot basiertes zweifarbiges Thermalpapier (PB670: MITSUBISHI PAPER) Rotdruck (Niedrigenergie) →... -
Seite 152: Dip-Schaltereinstellung
5. DIP-SCHALTEREINSTELLUNG 5.1 Lage der DIP-Schalter Das Gerät ausschalten. Die Druckerabdeckung entfernen, und die Papierrolle herausnehmen. (Der Schalter befindet sich unter der Papierrolle.) Es sind 2 Schalter (8 polig und 4 polig) für die serielle Schnittstelle und 2 Schalter (8 polig und 4 polig) für die parallele Schnittstelle vorhanden. - Seite 153 DS2 (serielle Schnittstelle) Funktion Beim Versand Baudrte und Parität Siehe Tabelle2 Stromsparmodus und Siehe Tabelle3 automatische Abschaltung — — Nicht verwendet Nicht verwendet — — Tabelle2 DS2-4 DS2-3 DS2-2 DS2-1 Parität Baudrate Keine 9.600 bps Keine 1.200 Keine 2.400 Keine 4.800 Keine 9.600...
- Seite 154 DS2 (parallele Schnittstelle) Funktion Beim Versand Stromsparmodus und automatische Siehe Tabelle4 Abschaltung Nicht verwendet — — Nicht verwendet — — Tabelle4 DS2-1 DS2-2 Keine Daten/Bedienung Stromsparmodus Autom. Abschaltung Anmerkungen 10 Min. Unbegrenzt Nein Autom. Abschaltung deaktiviert ↑ 10 Min. 10 Min. ohne Daten/Bedienung ↑...
-
Seite 155: Jumperdraht-Funktion
5.3 Jumperdraht-Funktion Die Jumperdrähte sind werksseitig vor dem Versand eingestellt. Die folgende Liste zeigt die grundlegende Einstellung beim Versand. Prüfen Sie die Einstellungen mit dem Selbsttest. Jumperdrähte Funktion Kurz Offen Bei Versand Kurz Internationale Zeichen Siehe Tabelle5 Kurz Kurz Datenbitlänge 7 Bit 8 Bit Offen... -
Seite 156: Wartung Und Dienst
9. WARTUNG UND DIENST Bitte wenden Sie sich an die folgenden Stellen für weitergehende Informationen. Nordamerika Andere Gebiete CBM America Corporation Japan CBM Corporation Service Center Information Systems Division 363 Van Ness Way CBM Bldg., 5-68-10,Nakano Suite 404 Nakno-ku, Tokyo 164-0001 Torrance, CA 90501, U.S.A Japan TEL +1-310-781-1460... - Seite 157 Information Systems Division CBM Bldg., 5-68-10, Nakano, Nakano-ku, Tokyo 164-0001, Japan Head Office Tel: (+81-3) 5345-7540 Fax: (+81-3) 5345-7541 01E-000000-××××-××××-×××.× Printed in Japan...