
Verwandte Anleitungen für cosori CP018-PC


Inhaltszusammenfassung für cosori CP018-PC
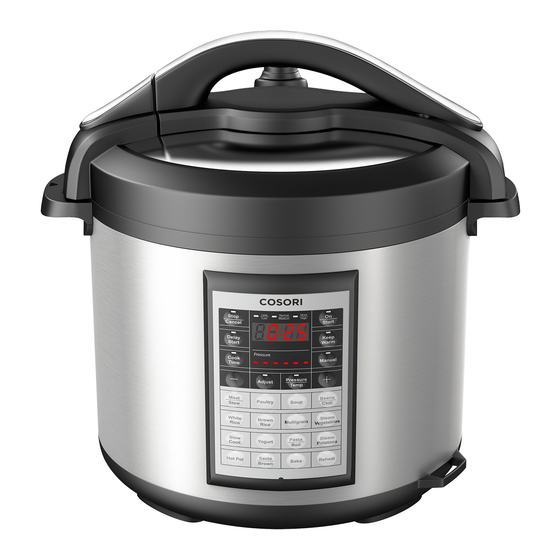
- Seite 1 Premium 8-Quart Pressure Cooker Model No.: CP018-PC Hot Pot EN • DE support.eu@cosori.com...
-
Seite 2: Inhaltsverzeichnis
Table of Contents Keeping Things Safe Getting to Know Your Pressure Cooker How Does it Work? Safely Removing the Lid Care & Maintenance Troubleshooting Warranty Customer Support Package Contents 1 x Electric Pressure Cooker 1 x Spoon 1 x Ladle 1 x Measuring Cup 1 x Glass Lid 1 x Sealing Ring... -
Seite 3: Verpackungsinhalt
Inhaltsverzeichnis Dinge Sicher Halten Den Schnellkochtopf kennenlernen Wie funktioniert es? Sichere Deckelnutzung Pflege & Wartung Fehlerbehebung Garantie Informationen Zeigen Sie uns was Sie kochen Verpackungsinhalt 1 x Elektro-Schnellkochtopf 1 x Löffel 1 x Schöpflöffel 1 x Messbecher 1 x Glasdeckel 1 x Dichtring 1 x Benutzerhandbuch 1 x Dampfreiniger... -
Seite 4: Keeping Things Safe
Keeping Things Safe IMPORTANT SAFEGUARDS Please read, understand, electric burner and/or in and comply with all the a heated oven. instructions provided • DO NOT use the unit in this manual before for anything other than using the device. Failure its intended use. - Seite 5 • This pressure cooker from a power source, should not be used for press ‘Stop/Cancel’ , any medical purposes. then remove plug from It is not designed to the outlet. reach the required • It is extremely temperature for important to fill the sterilization.
- Seite 6 • Check and wash anti- opening the lid. clog filter and pressure • Clean and properly release valve regularly place the water to avoid any blockage. collection cup before • DO NOT attempt to each use. open the lid while the •...
- Seite 7 NOTE: This appliance has a three- • prong grounding plug. To reduce the risk of electric shock, this plug will only fit one way into a grounded electrical outlet that is easily accessible. DO NOT attempt to modify When moving the unit, hold the the plug in anyway if it does pressure cooker by its handles.
-
Seite 8: Getting To Know Your Pressure Cooker
Geting to Know Your Pressure Cooker PRESSURE COOKER OUTSIDE OF LID INSIDE OF LID INSIDE OF COOKER 1. Lid 9. Anti-clog filter 2. Lid handle 10. Retainer nut 3. Pressure release valve 11. Float valve sealing ring 4. Float valve 12. - Seite 9 CONTROL PANEL Less Normal More Stop Medium High Cancel Start Delay Keep Warm Start Pressure Cook Manual Time Pressure Adjust Temp Meat Beans Poultry Soup Stew Chili White Brown Steam Multigrain Rice Rice Vegetables Pasta Slow Steam Yogurt Cook Potatoes Boil Sauté...
- Seite 10 DISPLAY DESCRIPTIONS Unit is on standby Function has been cancelled Unit is heating up/pressurizing Display time for non-pressurized cooking settings NOTE: The display will switch between the cooking time and temperature every two seconds. Display time for pressurized cooking settings Yogurt function Pasteurization function Jiu niang function...
- Seite 11 CONTROLS Button Function Starts any selected cooking function. Start Cancels any cooking process; also cancels any selections that are Stop made. Cancel NOTE: The display will show “OFF” after pressing ‘Stop/Cancel’ , indicating that the pressure cooker has stopped cooking. The pressure cooker will go into standby mode, showing “--:--”, after 3 minutes.
- Seite 12 • It is recommended to cook tender foods such as vegetables on the lower pressure levels. • The actual working pressure may vary depending on the amount of food and liquid being cooked. The warming function keeps food warm until you are ready to eat. Follow the steps below to manually set up the warming function.
-
Seite 13: How Does It Work
How Does it Work? PREPARING TO COOK NOTE: • Thoroughly wash the inner pot before each use. • The minimum amount of ingredients needed to cook in the pressure cooker is ⅕ of the capacity of the inner pot. • The minimum amount of liquid Place ingredients into the inner needed for cooking is 4 cups/1000 pot. - Seite 14 Select a pressurized cooking Set the pressure release valve function on the control panel to to the “Seal” position. cook your food. (Optional): Use the ‘Cook Time’ button to change the cooking time with the ‘+’ and ‘-’ buttons, or use the ‘Adjust’...
- Seite 15 The pressure cooker will beep three times to alert you when cooking has finished, and it will automatically set itself to the Keep Warm mode for 6 hours. (See Safely Removing the Lid.) PRESSURIZED COOKING FUNCTION TIMES NOTE: All pressurized cooking times can be adjusted from 1 minute to 4 hours. Preset Functions Adjust Default Time Setting...
- Seite 16 NON-PRESSURIZED COOKING FUNCTIONS Slow Cook This function allows you to cook various recipes at low temperatures ranging from 180° to 211°F (82° to 99°C). Only use the Press the ‘Pressure/Temp’ glass lid for this cooking function. button to change the cooking temperature, use ‘+’...
- Seite 17 Pasta/Boil NOTE: The pressure cooker always heats up This function allows you to boil water or liquids using high power, but maintains liquids as well as cook pasta al dente. the boiling temperature using the programmed setting. Press ‘On/Start’ , to start cooking.
- Seite 18 Sauté/Brown This function allows you to sauté, simmer, or even pan fry foods inside the inner pot. Press the ‘Pressure/Temp’ button and use ‘+’ or ‘-’ to change the temperature from 104° to 320°F. (Optional): Use the ‘Adjust’ button to select a pre-programmed cooking time and temperature (see table below).
- Seite 19 Once your ingredients have Hot Pot combined, turn off the pressure This function allows you to create savory cooker and carefully transfer the soups for a family hot pot dinner or sweet liquid to a warm bowl. If you are dipping sauces for fun desserts.
- Seite 20 Reheat Less/ Normal/ More/ Medium High This function allows you to reheat Cooking 165°F 212°F 248°F prepared food in the pressure cooker. temp (74°C) (100°C) (120°C) Please note that raw foods should not be cooked using this setting. Replace the lid and press ‘On/ Start’...
- Seite 21 Yogurt Your new Cosori electric pressure cooker can heat up milk at a safe temperature Use the ‘Adjust’ button to to create fresh yogurt for you to enjoy. select the “High” setting. The Follow the steps below to make your display will show the word “boil”,...
- Seite 22 Jiu Niang Jiu Niang, also known as fermented glutinous rice, is a sweet and mildly alcoholic delicacy of Asia. Glutinous rice, more commonly known as sticky rice, is used in making Jiu Niang and contains a high concentration of starch that is converted to sugar during the fermentation process.
- Seite 23 ‘+’ or ‘-’ buttons to Manual Pressure Cooking Mode select your cooking time. Your new Cosori Electric Pressure Cooker also gives you the option to manually set up the pressure cooker for complete control over your cooking settings. There are two methods for setting up the manual pressure cooking mode.
- Seite 24 Once the unit reaches optimal cooking pressure, the display Press the ‘Cook Time’ button, will begin to count down. then use the ‘+’ or ‘-’ buttons to select your cooking time. The pressure cooker will beep three times when cooking has finished, and NOTE: it will automatically set itself to the When the programmed temperature...
-
Seite 25: Safely Removing The Lid
NATURAL RELEASE Safely Removing the Lid For your safety, open the lid slowly. Escaping steam is hot and may cause burns to exposed skin. Do not open Once cooking is complete, turn the lid before all pressure has escaped off the pressure cooker’s power through the exhaust valve and the by unplugging the power cable. -
Seite 26: Care & Maintenance
Care & Maintenance Unplug the pressure cooker and allow it to completely cool before cleaning. Wait until float valve drops down to open the pressure cooker. DO NOT immerse the base in water or spray any water inside the housing. If necessary, wipe the inside and outside of the base with a clean, damp cloth. - Seite 27 LID MAINTENANCE Follow the steps below to properly detach the lid from the pressure cooker. It is important to maintain all parts of the lid in order for the pressure cooker to properly operate. Open the pressure cooker as noted in the Preparing to Cook section.
- Seite 28 SILICONE SEALING RING INSTALLATION NOTE: Make sure the silicone sealing ring is not cracked or damaged in any way. Removal Remove pressure cooker lid as noted in the Lid Maintenance section. Place the lid back onto the handle by aligning the slot on the lid with the bolt on the handle.
- Seite 29 Installation Line up silicone sealing ring on top of the metal ring. Gently push down on silicone sealing ring, ensuring that the metal ring is inside the ring’s groove as shown above. Continue pushing the silicone sealing ring all around until it is secured by the metal ring.
-
Seite 30: Troubleshooting
Troubleshooting Problem Cause Solution Difficulty closing lid. Silicone sealing ring may Correctly place the silicone not be placed correctly. sealing ring inside the lid. Lid is not in the “Open” Make sure the lid is in the position “Open” position when closing the lid. -
Seite 31: Warranty
Warranty Cosori warrants all products to be of the highest quality in material, craftsmanship and service for a minimum of 2 years, effective from the date of purchase. Warranty lengths may vary between product categories. Should you encounter any issues or... -
Seite 32: Customer Support
#iCookCosori @cosoricooks Cosori Appliances Considering what to cook? Many recipe ideas are available, both from us and the Cosori community. More Cosori Products Lastly, if you’re happy with this pressure cooker, the line doesn’t stop here. Check out www.cosori.com for a line of all our beautiful and thoughtfully designed cookware. They... -
Seite 33: Sachen Sicher Machen
Sachen sicher machen WICHTIGE SICHERHEITSREGELN Bitte lesen, verstehen oder den Topf NICHT und befolgen Sie alle in Wasser oder andere Instruktionen in dieser Flüssigkeiten ein. Bedienungsanleitung • Wenn eine Einheit von bevor Sie das Gerät oder in der Nähe von benutzen. - Seite 34 Heizgeräte oder ist oder wenn das feuchten Umgebungen. Gerät in irgendeiner • Im Falle einer Weise beschädigt Überhitzung, wurde. Falls das Gerät abschalten und eine Fehlfunktion hat, abziehen Sie sofort kontaktieren Sie bitte den Schnellkochtopf. an den Kundendienst. Versuchen Sie NICHT, •...
- Seite 35 zu füllen, bevor man Dichtung dicht zu ihn nutzt. Niemals machen. ohne Flüssigkeit • Überprüfen und kochen! Dies könnte waschen Anti- zu Beschädigungen Clog-Filter und führen. Druckentlastungsventil • Legen Sie KEIN regelmäßig, um eine gefrorenes Fleisch Blockade zu vermeiden. oder Fisch in den Topf; •...
- Seite 36 Sie das Gerät mit den darstellen kann eingebauten Griffen. • Ein kurzes Netzkabel Versuche nicht, den ist vorgesehen, Schnellkochtopf vom um Verletzungen Deckelgriff zu halten. durch Verwicklung • Zerlegen Sie das Gerät und Auslösung zu NICHT auseinander reduzieren. Wenn ein oder verwenden Verlängerungskabel Sie Ersatzteile von...
-
Seite 37: Bewaren Sie Diese Instruktionen
BEACHTE: Dieses Gerät hat • einen dreiteiligen Schutzkontaktstecker. Um einen Elektroschock zu vermeiden, past der Stecker nur in einer Richtung in die Steckdose. Versuchen Sie NICHT, den Stecker zu Halten Sie ihn außerhalb der modifizieren. Reichweite von Kleinkindern und Kindern. BEWAREN SIE DIESE INSTRUKTIONEN... -
Seite 38: Den Schnellkochtopf Kennenlernen
Den Schnellkochtopf kennenlernen SCHNELLKOCHTOPF AUSSENABDECKUNG IM DECKEL IM KOCHTOPF 1. Überwurfmutter 9. Anti-Clog-Filter 2. Sicherungsstift Riegel 10. Sicherungsmutter 3. Stromkabel 11. Dichtring 4. Innerer Topfsensor 12. Sicherheitsnadel 5. Heizplatte 13. Wassersammelbecher 6. Griffe 14. Netzkabel 7. Gehäuse 15. Innerer Topf-Sensor 8. - Seite 39 BEDIENFELD Less Normal More Stop Medium High Cancel Start Delay Keep Warm Start Pressure Cook Manual Time Pressure Adjust Temp Meat Beans Poultry Soup Stew Chili White Brown Steam Multigrain Rice Rice Vegetables Pasta Slow Steam Yogurt Cook Potatoes Boil Sauté...
- Seite 40 DISPLAY BESCHREIBUNGEN Topf ist im Standby Funktion wurde abgebrochen Topf wird aufgeheizt Anzeige für Kochen ohne Druckfunktion BEACHTEN: Die Anzeige wird alle zwei Sekunden zwischen Kochzeit und Temperatur wechseln. Anzeige für Einstellungen der Kochzeit unter Druck Joghurt-Funktion Pasteurisier-Funktion Jiu Niang Funktion...
- Seite 41 KONTROLLE Knopf Funktion Startet eine ausgewählte Kochfunktion Start Bricht jeden Kochprozess und alle gewählten Einstellungen ab. Stop BEACHTE: Die Anzeige wird “OFF” anzeigen, nachdem die Funktion “Stop/ Cancel Cancel” wurde. Der Topf hört nun auf zu kochen. Der Topf geht nun in den Standby-Modus und zeigt nach drei Minuten “--:--“...
- Seite 42 • Es wird empfohlen, Lebensmittel wie Gemüse unter niedrigem Druck zu kochen. • Der Druck kann je nach Menge an Lebensmitteln und Flüssigkeiten im Topf variieren. Die Wärmefunktion halt das Essen warm, bis Sie bereit sind, es zu servieren. Folgen Sie den Schritten, um die Wärmefunktion manuell Keep Warm einzustellen.
-
Seite 43: Wie Funktioniert Es
Wie funktioniert es? DAS KOCHEN VORBEREITEN BEACHTE: • Waschen Sie den inneren Topf vor Gebrauch aus. • Die Mindestmenge Zutaten, die für das Kochen benötigt werden, beträgt 1/5 der Kapazität des Geben Sie die Zutaten in Topfes. den Topf. Diese sollten eine •... -
Seite 44: Voreingestellte Kochfunktion Für Dampfkochen
Wählen Sie eine Stellen Sie das Ablassventil auf Druckkochfunktion auf dem “Verschlossen”. Bedienfeld aus, um Ihr Essen zu kochen. (Optional): Nutzen Sie den “Kochzeit”-Knopf, um die Kochzeit zu verändern mit “+” und “-“, oder nutzen Sie den “Einstellen”-Knopf, um ein voreingestelltes Programm auszuwählen. -
Seite 45: Druckkoch-Funktion Zeiten
Der Schnellkochtopf wird dreimal Stunden. (Sehen sie sich an, wie Sie piepen wenn der Kochvorgang sicher den Deckel entfernen.) abgeschlossen ist. Der Topf wird automatisch die “Warmhalte”- Funktion anschalten für bis zu 6 DRUCKKOCH-FUNKTION ZEITEN NOTE: Alle Druckkoch-Funktionen können von 1 Minute bis 4 Stunden eingestellt werden Funktion Anpassen Zeiteinstellung... -
Seite 46: Kochen Ohne Druck Funktionen
KOCHEN OHNE DRUCK FUNKTIONEN Langsam Garen Nutzen Sie für diese Funktion nur den Glasdeckel. Drücken Sie die Taste ‘Pressure/Temp’ und verwenden Sie ‘+’ oder ‘-’ , um die Temperatur zu ändern. (Optional): Nutzen Sie den “Einstellung”-Knopf, um eine vorprogrammierte Kochzeit zu wählen (siehe Übersicht unten). - Seite 47 Nudeln/Kochen BEACHTE: Der Schnellkochtopf nutzt Strom, um Diese Funktion ermöglicht es Ihnen, Flüssigkeiten aufzuheizen, nutzt dann Wasser oder Flüssigkeiten zu kochen, aber die eingestellte Wärme, um zu sowie Nudeln al dente zu kochen. kochen. Drücken Sie “An/Start”, um zu kochen. Geben Sie die Nudeln in das Wasser, wenn es die eingestellte Temperatur erreicht hat.
- Seite 48 Sautieren/Bräunen Mit dieser Funktion können Sie im Topf sautieren, kurzbraten und köcheln. Drücken Sie die Taste ‘Pressure/Temp’ und verwenden Sie ‘+’ oder ‘-’ , um die Temperatur von 40°C bis 160°C zu ändern. (Optional): Nutzen Sie den “Einstellung”-Knopf, um eine voreingestellte Kochtemperatur auszuwählen.
- Seite 49 Der Topf wird 5 Mal piepen, wenn er Fondue die eingestellte Temperatur erreicht Diese Funktion ermöglicht es Ihnen, hat. Geben Sie Ihre Zutaten nach schmackhafte Fondue-Rezepte Rezeptvorlage in den Topf. Rühren umzusetzen, die Sie beim Dinner Sie immer wieder um, damit sie nicht genießen können.
- Seite 50 Wiedererwärmen Niedrig Normal Hoch Diese Funktion ermöglicht es Ihnen, Koch- 74°C 100°C 248°F bereits gekochtes Essen wieder temp. (165°F) (212°F) (120°C) aufzuwärmen. Ungekochte Lebensmittel sollten nicht mit dieser Funktion gegart werden. Legen Sie den Deckel auf den Topf und drücken Sie “An/ Start”, um zu kochen.
- Seite 51 Joghurt Ihr neuer elektrischer Cosori Dampfgarer kann Milch bei sicherer Temperatur Nutzen Sie den “Einstellung”- erhitzen und so frischen Joghurt für Sie Knopf, um die Temperatur zaubern. Folgen Sie diesen Schritten, um “Hoch” zu wählen. Das Display leckeren Joghurt herzustellen.
- Seite 52 Jiu Niang Jiu Niang, auch bekannt als fermentierter, klebriger Reis, ist eine süße und alkoholische Speise aus Asien. Klebereis wird bei der Herstellung von Jiu Niang genutzt und beinhaltet eine hohe Konzentration Stärke, die während der Fermentierung in Zucker umgewandelt wird.
- Seite 53 Temp.” und “+” und “-“, um ist, piept der Topf dreimal und geht Einstellungen vorzunehmen. in Standby. Manueller Kochmodus Ihr neuer, elektrischer Cosori Schnellkochtopf ermöglicht es Ihnen, manuelle Einstellung während des Kochens vorzunehmen. Es gibt zwei Methoden, den manuellen Kochmodus Drücken Sie “Kochzeit”...
- Seite 54 Wenn der Topf die geeignete Kochtemperatur erreich, zählt Drücken Sie “Kochzeit” und er einen Countdown herunter. “+” und “-“, um die Kochzeit anzupassen. Wenn der Schnellkochtopf fertig ist, piept er dreimal und geht BEACHTE: dann für bis zu 6 Stunden in den Wenn die programmierte Temperatur Warmhalte-Modus.
-
Seite 55: Sichere Deckelnutzung
NATÜRLICHES ENTWEICHEN Sichere Deckelnutzung VORSICHT Für Ihre Sicherheit, öffnen Sie den Deckel langsam. Austretender Dampf Sobald das Kochen ist heiß und kann zu Verbrennungen abgeschlossen ist, schalten führen. Öffnen Sie den Deckel nicht, Sie den Druckkochtopf aus, bis all der Dampf aus dem Ventil indem Sie das Netzkabel ausgetreten ist. -
Seite 56: Pflege & Wartung
Pflege & Wartung Ziehen Sie den Schnellkochtopf ab und lassen Sie ihn vor dem Reinigen vollständig abkühlen. Warten Sie, bis das Schwimmventil unten ist, bevor Sie den Deckel öffnen. Tauchen Sie den Sockel NICHT in Wasser ein oder sprühen Sie kein Wasser in das Gehäuse. -
Seite 57: Deckel Instandhaltung
DECKEL INSTANDHALTUNG Folgen Sie den Schritten, um den Deckel richtig abzuheben. Es ist wichtig, dass alle Teile des Deckels vorhanden sind, um mit Druck zu kochen. Öffnen Sie den Kochtopf wie in der Sektion “Aufs Kochen vorbereiten” beschrieben. Entnehmen Sie den Anti- Verstopfungsfilter, in dem Sie ihn aus dem Ring entnehmen. - Seite 58 SILIKON-DICHTUNGS-RING- INSTALLATION BEACHTE: Achten Sie darauf, dass der Silikondichtring in keiner Weise geknackt oder beschädigt wird. Entnahme Entfernen Sie den Deckel wie beschrieben in DECKEL. 9. Place the lid back onto the handle by aligning the slot on the lid with the bolt on the handle.
-
Seite 59: Instandhaltung
Instandhaltung Silikon-Dichtring auf den Metallring aufrichten Schieben Sie den Silikon- Dichtungsring vorsichtig nach unten, um sicherzustellen, dass sich der Metallring wie oben gezeigt in der Ringrille befindet. Schieben Sie den Silikondichtring immer weiter, bis er durch den Metallring gesichert ist. Legen Sie den Deckel wieder auf den Schnellkochtopf. -
Seite 60: Fehlerbehebung
Fehlerbehebung Problem Grund Lösung Deckel schließt nicht Der Silikonring ist Setzen Sie den Silikonring ordentlich. möglicherweise nicht richtig ein korrekt eingesetzt Deckel befindet sich nicht Vergewissern Sie sich, dass in der ”Öffnen” Position sich der Deckel beim Schließen des Deckels in der Position “Öffnen”... -
Seite 61: Garantie Informationen
Garantie Informationen BEDINGUNGEN & POLITIK Cosori garantiert bei allen Produkte, dass wir die höchsten Standards bei den Materialien, der Verarbeitung und beim Service anlegen. Diese Garantie ist gültig für zwei Jahre ab Kaufdatum. Garantiezeiten können zwischen den Produktkategorien variieren. Sollten eine Frage oder Probleme im Bezug auf eines unserer neuen Produkte auftreten, dann können Sie jeder Zeit... -
Seite 62: Zeigen Sie Uns Was Sie Kochen
Mehr Cosori Produkte Schließlich, wenn Sie mit diesem elektrischen Druck-Kocher glücklich sind, hört die Linie hier nicht auf. Schauen Sie sich www.cosori.com für eine Linie von all unserem schönen und durchdacht entworfenen Kochgeschirr an. Sie könnten auch in Ihrer Küche zu Hause... - Seite 64 support.eu@cosori.com...