Herunterladen Inhalt Inhalt Diese Seite drucken
Klarstein 10006588 Bedienungsanleitung

Klarstein 10006588 Bedienungsanleitung

Glasheizung
Vorschau ausblenden Andere Handbücher für 10006588:

Werbung

Verfügbare Sprachen
  • DE

Verfügbare Sprachen

  • DEUTSCH, seite 1
Glasheizung
10006588 10006589 10011265

Werbung

Inhaltsverzeichnis
loading

Inhaltszusammenfassung für Klarstein 10006588

  • Seite 1 Glasheizung 10006588 10006589 10011265...
  • Seite 2: Technische Daten

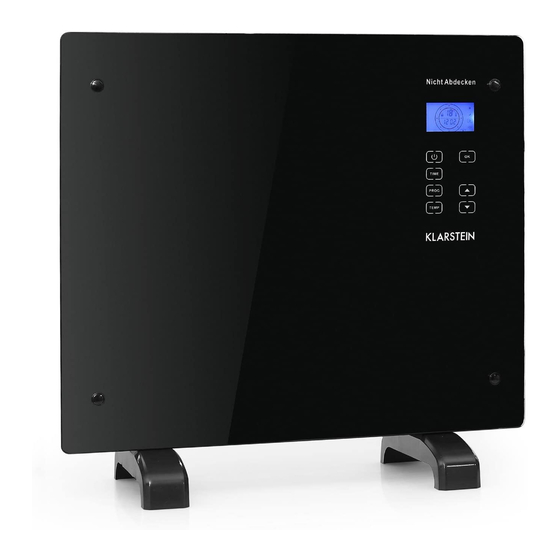
    Ihnen zum Erwerb Ihres Gerätes. Lesen Sie die folgenden Hinweise sorgfältig durch und befol- gen Sie diese, um möglichen Schäden vorzubeugen. Für Schäden, die durch Missachtung der Hinweise und unsachgemäßen Gebrauch entstehen, übernehmen wir keine Haftung. Technische Daten Artikelnummer 10006588, 10011265 10006589 Stromversorgung 230 V ~ 50 Hz Leistung...
  • Seite 3 Geräteübersicht 1 Zierblende Glas 2 LCD-Anzeige 3 Bedienfeld 4 Ein-/Aus Schalter 5 Stadfuß 6 Wandhalter Displayanzeigen Bedienfeld Standby-Taste: Temperatur- Wert erhöhen Gerät ein/ausschalten. einstellungen Eingabe bestätigen / Uhrzeit einstellen. Wert verringern Menü aufrufen Programmeinstellungen...
  • Seite 4: Montage

    Montage Freistehend 1. Befestigen Sie die beiden Standfüße mit den mitgelieferten Schrau- ben an der Unterseite. 2. Stellen Sie die Heizung auf einer ebenen Fläche auf. Wandmontage Festlegen des passenden Ortes: In Frankreich muss da Gerät nach NFC 15-100 montiert werden.
  • Seite 5 Inbetriebnahme und Bedienung Ein-/Ausschalten 1. Stellen Sie den An/Aus Schalter (4) auf die Position „I”. 2. Drücken Sie die Standby-Taste um den Standby-Modus zu verlassen. Die Anzeige zeigt nun die aktuelle Raumtemperatur und Uhrzeit (Standard 12:00) an. Durch erneutes Drücken dieser Taste wechselt das Gerät zurück in den Standby-Modus.
  • Seite 6 Programmierter wöchentlicher Heizmodus 1. Nachdem Sie in diesen Modus gewechselt sind, blinkt das Symbol für Montag . Nutzen Sie die Pfeil- tasten um den Wochentag zu wechseln. 2. Drücken Sie “PROG” zur Bestätigung. 3. Stellen Sie mit den Pfeiltasten die gewünschte Funktion ein. 4.
  • Seite 7: Reinigung Und Pflege

    Kindersicherung 1. Um die Heizung in den Standby-Modus mit aktivierter Kindersicherung zu schalten, drücken und halten Sie die Standby-Taste für 10 Sekunden. 2. Im Betrieb wird die Kindersicherung automatisch aktiviert wenn für 10 Sekunden keine Taste gedrückt wurde. 3. Zum Entsperren drücken Sie zuerst „OK“ und danach Uhrzeit einstellen Drücken Sie zum Stellen der Uhrzeit und die Stunden beginnen zu blinken.
  • Seite 8: Technical Data

    Any failure caused by ignoring the mentioned items and cautions mentioned in the instruction manual are not covered by our warranty and any liability. Technical Data Item number 10006588, 10011265 10006589 Power supply 230 V ~ 50 Hz...
  • Seite 9: Product Description

    Product Description 1 Decoration glass 2 LCD screen 3 Operation board 4 Power ON/OFF switch 5 Foot 6 Wall bracket Display Control Panel Standby key: Switching Setting temperature Adjusting value up. the appliance on/off. level. Confirming an input / Setting the time. Adjusting value down.
  • Seite 10 Assembly Free Standing 1. Attach the two plastic feet to the bottom of the appliance with the delivered screws. 2. Be sure to place the convection heater on a flat surface. Wall Mounting Finding a suitable location: In France the heater shall be installed and used accor- ding NFC 15-100.
  • Seite 11: Use And Operation

    Use and Operation Switching the appliance on/off 1. Set the I/0 switch (4) to the I position. 2. Press the Standby key to exit the standby mode, the LCD display (2) shows current ambient temperature and set time (default 12:00). Press the standby key again to active the standby mode. Note: Setting the I/0 switch (4) to “0”...
  • Seite 12 Programmed weekly heating mode 1. After entering the weekly heating mode and when the Mondy Icon . is flashing use the up or down key to select the day to be programmed. Each number corresponds to respective day of the week. 2.
  • Seite 13: Cleaning And Care

    Child lock function 1. To set the heater to a standby mode and apply the child lock function, simply press the standby key and wait for 10 seconds. 2. When in operation mode, child lock function is automatically activated when no button is pressed for 10 seconds. 3.
  • Seite 14: Dati Tecnici

    Non ci assumiamo alcuna responsabilità per danni derivati da una mancata osservazione delle avvertenze di sicurezza e da un uso improprio del dispositivo. Dati tecnici Numero articolo 10006588, 10011265 10006589 Alimentazione 230 V ~ 50 Hz...
  • Seite 15: Descrizione Del Prodotto

    Descrizione del prodotto 1 Vetro decorativo 2 Display LCD 3 Pannello di controllo 4 Interruttore accensione/ spegnimento 5 Piedi di appoggio 6 Supporto per la parete Spie sul display Pannello di controllo Tasto standby: Impostare accendere/spegnereil Aumentare il valore la temperatura dispositivo Confermare la Impostare l’...
  • Seite 16 Montaggio Distaccato 1. Fissare entrambi i piedi di appoggio nella parte inferiore del dispositi- vo servendosi delle viti incluse nella consegna. 2. Collocare il dispositivo su una superficie piana e stabile. Montaggio alla parete Trovare un punto adatto d’installazione: In Francia il dispositivo deve essere montato secon- do la normativa NFC 15-100.
  • Seite 17: Messa In Funzione E Utilizzo

    Messa in funzione e utilizzo Accensione/spegnimento 1. Posizionare l’interruttore di accensione/spegnimento (4) su “I”. 2. Premere il tasto standby per uscire dalla modalità standby. Sul display ora compare l’ a ttuale temperatura della stanza e l’ o ra (l’ o ra predefinita è 12:00). Premere di nuovo il tasto per ritornare in modalità standby. Nota: se si posiziona l’interruttore (4) su “0”, tutte le impostazioni vengono cancellate.
  • Seite 18 Modalità di riscaldamento programmata 1. Una volta che si passa a questa modalità, il simbolo corrispondente al lunedì lampeggia . Utilizzare i tasti direzionali per cambiare il giorno della settimana. 2. Premere “PROG” per confermare. 3. Impostare la funzione desiderata utilizzando i tasti direzionali. 4.
  • Seite 19: Pulizia E Manutenzione

    Blocco bambini 1. Per impostare il dispositivo in modalità standby con il blocco bambini attivo, tenere premuto il tasto standby per 10 secondi. 2. Quando il dispositivo è in funzione, il blocco bambini si attiva automaticamente se per 10 secondi non si preme alcun tasto.
  • Seite 20: Datos Técnicos

    La empresa no se responsabiliza de los daños ocasionados por un uso indebido del producto o por haber desatendido las indicaciones de seguridad. Datos técnicos Número de artículo 10006588, 10011265 10006589 Suministro eléctrico 230 V ~ 50 Hz...
  • Seite 21: Descripción Del Aparato

    Descripción del aparato 1 Cristal ornamental 2 Display LCD 3 Panel de control 4 Interruptor on/off 5 Soportes 6 Soporte para pared Indicadores del display Panel de control Botón standby: encen- Ajustes de temperatura Aumentar el valor der/apagar el aparato Confirmar cambio / Ajustes de hora Disminuir el valor...
  • Seite 22: Montaje

    Montaje Independiente 1. Fije ambos soportes a la parte inferior del aparato con los tornillos incluidos en el envío. 2. Coloque el radiador en una superficie plana. Montaje en pared Seleccione un lugar adecuado teniendo en cuenta las siguientes indicaciones: El aparato deberá...
  • Seite 23: Puesta En Marcha Y Uso

    Puesta en marcha y uso Encendido y apagado 1. Coloque el interruptor on/off (4) en la posición “I”. 2. Pulse el botón Standby para salir de dicha función. El display mostrará la temperatura actual y la hora (es- tándar 12:00). Al volver a pulsar este botón, el radiador volverá al modo standby. Advertencia: Al colocar el interruptor (4) en la posición “O”, se eliminarán los ajustes realizados.
  • Seite 24 Modalità di riscaldamento programmata 1. Cuando haya activado este modo, en el display parpadeará el símbolo para programar el lunes . Utiliz- zare i tasti direzionali per cambiare il giorno della settimana. 2. Utilice los botones de dirección para pasar de un día de la semana a otro. 3.
  • Seite 25: Limpieza Y Cuidado

    Seguro para niños 1. Para encender el radiador en modo standby con el seguro para niños activado, mantenga pulsado el botón Standby durante 10 segundos. 2. Con el radiador en funcionamiento, el seguro para niños se activará automáticamente si durante 10 se- gundos no pulsa ningún botón.
  • Seite 26: Données Techniques

    é viter d’ é ventuels dommages. Nous ne saurions être tenus pour res- ponsables des dommages dus au non-respect des consignes et à la mauvaise utilisation de l’ a ppareil. Données techniques Numéro d’ a rticle 10006588, 10011265 10006589 Alimentation électrique 230 V ~ 50 Hz...
  • Seite 27: Panneau De Commande

    Aperçu de l’ a ppareil 1 Verre décoratif 2 Affichage LED 3 Panneau de commande 4 Interrupteur marche/arrêt 5 Pied de support 6 Fixation murale Affichage Panneau de commande Touche de veille : Allu- Réglage de la tempéra- Augmenter la valeur mer/éteindre l’...
  • Seite 28 Montage Pose libre 1. Fixer les deux pieds de support au bas de l’ a ppareil à l’ a ide des deux vis fournies. 2. Installer le chauffage sur une surface plane. Accrochage au mur Choix d’un emplacement adapté En France, l’ a ppareil doit être monté selon la norme NFC 15-100.
  • Seite 29: Mise En Marche Et Utilisation

    Mise en marche et utilisation Marche/arrêt 1. Mettre l’interrupteur marche/arrêt (4) sur la position « I ». 2. Appuyer sur la touche de veille pour quitter le mode veille. L’ a ffichage indique à présent la température ambiante actuelle ainsi que l’heure (standard 12:00). Appuyer à nouveau sur la touche permet de refaire basculer l’...
  • Seite 30 Mode de chauffage hebdomadaire programmé 1. Une fois que l’ a ppareil est dans ce mode, le symbole indiquant lundi . s’ a ffiche en clignotant. Utiliser les touches fléchées pour modifier le jour de la semaine. 2. Appuyer sur « PROG » pour confirmer. 3.
  • Seite 31: Nettoyage Et Entretien

    Sécurité enfant 1. Pour mettre le chauffage en mode veille avec sécurité enfant, appuyer sur la touche veille et la maintenir enfoncée pendant 10 secondes. 2. Lors du fonctionnement de l’ a ppareil, la sécurité enfant s’ a ctive automatiquement si aucune touche n’ e st enclenchée pendant 10 secondes.

Diese Anleitung auch für:

1000658910011265

Inhaltsverzeichnis