Herunterladen Diese Seite drucken
Vorschau ausblenden Andere Handbücher für KeContact P20:

Werbung

Verfügbare Sprachen
  • DE

Verfügbare Sprachen

  • DEUTSCH, seite 5
KeContact P20/P30
Standsäule –
Installationsanleitung
Floor-mounted column –
Installation guide
Colonne –
Notice d'installation
Instrucciones de instalación
del poste
Colonnina portante –
Istruzioni per l'installazione
Standzuil – Installatiehand-
leiding
Coluna vertical –
Instruções de instalação
安装架
安装说明书
-
スタンドサポート – 設置説明書
© KEBA 2012-2016
Specifications are subject to change due to ongoing technical development. Errors and
omissions excepted. All rights reserved.
All intellectual property, including trademarks and copyrights, is the property of the respecti-
ve owner. Any unauthorized use of such intellectual property is expressly forbidden.
KEBA AG, Postfach 111, Gewerbepark Urfahr, A-4041 Linz
KeContact P20/P30 - Floor-mounted column, v3.00, #90333
Deutsch
(5)
English
(11)
Français
(17)
Español
(23)
Italiano
(29)
Nederlands
(35)
Português
(41)
中文
(47)
日本語
(53)

Werbung

loading

Inhaltszusammenfassung für Keba KeContact P20

  • Seite 1 All intellectual property, including trademarks and copyrights, is the property of the respecti- ve owner. Any unauthorized use of such intellectual property is expressly forbidden. KEBA AG, Postfach 111, Gewerbepark Urfahr, A-4041 Linz KeContact P20/P30 - Floor-mounted column, v3.00, #90333...
  • Seite 2 KeContact P20/P30 - Floor-mounted column, v3.00, #90333 © KEBA 2012-2016...
  • Seite 3 KeContact P20/P30 - Floor-mounted column, v3.00, #90333 © KEBA 2012-2016...
  • Seite 4 KeContact P20/P30 - Floor-mounted column, v3.00, #90333 © KEBA 2012-2016...
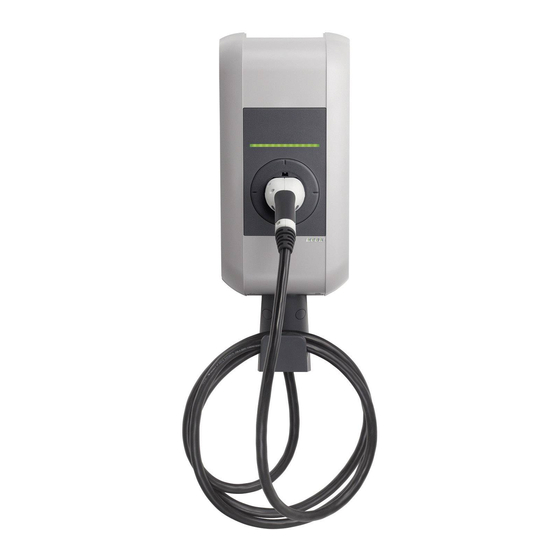
  • Seite 5 Anschluss der Stromladestation müssen beachtet werden! Bestimmungsgemäßer Gebrauch Alternativ zur Montage der KeContact P20/P30 Stromladestation auf einer Wand, steht eine Standsäule zur freistehenden Montage im Innen- oder Außenbereich zur Verfügung. Je nach Ausführung und Anzahl der Stromladestationen muss eine unterschiedliche Anzahl von Anschlusskabel und Leerrohre im Betonfundament berücksichtigt werden.
  • Seite 6 Die Standsäule V2 ist für die Montage von zwei KeContact P20/P30 Stromladestationen auf der Standsäule geeignet. Standsäule V3 Die Standsäule V3 ist für die Montage von zwei KeContact P20/P30 Stromladestationen auf der Standsäule geeignet. KeContact P20/P30 - Floor-mounted column, v3.00, #90333 © KEBA 2012-2016...
  • Seite 7: Anforderungen An Den Standort

    Standsäule dürfen nicht offen bleiben. Anforderungen an den Standort Allgemeines: · Alle Standortanforderungen für die Stromladestation aus dem „KeContact P20/P30 Installationshandbuch“ müssen beachtet werden! · Bei der Montage der Standsäule auf Parkplätzen oder in Tiefgaragen ist bauseits ein geeigneter Anfahrschutz vorzusehen.
  • Seite 8: Verankerung Am Boden

    Lieferumfang) so weit ein, dass sie mit dem Boden eben abschließen. Hilti HSD-G Hand-Setzwerkzeug. Quelle: Fa. Hilti Beachten Sie auch die folgende Anleitung: Anleitung zum Setzen der Dübel. Quelle: Fa. Hilti KeContact P20/P30 - Floor-mounted column, v3.00, #90333 © KEBA 2012-2016...
  • Seite 9 Positionieren Sie die Standsäule über dem Kabelauslass. ► Verankern Sie die Standsäule mit den 6 Sechskantschrauben am Fundament. Verankerung Erdung ► Schließen Sie (falls erforderlich) die Erdung am Erdungspunkt der Standsäule Erdungspunkt KeContact P20/P30 - Floor-mounted column, v3.00, #90333 © KEBA 2012-2016...
  • Seite 10 Installationshandbuch“ durch. Beispiel Standsäule V2 Halterung für Ladekabel montieren (Option) ► Montieren Sie die Halterung für das Ladekabel unterhalb der Stromladestation mit zwei Schrauben [A] an der Standsäule. Halterung für Ladekabel KeContact P20/P30 - Floor-mounted column, v3.00, #90333 © KEBA 2012-2016...
  • Seite 11 WARNING! Not observing the safety instructions can result in risk of death, injuries and dam- age to the device! KEBA AG assumes no liability for claims resulting from this! Electrical hazard! The installation, commissioning and maintenance of the charging station may...
  • Seite 12 KeContact P20/P30 charging stations on the column. V3 floor-mounted column The V3 floor-mounted column is designed for the installation of two KeContact P20/P30 charging stations on the column. KeContact P20/P30 - Floor-mounted column, v3.00, #90333 © KEBA 2012-2016...
  • Seite 13: Location Requirements

    Location requirements General: · All of the location requirements for the charging station in the "KeContact P20/P30 Installation manual" must be adhered to! · When mounting the floor-mounted columns in parking spaces or parking garages, appro- priate anti-collision protection must be provided by the customer.
  • Seite 14 Hilti HSD-G manual setting tool. Source: Hilti Please also observe the following instructions: Instructions on inserting the dowels. Source: Hilti KeContact P20/P30 - Floor-mounted column, v3.00, #90333 © KEBA 2012-2016...
  • Seite 15 Position the column directly over the cable outlet. ► Anchor the column to the foundation using the 6 hexagon bolts. Anchoring Grounding ► If necessary, connect the earthing to the column's grounding point. Grounding point KeContact P20/P30 - Floor-mounted column, v3.00, #90333 © KEBA 2012-2016...
  • Seite 16 Mount the holder for the charging cable (option) ► Mount the holder for the charging cable on the floor-mounted column below the charging station using two screws [A]. Holder for charging cable KeContact P20/P30 - Floor-mounted column, v3.00, #90333 © KEBA 2012-2016...
  • Seite 17 ! Utilisation conforme L'alternative au montage mural de la station de recharge KeContact P20/P30 est le montage isolé sur colonne à l'intérieur ou à l'extérieur. Selon le modèle et le nombre de stations de recharge, le nombre de câbles de raccordement et de gaines dans la fondation en béton varie.
  • Seite 18 Colonne V2 La colonne V2 convient au montage de deux stations de recharge KeContact P20/P30. Colonne V3 La colonne V3 convient au montage de deux stations de recharge KeContact P20/P30. KeContact P20/P30 - Floor-mounted column, v3.00, #90333 © KEBA 2012-2016...
  • Seite 19 Généralités · Respecter toutes les exigences relatives au site pour la station de recharge qui figurent dans le "Manuel d'installation KeContact P20/P30" ! · Si la colonne est installée dans un parking ou dans un garage souterrain, prévoir une protection contre les collisions adaptée.
  • Seite 20: Ancrage Au Sol

    Outil de pose manuel Hilti HSD-G. Source : Sté Hilti Respectez également les instructions suivantes : Instructions pour la pose des chevilles. Source : Sté Hilti KeContact P20/P30 - Floor-mounted column, v3.00, #90333 © KEBA 2012-2016...
  • Seite 21 ► Fixez la colonne à la fondation avec les 6 vis hexagonales. Ancrage Masse ► Raccordez (au besoin) la masse au point de masse de la colonne. Point de masse KeContact P20/P30 - Floor-mounted column, v3.00, #90333 © KEBA 2012-2016...
  • Seite 22 Support pour câble de recharge (option) ► Montez le support du câble de recharge sur la colonne sous la station de recharge à l'aide de deux vis [A]. Support pour câble de recharge KeContact P20/P30 - Floor-mounted column, v3.00, #90333 © KEBA 2012-2016...
  • Seite 23 Uso conforme a lo previsto Como alternativa al montaje de la estación de carga eléctrica KeContact P20/P30 en una pared, también hay disponible un poste para el montaje independiente en interiores o exte- riores.
  • Seite 24: Visión General

    El poste V2 está diseñado para montar dos estaciones de carga eléctrica KeContact P20/P30. Poste V3 El poste V3 está diseñado para montar dos estaciones de carga eléctrica KeContact P20/P30. KeContact P20/P30 - Floor-mounted column, v3.00, #90333 © KEBA 2012-2016...
  • Seite 25: Requisitos Del Emplazamiento

    (p.ej. con una manguera de protección). Esta manguera de pro- tección debe sobresalir aprox. 25 cm de la base de hormigón. · ¡No está permitido instalar el poste en asfalto! KeContact P20/P30 - Floor-mounted column, v3.00, #90333 © KEBA 2012-2016...
  • Seite 26 (no incluida en el volumen de suministro) hasta que estén a ras con el suelo. Herramienta de inserción manual Hilti HSD-G. Proveedor: Hilti Tenga en cuenta también las instrucciones siguientes: Instrucciones de colocación de los tacos. Proveedor: Hilti KeContact P20/P30 - Floor-mounted column, v3.00, #90333 © KEBA 2012-2016...
  • Seite 27 6 tonillos hexagonales. Anclaje Puesta a tierra ► Si fuera necesario, conecte la puesta a tierra al punto de puesta a tierra del poste. Punto de puesta a tierra KeContact P20/P30 - Floor-mounted column, v3.00, #90333 © KEBA 2012-2016...
  • Seite 28 Montaje del soporte del cable de carga (opción) ► Monte el soporte del cable de carga en el poste, debajo de la estación de carga eléctrica, con dos tornillos [A]. Soporte para el cable de carga KeContact P20/P30 - Floor-mounted column, v3.00, #90333 © KEBA 2012-2016...
  • Seite 29 Uso previsto In alternativa al montaggio della stazione di rifornimento elettrico KeContact P20/P30 a pare- te, è disponibile anche una colonnina portante per il montaggio indipendente in ambienti in- terni o esterni.
  • Seite 30 La colonnina V2 è adatta per il montaggio di due stazioni di rifornimento elettrico KeCon- tact P20/P30. Colonnina portante V3 La colonnina V3 è adatta per il montaggio di due stazioni di rifornimento elettrico KeCon- tact P20/P30. KeContact P20/P30 - Floor-mounted column, v3.00, #90333 © KEBA 2012-2016...
  • Seite 31 Informazioni generali: · Tutti i requisiti per il luogo d'installazione della stazione di rifornimento elettrico riportati nel "Manuale di installazione KeContact P20/P30" devono essere osserva- · Per il montaggio della colonnina portante in parcheggi o garage sotterranei, il committen- te deve prevedere una protezione anticollisione adeguata.
  • Seite 32 Attrezzo a espansione manuale HSD-G Hilti. Fonte: Ditta Hilti Osservare anche le seguenti istruzioni: Istruzioni per l'inserimento dei tasselli. Fonte: Ditta Hilti KeContact P20/P30 - Floor-mounted column, v3.00, #90333 © KEBA 2012-2016...
  • Seite 33 6 viti a testa esagonale. Ancoraggio Messa a terra ► Collegare (se necessario) la messa a terra al punto di messa a terra della colonnina. Punto di messa a terra KeContact P20/P30 - Floor-mounted column, v3.00, #90333 © KEBA 2012-2016...
  • Seite 34 Montaggio del supporto per cavo di carica (opzione) ► Montare il supporto per il cavo di carica al di sotto della stazione di rifornimento elettrico sulla colonnina mediante due viti [A]. Supporto per cavo di carica KeContact P20/P30 - Floor-mounted column, v3.00, #90333 © KEBA 2012-2016...
  • Seite 35 Beoogd gebruik Als alternatief voor de montage van het KeContact P20/P30-stroomlaadstation aan een muur is een standzuil beschikbaar voor de vrijstaande montage binnen of buiten. Afhankelijk van de uitvoering en het aantal stroomlaadstations moet rekening worden gehouden met een verschillend aantal aansluitkabels en lege buizen in de betonfundering.
  • Seite 36 De standzuil V2 is geschikt voor het monteren van twee KeContact P20/P30- stroomlaadstations op de standzuil. Standzuil V3 De standzuil V3 is geschikt voor het monteren van twee KeContact P20/P30- stroomlaadstations op de standzuil. KeContact P20/P30 - Floor-mounted column, v3.00, #90333 © KEBA 2012-2016...
  • Seite 37: Eisen Aan De Opstelplaats

    (bijvoorbeeld met een beschermslang). De beschermslang moet een uitstekende lengte van ca. 25 cm boven de betonfundering hebben. · Het is niet toegestaan om de standzuil op asfalt op te stellen! KeContact P20/P30 - Floor-mounted column, v3.00, #90333 © KEBA 2012-2016...
  • Seite 38 Sla de meegeleverde pluggen met de Hilti HSD-G-pluggentang (niet inbegrepen) zo ver erin, dat ze de bodem vlak afsluiten. Hilti HSD-G-pluggentang. Bron: Hilti Lees ook de volgende handleiding: Handleiding voor het plaatsen van pluggen. Bron: Hilti KeContact P20/P30 - Floor-mounted column, v3.00, #90333 © KEBA 2012-2016...
  • Seite 39 Plaats de standzuil boven de kabeluitlaat. ► Veranker de standzuil met de 6 zeskantbouten in de fundering. Verankering Aarding ► Sluit (indien nodig) de aarding aan op het aardingspunt van de standzuil. Aardingspunt KeContact P20/P30 - Floor-mounted column, v3.00, #90333 © KEBA 2012-2016...
  • Seite 40 “Installatiehandboek KeContact P20/P30”. Voorbeeld standzuil V2 Houder voor laadkabel monteren (optie) ► Monteer de houder voor de laadkabel met twee bouten [A] onder het stroomlaadstation aan de standzuil. Houder voor laadkabel KeContact P20/P30 - Floor-mounted column, v3.00, #90333 © KEBA 2012-2016...
  • Seite 41 Utilização deste manual Este manual de instalação destina-se exclusivamente a pessoa técnico qualificado Estas instruções são um suplemento do "Manual de instalação KeContact P20/P30" Devem ser cumpridas todas as indicações e instruções incluídas no manual relativas à seleção da localização, montagem e ligação da estação de carregamento elétrico! Utilização correcta...
  • Seite 42: Visão Geral

    KeContact P20/P30 na coluna vertical. Coluna vertical V3 A coluna vertical V3 é adequada para a montagem de duas estações de carregamento elétrico KeContact P20/P30 na coluna vertical. KeContact P20/P30 - Floor-mounted column, v3.00, #90333 © KEBA 2012-2016...
  • Seite 43 Geral: · Devem ser tidos em consideração todos os requisitos da localização para a estação de carregamento elétrico do "Manual de instalação KeContact P20/P30"! · Em caso de montagem da coluna vertical em parques de estacionamentos ou em garagens subterrâneas devem ser instalados protetores anti-colisão no local.
  • Seite 44 Hilti HSD-G (não incluída no âmbito de entrega), até ficar encostada de forma alinhada com o piso. Ferramenta de engaste manual Hilti HSD-G Fonte: Empresa Hilti Tenha em atenção as seguintes instruções: Instruções sobre a colocação das buchas. Fonte: Empresa Hilti KeContact P20/P30 - Floor-mounted column, v3.00, #90333 © KEBA 2012-2016...
  • Seite 45 Fixação Ligação à terra ► Ligue (se necessário) a ligação à terra ao ponto de ligação à terra da coluna vertical. Ponto de ligação à terra KeContact P20/P30 - Floor-mounted column, v3.00, #90333 © KEBA 2012-2016...
  • Seite 46 (opcional) ► Monte o suporte para o cabo de carregamento sob a estação de carregamento elétrico com dois parafusos [A] na coluna vertical. Suporte para o cabo de carregamento KeContact P20/P30 - Floor-mounted column, v3.00, #90333 © KEBA 2012-2016...
  • Seite 47 电气危险! 仅限经过相关培训、具备资质并经过授权的电气专业人员负责安装、首次调试及维护 充电站,其在执行前述作业时应遵守现有标准及安装规定。 务请遵循涉及安装位置选择和建筑物前提条件的各项指标! 如果未能采取相应预防措施,违背安装位置指标则可能导致死亡、重伤或财产损失! 本手册的用途 本安装手册仅供具备相关资质的人员使用 。 本说明书用于补充说明《KeContact P20/P30 安装手册》。务必遵守本手册中提及的与安装位 置选择、安装,以及充电站接口相关的提示和说明! 规定用途 本安装架可在室内或室外区域进行独立安装,并可替代在墙面上安装 KeContact P20/P30 充电 站。 必须根据充电站的设计和数量考虑连接电缆和混凝土地基中空管道的不同数量。 如果安装配备插入式电源线的充电站(例如,用于展示目的),则电源线应配备充分的应力消 除及边缘保护。 安装安装架时,应遵守各个国家的规定。 重量(不包括充电站): 15,0 kg (V1/V2) 19,2 kg (V3) 即,能够依据自身专业培训、知识和经验,以及对相关标准的了解评判所分配工作并能够辨别潜在危险的人员。 KeContact P20/P30 - Floor-mounted column, v3.00, #90333 © KEBA 2012-2016...
  • Seite 48 概述 V1 安装架 V1 安装架适用于将一台 KeContact P20/P30 充 电站安装在安装架上。 V2 安装架 V2 安装架适用于将两台 KeContact P20/P30 充 电站安装在安装架上。 V3 安装架 V3 安装架适用于将两台 KeContact P20/P30 充 电站安装在安装架上。 KeContact P20/P30 - Floor-mounted column, v3.00, #90333 © KEBA 2012-2016...
  • Seite 49 混凝土:C30/37 LP 用于 XC4、XD1、XF4 或 C25/30 LP 用于 XC4、XD1、XF2 钢筋:BSt 500 S;BSt 500 M · 基底必须能够排出渗入基座的水。 · 所有电缆必须精确位于混凝土地基中间并从底部将其引出,同时预留约 1.5 m 的余长以便 后续作业。 · 建造混凝土地基时,应采取适当的措施防止电缆受损(例如,使用保护软管)。保护软管 必须预留超出混凝土地基约 25 cm 的余长。 · 切勿将安装架置于沥青表面! KeContact P20/P30 - Floor-mounted column, v3.00, #90333 © KEBA 2012-2016...
  • Seite 50 Hilti HKD-ER M8x30 紧凑销钉规格。来源:Hilti 公司 钻孔作业 ► 借助安装架底板在混凝土地基上标记 6 个钻孔位置。 请确定连接电缆精确位于安装架的底板开口下方。 ► 钻出 6 个固定孔: 直径:10 mm 钻孔深度:33 mm ► 使用 Hilti HSD-G 手动安装工具(未包含在供货范围内)尽可能深地敲入随附的销钉, 以便完整封闭底部。 Hilti HSD-G 手动安装工具。来源:Hilti 公司 另请关注下列说明书: 销钉安装说明书。来源:Hilti 公司 KeContact P20/P30 - Floor-mounted column, v3.00, #90333 © KEBA 2012-2016...
  • Seite 51 提示 这 些 图 像是适用于所有版本。 穿电缆 ► 从底部将连接电缆穿过安装架并继续向上 直至穿过电缆开口。 安装架底部视图 锚固 ► 将安装架置于电缆出口上方。 ► 使用 6 枚六角螺栓将安装架锚固在地 基上。 锚固 接地 ► 将接地连接到安装架的接地点上 (如需要)。 接地点 KeContact P20/P30 - Floor-mounted column, v3.00, #90333 © KEBA 2012-2016...
  • Seite 52 拆除边缘保护 ► 安装充电站前,应首先拆除安装架电缆开 口上的边缘保护(参见图片)。 拆除边缘保护 安装充电站 ► 使用随附的螺栓将充电站安装在安装 架上。 连接和调试 ► 完成电气连接并根据《KeContact P20/P30 安装手册》中的说明执行调试。 V2 安装架示例 安装充电电缆支架(选配件) ► 使用安装架上的两枚螺栓 [A] 将充电电缆 支架安装在充电站下方。 充电电缆支架 KeContact P20/P30 - Floor-mounted column, v3.00, #90333 © KEBA 2012-2016...
  • Seite 53 本設置説明書は有資格者のみを対象としています 。 本説明書は「KeContact P20/P30 設置説明書」を補足するものです。本説明書に記載された 充電器の設置場所の選択、設置および接続に関するすべての注意事項および指示に従う必要 があります ! 規定に基づいた使用 KeContact P20/P30 充電器を壁に設置する以外に、屋内外に独立して設置するためのスタン ドサポートが用意されています。 充電器の施工および数に応じて、コンクリート基礎にさまざまな数の接続ケーブルおよびダ クトが必要になることを考慮する必要があります。 差込み式電源供給ケーブル付きの充電器を設置する場合 (デモンストレーション用など)、電 源供給ケーブルに関しては引っ張ることなく余裕を持って設置し、またエッジを保護する処 置を取ってください。 スタンドサポートの設置に関しては、各国の規定に従ってください。 重量 (充電器を含まず): 15,0 kg (V1/V2) 19,2 kg (V3) 関係する標準についての知識はもちろんのこと、特別な訓練によって、専門知識と経験をもつ人が実施された 作業を評価し、予期される危険を見積もることができます。 KeContact P20/P30 - Floor-mounted column, v3.00, #90333 © KEBA 2012-2016...
  • Seite 54 スタンドサポート V1 は、1 台 の KeContact P20/P30 充電器をスタンドサポートに設置する ためのものです。 スタンドサポート V2 スタンドサポート V2 は、2 台 の KeContact P20/P30 充電器をスタンドサポートに設置する ためのものです。 スタンドサポート V3 スタンドサポート V3 は、2 台 の KeContact P20/P30 充電器をスタンドサポートに設置する ためのものです。 KeContact P20/P30 - Floor-mounted column, v3.00, #90333 © KEBA 2012-2016...
  • Seite 55 コンクリート:XC4、XD1、XF4 用 C30/37 LP または XC4、XD1、XF2 用 C25/30 LP コンクリート鋼:BSt 500 S;BSt 500 M · 底部は土台に流れ込む水を排出できる構造である必要があります。 · すべてのケーブルは底部からコンクリート基礎のちょうど中央に通じ、作業スペースと して、約 1.5 m の余剰部分を残している必要があります。 · コンクリート基礎を構築する際は、ケーブルを適切な方法 (ケーブルプロテクターなど) で損傷から保護してください。ケーブルプロテクターはコンクリート基礎の上部から約 25 cm の余剰部分を残している必要があります。 · スタンドサポートをアスファルトの上に設置することは認められません ! KeContact P20/P30 - Floor-mounted column, v3.00, #90333 © KEBA 2012-2016...
  • Seite 56 コンパクトアンカー Hilti HKD-ER M8x30 の仕様。出典:Hilti 社 穴開け ► スタンドサポートのフロアプレートで、コンクリート基礎に 6 つの穴の印を付けます。 接続ケーブルがスタンドサポートのフロアプレートの開口部のちょうど下部にくるよ うにします。 ► 6 つの固定穴を開けます: 直径:10 mm 穴深さ:33 mm ► 同梱のアンカーを Hilti HSD-G ハンドセッティングツール (同梱されていません) で、 基礎にちょうど埋め込まれるまで打ち込みます。 Hilti HSD-G ハンドセッティングツール。出典:Hilti 社 以下の手引きにも注意してください: アンカーをセッティングするための手引き。出典:Hilti 社 KeContact P20/P30 - Floor-mounted column, v3.00, #90333 © KEBA 2012-2016...
  • Seite 57 日本語 ヒント 画像は、すべてのバージョンのために有効です。 ケーブルを通す ► 接続ケーブルを下からスタンドサポート を通して上方のケーブル開口部へ通しま す。 下から見たスタンドサポート 固定 ► スタンドサポートをケーブルの出ている 上部に位置決めします。 ► スタンドサポートを 6 本の六角ボルトで 基礎に固定します。 固定 アース ► (必要な場合は) スタンドサポートのアー スポイントにアースを接続します。 アース端子 KeContact P20/P30 - Floor-mounted column, v3.00, #90333 © KEBA 2012-2016...
  • Seite 58 ► 充電器を設置する直前に、スタンドサポ ートのケーブル開口部のエッジ保護を取 り外します (図を参照)。 エッジ保護の取り外し 充電器の設置 ► 充電器を同梱のボルトでスタンドサポー トに設置します。 接続および立ち上げ ► 「KeContact P20/P30 設置説明書」の手 引きに従って、電気的接続および立ち上 げを行います。 例:スタンドサポート V2 充電ケーブル掛けの設置 (オプション) ► 充電器下部の充電ケーブル掛けを 2 本の ボルト [A] でスタンドサポートに設置し ます。 充電ケーブル掛け KeContact P20/P30 - Floor-mounted column, v3.00, #90333 © KEBA 2012-2016...
  • Seite 59 ________________________________________________________________________ ________________________________________________________________________ ________________________________________________________________________ ________________________________________________________________________ ________________________________________________________________________ ________________________________________________________________________ ________________________________________________________________________ ________________________________________________________________________ ________________________________________________________________________ ________________________________________________________________________ ________________________________________________________________________ ________________________________________________________________________ ________________________________________________________________________ ________________________________________________________________________ ________________________________________________________________________ ________________________________________________________________________ ________________________________________________________________________ ________________________________________________________________________ ________________________________________________________________________ ________________________________________________________________________ ________________________________________________________________________ ________________________________________________________________________ ________________________________________________________________________ ________________________________________________________________________...

Diese Anleitung auch für:

Kecontact p30