Herunterladen Inhalt Inhalt Diese Seite drucken
Inhaltsverzeichnis

Werbung

Verfügbare Sprachen

Verfügbare Sprachen

VV Micro
Betriebsanleitung
Instruction manual
Mode d'Emploi

Werbung

Inhaltsverzeichnis
loading

Inhaltszusammenfassung für Heidolph VV micro

  • Seite 1 VV Micro Betriebsanleitung Instruction manual Mode d’Emploi...
  • Seite 2 DEUTSCH Seite 3 - 17 ENGLISH page 18 - 31 FRANCAISE page 32 - 47...
  • Seite 3: Inhaltsverzeichnis

    Wir danken Ihnen für den Kauf dieses Gerätes. Sie haben ein Produkt erworben, das von der Firma Heidolph Instruments nach DIN EN ISO 61010 gefertigt und geprüft wurde. Mit diesem Gerät werden Sie Ihre Arbeit einwandfrei und problemlos durchführen können.
  • Seite 4: Lieferumfang Und Zubehör

    LIEFERUMFANG UND ZUBEHÖR Bestellnummer Bestellnummer Bezeichnung Menge 230/240V 50/60Hz 115V 50/60Hz Heizbad VV-Micro 511-10400-00 511-10400-07 Antrieb VV-Micro 511-10300-00 511-10300-02 Glassatz V-Micro 513-10000-00 513-10000-00 Lose Teile: Verschraubung bearb. 23-09-03-01-01 23-09-03-01-01 Spannfeder 22-03-02-01-03 22-03-02-01-03 11/12 Dichtung kpl. 16 PTFE VV-micro 515-01000-00 515-01000-00 Haltestange 24-03-07-01-02 24-03-07-01-02...
  • Seite 5: Sicherheitshinweise

    Badflüssigkeit nicht berühren. Zum Wechsel des Verdampferkolbens geeigneten Wärmeschutzhandschuh benutzen. Heizbad nie ohne Flüssigkeit betreiben. Reparaturen dürfen nur von einem von Heidolph Instruments autorisierten Fachmann ausgeführt werden. Bitte achten Sie auf sicheren Stand des Gerätes! Den Rotationsverdampfer auf einer glatten, horizontalen Tischfläche aufstellen.
  • Seite 6: Aufbau

    AUFBAU Vor dem Aufbau beachten Sie bitte die allgemeinen Informationen und Sicherheitshinweise!
  • Seite 7: Ntrieb

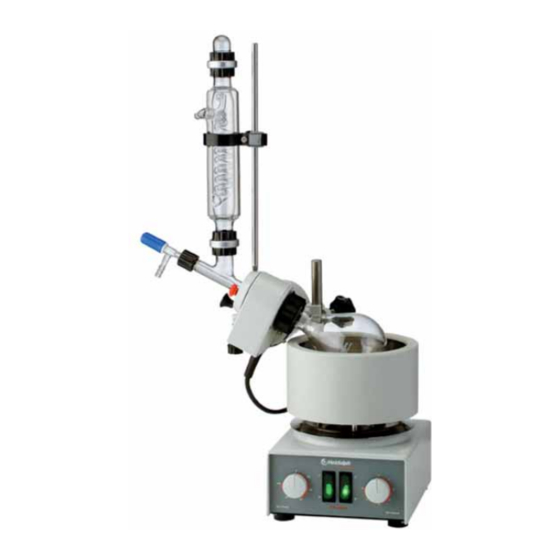
    Antrieb Antrieb mit Klemmring (4) an der Haltestange (1) befestigen. Die schwarze Überwurfmutter (9) muß nach innen in Richtung des Heizbades (2) weisen und das elektrische Anschlußkabel (6) muß nach unten führen. Den Klemmring (4) einschließlich der Antriebseinheit durch Festziehen des Sterngriffes (5) an der Haltestange (1) befestigen.
  • Seite 8: Inleitungsrohr

    (H) auf das Dampfdurchführungsrohr (A) schrauben. Roter Sicherungsknopf (14) muß festgezogen sein, damit Kühler und Haltestange abgesichert sind. Einleitungsrohr Die Lochschraubkappe (l) und die Dichtung (l1) auf das Einleitungsrohr (K) setzen. Danach das Einleitungsrohr in das offene Ende des Dampfdurchführungsrohrs (A) einsetzen und die Lochschraubkappe (l) festziehen.
  • Seite 9: Ühlwasser - Und Vakuumanschlüsse

    Kühlwasser- und Vakuumanschlüsse Kühlwasseranschlüsse (H2) und Vakuumanschluß (H1) seitlich am Kühler anschließen und durch Schlauchschellen sichern (nicht im Lieferumfang enthalten). Teileliste Glassatz V Micro Bestell-Nr.: Pos. Bestellbezeichnung Stück 514-40000-00 Dampfdurchführungsrohr mit Auflagering 514-72100-00 Verdampferkolben 250 ml 514-71100-00 Verdampferkolben 100 ml 514-70100-00 Verdampferkolben 50 ml 514-33000-00...
  • Seite 10 Schlauchstück (di ~ 6 mm) verbinden. Das Schlauchende in den Lösungsmittelbehälter geben. Mit dem Ventil (K1) kann die gewünschte Menge dosiert werden. Der VV Micro kann während des Betriebes von Rückflußdestillation auf Abdestillation umgestellt werden. Achtung: Vor Destillationsbeginn einen ausreichend großen Auffangkolben einsetzen. Zur Umstellung Sicherungsknopf (14) lösen, Halteknopf (13) herausziehen und den Kühler um...
  • Seite 11: Hinweise Zu Destillationseinstellungen

    Bitte vor einem ersten Laboreinsatz eine allgemeine Funktionsprüfung von Schaltern, Drehknöpfen, Antrieb usw. durchführen. HINWEISE ZU DESTILLATIONSEINSTELLUNGEN Bei der Verwendung eines Rotationsverdampfers zur thermischen Stofftrennung sollten verschiedene Punkte beachtet werden, um bestmögliche Destillationsergebnisse zu erzielen. Für eine optimale Einstellung müssen folgende Parameter berücksichtigt werden: 10.
  • Seite 12 13.2. bei Siedetemperaturen ungleich 40°C 1. Auf der Temperaturachse des Nomogramms wird der gewünschte Siedepunkt markiert. 2. Durch ziehen einer Linie nach rechts wird der Schnittpunkt mit der Lösungsmittel- Geraden ermittelt. 3. Von diesem Schnittpunkt senkrecht nach unten kann das notwendige Vakuum abgelesen werden.
  • Seite 13 Vacuum für ΔH Summen- Sdp. Lösungsmittel Sdp bei 40°C formel [g/mol] [°C] [J/g] [mbar] Aceton 58,08 56,5 Acetonitril C2H3N 41,05 81,8 Benzol 78,11 80,1 n-Butanol (Butylalkohol) 74,12 117,5 tert.-Butanol (tert.-Butylalkohol) 74,12 82,9 2-Butanon (Methylethylketon) 72,11 79,6 tert.-Butylmethylether 88,15 55,0 Chlorbenzol 112,60 132,2 Cyclohexan...
  • Seite 14: Reinigung Und Wartung

    Montage von Dampfdurchführung und Dichtung PTFE siehe Kapitel 2. Das Gerät ist wartungsfrei. Eine eventuell notwendige Reparatur ist unbedingt von einem durch Heidolph autorisierten Fachmann auszuführen. Wenden Sie sich hierzu an Ihren HEIDOLPH-Händler bzw. an die HEIDOLPH-Vertretung. ABBAU, TRANSPORT UND LAGERUNG Abbau Gerät abschalten und Netzstecker aus der Steckdose ziehen (abkühlen lassen).
  • Seite 15: Störungen Und Deren Beseitigung

    STÖRUNGEN UND DEREN BESEITIGUNG Keine Heizfunktion: Netzleitung überprüfen Kapillarrohrregler defekt Schalter ein/aus defekt Rohrheizkörper defekt Antrieb dreht nicht: Steckdose führt keinen Strom Netzleitung und Verbindungskabel zum Basisgerät überprüfen Einstellpotentiometer defekt Schalter ein/aus defekt zu niedrige Drehzahl eingestellt schwarze Überwurfmutter wurde zu stark angezogen Motor defekt Motorkondensator defekt Kein ausreichendes Vakuum:...
  • Seite 16: Garantie, Haftung Und Urheberrechte

    Im Falle eines Garantieanspruchs benachrichtigen Sie bitte Heidolph Instruments (Tel.: (+49) 9122 - 9920-69) oder Ihren Heidolph Instruments Händler. Wenn es sich um einen Material- oder Herstellungsfehler handelt, wird Ihnen im Rahmen der Garantie das Gerät kostenfrei repariert oder ersetzt.
  • Seite 17: Ce-Konformitätserklärung

    Sicherheitshinweis Bitte sorgen Sie bei der Anlieferung von Reparaturgeräten, die mit gefährlichen Arbeitsstoffen in Berührung gekommen sind für: Möglichst genaue Stoffangaben des entsprechenden Mediums Schutzmassnahmen zum sicheren Umgang für unser Annahme- und Wartungspersonal. Kennzeichnung der Verpackung gemäss der Gefahrenstoffverordng CE-KONFORMITÄTSERKLÄRUNG Wir erklären, dass dieses Produkt mit folgenden Normen und normativen Dokumenten übereinstimmt: EMV-Richtlinie:...
  • Seite 18: Summary

    Thank you for purchasing a Heidolph Instruments product. This item has been designed, made and inspected in compliance with DIN EN ISO 61010 for long performance and continuous operation. SUMMARY SUMMARY ........................18 STANDARD ITEM PLUS OPTIONS .................19 GENERAL .........................19 SAFETY INFORMATION ....................20 SET-UP..........................21...
  • Seite 19: Standard Item Plus Options

    STANDARD ITEM PLUS OPTIONS Order number Order number Item Description 230/240V 50/60Hz 115V 50/60Hz Heating bath VV-Micro 511-10400-00 511-10400-07 Drive VV-Micro 511-10300-00 511-10300-02 Glass set V-Micro 513-10000-00 513-10000-00 loose parts: Screw collar 23-09-03-01-01 23-09-03-01-01 Spring tension ring 22-03-02-01-03 22-03-02-01-03 11/12 PTFE seal 16 VV-micro 515-01000-00 515-01000-00 Support rod 7mm...
  • Seite 20: Safety Information

    Use gloves when replacing evaporator flask. Never run hot bath dry. Repair work is limited to skilled personnel so authorized by Heidolph. Your item needs a solid stand. Locate the rotary evaporator on a smooth, horizontal table. Make sure not to obstruct area around evaporator.
  • Seite 21: Set-Up

    SET-UP Please read the sections „General Information" and „Safety Instructions" before you assemble the appliance.
  • Seite 22: Drive Unit

    Drive unit Mount the drive on the support rod (1) with the clamping ring (4). The black screw collar (9) must face inwards towards the heating bath and the electric power cable (6) must point down. Secure the clamping ring (4) with the drive unit by tightening the star grip (5) on the support rod (1).
  • Seite 23: Nlet Tube

    lnlet tube Place the screw connection cap (I) and the seal (I1) on the inlet tube (K). Then insert the inlet tube in the open end of the vapor tube and tighten the screw connection cap (I). Inlet valve is made of PTFE, please do not grease. Collection flask Screw the butt flange (G) on the open end of the condenser (H) and screw the sealing ring (G1) and the collection flask (L, M, N) or vacuum cap (0) on the other end of the...
  • Seite 24: Part List Glass Set V-Micro

    Part list Glass set V-Micro Order number Item Description 514-40000-00 Vapor tube with Support ring 514-72100-00 Evaporation flask 250 ml 514-71100-00 Evaporation flask 100 ml 514-70100-00 Evaporation flask 50 ml 514-33000-00 Transition piece NS 14,5 514-45000-00 G + G1 Butt flange with Seal for butt flange 514-20000-00 Cooler K-micro 514-46000-00...
  • Seite 25: Information About Distillation Settings

    (dia 6 mm) and place the end of the tubing in the solvent container. Use the valve (K1) to regulate the required amount of solvent. You can switch over the VV Micro from reflux distillation to normal distillation while it is in operation. Important: Fit a large enough collection flask before beginning with the distillation.
  • Seite 26: Rotary Speed Of Evaporator Flask

    10. Rotary speed of evaporation flask Raise distillation speed by raising rotational speed. This methods cuts distillation time and protects the substances handled. 11. Temperature difference between hot bath and vapor This temperature difference should at least be 20 K to reach adequate distillation speed. If acceptable by thermal stability of the substances handled, you even may raise the temperature difference.
  • Seite 27 vacuum for molecular boil point ΔH boil point of solvents formula [g/mol] [°C] [J/g] 40°C [mbar] acetone 58,08 56,5 methyl cyanide C2H3N 41,05 81,8 benzol 78,11 80,1 n-butanol (butanol) 74,12 117,5 tert.-butanol (tert.-butanol) 74,12 82,9 2-butanon (methylene-etylene-ketone) 72,11 79,6 tert.-butylmethylether 88,15 55,0 chlorobenzol...
  • Seite 28: Cleaning And Maintenance

    PTFE seal, make reference to chapter 2. The item is maintenance-free. Repair work is limited to engineers authorized to do so by HEIDOLPH. So therefore get in touch with your local HEIDOLPH dealer or field respresentative.
  • Seite 29: Troubleshooting

    TROUBLESHOOTING The heater does not work: Check the power cable The capillary tube controller is defective The On/Off switch is defective The tubular heater is defective The drive does not rotate: No electricity at socket-outlet Check the power cable and the connecting cable to the main unit The setting potentiometer is defective The On/Off switch is defective The speed setting is too Iow...
  • Seite 30: Warranty, Liability & Copyright

    If any aspect of installation, operation or maintenance remains unanswered in the present Manual, please contact the following address: For repair services please call Heidolph Instruments (phone: +49 - 9122 - 9920-68) or your local, authorized Heidolph Instruments Dealer. Note...
  • Seite 31: Ce-Declaration Of Conformity

    Safety Information When shipping items for repair that may have been contaminated by hazardous substances, please: advise exact substance take proper protective measures to ensure the safety of our receiving and service personnel mark the pack IAW Hazardous Materials Act CE-DECLARATION OF CONFORMITY We herewith declare that the present product complies with the following standards and harmonized documents:...
  • Seite 32: Tables Des Matieres

    Nous vous remercions pour l'achat de cet appareil. Vous êtes en possession d'un produit qui a été fabriqué et contrôlé par la société Heidolph Instruments selon DIN EN ISO 61010. Vous pourrez, avec cet appareil, réaliser vos travaux à la perfection et sans problème.
  • Seite 33: Contenu De La Livraison Et Accessoires

    CONTENU DE LA LIVRAISON ET ACCESSOIRES Numéro de Numéro de Dénomination Nbre commande commande 230/240V 50/60Hz 115V 50/60Hz Bain-marie 511-10400-00 511-10400-07 Entraînement 511-10300-00 511-10300-02 Verrerie VV-Mikro 513-10000-00 513-10000-00 Pièces détachées: Ecrou-raccord 23-09-03-01-01 23-09-03-01-01 10Collier de serrage 22-03-02-01-03 22-03-02-01-03 11/12 Joint 16 PTFE VV-micro 515-01000-00 515-01000-00 Tige de fixation 7 mm...
  • Seite 34: Consignes De Securite

    N'utilisez jamais le bain chauffant sans liquide. Les réparations ne doivent être exécutées que par un spécialiste agréé par Heidolph Instruments. Veillez à ce que l'appareil soit bien stable ! Placez l'évaporateur rotatif sur une table lisse et horizontale. Veillez à ce que la distance de sécurité...
  • Seite 35: Structure

    STRUCTURE Avant le montage, veuillez respecter les informations générales et les consignes de sécurité !
  • Seite 36: Ntrainement

    Entraînement Fixer l'entraînement sur la tige de fixation (1) à l'aide de l'anneau de serrage. Placez l'écrou-raccord noir (9) vers l'intérieur, en direction du bain-marie (2) et faites en sorte que le câble de raccordement électrique (6) conduise vers le bas. Fixez l'anneau de serrage (4), y compris l'u-nité...
  • Seite 37: Obinet D ' Introduction

    vapeur (A) au moyen de la bride de raccordement bout à bout (G). Le bouton de sécurité rouge (14) doit être vissé à fond pour que le réfrigérant et la tige de fixation soient bien assurés. Robinet d'introduction Placez le bouchon fileté (I) et le joint (I1) sur le robinet d'introduction (K). Placez ensuite le robinet d'introduction à...
  • Seite 38: Accordements Eau De Refroidissement Et Vide

    Raccordements eau de refroidissement et vide Raccordez les raccordements d'eau de refro-idissement (H2) et le raccordement de vide (H1) latéralement sur le réfrigérant et assurez-les à l'aide de colliers de serrage (non compris dans l'étendue de la livraison). Verrerie V-Mikro Numéro de Dénomination Nbre...
  • Seite 39 (Ф int. 6 mm). Mettez l'extrémité du tuyau dans le réservoir à solvant. La quantité voulue peut être dosée à l'aide de la soupape (K1). Le VV Micro peut commuter, pendant son fonctionnement, du mode de distillation sous reflux à celui de séparation par distilla-tion. Attention: avant de commencer la distillation, placez une ballon récepteur suffisamment grand.
  • Seite 40: Remarques Sur Les Reglages De La Distillation

    Lorsque la distillation est terminée, soulever le ballon évaporateur hors du bain en desserrant la poignée-étoile (4 et/ou 5) et en déplaçant l'unité d'entraînement. Veuillez procéder à un examen général des interrupteurs, des boutons rotatifs, des entraînements etc. avant de mettre en service pour la première fois dans le laboratoire.
  • Seite 41 13.2. Pour les températures d'ébullition différentes de 40°C Le point d'ébullition souhaité est indiqué sur l'axe de température de l'abaque. Tirez une ligne vers la droite pour calculer le point d'intersection avec les droites de solvant. Le vide nécessaire est indiqué en bas à la verticale de ce point d'intersection. 13.3.
  • Seite 42 Formule Vide pour ΔH Sdp. Solvants brute Sdp à 40°C [g/mol] [°C] [J/g] formel [mbar] Acétone 58,08 56,5 Acétonitrile C2H3N 41,05 81,8 Benzène 78,11 80,1 Alcool butylique n 74,12 117,5 Alcool butylique tert. 74,12 82,9 Méthyle éthyle cétone 2 72,11 79,6 Ether de méthyle butylique tert.
  • Seite 43: Nettoyage Et Entretien

    PTFE, voir chapitre2. L'appareil ne nécessite aucun entretien. Toute réparation nécessaire doit impérativement être confiée à un spécialiste agréé par Heidolph. Pour cela, adressez-vous à votre vendeur HEIDOLPH ou à la représentation HEIDOLPH. DEMONTAGE, TRANSPORT ET ENTREPOSAGE Démontage...
  • Seite 44: Elimination

    ELIMINATION Veuillez éliminer les vieux appareils ou les pièces défectueuses comme il se doit, en les rapportant à un point de collecte. Veuillez également trier les vieux matériaux en séparant métal, verre, plastique etc.… Le matériel d'emballage doit également être éliminé conformément aux réglementations de protection de l'environnement (séparation des matériaux).
  • Seite 45: Caracteristiques Techniques

    GARANTIE, RESPONSABILITE ET DROITS DE REPRODUCTION Garantie La société Heidolph Instruments vous accorde une garantie de 3 ans sur les produits décrits dans le présent mode d'emploi (excepté verrerie et pièces d'usure), si vous vous régistrez avec la carte ci-joint ou par internet (www.heidolph.com). La garantie commence avec la date de régistration.
  • Seite 46: Questions / Reparations

    Dans le cas de réparations, veuillez auparavant prendre contact par téléphone avec la société Heidolph Instruments directement (tél. : +49 – 9122 - 9920-68) ou avec votre concessionnaire Heidolph Instruments agréé. Remarque Veuillez n'expédier des appareils qu'après avoir consulté...
  • Seite 47: Declaration De Conformite Ce

    DECLARATION DE CONFORMITE CE Nous déclarons que ce produit est conforme aux normes et aux documents normatifs suivants : Directive sur la compatibilité électromagnétique : EN 61326: 1997 + A1:1998 + A2:2001+ A3 2003 EN 61000-3-2: 2000 EN 61000-3-3: 1995 + 1997 + A1:2001 EN 61326: 1997 + A1:1998 + A2: 2001+ A3 2003 EN 61000-4-3:2002 +A1:2002 EN 61000-4-5:1995 +A1:2001...
  • Seite 48 01-005-001-58-2 21/08/2007 © HEIDOLPH INSTRUMENTS GMBH & CO KG Technische Änderungen sind ohne vorherige Ankündigung vorbehalten. We reserve the right to make technical changes without prior announcement. Sous réserve de modifications techniques sans avis préalable.

Inhaltsverzeichnis