Watercool HEATKILLER IV Montageanleitung
Vorschau ausblenden
Andere Handbücher für HEATKILLER IV:
- Montageanleitung (8 Seiten) ,
- Montageanleitung (4 Seiten) ,
- Montageanleitung (8 Seiten)
Inhaltsverzeichnis
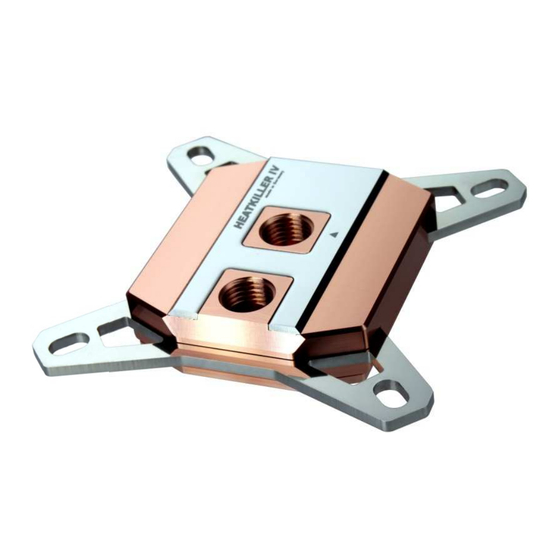
HEATKILLER® IV
Montageanleitung /
1
Assembly Instructions
1. Beschreibung
Die HEATKILLER® IV - Serie setzt neue
Maßstäbe im Bereich Leistung, Qualität und
Montagefreundlichkeit. Die Entwicklung der
neuen High-End Prozessorkühlerfamilie wurde
konsequent
auf
Generationen ausgerichtet.
Eine farbige Montageanleitung im PDF-
Format finden Sie im Servicebereich unserer
Homepage unter www.watercool.de
Die Installation erfolgt auf eigene Gefahr.
Das Nichtbeachten der Montageanleitung
kann das Produkt beschädigen. Die Firma
Watercool übernimmt keinerlei Haftung bei
Beschädigungen an der Hardware.
die
aktuellen
CPU-
1. Description
The HEATKILLER® IV Series sets new
standards in performance, quality and ease of
assembly. The development of the new high
end processor cooler family was consistently
aimed at the latest CPU generations.
Coloured
assembly
provided as a PDF-file in the service area of
our homepage. www.watercool.de
Installation is at your own risk. The
Watercool Company accepts no liability for
any damages caused to hardware and data. If
uncertain, hire a specialist to carry out the
modification or use our modification service.
instructions
are
Inhaltsverzeichnis

Verwandte Anleitungen für Watercool HEATKILLER IV


Inhaltszusammenfassung für Watercool HEATKILLER IV
- Seite 1 Die Installation erfolgt auf eigene Gefahr. Installation is at your own risk. The Das Nichtbeachten der Montageanleitung Watercool Company accepts no liability for kann das Produkt beschädigen. Die Firma any damages caused to hardware and data. If Watercool übernimmt keinerlei Haftung bei uncertain, hire a specialist to carry out the Beschädigungen an der Hardware.
-
Seite 2: Technische Daten / Technical Data
Wärmeleitpaste befreit werden. In case of a first time installation of the Vor Installation muss die CPU gleichmäßig mit HEATKILLER IV, you need to access the back einer Wärmeleitpaste versehen werden. of your mainboard (not Socket 2011). If your computer case doesn't provide an access,... - Seite 3 ausgebaut werden. Für weitere Montage- additional information vorgänge ist dies nicht mehr notwendig. disassembly of heat sink and mainboards in the corresponding manuals. Weitere Informationen zur Demontage des Kühlers, zur Demontage des Mainboards und zum Gehäuse entnehmen Sie bitte den jeweiligen Anleitungen.
- Seite 4 4. Informationen zum 4. Information on EasyMountSystem EasyMountSystem Watercool EasyMountSystem developed to provide very easy mounting and Watercool EasyMountSystem wurde accurate contact pressures, which are strictly entwickelt um eine kinderleichte Montage und defined by CPU manufacturers. definierte Anpressdrücke zu ermöglichen. Der...
- Seite 5 5. Installation on INTEL Socket 5. Montage auf INTEL Sockel 1150, 1150, 1151 1155, 1156 and 1366 1151 1155, 1156 und 1366 (w/o backplate) (ohne Backplate) Install all mounting parts according to the Montieren Sie alle Halterungsteile gemäß der following sketch. nachfolgenden Zeichnung.
- Seite 6 6. Installation on INTEL Socket 6. Montage auf INTEL Sockel 1150, 1150, 1151, 1155, 1156 and 1366 1151, 1155, 1156 und 1366 (with backplate) (mit Backplate) Install all mounting parts according to the Montieren Sie alle Halterungsteile gemäß der following sketch. nachfolgenden Zeichnung.
- Seite 7 7. Montage auf INTEL Sockel 2011, 7. Installation on INTEL Socket 2011, 2011-3 und 2066 2011-3 and 2066 Montieren Sie alle Halterungsteile gemäß der Install all mounting parts according to the nachfolgenden Zeichnung. following sketch. Achten Sie darauf, dass die korrekten Make sure to use the correct washers at Unterlegscheiben vorgegebenen...
- Seite 8 8. Montage auf INTEL Sockel 2011 8. Installation on INTEL Socket 2011 Narrow ILM und 2011-3 Narrow ILM Narrow ILM and 2011-3 Narrow ILM Montieren Sie alle Halterungsteile gemäß der Install all mounting parts according to the nachfolgenden Zeichnung. following sketch. Achten Sie darauf, dass die korrekten Make sure to use the correct washers at Unterlegscheiben...
- Seite 9 9. Montage auf AMD Sockel 939, 9. Installation on AMD Socket 939, 940, AM2, AM2+, AM3, AM3+, FM2 940, AM2, AM2+, AM3, AM3+, FM2 und FM2+ and FM2+ Montieren Sie alle Halterungsteile gemäß der Install all mounting parts according to the nachfolgenden Zeichnung.
-
Seite 10: Montage Auf Amd Sockel Am4
10. Montage auf AMD Sockel AM4 10. Installation on AMD Socket AM4 Montieren Sie alle Halterungsteile gemäß der Install all mounting parts according to the nachfolgenden Zeichnung. following sketch. Achten Sie darauf, dass die korrekten Make sure to use the correct washers at Unterlegscheiben vorgegebenen the determined positions. -
Seite 11: Allgemeine Hinweise
11. Allgemeine Hinweise 11. General information Die Kühler der HEATKILLER® IV – Serie The HEATKILLER® IV - series has defined haben einen definierten Ein- und Auslass. Der intakes and outlets. The intake is in the center Eingang befindet sich in der Mitte des Kühlers. of the cooler. -
Seite 12: Nachträgliche Umrüstung Auf Einen Anderen Sockel
12. Nachträgliche Umrüstung auf 12. Changing on a different socket einen anderen Sockel Your HEATKILLER® IV can be mounted on different sockets. Conversion kits can be Ihr HEATKILLER® IV kann nachträglich auf purchased separately. einen anderen Sockel umgerüstet werden. Dafür sind separate Umrüstkits erhältlich. In order to exchange the holders of the cooler, simply loosen the four screws on the bottom Das Lösen der Schrauben an der Unterseite...