Inhaltsverzeichnis
Werbung
Verfügbare Sprachen
Verfügbare Sprachen
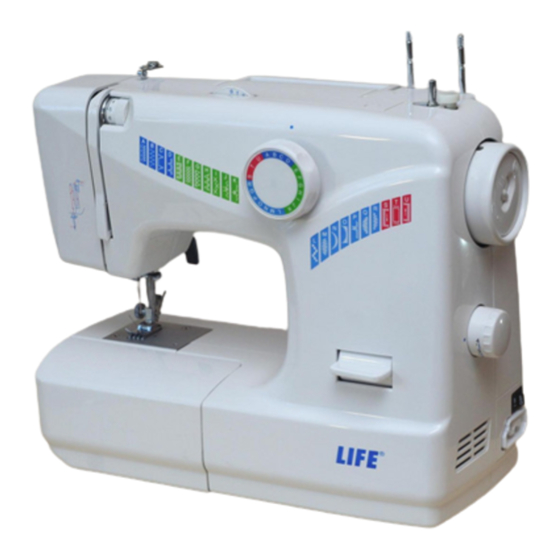
VISIÓN GENERAL
Componentes principales
Mecánica de coser
E-2
1) Alzador del hilo
2) Regulador de tensión del hilo superior
3) Guía del hilo superior
4) Regulador del ancho de la puntada
5) Asa de transporte abatible
6) Botón seleccionador de programa
7) Portacarretes de hilo extensibles
8) Husillo de la bobina
9) Tope de la bobina
10) Volante
11) Regulador de longitud de la puntada
12) Palanca para coser atrás
13) Interruptor principal (Motor y luz)
14) Caja del tomarcorriente para el reostato
15) Palanca del prensatelas (el dorso)
16) Brazo libre
17) Pie regulador
18) Tapa de la cápsula portacanilla
19) Placa de puntadas
20) Guía del hilo
21) Tapa frontal
22) Portaagujas
23) Tornillo del portaaguja
24) Guía del hilo del portaagujas
25) Aguja
26) Pata Prensatelas
27) Transportador de la tela
28) Tornillo del soporte del prensatelas
29) Soporte del prensatelas
30) Palanca del desenganche del prensatelas
Werbung
Kapitel
Inhaltsverzeichnis

Verwandte Anleitungen für Medion MD 11836


Inhaltszusammenfassung für Medion MD 11836
- Seite 1 VISIÓN GENERAL Componentes principales 1) Alzador del hilo 2) Regulador de tensión del hilo superior 3) Guía del hilo superior 4) Regulador del ancho de la puntada 5) Asa de transporte abatible 6) Botón seleccionador de programa 7) Portacarretes de hilo extensibles 8) Husillo de la bobina 9) Tope de la bobina 10) Volante...
-
Seite 2: Inhaltsverzeichnis
Í NDICE Advertencias de seguridad ......4 Aprenda a conocer su aparato ..... . . 6 Volumen de suministro . -
Seite 3: Advertencias De Seguridad
DVERTENCIAS DE SEGURIDAD Acerca de las presentes instrucciones ¡Antes de la primera puesta en funcionamiento lea detenidamente las presentes instruc- ciones de funcionamiento y ante todo observe las advertencias de seguridad! Todas las acciones en este aparato o con el mismo sólo se pueden realizar en la medida en que estén descritas en las presentes instrucciones de uso. -
Seite 4: Indicaciones Básicas
Si el cable de conexión está dañado, el fabricante o su servicio de postventa, o una persona similarmente cualificada, deberá sustitu- irlo a fin de evitar accidentes. Indicaciones básicas ¡No se debe mojar la máquina de coser, existe el peligro de recibir una descarga eléctrica! No deje la máquina de coser encendida sin vigilancia. -
Seite 5: Aprenda A Conocer Su Aparato
PRENDA A CONOCER SU APARATO Volumen de suministro Cuando desembale la caja, asegúrese de que están incluidos los si- guientes artículos: 1)Máquina de coser 2)Base plana desmontable con caja de accesorios 3)Reóstato (pedal) 4) Portabobina para hilos overlock Las siguientes piezas sin ilustración: •... -
Seite 6: Contenido De La Caja De Accesorios
Contenido de la caja de accesorios 1) Prensatelas estándar (puntada recta/puntada zigzag) (ya montado) 2) Suela dobladilladora 3) Prensatelas, suela ojales 4) Prensatelas, suela cremalleras 5) Prensatelas, suela para coser botones 6) Guía de bordes 7) Guía para enguatar 8) Bastidor para bordar 9) Bobina de recambio (3 unidades) 10) Protector de los dedos (ya montado) 11) Fieltro para el portacarretes de hilo (2 unidades) -
Seite 7: Conexiones Eléctricas
Conexiones eléctricas El interruptor de corriente conecta la máquina y también la bombil- • Enchufe la clavija de acoplamiento del reóstato (pedal) sumini- strado en la caja del tomacorriente de la máquina y a continua- ción la clavija de la red en la toma de corriente. Utilice solamente el reóstato (pedal) tipo KD 2902 suministrado. -
Seite 8: Tareas Previas
AREAS PREVIAS Devanar la bobina del hilo inferior Las bobinas del hilo inferior se pueden devanar rápida y fácilmente con la máquina de coser. Para ello introduzca el hilo del carrete de hilo a través de la guía de hilo hasta la bobina. El procedimiento exacto para el devanado lo encontrará... - Seite 9 • Coloque la bobina sobre el husillo de la bobina (8), encontrán- dose el extremo del hilo arriba sobre la bobina. Gire el husillo de bobina (8) hacia la derecha contra el tope de la bobina (9) hasta que oiga que queda encajado. •...
-
Seite 10: Retirar La Cápsula Portacanilla
Retirar la cápsula portacanilla • Retire la base plana desmontable. • Coloque tanto la aguja, girando el volante (10), como el prensa- telas en la posición más elevada y abra la tapa de la cápsula portacanilla (18) como se indica en la figura. •... -
Seite 11: Colocar La Cápsula Portacanilla
Colocar la cápsula portacanilla • Sujete la cápsula portacanilla de tal forma que el dedo de la cáp- sula señale hacia arriba. Abra la palanca basculante de la cápsula portacanilla. • Coloque la cápsula portacanilla sobre la espiga central y empuje la cápsula cuidadosamente hacia adentro, hasta que el dedo de la cápsula portacanilla entre en el anillo de la lanzadera. - Seite 12 • Ahora lleve el hilo por debajo de la guía del hilo superior (3), tal y como se indica. • A continuación deje que el hilo pase entre los discos de tensión del regulador de tensión del hilo superior (2), como se indica. CONSEJO Una tensión del hilo superior de 3 es ideal para la mayoría de apli- caciones.
-
Seite 13: Extraer El Hilo Inferior
Extraer el hilo inferior • Coloque el prensatelas (26) hacia arriba. Gire el volante (10) con la mano derecha hacia Usted hasta que la aguja se mueva hacia abajo y luego nuevamente hacia arriba. Detenga el volante (10) en cuanto la aguja se encuentre en su posición más elevada. -
Seite 14: Ajustes
JUSTES Ajuste de la tensión del hilo Si al coser se rompe el hilo, la tensión del hilo está demasiado alta. Si al coser se forman pequeños bucles, la tensión del hilo está de- masiado baja. En ambos casos se debe ajustar la tensión del hilo. Para ello la tensión del hilo superior e inferior deben estar en una re- lación correcta. -
Seite 15: Comprobar La Tensión Del Hilo
Comprobar la tensión del hilo inferior La manera más fácil de comprobar la tensión del hilo inferior consi- ste en coser una puntada zig-zag mediana sobre la tela que desea coser. Para ello utilice la aguja y los hilos adecuados. Será... -
Seite 16: Coser
OSER Aspectos generales Conecte el interruptor principal (13) . Al terminar las tareas de costura, coloque la aguja siempre en su po- sición más elevada. Introduzca la tela suficientemente por debajo del prensatelas (26). Deje que los hilos superior e inferior sobresal- gan aprox. -
Seite 17: Protector De Los Dedos
Protector de los dedos Este accesorio le protege para que la mano no vaya accidentalmen- te debajo de la aguja. Coser hacia atrás Cosa hacia atrás para reforzar el comienzo y el final de una costura. • Presione hacia abajo la palanca para coser hacia atrás (12) y manténgala presionada. -
Seite 18: Botón Seleccionador De Programa
Botón seleccionador de programa Con esta máquina de coser dispone Usted de una selección de dife- rentes puntadas de uso o de adorno. Con el botón selector de programa (6) puede ajustar el tipo de puntada deseada. • Antes de cambiar el tipo de puntada asegúrese siempre de que la aguja se encuentre en la posición más elevada. - Seite 19 Puntada zig-zag La puntada zig-zag es una de las puntadas más utilizadas. Esta pun- tada permite muchas posibilidades de aplicación, como p.ej., ribe- tear, coser aplicaciones y monogramas. Antes de utilizar la puntada zig-zag, cosa unas puntadas rectas para reforzar la costura. Prensatelas: .
-
Seite 20: Puntada Invisible
Puntada invisible Referente al denominado ribeteo invisible Prensatelas: ......suela estándar Programa:........D Longitud de puntada: . - Seite 21 Puntada de rombo Se puede aplicar la puntada de rombo de uso múltiple y de forma decorativa, p.ej., para coser encajes o cintas elásticas o para coser sobre material elástico. Prensatelas: ......suela estándar Programa: .
-
Seite 22: Ojales
Ojales CONSEJO Para encontrar la longitud de puntada adecuada se recomienda co- ser una muestra de ojal sobre un resto de tela. Prensatelas: ......suela ojales Programa:. -
Seite 23: Coser Botones Y Ojetes
Coser botones y ojetes Con la pata prensatelas de color azul transparente se pueden coser botones, corchetes y ojetes. Seleccione con el botón selector de programa (6) una anchura de la puntada zig-zag que corresponda a la distancia de los ojales. •... -
Seite 24: Coser Cremalleras
Coser cremalleras Utilice la suela cremalleras. En función del lado de la cinta de la cremallera se vaya a coser, el prensatelas debe descansar siempre sobre la tela. Por esta razón el prensatelas se fija bien en la parte izquierda o de- recha y no en el centro como con los demás prensatelas. -
Seite 25: Zurcir
• Preste atención para que la tela no se introduzca por debajo del lado derecho de la suela. CONSEJO Sujetando el extremo de la tela ligeramente oblicua, el dobladillo podrá entrar con más facilidad en la suela para dobladillos. Antes de coser fije el dobladillo con unos alfileres o planche el prin- cipio del dobladillo. -
Seite 26: Bordar
Bordar Aspectos generales Retire el soporte del prensatelas, coloque la placa de zurcir y selec- cione la tensión normal del hilo inferior. La tensión del hilo superior debe estar ajustada lo suficientemente suelta para que el hilo inferior no pueda ser llevado al lado derecho de la tela. -
Seite 27: Coser Con Una Aguja Gemela
Coser con una aguja gemela La aguja gemela se vende en comercios especializados bien surti- dos. Al comprarla preste atención a que la distancia entre las dos agujas no sobrepase los 2,5 mm. Con la aguja gemela se puede realizar preciosos diseños de dos co- lores si al coser se utilizan hilos de diferentes colores. -
Seite 28: Coser Con El Brazo Libre
Coser con el brazo libre El brazo libre (16) le da la posibilidad de coser más fácilmente piezas con forma de tubo; esta función es muy útil para coser p.ej. mangas y perneras. Se puede convertir fácilmente la máquina de coser en una máquina de brazo libre, retirando la base plana desmontable con la caja de accesorios de la máquina de coser. -
Seite 29: Mantenimiento , Cuidado Y Limpieza
ANTENIMIENTO CUIDADO Y LIMPIEZA En todos los trabajos de mantenimiento, limpieza y de recambio desconecte siempre primero la máquina y desenchúfela. Cambiar la lámpara de coser La lámpara de coser se enciende y se apaga mediante el interruptor principal (13). •... -
Seite 30: Retirar Y Colocar La Pata Prensatelas
Retirar y colocar la pata prensatelas Retirar • Gire el volante (10) hacia Usted hasta que la aguja se encuentre en su posición más elevada. • Eleve el prensatelas subiendo la palanca del prensatelas (15). • Al subir la palanca del prensatelas, detrás del soporte del prensa- telas, el prensatelas se cae. -
Seite 31: Retirar Y Colocar El Soporte De La Pata Prensatelas
Retirar y colocar el soporte de la pata prensatelas No en necesario retirar el soporte para el prensatelas, excepto si desea Usted zurcir, bordar u obtener más espacio para limpiar el transportador de la tela (27). Retirar • Coloque la aguja en su posición más elevada, girando el volante (10) hacia Usted... - Seite 32 Limpiar la carcasa y el reóstato (pedal) Antes de limpiar el aparato, desconéctelo de la red. Para limpiar la carcasa y el reóstato (pedal), emplee un paño seco y suave. Evite emplear detergentes y productos químicos de limpie- za, puesto que podrían dañar las superficies y las inscripciones del aparato.
-
Seite 33: Lubricar La Máquina
Lubricar la máquina ADVERTENCIA Su máquina ya ha sido lubricada en fábrica y está lista para el ser- vicio. Lubricar la máquina detrás de la tapa frontal Los puntos a lubricar están marcados con flechas en la figura. Antes de lubricar se debería limpiar estos puntos. Aplique sobre estos puntos una o dos gotas de un buen aceite para máquinas de coser. - Seite 34 Desmontaje de la tapa posterior de la carcasa • Empuje la palanca de la pata prensatelas (15) hacia arriba, abra la tapa frontal (21) y afloje el tornillo (A). ADVERTENCIA Ya que los tornillos A, B y C son diferentes, guárdelos siempre por separado.
- Seite 35 • Ahora solamente unos pequeños ganchos de plástico internos sujetan la tapa posterior, como se indica. • Ahora empuje cuidadosamente hacia abajo el borde superior de la tapa posterior (ahí donde se encuentran los ganchos) con la mano. • Ahora retire la tapa posterior, tirando hacia fuera. E-36...
- Seite 36 Lubricar la parte superior e inferior de la máquina Los puntos a lubricar están marcados con flechas en la figura. Antes de lubricar se debería limpiar estos puntos. Aplique una o dos gotas de un buen aceite para máquinas de coser sobre estos puntos. CONSEJO Los puntos marcados con flechas solamente deben ser lubricados pocas veces, aprox.
-
Seite 37: Averías
VERÍAS En caso de producirse averías, le rogamos que lea las instrucciones de funcionamiento, para cerciorarse de haber observado correcta- mente todas las indicaciones. Solamente si ninguna de las soluciones mencionadas tiene éxito, contacte con nuestro servicio postventa. Fallos Causa página La máquina no marcha libremente Se debe lubricar la máquina... - Seite 38 La costura se frunce o arregaza La tensión del hilo superior es demasiado página 15 fuerte Se ha enhebrado mal la máquina página 12 La aguja es demasiado grande para la tela página 40 El hilo forma bucles La tensión del hilo no está regulada página 15 El hilo superior no está...
- Seite 39 ABLA DE TELAS HILOS Y AGUJAS Generalmente se utilizan hilos y agujas finos para la costura de telas finas e hilos y agujas más fuertes para telas gruesas. Compruebe siempre el grosor del hilo y de la aguja sobre un resto de aquella tela que desea coser.
-
Seite 40: Eliminación
LIMINACIÓN Embalaje Su máquina de coser está embalada para protegerla contra eventuales daños durante el transporte. Los embalajes son materias primas y por ello son reuti- lizables o aptos para ser devueltos al ciclo de recic- laje de materias primas. Aparato No tire bajo ningún concepto su máquina de coser al final de su vida útil a la basura doméstica normal. -
Seite 41: Índice De Palabras Clave
Í NDICE DE PALABRAS CLAVE Aguja 17, 30 Aguja gemela 28 Ajuste de la longitud de la puntada 19 Ajuste del ancho de la puntada 19 Alzador de hilo 13 Anillo de la órbita de la lanzadera 33 Averías 38 Base plana desmontable 8, 11, 29, 35 Bastidor para bordar 7 Bobina del hilo inferior 9... - Seite 42 Extraer el hilo inferior 14 Guía de bordes 7, 29 Guía para enguatar 7, 29 Hacer dobladillos 25 Insertar el prensatelas 31 Insertar el soporte para el prensatelas 32 Lámpara de coser 30 Lanzadera 33 Limpieza 33 Lubricar 33, 34, 35 Mantenimiento 30 Ojales 23 Órbita de la lanzadera 33...
- Seite 43 Regulador de tensión del hilo superior 13 Regular la velocidad de costura 8 Reóstato (pedal) 6, 8, 10, 17, 18, 37, 41 Retirar el prensatelas 31 Retirar el soporte para el prensatelas 32 Retirar la cápsula portacanilla 11 Sobrecoser aplicaciones 28 Suela dobladilladora 7 suela estándar 19, 20, 21, 22 Suela para dobladillos 25, 26...
-
Seite 45: Vista Geral
ISTA GERAL Componentes principais 1) Alavanca da linha 2) Regulador da tensão da linha superior 3) Guia da linha superior 4) Regulador de largura do ponto 5) Pega de suporte rebatível 6) Botão selector do programa 7) Suporte do carrinho de linha amovível 8) Fuso da bobina 9) Encosto da bobina 10) Roda manual... - Seite 46 Í NDICE Indicações de segurança ......4 Conhecer o aparelho ......6 Material fornecido .
-
Seite 47: Indicações De Segurança
NDICAÇÕES DE SEGURANÇA Relativamente a este manual Antes da primeira colocação em funcionamento leia este manual de instruções com atenção e siga estritamente as indicações de segurança! Todos os trabalhos efectuados no e com este aparelho devem seguir as instruções descritas no manual. -
Seite 48: Limpeza E Armazenamento
Indicações fundamentais A máquina de costura não deve ser sujeita a humidade – risco de choque eléctrico! Nunca deixe a máquina de costura ligada sem vigilância. Não utilize a máquina ao ar livre. O aparelho só pode ser colocado em funcionamento com o pedal de tipo KD 2902. -
Seite 49: Conhecer O Aparelho
ONHECER O APARELHO Material fornecido Ao retirar o aparelho da embalagem, certifique-se de que as seguin- tes peças foram fornecidas: 1)Máquina de costura 2)Mesa amovível com caixa de acessórios 3)Pedal 4) Suporte da bobina para linha overlock Las seguintes peças sem imagem: •... -
Seite 50: Conteúdo Da Caixa De Acessórios
Conteúdo da caixa de acessórios 1) Calcador padrão (ponto a direito/ponto ziguezague) (já montado) 2) Calcador para bainhas 3) Calcador para casear 4) Calcador para pregar fechos de correr 5) Calcador para pregar botões 6) Régua da ourela 7) Régua wattier 8) Placa de cerzidura 9) Bobina de substituição (3 peças) 10) Protecção para os dedos (já... -
Seite 51: Ligações Eléctricas
Ligações eléctricas O interruptor de corrente liga não só a máquina como também a luz para a costura. • Encaixe a ficha de acoplamento do pedalfornecido na caixa da ficha na máquina e depois a ficha de rede na tomada. Utilize apenas o pedal de tipo KD 2902 fornecido. -
Seite 52: Trabalhos A Serem Efectuados
RABALHOS A SEREM EFECTUADOS Encher a bobina da linha inferior As bobinas da linha inferior podem ser enchidas de forma rápida e fácil com a máquina de costura. Passe a linha do carrinho de linha através da guia da linha em di- recção à... - Seite 53 • Encaixe a bobina no fuso da bobina (8), em que a extremidade da linha esteja no cimo da bobina. Gire o fuso da bobina (8) para a direita de encontro do encosto da bobina (9) até se ouvir a en- caixar.
-
Seite 54: Remoção Da Cápsula Da Bobina
Remoção da cápsula da bobina • Remova a mesa amovível. • Coloque a agulha, rodando a roda manual (10) bem como o cal- cador para a posição mais alta e abra a cobertura da cápsula da bobina (18) tal como é indicado na figura. •... -
Seite 55: Colocação Da Cápsula Da Bobina
Colocação da cápsula da bobina • Segure a cápsula da bobina de forma que os dedos da cápsula estejam virados para cima. Abra a alavanca basculante da cápsu- la da bobina. • Coloque a cápsula da bobina no pino central e pressione a cáp- sula cuidadosamente para dentro, até... - Seite 56 • Passe agora a linha por baixo da guia da linha superior (3), tal como é indicado. • Em seguida, deixe a linha passar entre os discos tensores do re- gulador da tensão da linha superior (2), tal como é indicado. DICA Uma tensão da linha superior de 3 é...
-
Seite 57: Fazer Subir A Linha Superior
Fazer subir a linha superior • Colocar o calcador (26) para cima. Gire a roda manual (10) para si com a mão direita, até a agulha se mover para baixo e de novo para cima. Logo que a agulha chegue à sua posição mais alta, imobilize a roda manual (10). -
Seite 58: Ajustes
JUSTES Ajuste da tensão da linha Se a linha partir ao coser, quer dizer que a tensão da linha está de- masiado elevada. Se, ao coser, se formarem nós, a tensão da linha é demasiado redu- zida. Em ambos os casos, a tensão da linha tem de ser ajustada. Nesse caso, a tensão da linha superior e inferior deve estar ajustada na relação correcta. -
Seite 59: Verificação Das Tensões Da Linha
Verificar a tensão da linha inferior A forma mais simples de verificar a tensão da linha inferior, é coser com um ponto médio de ziguezague no tecido que deseja coser. Utilize a agulha e as linhas adequadas. Isto é especialmente importante quando utilizar diferentes cores para a linha superior e inferior. -
Seite 60: Coser
OSER Generalidades Ligue o interruptor principal (13). Ao mudar o tipo de ponto, coloque a agulha sempre na posição mais alta. Desloque o tecido o suficiente por baixo do calcador (26). Deixe cerca de 10 cm de linha superior e inferior livre na parte de trás. -
Seite 61: Protecção Para Os Dedos
Protecção para os dedos Este acessório protege as mãos de ficarem inadvertidamente por baixo da agulha. Coser para trás Utilize a costura para trás para reforçar o início e o fim da costura. • Prima a alavanca de marcha-atrás (12) para baixo e mantenha-a premida. -
Seite 62: Botão Selector Do Programa
Botão selector do programa Nesta máquina de costura encontram-se disponíveis diferentes pontos normais e de fantasia. Com o botão selector de programa (6) pode ajustar facilmente o tipo de ponto desejado. • Antes da mudança de ponto, certifique-se sempre que a agulha se encontra na sua posição mais alta. - Seite 63 Ponto ziguezague O ponto ziguezague é um dos pontos mais usados. Permite muitas utilizações, como por exemplo, bainhas, aplicações e monogramas. Antes de utilizar o ponto ziguezague, cosa alguns pontos a direito para reforçar a costura. Calcador:......calcador padrão Programa: .
- Seite 64 Ponto invisível Para os chamados pontos invisíveis. Calcador: ......calcador padrão Programa:........D Comprimento do ponto: .
- Seite 65 Ponto em losango O ponto em losango é um ponto decorativo com múltiplas apli- cações, p. ex. para coser extremidades de bandas de borracha ou para coser em stretch e noutro material elástico. Calcador:......calcador padrão Programa: .
-
Seite 66: Orifício Do Botão
Orifício do botão DICA Para encontrar o comprimento adequado do ponto, recomenda-se que caseie num retalho de tecido em separado. Calcador: ......calcador para casear Programa:. -
Seite 67: Pregar Botões E Colchetes
Pregar botões e colchetes Com o calcador azul transparente podem ser cozidos botões e col- chetes sem esforço. Com o botão selector do programa (6) seleccione uma largura do ponto ziguezague, que corresponda à distância do furo. • Para este passo de trabalho, monte a placa de cerzidura, para evi- tar que a peça de trabalho se desloque. -
Seite 68: Pregar Fechos De Correr
Pregar fechos de correr Utilize o calcador para fechos. De acordo com o lado do fecho de correr que deseja coser, o calca- dor deve estar sempre pousado no tecido. Por este motivo, o calcador deve ser fixo à esquerda ou à direita, e não no meio como no caso de todos os outros calcadores. -
Seite 69: Passajar
• Mantenha a ourela do tecido um pouco por cima do lado es- querdo do calcador, para evitar um deslizamento para fora da rosca. • Preste atenção para que o tecido passe para baixo do lado direito do calcador. DICA Inclinando um pouco a extremidade do tecido, a bainha pode ser introduzida facilmente no calcador para bainhas. -
Seite 70: Bordar
Bordar Generalidades Remova o suporte do calcador, monte a placa de cerzidura e selec- cione a tensão normal da linha inferior. A tensão da linha superior tem de ser ajustada de forma solta, de tal modo que a linha superior não seja puxada para o lado direito do tecido. -
Seite 71: Coser Com Uma Agulha Dupla
Coser com uma agulha dupla A agulha dupla pode ser obtida em lojas especializadas. Na altura da compra, preste atenção para que a distância entre as agulhas não exceda 2,5 mm. Com a agulha dupla podem ser criados magníficos padrões de duas cores, se utilizar linhas de diferentes cores. -
Seite 72: Coser Com O Braço Livre
Coser com o braço livre O braço livre (16) permite-lhe coser facilmente peças tubulares, p. ex. esta função é muito útil para coser mangas e pernas de calças. A sua máquina de costura pode tornar-se numa máquina de braço livre, removendo a mesa amovível com a caixa de acessórios da má- quina de costura. -
Seite 73: Substituição Da Lâmpada
ANUTENÇÃO CONSERVAÇÃO E LIMPEZA Antes de qualquer trabalho de manutenção, limpeza e substituição, desligue sempre a máquina e retire a ficha. Substituição da lâmpada A lâmpada é ligada e desligada no interruptor principal (13). • Abrir a tampa da frente (21). •... -
Seite 74: Remoção E Colocação Do Calcador
Remoção e colocação do calcador Remoção • Gire a roda manual (10) para si, até a agulha chegar à sua po- sição mais alta. • Levante o calcador, premindo para cima a alavanca do calcador (15). • Premindo para cima a alavanca de accionamento do calcador, atrás do suporte do calcador, faz baixar o calcador. -
Seite 75: Remoção E Colocação Do Suporte Do Calcador
Remoção e colocação do suporte do calcador O suporte do calcador não precisa de ser removido, a não ser que pretenda passajar, bordar ou arranjar espaço para a limpeza do transportador do tecido (27). Remoção • Coloque a agulha na sua posição mais alta, girando a roda manual (10) para si e coloque a alavanca do calcador (15) para cima. - Seite 76 Limpeza da caixa e do calcador Antes de iniciar a limpeza retire a ficha de rede da tomada. Para a limpeza da caixa e do calcador deve ser utilizado um pano seco e macio. Devem ser evitados produtos de limpeza ou solventes químicos, visto que estes podem danificar a superfície e/ou as ins- crições no aparelho.
-
Seite 77: Lubrificação Da Máquina
Lubrificação da máquina NOTA A sua máquina de costura já vem lubrificada de fábrica e pronta para ser utilizada. Lubrificação da máquina atrás da tampa da frente Os locais a serem lubrificados estão marcados com setas na figura. Antes de lubrificar, limpar estes locais. Introduza aí uma ou duas go- tas de um bom óleo para máquinas de costura. - Seite 78 Desmontagem da tampa traseira da caixa • Coloque a alavanca do calcador (15) para cima, abra a tampa da frente (21) e solte o parafuso (A). NOTA Como os parafusos A; B e C são diferentes, guarde-os sempre sepa- rados. •...
- Seite 79 • A tampa interna é fixada por ganchos internos em plástico, tal como é indicado. • Pressione com cuidado o canto superior da tampa traseira (onde estão os ganchos) com uma mão. • Puxe agora a tampa traseira para fora. P-36...
- Seite 80 Lubrificação do lado superior e inferior da máquina Os locais a serem lubrificados estão marcados com setas na figura. Antes de lubrificar, limpar estes locais. Introduza uma ou duas gotas de um bom óleo para máquinas de costura. DICA Os locais marcados com setas só raramente necessitam de ser lubri- ficados, num intervalo aprox.
-
Seite 81: Avarias
VARIAS Se ocorrerem avarias, consulte este manual de instruções, para con- firmar se todas as instruções foram cumpridas correctamente. Só se as soluções mencionadas não surtirem efeito, é que deve con- sultar o nosso serviço de apoio ao cliente. Avaria Causa Página A máquina tem de ser lubrificada... - Seite 82 A tensão da linha superior é demasiado página 15 elevada A costura enruga ou franze A máquina foi mal enfiada página 12 A agulha é demasiado grande para o tecido página 40 A tensão da linha não está regulada página 15 A linha superior não está...
-
Seite 83: Tabela De Tecidos, Linhas E Agulhas
ABELA DE TECIDOS LINHAS E AGULHAS Geralmente, são utilizadas linhas e agulhas finas para coser tecidos finos, fios e agulhas mais grossas são utilizadas para tecidos mais fortes. Teste sempre a espessura da linha e da agulha numa parte do tecido, que deseja coser. -
Seite 84: Eliminação
LIMINAÇÃO Embalagem A sua máquina de costura encontra-se numa emba- lagem para ficar protegida de danos de transporte. As embalagens são matérias-primas reutilizáveis ou podem ser enviadas para reciclagem. Aparelho Nunca deposite a máquina de costura no lixo do- méstico no fim da sua vida útil. Informe-se junto dos serviços municipais sobre as possibilidades de uma eliminação correcta e ecológica. -
Seite 85: Índice Alfabético
Í NDICE ALFABÉTICO Agulha 17, 30 Agulha dupla 28 Ajuste do comprimento do ponto 19 Alavanca da linha 13 Alteração da direcção da costura 18 Anel do rodete 33 Avarias 38 Bobina da linha inferior 9 Bordar 27 Botão selector do programa 19 Braço livre 29 Caixa da bobina 33 Caixa de acessórios 7, 8... - Seite 86 Fazer subir a linha superior 14 Fechos de correr 25 Lâmpada 30 Limpeza 33 Lubrificação 33, 34, 35 Manutenção 30 Material fornecido 6 Mesa amovível 8, 11, 29, 35 Orifício do botão 23 Passajar 26 Pedal 6, 8, 10, 17, 18, 37, 41 Placa de cerzidura 7, 24, 26, 27 Ponto a direito 19 Ponto a direito triplo 21...
- Seite 87 Suporte do calcador 32 Suporte do carrinho de linha 9 Tabela de agulhas 40 Tensão da linha 15, 16 Tensão da linha inferior 15, 16 Tensão da linha superior 15 Transportador 33 P-44...
-
Seite 89: Main Components
VERVIEW Main components 1) Thread take-up 2) Upper thread tension regulator 3) Upper thread guide 4) Stitch width regulator 5) Fold-down carrying handle 6) Programme selection dial 7) Removable cotton reel holders (2) 8) Bobbin spindle 9) Winding stop 10) Hand wheel 11) Stitch length regulator 12) Reverse lever 13) Main switch (motor and light) - Seite 90 ABLE OF CONTENTS Safety instructions ....... 4 About these instructions ......4 Keep electrical equipment out of reach of children .
-
Seite 91: Safety Instructions
AFETY INSTRUCTIONS About these instructions Please read these operating instructions thoroughly and follow them, paying special atten- tion to the safety instructions, before using the appliance for the first time. This device may only be used as described in the operating instructions. If you pass on the appliance to another party it is essential that you also provide the opera- ting instructions. -
Seite 92: Basic Information
Basic information The sewing machine should never be allowed to get wet – there is the danger of electric shocks! When the sewing machine is on, never leave it unattended. Do not use the machine out of doors. The appliance can only be operated using the supplied foot pedal model KD 2902. -
Seite 93: Getting To Know Your Appliance
ETTING TO KNOW YOUR APPLIANCE Contents of package When unpacking, ensure that the following parts are included: 1) Sewing machine 2) Table extension with accessories box 3) Foot pedal 4) Bobbin holder for overlock threads The following parts not shown in the diagram: •... -
Seite 94: Contents Of The Accessories Box
Contents of the accessories box 1) Standard foot (straight stitch/zigzag stitch) (already attached) 2) Hemming foot 3) Buttonhole sewing foot 4) Zip sewing foot 5) Button sewing foot 6) Seam guide 7) Quilting guide 8) Darning plate 9) Spare bobbin (3) 10) Finger protector (already attached) 11) Felt for cotton reel holder (2) 12) Selection of needles... -
Seite 95: Electrical Connections
Electrical connections The power switch turns both the machine and the sewing light on. • Put the coupler plug of the supplied foot pedal into the connec- tor housing on the machine and then put the mains plug into the socket. -
Seite 96: Preparatory Work
REPARATORY WORK Winding thread on to the bobbin You can use the sewing machine to wind thread on to the bobbins easily. To do so, take the thread from the cotton reel through the thread guide to the bobbin. The exact procedure for winding thread on to the bobbin is descri- bed in the following points: •... - Seite 97 • Place the bobbin on the bobbin spindle (8), with the side of the bobbin containing the end of the thread facing upwards. Move the bobbin spindle (8) to the right towards the winding stop (9) until it audibly clicks into place. •...
-
Seite 98: Removing The Bobbin Case
Removing the bobbin case • Remove the table extension. • Turn the hand wheel (10) to move the needle to its highest po- sition, move the sewing foot to its highest position and open the bobbin case cover (18) as illustrated. •... -
Seite 99: Inserting The Bobbin Case
Inserting the bobbin case • Hold the bobbin case so that the finger of the case is pointing up- wards. Open the rocking arm of the bobbin case. • Put the bobbin case on the central pin and press the case in ca- refully until the finger of the bobbin case enters the shuttle track ring. - Seite 100 • Now pass the thread through the upper thread guide (3) as illu- strated. An upper thread tension of 3 is ideal for most applications. • Pass the thread under the front thread guide and upwards, which automatically pushes up the inner guide spring. •...
-
Seite 101: Bringing Up The Lower Thread
Bringing up the lower thread • Move the sewing foot (26) to the upper position. Turn the hand wheel (10) with your right hand towards you un- til the needle moves down and back up again. Stop turning the hand wheel (10) as soon as the needle has rea- ched its highest position. -
Seite 102: Settings
ETTINGS Setting the thread tension If the thread tears while you are sewing, the thread tension is too high. If small loops are formed when you are sewing, the thread tension is too low. In both cases, you need to set the thread tension. The tensions of the upper and lower threads must be in the correct proportion to each other. -
Seite 103: Checking The Thread Tension
Checking the lower thread tension The easiest way of checking the lower thread tension is by sewing a medium zigzag stitch on the fabric in question. Use the appropriate needle and threads. You can get a clearer picture by using different colours for the upper and lower threads. -
Seite 104: Sewing
EWING General information Switch the main switch (13) on. When changing the stitch type, always move the needle to its high- est position. Push the fabric sufficiently far under the sewing foot (26). Make sure there is a length of around 10 cm of the upper and lower thread behind the needle. -
Seite 105: Finger Protector
Finger protector This accessory prevents your hand from accidentally getting under the needle. Reverse stitching Use reverse stitches to reinforce the first and last stitches. • Press the reverse lever (12) and hold it down. • Press the foot pedal – the more pressure you apply to the foot pedal, the faster the machine runs. -
Seite 106: Programme Selection Dial
Programme selection dial On this sewing machine, you can select a number of different functional and decorative stitches. You can use the programme sel- ection dial (6) to easily select the stitch setting you want. • Before changing the stitch, always make sure that the needle is at its highest position. -
Seite 107: Zigzag Stitch
Zigzag stitch The zigzag stitch is one of the most commonly used stitches. It can be used for many different things, for example hemming, appliqué, and monograms. Before you use the zigzag stitch, sew a few straight stitches to rein- force the stitching. - Seite 108 Blind stitch For blind hemming. Sewing foot: ......Standard foot Programme: ........D Stitch length: .
-
Seite 109: Smocking Stitch
Smocking stitch The smocking stitch can be used in many different ways and is de- corative, e.g. for attaching lace or elastic bands, or for sewing on stretch and other elastic materials. Sewing foot: ......Standard foot Programme: . -
Seite 110: Buttonhole
Buttonhole To determine the correct stitch length, we recommend you sew a test buttonhole on a scrap of fabric. Sewing foot: ..... . .Buttonhole sewing foott Programme: . -
Seite 111: Sewing On Buttons And Hooks And Eyes
Sewing on buttons and hooks and eyes You can use the transparent blue sewing foot to sew on buttons, hooks and eyes easily. Use the programme selection dial (6) to select a zigzag stitch width that corresponds to the distance between the holes. •... -
Seite 112: Sewing In Zips
Sewing in zips Use the zip sewing foot. Depending on which side of the zip band you are sewing, the se- wing foot must always be on the fabric. For this reason, the sewing foot is attached on either the left-hand or right-hand side, and not in the middle like all other sewing feet. -
Seite 113: Darning
The hem can be inserted in the hemming foot more easily if you hold the end of the fabric at a slight angle. Before you start sewing, fix the hem with safety pins or iron down the start of the hem. For this work, you need to use suitable materials and have some ex- perience in order to obtain the best results. -
Seite 114: Embroidering
Embroidering General information Remove the sewing foot holder, attach the darning plate and select the normal lower thread tension. The upper thread tension must be low enough that the lower thread is not pulled to the upper side of the fabric. •... -
Seite 115: Sewing With A Twin Needle
Sewing with a twin needle The twin needle is available from well-stocked specialist retailers. When buying a twin needle, make sure that the distance between the two needles is no more than 2.5 mm. The twin needle can be used to create attractive, two-coloured pat- terns if you use different coloured threads when sewing. -
Seite 116: Sewing With The Free Arm
Sewing with the free arm The free arm (16) enables you to sew tube-shaped pieces more ea- sily. This function is very useful e.g. when sewing sleeves and trouser legs. You can easily turn your sewing machine into a free-arm machine by removing the table extension and accessories box from the se- wing machine The free arm (16) is particularly useful for the following work:... -
Seite 117: Maintenance And Cleaning
AINTENANCE AND CLEANING Before carrying out any maintenance, cleaning or replacement work, please always turn off and unplug the machine. Replacing the sewing light bulb You switch the sewing light on and off using the main switch (13). • For information on opening the front flap (21) see page 15. •... -
Seite 118: Removing And Attaching The Sewing Foot
Removing and attaching the sewing foot Removing • Turn the hand wheel (10) towards you until the needle has rea- ched its highest position. • Raise the sewing foot by pushing up the sewing foot lever (15). • If you push up the sewing foot release lever behind the sewing foot holder, the sewing foot drops out. -
Seite 119: Removing And Attaching The Sewing Foot Holder
Removing and attaching the sewing foot holder The sewing foot holder does not need to be removed unless you want to darn or embroider, or make space to clean the fabric feeder (27). Removing • Move the needle to its highest position by turning the hand wheel (10) towards you and raise the sewing foot lever (15). - Seite 120 Cleaning the housing and foot pedal Before cleaning, remove the plug from the mains socket. Use a dry, soft cloth to clean the housing and foot pedal. Avoid the use of chemical solutions and cleaning products because these may damage the appliance surface or markings. Cleaning the feeder It is necessary to keep the fabric feeder teeth clean at all times to en- sure perfect stitching.
-
Seite 121: Oiling The Machine
Oiling the machine NOTE Your sewing machine is delivered oiled and ready for use. Oiling the machine behind the front flap The places that need to be oiled are marked with an arrow on the illustration. You should clean these areas before oiling them. Put one or two drops of a good sewing machine oil on these areas. - Seite 122 Dismantling the rear housing cover • Raise the sewing foot lever (15), open the front flap (21) and loo- sen the screw (A). NOTE As screws A, B and C are different, always keep them separate from each other. • Remove the table extension and open the bobbin case cover (18).
- Seite 123 • Only small, internal plastic hooks now hold the rear cover, as il- lustrated. • Carefully push the upper edge of the rear cover (where the hooks are located) down with one hand. • Now pull out the rear cover. EN-36...
- Seite 124 Oiling the top and bottom of the machine The places that need to be oiled are marked with an arrow on the illustration. You should clean these areas before oiling them. Put one or two drops of a good sewing machine oil on these areas. The places marked with arrows do not need to be oiled often, only every two to three months or so, depending on how often you use the machine.
-
Seite 125: Faults
AULTS If faults occur, please read the operating instructions to determine whether you have followed all the instructions correctly. Please only contact our customer services if none of the solutions provided is successful. Fault Cause Page Machine does not run smoothly Machine needs to be oiled page 34 Dust and threads in shuttle track... - Seite 126 Puckering or gathering of seam Upper thread tension too high page 15 Machine threaded incorrectly page 12 Needle too large for the fabric page 40 Thread makes loops Thread tension not adjusted page 15 Upper thread not threaded correctly and/or page 9 lower thread not wound on to bobbin correctly Thread thickness not suitable for the fabric...
-
Seite 127: Fabric, Thread And Needle Table
ABRIC THREAD AND NEEDLE TABLE As a general rule, fine threads and needles are used to sew thin fa- brics, thicker threads and needles are used for heavier fabrics. Al- ways test the thread and needle thickness on a scrap of the fabric you intend to use. -
Seite 128: Disposal
ISPOSAL Packaging Your sewing machine is wrapped in packaging to pro- tect it against transportation damage. Packaging is raw material and can be re-used or added to the recyc- ling system. Device At the end of its useful life, the sewing machine should not be disposed of with the household rubbish. -
Seite 129: Index
NDEX Accessories box 7, 8 Blind stitch 20, 21 Bobbin 9 Bobbin case 33 Bobbin housing 33 Bringing up the lower thread 14 Button sewing foot 7 Buttonhole 23 Buttonhole sewing foot 7, 23 Buttons and hooks and eyes, sewing on 24 Buttons, sewing with a shank 24 Cleaning 33 Contents of package 6... - Seite 130 Hand wheel 9 Hemming foot 7, 25, 26 Hems 25 Inserting the bobbin case 12 Lace, sewing on 27 Lower thread tension 15, 16 Maintenance 30 Needle 17, 30 Needle table 40 Oiling 33, 34, 35 Overlock-overcast stitch 22 Programme selection dial 19 Quilting guide 7, 29 Removing the bobbin case 11 Reverse stitching 18...
- Seite 131 Sewing foot holder 32 Sewing foot holder, attach 32 Sewing foot holder, remove 32 Sewing foot, attach 31 Sewing foot, remove 31 Sewing light 30 Shuttle 33 Shuttle track 33 Shuttle track ring 33 Smocking stitch 22 Standard foot 7, 19, 20, 21, 22 Standardfuß...
-
Seite 133: Hauptkomponenten
Ü BERSICHT Hauptkomponenten 1 Fadenheber 2 Oberfadenspannungsregler 3 Oberfadenführung 4 Stichbreitenregler 5 Umklappbarer Tragegriff 6 Programmwahlknopf 7 Ausziehbare Garnrollenhalter (2) 8 Spulenspindel 9 Spulenanschlag 10 Handrad 11 Stichlängenregler 12 Rückwärtshebel 13 Hauptschalter (Motor und Licht) 14 Steckergehäuse für Fußanlasser 15 Nähfußhebel (auf der Rückseite) 16 Freiarm 17 Regulierungsfuß... - Seite 134 NHALTSVERZEICHNIS Sicherheitshinweise ......4 Elektrische Geräte nicht in Kinderhände ....4 Netzkabel und Netzanschluss .
-
Seite 135: Sicherheitshinweise
ICHERHEITSHINWEISE Zu dieser Anleitung Lesen Sie vor der ersten Inbetriebnahme diese Bedienungsanleitung gründlich durch und be- folgen Sie vor allen Dingen die Sicherheitshinweise! Alle Tätigkeiten an und mit diesem Gerät dürfen nur soweit ausgeführt werden, wie sie in der Bedienungsanleitung beschrieben sind. Bewahren Sie diese Bedienungsanleitung für den zukünftigen Gebrauch auf. -
Seite 136: Grundsätzliche Hinweise
Wenn die Anchlussleitung dieses Geräts beschädigt ist, muss sie durch den Hersteller oder seinen Kundendienst oder eine ähnlich qualifizierte Person ersetzt werden, um Gefährdungen zu vermeiden. Grundsätzliche Hinweise Die Nähmaschine darf nicht nass werden – es besteht Stromschlag- gefahr! Lassen Sie die eingeschaltete Nähmaschine niemals unbeaufsich- tigt. -
Seite 137: Sie Ihr Gerät Kennen
ERNEN ERÄT KENNEN Lieferumfang Vergewissern Sie sich beim Auspacken, dass folgende Teile mitgelie- fert wurden: 1) Nähmaschine 2) Anschiebetisch mit Zubehörbox 3) Fußanlasser 4) Spulenhalter für Overlockgarne Folgende Teile ohne Abbildung: • Abdeckhaube • Bedienungsanleitung und Garantieunterlagen... -
Seite 138: Inhalt Der Zubehörbox
Inhalt der Zubehörbox 1) Standardfuß (Geradstich/Zickzackstich) (bereits montiert) 2) Säumerfuß 3) Knopfloch-Nähfuß 4) Reißverschluss-Nähfuß 5) Knopf-Annähfuß 6) Kantenlineal 7) Wattierlineal 8) Stopfplatte 9) Ersatzspule (3 Stück) 10) Fingerschutz (bereits montiert) 11) Filz für Garnrollenhalter (2 Stück) 12) Nadelsortiment 13) Ölkännchen 14) Schraubendreher (groß) 15) Schraubendreher (klein) 16) Trennmesser... -
Seite 139: Elektrische Anschlüsse
Elektrische Anschlüsse Der Stromschalter schaltet sowohl die Maschine als auch das Näh- licht ein. • Stecken Sie den Kupplungsstecker des mitgelieferten Fußanlas- sers in das Steckergehäuse an der Maschine und dann den Netz- stecker in die Steckdose. Verwenden Sie nur den mitgelieferten Fußanlasser Typ KD 2902. Schalten Sie nach der Arbeit oder vor Wartungsarbeiten immer die Maschine aus und ziehen Sie den Netzstecker aus der Steckdose. -
Seite 140: Vorbereitende Arbeiten
ORBEREITENDE RBEITEN Aufspulen der Unterfadenspule Die Unterfadenspulen lassen sich schnell und einfach mit der Näh- maschine aufspulen. Dazu führen Sie den Faden von der Garnrolle durch die Fadenfüh- rung hin zur Spule. Die genaue Vorgehensweise für das Aufspulen entnehmen Sie bitte den folgenden Punkten: •... - Seite 141 • Stecken Sie die Spule auf die Spulenspindel (8), wobei das Fa- denende oben auf der Spule ist. Schwenken Sie die Spulenspin- del (8) nach rechts gegen den Spulenanschlag (9), bis er hörbar einrastet. • Halten Sie das Fadenende fest und betätigen Sie den Fußanlas- ser.
-
Seite 142: Entfernen Der Spulenkapsel
Entfernen der Spulenkapsel • Entfernen Sie den Anschiebetisch. • Stellen Sie die Nadel durch Drehen des Handrades (10) sowie den Nähfuß in die oberste Position und öffnen Sie die Spulenkapselabdeckung (18) wie in der Abbildung gezeigt. • Öffnen Sie den Kipphebel der Spulenkapsel und ziehen Sie diese aus der Maschine. -
Seite 143: Einsetzen Der Spulenkapsel
Einsetzen der Spulenkapsel • Halten Sie die Spulenkapsel so, dass der Finger der Kapsel nach oben zeigt. Öffnen Sie den Kipphebel der Spulenkapsel. • Setzen Sie die Spulenkapsel auf den mittleren Stift und drücken Sie die Kapsel vorsichtig hinein, bis der Finger der Spulenkapsel in den Greiferbahnring eintritt. - Seite 144 • Führen Sie nun den Faden durch die Oberfadenführung (3). • Lassen Sie danach den Faden zwischen den Spannungsscheiben des Oberfadenspannungsreglers (2) durchlaufen. TIPP Eine Oberfadenspannung von 3 ist für die meisten Anwendungen ideal. • Führen Sie den Faden unter der vorderen Fadenführung hin- durch nach oben, dabei wird die innere Führungsfeder automa- tisch hinaufgeschoben.
-
Seite 145: Heraufholen Des Unterfadens
Heraufholen des Unterfadens • Stellen Sie den Nähfuß (26) nach oben. Drehen Sie das Handrad (10) mit der rechten Hand zu sich, bis die Nadel sich nach unten und wieder nach oben bewegt. Dann stoppen Sie das Handrad (10), sobald die Nadel auf ihrer höchsten Position ist. -
Seite 146: Einstellungen
INSTELLUNGEN Einstellung der Fadenspannung Wenn der Faden beim Nähen reißt, ist die Fadenspannung zu hoch. Wenn sich beim Nähen kleine Schlaufen bilden, ist die Fadenspan- nung zu niedrig. In beiden Fällen muss die Fadenspannung eingestellt werden. Dabei müssen Oberfaden- und Unterfadenspannung im richtigen Verhältnis zueinander stehen. -
Seite 147: Unterfadenspannung Überprüfen
Unterfadenspannung überprüfen Die einfachste Art die Unterfadenspannung zu überprüfen ist das Nähen eines mittleren Zickzackstichs auf dem Stoff, den Sie nähen wollen. Benutzen Sie dazu die vorgesehene Nadel und Fäden. Besonders deutlich wird es, wenn Sie für Ober- und Unterfaden ver- schieden farbige Fäden benutzen. -
Seite 148: Nähen
ÄHEN Allgemeines Schalten Sie den Hauptschalter (13) ein. Stellen Sie die Nadel beim Wechsel der Sticharten immer in die höchste Position. Schieben Sie den Stoff weit genug unter den Nähfuß (26). Lassen Sie Ober- und Unterfaden etwa 10 cm nach hinten überstehen. -
Seite 149: Fingerschutz
Fingerschutz Dieses Zubehörteil schützt Sie davor, mit der Hand unter die Nadel zu gelangen. Rückwärtsnähen Benutzen Sie das Rückwärtsnähen zum Verstärken am Anfang und Ende einer Naht. • Drücken Sie den Rückwärtshebel (12) nach unten und halten Sie ihn gedrückt. •... -
Seite 150: Der Programmwahlknopf
Der Programmwahlknopf Bei dieser Nähmaschine stehen Ihnen verschiedene Nutz- und Zier- stiche zur Auswahl. Mit dem Programmwahlknopf (6) können Sie einfach das gewünschte Stichmuster einstellen. • Versichern Sie sich immer vor einem Stichwechsel, dass die Na- del sich in der obersten Position befindet. Die Buchstaben des Programmwahlknopfes entsprechen den Buch- staben, die sich über den Stichmusterabbildungen befinden. - Seite 151 Zickzackstich Der Zickzackstich ist einer der meistgebrauchten Stiche. Er erlaubt viele Anwendungsmöglichkeiten wie z. B. Einsäumen, Applika-tio- nen und Monogramme aufnähen. Bevor Sie den Zickzackstich nutzen, nähen Sie zur Nahtverstärkung einige Geradstiche. Nähfuß: ........Standardfuß Programm: .
-
Seite 152: Elastikstich: Dreifachgerad- Und -Zickzackstich
Blindstich Zum so genannten Blindsäumen. Nähfuß: ....... . . Standardfuß Programm: . -
Seite 153: Einfacher Überwendlingsstich
Rautenstich Der Rautenstich ist vielseitig verwendbar und dekorativ, z. B. zum Aufnähen von Spitzen oder Gummibändern oder zum Nähen auf Stretch und anderem Elastikmaterial. Nähfuß: ........Standardfuß Programm: . -
Seite 154: Knopflöcher
Knopflöcher TIPP Um die passende Stichlänge zu finden, ist es empfehlenswert, ein Muster-Knopfloch auf einem Stoffrest zu nähen. Nähfuß: ......Knopfloch-Nähfuß Programm: . -
Seite 155: Knöpfe Und Ösen Annähen
Knöpfe und Ösen annähen Mit dem transparent-blauen Knopf-Nähfuß lassen sich Knöpfe, Ha- ken und Ösen mühelos annähen. Wählen Sie mit dem Programmwahlknopf (6) eine Zickzackstich- breite, die dem Abstand der Löcher entspricht. • Montieren Sie für diese Arbeitsschritte die Stopfplatte, um ein verrutschen des Stoffstückes zu vermeiden. -
Seite 156: Reißverschlüsse Einnähen
Reißverschlüsse einnähen Verwenden Sie den Reißverschlussnähfuß. Je nachdem, welche Seite des Reißverschlussbandes Sie nähen, muss der Nähfuß immer auf dem Stoff aufliegen. Aus diesem Grund wird der Nähfuß entweder auf der linken oder rechten Seite befestigt, nicht in der Mitte wie alle anderen Nähfüße. •... -
Seite 157: Stopfen
• Halten Sie die Stoffkante immer etwas über die linke Seite des Nähfußes hinaus, um ein Herausgleiten des Stoffes aus der Schnecke zu vermeiden. • Achten Sie darauf, das der Stoff nicht unter der rechten Seite des Nähfußes gerät. TIPP Durch ein leichtes Abschrägen des Stoffendes kann der Saum leich- ter in den Säumerfuß... -
Seite 158: Sticken
Sticken Allgemeines Entfernen Sie den Nähfuß und montieren Sie die Stopfplatte. Wäh- len Sie die normale Unterfadenspannung. Die Oberfadenspannung muss so locker eingestellt werden, dass der Unterfaden nicht auf die rechte Seite des Stoffen gezogen wird. • Spannen Sie den Stoff in den Stickrahmen (im Fachhandel erhält- lich). -
Seite 159: Nähen Mit Einer Zwillingsnadel (Doppelnadel)
Nähen mit einer Zwillingsnadel (Doppelnadel) Die Zwillingsnadel ist im gutsortierten Fachhandel erhältlich. Ach- ten Sie beim Kauf darauf, dass der Abstand zwischen den beiden Nadeln nicht 2,5 mm überschreiten soll. Mit der Zwillingsnadel lassen sich wunderschöne zweifarbige Mu- ster erzeugen, wenn Sie zum Nähen verschiedenfarbige Garne be- nutzen. -
Seite 160: Nähen Mit Dem Freiarm
Nähen mit dem Freiarm Der Freiarm (16) ermöglicht es Ihnen, röhrenförmige Stücke leichter zu nähen, z. B. für das Nähen von Ärmeln und Hosenbeinen ist diese Funktion sehr hilfreich. Ihre Nähmaschine kann leicht zu einer Freiarm-Maschine gemacht werden, indem Sie den Anschiebetisch mit der Zubehörbox von der Nähmaschine entfernen. -
Seite 161: Wartung
ARTUNG FLEGE UND EINIGUNG Schalten Sie bitte vor allen Wartungs-, Reinigungs- und Austausch- arbeiten immer die Maschine aus und ziehen Sie den Netzstecker. Auswechseln der Nählampe Die Nählampe wird mittels des Hauptschalters (13) ein- bzw. ausge- schaltet. • Zum Öffnen der Frontklappe (21) siehe Seite 10. •... -
Seite 162: Entfernen Und Einsetzen Des Nähfußes
Entfernen und Einsetzen des Nähfußes Entfernen • Drehen Sie das Handrad (10) zu sich, bis die Nadel ihre höchste Position erreicht hat. • Heben Sie den Nähfuß durch Hinaufdrücken des Nähfuß- hebels (15). • Durch Hinaufdrücken des Nähfußauslösehebels, hinter dem Nähfußhalter, fällt der Nähfuß... -
Seite 163: Entfernen Und Einsetzen Des Nähfußhalters
Entfernen und Einsetzen des Nähfußhalters Der Nähfußhalter braucht nicht entfernt zu werden, es sei denn, Sie wollen entweder Stopfen, Sticken oder sich Raum zur Reinigung des Stofftransporteurs (27) verschaffen. Entfernen • Bringen Sie die Nadel in ihre höchste Position durch Drehen des Handrades (10) zu sich hin und stellen Sie den Nähfußhebel (15) nach oben. - Seite 164 Reinigen des Gehäuses und des Fußanlassers Vor der Reinigung ziehen Sie bitte den Netzstecker aus der Steckdo- Für die Reinigung des Gehäuses und des Fußanlassers verwenden Sie ein trockenes, weiches Tuch. Vermeiden Sie Chemische Lö- sungs- und Reinigungsmittel, weil diese die Oberfläche und/oder Beschriftungen des Gerätes beschädigen können.
-
Seite 165: Ölen Der Maschine
Ölen der Maschine HINWEIS Ihre Nähmaschine ist ab Werk bereits geölt und zum Gebrauch fer- tig. Ölen des Maschine hinter der Frontklappe Die zu ölenden Stellen sind auf der Abbildung mit Pfeilen markiert. Vor dem Ölen sollten diese Stellen gereinigt werden. Geben Sie ein oder zwei Tropfen eines guten Nähmaschinenöls auf diese Stellen. - Seite 166 Demontage des hinteren Gehäusedeckels • Bringen Sie den Nähfußhebel (15) nach oben, öffnen Sie die Frontklappe (21) und lösen Sie die Schraube (A). HINWEIS Da sich die Schrauben A, B und C unterscheiden, bewahren Sie die- se immer getrennt auf. •...
- Seite 167 • Nur kleine interne Kunststoffhaken halten jetzt den hinteren Deckel, wie abgebildet. • Drücken Sie nun vorsichtig die obere Kante des hinteren Deckels (dort wo die Haken sind) mit einer Hand herunter. • Ziehen Sie nun den hinteren Deckel nach außen ab. D-36...
-
Seite 168: Ölen Der Ober- Und Unterseite Der Maschine
Ölen der Ober- und Unterseite der Maschine Die zu ölenden Stellen sind auf der Abbildung mit Pfeilen markiert. Vor dem Ölen sollten diese Stellen gereinigt werden. Geben Sie ein oder zwei Tropfen eines guten Nähmaschinenöls auf diese Stellen. TIPP Die mit Pfeilen gekennzeichneten Stellen brauchen nur selten geölt werden, ca. -
Seite 169: Störungen
TÖRUNGEN Wenn Störungen auftreten, lesen Sie bitte in dieser Bedienungsan- leitung nach, ob Sie alle Anweisungen richtig beachtet haben. Erst wenn keine der genannten Lösungen zum Erfolg führt wenden Sie sich bitte an unseren Kundendienst. Störung Ursache Seite Die Maschine läuft nicht frei Die Maschine muss geölt werden Seite 34 Staub und Fäden befinden sich in der... - Seite 170 Zusammenziehen oder Kräuseln der Die Oberfadenspannung ist zu stark Seite 15 Naht Die Maschine ist falsch eingefädelt worden Seite 12 Die Nadel ist für den Stoff zu groß Seite 40 Der Faden macht Schlingen Die Fadenspannung ist nicht reguliert Seite 15 Der Oberfaden ist nicht richtig eingefädelt und/ Seite 9 oder der Unterfaden ist nicht richtig aufgespult...
- Seite 171 -, G TOFF ADELTABELLE Generell werden feine Garne und Nadel für das Nähen von dünnen Stoffen verwendet, stärkere Garne und Nadeln werden für schwere Stoffe verwendet. Testen Sie immer Garn- und Nadelstärke auf ei- nem Stoffrest jenes Stoffes, den Sie nähen wollen. Benutzen Sie das- selbe Garn für Nadel und Spule.
-
Seite 172: Entsorgung
NTSORGUNG Verpackung Ihre Nähmaschine befindet sich zum Schutz vor Transportschäden in einer Verpackung. Verpackun- gen sind Rohmaterialien und somit wiederverwen- dungsfähig oder können dem Rohstoff-Kreislauf zurückgeführt werden. Gerät Werfen Sie Ihre Nähmaschine am Ende ihrer Lebens- zeit keinesfalls in den normalen Hausmüll. Erkundi- gen Sie sich bei Ihrer Stadt- oder Gemeinde- verwaltung nach einer umwelt- und sachgerechten Entsorgung. - Seite 173 NDEX Anschiebetisch 8, 11, 29, 35 Aufspulen der Unterfadenspule 9 Blindstich 21 Einfädeln der Spulenkapsel 11 Einfädeln des Oberfadens 12 Einsetzen der Spulenkapsel 12 Elastikstich 21 Entfernen der Spulenkapsel 11 Entsorgung 41 Faden abschneiden 18 Fadenheber 13 Fadenspannung 15, 16 Fingerschutz 7, 18 Freiarm 29 Fußanlasser 6, 8, 10, 17, 18, 37, 41...
- Seite 174 Knopfloch-Nähfuß 7, 23 Kordeln einnähen 25 Lieferumfang 6 Nadel 17, 30 Nadeltabelle 40 Näfuß einsetzen 31 Näfuß entfernen 31 Nähen von elastischer Stoffe 21 Nähfuß 17, 31 Nähfußhalter 32 Nähfußhalter einsetzen 32 Nähfußhalter entfernen 32 Nählampe 30 Nährichtungswechsel 18 Oberfadenspannung 15 Oberfadenspannungsregler 13 Ölen 33, 34, 35 Programmwahlknopf 19...
- Seite 175 Stoffteile zusammennähen 21 Stopfen 26 Stopfplatte 7, 24, 26, 27 Störungen 38 Transporteur 33 Unterfadenspannung 15, 16 Unterfadenspule 9 Wartung 30 Wattierlineal 7, 29 Zickzackstich 20 Zierstickstiche 22 Zubehörbox 7, 8 Zwillingsnadel 28 D-44...