Silvercrest SWGS 1 B1 Kurzanleitung
Vorschau ausblenden
Andere Handbücher für SWGS 1 B1:
- Kurzanleitung (69 Seiten) ,
- Bedienungs- und sicherheitshinweise (25 Seiten)
Inhaltsverzeichnis
Werbung
Verfügbare Sprachen
Verfügbare Sprachen
Quicklinks
SMART DOUBLE OUTDOOR
SOCKET WITH STAKE
SWGS 1 B1
AUSSENSTECKDOSE
2-FACH MIT
ERDSPIESS
Quick-Start-Guide
SMART DOUBLE
OUTDOOR SOCKET
WITH STAKE
Quick start guide
DOUBLE PRISE
D'EXTÉRIEUR AVEC
PIQUET
Guide de démarrage rapide
IAN 401367_2107
BUITENSTOP-
CONTACT
2-VOUDIG MET
GRONDSPIES
Quick-Start-Guide
Werbung
Inhaltsverzeichnis

Verwandte Anleitungen für Silvercrest SWGS 1 B1


Inhaltszusammenfassung für Silvercrest SWGS 1 B1
- Seite 1 SMART DOUBLE OUTDOOR SOCKET WITH STAKE SWGS 1 B1 AUSSENSTECKDOSE BUITENSTOP- 2-FACH MIT CONTACT ERDSPIESS 2-VOUDIG MET GRONDSPIES Quick-Start-Guide Quick-Start-Guide SMART DOUBLE OUTDOOR SOCKET WITH STAKE Quick start guide DOUBLE PRISE D’EXTÉRIEUR AVEC PIQUET Guide de démarrage rapide IAN 401367_2107...
- Seite 2 DE/AT/CH Quick-Start-Guide Seite GB/IE/NI Quick start guide Page FR/BE Guide de démarrage rapide Page NL/BE Quick-Start-Guide Pagina...
- Seite 3 Diese Kurzanleitung ist fester Bestandteil der Bedienungs anleitung. Sie dient dazu, dieses Produkt sofort in Betrieb nehmen zu können. Lesen Sie vor der Verwendung die Bedienungs anleitung und beachten Sie insbesondere die Sicherheitshinweise. Um alle Funktionen des Produkts vollständig nachlesen zu können, wählen Sie bitte den Link Bedienungsanleitung im App-Menü...
- Seite 4 This quick start guide is a fixed part of the operating instructions, which enables you to start up your product immediately. Read the operating instructions before use, and pay particular attention to the safety instructions. In order to fully understand all functions of the product, please select the User Manual link in the app’s tab.
- Seite 5 Ce guide de démarrage rapide fait partie intégrante de la notice d’utilisation. Il sert à la mise en service immédiate de ce produit. Lisez le mode d’emploi avant l’utilisation et respectez en particulier les consignes de sécurité. Pour pouvoir consulter toutes les fonctions du produit dans leur intégralité, veuillez sélectionner le lien Mode d’emploi Moi.
- Seite 6 Deze snelstartgids maakt een vast deel uit van de gebruiksaanwijzing. De gids dient ervoor om het product direct in gebruik te kunnen nemen. Lees vóór het gebruik de gebruiksaanwijzing door en neem vooral de veiligheidstips in acht. Kies de link Gebruiksaanwijzing Ik van de app om in het menu alle functies van het product volledig...
-
Seite 7: Inhaltsverzeichnis
AUSSENSTECKDOSE 2-FACH MIT ERDSPIESS Bestimmungs gemäßer Gebrauch . . . . . . . . . . . . . . . . Seite 8 Lieferumfang . -
Seite 8: Gebrauch
˜ Bestimmungs gemäßer Gebrauch Dieser Gartenspieß mit 2 Steckdosen (nachfolgend „Produkt“ genannt) ist ein Informationstechnologiegerät . Dieses Produkt dient zum funkgesteuerten Ein-/Ausschalten eines angeschlossenen elektrischen Verbrauchers . Geeignet Nicht geeignet Privater Industrielle/gewerbliche Gebrauch Zwecke Einsatz in tropischen Klimazonen DE/AT/CH... -
Seite 9: Lieferumfang
Jede andere Verwendung gilt als unsachgemäß . Ansprüche aufgrund unsachgemäßer Verwendung oder aufgrund unbefugter Änderungen am Produkt werden vom Garantie umfang nicht erfasst . Eine derartige Verwendung erfolgt auf Ihre eigene Gefahr . Die Steuerung und Einrichtung des Produkts erfolgt über die App Lidl Home . -
Seite 10: Sie Benötigen
˜ Sie benötigen Gateway (Separat erhältlich Bitte besuchen Sie die Lidl-Website für weitere Einzelheiten) Router: 2,4 GHz, IEEE 802 .11b/g/n Mobilgerät: iOS 9 .0 oder höher Android 5 .0 oder höher Ø 8 mm (für Beton) Ø 3 mm (für Holz) Geeignete Befestigungsmaterialien (Schrauben, Dübel) -
Seite 11: Teilebeschreibung
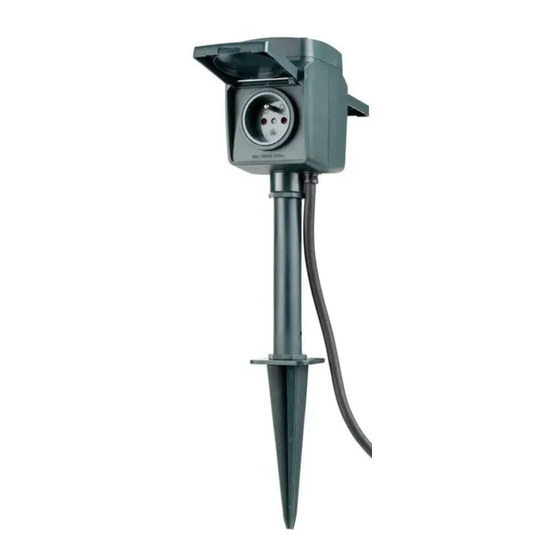
˜ Teilebeschreibung HG09044 HG09044-FR Ein-/Ausschalter (mit Indikator) Steckdose (x2) Stange Fuß Erdspieß Anschlussleitung mit Netzstecker DE/AT/CH... -
Seite 12: Technische Daten
˜ Technische Daten Betriebs spannung 230 V∼, 50 Hz Nennstrom 16 A Nennleistung max . 3680 W Frequenz bereich 2,400–2,483 GHz Max . Sende leistung +20 dBm Anschlussleitungs- länge ca . 3 m Kommunikations- protokoll ZigBee 3 .0 Empfangs reichweite ca . 70 m (freie Fläche) Schutzklasse IP-Schutzart... -
Seite 13: Montage
˜ Montage ˜ Erdspieß ca . 3 m DE/AT/CH... -
Seite 14: Fuß
1 . Schrauben Sie den Erdspieß vollständig auf die Stange 2 . Drücken Sie den Erdspieß an der gewünschten Stelle in den weichen Erdboden . 3 . Verbinden Sie den Netzstecker einer Steckdose . 4 . Produkt einschalten: drücken . 5 . - Seite 15 Ø 8 mm Ø 3 mm Ø 8 mm Ø 5 mm Das Produkt kann auf verschiedenen Oberflächenmaterialien montiert werden, die für Garten-/ Terrassenbereiche typisch sind . DE/AT/CH...
- Seite 16 Montage auf Holz: Schritt 3 überspringen . 1 . Markieren Sie die Position der Bohrlöcher durch die Schraubenlöcher im Fuß 2 . Bohren Sie Löcher mit einer Tiefe von ca . 50 mm in die markierten Positionen . Werkzeug: – Steinbohrer: Ø...
- Seite 17 ca 3 m 5 . Drehen Sie die Stange bis zum Anschlag auf den Fuß 6 . Verbinden Sie den Netzstecker einer Steckdose . DE/AT/CH...
-
Seite 18: Koppeln
7 . Produkt einschalten: drücken . 8 . Das Produkt ist betriebsbereit . ˜ Produkt und Mobil gerät koppeln HINWEISE: Alle Bildschirmfotos stammen aus der iOS-Version 13 .3 der App (falls nicht anders gekennzeichnet) . Ältere iOS-Versionen können Funktionseinschränkungen unterliegen . Die Android-Version der App ... -
Seite 19: Vorbereitung
Eine Aktualisierung der Firmware kann zu Änderungen der Funktionalität der App führen . Eine aktualisierte Bedienungsanleitung fi nden Sie hier: {Ich}: Reiter {Bedienungsanleitung} antippen . Vorbereitung App Lidl Home installieren und Gateway einrichten ( Gateway-Bedienungs anleitung) . 1 . - Seite 20 {Zuhause}: 5 . Reiter antippen (weitere Geräte hinzufügen) . 6 . Kategorie {Stecker und Buchse} auswählen: 7 . Auswählen: {Stecker} – iOS: {Stecker} – Android: 8 . Gateway auswählen . Nur notwendig, falls Sie 2 oder mehrere Gateways besitzen . {Fertig} antippen .
-
Seite 21: Entkoppeln
13 . Produkt benennen: antippen und Namen eingeben . 14 . Einen Raum antippen, um Standort des Produkts festzulegen (ausgewählter Raum wird grau hinterlegt) . {Fertig} 15 . antippen . 16 . Kopplung abgeschlossen . 17 . Zum Home-Bildschirm wechseln: {<} antippen . -
Seite 22: Netzwerk Trennen
{Gerät entfernen} antippen . Auswählen: {Trennen} – oder {Trennen und Daten löschen} – ( „Erweiterte Funktionen“ in der vollständigen Bedienungsanleitung) . {Bestätigen} antippen . ˜ Produkt manuell vom Netzwerk trennen ca . 5 s gedrückt halten, blinkt . DE/AT/CH... -
Seite 23: Signale
Diese Funktion versetzt das Produkt nur zurück in den Offl ine-Modus und startet den Kopplungsmodus . Falls Sie alle Daten vom Produkt und der Cloud löschen wollen, beziehen Sie sich auf das Kapitel „Erweiterte Funktionen“ in der vollständigen {Trennen und Bedienungsanleitung, Daten löschen} . -
Seite 24: Symbolerklärung
Symbolerklärung Indikator aus Indikator blinkt Indikator leuchtet ˜ Entsorgung Bevor Sie das Produkt an jemanden weitergeben, entsorgen oder dem Hersteller zurückgeben, stellen Sie sicher, dass alle Daten vom Produkt und von der Cloud gelöscht wurden . Beziehen Sie sich dazu auf das folgende Kapitel in der vollständigen Bedienungsanleitung: „Erweiterte Funktionen“, Menüpunkt:... - Seite 25 Die Verpackung besteht aus umweltfreundlichen Materialien, die Sie über die örtlichen Recyclingstellen entsorgen können . Beachten Sie die Kennzeichnung der Verpackungsmaterialien bei der Abfalltrennung, diese sind gekennzeichnet mit Abkürzungen (a) und Nummern (b) mit folgender Bedeutung: 1–7: Kunststoffe / 20–22: Papier und Pappe / 80–98: Verbundstoffe .
- Seite 26 Möglichkeiten zur Entsorgung des ausgedienten Produkts erfahren Sie bei Ihrer Gemeinde- oder Stadtverwaltung . Werfen Sie Ihr Produkt, wenn es ausgedient hat, im Interesse des Umweltschutzes nicht in den Hausmüll, sondern führen Sie es einer fachgerechten Entsorgung zu . Über Sammelstellen und deren Öffnungszeiten können Sie sich bei Ihrer zuständigen Verwaltung informieren .
-
Seite 27: Eu-Konformitätserklärung
˜ Vereinfachte EU-Konformitätserklärung Wir, OWIM GmbH & Co . KG, Stiftsbergstraße 1, 74167 Neckarsulm, DEUTSCHLAND, erklären in alleiniger Verantwortung, dass das Produkt AUSSENSTECKDOSE 2-FACH MIT ERDSPIESS HG09044, HG09044-FR den EU-Richtlinien 2014/53/EU und 2011/65/EU entspricht . Den vollen Text der EU-Konformitäts- erklärung finden Sie unter folgender Internetadresse: www .owim .com DE/AT/CH... - Seite 28 SMART DOUBLE OUTDOOR SOCKET WITH STAKE Intended use . . . . . . . . . . . . . Page 29 Scope of delivery . . . . . . . . . Page 30 You will need .
-
Seite 29: Intended Use
˜ Intended use This garden spike with 2 sockets (hereinafter referred to as “product”) is an Information Technology device . This product is used for radio-controlled switching on/off of connected electrical appliances . Suitable Not suitable Private use Industrial/commercial purposes Use in tropical climates GB/IE/NI... -
Seite 30: Scope Of Delivery
Any other use is considered improper . Any claims resulting from improper use or due to unauthorised modifi cation of the product will be considered unwarranted . Any such use is at your own risk . The Lidl Home app is required to control and set up the product . -
Seite 31: You Will Need
˜ You will need Gateway (Sold separately Please visit Lidl website for further details) Router: 2 .4 GHz, IEEE 802 .11b/g/n Mobile device: iOS 9 .0 or higher Android 5 .0 or higher Ø 8 mm (for concrete) Ø 3 mm (for wood) Suitable mounting materials (screws, dowels) GB/IE/NI... -
Seite 32: Description Of Parts
˜ Description of parts HG09044 HG09044-FR On/off button (with indicator) Socket-outlet (x2) Pole Foot Ground spike Power cord with plug GB/IE/NI... -
Seite 33: Technical Data
˜ Technical data Operating voltage 230 V∼, 50 Hz Rated current 16 A Rated power max . 3680 W Frequency band 2 .400–2 .483 GHz Max . transmitted power +20 dBm Power cord length approx . 3 m Communication protocol ZigBee 3 .0 Reception range approx . -
Seite 34: Installation
˜ Installation ˜ Ground spike approx . 3 m GB/IE/NI... -
Seite 35: Foot
1 . Fully screw the ground spike onto the pole 2 . At the desired location, push the ground spike into the soft soil . 3 . Connect the power plug to a socket-outlet . 4 . Switching the product on: Press 5 . - Seite 36 Ø 8 mm Ø 3 mm Ø 8 mm Ø 5 mm The product can be mounted on different surface materials typical for garden/patio locations . GB/IE/NI...
- Seite 37 Mounting on wood: Skip step 3 . 1 . Mark the position of the drill holes through the screw holes in the foot 2 . Drill holes with a depth of approx . 50 mm into the marked positions . Tool: –...
- Seite 38 approx 3 m 5 . Fully screw the pole onto the foot 6 . Connect the power plug to a socket-outlet . GB/IE/NI...
-
Seite 39: Device
7 . Switching the product on: Press 8 . The product is ready for use . ˜ Pairing product and mobile device NOTES: Screenshots are from the iOS 13 .3 app version (if not otherwise marked) . Older iOS versions may have functional limitations . - Seite 40 Updating the fi rmware might result in changes to the app’s functionality . An updated instruction manual can be found here: {Me} tab: {User Manual} . Preparation Install Lidl Home app and setup Gateway ( Gateway instruction manual) . 1 .
- Seite 41 {Home} tab: (add further devices) . {Plug and Socket} 6 . Select category: 7 . Select: {Plug} – iOS: {Plug} – Android: 8 . Select Gateway . Only necessary, if you have 2 or more Gateways . 9 . Tap {Done} . 10 .
-
Seite 42: Mobile Device
13 . Naming the product: and enter a name . 14 . Tap one of the rooms to set location of product (selected room is grayed out) . 15 . Tap {Done} . 16 . Pairing completed . 17 . Return to home screen: Tap {<} . -
Seite 43: Manually From Network
{Remove Device} . 4 . Tap Select: {Disconnect} – {Disconnect and wipe data} – ( “Additional functions” in the full instruction manual) . {Confi rm} . 5 . Tap ˜ Disconnecting product manually from network Press for approx . 5 s until ... -
Seite 44: Signals
This function only resets the product to offl ine mode and starts the pairing mode . If you want to remove all data from the product and the cloud, refer to the chapter “Additional functions” in the full instruction manual, {Disconnect and wipe data} . -
Seite 45: Explanation Of Symbols
Explanation of symbols Indicator off Indicator fl ashing Indicator on ˜ Disposal Before passing on, disposing of or returning the product to the manufacturer, make sure that all data has been deleted from the product and the cloud . To do this, refer to following chapter in the full instruction manual: “Additional functions”, menu point: {Disconnect and wipe... - Seite 46 The packaging is made entirely of recyclable materials, which you may dispose of at local recycling facilities . Observe the marking of the packaging materials for waste separation, which are marked with abbreviations (a) and numbers (b) with following meaning: 1–7: plastics / 20–22: paper and fibreboard / 80–98: composite materials .
- Seite 47 Contact your local refuse disposal authority for more details of how to dispose of your worn-out product . To help protect the environment, please dispose of the product properly when it has reached the end of its useful life and not in the household waste .
-
Seite 48: Of Conformity
˜ Simplified EU declaration of conformity Hereby, OWIM GmbH & Co . KG, Stiftsbergstraße 1, 74167 Neckarsulm, GERMANY declares that the product SMART DOUBLE OUTDOOR SOCKET WITH STAKE HG09044, HG09044-FR is in compliance with Directive 2014/53/EU and 2011/65/EU . The full text of the EU declaration of conformity is available at the following internet address: www .owim .com GB/IE/NI... - Seite 49 DOUBLE PRISE D’EXTÉRIEUR AVEC PIQUET Utilisation conforme aux prescriptions . . . . . . . . . . . . . Page 50 Contenu de l'emballage . . . Page 51 Vous avez besoin .
-
Seite 50: Prescriptions
˜ Utilisation conforme aux prescriptions Cette double prise d’extérieur avec piquet (désignée ci-après comme « Produit ») est un appareil de la technologie de l’information . Ce produit est utilisé pour la mise en marche/l'arrêt radiocommandé(e) d'un consommateur électrique raccordé . Approprié Non approprié... -
Seite 51: Contenu De L'emballage
Toute autre utilisation est considérée comme inadéquate . Des recours à la garantie en raison d'utilisation non appropriée ou de modifi cations non autorisées sur le produit sont exclus . Une utilisation de ce genre se fait à vos risques et périls . -
Seite 52: Vous Avez Besoin
˜ Vous avez besoin Passerelle domotique (Disponible séparément Veuillez consulter le site web Lidl pour d'autres détails) Routeur : 2,4 GHz, IEEE 802 .11b/g/n Appareil portable : iOS 9 .0 ou supérieur Android 5 .0 ou supérieur Ø 8 mm (pour le béton) Ø... -
Seite 53: Description Des Pièces
˜ Description des pièces HG09044 HG09044-FR Interrupteur marche/arrêt (avec voyant) Prise (x2) Montant Pied Piquet Cordon d'alimentation avec fiche de secteur FR/BE... -
Seite 54: Données Techniques
˜ Données techniques Tension de fonctionnement 230 V∼, 50 Hz Courant nominal 16 A Puissance nominale 3680 W maxi Plage de fréquence 2,400–2,483 GHz Puissance d'émission maxi +20 dBm Longueur du cordon d'alimentation env . 3 m Protocole de communication ZigBee 3 .0 Portée de réception env . -
Seite 55: Montage
˜ Montage ˜ Piquet env . 3 m FR/BE... -
Seite 56: Pied
1 . Visser complètement le piquet le montant 2 . Plantez le piquet dans un sol meuble à l'endroit désiré . 3 . Branchez la fiche de secteur une prise de courant . 4 . Allumer le produit : Appuyer sur 5 . - Seite 57 Ø 8 mm Ø 3 mm Ø 8 mm Ø 5 mm Le produit peut être monté sur divers matériaux typiques de jardins/ terrasses . FR/BE...
- Seite 58 Montage sur du bois : Sauter à la 3e étape . 1 . Marquez l'emplacement des trous à percer en utilisant le pied comme gabarit . 2 . Percez des trous d'une profondeur d'environ 50 mm aux positions marquées . Outil : – Foret pour pierre : Ø...
- Seite 59 env . 3 m 5 . Tournez le montant jusqu'à la butée sur le pied 6 . Branchez la fiche de secteur une prise de courant . FR/BE...
-
Seite 60: Et L'appareil Portable
7 . Allumer le produit : Appuyer sur 8 . Le produit est prêt à l'emploi . ˜ Coupler le produit et l'appareil portable REMARQUES : Toutes les captures d'écran proviennent de la version iOS 13 .3 de l'application (sauf indication contraire) . Les versions plus anciennes iOS peuvent présenter des limitations fonctionnelles . - Seite 61 La mise à jour du micrologiciel (Firmware) peut entraîner des changements dans les fonctionnalités de l'application . Vous pouvez trouver un mode d'emploi mis à jour ici : {Moi} : Onglet Tapez sur {Mode d'emploi} . Préparation Installer l’application Lidl Home et confi gurer la passerelle ( Mode d’emploi de la passerelle) .
- Seite 62 {Chez moi} : 5 . Onglet Tapez sur (Ajouter d'autres appareils) . 6 . Sélectionner {Prise mâle et prise la catégorie : femelle} 7 . Sélectionner : {Prise adaptateur} – iOS : {Prise adaptateur} – Android : 8 . Sélectionner la passerelle . Nécessaire uniquement si vous disposez de 2 passerelles ou plus .
-
Seite 63: L'appareil Portable
13 . Nommer le produit : Tapez sur et saisir le nom . 14 . Tapez sur une pièce, afin de déterminer l'emplacement du produit (la pièce sélectionnée est marquée en gris) . 15 . Tapez sur {Terminé} . 16 . Couplage terminé . 17 . -
Seite 64: Manuellement Du Réseau
4 . Tapez sur {Supprimer l'appareil} . Sélectionner : {Séparer} – {Séparer et supprimer toutes – données} ( « Autres fonctions » dans le mode d'emploi complet) . 5 . Tapez sur {Valider} . ˜ Séparer le produit manuellement du réseau Maintenir enfoncé pendant env . -
Seite 65: Signaux
Cette fonction ne fait que remettre le produit en mode hors ligne et démarre le mode de couplage . Si vous souhaitez supprimer toutes les données du produit et du cloud, reportez-vous au chapitre « Autres fonctions » du {Séparer et mode d'emploi complet, supprimer toutes les données} . -
Seite 66: Explication Des Symboles
Explication des symboles Voyant éteint Voyant clignotant Voyant allumé ˜ Mise au rebut Avant de transmettre le produit à un tiers, de le mettre au rebut pour recyclage ou de le retourner au fabricant, assurez-vous que toutes les données du produit et du cloud sont supprimées . - Seite 67 L’emballage se compose de matières recyclables pouvant être mises au rebut dans les déchetteries locales . Veuillez respecter l‘identification des matériaux d‘emballage pour le tri sélectif, ils sont identifiés avec des abbréviations (a) et des chiffres (b) ayant la signification suivante : 1–7 : plastiques / 20–22 : papiers et cartons / 80–98 : matériaux composite .
- Seite 68 Votre mairie ou votre municipalité vous renseigneront sur les possibilités de mise au rebut des produits usagés . Afin de contribuer à la protection de l’environnement, veuillez ne pas jeter votre produit usagé dans les ordures ménagères, mais éliminez-le de manière appropriée .
- Seite 69 ˜ Déclaration de conformité CE simplifiée Nous, OWIM GmbH & Co . KG, Stiftsbergstraße 1, 74167 Neckarsulm, ALLEMAGNE, déclarons sous notre seule responsabilité que le produit DOUBLE PRISE D’EXTÉRIEUR AVEC PIQUET HG09044, HG09044-FR répond aux directives de l'UE 2014/53/UE et 2011/65/UE .
- Seite 70 BUITENSTOPCONTACT 2-VOUDIG MET GRONDSPIES Beoogd gebruik ..Pagina 71 Levering....Pagina 72 U hebt nodig ... . Pagina 73 Onderdelenbeschrijving .
-
Seite 71: Beoogd Gebruik
˜ Beoogd gebruik Dit buitenstopcontact 2-voudig met grondspies (hierna "product" genoemd) is een apparaat behorend tot de informatietechnologie. Dit product dient voor radiogestuurd in-/uitschakelen van een aangesloten elektrische verbruiker. Geschikt Niet geschikt Privégebruik Industriële/commerciële doeleinden Gebruik in tropische klimaatzones NL/BE... -
Seite 72: Buitenstopcontact 2-Voudig Met Grondspies
Elk ander gebruik wordt als niet volgens de voorschriften aangemerkt. De garantie dekt geen claims op basis van onreglementair gebruik of van onbevoegde wijzigingen aan het product. Dergelijk gebruik vindt op eigen risico plaats. De besturing en installatie van het product vindt plaats via de app Lidl Home. -
Seite 73: U Hebt Nodig
˜ U hebt nodig Gateway (Apart verkrijgbaar Ga naar de Lidl-website voor verdere bijzonderheden) Router: 2,4 GHz, IEEE 802.11b/g/n Mobiel apparaat: iOS 9.0 of hoger Android 5.0 of hoger Ø 8 mm (voor beton) Ø 3 mm (voor hout) Geschikt bevestigingsmateriaal (schroeven, pluggen) NL/BE... -
Seite 74: Onderdelenbeschrijving
˜ Onderdelenbeschrijving HG09044 HG09044-FR Aan/uit-schakelaar (met indicatielampje) Stopcontact (x2) Stang Voet Grondspies Aansluitsnoer met netstekker NL/BE... -
Seite 75: Technische Gegevens
˜ Technische gegevens Bedrijfsspanning 230 V∼, 50 Hz Nominale stroom 16 A Nominaal vermogen max. 3680 W Frequentiebereik 2,400–2,483 GHz Max. zendvermogen +20 dBm Lengte aansluitsnoer ca. 3 m Communicatie- protocol ZigBee 3.0 Ontvangstbereik ca. 70 m (vrije ruimte) Beschermingsklasse IP-beschermingswijze IP44 Max. totaal Modelnr. uitgangsvermogen HG09044 3680 W (16 A) HG09044-FR 3680 W (16 A) NL/BE... -
Seite 76: Montage
˜ Montage ˜ Grondspies ca. 3 m NL/BE... -
Seite 77: Voet
1. Schroef de grondspies volledig op de stang 2. Duw de grondspies op de gewenste locatie in de zachte aarde. 3. Steek de netstekker in een stopcontact. 4. Het product inschakelen: Druk op 5. Het product is klaar voor gebruik. ˜... - Seite 78 Ø 8 mm Ø 3 mm Ø 8 mm Ø 5 mm Het product kan op de verschillende soorten ondergrond worden gemonteerd die kenmerkend zijn voor tuin-/terrasoppervlakken. NL/BE...
- Seite 79 Montage op hout: Stap 3 overslaan. 1. Geef door de schroefgaten in de voet de plaats van de boorgaten aan. 2. Boor op de aangegeven plaatsen gaten met een diepte van ca. 50 mm. Gereedschap: – Steenboor: Ø 8 mm – Houtboor: Ø...
- Seite 80 ca 3 m 5. Draai de stang tot de stuit op de voet 6. Steek de netstekker in een stopcontact. NL/BE...
-
Seite 81: Apparaat Koppelen
7. Het product inschakelen: Druk op 8. Het product is klaar voor gebruik. ˜ Product en mobiel apparaat koppelen TIPS: Alle beeldschermfoto's zijn afkomstig van de iOS-versie 13.3 van de app (indien niet anders aangegeven). Van oudere iOS-versies kan de functionaliteit beperkt zijn. - Seite 82 Het bijwerken van de fi rmware kan wijzigingen in de functionaliteit van de app tot gevolg hebben. U treft hier een bijgewerkte gebruiksaanwijzing aan: {Ik}: Tabblad Tik op {Gebruiksaanwijzing}. Voorbereiding App Lidl Home en Gateway installeren ( gebruiksaanwijzing Gateway).
- Seite 83 {Thuis}: 5. Tabblad Tik op (Meer apparaten toevoegen). 6. Categorie {Stekker en bus} kiezen: 7. Kiezen: {Tussenstekker} – iOS: {Tussenstekker} – Android: 8. Gateway kiezen. Alleen noodzakelijk indien u 2 of meer Gateways bezit. 9. Tik op {Gereed}. 10. Houd ca.
-
Seite 84: Apparaat Loskoppelen
13. Product benoemen: Tik op en voer de naam in. 14. Tik op een ruimte om de locatie van het product vast te leggen (de gekozen ruimte wordt in grijs weergegeven). 15. Tik op {Gereed}. 16. Koppeling voltooid. 17. Wisselen naar startscherm: Tik op {<}. -
Seite 85: Loskoppelen Van Het
{Apparaat verwijderen}. 4. Tik op Kiezen: {Loskoppelen} – {Koppel los en wis alle – gegevens} ( "Uitgebreide functies" in de volledige gebruiksaanwijzing). 5. Tik op {Bevestigen}. ˜ Product handmatig loskoppelen van het netwerk Houd ca. 5 sec lang ingedrukt, totdat knippert. -
Seite 86: Signalen
Deze functie zet het product alleen terug naar de offl ine-modus en start de koppelmodus. Mocht u alle gegevens in het product en in de Cloud willen wissen, raadpleeg dan het hoofdstuk "Uitgebreide functies" van de volledige {Koppel los en gebruiksaanwijzing wis alle gegevens}. -
Seite 87: Verklaring Van De Symbolen
Verklaring van de symbolen Indicatielampje uit Indicatielampje knippert Indicatorlampje brandt ˜ Afvoer Zorg ervoor dat alle gegevens van het product en in de cloud worden gewist, voordat u het product doorgeeft aan een derde, het verwijdert of het retourneert aan de fabrikant. Raadpleeg daarvoor het hieronder vermelde hoofdstuk van de volledige gebruiksaanwijzing:... - Seite 88 De verpakking bestaat uit milieuvriendelijke grondstoffen die u via de plaatselijke recyclingcontainers kunt afvoeren. Neem de aanduiding van de verpakkingsmaterialen voor de afvalscheiding in acht. Deze zijn gemarkeerd met de afkortingen (a) en een cijfers (b) met de volgende betekenis: 1–7: kunststoffen / 20–22: papier en vezelplaten / 80–98: composietmaterialen.
- Seite 89 Informatie over de mogelijkheden om het uitgediende product na gebruik te verwijderen, verstrekt uw gemeentelijke overheid. Gooi het afgedankte product omwille van het milieu niet weg via het huisvuil, maar geef het af bij het daarvoor bestemde depot of het gemeentelijke milieupark.
-
Seite 90: Eg-Verklaring Van
˜ Vereenvoudigde EG-verklaring van overeenstemming Wij, OWIM GmbH & Co. KG, Stiftsbergstraße 1, 74167 Neckarsulm, DUITSLAND, verklaren als alleenverantwoordelijke dat het product BUITENSTOPCONTACT 2-VOUDIG MET GRONDSPIES HG09044 en HG09044-FR voldoet aan de EU-richtlijnen 2014/53/EU en 2011/65/EU. De volledige tekst van de EG-verklaring van overeenstemming is op het volgende internetadres beschikbaar: www.owim.com NL/BE... - Seite 91 OWIM GmbH & Co. KG Stiftsbergstraße 1 74167 Neckarsulm GERMANY Model No.: HG09044 / HG09044-FR Version: 02/2022 IAN 401367_2107...