Herunterladen Inhalt Inhalt Diese Seite drucken

Werbung

Verfügbare Sprachen

Verfügbare Sprachen

TD 550
Bedienungsanleitung
User Manual
Mode d'Emploi

Werbung

Inhaltsverzeichnis
loading

Inhaltszusammenfassung für THORENS TD 550

  • Seite 1 TD 550 Bedienungsanleitung User Manual Mode d’Emploi...
  • Seite 2 www.thorens.com...
  • Seite 3 TD 550 Bedienungsanleitung User Manual Mode d’Emploi...
  • Seite 4 Inhalt EINLEITUNG SICHERHEITSHINWEISE ANSCHLÜSSE UND BEDIENELEMENTE MONTAGE UND AUFSTELLUNG ANSCHLUSS DES PLATTENSPIELERS INSTALLATION DES TONARMS INSTALLATION DES TONABNEHMERS EINSTELLUNG DER TONARMHÖHE (VTA) FEINJUSTAGE DES TONABNEHMERS AUFLAGE- UND ANTISKATINGKRAFT BETRIEB DES PLATTENSPIELERS WARTUNG UND PFLEGE TECHNISCHE DATEN PROBLEMBEHANDLUNG SERVICEINFORMATIONEN...
  • Seite 5: Inhaltsverzeichnis

    Table of Contents Table des matiéres INTRODUCTION INTRODUCTION HINTS FOR SAFETY AND PRECAUTION CONSIGNES DE SECURITE CONNECTIONS AND OPERATIONAL ELEMENTS RACCORDEMENTS ET COMMANDES MOUNTING AND SET-UP MONTAGE ET INSTALLATION CONNECTING THE RECORD PLAYER RACCORDEMENT DE LA PLATINE MOUNTING THE TONEARM INSTALLATION DU BRAS DE LECTURE MOUNTING THE PICKUP CARTRIDGE INSTALLATION DE LA CELLULE DE LECTURE...
  • Seite 6: Einleitung

    Wir empfehlen Ihnen daher, diese Bedienungs- anleitung vor der ersten Ingebrauchnahme aufmerksam durchzulesen. Sie enthält wichtige Hinweise für Aufstellung, Anschluss und Konfiguration Ihres neuen Laufwerks. Sollten Sie darüber hinaus noch Fragen haben, so können Sie sich jederzeit an Ihren Thorens Fachhändler wenden.
  • Seite 7: Sicherheitshinweise

    Sicherheitshinweise BITTE VOR DER ERSTMALIGEN INBETRIEBNAHME AUFMERKSAM LESEN! Dieses Elektronikprodukt entspricht den gültigen Richtlinien zur Erlangung des CE-Zeichens. Alle notwendigen Prüfungen wurden mit positivem Ergebnis vorgenommen. VORSICHT Um einen elektrischen Schlag zu vermeiden, darf das Gehäuse des 2002/95/EC (RoHS) konform. Netzteils nicht geöffnet werden.
  • Seite 8: Anschlüsse Und Bedienelemente

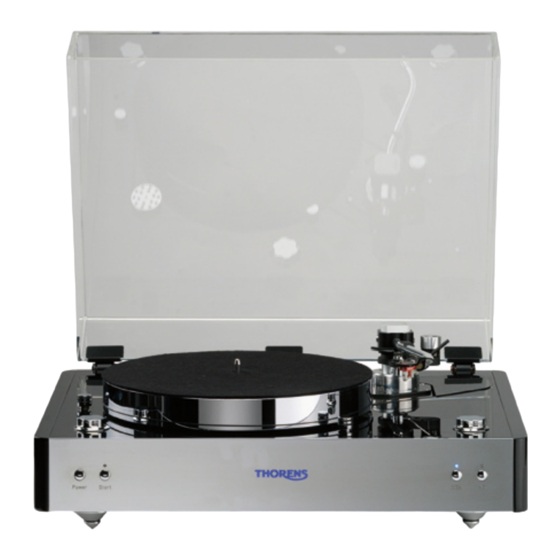
    Abbildung 1 (1) Ein/Aus-Schalter (8) Erdungsanschlussbuchse (2) Start-Schalter mit Anzeige-LED (9) XLR-Ausgangsbuchse, rechter Kanal (3) Hinterleuchtetes Thorens-Logo als Betriebsanzeige (10) XLR-Ausgangsbuchse, linker Kanal (4) Geschwindigkeitswahlschalter 33 1/3 U/min. (11) Geschwindigkeitsfeineinstellung 33 1/3 (5) Geschwindigkeitswahlschalter 45 U/min. (12) Einstellung Leuchtstärke Display/LED...
  • Seite 9: Montage Und Aufstellung

    Abbildung 2 1 x Wasserwaage (Libelle) 1 x Tonarmwaage 1 x Inbusschlüssel SW3 Stellen Sie die Zarge des TD 550 auf einer waagrechten Unterlage möglichst nah bei Ihrem Verstärker auf. Prüfen 3 x Subchassiseinstellschraube 1 x Adapter für 17cm-Schallplatten Sie den waagrechten Stand mit der beiliegenden Libelle.
  • Seite 10 Ihre Schallplat- gen kann. Bewahren Sie diese unbedingt auf. WICHTIG: ten vor Abnutzung während des Abspielvorgangs. Sollte Bitte transportieren Sie Ihren TD 550 immer nur mit einge- die Matte aufgrund statischer Aufladung an der Platte haf- drehten Transportsicherungsschrauben.
  • Seite 11: Anschluss Des Plattenspielers

    Stecken Sie das Ausgangskabel des Netzteils in die Span- Verbinden Sie diese mit dem Phonoeingang Ihres Verstär- nungsversorgungsbuchse auf der Rückseite des TD 550 kers. Der TD 550 besitzt sowohl symmetrische XLR-Buch- (14). Verbinden Sie anschließend mithilfe des beiliegenden sen (9+10) als asymmetrische Cinchbuchsen (6+7).
  • Seite 12 Verbinden Sie den Erdungsanschluss des TD 550 (8) mit- Thorens Plattenspieler sind relativ unempfindlich gegenü- hilfe des beiliegenden Erdungskabels mit dem Erdungsan- ber Erschütterungen. Dennoch stellen diese ein generelles schluss Ihres Verstärkers oder eines beliebigen Eingangs. Problem bei der Plattenwiedergabe mit hochwertigen Ton- abnehmern dar.
  • Seite 13 Sie können einen Tonarm auf der Montageplatte montie- ist dieser bereits montiert und die von dem jeweiligen Her- ren. Der TD 550 ist für Tonarme von 9” bis 12” geeignet. steller mitgelieferten Bedienungsanleitungen sowie Mon- Sollten hierbei Probleme auftreten, wenden Sie sich bitte tage- und Justagehilfen sind in der Verpackung beigelegt.
  • Seite 14 Installation des Tonabnehmers Installieren und konfigurieren Sie Ihr Tonabnehmersystem Die vier farblich gekennzeichneten Anschlusslitzen werden entsprechend der Montageanleitung des Herstellers und auf die entsprechenden Anschluss-Stifte (identische Far- nehmen Sie alle notwendigen Einstellungen vor. be) des Tonabnehmersystems geschoben. rechter Kanal, rot (Signal) Im Folgenden erhalten Sie einige allgemeine Hinweise zur rechter Kanal, grün (Masse) Installation und Konfiguration.
  • Seite 15: Einstellung Der Tonarmhöhe (Vta)

    Einstellung der Tonarmhöhe (VTA) Wenn Ihr TD 550 bereits ab Werk mit einem Tonabneh- mersystem ausgestattet wurde, so entfällt die folgende Einstellung. Die VTA-Einstellung erfolgt bei allen Tonarmen auf unter- schiedliche Weise. Für Arme, die keine VTA-Einstellmög- lichkeit bieten (z.B. Rega), können Sie von uns eine spezi- elle VTA-Spannschraube beziehen.
  • Seite 16 Laufwerks voll zur Geltung. Sollten Sie hierbei Probleme Tonarmachse. Bei allen Drehpunktarmen (wie z.B. den haben, so hilft Ihnen Ihr Fachhändler gerne weiter. Thorens Tonarmen) liegen die optimalen Werte zwischen 21° und 24°. Wir empfehlen einen Kröpfungswinkel von ACHTUNG: Bei der Feinjustage des Tonabneh- 23°...
  • Seite 17: Einstellung Von Auflage- Und Antiskatingkraft

    Hörtests bewiesen. Stellen Sie die Antiskatingkraft an Ihrem Tonarm auf „0“ Mithilfe der beigelegten Thorens-Tonarmwaage können (die Einstellung der Antiskatingkraft entnehmen Sie bitte Sie das eingestellte Gewicht überprüfen. Legen Sie die der Bedienungsanleitung Ihres Tonarms). Entfernen Sie Waage dazu auf die Filzmatte (Schallplatte vorher entfer- den Nadelschutz und schwenken Sie den Tonarm über die...
  • Seite 18: Betrieb Des Plattenspielers

    Geschwindigkeitseinstellung aufgerufen. Eine Erklärung aller Bedienelemente und Anschlüs- se des TD 550 finden Sie in Abbildung 1 auf Seite 8. HINWEIS: Der TD 550 besitzt eine intelligente Steuerung, die die Anlaufgeschwindigkeit in den ersten drei Sekunden nach Einschalten halbiert.
  • Seite 19 Gehen Sie wie folgt vor, um eine Schallplatte abzuspielen: Beim Abspielbetrieb können Sie die Haube abgesenkt las- sen. Jedoch können hierdurch Klangverfälschungen auf- Öffnen Sie die Haube, nehmen Sie die Schallplatte aus der treten, da der von den Lautsprecherboxen abgestrahlte Hülle, und legen Sie sie auf den Plattenteller.
  • Seite 20: Wartung Und Pflege

    Brillenputztuch. Ein trockenes Tuch kann unerwünschte elektro- statische Aufladungen verursachen. Den Thorens Präzisionsriemen sollten Sie alle 2 Jahre er- setzen. Sollte das Gerät über längere Zeit nicht in Betrieb sein, so empfiehlt es sich, den Riemen zu demontieren, um einer vorzeitigen Alterung vorzubeugen.
  • Seite 21 • Die Riemenspannung ist falsch. weiterhin vorhanden sein, so kontaktieren Sie bitte Ihren • Motor oder Steuerelektronik sind defekt Thorens Fachhändler oder Vertrieb. Fehler: Kein Signal auf einem oder beiden Kanälen. Mögliche Ursachen: • Die Verbindung zwischen Plattenspieler und Verstärker ist unterbrochen.
  • Seite 22: Technische Daten

    Technische Daten Modell TD 550 Funktion manuell Antriebssystem Riemenantrieb (außenliegend) Motor elektronisch geregelter AC-Synchronmotor ⅓ Geschwindigkeiten , 45 U/min Umschaltung elektronisch Plattenteller 12” Aluminiumteller mit 6,2 kg Tonarm je nach Ausführung abhängig vom Tonarm Anti-Skating – Endabschaltung 140 pF Kabelkapazität...
  • Seite 23: Serviceinformationen

    Ihr Thorens Produkt gerne zur Verfügung stehen. Für Transportschäden durch unsachgemäße Verpackung wird keine Haftung übernommen! Sie können Thorens auch direkt kontaktieren: Transportieren Sie den TD 550 niemals ohne die Trans- Thorens Export Company AG portsicherungsschrauben! Im Huebel 1, CH-4304 Giebenach, Schweiz www.thorens.com, info@thorens.com...
  • Seite 24 Notizen...
  • Seite 25: Introduction

    In the event that you have any question this user manual cannot answer please do not hesitate to ask your Thorens dealer for further assistance.
  • Seite 26: Safety Instructions

    Safety instructions PLEASE READ THIS PAGE CAREFULLY BEFORE OPERATING YOUR UNIT! This product was tested and complies with all the requirements for the CE Mark. CAUTION To reduce risk of electric shock, do not remove the cover (or back). Compliant to 2002/95/EC (RoHS) No user-serviceable parts inside.
  • Seite 27: Connections And Operational Elements

    (1) On/Off switch (8) Ground post (2) Start-up button with LED indicator (9) XLR output connector right channel (3) Illuminated Thorens-logo shows unit switched on (10) XLR output connector left channel (4) Speed selector 33 rpm (11) Speed fine-adjust 33 rpm...
  • Seite 28: Mounting And Set-Up

    1 x sprit level (bubble) 1 x tonearm balancing gauge 1 x Allen-key SW3 Put the plinth of the TD 550 onto a level surface as close as possible to your audio amplifier. You may verify its level 3 x thumb screws for adjusting 1 x adaptor for single records position with the help of the supplied spirit level (bubble).
  • Seite 29 Continue by detaching the locking screws which have Put felt mat on platter. It is soft and will protect your been factory-installed for safe transportation. Make sure records from damages that may occur during playback. the suspended chassis is freely oscillating after having re- If the felt mat is to stick against the record owing to static moved the screws.
  • Seite 30: Connecting The Record Player

    Insert the output lead of the power supply into the recep- Connect the leads with the phono input at your amplifier. tacle (14) at the rear panel of the TD 550. By means of the The TD 550 features balanced XLR-connectors (9+10) as supplied power cord connect the IEC input at power sup- well as unbalanced RCA-connectors (6+7).
  • Seite 31 Take the supplied ground lead and connect the ground Thorens record players are relatively insensitive when sub- post (8) at the rear panel with the ground post on your ject to foot-fall shocks or airborne vibrations. Neverthe- preamplifier/amplifier or separate phono-preamplifier.
  • Seite 32: Mounting The Tonearm

    Mounting the tonearm The TD 550 can be delivered as the so-called BC-version If you have acquired your TD 550 with tonearm it will be without tonearm whereupon you can install the tonearm delivered factory-installed and supplied with the respec- of your choice.
  • Seite 33: Mounting The Pickup Cartridge

    HINT: if cartridges from GRADO are to be employed it is recommended to fix them with screws “upside down”. This Tonearms supplied by Thorens will always accept pickup means the screws are inserted from underneath through cartridges with standard fixing hole distance of 12.5 mm cartridge holes and headshell slots and the nuts are to fix (1/2”).
  • Seite 34: Adjusting Tonearm Height (Vta)

    Adjusting tonearm height (VTA) If your TD 550 has come factory-equipped with tonearm you may disregard the following instructions. VTA adjustment is as different as there are different to- nearms. However Thorens can supply a special clamp mechanism for tonearms without the facility of adjusting VTA (e.g.
  • Seite 35: Alignment Of Pickup Cartridge

    They are avail- records! able from your Thorens dealer. When you are through with the alignment you can finally tighten the cartridge screws. Azimuth: this is the angle between cantilever/stylus as- sembly and record groove.
  • Seite 36: Adjusting Tracking Force And Bias

    Adjusting tracking force and bias We advise to have the tracking force adjusted rather Tracking force as well as anti-skating (bias) are to be ad- towards the higher value of the manufacturer‘s recom- justed according to the instructions supplied by the manu- mendation because this would in any case ensure a bet- facturer of the cartridge.
  • Seite 37: Operation

    An explanation of operational elements and connec- tions at the TD 550 is given in Figure 1 on page 25 of HINT: the TD 550 is equipped with an intelligent start-up control which within the first four seconds makes the mo- this manual.
  • Seite 38 For playing your records proceed as follows: You may have the dustcover closed during playback but sound waves from the speakers can excite the air beneath Open dustcover, take the record from its cover and in- the cover and thus induce sonic distortions. ner sleeve and put it on platter.
  • Seite 39: Maintenance And Care

    The Thorens precision belt should be exchanged at least every other year. If the record player is not in use for a longer time, it is advisable to remove the belt in order to prevent a premature ageing under tension.
  • Seite 40: Trouble Shooting

    Failure: there is wow and flutter audible. If a failure could not be remedied in spite of having thor- Possible cause: oughly examined the possible causes, please contact your • The bearing is defective Thorens dealer or distribution partner. • The motor control circuitry is defective...
  • Seite 41: Technical Specifications

    Technical specifications Modell TD 550 Function manual operation Drive system belt drive (via outer platter rim) Motor electronically controlled AC synchronous motor ⅓ Speed , 45 rpm Speed change electronically Platter 300 mm (12”) aluminium platter; 6.2 kg Tonearm optional...
  • Seite 42: Service Information

    You may contact Thorens also directly: not been properly packed. Thorens Export Company Ltd. Never transport or ship the TD 550 without having the Im Huebel 1, CH-4304 Giebenach, Switzerland suspended chassis fixed by means of the locking screws! www.thorens.com, info@thorens.com...
  • Seite 43 Notes...
  • Seite 44: Introduction

    Il contient d’importantes informations concernant l’installation, le raccordement et la configuration de votre nouvelle platine. Pour toute autre question, veuillez vous adressez à tout moment votre revendeur Thorens.
  • Seite 45: Consignes De Securite

    Consignes de sécurité A LIRE ATTENTIVEMENT AVANT LA PREMIERE MISE EN SERVICE! Ce produit électronique est conforme aux directives euro- péennes pour l‘obtention de la marque CE. Tous les essais nécessaires ont été effectués avec un résultat positif. ATTENTION Pour éviter tout choc électrique, le boîtier de l’alimentation ne doit pas Conforme à...
  • Seite 46: Raccordements Et Commandes

    (8) Prise de terre (2) Bouton de démarrage avec voyant LED (9) Douille de sortie XLR, canal droit (3) Logo Thorens rétro-éclairé indicateur de tension (10) Douille de sortie XLR, canal gauche (4) Sélecteur de vitesse de rotation 33 1/3 tr/mn.
  • Seite 47: Montage Et Installation

    1 x Niveau à bulle 1 x Balance pour bras de lecture 1 x Clé six-pans SW3 Installez le châssis du TD 550 sur un support horizontal 3 x Vis de réglage du sub-châssis aussi près que possible de votre amplificateur. Vérifiez 1 x Adaptateur pour disque 17cm l’horizontalité...
  • Seite 48 Enlevez maintenant les vis de sécurité pour le transport Posez le tapis de feutre sur le plateau. Le tapis est moel- vissées en usine, pour libérer le châssis. Conservez-les leux, mais antiglisse ment et protège vos disques de l’usu- précieusement. IMPORTANT : ne transportez votre TD re pendant le processus de lecture.
  • Seite 49: Raccordement De La Platine

    RIAA et l’amplification correspon- dante des signaux de la platine. La liaison du TD 550 Appuyez maintenant sur Power (1). Le logo rétro éclairé avec une entrée de haut niveau à l’amplificateur a pour bleu Thorens (3) au milieu de la façade avant et une des...
  • Seite 50 Reliez la prise de terre TD 550 (8) avec l’aide du câble Les platines Thorens sont relativement insensibles aux vi- de terre joint, à la prise de terre de votre amplificateur ou brations. Cependant, celles-ci posent en général un pro- l’entrée de votre choix.
  • Seite 51: Installation Du Bras De Lecture

    Installation du bras de lecture Dans la version BC le TD 550 est livré sans bras de lec- Si vous avez commandé votre TD 550 avec le bras de ture. Vous pouvez monter un bras de lecture sur la plaque lecture, celui-ci est déjà...
  • Seite 52: Installation De La Cellule De Lecture

    Installation de la cellule de lecture Installez et configurez votre cellule de lecture conformé- Les quatre cosses de raccordement repérées par couleurs ment aux instructions de montage du fabricant et procé- doivent être glissées sur les broches de raccordement dez à tous les réglages nécessaires. correspondantes (même couleur) de la cellule de lecture.
  • Seite 53: Reglage De La Hauteur Du Bras (Vta)

    Réglage de la hauteur du bras (VTA) Si votre TD 550 a été livré d’usine équipé d’une cellule de lecture, le réglage suivant n’est pas à faire. Le réglage VTA se fait de différentes façons en fonction du bras de lecture. Pour les bras qui n’offrent pas de possibi- lité...
  • Seite 54: Reglage Precis De La Cellule

    Pour nores de cette platine. Si vous rencontrez des problèmes tous les bras rotatifs (comme par ex. les bras Thorens) adressez-vous à votre revendeur qui vous aidera volon- les valeurs optimales se situent entre 21° et 24°. Nous tiers.
  • Seite 55: Force D'appui Et Antiskating

    Vous pouvez vérifier la force d’appui réglée à l’aide de la votre bras de lecture). Enlevez la protection de l’aiguille et balance Thorens fournie. Pour ce faire, (enlevez d’abord le déplacez le bras de lecture en position haute du lève-bras disque) poser la balance sur le tapis et déposez l’aiguille...
  • Seite 56: Utilisation De La Platine

    Power (1). Lorsque la platine est sous ten- tre usine à l’aide d’un disque stroboscopique de haute sion (Marche) le logo Thorens situé au centre de la façade précision de 300 Hz. L’électronique moteur intégrée avant et une des deux LED d’indication de vitesse de rota- est absolument exempte de dérive et de fluctuation...
  • Seite 57 Procédez comme suit pour écouter un disque : Vous pouvez laissez le capot fermé pendant la lecture du disque. Cependant, ceci peut provoquer des distorsions Ouvrez le capot, sortez le disque de sa pochette et dépo- du son, car les ondes sonores générées par les enceintes sez-le sur le plateau.
  • Seite 58: Maintenance Et Entretien

    Un chiffon sec peut produire des charges élec- trostatiques indésirables. Vous devriez remplacer la courroie de précision Thorens tous les deux ans. Si l’appareil n’était pas utilisé pendant une période de temps assez longue, il recommandé de démonter la courroie, pour éviter son vieillissement pré-...
  • Seite 59: Problèmes Et Solutions

    Problèmes et solutions Défaut : le plateau ne tourne pas, bien que l’appareil soit Défaut : pas de signal sur un ou les deux canaux. sous tension et que le bouton Start ait été actionné. Causes possibles : Causes possibles : •...
  • Seite 60: Caracteristiques Techniques

    Caractéristiques techniques Modèle TD 550 Fonctionnement manuel Entraînement courroie (extérieure) Moteur moteur AC synchrone à régulation électronique ⅓ Vitesses , 45 tr/mn Commutation électronique Plateau 12’’ en aluminium de 6,2 kg selon exécution Bras de lecture Antiskating dépendant du bras de lecture –...
  • Seite 61: Informations Service Apres-Vente

    ! Vous pouvez également contacter directement Thorens : Ne jamais transporter le TD 550 sans avoir préalablement Thorens Export Company S.A. monté et serré les vis de sécurité de transport ! Im Huebel 1, CH-4304 Giebenach, Suisse www.thorens.com, info@thorens.com...
  • Seite 62 Notes...
  • Seite 63 © 2007 Thorens Export Company AG Im Huebel 1, CH-4304 Giebenach E-Mail: info@thorens.com Internet: www.thorens.com...
  • Seite 64 analog high fidelity...

Inhaltsverzeichnis