Herunterladen Inhalt Inhalt Diese Seite drucken
oneConcept 10029987 Bedienungsanleitung

oneConcept 10029987 Bedienungsanleitung

Küchenradio (fm & dab+)

Werbung

Verfügbare Sprachen

Verfügbare Sprachen

Küchenradio (FM & DAB+)
10029987
10029988

Werbung

Inhaltsverzeichnis
loading

Inhaltszusammenfassung für oneConcept 10029987

  • Seite 1 Küchenradio (FM & DAB+) 10029987 10029988...
  • Seite 2: Sicherheitshinweise Und Gewährleistung

    Sehr geehrter Kunde, zunächst möchten wir Ihnen zum Erwerb Ihres Gerätes gratulieren. Bitte lesen Sie die folgenden Anschluss- und Anwendungshinweise sorgfältig durch und befol- gen Sie diese um möglichen technischen Schäden vorzubeugen. Sicherheitshinweise und Gewährleistung • Diese Bedienungsanleitung dient dazu, Sie mit der Funktionsweise dieses Produktes ver- traut zu machen.
  • Seite 3: Technische Daten

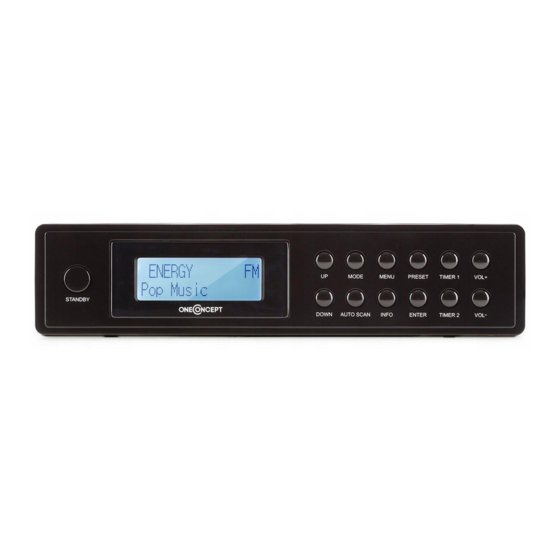
    Technische Daten Artikelnummer 10029987, 10029988 Stromversorgung AC 230V ~50Hz FM: 87.5 - 108MHz Frequenzbereiche DAB: 174 - 240MHz Lieferumfang: Gerät, Bedienungsanleitung Übersicht & Montage...
  • Seite 4 Power / Standby INFO Display ENTER UP (oben) TIMER 2 MODE (FM/DAB) VOLUME - MENU Netzkabel PRESET Antennenanschluss TIMER 1 Lautsprecher VOLUME + Standfuß DOWN (unten) Antenne mit Magnetfuß AUTO SCAN Montageplatte (für Unter-Schr.Montage)
  • Seite 5: Bedienung

    Bedienung Inbetriebnahme Schließen Sie das Gerät an einer gewöhnlichen Haushaltssteckdose mit 230V ~50Hz an. Das Gerät bezieht die aktuelle Uhrzeit durch die Synchronisierung mit dem Radiosignal, sobald ein Sender empfangen wird. Die erste Synchronisation kann einige Minuten dauern. Platzieren Sie die Antenne an einem geeigneten Platz und verbinden Sie sie mit den Antennen- Buchse an der Rückseite des Radios.
  • Seite 6 Manuelle Sendersuche: • Halten Sie ENTER gedrückt, bis „manual tune“ auf dem Display erscheint. • Nutzen Sie die Pfeiltasten, um das Frequenzband zu durchsuchen. • Drücken Sie ENTER zweimal, um die Frequenz zu bestätigen und die manuelle Sendersu- che zu beenden. Beachten Sie: Bei Multiplex-Kanälen wird die Kanalnummer sowie die Frequenz auf dem Display gezeigt.
  • Seite 7: Hinweise Zur Entsorgung

    Hinweise zur Entsorgung Elektroaltgeräte Befindet sich die diese Abbildung (durchgestrichene Mülltonne auf Rädern) auf dem Produkt, gilt die Europäische Richtlinie 2002/96/EG. Diese Produkte dürfen nicht mit dem normalen Hausmüll entsorgt werden. Informieren Sie sich über die örtlichen Regelungen zur getrennten Sammlung elektrischer und elektro- nischer Gerätschaften.
  • Seite 8: Important Safety Advice

    Dear Customer, Congratulations on purchasing this product. Please read and follow these instructions, in order to avoid damaging the item. We do not cover any damages that may arise from improper use of the item or the disregard of the safety instructions. Important Safety Advice •...
  • Seite 9: Technical Data

    Technical Data Item # 10029987, 10029988 Power supply AC 230V ~50Hz FM: 87.5 - 108MHz Frequency ranges DAB: 174 - 240MHz Scope of delivery Device, instruction manual Overview & Mounting...
  • Seite 10 Power / Standby INFO Display ENTER TIMER 2 MODE (FM/DAB) VOLUME - MENU Mains cable PRESET Antenna jack TIMER 1 Speaker VOLUME + Plastic stand DOWN Antenna with magnetic stand AUTO SCAN Mounting plate (for under-cabinet- mounting)
  • Seite 11: Operation

    Operation Startup Plug the AC Power Cord into AC wall outlet. Before switching on the unit, make sure that the voltage of your electricity supply is the same as that indicated on the rating plate. Put the antenna to a suitable place and connect to the antenna jack on the rear of the device. Time Setting This unit will automatically sync the time from radio station once it is connected to the AC.
  • Seite 12 Note: When first used, the unit scanned the DAB band for available stations. The station services found were then stored in its memory. You can rescan the band at anytime if you move to a different area or just refresh the stored list of available stations. The scanning process will take a few minutes.
  • Seite 13 • System Reset If a factory reset is required, follow these steps: • In FM mode, press and hold the MENU button • USE UP/DOWN button to select the System Reset. • Press ENTER when prompted to perform the system reset. The radio will return to DAB mode and perform an initial DAB+ scan on start-up.
  • Seite 14: Environment Concerns

    Environment Concerns According to the European waste regulation 2002/96/EG this symbol on the product or on its packaging indicates that this product may not be treated as household waste. Instead it should be taken to the appropriate collection point for the recycling of electrical and electronic equipment. By ensuring this product is disposed of correctly, you will hep prevent potential negative consequen- ces for the environment and human health, which could otherwise be caused by inappropriate waste handling of this product.
  • Seite 15: Consignes De Sécurité

    Chère cliente, cher client, Toutes nos félicitations pour l’acquisition de ce nouvel appareil. Veuillez lire attentivement et respecter les consignes suivantes de branchements et d’utilisation pour éviter d’éventuels dommages techniques. Consignes de sécurité • Ce mode d’emploi sert à vous familiariser aux fonctions de ce produit. Conservez-le bien afin de pouvoir vous y référer à...
  • Seite 16: Fiche Technique

    Fiche technique Numéro d’article 10029987, 10029988 Alimentation électrique AC 230V ~50Hz FM: 87.5 - 108MHz Plage de fréquence DAB: 174 - 240MHz Contenu de l’emballage Appareil, mode d’emploi Aperçu et montage...
  • Seite 17 Marche/veille INFO Affichage ENTER UP (haut) TIMER 2 MODE (FM/DAB) VOLUME - MENU Cordon d’alimentation PRESET Prise antenne TIMER 1 Haut-parleur VOLUME + Pied de soutien DOWN (bas) Pièce d’écartement (pour montage sous meuble) AUTO SCAN Plaque de montage (pour montage sous meuble)
  • Seite 18 Utilisation Mise en marche Brancher l’appareil à une prise de courant domestique classique de 230 V ~ 50Hz. L’appareil règle l’heure actuelle grâce à la synchronisation avec le signal radio, à partir du moment où une station radio est captée. La première synchronisation peut durer plusieurs minutes. This unit will automatically sync the time from radio station once it is connected to the AC.
  • Seite 19 Recherche manuelle de station : • Rester appuyer sur ENTER jusqu’à ce que « manual tune » apparaisse sur l’affichage. • Utiliser les touches fléchées pour parcourir la bande de fréquence. • Appuyer deux fois sur ENTER pour confirmer la fréquence et terminer la recherche manu- elle de stations.
  • Seite 20: Information Sur Le Recyclage

    Prune (supprimer une station) • Appuyer sur la touche MENU en mode DAB. Faire défiler les options du menu avec les tou- ches fléchées jusqu’à sélection de PRUNE. Utiliser les touches fléchées pour sélectionner les stations à supprimer et confirmer avec ENTER. L’appareil redémarre et effectue une recherche complète des stations.
  • Seite 21 Size: W148.5 x H176 mm Scale 1:1 TEMPLATE BORDER CAUTION . Do not install the appliance over a heat source. . Test the radio reception before installation. . Install the appliance far from the noise sources. Mounting Material - Using Spacers Mounting Material - Not Using Spacers 4 Spacer 4 Screw (Ø3x16mm)
  • Seite 22 Size: W148.5 x H176 mm Scale 1:1 TEMPLATE BORDER Achtung . Nicht über einer Hitzequelle installieren. . Testen Sie den Empfang, bevor Sie das Radio fest verbauen. . Installieren Sie das Gerät möglichst weit entfernt von anderen Geräuschquellen. Montagematerial (Distanzstücke-Nutzung): Montagematerial (Montage ohne Distanzstücke): 4 Distanzstücke 4 Schrauben (Ø3 x 16)

Diese Anleitung auch für:

10029988

Inhaltsverzeichnis