oneConcept Streamo Chef Bedienungsanleitung
Küchenradio + cd-player + bt

Verwandte Anleitungen für oneConcept Streamo Chef


Inhaltszusammenfassung für oneConcept Streamo Chef
- Seite 1 Streamo Chef Küchenradio + CD-Player + BT Kitchen Radio CD-Player + BT Radio de cuisine + Lecteur CD + BT Radio para cocina + Reproductor de CD + BT Radio da cucina + Lettore CD + BT 10034050 10034051...
-
Seite 3: Inhaltsverzeichnis
Sehr geehrter Kunde, wir gratulieren Ihnen zum Erwerb Ihres Gerätes. Lesen Sie die folgenden Hinweise sorgfältig durch und befolgen Sie diese, um möglichen Schäden vorzubeugen. Für Schäden, die durch Missachtung der Hinweise und unsachgemäßen Gebrauch entstehen, übernehmen wir keine Haftung. Scannen Sie den QR-Code, um Zugriff auf die aktuellste Bedienungsanleitung und weitere Informationen rund um das Produkt zu erhalten. -
Seite 4: Technische Daten
TECHNISCHE DATEN Artikelnummer 10034050, 10034051 Eingang: 100-240 V ~ 50/60 Hz max. 0,5 A Stromversorgung Ausgang: 5 V / 1,5 A Netzgerät 2 x 2 W RMS-Leistung 802.11b/g/n WLAN Verschlüsselung: WEP, WPA, WPA 2(PSK), UPnP, DLNA Streaming Unterstützte Dateiformate WMA, MP3... -
Seite 5: Sicherheitshinweise
SICHERHEITSHINWEISE Lesen Sie die Sicherheitshinweise und die Bedienungsanleitung sorgfältig durch, bevor Sie das Gerät bedienen. • Bewahren Sie die Bedienungsanleitung an einem sicheren Ort auf, damit Sie später darauf zurückgreifen können. • Halten Sie sich an alle erforderlichen Bedienungsschritte. • Stellen Sie das Gerät nicht an einem feuchten Ort auf. -
Seite 6: Lieferumfang
LIEFERUMFANG Down Enter Streamo Chef Netzgerät Bedienungsanleitung... -
Seite 7: Geräteübersicht
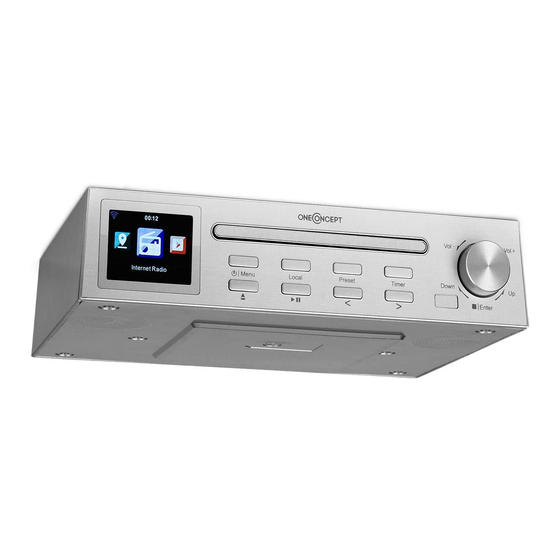
GERÄTEÜBERSICHT Vorn TFT-LCD-Bildschirm Menu (Ein-/ Ausschalttaste; Menü) CD-Ausgabe Local Wiedergabe/ Pause Preset (Speichern) < (nach links) Timer > (nach rechts) 10 CD-Lade Vol. +/- (Lautstärke erhöhen/ senken); /Enter (Stopp/ Eingabetaste) Rückseite 12 Netzanschluss... -
Seite 8: Symbole Auf Dem Display
Symbole auf dem Display Die Verbindung wird hergestellt, das Gerät funktioniert Keine WLAN-Verbindung WLAN-Verbindung wurde hergestellt Lautsprecher aus Suche Wecker ein Ein Internetradiosender wurde gespeichert... -
Seite 9: Inbetriebnahme
INBETRIEBNAHME Für die Nutzung der Stereoanlage Streamo bestehen folgende Anforderungen. • Eine Breitbandverbindung in Kombination mit einem verkabelten/ kabellosen Zugangspunkt, Router oder einem ähnlichen Netzwerkgerät. • Das Netzwerkgerät muss die drahtlose Verbindung über WLAN (802.11b/g/n) unterstützen. • Ein Computer oder Smartphone muss bereit sein und sich im gleichen Netzwerk befinden wie das Gerät. - Seite 10 • Wählen Sie zum Herstellen der Netzwerkverbindung „YES“ (ja) aus. • Wählen Sie „YES“ (WPS (nur bei WPS-Routern)) aus. Drücken Sie anschließend die WPS-Taste Ihres Routers. • Wenn Sie „YES“ auswählen, sucht das Gerät automatisch nach verfügbaren WLAN-Netzwerken und listet diese auf dem Bildschirm auf. •...
- Seite 11 Die Herstellung der Netzwerkverbindung dauert mögicherweise einige Sekunden. Sobald die Verbindung hergestellt wurde, erscheint das Hauptmenü mit den wichtigsten Hauptmenüunterpunkten: • Internetradio: Zugang zu Radiosendern weltweit • Media Center: Zugang zu Ihren UPnP Geräten via Software mit Streamingfähigkeit • Informationscenter: Zugang zu Informationen über das Wetter, Finanzen und Systeminformationen...
-
Seite 12: Streamen Von Musik
eingeben möchten, erreicht haben, die Taste und fahren Sie mit der Eingabe der nächsten Buchstaben fort. Drücken Sie, sobald Sie Ihre Eingabe beendet haben, die Taste zum Bestätigen der Eingabe die Taste ENTER. Sie können die Taste drücken, um zur vorherigen Eingabe zu gelangen. Drehen Sie am Lautstärkeregler des Geräts, um die Lautstärke anzupassen. - Seite 13 DLNA Abgesehen von UPnP, unterstützt Streamo die DLNA-Funktion. Das bedeutet, dass Sie Musikdateien vom PC oder Android-Smartphones mit Streamo teilen und die Wiedergabe über Ihren PC, Android-Smartphone oder iPhone/ iPad kontrollieren (es ist nicht notwendig jede Wiedergabe über Streamo anzupassen). Die Systemanforderungen für DLNA auf dem PC sind mindestens Windows 7 und Windows Media Player 12.
-
Seite 14: Übersicht Menü
ÜBERSICHT MENÜ Standby My mediaU Local Radio Internet Radio My Favorite Radio Station Music Sleep Radio History Service Media Center UPnP My Playlist Clear My Playlist Information Center Weather information Financial information System Information... - Seite 15 Übersicht Menü 2 Configuration Sleep Timer Time Display Manage Internet Radio my mediaU Network Weather Date & Time Local Radio Setup Playback Setup Alarm Timer Device Equalizer Scheduled Playing Language Resume when power on Dimmer Software update Display Reset to default Power management...
-
Seite 16: Hauptmenü
HAUPTMENÜ Im Hauptmenü können die folgenden Modi ausgewählt werden: My media, FM-Radio, AUX in, Internetradio, Lokale Radiosender, Einstellungen, Information Center, Media Center. Einstellungen „My mediaU“ verwalten My mediaU Bibliothek – Radiosender via Internet verwalten. Um jederzeit Zugriff auf Ihre weltweiten Lieblingsradiosender zu haben, können Sie, wenn Sie über ein mobiles Endgerät mit Streaming-Fähigkeit verfügen, einen kostenfreien Zugang zur Medienbibliothek unter www. - Seite 17 Nach der Registrierung muss diese Funktion unter Information Center > System information > Wireless Info > MAC Address aktiviert werden, damit das Internetradio auf die Medienbibliothek zugreifen kann. Das Gerät verbindet sich automatisch mit Ihrem Konto und zeigt an, was dort gespeichert wurde: •...
- Seite 18 Das Symbol für My mediaU erscheint ebenfalls im Hauptmenü. Folgende Unterpunkte stehen Ihnen zur Verfügung: • Favorite Station • Favorite Location/Genre • My Local Station • Manually Add Diese Unterpunkte werden Ihnen ebenfalls in der Medienbibliothek angezeigt, wo Sie die Radiosender entsprechend anordnen und verwalten können.
- Seite 19 Netzwerk Konfiguration drahtloses Netzwerk Aktivieren/ Deaktivieren Sie das WLAN-Netzwerk. Sobald Sie das WLAN aktivieren, verbindet sich das Gerät automatisch damit. Wählen Sie den gewünschten Router aus (siehe Abschnitt „Netzwerkverbin- dung herstellen“) Wireless Network (WPS PBC) Falls Sie einen Router mit WPS/QSS- Taste verwenden, können Sie die Netzwerkverbindung einfach via WPS-Funktion einrichten.
- Seite 20 können Sie ein bestimmtes Netzwerk auswählen. Netzwerk überprüfen, während das Gerät eingeschaltet ist WLAN aktivieren/ deaktivieren. Wenn Sie das WLAN-Netzwerk aktivieren, sucht das Gerät automatisch nach verfügbaren Netzwerken. Wählen Sie das gewünschte WLAN-Netzwerk aus. Geben Sie das WEP- oder WPA-Passwort zum Verbinden ein. Falls keine Verbindung zum Netzwerk besteht oder die Verbindung nicht hergestellt werde konnte, ist das Symbol in der linken oberen Ecke durchgestrichen.
- Seite 21 Wecker • Es gibt drei voneinander unabhängige Alarme. 2 Alarme für die absolute Zeiteinstellung (Alarm 1 und Alarm 2) und ein Alarm für die relative Zeiteinstellung (NAP Alarm). Wählen Sie im Menü „Alarm“ aus. • Es gibt drei voneinander unabhängige Wecker. 2 Wecker für die absolute •...
-
Seite 22: Hintergrundbeleuchtung Anpassen
Hintergrundbeleuchtung anpassen Sie können die Helligkeit der Hintergrundbeleuchtung anpassen. Wählen Sie „Power Saving“ aus, um die Helligkeit der Hintergrundbeleuch- tung im Standby-Modus zu regulieren und wählen Sie zum Aktivieren „Turn On“ aus. Sie können Einstellen, wie lange der Bildschirm des Radios beleuchtet ist, wenn Sie das Radio nicht bedienen. -
Seite 23: Wiedergabeeinstellung
Wiedergabeeinstellung Wählen Sie den gewünschten Wiedergabemodus im Media Center aus. Sie können zwischen „Off“ (keine Wiederholung oder Zufallswiedergabe), „Repeat all“ (Wiederholung aller Titel), „Repeat one“ (einen Titel wiederholen) oder „Shuffle“ (Zufallswiedergabe). DLNA Einstellung Der voreingestellte Gerätename für DLNA ist Streamo. Der Gerätename kann am PC oder Smartphone in den DLNA-Einstellungen geändert werden. -
Seite 24: Internet Radio
INTERNET RADIO Nachdem die Verbindung zu einem Sender erfolgreich hergestellt wurde, werden die Bitgeschwindigkeit und das Senderformat auf dem Bildschirm angezeigt. Meine Favoriten Sie können eine Liste Ihrer Lieblingssender erstellen und Speichern. Sie können bis zu 250 Favoriten speichern, inklusive Sender und Ordnern. Halten Sie während der Wiedergabe die Taste PRESET gedrückt, um einen Sender in den Favoriten zu speichern. -
Seite 25: Media Center
Sender zu den Favoriten hinzufügen, die automatische Sendersuche starten, einen Sender wiedergeben oder einen Sender als Weckton einstellen (falls Sie in den Alarmeinstellungen „Internetradio“ ausgewählt haben. Wenn Sie „Auto Scan“ auswählen, wird jeder Sender des Untermenüs für 30 Sekunden abgespielt, bis alle Sender ausgewählt wurden oder Sie zum Unterbrechen die Taste ENTER drücken. -
Seite 26: Informationscenter
Zeichen umfasst. Die Zeichen sollten in europäischer Sprache sein. Falls das Gerät einen Titel im UPnP-Modus nicht wiedergeben kann, sollten Sie zunächst versuchen, den Titel umzubenennen. Falls der Titel sich dann noch immer nicht wiedergeben lässt, können Sie versuchen, diesen in ein anderes Format umzuwandeln. -
Seite 27: Cd-Wiedergabe
CD-WIEDERGABE CD/ MP3 Bedienung • Drücken Sie die Taste MENU, um den CD-Modus auszuwählen. • Drücken Sie die Taste , um das CD-Fach zu öffnen. • Legen Sie eine CD in das CD-Fach ein. • Drücken Sie zum Starten der Wiedergabe ... -
Seite 28: Fernsteuerung Über Apps
FERNSTEUERUNG ÜBER APPS Einige Android-Apps, wie beispielsweise Air Music Control, ermöglichen die Steuerung des Geräts via Smartphone oder Tablet. Sobald die Geräte mit Streamo verbunden sind, wird die gleiche Menüanzeige wie auf dem Bildschirm von Streamo, auch auf dem Smartphone/ Tablet angezeigt. Sie können alle Funktionen auf die gleiche Weise wie bei Streamo auswählen. -
Seite 29: Hinweise Zur Entsorgung
HINWEISE ZUR ENTSORGUNG Befindet sich die linke Abbildung (durchgestrichene Mülltonne auf Rädern) auf dem Produkt, gilt die Europäische Richtlinie 2012/19/EU. Diese Produkte dürfen nicht mit dem normalen Hausmüll entsorgt werden. Informieren Sie sich über die örtlichen Regelungen zur getrennten Sammlung elektrischer und elektronischer Gerätschaften.