Herunterladen Inhalt Inhalt Diese Seite drucken

Werbung

Verfügbare Sprachen
  • DE

Verfügbare Sprachen

  • DEUTSCH, seite 1
TuneUp
Internetradio
Internet Radio
Radio de internet
Radio Internet
Internet Radio
10034902 10034903

Werbung

Inhaltsverzeichnis
loading

Inhaltszusammenfassung für oneConcept TuneUp

  • Seite 1 TuneUp Internetradio Internet Radio Radio de internet Radio Internet Internet Radio 10034902 10034903...
  • Seite 3: Inhaltsverzeichnis

    Sehr geehrter Kunde, wir gratulieren Ihnen zum Erwerb Ihres Gerätes. Lesen Sie die folgenden Hinweise sorgfältig durch und befolgen Sie diese, um möglichen Schäden vorzubeugen. Für Schäden, die durch Missachtung der Hinweise und unsachgemäßen Gebrauch entstehen, übernehmen wir keine Haftung. Scannen Sie den folgenden QR-Code, um Zugriff auf die aktuellste Bedienungsanleitung und weitere Informationen rund um das Produkt zu erhalten:...
  • Seite 4: Technische Daten

    TECHNISCHE DATEN Artikelnummer 10034902, 10034903 Netzwerk 802.11 b/g/n Verschlüsselung (WLAN) WEP, WPA, WPA 2 (PSK), WPS Unterstützte Dateitypen WMA, MP3 DC (Netzteil), USB-Anschluss, Verbindungen 3.5 mm Line-Out-Anschluss Stromversorgung (Netzteil) 100-240 V ~ 50/60 Hz, 0.2 A max. Ausgangsleistung 5 V / 1 A Leistungsaufnahme Leistungsaufnahme (Standby) <...
  • Seite 5: Sicherheitshinweise

    SICHERHEITSHINWEISE Allgemeine Hinweise • Blitzschlag - Wenn Sie das Gerät länger nicht benutzen oder es gewittert, ziehen Sie den Stecker aus der Steckdose oder trennen Sie das Gerät vom Antennenanschluss. Dadurch werden Schäden am Produkt durch Blitzschlag und Überspannung vermieden. •...
  • Seite 6 Besondere Hinweise • Kinder ab 8 Jahren, psychisch, sensorisch und körperlich eingeschränkte Menschen dürfen das Gerät nur benutzen, wenn sie vorher von einer für sie verantwortlichen Aufsichtsperson ausführlich mit den Funktionen und den Sicherheitsvorkehrungen vertraut gemacht wurden und die damit verbundenen Risiken verstehen. •...
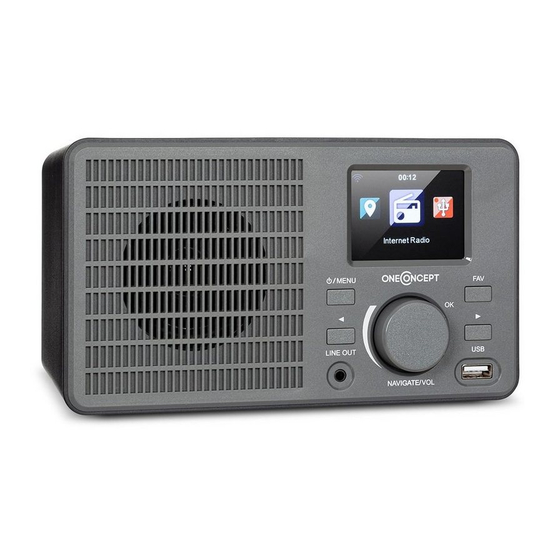
  • Seite 7: Geräteübersicht

    GERÄTEÜBERSICHT Standby/Menü-Taste USB-Buchse Links-Taste Rechts-Taste Line-Out-Anschluss Favoriten-Taste Display DC-Anschluss (Netzteil) Navigieren/Lautstärke/ Scrollen (zur Auswahl drücken)
  • Seite 8: Installation

    INSTALLATION • Entpacken Sie alle Gerätebestandteile und entfernen Sie sämtliches Verpackungsmaterial. • Stecken Sie den Netzstecker des Geräts erst dann in die Steckdose, wenn Sie die Spannung der Steckdose überprüft haben und alle Verbindungen hergestellt wurden. INBETRIEBNAHME UND BEDIENUNG Erste Verwendung Stellen Sie vor der Verwendung sicher, dass die auf dem Typenschild des Geräts angegebene Spannung der Spannung der Steckdose entspricht.
  • Seite 9: Netzwerkeinstellungen

    NETZWERKEINSTELLUNGEN Allgemeine Netzwerkeinstellung Wählen Sie für die normale Netzwerkeinstellung „Yes“ (Ja) aus: Wählen Sie die benötigte AP mit dem Drehregler NAVIGATE/VOL aus und bestätigen Sie Ihre Auswahl durch Drücken des Drehreglers. Geben Sie das für das gewünschte WLAN-Netzwerk benötigte WEP- oder WPA-Passwort mithilfe des Drehreglers NAVIGATE/VOL ein.
  • Seite 10: Internetradio

    Internetradio Versetzen Sie das Gerät in den Standbymodus und lassen Sie sich mit dem Drehregler NAVIGATE/VOL im Hauptmenü die verschiedenen Optionen anzeigen. Drücken Sie den Drehregler, um in die Untermenüs zu gelangen oder um eine Einstellung zu bestätigen. Drücken Sie die Taste [<], um zum vorherigen Menü...
  • Seite 11: Usb-Wiedergabe

    Weckton Sie können zwischen Birds (Vögel), Lullaby (Schlaflied), Piano, Rain (Regen), Spa, Space, Wave (Wellen), White Noise (Rauschen) auswählen. Verlauf Die 10 zuletzt gehörten Sender werden angezeigt. AirMusic App Drücken Sie die Taste NAVIGATE/VOL und scannen Sie den angezeigten QR-Code mit Ihrem mobilen Endgerät, um die App herunterzuladen. USB-WIEDERGABE Menüs werden aus den Ordnern auf dem USB-Gerät generiert.
  • Seite 12: Einstellungen

    EINSTELLUNGEN Der werkseitig vergebene Name für das Gerät ist Gerät AirMusic. In den DLNA-Einstellungen Ihres Computers oder des mobilen Endgeräts kann der Name geändert werden. Über den QR-Code gelangen Sie zum Download für die AirMusic App. Informationen zum Gerät und zum verbundenen Netzwerk können angezeigt werden.
  • Seite 13 Energie sparen / Einschalten Dimmen Das Gerät verfügt über drei voneinander unabhängige Alarm Alarme. Zwei Alarme für die Einstellung der absoluten Zeit (Alarm 1 und Alarm 2) und einen Alarm für die Einstellung der relativen Zeit (NAP). Die werkseitig voreingestellt Alarmquelle ist Internetradio.
  • Seite 14 Sie können für den Standby-Bildschirm die Wetter Wettervorhersage aktivieren oder deaktivieren. Wählen Sie hierfür zunächst die Temperatureinheit (°F oder °C) aus und fahren Sie anschließend mit der Einstellung Ihres Standorts fort. Wenn Sie diese Einstellung aktiviert haben, zeigt der Standby-Bildschirm abwechselnd die Uhrzeit und die Wettervorhersage an (alle 10 Sekunden Wechsel der Anzeige).
  • Seite 15: Hinweise Zur Entsorgung

    HINWEISE ZUR ENTSORGUNG Befindet sich die linke Abbildung (durchgestrichene Mülltonne auf Rädern) auf dem Produkt, gilt die Europäische Richtlinie 2012/19/EU. Diese Produkte dürfen nicht mit dem normalen Hausmüll entsorgt werden. Informieren Sie sich über die örtlichen Regelungen zur getrennten Sammlung elektrischer und elektronischer Gerätschaften.
  • Seite 17 Dear Customer, Congratulations on purchasing this device. Please read the following instructions carefully and follow them to prevent possible damages. We assume no liability for damage caused by disregard of the instructions and improper use. Scan the QR code to get access to the latest user manual and more product information.
  • Seite 18: Technical Data

    TECHNICAL DATA Order number 10034902, 10034903 Network 802.11 b/g/n Encryption (WLAN) WEP, WPA, WPA 2 (PSK), WPS Supported file types WMA, MP3 DC (power supply), USB Connections connection, 3.5 mm line out connection Power supply (power pack) 100-240 V ~ 50/60 Hz, 0.2 A max. Output power 5 V / 1 A Power consumption...
  • Seite 19: Safety Instructions

    SAFETY INSTRUCTIONS General information • Lightning - If you are not going to use the device for a long time or if there is a storm, disconnect the plug from the electrical outlet and disconnect the device from the antenna connector. This will avoid damage to the product that may be caused by lightning or overvoltage.
  • Seite 20 Special Instructions • This device may be only used by children 8 years old or older and persons with limited physical, sensory and mental capabilities and / or lack of experience and knowledge, provided that they have been instructed in use of the device by a responsible person who understands the associated risks.
  • Seite 21: Product Overview

    PRODUCT OVERVIEW Standby/Menu button USB socket Left button Right button Line-Out connection Favorites button DC connection (power Display supply unit) Navigate/Volume/Scroll (press to select)
  • Seite 22: Installation

    INSTALLATION Unpack all parts of the device and remove all packing material. Do not insert the power plug of the appliance into the power outlet until you have checked the voltage of the outlet and all connections have been made. START-UP AND OPERATION First use Before use, make sure that the voltage indicated on the nameplate of the...
  • Seite 23: Network Settings

    NETWORK SETTINGS Normal network setting Select „Yes“ for the normal network setting: Select the AP you need with the NAVIGATE/VOL knob and confirm your selection by pressing the knob. Enter the WEP or WPA password required for the desired wireless network using the NAVIGATE/VOL knob.
  • Seite 24 Internet radio Put the device in standby mode and use the NAVIGATE/VOL knob in the main menu to display the various options. Press the control dial to enter the submenus or to confirm a setting. Press the [<] button to return to the previous menu.
  • Seite 25: Usb Playback

    Alarm tones You can choose between Birds, Lullaby, Piano, Rain, Spa, Space, Wave, White Noise, and Wave. History The 10 most recently listened to stations are displayed. AirMusic App Press the NAVIGATE/VOL button and scan the displayed QR code with your mobile device to download the app.
  • Seite 26: Settings

    SETTINGS The factory default name for the unit is AirMusic. Device You can change the name in the DLNA settings of your computer or mobile device. Use the QR code to download the AirMusic App. Information about the device and the connected network can be displayed. This information includes the MAC address.
  • Seite 27 Saving energy / Switching on Dimming The device has three independent alarms. Two alarms Alarm for setting the absolute time (Alarm 1 and Alarm 2) and one alarm for setting the relative time (NAP). The factory default alarm source is Internet radio. Only the same Internet radio station can be selected for Alarm 1 and Alarm 2.
  • Seite 28 You can enable or disable weather forecasting for the Weather standby screen. To do this, first select the temperature unit (°F or °C) and then proceed to set your location. When you have activated this setting, the standby screen alternately displays the time and the weather forecast (the display changes every 10 seconds).
  • Seite 29: Hints On Disposal

    HINTS ON DISPOSAL According to the European waste regulation 2012/19/ EU this symbol on the product or on its packaging indicates that this product may not be treated as household waste. Instead it should be taken to the appropriate collection point for the recycling of electrical and electronic equipment.
  • Seite 31 Estimado cliente: Le felicitamos por la adquisición de este producto. atentamente siguiente manual siga cuidadosamente las instrucciones de uso con el fin de evitar posibles daños. La empresa no se responsabiliza de los daños ocasionados por un uso indebido del producto o por haber desatendido las indicaciones de seguridad.
  • Seite 32: Datos Técnicos

    DATOS TÉCNICOS Número de pedido 10034902, 10034903 802.11 b/g/n Cifrado (WLAN) WEP, WPA, WPA 2 (PSK), WPS Tipos de archivo soportados WMA, MP3 DC (fuente de alimentación), Conexiones conexión USB, 3.5 mm conexión linea out Fuente de alimentación (fuente de 100-240 V ~ 50/60 Hz, 0.2 A max.
  • Seite 33: Indicaciones De Seguridad

    INDICACIONES DE SEGURIDAD Indicaciones generales • Relámpago - Si no va a utilizar el aparato durante un periodo largo de tiempo o si hay una tormenta eléctrica, desenchufe el aparato de la toma de corriente y desconecte el conector de antena. De este modo, protegerá...
  • Seite 34 Indicaciones especiales • Este aparato puede ser utilizado por niños mayores de 8 años y personas con discapacidades físicas, sensoriales y mentales y/o con falta de experiencia y conocimientos, siempre y cuando hayan sido instruidos sobre el uso del aparato y comprendan los peligros y riesgos asociados.
  • Seite 35: Descripción Del Aparato

    DESCRIPCIÓN DEL APARATO Tecla de tandby y menú Conexión usb Techa izquierda Tecla derecha Conexión line-out Tecla de favoritos Pantalla Conexión DC (corriente) Navegación/volumen/ seleccionar (pulsar para elegir)
  • Seite 36: Instalación

    INSTALACIÓN • Desembale todas las partes del dispositivo y retire todo el material de embalaje. • No introduzca el enchufe del aparato en la toma de corriente hasta que no haya comprobado el voltaje de la toma y se hayan realizado todas las conexiones.
  • Seite 37: Configuración De La Red

    CONFIGURACIÓN DE LA RED Configuración general de la red Seleccione “Yes“ (sí) para la configuración normal de la red: Seleccione el AP que necesite con el mando NAVIGATE/VOL y confirme su selección pulsando el mando. Introduzca la contraseña WEP o WPA necesaria para la red inalámbrica deseada con el mando NAVIGATE/VOL.
  • Seite 38 Radio por Internet Ponga el dispositivo en modo de espera y utilice el mando NAVIGATE/VOL del menú principal para mostrar las distintas opciones. Pulse el dial de control para entrar en los submenús o para confirmar un ajuste. Presione el botón [<] para volver al menú anterior. Si la conexión con cualquier estación se establece con éxito, la información de la estación se muestra en la pantalla.
  • Seite 39: Reproducción Usb

    Tono de alarma Puedes elegir entre Pájaros, Canción de cuna, Piano, Lluvia, Spa, Espacio, Ola, Ruido blanco y Ola. Historia Se muestran las 10 estaciones escuchadas más recientemente. Aplicación AirMusic Presiona el botón NAVEGAR/VOL y escanea el código QR mostrado con tu dispositivo móvil para descargar la aplicación.
  • Seite 40: Ajustes

    AJUSTES El nombre de fábrica de la unidad es AirMusic. Puede Dispositivo cambiar el nombre en la configuración de la DLNA de su ordenador o dispositivo móvil. Usa el código QR para descargar la aplicación AirMusic. Se puede mostrar información sobre el dispositivo y la red conectada.
  • Seite 41 Ahorro de energía/ Encendido Atenuación El dispositivo tiene tres alarmas independientes. Dos Alarma alarmas para ajustar el tiempo absoluto (Alarma 1 y Alarma 2) y una alarma para ajustar el tiempo relativo (NAP). La alarma por defecto es la radio de Internet. Sólo se puede seleccionar la misma emisora de radio por Internet para la Alarma 1 y la Alarma 2.
  • Seite 42 Puede activar o desactivar la previsión meteorológica Tiempo para la pantalla de espera. Para ello, seleccione primero la unidad de temperatura (°F o °C) y luego proceda a establecer su ubicación. Cuando haya activado este ajuste, la pantalla de espera muestra alternativamente la hora y el pronóstico del tiempo (la pantalla cambia cada 10 segundos).
  • Seite 43: Retirada Del Aparato

    RETIRADA DEL APARATO Si el aparato lleva adherida la ilustración de la izquierda (el contenedor de basura tachado) entonces rige la normativa europea, directiva 2012/19/UE. Este producto no debe arrojarse a un contenedor de basura común. Infórmese sobre las leyes territoriales que regulan la recogida separada de aparatos eléctricos y electrónicos.
  • Seite 45 Cher client, Toutes nos félicitations pour l’acquisition de ce nouvel appareil. Veuillez lire attentivement les instructions suivantes de branchement et d’utilisation afin d’éviter d’éventuels dommages. Le fabricant ne saurait être tenu pour responsable des dommages dus au non-respect des consignes de sécurité et à la mauvaise utilisation de l’appareil.
  • Seite 46: Fiche Technique

    FICHE TECHNIQUE Numéro d'article 10034902, 10034903 Réseau 802.11 b/g/n Cryptage (Wifi) WEP, WPA, WPA 2 (PSK), WPS Formats de fichiers compatibles WMA, MP3 CC (adaptateur), port USB, Connexions Prise Line-Out 3.5 mm Alimentation (de l'adaptateur) 100-240 V ~ 50/60 Hz, 0.2 A max. Puissance de sortie 5 V / 1 A Consommation...
  • Seite 47: Consignes De Sécurité

    CONSIGNES DE SÉCURITÉ Consignes générales • Foudre - Si vous n‘utilisez pas l‘appareil pendant une longue période ou s‘il y a de l‘orage, débranchez la fiche de la prise et débranchez l‘antenne de l‘appareil. Cela évite d‘endommager le produit à cause de la foudre et des surtensions.
  • Seite 48 Consignes particulières • Cet appareil peut être utilisé par des enfants de 8 ans ou plus et des personnes ayant des capacités physiques, sensorielles et mentales limitées et / ou dénuées d‘expérience et de connaissances, à condition d‘avoir été instruits au fonctionnement de l‘appareil par une personne responsable et d‘en comprendre les risques associés.
  • Seite 49: Aperçu De L'appareil

    APERÇU DE L‘APPAREIL Touche menu/veille Port USB Touche gauche Touche Droite Prise Line-Out Touche favoris Ecran Prise CC (adaptateur) Navigation/volume/ défilement (appuyez pour sélectionner)
  • Seite 50: Installation

    INSTALLATION • Déballez tous les éléments de l‘appareil et retirez tout le matériel d‘emballage. • N‘insérez pas la fiche secteur de l‘appareil dans la prise tant que vous n‘avez pas vérifié la tension de celle-ci et que toutes les connexions n‘ont pas été...
  • Seite 51: Paramètres Réseau

    PARAMÈTRES RÉSEAU Configuration générale du réseau Sélectionnez „Oui“ pour le paramétrage réseau normal : sélectionnez l‘AP requis avec le bouton rotatif NAVIGATE / VOL et confirmez votre sélection en appuyant sur le bouton rotatif. Saisissez le mot de passe WEP ou WPA requis pour le réseau Wifi souhaité...
  • Seite 52 Radio Internet Mettez l‘appareil en mode veille et utilisez la commande NAVIGATE / VOL pour afficher les différentes options dans le menu principal. Appuyez sur la molette de commande pour accéder aux sous-menus ou pour confirmer un paramètre. Appuyez sur la touche [<] pour revenir au menu précédent. Une fois la connexion à...
  • Seite 53: Lecture Par Usb

    Tonalité d‘alarme Vous pouvez choisir parmi Birds (oiseaux), Lullaby (berceuse), Piano, Rain (pluie), Spa, Space, Wave (vagues), White Noise (bruitages). Historique Affiche les 10 dernières stations écoutées. Application AirMusic Appuyez sur le bouton NAVIGATE / VOL et scannez le QR code affiché avec votre appareil mobile pour télécharger l‘application.
  • Seite 54: Paramètres

    PARAMÈTRES Le nom attribué en usine à l'appareil est AirMusic. Appareil Le nom peut être modifié dans les paramètres DLNA de votre ordinateur ou appareil mobile. Vous pouvez télécharger l'application AirMusic à l'aide du QR code. Vous pouvez afficher des informations sur l'appareil et le réseau connecté.
  • Seite 55 Economie d'énergie / allumer Réglage de la luminosité Alarme L'appareil dispose de trois alarmes indépendantes. Deux alarmes pour régler l'heure absolue (alarme 1 et alarme 2) et une alarme pour régler l'heure relative (NAP). La source d'alarme par défaut est la radio Internet. Vous devez choisir la même station de radio Internet pour l'alarme 1 et l'alarme 2.
  • Seite 56 Vous pouvez activer ou désactiver les prévisions météo Météo sur l'écran de veille. Pour ce faire, sélectionnez d'abord l'unité de température (°F ou °C), puis continuez par la définition de votre emplacement. Si vous avez activé ce paramètre, l'écran de veille affiche alternativement l'heure et les prévisions météo (l'affichage change toutes les 10 secondes).
  • Seite 57: Conseils Pour Le Recyclage

    CONSEILS POUR LE RECYCLAGE Le pictogramme ci-contre apposé sur le produit signifie que la directive européenne 2012/19/UE s‘applique (poubelle à roues barrée d’une croix). Ces produits ne peuvent être jetés dans les poubelles domestiques courantes. Renseignez-vous concernant les règles appliquées pour la collecte d’appareils électriques et électroniques.
  • Seite 59 Gentile cliente, La ringraziamo per aver acquistato il dispositivo. La preghiamo di leggere attentamente le seguenti istruzioni per l’uso e di seguirle per evitare possibili danni tecnici. Non ci assumiamo alcuna responsabilità per danni scaturiti da una mancata osservazione delle avvertenze di sicurezza e da un uso improprio del dispositivo.
  • Seite 60: Dati Tecnici

    DATI TECNICI Numero articolo 10034902, 10034903 Rete 802.11 b/g/n Codifica (Wi-Fi) WEP, WPA, WPA 2 (PSK), WPS Tipi di file supportati WMA, MP3 DC (alimentatore), connessione Connessioni USB, connessione Line-Out 3,5 mm Alimentazione (alimentatore) 100-240 V ~ 50/60 Hz, 0.2 A max. Potenza di uscita 5 V/1 A Potenza assorbita...
  • Seite 61: Avvertenze Di Sicurezza

    AVVERTENZE DI SICUREZZA Avvertenze generali • Colpo di fulmine – Se il dispositivo non viene utilizzato o c’è un temporale, staccare la spina dalla presa di corrente e scollegare il dispositivo dalla connessione dell’antenna. In questo modo si evitano danni al dispositivo dovuti a colpi di fulmine o sovratensione. •...
  • Seite 62 Avvertenze particolari • Questo dispositivo può essere utilizzato da bambini a partire da 8 anni e da persone con limitate capacità fisiche e psichiche o con conoscenza ed esperienza limitate, solo se sono stati istruiti sulle modalità d’uso e comprendono i rischi e i pericoli connessi. •...
  • Seite 63: Descrizione Del Dispositivo

    DESCRIZIONE DEL DISPOSITIVO Standby/Menu Connessione USB Sinistra Destra Connessione Line-Out Preferiti Connessione DC Display (alimentatore) Navigare/Volume/Scorrere (premere per selezionare)
  • Seite 64: Installazione

    INSTALLAZIONE • Disimballare tutti i componenti del dispositivo e rimuovere tutto il materiale d’imballaggio. • Collegare la spina del dispositivo alla presa elettrica solo dopo aver controllato la tensione della presa in tensione e aver realizzato tutti i collegamenti. MESSA IN FUNZIONE E UTILIZZO Primo utilizzo Prima di ogni utilizzo, assicurarsi che la tensione sulla targhetta del dispositivo coincida con quella della presa elettrica.
  • Seite 65: Impostazioni Di Rete

    IMPOSTAZIONI DI RETE Impostazioni di rete generiche Selezionare “Yes” (sì) per impostare la configurazione di rete normale. Selezionare il punto di accesso necessario (AP) ruotando la manopola NAVIGATE/VOL e confermare premendo la manopola. Inserire la password WEP o WPA per la linea Wi-Fi desiderata utilizzando la manopola NAVIGATE/VOL.
  • Seite 66 Internet radio Mettere il dispositivo in modalità standby e farsi mostrare le diverse opzioni nel menu principale con la manopola NAVIGATE/VOL. Premere la manopola per accedere ai sottomenu o per confermare un’impostazione. Quando è stato stabilito il collegamento con un’emittente a piacere, vengono mostrate le relative informazioni sul display.
  • Seite 67: Riproduzione Usb

    Sveglia Si può scegliere tra Birds (uccelli), Lullaby (ninna nanna), Piano, Rain (pioggia), Spa, Space, Wave (onde), White Noise (rumore bianco). Cronologia Vengono mostrate le ultime 10 emittenti ascoltate. AirMusic App Premere NAVIGATE/VOL e scansionare il codice QR mostrato con il vostro dispositivo mobile per scaricare la app.
  • Seite 68: Impostazioni

    IMPOSTAZIONI Il nome dato al dispositivo in fabbrica è AirMusic. Il Dispositivo nome può essere cambiato nelle impostazioni DLNA del computer o del dispositivo mobile. Scansionando un codice QR si raggiunge il download dell’app AirMusic. Possono essere mostrate informazioni su dispositivo e reti collegate. Queste informazioni includono indirizzo MAC.
  • Seite 69 Risparmio energetico/Accensione. Dimmer Il dispositivo è dotato di tre sveglie indipendenti. Due Sveglia sveglie per impostare il tempo assoluto (Alarm 1 e Alarm 2) e una sveglia per impostare il tempo relativo (NAP). La fonte audio della sveglia impostata in fabbrica e la Internet radio.
  • Seite 70 È possibile attivare o disattivare le previsioni meteo Meteo per la schermata di standby. Selezionare prima l’unità della temperatura (°F o °C) e procedere con l’impostazione della località. Se si è attivata tale funzione, la schermata di standby mostra alternativamente ora e previsioni meteo (indicazione cambia ogni 10 secondi).
  • Seite 71: Smaltimento

    SMALTIMENTO Se sul prodotto è presente la figura a sinistra (il cassonetto dei rifiuti mobile sbarrato), si applica la direttiva europea 2012/19/UE. Questi prodotti non possono essere smaltiti con i rifiuti normali. Informarsi sulle disposizioni vigenti in merito alla raccolta separata di dispositivi elettrici ed elettronici. Non smaltire i vecchi dispositivi con i rifiuti domestici.

Diese Anleitung auch für:

1003490210034903

Inhaltsverzeichnis