Inhaltszusammenfassung für TEFAL OptiGrill SMART GC730D12
Seite 1
Compatibility: iPhone 4S or newer model. iPad 3 / iPad mini or newer model. Android™ 4.3 or newer. Apple, the Apple logo, iPhone, and iPad are trademarks of Apple Inc., registered in the U.S. and other countries. App Store is a service mark of Apple Inc.
Seite 2
CONSIGNES DE SÉCURITÉ PRÉCAUTIONS IMPORTANTES Utilisation, entretien et installation de ce produit : pour votre sécurité, veuillez consulter les diverses rubriques de ce manuel et les schémas correspondants. • Cet appareil n’est pas destiné à être mis en fonctionnement au moyen d’une minuterie extérieur ou par un système de commande à...
Seite 3
son service après-vente ou une personne de qualification similaire afin d’éviter un danger. • N'utilisez pas de rallonge. Si vous utilisez une rallonge, choisissez-la avec un diamètre de cordon équivalent, dotée d'une prise de terre et adaptée à la puissance de l ' appareil.
Seite 4
• Pour préserver le revêtement des plaques de cuisson, toujours utiliser une spatule plastique ou en bois. • N'utiliser que les accessoires fournis avec l’appareil ou achetés à un centre de service autorisé. Ne pas les utiliser avec d'autres appareils. À...
Seite 5
A1 A2 A4 A5 Description Mode manuel de 4 réglages de Tableau de bord température / voir quick start guide B Corps de l'appareil specifique mode manuel Bouton A5 Bouton OK C Poignée marche/arrêt A2 Mode surgelé A6 Indicateur de niveau de cuisson D Plaques de cuisson Programmes de Plateau de récupération...
Seite 6
Préparation 1 Enleve z tous le s e mb a ll ag e s , autocollants ou accessoires divers à l’intérieur comme à l’extérieur de l’appareil. Selon la langue, le sticker couleur autour de l’indicateur de niveau de cuisson peut être changé. Il suffit de le remplacer par celui qui se trouve à...
Seite 7
Cuisson connectée Téléchargez l'application et synchronisez votre OptiGrill Téléchargez l’application Mon OptiGrill dans l’App Store ou dans Play Store pour Android via votre tablette ou votre smartphone. Activez la fonction Bluetooth sur votre tablette ou votre ® smartphone.Branchez votre OptiGrill Smart puis allumez-le en appuyant sur le bouton Marche/Arrêt.
Seite 8
…Préchauffage Pour démarrer le préchauffage, ouvrez le tableau de bord de l’application. Lorsqu’il est connecté à l’appareil, le voyant Bluetooth du produit est fixe. En mode déconnecté, le voyant est éteint. C h o isis s e z u n p ro g ra m m e d e cuisson dans le tableau de bord de l’application et cliquez sur “OK”...
Seite 9
…Cuisson Une fois le préchauffage terminé, l’appareil est prêt à l’emploi. Ouvrez le gril et placez vos aliments sur la plaque de cuisson. Remarques : si l’appareil reste ouvert trop longtemps, le système de sécurité éteint l’appareil automatiquement. L’application Mon OptiGrill indique que la cuisson a commencé.
Seite 10
…Cuisson Créez vos profils personnalisés Créez un nouveau profil en choisissant une image, un son et une catégorie et en complétant vos préférences. Cuisinez avec vos profils personnalisés Programmez une cuisson personnalisée en sélectionnant un mode de cuisson et en plaçant les profils sur les niveaux de cuisson souhaités.
Seite 11
…Cuisson 16 Fonction de maintien au chaud Lorsque le niveau de cuisson bien cuit est atteint, la cuisson est terminée, l’appareil active automatiquement la fonction de maintien au chaud, le voyant lumineux devient rouge et l’appareil commence à émettre un signal sonore toutes les 20 secondes. Si des aliments sont laissés sur le gril, ils continueront de cuire pendant que les plaques de cuisson refroidissent.
Seite 12
Cuisson non connectée Commencez à cuisiner avec votre OptiGrill 1 Appuyez sur le bouton Marche / Arrêt. Attention : assurez vous qu'il n'y a pas d'aliments entre les plaques. 2 Si vous souhaitez cuire un aliment congelé, appuyez sur le bouton correspondant.
Seite 13
Cuisson… 7-8 Après le préchauffage, l’appareil est prêt à être utilisé. Soulevez le couvercle du gril et mettez la nourriture sur la plaque de cuisson. Commentaire : si l’appareil demeure ouvert trop longtemps, le système de sécurité mettra l’appareil hors tension automatiquement 9-10 L’appareil sélectionne automatiquement...
Seite 14
…Cuisson 12-13 Lorsque la couleur correspondant à votre choix du degré de cuisson apparaît et que le signal sonore retentit, ouvrez l’appareil et retirez vos aliments. 14-15-16 En fonction des préférences personnelles ouvrez le gril et retirez les aliments ayant atteint le degré de cuisson souhaité, puis refermez le gril pour poursuivre la cuisson des autres aliments.
Seite 15
…Cuisson 18 Abaissez le couvercle. Le panneau de commande s’allume et se met en mode « Sélection de programme ». Commentaire : le système de sécurité mettra l’appareil hors tension automatiquement si aucun programme n’est sélectionné. Cuissons successives Si vous désirez faire cuire plus d’aliments, veuillez mettre à température à nouveau l’appareil (reportez-vous à...
Seite 16
Nettoyage et entretien… 1 Appuyez sur le bouton marche/arrêt pour éteindre l’appareil. 2 Débranchez l'appareil. 3 Laissez refroidir pendant au moins 2 heures. Pour éviter des brûlures accidentelles, laissez le gril refroidir complètement avant de procéder à son nettoyage.
Seite 17
…Nettoyage et entretien 4 Avant le nettoyage, débloquez et retirez les plaques pour éviter d’endommager la surface de cuisson. 5 Le plateau de récupération de jus et les plaques de cuisson peuvent aller au lave-vaisselle. L’appareil et son cordon ne doivent jamais être mis au lave-vaisselle.
Seite 18
Si le problème persiste, contactez votre service clientèle Tefal local. • Défaillance de l’appareil. • D é b ra n c h e z , re b ra n c h e z Indicateur blanc clignotant •...
Seite 19
Guide de cuisson (programmes automatiques) Indicateur de couleur du degré de cuisson Programme dédié Viande rouge Saignant À point Bien cuit Steak haché Saignant À point Bien cuit Panini/Sandwich Légèrement cuit Bien cuit Croustillant Poisson Légèrement cuit À point Bien cuit Volaille Très cuit Porc/saucisses/agneau...
Seite 20
VEILIGHEIDSADVIEZEN BELANGRIJKE VOORZORGSMAATREGELEN Gebruik, onderhoud en installatie van dit product: voor uw veiligheid vragen we om de verschillende delen van deze handleiding of de bijbehorende afbeeldingen te raadplegen. • Dit apparaat is niet bedoeld voor bediening met behulp van een externe timer of aparte afstandsbediening anders dan die die vermeld worden door de fabrikant, zoals een smartphone of tablet.
Seite 21
• Dit apparaat is niet geschikt om gebruikt te worden in combinatie met een tijdschakelaar of afstandsbediening. • Rol het snoer volledig uit. • Wanneer het netsnoer is beschadigd dient deze te worden vervangen door de fabrikant, zijn servicedienst of een gelijkwaardig gekwalificeerd persoon om een gevaarlijke situatie te voorkomen.
Seite 22
• Houd het apparaat altijd buiten het bereik van kinderen. • Controleer of beide zijden van de plaat vóór gebruik goed zijn schoongemaakt. • Om beschadigingen van de bakplaten te voorkomen dient u deze alleen te gebruiken bij het apparaat waar ze voor bedoeld zijn.
Seite 23
A1 A2 A4 A5 Beschrijving Handmatige stand voor 4 Behuizing van Bedieningspaneel A4 temperatuurinstellingen zie quick start het apparaat specifieke gids handmatige stand A1 Aan/uit-knop A5 OK-toets C Handgreep A2 Diepvriesfunctie A6 Gaarheidsindicator D Bakplaten A3 Kookprogramma's A7 Bluetooth-lampje E Vetopvangbak F Netsnoer...
Seite 24
Voorbereiding 1 Verwijder de volledige verpakking, de stickers en diverse accessoires, zowel aan de binnenkant als aan de buitenkant van het apparaat. De kleur van de sticker rond het bakniveaulichtje kan afhankelijk van de taal worden gewijzigd. Deze kan worden vervangen door de sticker die zich in de verpakking van het apparaat bevindt.
Seite 25
Bakken met de app Download de applicatie en koppel uw OptiGrill Download de app Mijn OptiGrill met uw tablet of smartphone via de App Store of Play Store voor Android Activeer de Bluetooth -functie op ® uw tablet of smartphone. Steek de stekker van uw OptiGrill Smart in het stopcontact en schakel het apparaat aan door op de aan/uit-knop te...
Seite 26
…Voorverwarmen Open het dashboard van de app om de voorverwarming te starten. De Bluetooth-indicator op het product blijft branden eens het is verbonden met het apparaat. Het wordt uitgeschakeld als het apparaat niet meer is gekoppeld. Selecteer een bereidingsprogramma op het dashboard van de app en klik op “OK”...
Seite 27
…Bakken Het apparaat is klaar voor gebruik zodra het is voorverwarmd. Open de grill en plaats het voedsel op de grillplaat. Opmerkingen: als het apparaat te lang open blijft staan, schakelt de veiligheidsvoorziening het apparaat automatisch uit. De app Mijn OptiGrill geeft aan dat de bereiding is gestart en wacht tot de gewenste gaarheid is bereikt.
Seite 28
…Bakken Uw aangepaste profielen aanmaken Maak een nieuw profiel aan door een afbeelding, geluid en categorie te selecteren en uw voorkeuren toe te voegen. Bak met uw aangepaste profielen U kunt de bereiding naar uw voorkeur aanpassen door een bereidingsmodus te selecteren en de profielen op de gewenste bakniveaus te plaatsen.
Seite 29
…Bakken 16 Keep warm function Warmhoudfunctie Eens het gaarheidsniveau “doorbakken” is bereikt en de bereiding is afgerond, zal het apparaat automatisch de warmhoudfunctie inschakelen. Het indicatielampje wordt rood en het apparaat zal elke 20 seconden een biepgeluid uitgeven. Als er nog voedsel op de grill ligt, blijft het bakken terwijl de grillplaten afkoelen.
Seite 30
Bakken zonder de app Start het bakken met uw OptiGrill 1 Druk op de aan/uit-knop. Opgelet: zorg ervoor dat er zich geen voedsel tussen de platen bevindt 2 Als het voedsel dat u wilt bakken bevroren is, druk dan op de desbetreffende knop. 3 Selecteer de geschikte bereidingsmodus afhankelijk van welk type voedsel u wilt bakken.
Seite 31
Koken… Na het voorverwarmen is het apparaat klaar voor gebruik. Gebruik het middenstuk van de handgreep om de grill één keer te openen en plaats het voedsel op de bakplaat. Opmerking: indien het apparaat te lang open blijft staan, schakelt het beveiligingssysteem het apparaat automatisch uit.
Seite 32
…Koken 12-13 Als de corresponderende kleur van het gekozen kookniveau verschijnt en een geluidssignaal te horen is, opent u het apparaat en verwijdert u het eten. 14-15-16 Als u de voeding op de grill wilt bereiden naar verschillende persoonlijke voorkeuren, opent u de grill om de ingrediënten die het gewenste bereidingsniveau hebben bereikt te verwijderen, waarna u het apparaat...
Seite 33
…Koken 18 Sluit het apparaat. Het bedieningspaneel schakelt zich in en gaat naar de modus 'programmakeuze'. Opmerking: indien geen enkele programmakeuze wordt gemaakt, schakelt het beveiligingssysteem het apparaat automatisch uit. Opeenvolgende kookprocessen Als u grotere hoeveelheden wilt koken, dient u de temperatuur van het apparaat opnieuw in te stellen (zie hoofdstuk “Voorverwarmen”, startend vanaf punt 4), zelfs als u hetzelfde soort eten met behulp van hetzelfde programma kookt.
Seite 34
Reiniging en onderhoud… 1 Druk op de aan/uit knop om het apparaat uit te schakelen. 2 Trek de stekker uit het stopcontact. 3 Laat minstens 2 uur afkoelen. Laat de grill volledig afkoelen voor u hem schoonmaakt, om brandwonden te voorkomen.
Seite 35
…Reiniging en onderhoud 4 Voor de reiniging maakt u de platen los en verwijdert u ze om schade aan het bakoppervlak te verhinderen. 5 De vetopvangbak en de bakplaten mogen in de vaatwasser. Het apparaat en het snoer mogen niet in de vaatwasser. De verwarmingselementen - dit zijn de delen die zichtbaar en toegankelijk worden nadat u de platen hebt verwijderd- worden...
Seite 36
Neem warmhoud proces. contact op met de klantenservice van Tefal als het probleem zich nog eens voordoet. • Defect van het apparaat • Trek de stekker uit het stopcontact, steek Knipperend wit lichtje •...
Seite 37
Bereidingsgids (met automatische programma's) Gekleurd bereidingsniveaulampje Speciaal programma Rood vlees Rood Medium Doorbakken Hamburger Rood Medium Doorbakken Licht Panini Medium Doorbakken gebakken Licht Medium Doorbakken gebakken Gevogelte Doorbakken Varken/worstjes/lam Doorbakken Tip: als u heel saignant (bleu) vlees wilt, kunt u gebruikmaken van De bereidingsgids (handmatige stand inbegrepen) Bakniveau Bak-...
Seite 38
SICHERHEITSHINWEISE WICHTIGE SICHERHEITSMASSNAHMEN Verwendung, Wartung und Inbetriebnahme dieses Produkts: Beachten Sie im Interesse Ihrer Sicherheit bitte die verschiedenen Abschnitte dieses Handbuchs und die entsprechenden Diagramme. • Dieses Gerät ist nicht für den Betrieb mit einem externen Timer oder einer separaten Fernbedienung mit Ausnahme des vom Hersteller angegebenen Geräts (z.
Seite 39
• Um Gefahren zu vermeiden, darf ein schadhaftes Stromkabel nur vom Hersteller, dessen Kundendienst oder einer ähnlich qualifizierten Person ausgetauscht werden. • Wird ein Verlängerungskabel verwendet, muss dieses mindestens den gleichen Querschnitt wie die Zuleitung des Gerätes haben. Die auf dem Verlängerungskabel angegebene Leistung, muss mindestens der des Gerätes entsprechen.
Seite 40
Beachten Sie, was Sie vermeiden müssen. • Gerät niemals am Stromkreislauf lassen, wenn es nicht benutzt wird. • Um eine Überhitzung zu vermeiden, darf das Gerät nicht in Ecken oder an einer Wand platziert werden. • Ihr Gerät niemals direkt auf eine empfindliche Fläche (Glastisch, Tischdecke, lackiertes Möbelstück…) oder auf eine Plastiktischdecke stellen.
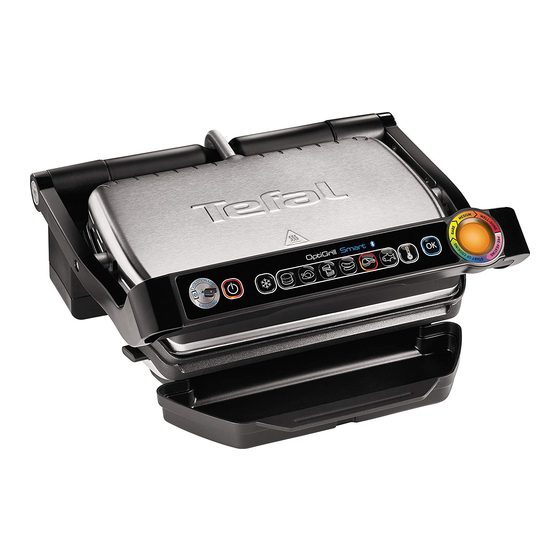
Seite 41
A1 A2 A4 A5 Beschreibung Manueller Betrieb mit 4 Temperatureinstellungen - Bedienfeld B Gerätegehäuse siehe Quick Start Guide, manueller Betrieb.. A1 Ein/Aus-Taste A5 Taste OK C Griff A2 Auftauprogramm A6 Anzeige zur Garstufe D Heizplatten A3 Grillprogramme A7 Bluetooth-Anzeige E Auffangschale F Stromkabel...
Seite 42
Vorbereitung 1 Alle Verpackungen, Klebestreifen oder diverse Zubehörteile innen und außen am Gerät entfernen. Der Farbaufkleber an der Anzeige der Garstufe kann je nach Sprache ausgetauscht werden. Dazu wird einfach der Aufkleber verwendet, der sich in der Verpackung des Geräts befindet. 2 N e h m e n S i e v o r d e r e r s t e n Inbetriebnahme die Platten ab und reinigen Sie sie gründlich mit warmem...
Seite 43
Garen mit Verbindung Laden Sie die App herunter und verbinden Sie Ihren OptiGrill Laden Sie die App „Mein OptiGrill“ über Ihr Tablet oder Ihr Smartphone vom App Store oder Play Store für Android herunter. Aktivieren Sie die Bluetooth -Funktion auf dem Tablet ®...
Seite 44
…Vorheizen Um den Vorheizvorgang zu starten, öffnen Sie das Dashboard der App. Die Bluetooth-Anzeige am Produkt leuchtet dauerhaft, wenn es mit der App verbunden ist. Sie ist ausgeschaltet, wenn keine Verbindung besteht. Wählen Sie ein Garprogramm im Dashboard der App und drücken Sie „OK“...
Seite 45
…Garen Nach dem Vorheizen ist das Gerät betriebsbereit. Öffnen Sie den Grill und legen Sie das Gargut auf die Grillplatte. Anmerkungen: Wenn das Gerät zu lange geöffnet ist, wird es vom Sicherheit ssystem automatisch ausgeschaltet. Die OptiGrill-App zeigt an, dass der Garvorgang begonnen hat.
Seite 46
…Garen Anpassbare Profile erstellen Erstellen Sie ein neues Profil, indem Sie ein Bild, ein akustisches Signal und eine Kategorie auswählen und Ihre Vorlieben einstellen. Mit anpassbaren Profilen garen Legen Sie eine angepasste Gareinstellung fest, indem Sie den Garmodus auswählen und die Profile auf die gewünschten Garstufen einstellen.
Seite 47
…Garen 16 Warmhaltefunktion Sobald die Garstufe „durch“ erreicht ist, ist der Garvorgang abgeschlossen. Das Gerät aktiviert automatisch die Warmhaltefunktion, die Anzeigelampe leuchtet rot und das Gerät gibt alle 20 Sekunden ein akustisches Signal (Piepton) aus. Wird das Grillgut auf dem Grill gelassen, gart es beim Abkühlen der Grillplatten weiter.
Seite 48
Garen ohne Verbindung Einleitung des Gar-Vorgangs mit Ihrem OptiGrill. 1 Drücken Sie die Ein-/Aus-Taste. Achtung: Stellen Sie sicher, dass sich keine Lebensmittel zwischen den Platten befinden. 2 Sind die Lebensmittel, die Sie zubereiten möchten, gefroren, drücken Sie die entsprechende Taste. 3 Wählen Sie den für den Grillguttyp geeigneten Garmodus.
Seite 49
Garen… 7-8 Nach der Aufheizzeit ist das Gerät betriebsbereit. Öffnen Sie den Grill ein einziges Mal, indem Sie den Griff mittig betätigen und legen Sie die Lebensmittel auf die Heizplatte.. Anmerkung: Wenn das Gerät zu lange geöffnet bleibt, schaltet das Sicherheitssystem das Gerät automatisch aus.
Seite 50
…Garen 12-13 Wenn die Farbe aufleuchtet, die der von Ihnen ausgewählten Garstufe entspricht und der Piepton zu hören ist, öffnen Sie das Gerät und entnehmen Sie Ihre Speisen. 14-15-16 Wenn Sie die auf dem Grill platzierten Lebensmittel mit persönlichen Vorlieben garen wollen, öffnen Sie den Grill und entnehmen Sie anschließend die Stücke, die den gewünschten Garzustand erreicht...
Seite 51
…Garen 18 Schließen Sie das Gerät. Das Bedienfeld schaltet sich ein und ist im Modus "Programmauswahl". Anmerkung: Wenn keine Programm- auswahl getroffen wird, schaltet das Sicherheitssystem das Gerät automatisch aus. Zweites Garen Wenn Sie anderes Gargut garen wollen, starten Sie bei Bereich 2. Vorheizen, Punkt 9, auch wenn Sie denselben Lebensmitteltyp garen möchten.
Seite 52
Reinigung und Wartung… 1 Drücken Sie die Ein-/Aus-Taste, um das Gerät auszuschalten. 2 Ziehen Sie den Stecker des Gerätes aus der Wandsteckdose. 3 Lassen Sie das Gerät mindestens 2 Stunden abkühlen. Um Verbrennungen zu vermeiden, lassen Sie den Grill vollständig abkühlen, bevor Sie mit der Reinigung beginnen.
Seite 53
…Reinigung und Wartung 4 Vor der Reinigung die Heizplatten entriegeln und entnehmen, um eine Beschädigung der Grillflächen zu vermeiden. 5 Die Auffangschale und die Heizplatten können in der Spülmaschine gereinigt werden. Die Heizelemente, die nach der Entnahme der Heizplatten sichtbar und zugänglich sind, dürfen nicht gereinigt werden.
Seite 54
Sie das Gerät schnell öffnen Warmhaltevorgang zu und schließen, um bestmögliche Gar- lange nicht in Betrieb. Resultate zu erhalten. Wenn das Problem erneut auftritt, kontaktieren Sie ihren Tefal- Kundendienst vor Ort. • Ausfall des Geräts. • Ziehen Sie den Netzstecker, schließenSie Anzeige Weiß blinkend •...
Seite 55
Übersicht über Garvorgänge (automatische Programme) Farbanzeige des Garstufe Ausgewähltes Programm Rotes Fleisch Blutig Medium Gut durch Hamburger Blutig Medium Gut durch Panini / Sandwich Leicht gegrillt Gut durch Knusprig Fisch Leicht gegrillt Medium Gut durch Geflügel Gut durch Schwein/Würstchen/ Gut durch Lamm Tipp: Wenn das Fleisch sehr blutig sein soll („englisch“), verwenden Sie Übersicht über Garvorgänge (einschließlich manueller Betrieb)
Seite 56
SAFETY INSTRUCTIONS IMPORTANT SAFEGUARDS Use, maintenance and installation of this product: for your safety, please refer to the various sections of this manual and the corresponding diagrams. • This appliance is not intended to be operated using an external timer or separate remote control system, other than those specified by the manufacturer, such as a smartphone or tablet.
Seite 57
• Never leave the appliance unattended when in use. • Accessible surface temperatures can be high when the appliance is operating. Never touch the hot surfaces of the appliance. • This appliance is not intended to be operated by means of an external timer or separate remote-control system.
Seite 58
Do not • Do not use the appliance outside. • Never leave the appliance unattended when plugged in or in use. • To prevent the appliance from overheating, do not place it in a corner or below a wall cupboard. •...
Seite 59
A1 A2 A4 A5 Description 4 temperature settings in manual mode; Control panel B Body see specific manual mode in Quick Start Guide A1 On/off button A5 “OK” button C Handle A2 Frozen food mode A6 Cooking level indicator D Cooking plates A3 Cooking programs A7 Bluetooth light E Drip tray F Power cord...
Seite 60
Preparing 1 Remove all packaging materials, stickers and accessories from the inside and the outside of the appliance. The colour sticker on the cooking level indicator can be changed, according to the language. You can replace it with the one on the inside of the packaging. 2 Before using for the first time, thoroughly clean the plates with warm water and a little dishwashing liquid,...
Seite 61
Cooking with connection Download the application and pair your OptiGrill Download the My OptiGrill app from the App Store or Play Store for Android via your tablet or smartphone. Activate the Bluetooth ® function on your tablet or smartphone. Plug in your OptiGrill Smart and turn it on by pressing the on/off button.
Seite 62
…Preheating To start preheating, open the app’s dashboard. The Bluetooth indicator on the product is fixed when it is connected to the appliance. It is switched off in disconnected mode. Choose a cooking program on the app’s dashboard and click “OK” on the OptiGrill’s button.
Seite 63
…Cooking After preheating, the appliance is ready for use. Open the grill and place the food on the cooking plate. Comments: if the appliance remains open for too long, the safety system will turn off the appliance automatically. The OptiGrill’s app. indicates that the cooking has started then wait until the desired cooking level.
Seite 64
…Cooking Create your custom profiles Create a new profile by choosing a picture, a sound, a category and by completing your preferences. Cook with your custom profiles Set a customized cooking by selecting a cooking mode and place the profils at the desired cooking levels.
Seite 65
…Cooking 16 Keep warm function Once the well done cooking level is reached, the cooking is finished, the appliance automatically activates the keep warm function, the indicator light turns red and the device begins to beep every 20 seconds. If food is left on the grill, it will continue to cook while the cooking plates cool.
Seite 66
Cooking without connection Start cooking with your OptiGrill 1 Press the on/off button. Caution : Make sure there are no food between the plates 2 If the food you wish to cook is frozen, press the corresponding button. 3 Select the appropriate cooking mode according to what type of food you wish to cook.
Seite 67
Cooking… 7-8 After preheating, the appliance is ready for use. Open the grill and place the food on the cooking plate. Comments: if the appliance remains open for too long, the safety system will turn off the appliance automatically. 9-10 The appliance automatically adjusts the cooking cycle (time and temperature) according to the food thickness and quantity.
Seite 68
…Cooking 12-13 When the color corresponding to your choice of cooking level appears and that the beep sounds, open the appliance and remove your food. 14-15-16 If you want to cook food to different personal tastes, open the grill and remove the food when it has reached the desired level and then close the grill and continue cooking the other food.
Seite 69
…Cooking 18 Close the appliance. The control panel will light up and set itself to ‘choice of program’ mode. Comment: the security system will turn off automatically if no program selection is made. Successive cooking If you wish to cook larger quantities, set in temperature the appliance again (see section 2. “Preheating”, starting from point 4), even if cooking the same type of food or same programme.
Seite 70
Cleaning and maintenance… 1 Press the on/off button to turn off the appliance. 2 Unplug the appliance from wall outlet. 3 Allow to cool for at least 2 hours. To avoid accidental burns, allow grill to cool thoroughly before cleaning.
Seite 71
…Cleaning and maintenance 4 Before cleaning, unlock and remove the plates to prevent damage to the cooking surface. 5 The appliance and its cord cannot be placed in the dishwasher. The heating elements, visible and accessible parts, should not be cleaned after removing the plates.
Seite 72
If end of warm up or keep the problem occurs again contact your warm. local Tefal customer service. • Appliance failure. • Disconnect and reconnect your The indicator light will blink white • Appliance stored or used...
Seite 73
Cooking Guide (automatic programs) Cooking level color indicator Dedicated program Red meat Rare Medium Well-done Burger Rare Medium Well-done Panini / Sandwich Lightly cooked Browned Crispy Fish Lightly cooked Medium Well-done Poultry Well cooked Pork / Sausages / Lamb Well cooked Tips: if you want your meat to be very rare (blue), you may use Cooking Guide (including Manual Mode) Cooking level...
Seite 74
ISTRUZIONI DI SICUREZZA AVVERTENZE IMPORTANTI Uso, manutenzione e installazione del prodotto: per la vostra sicurezza, fare riferimento alle varie sezioni del presente manuale e ai diagrammi corrispondenti. • Questo apparecchio non è destinato al funzionamento mediante l'utilizzo di un timer esterno o di un sistema di comando a distanza separato, diverso da quelli specificati dal produttore, per esempio uno smartphone o un tablet.
Seite 75
• La temperatura delle superfici accessibili può essere alta quando l'apparecchio è in funzione. Non toccare le superfici calde dell'apparecchio. • Questo apparecchio non è progettato per essere attivato tramite timer esterni o telecomandi separati. • Svolgere completamente il cavo di alimentazione prima di collegare l'apparecchio alla presa di corrente.
Seite 76
Che cosa non fare • Non usare l'apparecchio all'aperto. • Non lasciare l'apparecchio incustodito quando è collegato all'alimentazione o è in funzione. • Per evitare che l'apparecchio si surriscaldi, non posizionarlo in angoli o sotto un pensile. • Non posizionare l'apparecchio direttamente su superfici fragili (tavoli in vetro, tovaglie, mobili laccati, ecc.) o morbide (strofinacci, ecc.).
Seite 77
A1 A2 A4 A5 Descrizione 4 livelli di temperatura in modalità manuale; Pannello di B Corpo consultare le istruzioni relative alla modalità controllo dell'apparecchio manuale nella guida di avvio rapido Pulsante Acceso/ A5 Pulsante OK C Impugnatura Spento Modalità alimenti A6 Indicatore del livello di cottura D Piastre di cottura surgelati...
Seite 78
Pulizia 1 Rimuovere tutti i materiali di imballaggio, gli adesivi e gli accessori dalle superfici esterne e interne dell'apparecchio. A seconda della lingua, è possibile s o s t i t u i r e l ' a d e s i v o c o l o ra t o sull'indicatore del livello di cottura con uno di quelli inclusi.
Seite 79
Cottura con collegamento Scarica l'applicazione e collega il tuo OptiGrill S c a r i c a l ’a p p M y O p t i G r i l l direttamente dall’App Store o da Play Store per Android attraverso il tuo tablet o smartphone.
Seite 80
…Preriscaldamento Per avviare il preriscaldamento, aprire il dashboard dell’applicazione. L’indicatore bluetooth sul prodotto è fisso quando è collegato all’apparecchio. È spento quando è scollegato. Scegli un programma di cottura sul dashboard dell’applicazione e clicca “OK” sul pulsante di OptiGrill. La luce del pulsante “OK”...
Seite 81
…Cottura Dopo il preriscaldamento, l’apparecchio è pronto all’uso. Apri il grill e posiziona il cibo sulla piastra di cottura. Note: se l’apparecchio resta aperto troppo tempo, il sistema di sicurezza lo spegne automaticamente. L’applicazione di OptiGrill indica che la cottura è cominciata, quindi attendi il grado di cottura desiderato Vedi il punto 14 per personalizzare le tue preferenze di cottura con i profili...
Seite 82
…Cottura Crea i tuoi profili personalizzati Crea un nuovo profilo scegliendo un’immagine, un suono, una categoria e completando le tue preferenze. Cucina con i tuoi profili personalizzati Imposta una cottura personalizzata selezionando una modalità di cottura e posizionando i profili ai gradi di cottura desiderati.
Seite 83
…Cottura 16 Funzione scaldavivande Una volta raggiunto il grado “ben fatto”, la cottura è terminata, l’apparecchio attiva automaticamente la funziona scaldavivande, l’indicatore luminoso diventa rosso e il dispositivo comincia ad emettere un “bip” ogni 20 secondi. Se il cibo viene lasciato sul grill, continuerà la cottura mentre le piastre di cottura si raffreddano.
Seite 84
Cottura senza collegamento Comincia a cucinare con il tuo OptiGrill 1 Premi il pulsante on/off Attenzione: assicurati che non ci sia cibo nei piatti 2 Se il cibo che vuoi cucinare è congelato, premi il pulsante corrispondente. 3 Selezionare la modalità di cottura appropriata a seconda del tipo di cibo che desideri cucinare Suggerimento, in particolare per la...
Seite 85
Cottura… 7-8 Al termine del pre-riscaldamento, l'apparecchio è pronto per l'uso. Aprire la griglia e disporre gli alimenti sulla piastra di cottura. Nota: se l'apparecchio rimane aperto troppo a lungo, il sistema di sicurezza ne causerà lo spegnimento. 9 - 1 0 L ' a p p a r e c c h i o r e g o l a automaticamente il ciclo di cottura...
Seite 86
…Cottura 12-13 Quando l'indicatore diventa del colore corrispondente al livello di cottura desiderato e l'apparecchio emette un segnale acustico, aprire l'apparecchio e rimuovere gli alimenti. 14-15-16 Se si desidera cuocere alimenti secondo le proprie preferenze, aprire la griglia e rimuovere gli alimenti al raggiungimento del livello di cottura desiderato, quindi chiudere la griglia per continuare la cottura di altri alimenti.
Seite 87
…Cottura 18 Chiudere l'apparecchio. Il pannello di controllo si illuminerà ed entrerà automaticamente in modalità "selezione del programma". Nota: il sistema di sicurezza causerà lo spegnimento dell'apparecchio se non viene selezionato alcun programma. Cotture sequenziali Se si desidera cuocere grandi quantità di alimenti, impostare nuovamente la temperatura (consultare la sezione 2, “Pre-riscaldamento”, a partire dal punto 4), anche se il tipo di alimento o il programma di cottura non cambia.
Seite 88
Pulizia e manutenzione… 1 Premere il pulsante Acceso/Spento per spegnere l'apparecchio. 2 Scollegare l'apparecchio dalla presa di corrente. 3 Lasciare che l'apparecchio si raffreddi per almeno 2 ore. Per evitare il rischio di ustioni, attendere che la griglia si raffreddi completamente prima di pulirla.
Seite 89
…Pulizia e manutenzione 4 Prima di pulire l'apparecchio, sbloccare e rimuovere le piastre per evitare di danneggiare la superficie di cottura. 5 L'apparecchio e il cavo di alimentazione non possono essere lavati in lavastoviglie. Gli elementi riscaldanti e le parti accessibili e visibili dopo la rimozione delle piastre non devono essere puliti.
Seite 90
Se il problema si riscaldamento o del ripresenta, contattare il servizio clienti mantenimento al caldo. Tefal locale. • M a l f u n z i o n a m e n t o • Scollegare e ricollegare l'apparecchio L'indicatore lampeggia di bianco dell'apparecchio.
Seite 91
Guida di cottura (programmi automatici) Colore dell'indicatore del livello di cottura Programma predefinito Carne rossa Al sangue Mediamente cotta Ben cotta Hamburger Al sangue Mediamente cotto Ben cotto Panino/sandwich Riscaldato Tostato Croccante Leggermente Pesce Mediamente cotto Ben cotto cotto Pollame Ben cotto Maiale/salsiccia/agnello Ben cotto...
Seite 92
INSTRUCCIONES DE SEGURIDAD PRECAUCIONES IMPORTANTES Uso, mantenimiento e instalación de este producto: por su seguridad, consulte los distintos apartados de este manual y los diagramas correspondientes. • Este electrodoméstico no está diseñado para funcionar con un temporizador externo u otro sistema de control remoto independiente diferente de los especificados por el fabricante, como un smartphone o un tablet.
Seite 93
cualquier peligro. • No utilice alargadores. Si utiliza un alargador, asegúrese de elegir uno con un diámetro equivalente, que disponga de enchufe con conexión a tierra y sea adecuado para la potencia del aparato. Tome todas las precauciones necesarias para impedir que alguien tropiece con el alargador. •...
Seite 94
• Utilice únicamente los accesorios suministrados con el aparato o comprados en un centro de servicio autorizado. No los utilice con otros aparatos. Qué no debe hacer • No utilice el aparato en el exterior. • Nunca deje conectado el aparato cuando no vaya a utilizarlo. •...
Seite 95
A1 A2 A4 A5 Descripción Panel de control Modo manual con 4 niveles de B Cuerpo del aparato temperatura véase la guía de inicio rápido específica del modo manual A1 Botón ON/OFF A5 Botón OK C Asa Modo Indicador de nivel de cocción Placas de cocción descongelación Programas de...
Seite 96
Preparación 1 Retire todos los embalajes, pegatinas o accesorios diversos tanto del interior como del exterior del aparato. En función del idioma, la pegatina alrededor del indicador de nivel de cocción puede ser distinta. Basta con sustituirla por la que se encuentra en el interior del embalaje del aparato.
Seite 97
Cocinar con conexión Descargue la aplicación y sincronice su OptiGrill Descargue la aplicación Mi OptiGrill de la App Store o Play Store para Android desde su tablet o smartphone. Active la función de Bluetooth de su tablet ® o smartphone. Enchufe su OptiGrill Smart y enciéndalo pulsando el botón on/off.
Seite 98
…Precalentamiento Para empezar a precalentar, abra el tablero de la aplicación. El indicador de Bluetooth del producto está fijo cuando está conectado al aparato. Se apaga en el modo desconectado Elija un programa de cocina en el tablero de la aplicación y pulse “OK” en el botón del OptiGrill.
Seite 99
…Cocinar Después del precalentamiento, el aparato está listo para usar. Abra la parrilla y coloque el alimento en la placa de cocción Observaciones: si el aparato permanece abierto mucho tiempo, el sistema de seguridad lo apagará automáticamente. La aplicación OptiGrill indica que ha empezado la cocción;...
Seite 100
…Cocinar Cree perfiles personalizados Cree un nuevo perfil eligiendo una foto, un sonido, una categoría y rellenando sus preferencias. Cocine con perfiles personalizados Establezca una forma de cocinar personalizada seleccionando un modo de cocción y coloque los perfiles en los niveles de cocción deseados.
Seite 101
…Cocinar 16 Función de mantenimiento del calor Cuando se ha alcanzado el nivel de cocción “muy hecho” termina la cocción, el aparato activa automáticamente la función de conservación del calor, la luz del indicador se pone roja y el aparato empieza a pitar cada 20 segundos. Si se deja algún alimento en la parrilla, seguirá...
Seite 102
Cocinar sin conexión Comience a cocinar con su OptiGrill 1 Pulse el botón on/off Advertencia: no deje alimentos entre las placas. 2 Si el alimento a cocinar está congelado, pulse el botón correspondiente 3 Elija el modo de cocción apropiado según el tipo de alimento que desea cocinar.
Seite 103
Cocción… Después del precalentamiento, el aparato está listo para su uso. Levante la tapa del grill y coloque los alimentos sobre la placa de cocción. Comentario: si el aparato se deja abierto demasiado tiempo, el sistema de seguridad desconectará automáticamente el aparato. 9-10 El aparato selecciona automáticamente el ciclo de cocción (tiempo y temperatura) en...
Seite 104
…Cocción 12-13 Cuando aparezca el color correspondiente al grado de cocción elegido por usted y suene el pitido, abra el aparato y retire los alimentos. 14-15-16 En función de las preferencias individuales de cada persona, abra el grill y retire los alimentos que hayan alcanzado el grado de cocción deseado;...
Seite 105
…Cocción 18 Baje la tapa. El panel de control se ilumina y pasa al modo «Selección de programa». Co m e nt a r i o: el sis tema de seguridad desconectará el aparato automáticamente si no se selecciona ningún programa. Cocción sucesiva Si desea cocinar más alimentos, vuelva a ajustar la temperatura del aparato (consulte el apartado 2.
Seite 106
Limpieza y mantenimiento… 1 Pulse el botón de encendido/apagado para apagar el aparato.. 2 Desenchufe el aparato de la toma de corriente. 3 Déjelo enfriar durante al menos 2 horas. Para evitar quemaduras accidentales, deje enfriar completamente el grill antes de proceder a su limpieza.
Seite 107
…Limpieza y mantenimiento 4 Antes de limpiarlo, desencaje y retire las placas para evitar dañar la superficie de cocción. 5 La bandeja de recogida de jugos y las pla- cas de cocción pueden lavarse en el lavava- jillas. El aparato y su cable nunca deben in- troducirse en el lavavajillas.
Seite 108
Tefal. • Avería del aparato. • D e s c o n e c t e , v u e l v a a c o n e c t a r Indicador blanco intermitente •...
Seite 109
Guía de cocción (programas automáticos) Indicador de color del grado de cocción Programa específico Carne roja Poco hecha Al punto Muy hecha Hamburguesa Poco hecha Al punto Muy hecha Ligeramente Panini/Sándwich Muy tostado Crujiente tostado Pescado Poco hecho Al punto Muy hecho Carne de ave Muy hecha...
Seite 110
INSTRUÇÕES DE SEGURANÇA INFORMAÇÕES IMPORTANTES Utilização, manutenção e instalação deste produto: consulte as várias secções do presente manual. • Este aparelho não foi concebido para ser utilizado com um sistema de controlo remoto em separado, sem ser, por exemplo, um smartphone ou um tablet.
Seite 111
precauções necessárias para evitar que alguém tropece na extensão elétrica. • Se utilizar uma extensão elétrica, esta deve ter uma secção pelo menos equivalente, e ter uma tomada com ligação de terra incorporada. Tome as devidas precauções para que ninguém tropece. •...
Seite 112
O que não pode fazer • Não utilize o aparelho no exterior. • Nunca ligue o aparelho quando não é utilizado. • A fim de evitar o sobreaquecimento, não o coloque num canto nem encostado a uma parede. • Nunca coloque o aparelho diretamente sobre um suporte frágil (mesa de vidro, toalha, móvel envernizado, etc.) ou sobre um suporte de tipo toalha de plástico.
Seite 113
A1 A2 A4 A5 Descrição Modo manual com 4 níveis de Painel de controlo temperatura. B Corpo do aparelho Consulte o guia de início rápido específico para o modo manual. A1 Botão Ligar/Desligar A5 Botão “OK” C Pega A2 Modo ultracongelado A6 Indicador de nível de confeção D Placas grill Programas de Gaveta de recolha de...
Seite 114
Preparação 1 Retire todas as embalagens, autocolantes ou acessórios diversos quer do interior quer do exterior do aparelho. Consoante o idioma, o autocolante de cor à volta do indicador de nível de confeção pode ser alterado. Basta substituí-lo pelo o que se encontra no interior da embalagem do aparelho.
Seite 115
Cozinhar com ligação Descarregue a aplicação e emparelhe-a com o OptiGrill Descarregue a aplicação My Optigrill na App Store ou Play Store para Android através do tablet ou do smartphone. Ative a função Bluetooth no tablet ou smartphone. ® Ligue o Optigrill Smart à tomada e prima o botão ligar/desligar.
Seite 116
…Preaquecimento Para começar a preaquecer, abra o painel de instrumentos da aplicação. O indicador Bluetooth do produto fica aceso quando está ligado ao aparelho. Fica desligado no modo desconectado. Escolha um programa de cozedura no painel de instrumentos da aplicação e clique “OK” no botão do Optigrill.
Seite 117
…Cozedura Após o preaquecimento, a aplicação está pronta a utilizar. Abra o grelhador e coloque os alimentos na placa de cozedura. C o m e n t á r i o s : s e o a p a relho permanecer aberto durante demasiado tempo, o sistema de segurança desliga-o automaticamente.
Seite 118
…Cozedura Crie os seus perfis personalizados Crie um novo perfil selecionando uma imagem, um som, uma categoria e preenchendo as suas preferências.. Cozinhe com os seus perfis D e fi n a u m a c oze d u ra p e r s o n a l i za d a selecionando um modo de cozedura e coloque personalizados os perfis nos níveis de cozedura pretendidos.
Seite 119
…Cozedura 16 Função manter quente Assim que atingir o nível de cozedura “bem passado”, esta está concluída. O aparelho ativa automaticamente a função manter quente, a luz do indicador fica vermelha e o aparelho emite um sinal sonoro a cada 20 segundos. Se ficarem alimentos no grelhador, este continuará...
Seite 120
Cozinhar sem ligação Comece a cozinhar com o OptiGrill 1 Prima o botão ligar/desligar. Advertência: Certifique-se de que não há alimentos entre as placas 2 Se os alimentos que pretende cozinhar estão congelados, prima o botão correspondente. 3 Selecione o modo de cozedura adequado de acordo com o tipo de alimentos que pretende cozinhar.
Seite 121
Cozedura… 7-8 Após o preaquecimento, o aparelho fica pronto a ser utilizado. Levante a tampa do grelhador e coloque os alimentos sobre a placa grill. Comentário : se o aparelho permanecer aberto durante demasiado tempo, o sistema de segurança desliga automaticamente o aparelho.
Seite 122
…Cozedura 12-13 Quando a cor correspondente ao nível de confeção escolhido aparecer e é emitido um sinal sonoro, abra o aparelho e retire os alimentos. 14-15-16 Consoante as preferências pessoais de cada pessoa, abra o grelhador e retire os alimentos que alcançaram o nível de confeção pretendido e volte a fechar o grelhador para que os restantes alimentos continuem a grelhar.
Seite 123
…Cozedura 18 Baixe a tampa. O painel de controlo liga- se e coloca-se em modo « Seleção de programa ». Comentário : o sistema de segurança desliga automaticamente o aparelho se não estiver selecionado nenhum programa. Cozinhar sem parar Se pretender cozinhar quantidades maiores, volte a configurar a temperatura do aparelho (consultar secção 2.
Seite 124
Limpeza… 1 Prima o botão ligar/desligar para desligar o aparelho. 2 Retire a ficha da tomada. 3 Deixe arrefecer pelo menos 2 horas. Para evitar queimaduras acidentais, deixe arrefecer o grelhador por completo antes de proceder à sua limpeza.
Seite 125
…Limpeza 4 Antes da limpeza, desencaixe e retire as placas para evitar danificar a superfície de cozedura. 5 A gaveta de recolha de sucos e as placas de cozedura podem ser colocadas na máquina de lavar louça. O aparelho e o respetivo cabo nunca devem ser colocados na máquina de lavar louça.
Seite 126
Se demasiado tempo após o o problema persistir, contacte o Centro de fim do preaquecimento ou a Contacto do Consumidor Tefal. função manter quente. • Falha do aparelho. • Desligue e volte a ligar imediatamente o Indicador branco intermitente •...
Seite 127
Guia de confeção (programas automáticos) Indicador de cor do nível de cozedura Programa específico Carne vermelha Mal passado Médio Bem passado Hambúrguer Mal passado Médio Bem passado Ligeiramente Tostas/Sandes Bem passado Estaladiço tostado Ligeiramente Peixe/marisco Médio Bem passado grelhado Carne de aves Muito bem passado Carne de porco/salsichas/ Muito bem passado...
Seite 128
ΟΔΗΓΙΕΣ ΑΣΦΑΛΕΙΑΣ ΣΗΜΑΝΤΙΚΕΣ ΠΡΟΦΥΛΑΞΕΙΣ Χρήση, συντήρηση και εγκατάσταση αυτού του προϊόντος: για την ασφάλειά σας, παρακαλείστε να ανατρέχετε στα διάφορα κεφάλαια του παρόντος εγχειριδίου και στα αντίστοιχα διαγράμματα. • Η συσκευή αυτή δεν προορίζεται για χρήση με εξωτερικό χρονοδιακόπτη ή ξεχωριστό...
Seite 129
• Εάν χρησιμοποιείτε ηλεκτρική μπαλαντέζα, η τάση της πρέπει να είναι τουλάχιστον ισοδύναμη με αυτήν της συσκευής και να διαθέτει ενσωματωμένη γειωμένη πρίζα. Λαμβάνετε όλες τις απαραίτητες προφυλάξεις, για να αποφύγετε τον κίνδυνο να σκοντάψει κάποιος στο καλώδιο. Συνδέετε τη συσκευή αποκλειστικά και μόνο σε πρίζα...
Seite 130
Τι να μην κάνετε • Μην χρησιμοποιείτε τη συσκευή σε εξωτερικό χώρο. • Μην αφήνετε ποτέ τη συσκευή συνδεδεμένη στο ρεύμα όταν δεν βρίσκεται σε χρήση. • Για να αποφύγετε την υπερθέρμανση της συσκευής, μην την τοποθετείτε σε γωνία ή ακριβώς δίπλα στον τοίχο. •...
Seite 131
A1 A2 A4 A5 Περιγραφή Μη αυτόματη λειτουργία με 4 ρυθμίσεις Κεντρική μονάδα της Πίνακας ελέγχου θερμοκρασίας, βλέπε ειδικές οδηγίες γρήγορης συσκευής έναρξης για τη μη αυτόματη λειτουργία Κουμπί έναρξη/ A5 Κουμπί «OK» C Λαβή διακοπή λειτουργίας Λειτουργία για A6 Ένδειξη επιπέδου ψησίματος D Πλάκες...
Seite 132
Προετοιμασία 1 Αφαιρέστε όλες τις συσκευασίες, τα αυτοκόλλητα ή τα διάφορα εξαρτήματα από το εσωτερικό και το εξωτερικό της συσκευής. Ανάλογα με τη γλώσσα, το χρωματιστό αυτοκόλλητο γύρω από την ένδειξη του επιπέδου ψησίματος μπορεί να διαφέρει. Αρκεί να το αντικαταστήσετε με εκείνο που βρίσκεται...
Seite 133
Ψήσιμο με σύνδεση Κατέβασμα της εφαρμογής και ζευγοποίηση του OptiGrill Κατεβάστε την εφαρμογή My Optigrill από το App Store ή το Play Store για συσκευές με τεχνολογία Android μέσω του tablet ή του smartphone σας. Ενεργοποιήστε τη λειτουργία ® Bluetooth στο...
Seite 134
…Προθέρμανση Για να ξεκινήσετε την προθέρμανση, ανοίξτε τον πίνακα ελέγχου της εφαρμογής. Η λυχνία ένδειξης Bluetooth του προϊόν τος είναι σ ταθερή όταν υπάρχει σύνδεση με τη συσκευή. Εί ν α ι α πε ν ε ργ οπο ι ημ έ ν η σ τ ην αποσυνδεδεμένη...
Seite 135
…Ψήσιμο Μετά από την προθέρμανση, η συσκευή είναι έτοιμη για χρήση. Ανοίξτε την ψηστιέρα και τοποθετήστε τα τρόφιμα στην πλάκα μαγειρέματος. Π α ρ α τ η ρήσ ε ι ς : ε ά ν η σ υ σ κ ε υ ή παραμείνει...
Seite 136
…Ψήσιμο Δημιουργήστε τα δικά σας διαμορφωμένα προφίλ Δημιουργήστε ένα νέο προφίλ επιλέγοντας μια εικόνα, έναν ήχο, μια κατηγορία και συμπληρώνοντας τις προτιμήσεις σας. Μαγειρέψτε με τα δικά σας Ρυθμίστε ένα ειδικά διαμορφωμένο ψήσιμο επιλέγοντας τρόπο ψησίματος και τοποθετήστε τα προφίλ στους διαμορφωμένα...
Seite 137
…Ψήσιμο 16 Λειτουργία διατήρησης θερμότητας Όταν επιτευχθεί ο βαθμός ψησίματος «καλοψημένο», το ψήσιμο τελειώνει, η εφαρμογή ενεργοποιεί αυτομάτως τη λειτουργία διατήρησης θερμότητας, η λυχνία της ένδειξης γίνεται κόκκινη και η συσκευή αρχίζει να εκπέμπει ήχο «μπιπ» κάθε 20 δευτερόλεπτα. Εάν παραμείνουν...
Seite 138
Ψήσιμο χωρίς σύνδεση Αρχίστε το ψήσιμο με το OptiGrill 1 Πιέστε το κουμπί on/off. Προσοχή: Σιγουρευτείτε ότι δεν υπάρχουν τρόφιμα ανάμεσα στις πλάκες 2 Εάν τα τρόφιμα που θέλετε να ψήσετε είναι κατεψυγμένα, πιέστε το αντίστοιχο κουμπί. 3 Επιλέξτε τον κατάλληλο τρόπο ψησίματος, ανάλογα...
Seite 139
…Ψήσιμο 7-8 Μετά από την προθέρμανση, η συσκευή είναι έτοιμη προς χρήση. Σηκώστε το καπάκι της σχάρας και τοποθετήστε τα τρόφιμα στην πλάκα ψησίματος. Παρατήρηση : ε' ά ν η συσκευή παραμείνει κλειστή για πολλή ώρα, το σύστημα ασφαλείας θα θέσει ααυτομάτως τη συσκευή...
Seite 140
…Ψήσιμο 12-13 Μόλις ανάψει η ένδειξη στο χρώμα που ανταποκρίνεται στο επίπεδο ψησίματος της επιλογής σας και ακουστεί το ηχητικό σήμα, ανοίξτε τη συσκευή και βγάλτε το φαγητό σας.. 14-15-16 Αναλόγως των προσωπικών προτιμήσεων κάθε προσώπου, μπορείτε να ανοίγετε τη σχάρα και να βγάζετε...
Seite 141
…Ψήσιμο 18 Χαμηλώστε το καπάκι. Ο πίνακας ελέγ- χου ανάβει και τίθεται σε λειτουργία « Επιλογή προγράμματος ». Παρατήρηση : το σύστημα ασφαλεί- ας θα θέσει τη συσκευή εκτός τάσης αυτομάτως, εάν δεν επιλεγεί κανένα πρόγραμμα. Διαδοχικό ψήσιμο Εάν θέλετε να ψήσετε μεγαλύτερες ποσότητες, ρυθμίστε ξανά τη θερμοκρασία της συσκευής (δείτε...
Seite 142
Καθαρισμός και συντήρηση… 1 Πιέστε το πλήκτρο έναρξη/διακοπή λει- τουργίας για να απενεργοποιήσετε τη συσκευή. 2 Αποσυνδέστε τη συσκευή από την πρίζα. 3 Αφήστε τη να κρυώσει για τουλάχιστον 2 ώρες. Για να αποφύγετε την πρόκληση εγκαύ- ματος, αφήστε τη σχάρα να κρυώσει τελείως...
Seite 143
…Καθαρισμός και συντήρηση 4 Πριν από τον καθαρισμό, αποσυνδέστε και τραβήξτε τις πλάκες για να αποφύγετε την πρόκληση φθορών στην επιφάνεια ψησίματος. 5 Ο δίσκος περισυλλογής λιπών και οι πλάκες ψησίματος μπορούν να μπουν στο πλυντή- ριο πιάτων. Η συσκευή και το καλώδιό της δεν...
Seite 144
το τέλος της προθέρμανσης ή της γρήγορα για καλύτερα αποτελέσματα ψησίματος. Εάν διατήρησης θερμοκρασίας. το πρόβλημα παραμένει, απευθυνθείτε στο σημείο εξυπηρέτησης πελατών Tefal της περιοχής σας. Ένδειξη παλλόμενη λευκή • Βλάβη της συσκευής. • Βγάλτε και ξαναβάλτε αμέσως τη συσκευή...
Seite 146
TEFAL/T-FAL INTERNATIONAL GUARANTEE: COUNTRY LIST www.tefal.com GROUPE SEB ARGENTINA S.A. 2 años Billinghurst 1833 3° 0800-122-2732 ARGENTINA 2 years C1425DTK Capital Federal Buenos Aires ՓԲԸ <<ԳՐՈՒՊՊԱ ՍԵԲ>> ՀԱՅԱՍՏԱՆ 2 տարի 2 years 125171,ՄՈՍԿՎԱ, ԼԵՆԻՆԳՐԱԴՅԱՆ 010 55-76-07 ARMENIA ԽՃՈՒՂԻ, 16A, ՇԻՆ.3...
Seite 147
FINLAND 2 years Kutojantie 7 02630 Espoo GROUPE SEB France France Continentale + 2 ans Service Consommateur Tefal 09 74 50 47 74 Guadeloupe, Martinique, 2 years 112 Ch. Moulin Carron, TSA 92002 Réunion, St-Martin 69134 ECULLY Cedex GROUPE SEB DEUTSCHLAND GmbH /...
Seite 148
NORGE 815 09 567 Tempovej 27 2 years NORWAY 2750 Ballerup ع ُ مان سلطنة 24703471 1 year www.tefal-me.com OMAN 801 300 420 2 lata GROUPE SEB POLSKA Sp. z o.o. POLSKA koszt jak za 2 years ul. Bukowińska 22b POLAND połączenie lokalne...
Seite 149
2 años ESPAÑA 902 31 24 00 C/ Almogàvers, 119-123, Complejo 2 years SPAIN Ecourban 08018 Barcelona TEFAL SVERIGE SUBSIDIARY OF 2 år SVERIGE 08 594 213 30 GROUPE SEB NORDIC SWEDEN 2 years Truckvägen 14 A, 194 52 Upplands Väsby...
Seite 150
TEFAL/T-FAL INTERNATIONAL GUARANTEE Date of purchase: ....../ Date d'achat / Fecha de compra / Data da compra / Data d'acquisto / Kaufdatum / Aankoopdatum / Købsdato / Inköpsdatum / Kjøpsdato / Ostopäivä...