Herunterladen Diese Seite drucken

Werbung

Verfügbare Sprachen
  • DE

Verfügbare Sprachen

VDPL3
V
300S
D
ELISO –
– STROB
US
SER MAN
UAL
GE
EBRUIKER
RSHANDL
MO
ODE D'EM
MPLOI
MA
ANUAL D
EL USUAR
BE
EDIENUN
GSANLEIT
D
BE DANC
CER
LEIDING
15
RIO
21
TUNG
27
3
 
9


Werbung

loading

Inhaltszusammenfassung für HQ Power VDPL300SD

  • Seite 1 VDPL3 300S ELISO – – STROB BE DANC SER MAN   EBRUIKER RSHANDL LEIDING   ODE D’EM MPLOI   ANUAL D EL USUAR   EDIENUN GSANLEIT TUNG  ...
  • Seite 2 VDPL300SD terminator eindweerstand résistance de terminaison terminación Terminierung How to turn the controller line from 3-pins into 5-pins (plug and socket). Controller line van 3-pin naar 5-pin aanpassen (stekker en contact). Modifier la ligne du contrôleur de 3 broches en 5 broches (fiche et contact).
  • Seite 3 VDPL300SD R MAN NUAL Intro oduction o all residen nts of the E European Un nion mportant en nvironment tal informat tion about t this produc This symbol on th he device or r the packag e indicates t that disposa...
  • Seite 4 • This device is designed for professional use on stage, in discos, theatres, etc. The VDPL300SD should only be used indoors with an alternating current of 100 to 240 VAC – 50/60 Hz.
  • Seite 5 When applicable, connect an XLR cable to the female XLR output of a controller (not incl.) and the other side to the male XLR input [9] of the VDPL300SD. Multiple VDPL300SDs can be linked through serial linking. The linking cable should be a dual core, screened cable with XLR input and output connectors.
  • Seite 6 VDPL300SD Master/Slave Mode The master/slave mode allows connecting several devices to a single master device. All slave devices will then work synchronously with the master device. You need to set one device to master mode and all other devices to slave mode.
  • Seite 7 VDPL300SD Channel From Description Auto program 12 Auto program 13 Auto program 14 Auto program 15 Auto program 16 Auto program 17 Auto program 18 Auto program 19 Auto program 20 Auto program 21 Auto program 22 Auto program 23...
  • Seite 8 VDPL300SD 3. Remove the damaged fuse from its holder and replace with the exact same type of fuse. 4. Insert the fuse holder back in its place and reconnect power. Technical Specifications power supply 100 to 240 Vac - 50/60 Hz...
  • Seite 9 VDPL300SD GEBR RUIKER RSHAN NDLEID DING Inlei ding an alle inge ezetenen va an de Europ pese Unie elangrijke m milieu-infor rmatie betr reffende dit t product Dit sy ymbool op h het toestel of f de verpakk king geeft aa...
  • Seite 10 VDPL300SD Bescherm tegen schokken. Vermijd brute kracht tijdens de bediening. • Leer eerst de functies van het toestel kennen voor u het gaat gebruiken. Ongeschoolde personen mogen dit toestel niet gebruiken. Meestal is beschadiging het gevolg van onprofessioneel gebruik. •...
  • Seite 11 De VDPL300SD heeft een voedingsuitgang [6] waaraan een volgende VDPL300SD kan aangesloten worden. Bij het aansluiten van meerdere VDPL300SD's in een ketting via deze uitgang, mag de totale stroom de nominale stroom van de stroomkring niet overschrijden. Gebruik voedingskabels met een geschikte diameter.
  • Seite 12 VDPL300SD 3. Druk op <MENU> tot <S--> op de display verschijnt. 4. Gebruik de <UP> en <DOWN> toetsen om de snelheid in te stellen van <S--1> (traag) tot <S100> (snel). Muziekgestuurde modus Voor het activeren van de muziekgestuurde modus: 1. Druk op <MENU> tot <SND> op de display verschijnt en druk op <ENTER>.
  • Seite 13 VDPL300SD Kanaal Functie Automatisch programma 3 Automatisch programma 4 Automatisch programma 5 Automatisch programma 6 Automatisch programma 7 Automatisch programma 8 Automatisch programma 9 Automatisch programma 10 Automatisch programma 11 Automatisch programma 12 Automatisch programma 13 Automatisch programma 14 Automatisch programma 15...
  • Seite 14 VDPL300SD • Ontkoppel het toestel van het lichtnet voor u aan onderhoudswerkzaamheden begint. Laat het toestel afkoelen. • Maak het toestel geregeld schoon met een vochtige, niet pluizende doek. Gebruik geen alcohol of solventen. • Dompel het toestel niet onder.
  • Seite 15 (p.e ex. VDLSC7N N ou VDLSC8 8N). • Installer le e VDPL300SD D à une dista ance minima ale de 0.5 m de tout obj et ou produi it inflammab ble ou explos sif.
  • Seite 16 • Fixer votre VDPL300SD à l’aide d’un câble de sécurité (sécurité supplémentaire). • Éviter de vous positionner en dessous de l’appareil pour l’enlever ou lors du montage ou du nettoyage. Un technicien qualifié...
  • Seite 17 Si nécessaire, connecter un câble à fiche XLR à la sortie XLR femelle de votre contrôleur (non incl.) et l’autre fiche XLR mâle à l’entrée [9] du VDPL300SD. Il est possible de relier plusieurs VDPL300SD à partir d’une connexion sérielle. Utiliser un câble de connexion blindé à 2 conducteurs avec des connecteurs d’entrée et de sortie XLR.
  • Seite 18 VDPL300SD Mode maître/esclave Le mode maître/esclave permet de connecter plusieurs appareils à un appareil maître. Tous les appareils esclave fonctionneront en parfaite synchronisation avec l'appareil maître. Mettez un appareil en mode maître et les autres appareils en mode esclave. 1. Connectez tous les appareils en série avec des câbles DMX.
  • Seite 19 VDPL300SD Canal À Description Programme automatique 12 Programme automatique 13 Programme automatique 14 Programme automatique 15 Programme automatique 16 Programme automatique 17 Programme automatique 18 Programme automatique 19 Programme automatique 20 Programme automatique 21 Programme automatique 22 Programme automatique 23...
  • Seite 20 VDPL300SD Spécifications techniques alimentation 100 à 240 Vcc - 50/60 Hz fusible 1A / 250 Vca consommation 20 W pilotage DMX 2-4 canaux connexion DMX entrée et sortie XLR 3 broches nombre de LEDs 64 LEDs x 5 lentilles (16 pcs par couleur RGB + 8 pcs par couleur AW), 5 mm...
  • Seite 21 VDPL300SD ANUAL L DEL U USUAR Intro oducción los ciudada anos de la U Unión Europ mportantes informacio ones sobre el medio am mbiente co oncerniente e a este pro oducto Este símbolo en este aparato o o el embala...
  • Seite 22 • Utilice sólo el VDPL300SD para aplicaciones descritas en este manual a fin de evitar p.ej. cortocircuitos, quemaduras, descargas eléctricas, etc. Un uso desautorizado puede causar daños y anula la garantía completamente.
  • Seite 23 ON/OFF (de 0% a 100%). • El VDPL300SD tiene una salida de potencia [6] a la que es posible conectar otro VDPL300SD. Asegúrese de que la corriente total no sobrepase la corriente nominal de la red al conectar varios VDPL300SDs en serie a esta salida.
  • Seite 24 VDPL300SD Control por la música Para activar el control por la música: 1. Pulse la tecla <MENU> hasta que se visualice <SND> y pulse <ENTER>. 2. Si fuera necesario, ajuste la sensibilidad del micrófono incorporado con el ajuste de sensibilidad [5].
  • Seite 25 VDPL300SD Canal Función Programa automático 7 Programa automático 8 Programa automático 9 Programa automático 10 Programa automático 11 Programa automático 12 Programa automático 13 Programa automático 14 Programa automático 15 Programa automático 16 Programa automático 17 Programa automático 18 Programa automático 19 Programa automático 20...
  • Seite 26 VDPL300SD Reemplazar el fusible Reemplace un fusible fundido por otro del mismo tipo. 1. Desconecte el aparato de la red antes de reemplazar el fusible. 2. Desatornille el portafusibles con un destornillador con punta plana. 3. Saque el fusible fundido y reemplácelo.
  • Seite 27 VDPL300SD DIENUN NGSAN NLEITU Einfü ührung n alle Einwo ohner der E Europäische en Union ichtige Umw weltinform mationen üb ber dieses P Produkt Diese s Symbol au uf dem Produ ukt oder der Verpackung g zeigt an, d ass die Ents...
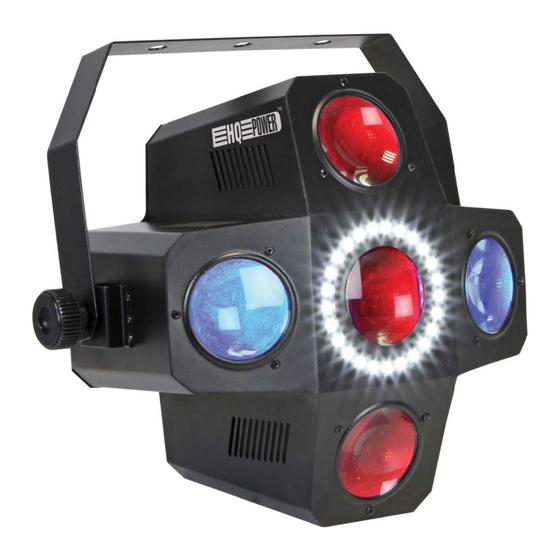
  • Seite 28 VDPL300SD Vermeiden Sie Erschütterungen. Vermeiden Sie rohe Gewalt während der Installation und Bedienung des Gerätes. • Nehmen Sie das Gerät erst in Betrieb, nachdem Sie sich mit seinen Funktionen vertraut gemacht haben. Lassen Sie das Gerät nicht von Personen bedienen, die sich nicht mit dem Gerät auskennen. Meist ist die Beschädigung des Gerätes das Ergebnis von unfachmännischer Bedienung.
  • Seite 29 Wenn nötig, so verbinden Sie ein XLR-Kabel mit dem XLR-Ausgang der Steuerung (nicht mitgeliefert) und die andere Seite mit dem XLR-Eingang [9] des VDPL300SD. Sie können verschiedene VDPL300SD in Serie schalten. Verwenden Sie ein zweipoliges abgeschirmtes Kabel mit XLR Ein- und Ausgangsanschlüssen.
  • Seite 30 VDPL300SD 3. Drücken Sie auf <MENU> bis <S--> im Display erscheint. 4. Verwenden Sie <UP> und <DOWN> um die Geschwindigkeit einzustellen: <S--1> (langsam) auf <S100> (schnell). Musiksteuerung Um die Musiksteuerung einzuschalten: 1. Drücken Sie auf <MENU> bis <SND> im Display erscheint und drücken Sie <ENTER>.
  • Seite 31 VDPL300SD 4-Kanal-Modus: Kanal Funktion Blackout Automatisches Programm 1 Automatisches Programm 2 Automatisches Programm 3 Automatisches Programm 4 Automatisches Programm 5 Automatisches Programm 6 Automatisches Programm 7 Automatisches Programm 8 Automatisches Programm 9 Automatisches Programm 10 Automatisches Programm 11 Automatisches Programm 12...
  • Seite 32 VDPL300SD • Die mechanisch bewegenden Teile dürfen keinen Verschleiß aufweisen. • Sorgen Sie dafür, dass die Netzkabel nicht beschädigt werden. Lassen Sie das Gerät von einer Fachkraft installieren. • Trennen Sie das Gerät vom Netz ehe Sie mit den Servicearbeiten anfangen. Lassen Sie das Gerät abkühlen.
  • Seite 33 - defecten veroorzaakt door opzet, nalatigheid of door een onoordeelkundige behandeling, slecht onderhoud of abnormaal Velleman® Service and Quality Warranty gebruik of gebruik van het toestel strijdig met de voorschriften van Since its foundation in 1972, Velleman® acquired extensive de fabrikant. experience in the electronics world and currently distributes its - schade ten gevolge van een commercieel, professioneel of collectief products in over 85 countries.
  • Seite 34 nur aufladbare, sondern auch nicht aufladbare, eingebaute oder ersetzbare), Lampen, Gummiteile, Treibriemen, usw. (unbeschränkte Garantía de servicio y calidad Velleman® Liste). Desde su fundación en 1972 Velleman® ha adquirido una amplia - Schäden verursacht durch Brandschaden, Wasserschaden, Blitz, experiencia como distribuidor en el sector de la electrónica en más de Unfälle, Naturkatastrophen, usw.