ALFRA VKS 125 Bedienungsanleitung
Verdrahtungskanalschneider
Vorschau ausblenden
Andere Handbücher für VKS 125:
- Bedienungsanleitung (68 Seiten) ,
- Bedienungsanleitung (20 Seiten) ,
- Bedienungsanleitung (32 Seiten)

Verwandte Anleitungen für ALFRA VKS 125


Inhaltszusammenfassung für ALFRA VKS 125
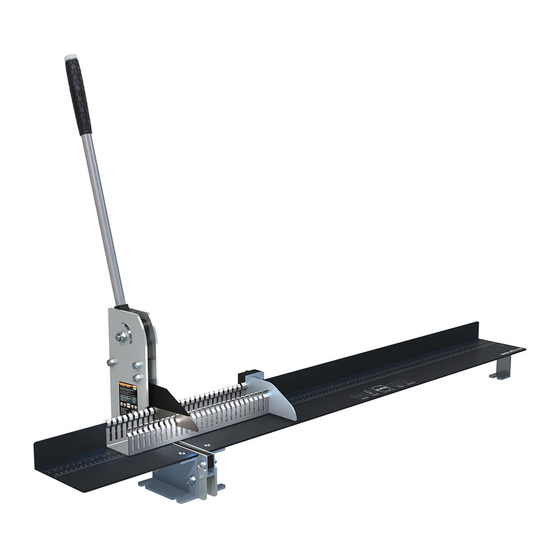
- Seite 1 Bedienungsanleitung / Operation manual / Mode d‘emploi ALFRA VKS 125 Verdrahtungskanalschneider Wiring Duct Cutter Cisaille pour goulottes Art.-Nr. 031920 / Prod.-No. 031920 / N° art. 031920...
-
Seite 2: Inhaltsverzeichnis
Inhaltsverzeichnis Sicherheitshinweise, Bestimmungsgemäße Verwendung Montage Bedienung Auswechseln des Messers Reinigung oder Wechsel des Messerschutzes Explosionszeichnund und Stückliste Vor Inbetriebnahme Bedienungsanleitung lesen und aufbewahren! Contents Safety instructions, Specifies conditions of use Assembly Operation Replacement of the blade Cleaning or replacement of the blade guard Exploded view and spare parts list Before use read and save these instructions! Table des matières... -
Seite 3: Sicherheitshinweise
Bestimmungsgemäße Verwendung Mit dem VKS 125 können Verdrahtungskanäle und entsprechende Deckel aus Kunststoff bis zu einer Breite von 125 mm und einer Wandstärke bis 2,5 mm geschnitten werden. Geeignet für weiche Kunststoffe. Für Verdrahtungskanäle aus Hart-PVC und halogenfreie nur bedingt geeignet. -
Seite 4: Montage
Die Montage 1. Handhebel einschrauben. Anschlag auf das Lineal aufschieben. Montage Gegenhalter (seitliche Auflage) und Längenanschlag mittels mitgeliefertem Befestigungsmaterial. Das Lineal muss beim Montieren mit Hilfe eines Zollstocks oder Maßbandes auf das genaue Maß (Abstand zwischen Messer und Außenkante des Anschlags) eingestellt werden. -
Seite 5: Bedienung
2. Befestigung auf einem stabilen und kippsicheren Untergrund (z.B. Werkbank). Position und Lage des Gerätes festlegen und Befestigungspunkte vom Gerät übernehmen. Dem Untergrund geeignetes Befestigungsmaterial verwenden. Bedienung 1. Die gewünschte Länge des Verdrahtungskanals am Längenanschlag einstellen und die Position mittels Flügelschraube fixieren. Den Messerschutz mit dem Verdrahtungskanal nach unten drücken. - Seite 6 2. Den Verdrahtungskanal nur vorne außerhalb des Schneidbereichs und Messerlage halten. Nicht hinter den Kanal fassen. Für das gewählte Schnittmaß den Verdrahtungskanal an Längenanschlag anlegen und dann komplett bis zum Gegenhalter in das Gerät einschieben. Das Messer ist zwischen den Stegen einzufädeln, gegebenenfalls ist der Kanal bis zum letzten Schlitz zurückzunehmen.
-
Seite 7: Auswechseln Des Messers
Zum Schneiden des Deckels die Schritte 1 - 3 wiederholen. Die Abkantungen des Deckels müssen beim Schneiden nach oben zeigen. Auswechseln des Messers 1. Zum Ausbauen des Messers die Schraube entfernen und das Messer gerade herausziehen. 2. Die Aufnahmeflächen des Messers mit dem mitgelieferten Mehrzweckfett einfetten. 3. -
Seite 8: Reinigung Oder Wechsel Des Messerschutzes
Reinigung oder Wechsel des Messerschutzes 1. Um den Messerschutz zu reinigen oder zu wechseln muss zuerst das Messer ausgebaut werden. Siehe hierzu den Abschnitt „Auswechseln des Messers“. 2. Zum Ausbau des Messerschutzes die Schraube entfernen und den Messerschutz schräg nach oben heraus- ziehen. -
Seite 9: Safety Instructions
Specified conditions of use The VKS 125 is only to be used to cut plastic wiring ducts and covers up to a width of 125 mm and a wall thickness up to 2,5 mm. It is only suitable for soft, non-reinforced plastics. For wiring ducts made out of rigid PVC and... -
Seite 10: Assembly
Assembly 1. Screw the lever. Attach the length stopper to the ruler. Mount the counter support (lateral support) and the ruler by using the included mounting parts. The ruler has to be adjusted to the exact gauge (distance between knife and the outer edge of the length stopper) by using a tape-measure or a folding ruler. -
Seite 11: Operation
2. Attachment on a firm and tilt-proof basis e.g. workbench. Set position and location of the device and transfer attachment points to basis. Use mounting parts that are suitable for the subsurface. Operation 1. Adjust the desired length of the wiring duct by using the length stopper and lock position by screwing down the thumbscrew. - Seite 12 2. Hold the wiring duct only at the front and outside of the cutting area and the blade position. Do not reach behind the wiring duct. For the desired cutting dimension connect the wiring duct to the length stopper then slide it completely back against the counter support. The blade has to be placed between the bars. Possibly the duct has to be moved back to the previous slot.
-
Seite 13: Replacement Of The Blade
4. To cut covers please repeat steps 1 - 3. The rims of the cover must be on top when cutting. Replacement of the blade 1. To remove the blade, remove the screw and pull the blade straight out. 2. Grease the slide faces of the blade with the included multi-purpose grease. 3. -
Seite 14: Cleaning Or Replacement Of The Blade Guard
Cleaning or replacement of the blade guard 1. To clean or to replace the blade guard the blade must first be removed. See description “Replacement of the blade”. 2. To remove the blade guard, firstly remove the screw. Pull the blade guard diagonally up and out. 3. -
Seite 15: Consignes De Sécurité
Utilisation conforme La cisaille VKS 125 a été conçue pour la découpe de goulottes et de couvercles en plastique jusqu'à 125 mm de large et 2,5 mm d'épaisseur. Elle convient pour les matières synthétiques tendres. -
Seite 16: Montage
Montage 1. Visser le levier à bras. Glisser la butée sur le gabarit. Monter la plaque d'appui (support latéral) et la butée longitudinale à l'aide du matériel de fixation fourni. Lors du montage, le gabarit doit être ajusté à la longueur correspondante à... -
Seite 17: Utilisation
2. Fixer l'outil sur un support stable afin d'éviter tout renversement (par ex. sur un établi). Déterminer la position de l'outil puis utiliser les points de fixation de l'outil. Employer du matériel de fixation adéquat adapté au support de l'outil. Utilisation 1. - Seite 18 2. Maintenir uniquement la goulotte à l'avant, en dehors de la zone de coupe et hors de la portée de la lame. Ne pas tenir les mains derrière la goulotte. En fonction de la longueur requise, positionner la goulotte sur la butée longitudinale puis complètement enfoncer la plaque d'appui dans l'outil.
-
Seite 19: Remplacement De La Lame
Pour découper le couvercle, répéter les étapes 1 à 3. Les arêtes du couvercle doivent pointer vers le haut durant la découpe. Remplacement de la lame 1. Pour démonter la lame, retirer la vis et la lame en la maintenant à l'horizontale. 2. -
Seite 20: Nettoyage Ou Remplacement De La Protection De Lame
Nettoyage ou remplacement de la protection de la lame 1. Pour nettoyer ou remplacer la protection de la lame, il faut d'abord démonter la lame. Pour ce faire, se référer à la description « Remplacement de la lame ». 2. Pour démonter la protection de la lame, retirer la vis puis retirer la protection de la lame par le haut en la maintenant inclinée. - Seite 21 Explosionszeichnung / Exploded drawing / Vue éclatée...
- Seite 22 Ersatzteilliste / Spare parts list / Liste des pièces de rechange Menge Art.-Nr. / Prod.-No. / Pos. Beschreibung Description Description N°art. Qté. 03192-001A Seitenblende R/L Lateral plate R/L Plaque support D/G 03192-002 Exzenter Eccentric Excentrique 03192-003 Messerhalter Blade holder Porte-couteau 03192-004 Messerführung -vorn- Blade guide -front-...
- Seite 23 Cylinder screw Vis à tête cylindrique Countersink screw Vis à tête fraisée DIN965-M4X10-4.8 Senkschraube -verzinkt- -galvanized- -galvanisée- Cylinder screw Vis à tête cylindrique DIN912-M6X30-8.8 Zylinderschraube -verzinkt- -galvanized- -galvanisée- Seitenanschlag VKS125 Butée latérale VKS 125 031921 Side fence VKS125 -left- -links- -gauche-...
- Seite 24 Stand 02/2017 ALFRA Alfred Raith GmbH • 2. Industriestraße 10 • DE-68766 Hockenheim • Tel.: +49 (0) 62 05/30 51-0 Fax.: +49 (0) 62 05/30 51-150 • Internet: www.alfra.de • E-Mail: info@alfra.de...