Herunterladen Diese Seite drucken
Klarstein SHIRAZ 16 UNO Bedienungsanleitung
Vorschau ausblenden Andere Handbücher für SHIRAZ 16 UNO:

Werbung

Verfügbare Sprachen
  • DE

Verfügbare Sprachen

  • DEUTSCH, seite 1
SHIRAZ 16 UNO |
ULTIMO 16 UNO
Weinkühlschrank
Wine Cooler
Vinoteca
Cave à vin
Frigorifero per vino
10033622 10035777
www.klarstein.com

Werbung

loading

Inhaltszusammenfassung für Klarstein SHIRAZ 16 UNO

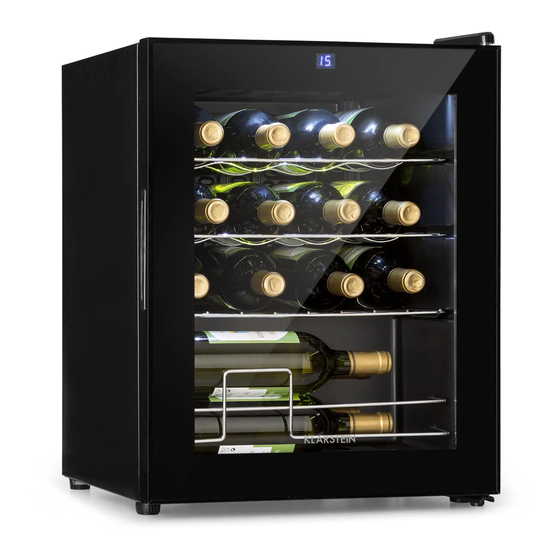
  • Seite 1 SHIRAZ 16 UNO | ULTIMO 16 UNO Weinkühlschrank Wine Cooler Vinoteca Cave à vin Frigorifero per vino 10033622 10035777 www.klarstein.com...
  • Seite 3 Sehr geehrter Kunde, wir gratulieren Ihnen zum Erwerb Ihres Gerätes. Lesen Sie die folgenden Hinweise sorgfältig durch und befolgen Sie diese, um möglichen Schäden vorzubeugen. Für Schäden, die durch Missachtung der Hinweise und unsachgemäßen Gebrauch entstehen, übernehmen wir keine Haftung. Scannen Sie den folgenden QR-Code, um Zugriff auf die aktuellste Bedienungsanleitung und weitere Informationen rund um das Produkt zu erhalten:...
  • Seite 4 SICHERHEITSHINWEISE • Prüfen Sie vor der Benutzung die Spannung auf der Geräteplakette. Schließen Sie das Gerät nur an Steckdosen an, die der Spannung des Geräts entsprechen. • Kinder ab 8 Jahren, psychisch, sensorisch und körperlich eingeschränkte Menschen dürfen das Gerät nur benutzen, wenn sie vorher von einer für sie verantwortlichen Aufsichtsperson ausführlich mit den Funktionen und den Sicherheitsvorkehrungen vertraut gemacht wurden und die damit verbundenen Risiken verstehen.
  • Seite 5 Dieses Gerät enthält das Kältemittel Isobutan (R600a), ein Naturgas mit hoher Umweltverträglichkeit, aber brennbar. Obwohl es brennbar ist, schädigt es nicht die Ozonschicht und verstärkt nicht den Treibhauseffekt. Die Verwendung dieses Kältemittels führt zu einer etwas höheren Geräuschentwicklung des Gerätes. Zusätzlich zum Kompressorgeräusch können Sie den Fluss des Kältemittels hören.
  • Seite 6 Besondere Hinweise zu den Regalen • Die Regale wurden vorab so eingesetzt, dass sie die effizienteste Energienutzung ermöglichen. • Verwenden Sie nur die vom Hersteller bereitgestellten Regale. • Blockieren Sie niemals die Löcher in den Regalen oder verwenden Sie andere vom Hersteller nicht zugelassene Regaltypen, die eine schlechte Kühlung verursachen oder den Energieverbrauch erhöhen können.
  • Seite 7 INSTALLATION Vor dem ersten Betrieb Lassen Sie das Gerät vor dem ersten Betrieb 24 Stunden lang stehen, damit sich das Kühlmittel verteilen kann. Lassen Sie die Tür in dieser Zeit offen, damit sich produktionsbedingter Geruch verflüchtigen kann. Hinweis: Alle Modelle ohne Frontbelüftung bzw. Belüftungsschlitze an der Front sind keine Einbaugeräte und müssen frei stehen.
  • Seite 8 INBETRIEBNAHME • Stecken Sie den Stecker in die Steckdose und schalten Sie das Gerät ein, indem sie die POWER-Taste einige Sekunden gedrückt halten. Wenn die das Gerät zum ersten Mal (oder nach längerer Zeit wieder) benutzen, gibt es eine Differenz zwischen der von Ihnen eingestellten Temperatur und der Temperatur, die im Display angezeigt wird.
  • Seite 9 Beladung • Sie können die Weinflaschen in Einzel- oder Doppelreihen in den Kühlschrank legen. Falls sie nicht genug Flaschen haben, um das Gerät komplett zu befüllen, verteilen Sie die Flaschen, so dass sich nicht alle Flaschen oben oder unten im Gerät befinden.
  • Seite 10 • Sobald Sie die Temperatur eingestellt haben, empfehlen wir Ihnen, Sie vorerst nicht mehr zu verändern. Der Thermostat hält die Temperatur im Weinkühlschrank mit einer Abweichung von +/- 2,5 °C. Die thermische Trägheit des Weines und des Glases sorgt aber dafür, dass die tatsächliche Temperatur des Weins nur um 0,5 °C – 1 °C abweicht.
  • Seite 11 REINIGUNG UND PFLEGE Reinigung des Gerätes • Schalten Sie das Gerät erst aus und ziehen Sie den Netzstecker aus der Steckdose. Entfernen Sie den gesamten Inhalt. • Wischen Sie das Innere mit einem feuchten Tuch ab, das in lauwarmes Wasser mit etwas Spülmittel getaucht wurde.
  • Seite 12 FEHLERBEHEBUNG Hinweis: Sie können viele gängige Probleme einfach lösen und sparen so die Kosten für einen möglichen Service-Anruf. Probieren Sie die folgenden Vorschläge aus, um zu sehen, ob Sie das Problem selbst lösen können, bevor Sie den Kundendienst kontaktieren. Problem Mögliche Ursache und Lösungsansatz Das Gerät läuft nicht.
  • Seite 13 Problem Mögliche Ursache und Lösungsansatz Die Tür schließt nicht richtig. Das Gerät steht nicht eben. Die Tür wurde umgedreht und nicht richtig angebracht. Die Dichtung oder der Magnet sind beschädigt. Die Ablagen ragen zu weit heraus. HINWEISE ZUR ENTSORGUNG Wenn es in Ihrem Land eine gesetzliche Regelung zur Entsorgung von elektrischen und elektronischen Geräten gibt, weist dieses Symbol auf dem Produkt oder auf der Verpackung darauf hin, dass dieses Produkt nicht im...
  • Seite 15 Dear Customer, Congratulations on purchasing this device. Please read the following instructions carefully and follow them to prevent possible damages. We assume no liability for damage caused by disregard of the instructions and improper use. Scan the QR code to get access to the latest user manual and more product information.
  • Seite 16 SAFETY INSTRUCTIONS • Check that the voltage of the power supply in your home is the same as the voltage shown on the rating label of this product. • This device may be only used by children 8 years old or older and persons with limited physical, sensory and mental capabilities and / or lack of experience and knowledge, provided that they have been instructed in use of the device by a responsible person who understands the associated risks.
  • Seite 17 This appliance contains the coolant isobutane (R600a), a natural gas which is environmentally friendly. Although it is fl ammable, it does not damage the ozone layer and does not increase the greenhouse effect. The use of this coolant has,however,led to a slight increase in the noise level of the appliance. In addition to the noise of the compressor,you might be able to hear the coolant fl owing around the system.
  • Seite 18 Special notes on the shelves • The shelves were placed in advance in such a way that they allow the most efficient use of energy. • Only use the shelves provided by the manufacturer. • Never block the holes in the shelves or use other types of shelves not approved by the manufacturer, which may cause poor cooling or increase energy consumption.
  • Seite 19 INSTALLATION Before first Use Allow 24 hours before switching on the wine cellar. During this time we recommend that you leave the door open to clear any residual odors. Note: All models without front venting (air opening) are strictly for free standing only. Location The location you have selected for your wine cellar should: •...
  • Seite 20 GETTING STARTED • Plug in and switch on the cooler by pressing on the power button for a few seconds. When you use the wine cooler for the first time (or restart the wine cooler after having it shut off for a long time), there will be a few degrees variance between the temperature you have selected and the one indicated on the LED readout.
  • Seite 21 • Avoid obstructing the internal fans (located inside on the back panel of the wine cooler). • Do not slide the shelves outwards beyond the fixed position to prevent the bottles from falling. • Do not pull out more than one loaded shelf at a time as this may cause the wine cooler to tilt forward.
  • Seite 22 CONTROL PANEL AND OPERATION Setting the temperature control Note: Your wine cooler has been equipped with an ”automatic”control panel lock that will be activated 20 seconds after the last time a button has been touched. Button Function • Push the button simultaneously for 2 seconds to unlock the control panel.
  • Seite 23 CLEANING AND CARE Cleaning the Unit • First switch off the unit and disconnect the power plug from the socket. Remove the entire contents. • Wash the interior with a damp cloth dipped in lukewarm water with a little detergent. •...
  • Seite 24 TROUBLESHOOTING Note: You can solve many common problems easily, saving you the cost of a possible service call. Try the suggestions below to see if you can solve the problem before contacting the costumer service. Problem Possible Cause and Suggested Solution Wine cooler does not operate.
  • Seite 25 Problem Possible Cause and Suggested Solution The door will not close The wine cooler is not level. properly. The door was reversed and not properly installed. The gasket is faulty (magnet or rubber is spoiled). The shelves are out of position. DISPOSAL CONSIDERATIONS If there is a legal regulation for the disposal of electrical and electronic devices in your country, this symbol on the...
  • Seite 27 Estimado cliente, Le felicitamos por la adquisición de este producto. Lea atentamente las siguientes instrucciones y sígalas para evitar posibles daños. No asumimos ninguna responsabilidad por los daños causados por el incumplimiento de las instrucciones y el uso inadecuado. Escanee el siguiente código QR para obtener acceso a la última guía del usuario y más información sobre el producto: ÍNDICE...
  • Seite 28 INDICACIONES DE SEGURIDAD • Antes de utilizar el aparato, compruebe la tensión en la placa técnica del mismo. Conecte el aparato solamente a tomas de corriente que se adecuen a la tensión del mismo. • Este aparato puede ser utilizado por niños mayores de 8 años y personas con discapacidades físicas, sensoriales y mentales y/o con falta de experiencia y conocimientos, siempre y cuando hayan sido instruidos sobre el uso del aparato y comprendan los peligros y riesgos asociados.
  • Seite 29 Este aparato contiene refrigerante isobutano (R600a), un gas natural que no es nocivo para el medioambiente pero sí infl amable. Aunque sea infl amable, no es perjudicial para la capa de ozono ni aumenta el efecto invernadero. La utilización de este refrigerante provoca un aumento de ruido del aparato. Además del ruido del compresor, podrá...
  • Seite 30 Notas especiales en los estantes • Las estanterías se han utilizado con antelación de tal manera que permiten el uso más eficiente de la energía. • Sólo use los estantes proporcionados por el fabricante. • Nunca bloquee los agujeros de las estanterías o utilice otro tipo de estanterías no aprobadas por el fabricante, lo que puede causar una mala refrigeración o aumentar el consumo de energía.
  • Seite 31 INSTALACIÓN Antes del primer uso Deje el aparato en posición vertical durante 24 horas antes de ponerlo en marcha por primera vez para que el líquido refrigerante pueda distribuirse correctamente. Deje la puerta abierta durante este periodo para que los olores del proceso de fabricación desaparezcan.
  • Seite 32 PUESTA EN MARCHA • Conecte el enchufe a la toma de corriente y encienda el aparato manteniendo pulsado el botón POWER durante algunos segundos. Si utiliza el aparato por primera vez (o después de un período prolongado de tiempo), existirá una diferencia entre la temperatura que ha seleccionado y la temperatura que aparece en el display.
  • Seite 33 • No extraiga más de una balda llena de botellas, ya que podría volcar el aparato. • No cubra las baldas con papel de aluminio para evitar bloquear el flujo de aire. • No mueva el aparato si está cargado de botellas. Puede lesionarse o dañar la vinoteca.
  • Seite 34 PANEL DE CONTROL Y OPERACIÓN Configurar la temperatura Nota: La vinoteca cuenta con un bloqueo automático del panel de control que se activa 20 segundos después de pulsar un botón. Botón Función • Mantenga pulsado este botón durante 2 segundos para desbloquear el panel de control.
  • Seite 35 LIMPIEZA Y CUIDADO Limpieza del aparato • Apague el aparato y desconecte el enchufe de la toma de corriente. Retire todo el contenido. • Limpie el interior con un paño humedecido en agua tibia con un poco de detergente. • Asegúrese de limpiar la junta de goma de la puerta para que el aparato funcione correctamente.
  • Seite 36 RESOLUCIÓN DE PROBLEMAS Nota: Puede resolver fácilmente muchos problemas comunes y ahorrar los gastos si contacta con un servicio. Pruebe las siguientes sugerencias para ver si puede resolver el problema usted mismo antes de ponerse en contacto con el servicio de atención al cliente.
  • Seite 37 Problema Posible causa y solución La puerta no cierra El aparato no está recto. correctamente. La puerta está invertida y no está bien acoplada. La junta o el imán están dañados. Las baldas están colocadas demasiado hacia afuera. INDICACIONES SOBRE LA RETIRADA DEL APARATO Si en su país existe una disposición legal relativa a la eliminación de aparatos eléctricos y electrónicos, este...
  • Seite 39 Chère cliente, cher client, Toutes nos félicitations pour l’acquisition de ce nouvel appareil. Veuillez lire attentivement et respecter les instructions de ce mode d’emploi afin d’éviter d’éventuels dommages. Nous ne saurions être tenus pour responsables des dommages dus au non-respect des consignes et à...
  • Seite 40 CONSIGNES DE SÉCURITÉ • Avant d‘utiliser l‘appareil vérifiez la tension sur la plaque signalétique. Branchez l‘appareil sur des prises de tension correspondante uniquement. • Cet appareil peut être utilisé par des enfants de 8 ans ou plus et des personnes ayant des capacités physiques, sensorielles et mentales limitées et / ou dénuées d‘expérience et de connaissances, à...
  • Seite 41 Cet appareil contient du liquide réfrigérant Isobutane (R600a), un gaz naturel très respectueux de l’environnement mais infl ammable. Bien qu’il soit infl ammable, il ne détruit pas la couche d’ozone et ne renforce pas l’effet de serre. L’utilisation de ce liquide réfrigérant provoque toutefois un niveau sonore de l’appareil légèrement plus élevé.
  • Seite 42 Notes spéciales sur les étagères • Les étagères ont été utilisées à l‘avance de manière à permettre l‘utilisation la plus efficace possible de l‘énergie. • N‘utilisez que les étagères fournies par le fabricant. • Ne bouchez jamais les trous des étagères et n‘utilisez jamais d‘autres types d‘étagères non approuvées par le fabricant, ce qui pourrait entraîner un mauvais refroidissement ou augmenter la consommation d‘énergie.
  • Seite 43 INSTALLATION Avant la utilisation Avant la première utilisation, laissez l’appareil reposer pendant 24 heures, afin que le fluide réfrigérant puisse se répartir. Pendant ce temps, laissez la porte ouverte pour que les odeurs de l’appareil neuf puisse s’évacuer. Note : tous les modèles sans aération frontale ni fentes de ventilation en façade ne conviennent pas pour une installation encastrée et doivent être installés en pose libre.
  • Seite 44 MISE EN MARCHE • Branchez la fiche dans la prise et allumez l’appareil en maintenant le bouton POWER pendant quelques secondes. Lorsque vous utilisez l’appareil pour la première fois (ou après une longue période), il y a une différence entre la température que vous avez définie et la température affichée à...
  • Seite 45 • Ne poussez pas les clayettes au-delà de leur position fixe pour empêcher les bouteilles de tomber. • Ne tirez pas plus d’une clayette chargée à la fois, sinon l’appareil pourrait basculer vers l’avant. • Ne couvrez pas les clayettes avec du papier aluminium pour ne pas bloquer l’écoulement de l’air.
  • Seite 46 PANNEAU DE COMMANDE ET UTILISATION Paramétrer le réglage de la température Remarque : Votre cave à vin est équipée d’un verrouillage « automatique » de panneau qui s’active 20 secondes après la dernière pression sur une touche. Touche Fonction • Appuyez sur la touche pendant 2 secondes pour déverrouiller le panneau de commande.
  • Seite 47 NETTOYAGE ET ENTRETIEN Nettoyage de l’appareil • Éteignez l’appareil et débranchez le cordon d’alimentation de la prise. • Videz tout le contenu. • Lavez l’intérieur avec un chiffon humide trempé dans de l’eau tiède avec un peu de savon. • Soyez attentif à la propreté du joint en caoutchouc sur la porte, afin que l’appareil reste efficace.
  • Seite 48 RÉSOLUTION DES PROBLÈMES Remarque : Vous pouvez résoudre de nombreux problèmes courants simplement et économiser ainsi le coût d’un appel au service clientèle. Essayez les suggestions suivantes pour voir si vous pouvez résoudre le problème vous-même avant de contacter le service clientèle. Problème Cause possible et solution L’appareil ne fonctionne...
  • Seite 49 Problème Cause possible et solution La porte ferme mal. L’appareil n’est pas de niveau. La porte a été retournée mais pas correctement remontée. Le joint ou l’aimant est endommagé. Les étagères sont trop sorties. INFORMATIONS SUR LE RECYCLAGE S‘il existe une réglementation pour l‘élimination ou le recyclage des appareils électriques et électroniques dans votre pays, ce symbole sur le produit ou sur l‘emballage indique que cet appareil ne doit pas être jeté...
  • Seite 51 Gentile cliente, La ringraziamo per aver acquistato il dispositivo. La preghiamo di leggere attentamente le seguenti istruzioni per l’uso e di seguirle per evitare possibili danni. Non ci assumiamo alcuna responsabilità per danni scaturiti da una mancata osservazione delle avvertenze di sicurezza e da un uso improprio del dispositivo.
  • Seite 52 AVVERTENZE DI SICUREZZA • Prima dell‘uso, controllare la tensione sulla targhetta del dispositivo. Collegare il dispositivo solo ad una presa che corrisponde alla tensione indicata. • Questo dispositivo può essere utilizzato da bambini a partire da 8 anni e da persone con limitate capacità...
  • Seite 53 Questo dispositivo contiene il refrigerante isobutano (R600a), un gas naturale ecocompatibile ma infi ammabile. Anche se è infi ammabile, non danneggia lo strato di ozono e non aumenta l´effetto serra. Tenere presente che l´utilizzo di questo refrigerante comporta rumori del dispositivo. Oltre al rumore del compressore si può sentire anche il fl usso del liquido refrigerante.
  • Seite 54 Note speciali sugli ripiani • I ripiani sono stati utilizzati in anticipo in modo tale da consentire l‘uso più efficiente possibile dell‘energia. • Utilizzare solo gli ripiani forniti dal produttore. • Non ostruire mai i fori dei ripiani o utilizzare altri tipi di ripiani non approvati dal produttore, che possono causare un cattivo raffreddamento o aumentare il consumo energetico.
  • Seite 55 INSTALLAZIONE Avvertenze per il primo utilizzo Attendere 24 ore prima di mettere in funzione il dispositivo per la prima volta affinché il refrigerante possa distribuirsi. Inoltre lasciare lo sportello aperto in modo che gli odori di produzione svaniscano. Nota: tutti i modelli senza ventilazione frontale o fessure di ventilazione sulla parte anteriore non sono idonei ad essere incassati e sono per la libera installazione.
  • Seite 56 MESSA IN FUNZIONE • Inserire la spina nella presa e azionare il dispositivo tenendo premuto per alcuni secondi il tasto POWER. Se si utilizza il dispositivo per la prima volta (o dopo un certo periodo di tempo), sussiste una differenza tra la temperatura impostata dall’utilizzatore e quella indicata sul display.
  • Seite 57 • Non estrarre più di un ripiano pieno per volta, altrimenti il dispositivo potrebbe cadere in avanti. • Non coprire i ripiani con la carta stagnola per non bloccare il flusso d’aria. • Non muovere il dispositivo quando è pieno di bottiglie, altrimenti si corre il rischio di lesioni o di danneggiare il dispositivo.
  • Seite 58 PANNELLO DI CONTROLLO E UTILIZZO Impostare la temperatura Nota: la cantinetta per vino è provvista di un blocco “automatico” del pannello di controllo, che si attiva 20 secondi dopo aver esercitato la pressione sull’ultimo tasto. Tasto Funzione • Tenere premuto il tasto per 2 secondi per sbloccare il pannello di controllo.
  • Seite 59 PULIZIA E MANUTENZIONE Pulizia del dispositivo • Spegnere prima il dispositivo e staccare la spina dalla presa. Rimuovere tutto il contenuto. • Lavare l’interno con un panno umido immerso in acqua tiepida con un po’ di detersivo. • Pulire regolarmente la guarnizione di gomma dello sportello per garantire il corretto funzionamento del dispositivo.
  • Seite 60 RISOLUZIONE DEI PROBLEMI Nota: e’ possibile risolvere molti problemi comuni e risparmiare così sulle spese della chiamata di assistenza. Seguire i seguenti consigli per vedere di risolvere autonomamente i problemi prima di contattare il servizio assistenza. Problema Possibile causa e risoluzione dei problemi Il dispositivo non funziona.
  • Seite 61 Problema Possibile causa e risoluzione dei problemi Lo sportello non si chiude Il dispositivo non è collocato su una superficie piana. correttamente. Lo sportello è stato invertito e non è stato montato correttamente. La guarnizione o il magnete sono danneggiati. I ripiani sporgono troppo in avanti.

Diese Anleitung auch für:

Ultimo 16 uno1003362210035777