Weller WXP 120 Betriebsanleitung
Lötkolben
Vorschau ausblenden
Andere Handbücher für WXP 120:
- Originalbetriebsanleitung (212 Seiten) ,
- Betriebsanleitung (121 Seiten) ,
- Bedienungsanleitung (19 Seiten)
Inhaltsverzeichnis
Verfügbare Sprachen
Verfügbare Sprachen
Kapitel
Inhaltsverzeichnis

Verwandte Anleitungen für Weller WXP 120


Inhaltszusammenfassung für Weller WXP 120
- Seite 1 WXP 120 Betriebsanleitung...
-
Seite 2: Geräteübersicht
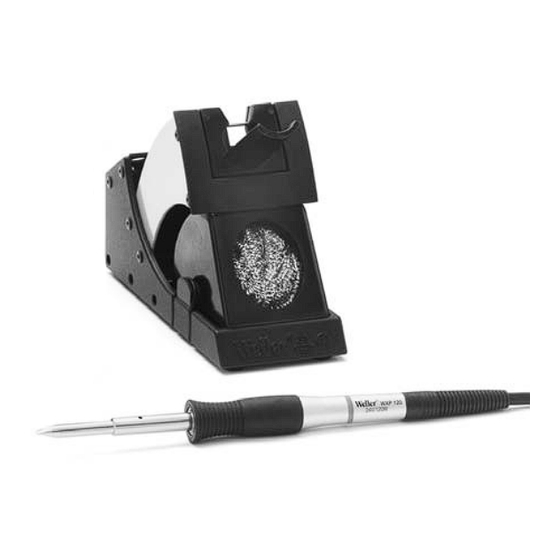
WXP 120 WXP 120 Geräteübersicht WXP 120 WDH 10 Reinigungseinsatz LED Statusanzeige Lötspitze Temperaturbeständige antistatische Silikonleitung Spitzenhülse Veriegelbarer Anschlußstecker... -
Seite 3: Inhaltsverzeichnis
Geltende Unterlagen − Betriebsanleitung für Ihre Versorgungseinheit − Betriebsanleitungen für WXP 120 2 Zu Ihrer Sicherheit − Der Lötkolben WXP 120 wurde nach dem neuesten Stand der Technik und anerkannten Sicherheitsregeln und -bestimmungen entsprechend hergestellt. − Bei Nichtbeachtung der beiliegenden Sicherheitsinformationen und aufgeführten Warnhinweise besteht jedoch die Gefahr von... - Seite 4 Verwendung des Werkzeugs oder unerlaubten Veränderungen am Gerät entstehen. Beachten Sie bitte Folgendes: Allgemeine − Legen Sie den Lötkolben WXP 120 immer in die vorgesehene Hinweise Sicherheitsablage. − Entfernen Sie alle entzündbaren Objekte aus der Nähe des heißen Lötwerkzeugs.
-
Seite 5: Bestimmungsgemäßer Gebrauch
WXP 120 Bestimmungsgemäßer Gebrauch Verwenden Sie den WXP 120 Lötkolben ausschließlich für den in der Betriebsanleitung bezüglich Lösen, Verstauung und Ablage von elektronischen Bauteilen angegebenen Zweck unter den hier beschriebenen Bedingungen. Der bestimmungsgemäße Gebrauch des Lötkolbens WXP 120 beinhaltet auch, dass −... -
Seite 6: Technische Daten
Bei Berührung der Spitzen besteht Verbrennungsgefahr. Berühren Sie nicht die heißen Lötspitzen und halten Sie entzündbare Objekte fern. 1. Den Lötkolben WXP 120 vorsichtig auspacken. 2. Den Lötkolben in der Sicherheitsablage WDH 10 ablegen. 3. Den Anschlussstecker (6) an der Versorgungseinheit anschließen und durch Drehen im Uhrzeigersinn verriegeln. -
Seite 7: Zubehör
6. Netzschalter der Versorgungseinheit einschalten und die gewünschte Temperatur einstellen. 7 Zubehör XT Lötspitzen für den Lötkolben WXP 120 Siehe Tabelle XT Lötspitzen für Lötkolben WXP 120 am Ende dieser Anleitung und auf www.weller-tools.com Ersatzteile und Zubehör für WXP 120 Bestell-Nr. -
Seite 8: Garantie
WXP 120 9 Garantie Die Mängelansprüche des Käufers verjähren nach einem Jahr ab Ablieferung an ihn. Dies gilt nicht für Rückgriffsansprüche des Käufers nach §§ 478, 479 BGB. Aus einer von uns abgegebenen Garantie haften wir nur bei Ansprüchen, wenn die Beschaffenheits- oder Haltbarkeitsgarantie von uns schriftlich und unter Verwendung des Begriffs „Garantie“... - Seite 17 WXP 120 Manual de uso...
- Seite 25 Soldering Tips XT- Spitzen für WXP 120 Soldering Tips for WXP 120 Bestell-Nr. Modell Beschreibung. Breite A Dicke B Länge C Order-No Model Description Width A Length B Length C T005 44 701 99 XT AL Meisselform 1,6 mm 1,0 mm...
- Seite 26 Soldering Tips Bestell-Nr. Modell Beschreibung. Breite A Dicke B Länge C Order-No Model Description Width A Length B Length C T005 44 711 99 XT KN 60° Lötspitze Ø 2,0 mm 60° tip bulk Ø 0.078 in. T005 44 712 99 XT GW Lötspitze 2,3 mm/3,2 mm Chisel...
- Seite 27 Soldering Tips Bestell-Nr. Modell Beschreibung. Breite A Dicke B Länge C Order-No Model Description Width A Length B Length C T005 44 722 99 XT Messspitze XT Measuring tip...
- Seite 28 Soldering head Bestell-Nr. Beschreibung. Order-No Description T005 44 731 99 XT Lötstempel 10 x 4 mm komplett (besteht aus XT Lötstempel und XT Lötstempeladapter) XT Soldering head 10 x 4 mm complete (consist of: XT Soldering head and soldering head adapter) T005 44 731 90 XT Lötstempel 10 x 4 mm, Ersatz XT Soldering head 10 x 4 mm, spare...