Inhaltsverzeichnis
Werbung
Verfügbare Sprachen
Verfügbare Sprachen
Quicklinks
INSTRUCTION MANUAL
ENGLISH
See product page at celestron.com for other language versions of this instruction manual.
Consultez la page produit sur celestron.com pour les autres versions linguistiques de ce manuel d'instructions
Siehe die Produktseite auf celestron.com für andere Sprachversionen dieser Bedienungsanleitung.
Consultare la pagina relativa al prodotto su celestron.com per le versioni in altre lingue del presente manuale di istruzioni.
Consulte la página del producto en celestron.com para ver las versiones en otros idiomas de este Manual de instrucciones.
With the Celestron StarSense Autoguider, using a Celestron telescope
for astroimaging has never been easier. This all-in-one accessory can
help with every aspect of telescope alignment and tracking. With your
new StarSense Autoguider (SSAG), you can:
• Automatically align your equatorial or altazimuth telescope to the night
sky in just a few minutes. Once aligned, your telescope will fi nd and
center objects with enhanced pointing accuracy.
• Guide your telescope accurately during long astroimaging exposures
without any additional alignment required (not even polar alignment).
• Quickly and accurately polar align your equatorial mount, if desired.
Please read this manual before setting up and using your StarSense
Autoguider. You can fi nd the most current version of this instruction
manual on the StarSense Autoguider product page at celestron.com.
WARNING -
Never point the StarSense Autoguider at the Sun! Doing
so will damage SSAG's image sensor. This damage is not covered under
your warranty. Keep SSAG's cover cap on during the day.
TABLE OF CONTENTS
1. Parts List . . . . . . . . . . . . . . . . . . . . . . . . . . . . . . . . . . . . . . . . . . . . . . . . .1
2. Installation . . . . . . . . . . . . . . . . . . . . . . . . . . . . . . . . . . . . . . . . . . . . . . . .1
3. Controlling your StarSense Autoguider . . . . . . . . . . . . . . . . . . . . . . .3
4. Using SSAG with NexStar+ Hand Control . . . . . . . . . . . . . . . . . . . . .3
5. Using SSAGE with CPWI . . . . . . . . . . . . . . . . . . . . . . . . . . . . . . . . . . .7
6. Focusing . . . . . . . . . . . . . . . . . . . . . . . . . . . . . . . . . . . . . . . . . . . . . . . . .10
7. Status LED Ring . . . . . . . . . . . . . . . . . . . . . . . . . . . . . . . . . . . . . . . . . . .10
8. Using Filters . . . . . . . . . . . . . . . . . . . . . . . . . . . . . . . . . . . . . . . . . . . . . .10
9. Updating SSAG's Internal Software with CFM . . . . . . . . . . . . . . . . .10
and Live View via Web Interface . . . . . . . . . . . . . . . . . . . . . . . . . . . .11
11. Troubleshooting and Tips . . . . . . . . . . . . . . . . . . . . . . . . . . . . . . . . . .11
12. Specifi cations. . . . . . . . . . . . . . . . . . . . . . . . . . . . . . . . . . . . . . . . . . . .11
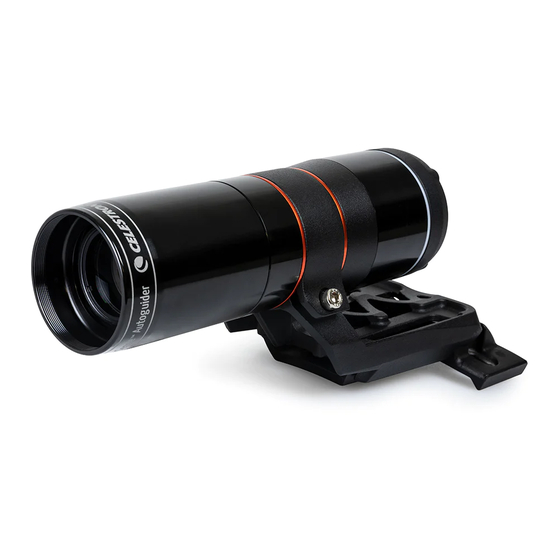
1. Parts List
A. StarSense Autoguider with cover cap
B. Large bracket (pre-installed on StarSense Autoguider)
C. Large bracket base
D. AUX cable
E. Phillips head screws (2)
F. Large bracket base thumbscrews (2)
G. Hex key
H. Small bracket
A
Model # 94008
Fig. 1:
2. Installation
StarSense Autoguider connects to your optical tube using one of the two
supplied brackets (i.e., the large bracket or the small bracket). Use the
large bracket with Schmidt-Cassegrain, EdgeHD, and RASA telescopes
with 5" or more of aperture (Fig. 2).
Fig. 2: The large bracket and base connect SSAG to Celestron Schmidt-
Cassegrain, EdgeHD, and RASA telescopes 5" or larger.
Use the small bracket with other telescopes that have a standard dovetail
base for a fi nderscope (Fig. 3).
Fig. 3: If your telescope already has a standard fi nder base, you can use the small
bracket to mount SSAG on your telescope.
If you are using a telescope smaller than 5" in aperture, and your
telescope does not have a standard dovetail base you must purchase a
standard dovetail base from a third-party supplier.
C
D
E
F
Large bracket
Small
bracket
B
G
H
Large
bracket base
Standard
fi nder base
ENGLISH |
1
Werbung
Inhaltsverzeichnis
Fehlerbehebung

Verwandte Anleitungen für Celestron StarSence Autoguider


Inhaltszusammenfassung für Celestron StarSence Autoguider
-
Seite 1: Inhaltsverzeichnis
Siehe die Produktseite auf celestron.com für andere Sprachversionen dieser Bedienungsanleitung. Consultare la pagina relativa al prodotto su celestron.com per le versioni in altre lingue del presente manuale di istruzioni. Consulte la página del producto en celestron.com para ver las versiones en otros idiomas de este Manual de instrucciones. - Seite 2 Fig. 4: The large bracket can be connected to the OTA in two locations on most you could accidentally affect SSAG’s factory focus. Keep this in Celestron telescopes. mind when you are using SSAG later. If the device is not working correctly and you are receiving “No Stars!”...
-
Seite 3: Controlling Your Starsense Autoguider
Celestron AUX Port Splitter. AUX port (on SSAG) AUX cable Fig. 11: When you connect your Celestron mount to your PC and launch CPWI, you should see the StarSense AG menu among the icons on the left side of the screen. - Seite 4 b. If you have an EQ mount without home positioning to a clear area of the sky, press ENTER. SSAG will capture an image switches, such as the Advanced VX mount, the hand control will to use as an alignment reference. prompt you to manually move the mount to its index marks.
-
Seite 5: Polar Alignment
We don’t usually recommend this alignment method. But if your mount Once you’ve completed Auto Align and Center Calibration, you can is already well polar aligned, this option may provide accurate enough command the telescope to accurately place any celestial object you pointing and tracking with no further alignment required. -
Seite 6: Using Ssage With Cpwi
5. Using SSAG with CPWI If you already use a PC to control your telescope (e.g., for astroimaging), Celestron’s free CPWI software is a great way to control SSAG. Its intuitive user interface makes accessing all of SSAG’s features easy. - Seite 7 “Polar Align Mount” option from the StarSense Alignment StarSense AG menu. After you connect CPWI to your Celestron mount and SSAG as NOTE: Remember, in many cases, you will not need to accurately polar described previously, the Alignment window will appear (Fig. 14) so you align your mount to use SSAG, including for autoguiding.
- Seite 8 points near the poles for EQ mounts. After selecting alignment points, 4. SSAG will perform the center calibration and return the message click “Complete” in the bottom left of the window. Before CPWI begins “Center Calib Success.” the alignment, it will ask if you want to save your user-defi ned alignment Once you’ve completed Auto Align and Center Calibration, you can points.
- Seite 9 SSAG needs to recalibrate itself before it can begin guiding on the new driver on your computer. You’ll fi nd it in the Support & Downloads section object. of the StarSense Autoguider (#94008) product page at celestron.com. Dithering Once you install the driver and connect SSAG with the USB cable, the Live View window will display the current view from SSAG’s image...
-
Seite 10: Focusing
If a new SSAG software update is available, you can download and install it with the Celestron 6. When you see a sharp image, retighten the lock ring and reinstall Firmware Manager (CFM) software. Follow these steps to update SSAG’s front cover. -
Seite 11: And Live View Via Web Interface
Under heavy dew conditions, however, you may consider This method does not use CFM and does not update the hand adding a third-party heater strip along with a Celestron Smart control. If any new fi rmware is available, you’ll fi nd it as a .swu fi le DewHeater Controller to keep dew off the SSAG’s lens. -
Seite 12: Specifi Cations
CORE 1x Cortex-M7 up to 600 MHz ® RAM 512 MB ROM 4 GB ©2023 Celestron. Celestron and Symbol are trademarks of Celestron, LLC. GPU GC7000UltraLite All rights reserved. Celestron.com. 2835 Columbia Street • Torrance, CA 90503 U.S.A. OPERATING TEMPERATURE -25°C to 85°C celestron.com/pages/technical-support... -
Seite 13: Liste Des Pièces
7. Anneau LED d’état ........10 Fig. 2: Le grand support et la base connectent le SSAG à des télescopes Celestron 8. - Seite 14 Fig. 4: Le grand support peut être connecté à l'OTA à deux emplacements sur la REMARQUE: Lors du retrait du boîtier avant pour installer le petit plupart des télescopes Celestron. support, vous pourriez accidentellement dérégler la mise au point d'usine de SSAG. Gardez cela à l'esprit lorsque avant de réutiliser le SSAG.
- Seite 15 Port AUX (sur SSAG) Câble AUX Port AUX (sur la Fig. 11: Lorsque vous connectez votre monture Celestron à votre PC et lancez monture) CPWI, vous devriez voir le menu StarSense AG parmi les icônes sur le côté gauche de l'écran.
- Seite 16 Pour effectuer un alignement automatique à l'aide de la pivoter manuellement le télescope pour vers des zones dégagées du ciel afi n d'obtenir les références d'alignement. Étant donné que le télescope Commande NexStar+: ne pivote pas automatiquement vers des positions bloquées par des 1.
- Seite 17 Une fois lancé, le télescope pivotera automatiquement vers le premier 3. Le télescope se dirige vers l'étoile ou la planète que vous avez choisie. point d'alignement de l'alignement automatique manuel précédent. Il Selon le décalage entre le champ de vision du SSAG et celui du passera ensuite aux autres points défi...
-
Seite 18: Alignement Polaire
Alignement polaire desserrez-les avant de régler l'altitude. 11. Utilisez les boutons de réglage fi n de l’altitude de la monture pour Bien que votre monture équatoriale n'ait pas besoin d'être parfaitement régler l’altitude de la monture (de haut en bas). Au fur et à mesure que alignée polaire pour utiliser SSAG, SSAG peut vous aider à... - Seite 19 Alignement StarSense de la section Alignement polaire à la page 8. Si vous choisissez de ne Après avoir connecté CPWI à votre monture Celestron et SSAG comme pas effectuer d'alignement polaire, cliquez sur « Non » pour passer à décrit précédemment, la fenêtre d'alignement apparaîtra (Fig. 14) afi n l'alignement du ciel.
- Seite 20 au modèle de pointage de la monture. La précision de pointage devrait être assez bonne avec seulement quatre points, mais elle augmentera généralement avec chaque référence d'alignement que vous ajoutez. Si vous n'avez jamais effectué d'étalonnage central avec votre télescope et SSAG, CPWI vous demandera de le faire après l'alignement du ciel.
- Seite 21 de la monture indique à peu près la même latitude que votre site Si vous avez déjà effectué l’alignement sur le ciel, alors supprimez d'observation. l’alignement actuel du menu Alignement, et effectuez l’alignement sur le ciel à nouveau. c. Soulevez et faites pivoter l'ensemble du trépied et de la monture de sorte que l'axe d'ascension droite (RA) pointe REMARQUE: N'essayez pas d'ajuster l'alignement polaire à...
-
Seite 22: Mise Au Point
L'anneau d'état s'allume lorsque vous connectez SSAG à une monture données d'étalonnage du centre précédentes. Lorsque vous allumez Celestron sous tension. L'anneau donne des indications d'états SSAG après une réinitialisation d'usine, il lancera automatiquement un « Immédiates » pour SSAG. -
Seite 23: Utilisation Des Fi Ltres
fi chier .swu sur la page StarSense Autoguider (#94008) contribuer à la perte de signal. sur celestron.com. Pour installer le fi chier, vous aurez besoin d'un câble 8. Si vous le souhaitez, vous pouvez connecter SSAG directement à... -
Seite 24: Spécifi Cations
Cet équipement génère, utilise et peut émettre une énergie de ©2023 Celestron. Celestron et le Symbol sont des marques déposées de fréquence radio et, s’il n’est pas installé et utilisé conformément aux instructions, peut causer Celestron, LLC. - Seite 25 5. Verwendung von SSAGE mit CPWI ......7 Abb. 2: Die große Halterung und Bügel verbinden SSAG mit Celestron Schmidt- 6.
- Seite 26 Halterung 2 (Abb. 6). Nehmen Sie auch den orangefarbenen vorderen Kosmetikring Vorderseite des SSAG- Gehäuses Abb. 4: Die große Halterung kann bei den meisten Celestron-Teleskopen an zwei Stellen mit dem OTA verbunden werden. Orangefarbener Kosmetikring Abb. 6: Um die Halterungen zu wechseln, lösen und entfernen Sie die gesamte 2.
-
Seite 27: Steuerung Ihres Starsense Autoguiders
Celestron AUX-Port-Splitters in Betracht ziehen. AUX-Anschluss (bei SSAG) AUX-Kabel Abb. 11: Wenn Sie Ihre Celestron-Montierung an Ihren PC anschließen und CPWI starten, sollten Sie das StarSense AG-Menü unter den Symbolen auf der linken Seite des Bildschirms sehen. AUX-Anschluss (an der Montierung) SkyPortal App für iOS und Android... -
Seite 28: Verwendung Der Ssag Mit Nexstar+ Handsteuerung
Eine der praktischsten Funktionen von SSAG ist die Möglichkeit, Ihre Sie können die Option „Manuelles Ausrichten“ verwenden, wenn Sie Celestron-Montierung automatisch auf den Nachthimmel auszurichten. viele Hindernisse an Ihrem Beobachtungsort haben, wie z. B. Gebäude, Kein manuelles Zentrieren von Sternen mehr, um Ausrichtungsparameter Bäume oder Stromleitungen. -
Seite 29: Automatische Benutzerausrichtung
auf. Siehe den Abschnitt „Mittenkalibrierung“ weiter unten in diesem 2. Verwenden Sie als Nächstes die SCROLL-Tasten, um entweder Handbuch. Wenn Sie zuvor eine Mittenkalibrierung durchgeführt haben, benannte Sterne oder Sonnensystemobjekte (d. h. Planeten) ist das Teleskop jetzt bereit, Objekte in der Nähe der Mitte des Sichtfelds auszuwählen, die für die Mittenkalibrierung verwendet werden sollen. -
Seite 30: Polausrichtung
des Autoguiding funktioniert keine der Tasten der Handsteuerung außer • Das Teleskop schwenkt während der Polausrichtung um etwa der BACK-Taste.) 50° von West nach Ost. Versuchen Sie, einen freien Bereich zu wählen, der einen klaren Weg bietet. 5. Das Teleskop wird von West nach Ost schwenken, um Bezugspunkte für die Polausrichtung zu erhalten. -
Seite 31: Verwendung Von Ssage Mit Cpwi
StarSense Ausrichtung SSAG PRECISE GOTO Nachdem Sie CPWI wie zuvor beschrieben an Ihre Celestron-Montierung PLATE SOLVING und SSAG angeschlossen haben, erscheint das Ausrichtungsfenster (Abb. 14), damit Sie eine Methode zum Ausrichten Ihrer Montierung auf den Nachthimmel auswählen können. Überprüfen Sie jedoch MITTENKALIBRIERUNG zuerst oben im Fenster das Datum, die Uhrzeit und den Ort. -
Seite 32: Zusätzliche Ausrichtungsparameter Hinzufügen
durchführen möchten. (Wenn Sie Ihre Montierung polar ausrichten möchten, Klicken Sie in das Diagramm, um Ausrichtungspunkte am Himmel ist jetzt der beste Zeitpunkt. Wenn Sie nach der Himmelsausrichtung auszuwählen. Sie fi nden die Himmelsrichtungen am Umfang der Karte. eine Polarausrichtung vornehmen, müssen Sie die Himmelsausrichtung Das Innere des Diagramms reicht von 0°... - Seite 33 Teleskops zu zentrieren. Sie können das Mount Slew Controls-Fenster 4. Nachdem SSAG seine polaren Ausrichtungsparameter erhalten hat, auf dem Bildschirm verwenden. Wenn Sie fertig sind, klicken Sie im wird das Fenster zur Einstellung der Azimutachse angezeigt (Abb. 18). Fenster Pointing Model Information auf „Centered“. Passen Sie den Azimut Ihrer Montierung langsam an, bis der „Azm- Fehler“...
-
Seite 34: Live-Ansicht
Faktoren abhängt, einschließlich (#94008) auf celestron.com. der Last auf der Montierung, der Balance Ihrer Montierung Nachdem Sie den Treiber installiert und SSAG mit dem USB-Kabel (d. h. Ihre Montierung muss entlang beider Achsen gut verbunden haben, zeigt das Live-Ansichtsfenster die aktuelle Ansicht des ausbalanciert sein) und den örtlichen Sichtbedingungen. -
Seite 35: Status-Led-Ring
Handsteuerung. Wenn eine neue Firmware verfügbar ist, fi nden Sie sie als .swu-Datei auf der Seite StarSense Autoguider (#94008) auf celestron.com. Um die Datei zu installieren, benötigen Sie ein USB- Typ-A-zu-USB-Typ-C-Kabel (nicht im Lieferumfang enthalten) und den SSAG-PC-Treiber, der auch auf der StarSense-Autoguider-Seite unter celestron.com verfügbar ist. -
Seite 36: Fehlerbehebung Und Tipps
USB C Für eine PC-Verbindung zum Fokussieren fi nden erwägen, einen Heizstreifen eines Drittanbieters zusammen mit einem Sie unter Live View und Firmware Update Celestron Smart DewHeater Controller hinzuzufügen, um Tau von der Linse des SSAG fernzuhalten. GEHÄUSE 7. Wenn Sie SSAG über ein USB-Kabel mit Ihrem PC verbinden, vergewissern Sie sich, dass es sich um ein hochwertiges Kabel handelt. - Seite 37 Produktdesign und technische Daten können ohne vorherige Ankündigung geändert werden. Dieses Produkt ist für Personen ab 14 Jahren konzipiert und vorgesehen. ©2023 Celestron. Celestron und Symbol sind Warenzeichen von Celes- tron, LLC. Alle Rechte vorbehalten. Celestron.com celestron.com/pages/technical-support 2835 Columbia Street • Torrance, CA 90503 USA.
-
Seite 38: Elenco Componenti
4. Utilizzo di SSAG con pulsantiera NexStar+ ....3 5. Utilizzo di SSAGE con CPWI Fig. 2: La base e la staffa grande collegano SSAG ai telescopi Celestron Schmidt-Cassegrain, EdgeHD e RASA da 5" o superiori. - Seite 39 Fig. 4: La staffa grande può essere collegata all'OTA in due posizioni sulla maggior NOTA: Quando si rimuove l'alloggiamento anteriore per installare la staffa parte dei telescopi Celestron. piccola, si potrebbe accidentalmente infl uenzare la messa a fuoco di fabbrica di SSAG. Tenerlo a mente quando si utilizzerà il SSAG 2.
-
Seite 40: Controllo Del Proprio Starsense Autoguider
AUX Celestron opzionale. Porta AUX (su SSAG) Cavo AUX Fig. 11: Quando si collega la propria montatura Celestron al proprio PC e si lancia CPWI, si vedrà il menu di StarSense AG tra le icone sul lato sinistro dello schermo. - Seite 41 Per eseguire un allineamento automatico usando la pulsantiera manuale se ci sono molti ostacoli nella posizione di osservazione, come edifi ci, alberi o linee elettriche. Allineamento manuale funziona come NexStar+: Allineamento automatico, ma consente di spostare manualmente il 1. Accendere la montatura. telescopio in aree libere del cielo per ottenere i riferimenti di allineamento.
- Seite 42 automatico dell'utente" come metodo di allineamento. Una volta avviato, il può trovarsi o meno nel campo visivo del telescopio. In ogni caso, il telescopio ruoterà automaticamente verso il primo punto di allineamento telescopio dovrebbe essere generalmente puntato verso l'oggetto. nel precedente Allineamento automatico manuale. Procederà quindi agli 4.
-
Seite 43: Allineamento Polare
Allineamento polare 11. Utilizzare le manopole di regolazione fi ne dell'altitudine della montatura per regolare lentamente il posizionamento dell'altitudine Sebbene la montatura equatoriale non abbia bisogno di essere (da su a giù) della montatura. Man mano che si apportano queste accuratamente allineata polare per utilizzare SSAG, SSAG può... -
Seite 44: Utilizzo Di Ssage Con Cpwi
Se già si utilizza un PC per controllare il telescopio (ad es. per l'imaging Successivamente, se si utilizza una montatura EQ o una montatura AZ astronomico), il software CPWI gratuito di Celestron è un ottimo modo su un cuneo EQ, CPWI chiederà se si desidera eseguire l'allineamento per controllare SSAG. - Seite 45 allineamento in modo che il telescopio si allontani da essi. Se si sceglie essere abbastanza buona con solo quattro punti, ma generalmente questa opzione, verrà visualizzata la fi nestra Auto Alignment Creator aumenterà con ogni riferimento di allineamento aggiunto. dell'interfaccia utente di StarSense (Fig. 17). Se non si è...
- Seite 46 approssimativo, è possibile ottenere un allineamento polare accurato 6. Regolare lentamente l'altitudine della montatura fi nché l'"Errore Alt" utilizzando solo le manopole di regolazione fi ne dell'altitudine e non è inferiore a due minuti d'arco. dell'azimut della montatura. • Se la montatura è dotata di blocchi dell'asse dell'altitudine, a.
-
Seite 47: Messa A Fuoco
LED (Fig. 23). L'anello di stato si illumina quando si collega cancella dal dispositivo tutti i dati di calibrazione del centro precedenti. SSAG a una montatura Celestron accesa. L'anello fornisce messaggi di Quando si attiva SSAG dopo un ripristino delle impostazioni di fabbrica, stato "con uno sguardo"... -
Seite 48: Utilizzo Dei Fi Ltri
SSAG su celestron. (formato TIFF) qui. com/CFM. Se è disponibile un nuovo aggiornamento del software SSAG, è possibile scaricarlo e installarlo con il software Celestron Firmware 11. Risoluzione dei problemi e Manager (CFM). Seguire questi passaggi per aggiornare il software di... - Seite 49 In condizioni di forte rugiada, tuttavia, si potrebbe prendere in considerazione l'aggiunta di una striscia SENSORE IMMAGINE CMOS riscaldante di terze parti insieme a un controller Celestron Smart SENSORE IMMAGINE CMOS Sony IMX290LLR, monocromo, DewHeater per tenere lontana la rugiada dalla lente di SSAG.
- Seite 50 Il design del prodotto e le specifi che sono soggetti a modifi che senza previa notifi ca. Questo prodotto è progettato per essere utilizzato da persone di età pari o superiore ai 14 anni. ©2023 Celestron. Celetron e Symbol sono marchi di Celestron, LLC. Tutti i diritti riservati. Celestron.com celestron.com/pages/technical-support 2835 Columbia Street •...
-
Seite 51: Lista De Piezas
6. Enfoque ..........10 Fig. 2: El soporte grande y la base conectan el SSAG a telescopios Celestron Schmidt- Cassegrain, EdgeHD, and RASA de 5"... - Seite 52 Fig. 4: El soporte grande puede conectarse al OTA en dos ubicaciones en la mayoría Téngalo en cuenta cuando use posteriormente el SSAG. Si el de telescopios Celestron. dispositivo no funciona correctamente y recibe mensajes de error "¡Sin estrellas!", puede tener que volver a enfocar. Para hacerlo, consulte la sección Enfoque más adelante en este manual.
-
Seite 53: Controlar Su Starsense Autoguider
AUX de Celestron. Puerto AUX (en SSAG) Cable AUX Fig. 11: Cuando conecte el soporte Celestron a su PC y ejecute CPWI, debería ver el menú StarSense AG en los iconos del lado izquierdo de la pantalla. Puerto AUX (en soporte) App SkyPortal para iOS y Android Si usa el módulo WiFi Celestron SkyPortal o tiene un soporte Celestron... - Seite 54 2. Pulse INTRO. mando manual NexStar+: 1. Siga los pasos 1 a 5 en la sección alineación automática anterior. 3 a. Si tiene un soporte EQ con conmutadores de posición de inicio, como el CGX o el CGX-L, el mando manual le solicitará 2.
-
Seite 55: Alineación Polar
Última alineación teclado para hacerlo. No se preocupe en centrarlo con precisión aún - esto sucede en el paso siguiente. Por el momento, centre el objeto Si deja su telescopio instalado en una única ubicación, como un aproximadamente en el punto de mira del localizador y pulse INTRO. observatorio doméstico, Última alineación es una elección práctica. - Seite 56 alineación polar en soportes ecuatoriales o soportes AZ que usen cuñas NAVEGACIÓN para seleccionar "Sí" y pulse INTRO. Ajuste hasta que el error sea inferior a dos arcominutos y pulse INTRO. b. Si no desea realizar más ajustes, use las teclas NAVEGACIÓN NOTA: Estas instrucciones explican cómo realizar el procedimiento para seleccionar "No"...
-
Seite 57: Usar Ssag Con Cpwi
Alineación de StarSense y siga las instrucciones de la sección Alineación polar en la página Después de conectar CPWI a su soporte Celestron y al SSAG del 8. Si elige no realizar la alineación polar, pulse "No" para pasar a la modo descrito anteriormente, aparecerá... - Seite 58 seleccionando "Modelar". El soporte se desplazará a la ubicación del objeto y el SSAG añadirá la referencia de alineación al modelo de apuntado del soporte. La precisión de apuntado debería ser bastante buena solo con cuatro puntos, pero normalmente aumentará con cada referencia de alineación que añada.
- Seite 59 solamente los mandos de ajuste preciso de altitud y azimut del soporte. 7. Si desea volver a ajustar el eje de azimut, pulse "Siguiente eje”. En caso contrario, pulse "Finalizar". a. Asegúrese de que el soporte esté razonablemente nivelado. Si su soporte tiene un nivel de burbuja integrado, úselo como 8.
-
Seite 60: Enfoque
LED (Fig. 23). La arandela de estado se ilumina cuando conecta Un restablecimiento de fábrica realiza un ciclo de encendido de SSAG el SSAG a un soporte Celestron encendido. La arandela proporciona un y borra todos los datos de calibración de centro previos del dispositivo. -
Seite 61: Actualizar El Software Interno De Ssag Con Cfm
SSAG en celestron.com/CFM. Si está disponible una nueva actualización 11. Recomendaciones y solución de del software de SSAG, puede descargarla e instalarla con el software Celestron Firmware Manager (CFM). Siga estos pasos para instalar el software de SSAG: problemas 1. Instale como lo haría normalmente, con el mando NexStar+ y el SSAG conectado a los puertos AUX del soporte. -
Seite 62: Especifi Caciones
NÚCLEO PRIMARY ARM® 2x Cortex -A53 hasta 1,4 GHz ® producto del SSAG en celestron.com). Conecte el SSAG a su PC. NÚCLEO SECONDARY ARM® 1x Cortex-M7 hasta 600 MHz Pasados aproximadamente 5 segundos, la arandela LED del SSAG se iluminará, y su ordenador reconocerá la autoguía. - Seite 63 El diseño y las especifi caciones del producto están sujetos a cambios sin notifi cación previa. Este producto ha sido diseñado y está pensado para ser usado por personas de 14 años o más de edad. ©2023 Celestron. Celestron y su símbolo son marcas comerciales de Celestron, LLC. Todos los derechos reservados. Celestron.com celestron.com/pages/technical-support 2835 Columbia Street •...