Herunterladen Inhalt Inhalt Diese Seite drucken
Technoline WT475 Bedienungsanleitung

Technoline WT475 Bedienungsanleitung

Led-wecker mit temperaturanzeige
Vorschau ausblenden Andere Handbücher für WT475:

Werbung

Verfügbare Sprachen
  • DE

Verfügbare Sprachen

  • DEUTSCH, seite 1
WT475 - BEDIENUNGSANLEITUNG
LED-WECKER MIT TEMPERATURANZEIGE
Übersicht:
Anzeige
Tasten
Batteriefach
DE1

Werbung

Inhaltsverzeichnis
loading

Inhaltszusammenfassung für Technoline WT475

  • Seite 1 WT475 - BEDIENUNGSANLEITUNG LED-WECKER MIT TEMPERATURANZEIGE Übersicht: Anzeige Tasten Batteriefach...
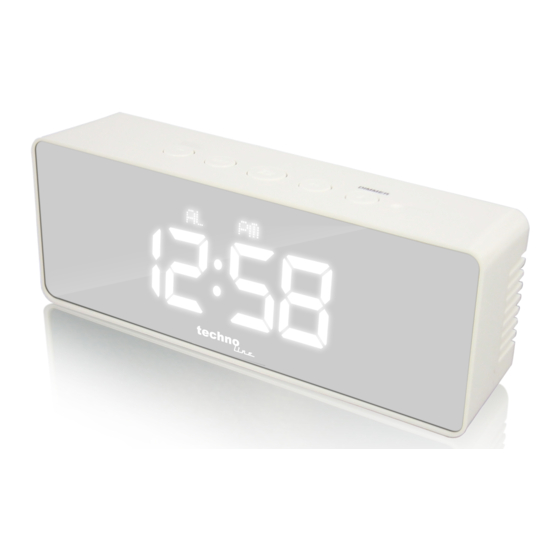
  • Seite 2 1) AL Symbol 2) PM Symbol 3)°C Symbol 4) °F Symbol 5) Ziffern (Anzeige von Uhrzeit und Temperatur) 6) MODE Taste 7) ALARM Taste 8) SNZ/LIGHT Taste 9) UP Taste 10) DOWN Taste 11) Batteriefachabdeckung Funktionen  LED-Zeitanzeige  12/24 Stunden Zeitformat wählbar ...
  • Seite 3 Hinweis: Verwenden Sie nur das Originalnetzteil. ZEITEINSTELLUNG Halten Sie die MODE Taste im Zeitanzeigemodus für 2 Sekunden gedrückt und die Stundenziffern blinken. Drücken Sie die UP oder die DOWN Taste um die Stunde einzustellen. Drücken Sie die MODE Taste und die Minutenziffern blinken. Drücken Sie die UP oder die DOWN Taste um die Minuten einzustellen.
  • Seite 4: Alarm Ein- / Ausschalten

    Drücken Sie die ALARM Taste oder drücken Sie für 10 Sekunden keine Taste um in den Zeitanzeigemodus zurückzukehren. Hinweis: Halten Sie die UP oder die DOWN Taste gedrückt um die Einstellung zu beschleunigen. ALARM EIN-/AUSSCHALTEN Drücken Sie die ALARM Taste einmal im Zeitanzeigemodus und der Alarm ist eingeschaltet und das “AL”...
  • Seite 5: Anzeige Der Innentemperatur

    Hinweis: Die Werkeinstellung der Schlummerdauer ist 5 Minuten. Die Einstellung der Schlummerdauer ist ein Bestandteil der Alarmzeiteinstellung. ANZEIGE DER INNENTEMPERATUR Drücken Sie die MODE Taste einmal im Zeitanzeigemodus um in den Temperaturanzeigemodus zu wechseln. In diesem Anzeigemodus wird die gemessene Innentemperatur mit dem entsprechenden Temperatursymbol “°C“...
  • Seite 6: Dimmer-Funktion

    Drücken Sie die SNZ/LIGHT Taste einmal, um die LED- Hintergrundbeleuchtung für 5 Sekunden zu aktivieren. DIMMER-FUNKTION Drücken Sie die UP Taste einmal, um die Helligkeitsstufe der LED- Anzeige anzupassen. Zwei Helligkeitsstufen (hoch und niedrig) sind auswählbar. NACHTMODUS-FUNKTION Drücken Sie die MODE Taste zweimal im Zeitanzeigemodus um in die Nachtmodusanzeige zu wechseln.
  • Seite 7: Fehlerbehebung

    Drücken Sie die MODE Taste und die Endminuten des Nachtmodus blinken. Drücken Sie die UP oder die DOWN Taste um die Minuten einzustellen. Drücken Sie die MODE Taste oder drücken Sie für 10 Sekunden keine Taste um in die Nachtmodusanzeige zurückzukehren.
  • Seite 8  Ersetzen Sie stets einen vollständigen Batteriesatz.  Mischen Sie niemals alte und neue Batterien.  Entfernen Sie erschöpfte Batterien sofort.  Entfernen Sie die Batterien bei Nichtnutzung.  Laden Sie die Batterien nicht auf und werfen Sie sie nicht ins Feuer.
  • Seite 9 WT475 - INSTRUCTION MANUAL LED ALARM CLOCK WITH TEMPERATURE Overview: Display Buttons Battery compartment...
  • Seite 10: Quick Setup

    1) AL icon 2) PM icon 3)°C icon 4) °F icon 5) Digits (display of time and temperature) 6) MODE button 7) ALARM button 8) SNZ/LIGHT button 9) UP button 10) DOWN button 11) Battery compartment cover Features  LED time display ...
  • Seite 11: Time Setting

    specifications or voltage TIME SETTING In time display mode, press and hold the MODE button for 2 seconds and the hour digits flash. Press the UP or DOWN button to set the hours. Press the MODE button once again and the minute digits flash. Press the UP or DOWN button to set the minutes.
  • Seite 12 Hold the UP or DOWN button to speed up the setting. TURN YOUR ALARM ON OR OFF In time display mode, press the ALARM button once to activate the alarm and the “AL” icon will be displayed. Press the ALARM button again to deactivate the alarm and the “AL”...
  • Seite 13: Dimmer Function

    The “°C“ icon is the default setting. In temperature display mode, press the DOWN button once to change between °C and °F as temperature measuring units. The temperature icons and values will change accordingly. In temperature display mode, press and hold the MODE button for 2 seconds to change into combined display mode and a signal tone is sounding.
  • Seite 14: Troubleshooting

    The status “OFF” will be shown on the display as this is the default setting. Press the UP or DOWN button to set night mode status to “ON” (activated) or “OFF” (deactivated). Once set to “ON” the background LED automatically lowers the luminance during the set night mode period.
  • Seite 15 Do not plug in any other AC/DC adaptor with incorrect specifications or voltage Precautions  This main unit is intended to be used only indoors.  Do not subject the unit to excessive force or shock.  Do not expose the unit to extreme temperatures, direct sunlight, dust or humidity.
  • Seite 16 bring back needed batteries to distributors and other collecting points! Consideration of duty according to the law of electrical devices This symbol means that you must dispose of electrical devices separated from the General household waste when it reaches the end of its useful life. Take your unit to your local waste collection point or recycling centre.
  • Seite 17 WT475 – GUIDE D'UTILISATION REVEIL A LED AVEC AFFICHAGE DE LA TEMPERATURE Vue d’ensemble : Affichage Touches Compartiment à piles...
  • Seite 18: Installation Rapide

    Icône AL Icône PM Icône °C Icône °F Chiffres (affichage de l’heure et de la température) Touche MODE Touche ALARME Touche RAPPEL Touche HAUT D’ALARME/ÉCLAIRAG 10) Touche BAS 11) Couvercle du compartiment à piles Caractéristiques  Affichage LED de l’heure ...
  • Seite 19: Réglage De L'heure

    L’horloge affiche tous les chiffres et icônes et émet un petit signal sonore pour indiquer qu’il est alimenté et prêt à fonctionner. Remarque : N’utilisez que l’adaptateur secteur fourni sur un réseau de mêmes spécifications ou tension. RÉGLAGE DE L’HEURE En mode d’affichage de l’heure, maintenez enfoncée la touche MODE pendant 2 secondes et les chiffres des heures clignotent.
  • Seite 20: Rappel D'alarme

    Appuyez une nouvelle fois sur la touche ALARM et les chiffres des minutes clignotent. Appuyez sur la touche UP ou DOWN pour régler les minutes d’alarme souhaitée. Appuyez à nouveau sur la touche ALARM et « 05 » clignote sur l’affichage. Appuyez sur la touche UP ou DOWN pour régler la durée de rappel d’alarme souhaitée de 05 à...
  • Seite 21 de clignoter. L'alarme sonne à nouveau dans 5 minutes ou après la durée de rappel que vous avez fixée. Pour arrêter le rappel d’alarme, appuyez sur la touche MODE, ALARM, UP ouDOWN et l’icône « AL » redevient statique. L’alarme sera active le même jour le jour suivant. Remarques : Le paramètre de la durée du rappel d’alarme par défaut est de 5 minutes.
  • Seite 22 RÉTROÉCLAIRAGE LED Lors de la première mise sous tension, l’affichage LED de l’horloge s’allume et un signal retentit. Les LED de l’affichage restent allumées lorsque l’horloge est alimentée par l’adaptateur. Lorsqu’elle est uniquement alimentée par des piles, les LED de l’affichage ne s’allument brièvement que lorsque les touches de l’horloge sont enfoncées.
  • Seite 23: En Cas De Panne

    Lorsque « ON » est affiché, maintenez enfoncée la touche MODE pendant 2 secondes et les chiffres de l’heure du début du mode nocturne clignotent. Appuyez sur la touche UP ou DOWN pour régler les heures. Appuyez une nouvelle fois sur la touche MODE et les chiffres des minutes du début du mode nocturne clignotent.
  • Seite 24  Évitez tout contact avec des matériaux corrosifs.  Ne jetez pas l'appareil dans le feu, elle risque d'exploser.  N'ouvrez pas le coffret de l'appareil et n'altérez aucun de ses composants. Avertissements de sécurité concernant les piles  Utilisez uniquement des piles alcalines, ne pas des piles rechargeables.
  • Seite 25 Noter l'obligation de la Loi sur les appareils électriques Ce symbole signifie que les appareils électriques ne doivent pas être jetés aux ordures ménagères à la fin de leur vie utile. Ramenez votre appareil à votre point local de collecte de déchets ou à...
  • Seite 26 MANUAL DE INSTRUCCIONES DE WT475 RELOJ CON ALARMA Y TEMPERATURA Vista genera: Presentación Botones Compartimento de las pilas...
  • Seite 27: Ajuste Rápido

    Icono AL Icono PM Icono °C Icono °F Dígitos (pantalla de hora y temperatura) Botón MODO Botón ALARMA Botón RETARDO / LUZ Botón ARRIBA 10) Botón ABAJO 11) Cubierta del compartimento de las pilas Funciones  Pantalla horaria LED  Formato horario de 12/24 seleccionable ...
  • Seite 28 El reloj muestra todos los dígitos e iconos y realiza un pequeño tono de señal para mostrar que tiene alimentación y está listo para funcionar. Nota: No conecte ningún otro adaptador de CA/CC con especificaciones o voltaje incorrectos. CONFIGURACIÓN HORARIA En el modo pantalla horaria, mantenga pulsado el botón MODE durante 2 segundos y los dígitos de la hora parpadean.
  • Seite 29 Vuelva a pulsar el botón ALARM; “05” parpadea en la pantalla. Pulse el botón UP o DOWN para fijar la duración del retardo que desee desde 05 a 60 minutos. Pulse el botón ALARM para volver al modo de pantalla horaria o volverá...
  • Seite 30 Para detener el retardo de la alarma, pulse el botón MODE, ALARM, UP o DOWN y el icono “AL” vuelve a quedarse estático. La alarma volverá a estar activa para la misma hora del día siguiente. Notas: La duración del retardo por defecto es de 5 minutos. La configuración de la duración del retardo forma parte del proceso de configuración de la alarma.
  • Seite 31 Cuando se alimenta por primera vez, el reloj se iluminará con el LED de la pantalla y sonará un tono de señal. El LED de la pantalla permanecerá iluminado siempre que esté alimentando usando el adaptador. Cuando está alimentado por pilas, el Led de la pantalla se iluminará...
  • Seite 32: Solución De Problemas

    nocturno parpadean. Pulse el botón UP or DOWN para fijar la hora. Vuelva a pulsar el botón MODE y parpadean los dígitos de los minutos de inicio del modo nocturno. Pulse el botón UP o DOWN para fijar los minutos. Vuelva a pulsar el botón MODE y parpadean los dígitos de la hora de finalización del modo nocturno.
  • Seite 33 puede explotar.  No abra la carcasa trasera interior ni manipule ninguno de los componentes de esta unidad. Advertencias de seguridad sobre las baterías  Utilizar solamente baterías alcalinas. No utilizar recargables baterías.  Coloque las baterías correctamente haciendo coincidir la polaridad (+/-).
  • Seite 34 Obligación en virtud de la ley de los dispositivos eléctricos Este símbolo indica que no debe arrojar los dispositivos eléctricos a la basura doméstica general cuando alcancen el final de su vida a útil. Lleve su aparato a un punto de recogida selectiva de basura o a un centro de reciclaje.
  • Seite 35 WT475 - INSTRUCTIEHANDLEIDING LED-ALARMKLOK MET TEMPERATUUR Overzicht: Weergave Knoppen Batterijvak...
  • Seite 36 AL-icoontje PM-icoontje °C-icoontje °F-icoontje Cijfers (tijd- en temperatuurweergave) MODUS-toets ALARM-toets SLUIMER- OMHOOG-toets /LICHTTOETS 10) OMLAAG-toets 11) Klepje van batterijhouder Eigenschappen  LED-tijdweergave  12/24 uurformaat selecteerbaar  Alarm & sluimerfunctie  Temperatuurweergave in °C of °F  Temperatuurbereik: 0°C ~ 50°C ...
  • Seite 37 Opmerking: Sluit geen andere AC/DC-adapter met incorrecte specificaties of een incorrect voltage aan. TIJDINSTELLING Houd in de modus tijdweergave de toets MODE 2 seconden ingedrukt en de uurweergave begint te knipperen. Druk op de toets UP of DOWN om de uren in te stellen. Druk nogmaals op de toets MODE en de minuutweergave begint te knipperen.
  • Seite 38 Druk nogmaals op de toets ALARM en “05” knippert op de display. Druk op de toets UP of DOWN om de gewenste sluimerduur in te stellen tussen 05 en 60 minuten. Druk op de toets ALARM om terug te keren naar de modus tijdweergave of druk 10 seconden lang op geen enkele toets en de klok zal automatisch terugkeren naar de tijdweergave.
  • Seite 39 Druk op de toets MODE, ALARM, UP of DOWN om het sluimeralarm te stoppen; het “AL”-icoontje blijft weer permanent branden. Het alarm zal de volgende dag op dezelfde tijd weer klinken. Opmerkingen: De sluimerduur is standaard ingesteld op 5 minuten. De instelling van de sluimerduur maakt deel uit van de instellingsprocedure van de alarmtijd.
  • Seite 40: Nachtmodusfunctie

    ACHTERGROND-LED Wanneer u de klok voor het eerst inschakelt, dan zal de dislay-LED oplichten en klinkt er een signaaltoon. De LED van de display zal blijven branden als de klok van stroom wordt voorzien via de adapter. Als alleen de batterijen als voeding worden gebruikt, dan zal de display-LED alleen kort oplichten wanneer u de toetsen op de klok gebruikt.
  • Seite 41: Probleemoplossing

    Terwijl “AAN” wordt weergegeven, houd de toets MODE 2 seconden ingedrukt en de starturen van de nachtmodus beginnen te knipperen. Druk op de toets UP of DOWN om de uren in te stellen. Druk nogmaals op de toets MODE en de startminuten van de nachtmodus beginnen te knipperen.
  • Seite 42  Niet onderdompelen het apparaat in water  Vermijd contact met bijtende stoffen.  Gebruik het apparaat niet in een vuur. Deze kan ontploffen.  Niet open de behuizing en niet manipuleren structurele componenten van het apparaat. Batterijvoorschriften  Gebruik uitsluitend alkaline batterijen,...
  • Seite 43 Verordening verwijdering elektrische apparaten Dit symbool betekent dat elektrische apparatuur, wanneer hij het eind van zijn levensduur bereikt, niet mag worden afgevoerd met het gewone huishoudelijk afval. Breng de apparaat naar het plaatselijke inzamelpunt voor afval of recyclingcentrum. Dit is van toepassing voor alle landen van de Europese Unie en op de overige Europese landen met een systeem voor gescheiden afvalinzameling.
  • Seite 44 WT475 – MANUALE D’USO SVEGLIA A LED CON TEMPERATURA Panoramica: Visualizzazione Pulsanti Vano batteria...
  • Seite 45: Installazione Rapida

    Icona AL Icona PM Icona °C Icona °F Cifre (visualizzazione dell'orario e della temperatura) Pulsante MODE Pulsante ALARM Pulsante SNZ/LIGHT Pulsante SU 10) Pulsante DOWN 11) Coperchio vano batteria Caratteristiche  Display orario LED  Formato 12/24 ore selezionabile  Sveglia e snooze ...
  • Seite 46: Impostazione Orario

    Non utilizzare altri adattatori CA/CC con specifiche o voltaggio incorretti. IMPOSTAZIONE ORARIO Nella modalità di visualizzazione dell'orario, premere e tenere premuto il pulsante MODE per 2 secondi e le cifre dell'ora lampeggiano. Premere il pulsante UP e DOWN per impostare le ore.
  • Seite 47: Sveglia Snooze

    Premere nuovamente il pulsante ALARM ancora una volta e “05” lampeggia sul display. Premere il pulsante UP e DOWN per impostare la durata dello snooze desiderata da 05 a 60 minuti. Premere il pulsante ALARM per ritornare alla modalità di visualizzazione dell'orario in 10 secondi se non è...
  • Seite 48 Per arrestare la sveglia snooze, premere il pulsante MODE, ALARM, UP o DOWN e l'“AL” diventa nuovamente fissa. La sveglia si attiva allo stesso orario il giorno successivo. Note: L'impostazione della durata dello snooze predefinita è 5 minuti. L'impostazione della durata dello snooze è parte del processo di impostazione dell'orario della sveglia.
  • Seite 49 Quando acceso per la prima volta, l'orologio accenderà il LED del display e si sentirà un segnale acustico. Il LED del display resterà acceso quando alimentato usando l'alimentatore. Quando alimentato solo a batterie, il LED del display si accende solo brevemente quando si usano i pulsanti sull'orologio. Premere una volta il pulsante SNZ/LIGHT per attivare la retroilluminazione del LED per 5 secondi.
  • Seite 50: Risoluzione Dei Problemi

    Premere nuovamente il pulsante MODE una volta e le cifre dei minuti in modalità notte iniziano a lampeggiare. Premere il pulsante UP e DOWN per impostare i minuti. Premere nuovamente il pulsante MODE una volta e le cifre delle ore in modalità notte smettono di lampeggiare. Premere il pulsante UP e DOWN per impostare le ore.
  • Seite 51 Avvertenze per l'uso sicuro delle batterie  Uilizzare solo batterie alcaline. utilizzare batterie ricaricabili.  Installare le batterie correttamente rispettando le polarità (+/-).  Sostituire sempre il set completo di batterie.  Non mescolare mai batterie usate e nuove.  Rimuovere immediatamente le batterie scariche.
  • Seite 52 WT475 - UŽIVATELSKÁ PŘÍRUČKA LED BUDÍK S TEPLOMĚREM Přehled: Displej Tlačítka Bateriový prostor...
  • Seite 53: Rychlé Nastavení

    Ikona AL Ikona PM Ikona °C Ikona °F Číslice (zobrazení času a teploty) Tlačítko REŽIM Tlačítko ALARM Tlačítko OPAKOVANÉ Tlačítko NAHORU BUZENÍ / SVĚTLO 10) Tlačítko DOLŮ 11) Kryt bateriového prostoru Funkce  Zobrazení času na displeji LED  Volba mezi 12- a 24hodinovým formátem ...
  • Seite 54: Nastavení Času

    Na budíku se zobrazí všechny číslice a ikony a ozve se slabý signální tón značící, že je zařízení napájeno a připraveno k provozu. Poznámka: K budíku nepřipojujte žádný jiný napájecí adaptér s nesprávným napětím či technickými parametry. NASTAVENÍ ČASU V režimu zobrazení času stiskněte tlačítko „MODE“ a držte jej stisknuté...
  • Seite 55 Znovu stiskněte tlačítko „ALARM“ a začnou blikat číslice minut. Stisknutím tlačítka „UP“ nebo „DOWN“ nastavte požadované minuty budíku. Znovu stiskněte tlačítko „ALARM“ a na displeji bude blikat text „05“. Stisknutím tlačítka „UP“ nebo „DOWN“ nastavte požadovanou dobu pro opakované buzení v rozsahu 05 až 60 minut.
  • Seite 56 Chcete-li opakované buzení vypnout, stiskněte tlačítko „MODE“, „ALARM“, „UP“ nebo „DOWN“ a ikona „AL“ bude znovu trvale svítit. Budík se aktivuje opět následující den ve stejný čas. Poznámky: Výchozí doba pro opakované buzení je 5 minut. Nastavení doby pro opakované buzení je součástí procesu nastavení času budíku. ZOBRAZENÍ...
  • Seite 57 Je-li budík napájen pouze pomocí baterií, displej LED se rozsvítí jen krátce po stisknutí tlačítek budíku. Podsvícení displeje LED na dobu 5 sekund aktivujete jedním stisknutím tlačítka „SNZ/LIGHT“. FUNKCE ZTLUMENÍ Úroveň jasu displeje nastavíte jedním stisknutím tlačítka „UP“. K dispozici jsou dvě úrovně nastavení jasu (vysoký a nízký jas). Výchozím nastavením je vysoká...
  • Seite 58: Řešení Problémů

    Znovu stiskněte tlačítko „MODE“ a začnou blikat číslice hodin konce nočního režimu. Stisknutím tlačítka „UP“ nebo „DOWN“ nastavte hodiny. Znovu stiskněte tlačítko „MODE“ a začnou blikat číslice minut konce nočního režimu. Stisknutím tlačítka „UP“ nebo „DOWN“ nastavte minuty. Stisknutím tlačítka „MODE“ se vraťte k zobrazení nočního režimu.
  • Seite 59 Baterie vkládejte správně odpovídající polaritou (+/-).   Vždy vyměňte kompletní sadu baterií.  Nikdy nemíchejte použité a nové baterie. Okamžitě odstraňte vybité baterie.   Baterie vyjměte, když není zařízení v provozu. Nenabíjejte a nevhazujte baterie do ohně, mohly by explodovat. ...
  • Seite 60 WT475 - INSTRUKCJA OBSŁUGI BUDZIK LED Z ALARMEM I TERMOMETREM Przegląd: Wyświetlenie Przyciski Komora baterii...
  • Seite 61 Ikona ALARM Ikona PM Ikona °C Ikona °F Cyfry (wyświetlanie czasu i temperatury) Przycisk TRYB Przycisk ALARM Przycisk Przycisk DO GÓRY DRZEMKA/PODŚWIETL ENIA 10) Przycisk DO DOŁU 11) Osłona komory baterii Funkcje  Wyświetlacz czasu LED  12/24-godzinny format czasu do wyboru ...
  • Seite 62: Ustawianie Czasu

    sygnał dźwiękowy, wskazując, że jest podłączony do zasilania i gotowy do pracy. Uwaga: Nie podłączać do żadnego innego zasilacza AC/DC o błędnej specyfikacji lub zasilaniu. USTAWIANIE CZASU W trybie wyświetlania czasu naciśnij i przytrzymaj przez 2 sekundy przycisk MODE, zaczną migać cyfry godziny. Naciśnij przycisk UP lub DOWN, aby ustawić...
  • Seite 63 Naciśnij ponownie przycisk ALARM, zaczną migać cyfry minut. Naciśnij przycisk UP lub DOWN, aby ustawić żądane minuty alarmu. Naciśnij ponownie przycisk ALARM, na wyświetlaczu zacznie migać „05”. Naciśnij przycisk UP lub DOWN, aby ustawić żądany czasu drzemki od 05 do 60 minut. Naciśnij przycisk ALARM, aby powrócić...
  • Seite 64 dzwonić po 5 minutach, lub ustawionym wcześniej okresie drzemki. Aby zatrzymać alarm drzemki, naciśnij przycisk MODE, ALARM, UP lub DOWN, ikona „AL” ponownie przestanie migać. Alarm uruchomi się w tym samym czasie następnego dnia. Uwagi: Domyślne ustawienie czasu drzemki wynosi 5 minut. Ustawianie czasu drzemki to część...
  • Seite 65 PODŚWIETLENIE LED Po pierwszym podłączeniu do sieci zegar podświetli wyświetlacz LED i rozlegnie się sygnał dźwiękowy. Podświetlenie LED wyświetlacza pozostanie włączone, jeśli urządzenie jest zasilane adapterem. Podczas zasilania bateriami wyświetlacz LED zostanie podświetlony jedynie na krótko podczas korzystania z przycisków na zegarze.
  • Seite 66: Rozwiązywanie Problemów

    rozpoczynającej tryb nocny. Naciśnij przycisk UP lub DOWN, aby ustawić godzinę. Naciśnij ponownie raz przycisk MODE, zaczną migać cyfry godziny rozpoczynającej tryb nocny. Naciśnij przycisk UP lub DOWN, aby ustawić minuty. Naciśnij ponownie raz przycisk MODE, zaczną migać cyfry godziny kończącej tryb nocny. Naciśnij przycisk UP lub DOWN, aby ustawić...
  • Seite 67 Nie otwierać obudowy i nie ingerują w wewnętrzne części  urządzenia. Ostrzeżenia bezpieczeństwa dotyczące baterii  Używać tylko baterii alkalicznych. wolno używać akumulatorów.  Włożyć baterie prawidłowo, zgodnie z biegunowością (+/-).  Zawsze należy wymieniać cały zestaw baterii.  Nigdy nie wolno mieszać zużytych i nowych baterii. ...
  • Seite 68 Zawiadomienie wymagań na mocy dyrektywy urządzenia elektryczne Ten symbol oznacza, że należy oddzielać urządzenia elektryczne od ogólnych odpadów domowych po zakończeniu ich żywotności. Urządzenie należy oddać do lokalnego punktu zbiórki odpadów lub centrum recyklingu. Dotyczy to wszystkich państw Unii Europejskiej oraz innych państw europejskich, w których obowiązuje system zbierania odpadów segregowanych.

Inhaltsverzeichnis