Inhaltsverzeichnis
Werbung
Verfügbare Sprachen
Verfügbare Sprachen
Quicklinks
SOLAR POND PUMPS
de
SOLAR TEICHPUMPEN
Version 23.03
GB
OPERATING INSTRUCTIONS
BEDIENUNGSANLEITUNG
DE
Teichpumpen-Set
Solar Aqua-Vital
9-UV-C
(SP01125-4)
Teichpumpen-Set
Solar Aqua-Vital
12-UV-C
(SP01126-4)
Technical changes, misprints and mistakes reserved! Newest information about our products can be found online
Technische Änderungen, Druckfehler und Irrtümer vorbehalten! Aktuelle Informationen zu unseren Produkten finden Sie auf:
https://www.profi-pumpe.de
Werbung
Inhaltsverzeichnis

Verwandte Anleitungen für profi-pumpe Teichpumpen-Set Solar Aqua-Vital 9-UV-C


Inhaltszusammenfassung für profi-pumpe Teichpumpen-Set Solar Aqua-Vital 9-UV-C
- Seite 1 Teichpumpen-Set Solar Aqua-Vital 9-UV-C (SP01125-4) Teichpumpen-Set Solar Aqua-Vital 12-UV-C (SP01126-4) Technical changes, misprints and mistakes reserved! Newest information about our products can be found online Technische Änderungen, Druckfehler und Irrtümer vorbehalten! Aktuelle Informationen zu unseren Produkten finden Sie auf: https://www.profi-pumpe.de...
-
Seite 2: Inhaltsverzeichnis
Please keep this manual with the instructions and safety instructions ca- refully in order to at any time you can restore them. Please always down- load the latest version of the user manual of www.profi-pumpe.de under „downloads“. This shall always prevail. -
Seite 3: Operation
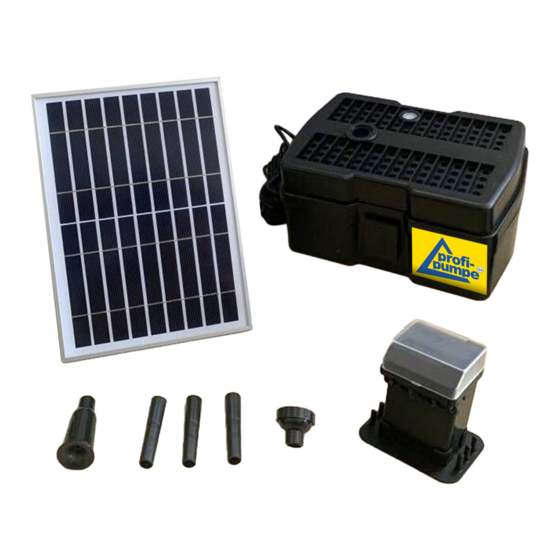
English 3 3. OPERATION ● Unpack all components carefully ● Mount the solar panel (see illustration). Remove the protective film from the solar panel (if any). Overview of components and assembly Solar Pump Kit ● The solar pump is designed for outdoor use, the pump is powered by a solar panel. In order to make the pump work, the solar panel needs to be placed in direct sunlight –... -
Seite 4: Frost
4 English Filter box Solar Panel Control box Base Position the solar panel so that it receives direct sunlight. The fountain can not work if the solar pa- nel is shaded. Adjust the solar panel angle to maximise the amount of solar energy collected. Summer 0°- 30°... -
Seite 5: Operating Instructions
English 5 6. OPERATING INSTRUCTIONS Once installed, allow the control box to charge at least eight hours in direct sunlight or 8 hours by adapter in order to fully charge the Battery. 3.1 Press the “on/off” button, turn on/off the system. The “L4” indicator light is on. „L4“... - Seite 6 6 English Indicator light Button Setting Timing Cycle Blink-according to Solid timing during running Press once Twice interval Three times Press twice (UV&Pump) interval Press 3 Four times interval times Press once Twice interval Same time During Three times Press twice as originally stand by (UV)
-
Seite 7: Performing Of The Pump
English 7 9. PERFORMANCE OF THE PUMP The performance of the pump depends on the orientation of the solar panels towards the sun and their intensity. The max. Performance is achieved under optimum conditions. A function in the shade or under cloudy skies can not be guaranteed. The solar pond kits are designed primarily for use in the summer months. -
Seite 8: Servicing
8 English l When the battery is worn out, wrap the terminals with adhesive tape or similar materials be- fore disposal l Immediately discontinue use of the battery, if there is an unusuak smell, a change of color or shape, or if it appears abnormal in any other way l Do not place the battery in microwave ovens, high pressure containers or on cookware facili- ties l In the event of the battery is leaking and fluid gets into your eye, do not rub the eye, rinse... -
Seite 9: Security Tips
English 9 14. SECURITY TIPS l Obey absolutely valid regulations on the electrical security l Never run pump dry l Pumping inflammable, as well as all other aggressive liquids is prohibited l Pay attention to the medium temperature max. 35°C l Never pull the pump on the electrical cable or pressure hose l Avoid cross section narrowing l Pay attention to the given particle size... -
Seite 10: Notes On Product Liability
10 English 17. NOTES ON DISPOSAL Electro devices of our company, labeled with the symbol of the crossed trash bin, are not permitted to be disposed in your household garbage. We are registered at the German registration department EAR under the WEEE-No. DE79535656. This symbol means, that you’re not allowed to treat this product as a regular household waste item –... -
Seite 11: Vorwort
Bitte bewahren Sie die Bedienungsanleitung mit den Anweisungen und Sicherheitshin- weisen sorgfältig auf, um jederzeit darauf zurückgreifen zu können. Bitte laden Sie stets die neueste Ausführung der Bedienungsanleitung von www.profi-pumpe.de unter „download“ herunter. Diese ist stets maßgebend. 2. ALLGEMEINES Die Solar-Teichpumpen-Sets sind hochwertige Fontänen-Pumpensysteme für den Einsatz im Au- ßen- bzw. -
Seite 12: Inbetriebnahme
12 Deutsch 3. INBETRIEBNAHME ● Entnehmen Sie alle Teile vorsichtig und kontrollieren Sie diese auf Vollständigkeit ● Montieren Sie das Solarpanel (siehe Abbildung). Entfernen Sie die Schutzfolie vom Solarpanel (wenn vorhanden). Übersicht der gelieferten Teile und Montage S olarpumpen-Bausatz ● Die Solarpumpe ist für die Verwendung im Freien konzipiert und wird von einem Solarmodul angetrieben. -
Seite 13: Solarpanel
Deutsch 13 Filterkasten Solarpanel Schaltkasten Sockel Positionieren Sie das Solarpanel so, dass es direktes Sonnenlicht erhält. Die Pumpe/Belüfter kann nicht funktionieren, wenn die Solarzelle beschattet wird. Passen Sie den Winkel des Solar- panels an. Sommer 0°- 30° Frühjahr/Herbst 30°- 60° Schließen Sie die Pumpe/Belüfter und das Solarpanel an (siehe Abbildung). -
Seite 14: Bedienung Und Funktion
14 Deutsch 6. BEDIENUNG UND FUNKTION Lassen Sie das Steuergerät nach der Installation mindestens acht Stunden in direktem Sonnenlicht oder acht Stunden über einen Adapter aufladen, um den Akku vollständig aufzuladen. 3.1 Drücken Sie die Taste „on/off“, um das System ein- und auszuschalten. Die Kontrollleuchte „L4“ leuchtet. - Seite 15 Deutsch 15 Anzeigelampe Zeitein- Schaltfläche Einstellung Zyklus stellung Blinken gemäß der Dauer- Zeiteinstellung wäh- haftes rend des Betriebs Leuchten Einmal Zweimaliges 2 Std. drücken Intervall Zweimal Dreimaliges 3 Std. (UV&Pumpe) drücken Intervall 3 Mal Viermaliges 4 Std. drücken Intervall Einmal Zweimaliges 2 Std.
-
Seite 16: Leistung Der Pumpe
16 Deutsch 9. LEISTUNG DER PUMPE Die Leistung der Pumpe hängt von der Ausrichtung des Solar- Panels zur Sonne und deren Inten- sität ab. Die max. Leistung wird bei optimalen Bedingungen erreicht. Eine Funktion im Schatten oder bei bewölktem Himmel kann nicht garantiert werden. Die Solarteichsets sind primär für den Einsatz in den Sommermonaten konzipiert. -
Seite 17: Wartung
Deutsch 17 aus. Lagern Sie den Akku bei heißem Wetter nicht im Auto. Der Akku kann bei hohen Tempera- turen explodieren oder sich entzünden. l Akkus sollten nicht in Reichweite von Kindern aufbewahrt werden. l Um Kurzschlüsse zu vermeiden, sollten die Pole der Batterien vor der Entsorgung mit isolie- rendem Klebeband abgedeckt werden. -
Seite 18: Sicherheitshinweise
18 Deutsch 14. SICHERHEITSHINWEISE l Unbedingt geltende Vorschriften zur elektrischen Sicherheit befolgen l Pumpe niemals trocken betreiben l Das Pumpen von entzündlichen, sowie allen anderen aggressiven Flüssigkeiten ist untersagt l Mediumtemperatur max. 35°C beachten l Niemals die Pumpe am stromführenden Kabel oder Druckleitung ziehen l Querschnittsverengung vermeiden l Bei längeren Stillstandszeiten die Pumpe säubern, mit klarem Wasser spülen und tro- cken bei Zimmertemperatur lagern... -
Seite 19: Entsorgungshinweise
Deutsch 19 17. ENTSORGUNGSHINWEISE Elektro-Geräte mit dem Symbol der durchgestrichenen Mülltonne dürfen nicht über den Hausmüll entsorgt werden, sondern sind an einer Annahmestelle für Recycling von elektro- nischen Geräten abzugeben. Bei der deutschen Registrierungsstelle EAR sind wir unter der WEEE-Nummer DE79535656 gelistet. ... -
Seite 20: Technical Data
20 English / Deutsch 19. TECHNICAL DATA/TECHNISCHE DATEN Aqua-Vital Aqua-Vital English Deutsch 9-UV-C 12-UV-C SP01125-4 SP01126-4 Max. pump capacity Max. Fördermenge 450 l/h 850 l/h Max pump height Max. Förderhöhe 1,2 m 1,25 m Max. water temperature Max. Wassertemperatur 45 °C 45 °C Rated voltage Nennspannung... -
Seite 21: Spare Parts
English / Deutsch 21 20. SPARE PARTS / ERSATZTEILE The spare parts are available for purchase from AMUR S.à.r.l. at www.profi-pumpe.de. Die Ersatzteile sind bei AMUR S.à.r.l. unter www.profi-pumpe.de käuflich zu erwerben. If you need further spare parts, please contact us. - Seite 22 Notes/Notizen...
- Seite 23 Notes/Notizen...
- Seite 24 Imprint/Impressum Amur S.à r.l. www.amur.lu Email: info@amur.lu Tel.: (+49) 0611-9 45 87 77-0 Fax: (+49) 0611-9 45 87 77-11...