
Verwandte Anleitungen für Geutebruck G-Cam/EWPC-5240


Inhaltszusammenfassung für Geutebruck G-Cam/EWPC-5240
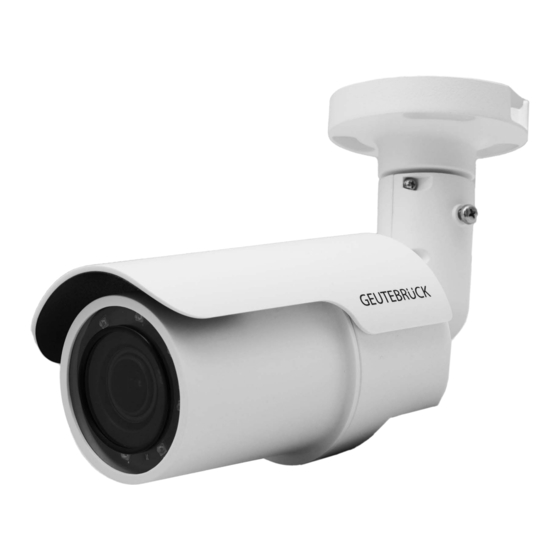
- Seite 1 G-Cam/EWPC-5240 G-Cam/EWPC-5250 5 MP Bullet IP-Kamera Installationsanleitung Installation manual...
- Seite 2 Zurück zum G-Cam/EWPC-5240, G-Cam/EWPC-5250 Installationsanleitung Inhaltsverzeichnis Vorwort Die Informationen in diesem Handbuch waren zum Zeitpunkt der Veröffentlichung korrekt. Das Unternehmen behält sich das Recht vor, Produkte zu verändern und zu verbessern. Änderungen vorbehalten. Copyright Dieses Handbuch unterliegt dem Urheberrecht. Der Inhalt dieses Benutzerhandbuchs darf ohne vorherige schriftliche Genehmigung des Unternehmens nicht kopiert, fotokopiert, übersetzt, reproduziert oder auf elektronischen Medien beziehungsweise...
-
Seite 3: Sicherheitsbestimmungen
Zurück zum G-Cam/EWPC-5240, G-Cam/EWPC-5250 Installationsanleitung Inhaltsverzeichnis Sicherheitsbestimmungen Dieses Gerät entspricht den Anforderungen gemäß Teil 15 der FCC-Richtlinien. Es darf unter folgenden Bedingungen betrieben werden: Gerät darf keine elektromagnetischen Störungen verursachen und (2) das Gerät muss eine angemessene Festigkeit gegen elektromagnetische Störungen aufweisen, einschließlich Störungen, die Funktionsstörungen verursachen können. -
Seite 4: Sicherheitshinweise
Zurück zum G-Cam/EWPC-5240, G-Cam/EWPC-5250 Installationsanleitung Inhaltsverzeichnis Sicherheitshinweise Kamera sorgfältig handhaben Setzen Sie die Kamera keiner Gewalt aus. Vermeiden Sie Stöße, Schütteln usw. Bei unsachgemäßer Handhabung oder Lagerung kann die Kamera beschädigt werden. Kamera fehlerfrei elektrisch anschließen Der Anschluss der Anlage muss von qualifizierten Elektrikern durchgeführt werden. Für die Spannungsversorgung sehen Sie bitte in die technischen Daten am Ende dieser Anleitung. -
Seite 5: Inhaltsverzeichnis
Videoauflösung einstellen ......................19 Konfigurationsdateien exportieren / importieren ..............20 Einstellungen GEUTEBRÜCK Software ..................21 Integration einer IP-Kamera in G-Set ..................21 8.1 Tech-Support Information ......................30 Einen existierenden Viewer löschen ..................30 9.1 Anhang A: Technische Daten G-Cam/EWPC-5240-5250..............31 ... -
Seite 6: Überblick
Zurück zum G-Cam/EWPC-5240, G-Cam/EWPC-5250 Installationsanleitung Inhaltsverzeichnis Überblick Cam/EWPC-52x0 Bullet IP Kamera unterstützt bis zu 5M@30 fps + 720p@27fps Video- Streaming. In Kombination mit der neuesten HDR-Technologie und der Low-Light- Technologie ist die E5-Serie in der Lage, auch bei Dunkelheit und schlechten Lichtverhältnissen qualitativ hochwertige Bilder zu liefern. -
Seite 7: Verpackungsinhalt
Zurück zum G-Cam/EWPC-5240, G-Cam/EWPC-5250 Installationsanleitung Inhaltsverzeichnis 1.2 Verpackungsinhalt Prüfen Sie den Verpackungsinhalt auf Vollständigkeit. Bullet IP-Kamera (Kabel fest integriert) 2-Pin Spannungsanschluss 5-Pin Alarm-Anschluss M5 Standardschraube (x1) Kunststoffdübel (x5) M4 Selbstschneidende Schraube (x5) Schnellstartanleitung WICHTIG: Um ein externes Netzteil zu verwenden, fragen Sie Ihren Lieferanten nach einem passenden Modell. -
Seite 8: Abmessungen
Zurück zum G-Cam/EWPC-5240, G-Cam/EWPC-5250 Installationsanleitung Inhaltsverzeichnis 1.3 Abmessungen Nachfolgend sind die Abmessungen der IP-Kamera dargestellt. -
Seite 9: Microsd-Kartenslot / Taster Für Werkeinstellungen
Zurück zum G-Cam/EWPC-5240, G-Cam/EWPC-5250 Installationsanleitung Inhaltsverzeichnis 1.4 microSD-Kartenslot / Taster für Werkeinstellungen Ein microSD-Kartenslot und der Taster für die Werkeinstellungen befinden sich im Kameragehäuse. Benötigt man sie, muss die Gehäusefront geöffnet werden. Folgende Schritte sollten Sie dabei beachten: WICHTIG: Die Silika-Gel-Säckchen sollten nach jedem Öffnen ersetzt werden. -
Seite 10: Kamera Anschließen
Zurück zum G-Cam/EWPC-5240, G-Cam/EWPC-5250 Installationsanleitung Inhaltsverzeichnis Kamera anschließen Bevor Sie die Kabel verdrahten, stellen Sie sicher, dass sich diese in trockener und wasserdichter Umgebung (z. B. Anschlusskasten) befinden. Dies soll verhindern, dass Feuchtigkeit in die Kabel eindringt und dadurch zu Defekten führen könnte. -
Seite 11: Spannungsversorgung
Zurück zum G-Cam/EWPC-5240, G-Cam/EWPC-5250 Installationsanleitung Inhaltsverzeichnis 2.2 Spannungsversorgung Für den Stromanschluss verwenden Sie bitte einen AC 24V / DC 12V-Adapter und schließen ihn an die 2-polige Klemmleiste des All-in-One-Kabels und die Steckdose an. Alternativ können Sie die Kamera auch über PoE mit Strom versorgen, wenn ein Power Sourcing Equipment (PSE)-Schalter vorhanden ist. - Seite 12 Zurück zum G-Cam/EWPC-5240, G-Cam/EWPC-5250 Installationsanleitung Inhaltsverzeichnis Wasserdichte Kabelsteckverbinder Führen Sie die folgenden Schritte aus, um die Anschlüsse des All-in-One- Kabels wasserdicht zu machen. Schritt 1: Schließen Sie die erforderlichen Geräte an das All-in-One-Kabel an und beschichten Sie die Verbindungen mit Silikon. Es darf...
-
Seite 13: Installation
Zurück zum G-Cam/EWPC-5240, G-Cam/EWPC-5250 Installationsanleitung Inhaltsverzeichnis Installation Lesen Sie die Instruktionen im folgenden Kapitel sorgfältig, bevor Sie die IP- Kamera installieren. 3.1 Decken- / Wandmontage Die Kamera kann direkt an einer Wand oder unter einer Decke installiert werden. Der integrierte Wandarm lässt jede Position daran zu. Prüfen Sie bitte, dass der Befestigungsort so stabil ist, dass er die Last der Kamera auch trägt. -
Seite 14: Platzieren Des Trockenmittels
Zurück zum G-Cam/EWPC-5240, G-Cam/EWPC-5250 Installationsanleitung Inhaltsverzeichnis Schritt 4: Platzieren Sie die drei Befestigungslöcher des Wandarms über den Dübeln und befestigen Sie den Wandarm mit den beiliegenden selbstschneidenden M4 x 31-Schrauben. Schritt 5: Drehen Sie die Kamera in die von Ihnen gewünschte Position und arretieren Sie den... -
Seite 15: Systemanforderungen
Zurück zum G-Cam/EWPC-5240, G-Cam/EWPC-5250 Installationsanleitung Inhaltsverzeichnis Systemanforderungen Damit die IP-Kamera über den Webbrowser bedient werden kann, muss der Computer über eine funktionierende Netzwerkverbindung verfügen und die nachfolgend beschriebenen Systemanforderungen erfüllen. Element Systemanforderung Minimum: 1. Intel® Core i5-2430M @ 2,4 GHz 2. -
Seite 16: Zugriff Auf Die Kamera
Zurück zum G-Cam/EWPC-5240, G-Cam/EWPC-5250 Installationsanleitung Inhaltsverzeichnis Zugriff auf die Kamera Für den Erstzugriff auf die IP-Kamera kann diese über das Installationsprogramm „DeviceSearch.exe“ gesucht werden. Download unter: DeviceSearch.zip Software für Gerätesuche verwenden Schritt 1: Doppelklicken Sie auf „DeviceSearch.exe“. Schritt 2: Das Anwendungsfenster wird angezeigt. Klicken Sie oben auf <Device Search>. -
Seite 17: Erstmalige Anmeldung An Der Ip-Kamera
Zurück zum G-Cam/EWPC-5240, G-Cam/EWPC-5250 Installationsanleitung Inhaltsverzeichnis Schritt 8: Sie werden zur Eingabe des Standard-Benutzernamens und des Kennworts für die Anmeldung bei der IP-Kamera aufgefordert. Standard-Benutzername und -Kennwort für den Administrator lauten: Login ID Password root admin HINWEIS: Bei Benutzername und Kennwort wird die Groß- /Kleinschreibung berücksichtigt. - Seite 18 Zurück zum G-Cam/EWPC-5240, G-Cam/EWPC-5250 Installationsanleitung Inhaltsverzeichnis Wenn DC Viewer fehlerfrei installiert wurde, wird die Startseite der Benutzeroberfläche der IP-Kamera angezeigt (siehe Abbildung unten). Zoom und Fokuseinstellung Wenn die Kamera verbunden ist, wird das Livebild angezeigt. Wenn Zoom oder Fokus nicht die gewünschte Position eingenommen haben, benutzen Sie zur...
-
Seite 19: Videoauflösung Einstellen
Zurück zum G-Cam/EWPC-5240, G-Cam/EWPC-5250 Installationsanleitung Inhaltsverzeichnis Videoauflösung einstellen Die Videoauflösung finden Sie unter: Streaming > Video Configuration. Werkseinstellung der Videoauflösung ist: Stream1 H.264 2688x1944 VBR 25fps Stream2 H.264 640x360 VBR 25fps Weitere Kombinationen können Sie sehen, wenn Sie die Dropdown-Listen bei “Resolution”... -
Seite 20: Konfigurationsdateien Exportieren / Importieren
Zurück zum G-Cam/EWPC-5240, G-Cam/EWPC-5250 Installationsanleitung Inhaltsverzeichnis Konfigurationsdateien exportieren / importieren Um Konfigurationsdateien zu exportieren / importieren, wechseln Sie zur Seite <Werkeinstellungen>. Die Seite mit den Wartungsfunktionen befindet sich unter: System > Werkeinstellungen. Sie können Konfigurationsdateien an selbst gewählten Speicherorten speichern. Zum Wiederherstellen von Konfigurationen können Sie diese auf die IP-Kamera hochladen. -
Seite 21: Einstellungen Geutebrück Software
Zurück zum G-Cam/EWPC-5240, G-Cam/EWPC-5250 Installationsanleitung Inhaltsverzeichnis 8. Einstellungen GEUTEBRÜCK Software Achtung: Für eine korrekte Installation der IP-Kameras muss die GEUTEBRÜCK- Software folgenden Versionsstand haben: G-Core Version 6.1 mit G-Cam/E5 Plugin Ältere Versionen sollten aktualisiert werden. Download von: www.geutebrueck.com 8.1 Integration einer IP-Kamera in G-Set Achtung: Für eine korrekte Installation von IP-Kameras in G-Set muss eine Option... - Seite 22 G-Cam/EWPC-5240, G-Cam/EWPC-5250 Installationsanleitung Zurück zum Inhaltsverzeichnis Der Dialog zeigt die fünf Registerkarten Options [Optionen], Dongles, Request new options [Neue Optionen anfordern] und Failed requests [Fehlgeschlagene Anforderungen] SoftDongle. Request new options [Neue Optionen anfordern]...
- Seite 23 Zurück zum Inhaltsverzeichnis G-Cam/EWPC-5240, G-Cam/EWPC-5250 Installationsanleitung Mit diesem Dialog können neue Optionen angefordert werden. Mit einem Klick auf den Dongle, dem die neuen Optionen zugewiesen werden sollen, erscheint in dem Feld Follow this link to purchase new options [Diese Verknüpfung aufrufen, um neue Optionen anzufordern] eine URL.
- Seite 24 Zurück zum Inhaltsverzeichnis G-Cam/EWPC-5240, G-Cam/EWPC-5250 Installationsanleitung Schritt 2: Medienkanäle aktivieren und konfigurieren. Ein Linksklick auf den Media channel wizard [Medienkanalassistent] und den Reiter Cameras öffnet das nachfolgende Fenster: Links im Kamerabaum werden alle erkannten Kameras im Netzwerk angezeigt. Markieren Sie die zu konfigurierende Kamera durch Klick auf das Kontrollkästchen.
- Seite 25 Zurück zum Inhaltsverzeichnis G-Cam/EWPC-5240, G-Cam/EWPC-5250 Installationsanleitung Linksklick auf den Reiter Media channels [Medienkanäle] öffnet das Konfigurationsfenster. Wählen Sie im Kamerabaum durch Mausklick die gewünschte Kamera aus. In den Menüs können die gewünschten Einstellungen für Permanente Aufzeichnung und Live Stream der Kamera ausgewählt werden.
- Seite 26 Zurück zum Inhaltsverzeichnis G-Cam/EWPC-5240, G-Cam/EWPC-5250 Installationsanleitung Mit Klick auf den Übertragen-Button auf der Menü- und Symbolleiste übertragen Sie Ihre Einstellungen an den gewählten Server. Abschließend können Sie mit Klick auf Hardware überprüfen, ob die Kameras im Netz vorhanden sind und die Medienkanäle richtig parametriert sind.
- Seite 27 Zurück zum Inhaltsverzeichnis G-Cam/EWPC-5240, G-Cam/EWPC-5250 Installationsanleitung Die Plugin-Auswahlliste erscheint: 4. Plugin auswählen (hier: <G-Cam/E5 IPC>), 5. Klick auf „Add“ oder Doppelklick auf das Plugin Beachten Sie bitte, dass E5-Kameras ausschließlich mit diesem Plugin funktionieren. Evtl. vorhandene E4-Modelle müssen auch weiterhin mit dem E4-Plugin angelegt werden.
- Seite 28 Zurück zum Inhaltsverzeichnis G-Cam/EWPC-5240, G-Cam/EWPC-5250 Installationsanleitung Öffnen Sie nun mit einem Klick auf „Medienkanäle“ das entsprechende Dialogfenster. Mit einem Rechtsklick auf „Medienkanal Liste“ öffnet sich das Fenster „Modulkanäle“. Wählen Sie den gewünschten Kanal aus und klicken Sie auf „Hinzufügen“ und „Schließen“, oder doppelklicken sie auf den gewünschten Kanal.
- Seite 29 Zurück zum Inhaltsverzeichnis G-Cam/EWPC-5240, G-Cam/EWPC-5250 Installationsanleitung Wichtig: Damit Ihre Einstellungen/Änderungen wirksam werden, müssen diese an den Server übertragen werden. Mit Klick auf den Übertragen-Button auf der Menü- und Symbolleiste übertragen Sie Ihre Einstellungen an den gewählten Server.
-
Seite 30: Tech-Support Information
Zurück zum G-Cam/EWPC-5240, G-Cam/EWPC-5250 Installationsanleitung Inhaltsverzeichnis Tech-Support Information Dieses Kapitel zeigt Ihnen, wie Sie frühere Installationen des Viewers löschen und wie Sie die Internet-Sicherheit einstellen. 9.1 Einen existierenden Viewer löschen Wenn Sie DC Viewer schon vor längerer Zeit auf Ihrem Computer installiert haben, sollten Sie die vorhandene DC Viewer-Version deinstallieren, bevor Sie auf die IP-Kamera zugreifen. - Seite 31 Zurück zum G-Cam/EWPC-5240, G-Cam/EWPC-5250 Installationsanleitung Inhaltsverzeichnis Technische Daten G-Cam/EWPC-5240 Megapixel 5 MP Effective pixels 2720 x 1976 Bildaufnehmer (Chip) 1/2.7" Progressive CMOS Pixelgröße 2 µm Bildformat 112:81 / 16:9 / 4:3 Objektiv f = 2.7 mm bis 12 mm (Motorisiertes Vario)
- Seite 32 Zurück zum G-Cam/EWPC-5240, G-Cam/EWPC-5250 Installationsanleitung Inhaltsverzeichnis Spannungsversorgung 12 VDC/24 VAC oder PoE (IEEE 802.3af class 0 kompatibel) Leistungsaufnahme ca. PoE = 12.95W, DC12V = 16.76W, AC24V = 14.08W Schutzklasse / Vandalismus-geschützt IP 66 / IK10 (außer Frontglas) Zertifizierungen FCC, CE, RoHS, LVD...
- Seite 33 Zurück zum G-Cam/EWPC-5240, G-Cam/EWPC-5250 Installationsanleitung Inhaltsverzeichnis Technische Daten G-Cam/EWPC-5250 Megapixel 5 MP Effective pixels 2720 x 1976 Bildaufnehmer (Chip) 1/2.7" Progressive CMOS Pixelgröße 2 µm Bildformat 112:81 / 16:9 / 4:3 Objektiv f = 9 mm bis 22 mm (variabel)
- Seite 34 Zurück zum G-Cam/EWPC-5240, G-Cam/EWPC-5250 Installationsanleitung Inhaltsverzeichnis Spannungsversorgung 12 VDC/24 VAC oder PoE (IEEE 802.3af class 0 kompatibel) Leistungsaufnahme Ca. 13,7 W @ 12 VDC/24 VAC Schutzklasse / Vandalismus-geschützt IP 66 / IK10 (außer Frontglas) Zertifizierungen FCC, CE, RoHS, LVD Lizenzierung...
- Seite 35 Technische Änderungen vorbehalten. GEUTEBRÜCK GmbH Im Nassen 7-9 | D-53578 Windhagen | Tel. +49 (0)2645 13 7-0 | F ax-999| E-mail: info@geutebrueck.com | Web: www.geutebrueck.com...
- Seite 36 G-Cam/EWPC-5240 G-Cam/EWPC-5250 5 MP Bullet IP-Kamera Installation Manual...
- Seite 37 Back to the G-Cam/EWPC-5240, G-Cam/EWPC-5250 Installation Manual table of contents Preface The information given in this manual was current when published. The company reserves the right to revise and improve its products. All specifications are subject to change without notice.
- Seite 38 Back to the G-Cam/EWPC-5240, G-Cam/EWPC-5250 Installation Manual table of contents Regulation This device complies with Part 15 of the FCC Rules. Operation is subject to the following two conditions: (1) This device may not cause harmful interference, and (2) this device must accept any interference received, including interference that may cause undesired operation.
-
Seite 39: Warnings And Cautions
Back to the G-Cam/EWPC-5240, G-Cam/EWPC-5250 Installation Manual table of contents Warnings and Cautions Handle the camera carefully Do not abuse the camera. Avoid striking, shaking, etc. The camera could be damaged by improper handing or storage. Installing electricity wiring carefully ... - Seite 40 Configuration Files Export / Import ..................21 Commissioning in GEUTEBRÜCK Software ..............22 Commissioning of IP Cameras in G-Set ............... 22 Tech Support Information ....................31 Delete the Existing DCViewer ..................31 Technical specifications G-Cam/EWPC-5240 ................32 Technical specifications G-Cam/EWPC-5250 ................34 ...
-
Seite 41: Overview
Back to the G-Cam/EWPC-5240, G-Cam/EWPC-5250 Installation Manual table of contents Overview Cam/EWPC-52x0 Bullet IP Camera is capable of supporting up to 5M@30fps + 720p@27fps video streaming. Moreover, combined with latest HDR technology and low-light technology, E5 Series is able to deliver high quality images in the dark, low light condition. -
Seite 42: Package Contents
Back to the G-Cam/EWPC-5240, G-Cam/EWPC-5250 Installation Manual table of contents Package Contents Please check the package containing the following items listed below. Bullet IP Camera (cable included) 5-Pin Alarm Terminal Block 2-Pin Power Terminal Block Plastic Screw Anchor (x5) M5 Standard Screw (x1) -
Seite 43: Dimensions
Back to the G-Cam/EWPC-5240, G-Cam/EWPC-5250 Installation Manual table of contents Dimensions The dimensions of the camera are shown below. -
Seite 44: Microsd Card Slot / Factory Default Button
Back to the G-Cam/EWPC-5240, G-Cam/EWPC-5250 Installation Manual table of contents microSD Card Slot / Factory Default Button The camera’s microSD card slot and factory default button are inside the front housing. If users need to use them, the front housing must be opened. Follow the steps below to reach microSD card slot and factory default button. -
Seite 45: Camera Cabling
Back to the G-Cam/EWPC-5240, G-Cam/EWPC-5250 Installation Manual table of contents Camera Cabling Before users connect cables, make sure that all cables and the power adaptor are placed in dry and well-waterproofed environments, e.g. waterproof boxes. The purpose is to prevent moisture accumulation inside the camera and moisture penetration into cables, which might lead to camera breakdown. -
Seite 46: Connect Power
Back to the G-Cam/EWPC-5240, G-Cam/EWPC-5250 Installation Manual table of contents Connect Power For power connection, please use an AC 24V / DC 12V adaptor and connect it to the 2-pin terminal block of the All-in-One cable and the power outlet. -
Seite 47: Waterproof Cable Connectors
Back to the G-Cam/EWPC-5240, G-Cam/EWPC-5250 Installation Manual table of contents Waterproof Cable Connectors Follow the steps below to waterproof the connectors of the All-in-One cable. Step 1: Connect the required devices to the All-in- One cable and coat the joints with silicone gel. -
Seite 48: Installation
Back to the G-Cam/EWPC-5240, G-Cam/EWPC-5250 Installation Manual table of contents Installation Please read the instructions provided in this chapter thoroughly before installing the camera. NOTE: This camera must be installed by qualified personnel and the installation should conform to all local codes. - Seite 49 Back to the G-Cam/EWPC-5240, G-Cam/EWPC-5250 Installation Manual table of contents Step 3: Thread the All-in-One cable of the camera through the cable entry hole. Refer to chapter Camera Cabling for cable connections. Step 4: Match the two screw holes of the camera with the plastic screw anchors at the installation location.
-
Seite 50: Desiccant Application
Back to the G-Cam/EWPC-5240, G-Cam/EWPC-5250 Installation Manual table of contents Desiccant Application Desiccants are to prevent moisture from condensing on the glass cover of the camera. Desiccants should be replaced every time when opening the front cover. Follow the steps shown in this guide to place / replace desiccants. -
Seite 51: System Requirements
Back to the G-Cam/EWPC-5240, G-Cam/EWPC-5250 Installation Manual table of contents System Requirements To perform the camera via web browser, please ensure the PC is in good network connection, and meet system requirements as described below. Items System Requirement Minimum : 1. -
Seite 52: Access Camera
Back to the G-Cam/EWPC-5240, G-Cam/EWPC-5250 Installation Manual table of contents Access Camera For initial access to the IP camera, users can search the camera through the DeviceSearch.zip installer program. Download: Accessing the Camera by Device Search Software Step 1: Double click on the program Device Search.exe. - Seite 53 Back to the G-Cam/EWPC-5240, G-Cam/EWPC-5250 Installation Manual table of contents Step 8: A prompt window requesting for default username and password will appear. Enter the default username and password shown below to login to the camera. Login ID Password root admin NOTE: ID and password are case sensitive.
- Seite 54 Back to the G-Cam/EWPC-5240, G-Cam/EWPC-5250 Installation Manual table of contents Once the Viewer is successfully installed, the Home page of the IP camera will be displayed as the figure below. Motorized Lens Models Zoom and Focus Adjustment The live image will be displayed on the Home page when the camera is successfully accessed.
-
Seite 55: Setup Video Resolution
Back to the G-Cam/EWPC-5240, G-Cam/EWPC-5250 Installation Manual table of contents Setup Video Resolution Users can setup video resolution on Video Configuration page of the user- friendly browser-based configuration interface. Video Configuration can be found under: Streaming> Video Configuration. The default values of video resolution are as below. -
Seite 56: Configuration Files Export / Import
Back to the G-Cam/EWPC-5240, G-Cam/EWPC-5250 Installation Manual table of contents Configuration Files Export / Import To export / import configuration files, users can access the Maintenance page on the user-friendly browser-based configuration interface. The Maintenance setting can be found under this path: System> Maintenance. -
Seite 57: Commissioning In Geutebrück Software
Back to the G-Cam/EWPC-5240, G-Cam/EWPC-5250 Installation Manual table of contents 8. Commissioning in GEUTEBRÜCK Software Attention: To install the IP cameras correctly, the software must be: G-Core version 6.1 with G-Cam/E5 plugin Older versions should be updated. Download from: www.geutebrueck.com 8.1 Commissioning of IP Cameras in G-Set... - Seite 58 Back to the G-Cam/EWPC-5240, G-Cam/EWPC-5250 Installation Manual table of contents The dialog shows the four tabs Options, Dongles, Request new options, Failed requests and SoftDongle. Request new options Request new options...
- Seite 59 Back to the G-Cam/EWPC-5240, G-Cam/EWPC-5250 Installation Manual table of contents New options can be requested using this dialog. When you click the dongle that will be assigned the new options, an URL appears in the field Follow this link to purchase new options.
- Seite 60 Back to the G-Cam/EWPC-5240, G-Cam/EWPC-5250 Installation Manual table of contents Step 2: Activation and configuration of Media channels. Left mouse click at Media channel wizard and click on tab Cameras opens the following window: The Media Channel Wizard automatically searches for existing network cameras and displays them in the first column.
- Seite 61 Back to the G-Cam/EWPC-5240, G-Cam/EWPC-5250 Installation Manual table of contents Left click on the tab Media channels opens the configuration window. At left column (camera tree) please choose the desired camera. In the camera menus you can make the desired settings for Permanent Recording and Live Stream.
- Seite 62 Back to the G-Cam/EWPC-5240, G-Cam/EWPC-5250 Installation Manual table of contents You can find the transfer button on the command bar of G-Set. Finally, with click at Hardware and Media Channels, you can check whether the camera is present in the network and the media channels are configured correctly.
- Seite 63 Back to the G-Cam/EWPC-5240, G-Cam/EWPC-5250 Installation Manual table of contents The Plugin list appears: 4. choose a plugin (here: <G-Cam/E5 IPC>), 5. click on „Add“ or doubleclick onto the plugin Please note, that E5 cameras exclusively run with this plugin.
- Seite 64 Back to the G-Cam/EWPC-5240, G-Cam/EWPC-5250 Installation Manual table of contents Open the the dialog window with a click on „Media channels“. With a right click on „Media channel list“ the window „Module channels“ opens. Choose the desired channel and click on „Add“ and „Close“, or doubleclick onto the desired channel.
- Seite 65 Back to the G-Cam/EWPC-5240, G-Cam/EWPC-5250 Installation Manual table of contents IMPORTANT: For settings to take effect, they must be sent to the server by clicking the icon You can find the transfer button on the command bar of G-Set.
-
Seite 66: Tech Support Information
Back to the G-Cam/EWPC-5240, G-Cam/EWPC-5250 Installation Manual table of contents Tech Support Information This chapter will introduce how to delete previously-installed DCViewer in the PC and how to setup the Internet security. Delete the Existing DCViewer For users who have installed the DCViewer in the PC previously, please first remove the existing DCViewer from the PC before accessing to the IP camera. - Seite 67 Back to the G-Cam/EWPC-5240, G-Cam/EWPC-5250 Installation Manual table of contents Technical data G-Cam/EWPC-5240 Mega pixel 5 MP Effective pixels 2720 x 1976 Image sensor 1/2.7" Progressive CMOS Pixel size 2 µm Picture Format 112:81 / 16:9 / 4:3 Lens f = 2.7 mm to 12 mm (Motorized Vario)
- Seite 68 Back to the G-Cam/EWPC-5240, G-Cam/EWPC-5250 Installation Manual table of contents Power consumption Approx. PoE = 12.95W, DC12V = 16.76W, AC24V = 14.08W IP class / vandalism proof IP 66 / IK10 (except front glass) Certification FCC, CE, RoHS, LVD Licensing...
- Seite 69 Back to the G-Cam/EWPC-5240, G-Cam/EWPC-5250 Installation Manual table of contents Technical data G-Cam/EWPC-5250 Mega pixel 5 MP Effective pixels 2720 x 1976 Image sensor 1/2.7" Progressive CMOS Pixel size 2 µm Picture Format 112:81 / 16:9 / 4:3 Lens f = 9 mm to 22 mm (Motorized Vario)
- Seite 70 Back to the G-Cam/EWPC-5240, G-Cam/EWPC-5250 Installation Manual table of contents Voltage supply 12 VDC/24 VAC or PoE (IEEE 802.3af class 0 compatible) Power consumption Approx. 13.7 W @ 12 VDC/24 VAC IP class / vandalism proof IP 66 / IK10 (except front glass)
- Seite 71 Technical alterations reserved. GEUTEBRÜCK GmbH Im Nassen 7-9 | D-53578 Windhagen | Tel. +49 (0)2645 13 7-0 | F ax-999| E-mail: info@geutebrueck.com | Web: www.geutebrueck.com...