CONTENS YABER Lifetime Professional Support Tips Package List Projector Specifications Projector Overview Remote Control Installation 1. Installation Method 2. Install on the Ceiling Starting Projector Image Adjustment 1. Installation Method 2. Keystone Correction Setting Up The Projector 1. Select The Insert Signal Source 2.
Seite 3
5.3 Digital Zoom 6. System Update 7. Other Setting 8. About Signal Lines Connection 1. Connect USB Disk 2. Connect the Devices via the HDMI ports 3. Connect to the DVD Player 4. Connect to the Sound bar/Speaker Safe Shutdown Warranty...
YABER Lifetime Professional Support Dear customer, Thank you very much for supporting YABER! Please read this manual thoroughly before using the projector. If you have any issues, email your order number and the problem to support@yabertech.com We will provide a fast solution in 24 hours.
Projector Specifications Model No. Ace K1 Auto/Manual Vertical& Native Resolution 1920*1080P Keystone Correction Horizontal Display Technology Light Source Color Game 55% NTSC Aspect Ratio 4:3/16:9 Recommended Minimum Projection 3.8-21.9ft 3.8ft Projection Distance Distance Power Voltage AC100-240V Projector Weight 8.6lb HDMI*2/USB*2/3.5mm...
Seite 7
Rubber Pads Heat-Sink Window Bottom Label Height Adjusting Screw Power Cord Port Automatic FocusSignal Receiver For Automatic Focus IR Window Infrared signal receiver Projector Lens Optical coated glass lens AV Port Audio input Headphone Jack 3.5mm Headphone Output Air Inlet Prevent the projector from overheating USB Ports USB 1 port / USB 2 port...
Seite 8
Power Menu Source Back Up Key Down Key Left Key Right Key Power Turn on/off the power Menu Enter the menu interface Enter the signal source selection Source interface Back Return to the previous menu Confirm the option Up Key Down Key Used to adjust the parameter of the projector in the menu mode...
Remote Control Power Source Homepape Arrow keys Confirmation key Menu Back Auto focus/keystone Volume + Focus + Volume - Focus - Mute Power Turn on/off the power Source Select the input signal source Used to adjust the parameter of the projector in the menu Arrow keys mode Press once: Operate picture and sound settings in AV or HDMI...
Note: 1. Install 2 pieces of AAA batteries into the remote controller before using it. Do not combine new batteries with old ones in remote controller, which can cause operation failure due to insufficient power supply. 2. When using the remote controller, please make sure that the signal transmitter of the remote controller aims at infrared signal receiver of the projector.
Aspect Ratio: 16:9 Distance (ft.) Screen Size 35" 50" 70" 10.9 100" 13.1 120" 16.4 150" 21.9 200" The recommended projection distance is about 10.9ft,the shortest projection distance is 3.8ft. The image size depends on the distance between projector and screen, there may be 3% deviation among above listed data.
Starting Projector 1. Press the power key on the remote controller or projector, the indicator light will turn blue. 2. Use the focus function of the projector to get the best image performance.(If it is still blurry, please try to adjust the projection distance.) 3.
2. Keystone Correction You can use the automatic keystone correction or digital 4D keystone correction of the projector to change the image to be rectangle(vertical and horizontal). Detail please refer the page 17 of this manual. Setting Up The Projector The projector's home page is as follow.
External Device 1. The Ace K1 upgraded projector supports U disk to directly play PPT, Word, Excel files. 2. If you enter from the [Video] menu, you can only play the video, The same as other 3 options.
Seite 15
Menu Function Select play mode (directory play/single cycle/directory loop) Switch to the previous video Fast Backward,rewinds the video back quickly while playing it. The rewinding speed ranges from 2X to 32X Play or pause the current video Fast Forward, pushes the video to move forward quickly while playing it. The forward speed ranges from 2X to 32X Switch to the next video Select all playlists in the current folder...
Menu Content Mode Function Brightness Energy Saving Modify the picture User/Standard/Vivid/ Picture Mode parameters in the Sport/Movie/Game Saturation range 0-100 Sharpness Balance User/Standard/Vivid/ Modify the sound Bass Sound Style Sports/Movie/Music/ parameters in the News range 0-100 Treble 2.3 Music Play Interface Menu Function Select play mode (directory play/single cycle/directory loop)
2.4 Picture Play Interface Menu Function Switch to the previous picture Play or pause the current picture Switch to the next picture Zoom in image Zoom out image Flip picture 90°to the left Flip picture 90°to the right Set the picture information EN 15...
1. Go to home page -- Select the [ ] menu -- Select the [ WiFi ] menu-- Open the WiFi function -- Select your home WiFi from the list -- Connect the Ace K1 projector to your home WiFi.
2. Select the [ Settings ] menu on your Android device -- Select the [ Screen mirroring ] function -- Select your Miracast receiver named [ Ace K1-AnCast-XXXX ]-- your Android device screen will be displayed on the projection screen after 3 seconds.
Note: 1. The Ace K1 projector is compatible with the Bluetooth headsets, Bluetooth speakers and Airpods, but not the Bluetooth keyboards or Bluetooth phones. 2. If you have any question, please feel free to email YABER via: support@yabertech.com.
1. Front projection Ceiling mount 2. Rear projection Ceiling mount 3. Front projection Desk mount 4. Rear projection Desk mount 5.2 Automatic Keystone & 4-Point Keystone 5.2.1 Automatic Keystone Correction When you start the projector,please wait patiently for 2-3 seconds the projector will adjust keystone automatically.if the image is not rectangle,you can Use the digital 4D keystone correction to change the image to be rectangle.
Back : Press the key on the remote controller to back to previous page. Reset : Press the key on the remote controller to restore the original parameters. 5.3 Digital Zoom Step 1: Select the [ Digital Zoom ] option and press the OK button on the remote controller or projector to enter the submenu.
7. Other Setting Menu Function Boot Source Option Off/HDMI1/HDMI2/AV Power On Option Direct/Standby Language Setting Set up the language Scheduled Shutdown Off/10min/20min/30min/60min/120min About the Direct/Standby Power On Option Direct Mode: When the projector is powered on, the projector will be automatically turned Standby Mode: When the projector is powered on, you need to press the button on the remote controller or projector to turn on the projector.
Signal Lines Connection YABER Ace K1 projector has 6 interfaces, HDMI ports*2/ USB ports*2/ 3.5mm headphone output/ AV in. Please select the correct connecting port to connect your device (PC, Phone, DVD Player, Sound bar, USB, PS4 etc.) HDMI 1H DMI 2I 1.
3. Cover the lens and store the projector in a cool and dry place. Warranty Thank you so much for your purchase and support! We provide 3-year warranty for Ace K1 projector. If you have any questions, please feel free to contact us via: purchased from Amazon: support@yabertech.com...
FCC STATEMENT : This device complies with Part 15 of the FCC Rules. Operation is subject to the following two conditions: (1) This device may not cause harmful interference, and (2) This device must accept any interference received, including interference that may cause undesired operation.
FCC Radiation Exposure Statement: This equipment complies with FCC radiation exposure limits set forth for an uncontrolled environment. This equipment should be installed and operated with minimum distance 20cm between the radiator & your body. Correct Disposal of this product This marking indicates that this product should not be disposed with other household wastes throughout the EU.
Seite 28
INHALT YABER Lebenslanger Professioneller Support Tipps Paketliste Projektor Spezifikationen Projektor Übersicht Fernbedienung Installation 1. Installations Methode 2. An der Decke installieren Projektor Starten Bildanpassung 1. Fokuseinstellung 2. Keystone-Korrektur Einrichten des Projektors 1. Wählen Sie die Insert-Signalquelle 2. USB-Datenträger-Eingabemodus 2.1 Wiedergabe von Video/Musik/Foto/Office Suite im USB-Festplatten-Einfügungsmodus 2.2 Play-Schnittstelle...
Seite 29
5.3 Digitaler Zoom 6. Systemupda 7. Andere Einstellung 8. Über Signal Lines Connection 1. USB-Datenträger anschließen 2. Verbinden Sie die Geräte über die HDMI-Anschlüsse 3. An den DVD-Player anschließen 4. Verbinden Sie sich mit der Soundbar/dem Lautsprecher Sicheres Herunterfahren Garantie...
YABER Lebenslanger Professioneller Support Lieber Kunde, Vielen Dank, dass Sie sich für YABER entschieden haben! Bitte lesen Sie dieses Handbuch sorgfältig durch, bevor Sie den Projektor verwenden. Bei Problemen senden Sie bitte Ihre Bestellnummer und das Problem per E-Mail an support@ yabertech.com.
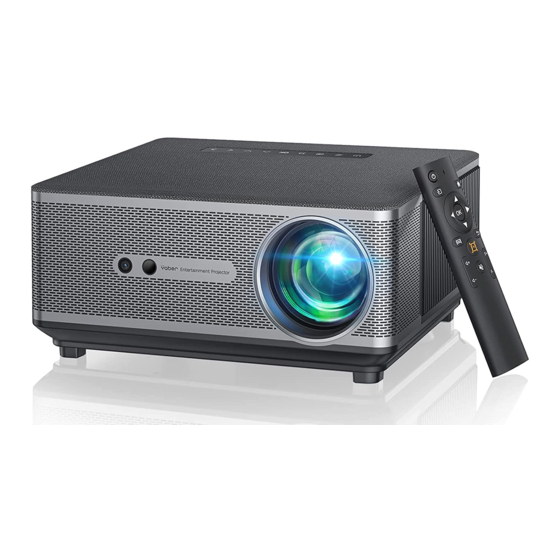
Projektor Spezifikationen Modell Nr. Ace K1 Automatisch/Manuell Native Auflösung 1920*1080P Keystone-Korrektur Vertikal Horizontal Display-Technologie Lichtquelle Farbspiel 55% NTSC Seitenverhältnis 4:3/16:9 Empfohlener Minimaler 3.8-21.9ft 3.8ft Projektionsabstand Projektionsabstand Netzspannung AC100-240V Projektorgewicht 8.61b HDMI*2/USB*2/3.5mm Bilddatei JPGZJPEG/ BMP/PNG Schnittstellen Kopfhöreranschluss/AV Projektionsmethode Vorn/hinten am Schreibtisch, Vorne/hinten an der Decke...
Seite 33
Gummipads Kühlkörperfenster Unteres Etikett Höhenverstellung Schrauben Netzkabelanschluss Automatischer FocusSignal-Empfänger Für den automatischen Fokus IR-Fenster Infrarot-Signalempfänger Projektorobjektiv Optisch beschichtete Glaslinse AV-Anschluss Audioeingang Kopfhöreranschluss 3,5-mm-Kopfhörerausgang Vermeiden Sie eine Überhitzung des Lufteinlass Projektors USB-Anschlüsse USB 1-Anschluss / USB 2-Anschluss HDMI-Anschlüsse HDMI 1-Eingang / HDMI 2-Eingang Sprecher Stereo 15W Vermeiden Sie eine Überhitzung des...
Seite 34
Leistung Speisekarte Ressource Zurück Hoch Taste Runter Taste Linke Taste Rechts Taste Leistung Schalten Sie den Strom ein/aus Speisekarte Rufen Sie die Menüoberfläche auf Rufen Sie das Fenster zur Auswahl der Ressource Signalquelle auf Zurück Zurück zum vorherigen Menü Bestätigen Sie die Option Hoch Taste Runter Taste Schutzpolster/zur Installation der...
Fernbedienung Leistung Ressource Homepape Pfeiltasten Bestätigungstaste Speisekarte Zurück Autofokus/Keystone Volumen + Fokus + Volumen - Fokus - Stumm Leistung Schalten Sie den Strom ein/aus Ressource Wählen Sie die Eingangssignalquelle Wird verwendet, um die Parameter des Projektors im Pfeiltasten Menümodus einzustellen Einmal drücken: Bild- und Toneinstellungen im AV- oder Speisekarte HDMI-Modus vornehmen Zweimal hintereinander drücken:...
Notiz: 1. Bitte legen Sie vor der Verwendung 2 AAA-Batterien in die Fernbedienung ein. Verwenden Sie keine alten und neuen Batterien in der Fernbedienung, da dies zu Betriebsausfällen aufgrund unzureichender Stromversorgung führen kann. 2. Stellen Sie bei Verwendung der Fernbedienung sicher, dass der Signalsender der Fernbedienung auf den Infrarotsignalempfänger des Projektors gerichtet ist.
Seitenverhältnis: 16:9 Distanz (ft.) Bildschirmgröße 35" 50" 70" 10.9 100" 13.1 120" 16.4 150" 21.9 200" Der empfohlene Projektionsabstand beträgt etwa 10,9 Fuß, der kürzeste Projektionsabstand beträgt 3,8 Fuß. Die Bildgröße hängt von der Entfernung zwischen Projektor und Leinwand ab, es kann zu Abweichungen von 3 % zwischen den oben aufgeführten Daten kommen. Unterschiedliche Einstellungen bewirken unterschiedliche Entfernungen.
Projektor Starten 1. Drücken Sie die Ein/Aus-Taste auf der Fernbedienung oder am Projektor, die Kontrollleuchte leuchtet blau. 2. Verwenden Sie die Fokusfunktion des Projektors, um die beste Bildleistung zu erzielen. (Wenn es immer noch verschwommen ist, versuchen Sie bitte, den Projektionsabstand anzupassen.) 3.
2. Keystone-Korrektur Sie können die automatische Keystone-Korrektur oder die digitale 4D-Keystone-Korrektur des Projektors verwenden, um das Bild in ein Rechteck (vertikal und horizontal) zu ändern. Einzelheiten finden Sie auf Seite 17 dieses Handbuchs. Einrichten des Projektors Die Homepage des Projektors ist wie folgt. 1.
2. USB-Datenträger-Eingabemodus 2.1 Wiedergabe von Video/Musik/Foto/Office Suite im USB-Festplatten- Einfügungsmodus 1. Legen Sie den USB-Datenträger ein, das [USB]-Symbol auf der Startseite wird weiß. 2. Wählen Sie die Option [Video/Musik/Foto/Office-Suite]. 3. Wählen Sie die gewünschte Datei (in einem Ordner oder Unterordner) auf dem USB- Laufwerk aus und drücken Sie dann die Taste [OK], um sie abzuspielen.
Menu Funktion Wiedergabemodus auswählen (Verzeichniswiedergabe/Einzelzyklus/ Verzeichnisschleife) Zum vorherigen Video springen Schneller Rücklauf, schnelles Zurückspulen des Videos während der Wiedergabe. Die Rückspulgeschwindigkeit reicht von 2X bis 32X Spielen Sie das aktuelle Video ab oder halten Sie es an Schneller Vorlauf, schiebt das Video während der Wiedergabe in den schnellen Vorlauf.
Speisekarte Inhalt Modus Funktion Helligkeit Energie sparen Ändern Sie die Benutzer/Standard/ Bildmodus Bildparameter im Lebhaft/ Sättigung Bereich 0-100 Schärfe Gleichgewicht Ändern Sie die Bass Klangstil Sport/Film/Spiel Klangparameter im Bereich 0-100 Verdreifachen 2.3 Musikwiedergabe-Schnittstelle Speisekarte Funktion Wiedergabemodus auswählen (Verzeichniswiedergabe/Einzelzyklus/ Verzeichnisschleife) Zum vorherigen Video springen Schneller Rücklauf, schnelles Zurückspulen des Videos während der Wiedergabe.
2.4 Picture Play-Schnittstelle Menu Funktion Wechseln Sie zur vorherigen Bild Spielen oder pausieren Sie die aktuelle Bild Zur nächsten Bild wechseln Bild vergrößern Bild verkleinern Bild um 90° nach links kippen Bild um 90° nach rechts kippen Stellen Sie die Bildinformationen ein DE 39...
3.Einige Mobilgeräte unterstützen möglicherweise aufgrund der Kompatibilität keine Bildschirmspiegelung. 4. Bei Fragen senden Sie bitte eine E-Mail an YABER über support@yabertech.com. 3.1 iOS Cast (für iOS-Geräte) 1. Gehen Sie zur Startseite - Wählen Sie das Menü [ ] - Wählen Sie das Menü [ WiFi ] - Öffnen Sie die WiFi-Funktion - Wählen Sie Ihr Heim-WiFi aus der Liste - Verbinden Sie den Ace KI...
[Bildschirmspiegelung] —Wählen Sie Ihren Miracast-Empfänger mit dem Namen [Ace Kl- AnCast-XXXX]—der Bildschirm Ihres Android-Geräts wird nach 3 auf der Projektionsfläche angezeigt Sekunden. Wireless Projection Wireless Projection Available devices Available devices Ace K1-Cast-XXXX Ace K1-Cast-XXXX Connected HELPC ANCEL CANCELD ISCONNECT 3. Tippen Sie auf Ihrem Android-Gerät auf [ Einstellungen ] - [ WLAN-Anzeige ] - Schalten Sie [ Wi-Fi ] ein, verbinden Sie Ihr Heim-WLAN.
Notic: 1. Der Ace KI-Projektor ist mit Bluetooth-Headsets, Bluetooth-Lautsprechern und Airpods kompatibel, jedoch nicht mit Bluetooth-Tastaturen oder Bluetooth-Telefonen. 2. Wenn Sie Fragen haben, senden Sie bitte eine E-Mail an YABER unter: support@yabertech. com. 5. Projektorbildeinstellung 5.1 Projektionsmodus DE 42...
1. Frontprojektion Deckenhalterung 2. Rückprojektions-Deckenhalterung 3. Frontprojektion Tischhalterung 4. Rückprojektions Tischhalterung 5.2 Automatische Trapezkorrektur und 4-Punkt-Trapezkorrektur 5.2.1 Automatische Trapezkorrektur Warten Sie nach dem Einschalten des Projektors 2-3 Sekunden. Der Projektor passt die Trapezkorrektur automatisch an. Wenn das Bild nicht rechteckig ist, können Sie die digitale 4D-Keystone-Korrektur verwenden, um das Bild in ein Rechteck umzuwandeln.
Zurück: Drücken Sie die Taste auf der Fernbedienung, um zur vorherigen Seite zurückzukehren. Zurücksetzen: Drücken Sie die Taste auf der Fernbedienung, um die ursprünglichen Parameter wiederherzustellen. 5.3 Digitaler Zoom Schritt 1: Wählen Sie die Option [ Digital Zoom ] und drücken Sie die OK-Taste auf der Fernbedienung oder dem Projektor, um das Untermenü...
7. Andere Einstellung Speisekarte Funktion Boot-Quellenoption Von/HDMI/HDMI 2/AV Einschaltoption Direkt/Standby Spracheinstellungen Stellen Sie die Sprache ein Geplante Abschaltung 0ff/10min/20min/30min/60min/120 nin About the Direct/Standby Power On Option Direktmodus: Wenn der Projektor eingeschaltet wird, wird der Projektor automatisch eingeschaltet. Standby-Modus: Wenn der Projektor eingeschaltet ist, müssen Sie die Taste auf der Fernbedienung oder dem Projektor drücken, um den Projektor einzuschalten.
Signal Lines Connection Der YABER Ace KI Projektor verfügt über 6 Schnittstellen, HDMI-Anschlüsse*2/ USB- Anschlüsse*2/ 3,5mm Kopfhörerausgang/ AV-Eingang. Bitte wählen Sie den richtigen Anschluss, um Ihr Gerät anzuschließen (PC, Telefon, DVD Player, Soundbar, USB, PS4 etc.) HDMI 1H DMI 2I 1.
Video USBH DMI 1H DMI 2I Left AV port Right Oder mit dem mitgelieferten HDMI-Kabel an den DVD-Player anschließen. USBH DMI 1 HDMI 2I 4. Verbinden Sie sich mit der Soundbar/dem Lautsprecher Wenn Ihr Lautsprecher über einen AUX-Anschluss verfügt, verwenden Sie bitte Ihr 3,5-mm- Audiokabel, verbinden Sie den Projektor und Ihren Lautsprecher wie auf dem Bild gezeigt, rufen Sie die Startseite auf, um [ AV ] als Signalquelle auszuwählen.
Seite 52
CONTENTS Assistance professionnelle à vie YABER Des astuces Liste des packages Spécifications du projecteur Présentation du projecteur Fernbedienung Installation 1. Méthode d'installation 2. Installer au plafond Démarrage du projecteur Ajustement de l'image 1. Réglage de la mise au point 2. Correction trapézoïdale Configuration du projecteur 1.
Seite 53
5.3 Zoom numérique 6. Mise à jour du système 7. Autres réglages 8. À propos Connexion des lignes de signal 1. Connectez le disque USB 2. Connectez les appareils via les ports HDMI 3. Connectez-vous au lecteur DVD 4. Connectez-vous à la barre de son/haut-parleur Arrêt sécurisé...
Assistance professionnelle à vie YABER Cher client, Merci beaucoup de soutenir YABER ! Veuillez lire attentivement ce manuel avant d'utiliser le projecteur. Si vous rencontrez des problèmes, envoyez votre numéro de commande et le problème par e-mail à support@ yabertech.com Nous vous fournirons une solution rapide dans les 24 heures.
Liste des packages Projecteur Ace K1 Câble HDMI Câble AV 3-in-1 Télécommand Cordon d'alimentation Chiffon de nettoyage Couverture d'objectif Guide de démarrage rapide Carte de garantie FR 51...
Spécifications du projecteur Model No. Ace K1 Auto/Manuel Vertical et Résolution native 1920*1080P Correction trapézoïdale Horizontal Technologie d'affichage LCD Source de lumière Jeu de couleurs 55% NTSC Ratio d'aspect 4:3/16:9 Distance de projection Distance de projection 3.8-21.9ft 3.8ft recommandée minimale...
Seite 57
Tampons en Fenêtre du dissipateur caoutchouc de chaleur Étiquette inférieure Vis de réglage de la hauteur Port du cordon d'alimentation Récepteur de signal de mise au point Pour la mise au point automatique automatique Fenêtre infrarouge Récepteur de signal infrarouge Lentille du projecteur Lentille en verre à...
Seite 58
Démarrage/Veille Menu Source Retour Touche haut Touche vers le bas Touche gauche Clé droite Démarrage/Veille Allumer/éteindre l'alimentation Menu Entrez dans l'interface du menu Entrez dans l'interface de sélection de la source source du signal Retour Retourner au menu précédent Confirmez l'option Touche haut Touche vers le bas Utilisé...
Fernbedienung Démarrage/Veille Source Page d’accueil Touches directionnelles Clé de validation Menu Retour Mise au point automatique/distorsion trapézoïdale Focus + Volume + Volume - Focus - couper le son Démarrage/Veille Allumer/éteindre l'alimentation Source Sélectionnez la source du signal d'entrée Utilisé pour régler le paramètre du projecteur dans le mode Touches directionnelles menu Appuyez une fois : utilisez les paramètres d'image et de...
Noter: 1. Installez 2 piles AAA dans la télécommande avant de l'utiliser. Ne combinez pas de nouvelles piles avec des anciennes dans la télécommande, ce qui peut entraîner une panne de fonctionnement en raison d'une alimentation électrique insuffisante. 2. Lorsque vous utilisez la télécommande, assurez-vous que l'émetteur de signal de la télécommande vise le récepteur de signal infrarouge du projecteur.
Ratio d'aspect: 16:9 Distance (m.) Taille de l'écran 1.15 35" 1.68 50" 2.32 70" 100" 120" 150" 200" La distance de projection recommandée est d'environ 3,3 m, la distance de projection la plus courte est de 1,15 m. La taille de l'image dépend de la distance entre le projecteur et l'écran, il peut y avoir un écart de 3 % parmi les données énumérées ci-dessus.
Démarrage du projecteur 1.Appuyez sur la touche d'alimentation de la télécommande ou du projecteur, le voyant lumineux deviendra bleu. 2.Utilisez la fonction de mise au point du projecteur pour obtenir les meilleures performances d'image. (S'il est encore flou, veuillez essayer d'ajuster la distance de projection.) 3.Utilisez la fonction trapézoïdale du projecteur pour obtenir un écran de projection rectangulaire.
2. Correction trapézoïdale Vous pouvez utiliser la correction trapézoïdale automatique ou la correction trapézoïdale 4D numérique du projecteur pour changer l'image en rectangle (vertical et horizontal). Pour plus de détails, veuillez consulter la page xx de ce manuel. Configuration du projecteur La page d'accueil du projecteur est la suivante.
2. Mode d'entrée du disque USB 2.1 Lecture de vidéo/musique/photo/suite bureautique en mode d'insertion de disque USB 1.Insérez le disque USB, l'icône [USB] de la page d'accueil deviendra blanche. 2.Sélectionnez l'option [Vidéo/Musique/Photo/Suite Office]. 3.Sélectionnez le fichier souhaité (ou le dossier pour accéder au sous-dossier) sur le disque USB, puis appuyez sur le bouton [ OK ] pour le lire.
Seite 65
Menu Fonction Sélectionner le mode de lecture (lecture de répertoire/cycle unique/ boucle de répertoire) Passer à la vidéo précédente Retour rapide, rembobine rapidement la vidéo pendant la lecture. La vitesse de rembobinage varie de 2X à 32X Lire ou mettre en pause la vidéo en cours Avance rapide, pousse la vidéo à...
Menu Contenu Mode Fonction Luminosité Économie d'énergie Modifier les Utilisateur/Standard/ Mode image paramètres de l'image Vif/Sport/Film/Jeu Saturation dans la plage 0-100 Acuité Solde Utilisateur/Standard/ Modifier les Basse Style sonore Vif/Sport/Film/ paramètres sonores Musique/Actualités dans la plage 0-100 Tripler 2.3 Interface de lecture de musique Menu Fonction Sélectionner le mode de lecture (lecture de répertoire/cycle unique/...
2.4 Interface de lecture d'images Menu Fonction Passer à l'image précédente Lire ou mettre en pause l'image actuelle Passer à l'image suivante agrandir l'image dézoomer l'image retourner l'image de 90° vers la gauche retourner l'image de 90° vers la droite définir les informations sur l'image FR 63...
3. Certains appareils mobiles peuvent ne pas prendre en charge la mise en miroir d'écran en raison de la compatibilité. 4.Pour toute question, n'hésitez pas à envoyer un e-mail à YABER via support@yabertech. com. 3.1 iOS Cast (pour les appareils iOS) 1.
1.Le projecteur Ace KI est compatible avec les casques Bluetooth, les haut-parleurs Bluetooth et les Airpods, mais pas avec les claviers Bluetooth ou les téléphones Bluetooth. 2. Si vous avez des questions, n'hésitez pas à envoyer un e-mail à YABER via : support@ yabertech.com.
1. Projection avant Montage au plafond 2. Rétroprojection Montage au plafond 3. Projection frontale Montage sur bureau 4. Rétroprojection Support de bureau 5.2 Trapèze automatique et trapèze à 4 points 5.2.1 Correction trapézoïdale automatique Lorsque vous démarrez le projecteur, veuillez attendre patiemment pendant 2 à 3 secondes, le projecteur ajustera automatiquement la distorsion trapézoïdale.
Retour : Appuyez sur la touche de la télécommande pour revenir à la page précédente. Réinitialiser : appuyez sur la touche de la télécommande pour restaurer les paramètres d'origine. 5.3 Zoom numérique Étape 1 : Sélectionnez l'option [ Zoom numérique ] et appuyez sur le bouton OK de la télécommande ou du projecteur pour accéder au sous-menu.
7. Autres réglages Menu Fonction Option de source de démarrage Off/HDMIl/HDMI2/AV Option de mise sous tension Direct/Veille Paramètres de langue Configurer la langue Arrêt programmé 0ff/10min/20min/30min/60min/120rnin À propos de l'option de mise sous tension directe/en veille Mode Direct : Lorsque le projecteur est sous tension, le projecteur s'allume automatiquement. Mode veille : Lorsque le projecteur est sous tension, vous devez appuyer sur le bouton la télécommande ou du projecteur pour allumer le projecteur.
Connexion des lignes de signal Le projecteur YABER Ace KI dispose de 6 interfaces, ports HDMI*2/ports USB*2/sortie casque 3,5 mm/entrée AV. Veuillez sélectionner le bon port de connexion pour connecter votre appareil (PC, téléphone, DVD lecteur, barre de son, USB, PS4, etc.)
Video USBH DMI 1H DMI 2I Left AV port Right Ou connectez-vous au lecteur DVD avec le câble HDMI fourni dans l'emballage. USBH DMI 1 HDMI 2I 4. Connectez-vous à la barre de son/haut-parleur Si votre haut-parleur a un port AUX, veuillez utiliser votre câble audio 3,5 mm pour connecter le projecteur et votre haut-parleur comme le montre l'image, entrez dans la page d'accueil pour sélectionner [AV] comme source de signal.
Video USBH DMI 1H DMI 2I Left AV port Right または、パッケージ内の HDMI ケーブルで DVD プレーヤーに接続します。 USBH DMI 1 HDMI 2I 4. 外部スピーカー / サウンドバーの接続 スピーカーに AUX ポートがある場合は、3.5mm オーディオケーブルを使用して、下記の図のに示すよ うにプロジェクターとスピーカーを接続し、ホームページに入り、 [AV] 信号源を選択してください。 HDMI 1 HDMI 2I Audio port 安全なシャットダウン 1. プロジェクターまたはリモコンのボタンを押し、 OK キーを押して、 プロジェクターの電源を切ります。 2.
Seite 101
Scan and download the PDF user manual Where to Get More Help Support@yabertech.com @Yaber Entertainment Projector aftersales@yabertch.com @Yaber Entertainment Projector www.yaberglobal.com...